1
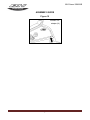
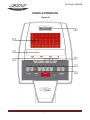
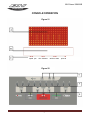
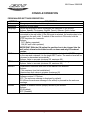
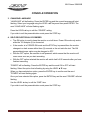
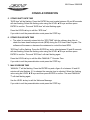
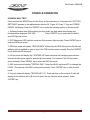
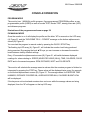
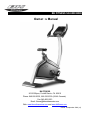
BH FITNESS SK-9000 BIKE
Owner�s Manual
BH FITNESS
20155 Ellipse, Foothill Ranch, CA 92610
Phone: 949-206-0330 , 866-325-2339 (USA & Canada)
Fax: 949-206-0013
Email: [email protected]
Web: www.bhnorthamerica.com and www.bhfitness.com
Issued: 9 September 2008 (v2)
BH Fitness SK9000B
TABLE OF CONTENTS
IMPORTANT SAFETY INSTRUCTIONS ..................................................... 2
ASSEMBLY GUIDE ..................................................................................... 4
CONSOLE OPERATION ............................................................................11
Electronic Monitor Illustrations .............................................................. 12
Electronic Monitor Display & Keypad .................................................... 14
Starting the Unit..................................................................................... 17
Personalizing the Electronic Monitor..................................................... 18
PROGRAM MODE (P0 – P13).............................................................. 24
P0 MANUAL ..................................................................................... 24
P1 – P8 ............................................................................................ 25
P9 USER .......................................................................................... 26
P10 MALE – P11 FEMALE............................................................... 27
P12 HEART ...................................................................................... 29
P13 WATT RATE .............................................................................. 32
Program Profile Illustrations .................................................................. 33
Symbols and their Meanings................................................................. 34
PARTS LIST .............................................................................................. 36
EXPLODED VIEW ..................................................................................... 38
WARRANTY .............................................................................................. 39
This manual is compatible with software versions 2.0 and 2.1.
BH RESERVES THE RIGHT TO MODIFY THE PRODUCTS SPECIFICATIONS WITHOUT PRIOR NOTICE
Page 1
BH Fitness SK9000B
IMPORTANT SAFETY INSTRUCTIONS
User Safety
1. Users should pass a full medical examination before they begin an exercise program. Work at the
recommended exercise level. Do not over exert yourself. If you feel any pain or discomfort, stop
exercising immediately and consult your doctor.
2. Before exercising calculate your maximum heart rate using the formula on page 28 (P12 Heart).
3. Do warm up stretching exercises before using the unit.
4. Verify that all of the parts are attached and that the nuts, bolts, pedals and bar are correctly
tightened before use.
5. Do not wear loose clothing or high heels. Tie up shoe laces.
6. The maximum user weight is 418 pounds (190 Kg). The height must not exceed 6 ft., 10 in. (2.1m).
7. Keep hands away from moving parts.
8. Supervise children, invalids or disabled persons at all times. Children are curious and vulnerable to
accidents. Do not use the unit as a toy. Disabled people should not use the exercise equipment
without the assistance of a qualified person or doctor. Keep pets away from unit.
9. The owner is responsible for explaining safety instructions to each user.
10. The unit can only be used by one person at a time.
Bike Safety
1. For safety, maintain a minimum clearance around the unit. Maintain 18 inches on the front and on
each side of the unit plus 24 inches at the rear of the unit.
2. Install and use the unit on a flat, stable surface, with some type of protection for the floor or carpet.
Do not place it alongside walls or furniture. Check the unit before each use.
3. Please read all of the instructions before assembling or using this unit.
4. To reduce the dangers and risk of electric shock always unplug the unit from its electrical power
immediately after using, before cleaning, opening, disassembling or doing maintenance.
5. Do not place sharp objects near the exercise equipment.
6. Do not use the exercise equipment if it is not working correctly.
WARNING: To reduce the risk of fire, electric shock, injury to persons or inflicting the harm of a burn:
7. The unit should never be left unattended when plugged in. Unplug the unit from the electrical power
before leaving the room, when unused and before adding or removing parts.
Page 2
BH Fitness SK9000B
IMPORTANT SAFETY INSTRUCTIONS
8. Do not operate the unit under a blanket or pillow. Excessive heating can occur and cause fire,
electric shock, injury to persons or inflict the harm of a burn.
9. Use the unit only as described in this manual. Only use attachments recommended by the
manufacturer.
10. Never operate this unit if it has a damaged electrical cord or plug. Do not operate this unit if it is not
working properly. Do not operate this unit if it has been dropped or damaged. Do not operate this
unit if it has been immersed into water. Return the unit to a service center for examination and
repair.
11. Do not pull or carry the unit by the electrical cord. Do not use the cord as a handle.
12. Keep the electrical cord away from heated surfaces.
13. Never operate the unit when the air openings are blocked. Keep the air openings free of lint, hair
and the like.
14. Do not drop or insert any objects into any openings.
15. Do not use outdoors or near water.
16. Do not operate where aerosol (spray) products are being used or where oxygen is being
administered.
Adapter Safety
The Adapter may have a polarized plug (one blade is wider than the other). This plug will fit only one
way into a polarized outlet. If the plug does not fully fit into the outlet, then reverse the plug. If it still
does not fit then contact a qualified Electrician to install the correct outlet. Do not change the plug in
any way.
Please save these instructions.
Page 3
BH Fitness SK9000B
ASSEMBLY GUIDE
Figure 1
F) Flat washer Φ18X10.5X2.0t.
Quantity 4
A)
Main post with Handlebar and Monitor.
G) Spring washer M10.
Quantity 4
B)
Main body.
H) Allen bolt M10xP1.5x25.
Quantity 4
C)
Front trim cover.
I)
Self tapping screw Φ 4x20.
Quantity 1
D)
Top trim cover.
J) Self tapping screw Φ 4x15.
Quantity 3
E)
Rear trim cover.
K) Allen wrench 8mm.
M)
Bottle holder.
L) Star driver spanner (wrench).
N) Adapter, 15V, 1Amp.
Page 4
BH Fitness SK9000B
ASSEMBLY GUIDE
Figure 2
Figure 3
Figure 4
Figure 5
Page 5
BH Fitness SK9000B
ASSEMBLY GUIDE
Figure 6
Figure 7
Figure 8
Figure 9
Page 6
BH Fitness SK9000B
ASSEMBLY GUIDE
Figure 10
Connect 15V
Adapter (N)
Page 7
BH Fitness SK9000B
ASSEMBLY GUIDE
NOTE: The exercise bike is heavy. At least two people are required to ensure the safety of the
people unpacking and moving the bike.
1. CHECK THE PARTS
Figure 1. Take the unit out of the box. Verify that the parts are undamaged and quantities are
correct.
2. ATTACH THE MAIN POST
Figure 2. Bring the main post (A) up to the boss on the main body (B). Connect the terminals
(m), sticking out of the bottom of the post, with terminal (n) coming up out of the top of the tube
on the main body (B).
Figure 2. Slip the main post (A) over the boss on the main body (B), making sure not to
damage any of the cables.
Check that the cables are connected correctly by turning the pedals until the monitor starts to
operate.
Install the flat washers (F), Grower washer (G) and bolt (H) in four places.
Line the main post (A) up with the main body (B) and tighten the bolt securely.
3. FIT THE FRONT TRIM COVER AND BOTTLE HOLDER.
Figure 3. Fit the front trim cover (C) by sliding it onto the side tubes. Install and tighten screw
(I) to secure the cover.
Figure 3. Remove the screws from the main post (B). Position the bottle holder and secure it
by using the screws previously removed.
4. FIT THE TOP TRIM COVER.
Figure 4. Position the top trim cover (D) on top of the side tubes. Slide the cover forward,
inserting it into the slots on the main body (B) then position it onto the seat post.
5. FIT THE REAR TRIM COVER
Figure 5. Position the rear cover (E) onto the saddle post, as shown in the direction of the
arrow. Fasten the rear cover (E) to the top trim cover (D) and the seat post using screws (J).
Page 8
BH Fitness SK9000B
ASSEMBLY GUIDE
6. ADJUST THE SEAT HEIGHT
Figure 6. Loosen the seat height (pop-pin) control knob, a little, by turning it counter clockwise.
Pull and hold the (pop-pin) knob outwards, away from the bike. Lift the seat upwards. When it
is at the correct height, push the (pop-pin) knob inwards and gently slide the seat up and down
until it is trapped. Lock the seat into position by turning the height control (pop-pin) knob
clockwise until secure.
7. VIEW PULSE SENSORS
Figure 9. View the pulse sensors (Y) located on the handlebar. The users pulse rate is
measured by placing both hands on pulse sensors (Y).
NOTE:
You can also use the chest band (optional telemetric pulse sensor) to measure your heart rate.
A chest band such as the POLAR T41 Transmitter may be purchased separately from this unit.
The reading from the telemetric pulse rate takes preference over the pulse sensors (Y) located
on the handlebar.
8. LEVELING
NOTE: For safety, maintain a minimum clearance around the equipment. Maintain 18 inches
on the front and each side plus 24 inches at the rear of the unit.
Figure 7. Once the unit has been placed into its final position for doing exercise, make sure
that it sits flat on the floor and that it is level. This can be achieved by screwing the adjustable
support blocks (R) up or down.
9. MOVEMENT & STORAGE
Figure 8. The unit is equipped with wheels (T) making it easier to move about. The two wheels
at the front of the unit make it easy to store the unit away.
10. BATTERY CHARGE
Verify that the electric supply voltage is 110V-120V.
Figure 10. Install the terminal end of the 15V, 1 Amp Adapter (N) onto the connector located at
the lower end of the chain cover.
Install the plug end of Adapter (N) into an 110V-120V outlet.
Page 9
BH Fitness SK9000B
ASSEMBLY GUIDE
NOTE: This unit is equipped with a generator (dynamo) that converts the mechanical rotation
(produced by the exercising user) into current (electrical energy) to power the electronic
monitor and brake controller.
This unit also includes a set of batteries that store enough energy to keep the electronic
monitor operating for 60 seconds after mechanical rotation from the exercising user has
stopped.
If the battery runs down, it can be recharged by using the 15V Adapter (N) that is supplied with
the unit.
Page 10
BH Fitness SK9000B
CONSOLE OPERATION
Figure 20
Page 11
BH Fitness SK9000B
CONSOLE OPERATION
Figure 21
speed rpm
time distance
Figure 22
Page 12
calories watts
pulse ♥
BH Fitness SK9000B
CONSOLE OPERATION
GENERAL INSTRUCTIONS
This exercise unit is equipped with a generator (dynamo). The generator uses the energy
produced by the user (while exercising) to power the electronic monitor and the brake
controller.
This exercise unit also includes a set of batteries that store enough energy to keep the
electronic monitor operating for 60 seconds after the exercise has finished.
Should the battery run down because of an operational fault, it can be recharged by using the
15V adapter that is supplied with the exercise unit.
To switch the monitor on, begin exercising.
ATTENTION: Plug one end of the 15V adapter into the unit per Figure 9 and the other end into
an appropriate outlet.
The electronic monitor is designed to be easy and intuitive to use. The messages that appear
on the bottom screen (B) will guide the user throughout the whole exercise.
Nevertheless, we recommend that the gym instructor reads through this section carefully to
become fully familiar with the electronic monitor in order to show the user how to operate it
correctly.
NOTE: TO ENSURE THAT THE BATTERIES OPERATE CORRECTLY AND LAST LONGER,
RECHARGE THEM USING THE 15V ADAPTER (N) SUPPLIED WITH THE UNIT.
Page 13
BH Fitness SK9000B
CONSOLE OPERATION
ELEMENTS OF THE ELECTRONIC MONITOR (Figure 20)
The electronic monitor is made up of two distinct areas:
The top area, Figure 21 (A – B – C) for the DISPLAY
The bottom area, Figure 22 (E – F – G) for the KEYPAD
DISPLAY
This area is comprised of two screens.
(A) The top LED array displays real-time exertion levels being produced during the selected
program.
(B) Bottom alphanumeric screen, which guides the user selection options and exercise.
The top screen (A) displays the various pre-programmed exercise profiles (programs) that can
be selected and, during exercise, current exertion levels.
The bottom alphanumeric screen (B) is used to guide the user when selecting the exercise to
do, as well as displaying information about the exercise both during and after the session. The
LED indicators (C) located below the alphanumeric screen give a simultaneous readout of
SPEED, RPM; TIME, DISTANCE; CALORIES, WATTS; PULSE and indicate which information
is being displayed throughout the exercise.
The data that are displayed on the LEDs (C) during exercise are as follows:
SPEED: This shows an estimated value of the linear velocity at which a bicycle will travel
based on the user’s pedaling rate.
RPM: (Revolutions Per Minute) This shows the current pedalling rate during exercise. It
indicates the number of full turns that the crank makes in one minute.
TIME: This shows the time that has elapsed since you started the exercise or, if a time limit
has been established, the amount of time left before the exercise finishes. The time is
displayed in minutes and seconds (mm:ss).
DISTANCE: This shows the distance that you have travelled since beginning the exercise. The
distance is calculated by using the estimated linear speed.
CALORIES: This shows the estimated number of calories that have been burned off up until
now. This calculation is based on the energy being produced and the weight and age values
provided by the user.
Page 14
BH Fitness SK9000B
CONSOLE OPERATION
WATTS: This shows the amount of energy currently being produced during the exercise. This
calculation is based on the exertion level at which the user is working and the pedaling rate.
The information is displayed in Watts.
PULSE: This shows the user’s heart rate recorded through the handlebar pulse sensors or a
telemetric chest belt such as the POLAR T41 transmitter.
KEYPAD
The function of each key is listed below. See Figure 22.
The electronic monitor includes an easy-to-use keypad. This keypad consists of Fan keys ( E ),
numeric keys ( F ) and function keys ( G ).
Fan keys ( E ) – Off / On; Low (minimum speed); High (maximum speed).
Numeric keys (F) - (1- 0) are used to enter the data requested by the monitor.
Function keys ( G ) - reset; level▲; level▼; enter ; pause ; stop ; quick / start - are used
to select a particular exercise, enter requested data, control exercise exertion levels and to
finish the exercise.
RESET - Reset key. This is used to erase the data that have been entered into the monitor
when selecting a program.
LEVEL ▼ - Key for decreasing exertion level. When pressed during exercise, this key will
decrease the exertion level by one machine setting. During the selection of pre-programmed
profiles, it is used to move on to the next profile screen.
LEVEL ▲ -Key for increasing exertion levels. When pressed during exercise, this key will
increase the exertion level by one machine setting. During the selection of pre-programmed
profiles, it is used to move back to the previous profile screen.
ENTER - Selection and validation key. This is used during pre-programmed profile selection to
select a profile, confirm data that have been entered and to start the exercise. It is also used
during user profile programming to confirm the exertion level settings for each minute.
PAUSE - Pause key. If this is pressed during a session, the exercise is interrupted and the
exercise timekeeper (clock) is halted. To restart the exercise timekeeper (clock) press the
pause key again or continue exercising. Pause will only last for 45 seconds, then the exercise
will stop and the monitor will exit the exercise.
If, the STOP key is pressed, in pause mode, then the exercise will finish.
Page 15
BH Fitness SK9000B
CONSOLE OPERATION
STOP - Stop key. If this is pressed during the session, the exercise will be taken as finished
and exertion settings will drop to minimum level. A summary of all the exercise data will be
displayed and it will then return to the start screen.
Hold the STOP key down for 3 seconds in Start/Ready mode, and the monitor screen will
change to black with a beep. The ON personalized power option may be changed to OFF.
QUICK / START - Quick start key. When this key is pressed, provided that the LED on the key
is flashing, exercise will begin in manual mode.
Page 16
BH Fitness SK9000B
CONSOLE OPERATION
OPERATING INSTRUCTIONS
STARTING THE UNIT
To turn on the monitor, plug the unit in or pedal the unit.
•
Plug the 15V adapter (N) that is supplied with the unit into a wall outlet, and select the ON
option in the personalized settings (step 4 POWER).
•
Or pedal (spin) the crank at 45 rpm. As soon as it reaches 45 rpm the monitor will come on
and remain on for 60 seconds so that it can be programmed.
Once the monitor is on it will display the profile and the letter “M” for manual on the LED array
( A ) Figure 21, and the “WELCOME TO HI – POWER” message on the bottom alphanumeric
screen ( B ).
You can start the program in manual mode by pressing the QUICK / START key and by
pressing the level ▲▼ keys you can increase or decrease the exertion levels.
STARTING THE FAN
The monitor on this machine is fitted with an air vent (D), Figure 20, through which a FAN
provides two air speeds, LOW and HIGH. To switch the fan on while exercising press the ON /
OFF key on the keypad, Figure 22, and the fan will start. Whenever the monitor is switched to
PAUSE the fan will switch off.
SLEEP MODE
If the 15V adapter (N) is connected to the unit then the console will not switch over to sleep
mode when the POWER option under personalization mode is switched ON.
If the 15V adapter (N) is not connected, the console will switch over to sleep mode even when
the POWER option is switched ON.
This mode is activated if an RPM signal is not received within 45 seconds when in stand-by
mode. Windows are not displayed while in this mode. You have to step on the footplate to
produce a signal and reopen the display window.
Page 17
BH Fitness SK9000B
CONSOLE OPERATION
PERSONALIZED SETTINGS DESCRIPTION
SETTING
Unit
Wheelsize
Language
Power
SWR time
SPR time
Manual T
Text
Sounds
DESCRIPTION
Change speed unit from km/h to mph.
Select 80 on this model.
Define the language in which messages are displayed on the monitor.
Options: Spanish, Portuguese, English, French, German, Dutch, Italian.
Defines the method of operating the machine, between self-powered or
connected to the wall outlet. If the ON mode is selected, the machine has to be
plugged into the wall outlet. To switch off the monitor in ON mode, hold the
STOP key down for 4 seconds.
Options:
OFF (Battery operated)
ON (AC wall outlet operated)
IMPORTANT: With the ON option the machine has to be plugged into the
wall outlet, otherwise the batteries will run down and may be rendered
useless.
Establishes the frequency at which the program calculates the WATTS created
by the user and compares it to the target WATT value. The exertion level will be
increased or decreased automatically.
Options: Value in seconds (minimum 20, maximum 60)
Establishes the calculation rate for the constant heart rate program.
Options: Value in seconds (minimum 20, maximum 60)
Establishes a maximum time limit for the Manual Run exercise.
Options:
0 (No maximum time limit established)
Exercise time limit values in minutes (maximum 60)
Text cannot be changed on Software version 2.0.
Software version 2.1 Options:
OFF (The welcome message is displayed by default)
ON (Allows the welcome message to be edited) to personalize the welcome
message.
Enables or disables sounds (beeps) emitted by the monitor.
Options:
ON (Enabled)
OFF (Disabled)
Page 18
BH Fitness SK9000B
CONSOLE OPERATION
PERSONALIZING THE ELECTRONIC MONITOR
Follow the steps below to access the monitor’s personalization mode:
Press and hold the RESET key and the 0 key at the same time until “FACTORY SETTINGS”
appears on the alphanumeric screen (B), Figure 20.
In general use these rules when personalizing the monitor:
•
The word that is flashing can be revised.
•
Pressing the ENTER key moves the flashing to a different word.
•
Pressing the LEVEL key displays the choices.
NOTE: If you wish to exit the personalization mode, press the STOP key and the manual
program will be displayed on the LED array (A).
1. CHANGING UNITS (Mile or km)
Once the words “FACTORY SETTINGS” appear on the alphanumeric screen (B), Figure
20, press the ENTER key and the word “UNITS” will flash. Press the ENTER key and the
word ENGLISH or METRIC starts flashing. Select the unit of distance by using the LEVEL
▲▼ keys, (ENGLISH / Miles - METRIC / Km.). Press the ENTER key and the word
“UNITS” will start flashing again.
Press the LEVEL ▲ key to edit the “WHEELSIZE” Distance per Revolution.
If you wish to exit the personalization mode, press the STOP key and the manual program
will be displayed on the LED array (A).
2. CHANGING WHEELSIZE (DISTANCE PER REVOLUTION)
“WHEELSIZE” will be flashing. Press the ENTER key and a figure between 0 and 80 will
start flashing. Select the value 80 using the LEVEL ▲▼ keys. Press the ENTER key and
the word “WHEELSIZE” will start flashing again.
Press the LEVEL ▲ key to edit the “LANGUAGE”.
If you wish to exit the personalization mode press the STOP key.
Page 19
BH Fitness SK9000B
CONSOLE OPERATION
3. CHANGING LANGUAGE
“LANGUAGE" will be flashing. Press the ENTER key and the current language will start
flashing. Select your language using the LEVEL ▲▼ keys and then press ENTER. The
word “LANGUAGE” will start flashing again.
Press the LEVEL ▲ key to edit the “POWER” setting.
If you wish to exit the personalization mode press the STOP key.
4. SELF OR ELECTRICALLY POWERED
•
The ON option is used to keep the monitor on at all times. Power ON mode only works
while the 15V Adapter (N) is connected.
•
If the monitor is in POWER ON mode and the STOP key is pressed then the monitor
changes to a dark screen within three (3) seconds or the unit exits the test. The ON
personalized power option may be changed to OFF.
•
With the OFF option, the machine is self powered, which means that the monitor will
come on as soon as you start exercising.
•
With the OFF option selected the monitor will switch itself off 45 seconds after you have
finished exercising.
“POWER” will be flashing. Press the ENTER key and the word ON or OFF will start
flashing. Select the option that is flashing by using the LEVEL ▲▼ keys.
When you have selected an option, press the ENTER key to confirm and the word
"POWER" will start flashing again.
Once you have selected this option, press the ENTER key and the word “POWER” will start
flashing.
Use the LEVEL ▲ key to edit the “SWR” time.
If you wish to exit the personalization mode press the STOP key.
Page 20
BH Fitness SK9000B
CONSOLE OPERATION
5. STEADY WATT RATE TIME
“SWR time" will be flashing. Press the ENTER key and a value between 20 and 60 seconds
will start flashing. Select the flashing value using the LEVEL ▲▼ keys and then press
ENTER to confirm. The word “SWR time” will start flashing again.
Press the LEVEL ▲ key to edit the “SPR time".
If you wish to exit the personalization mode press the STOP key.
6. STEADY PULSE RATE TIME
•
The value (in seconds) entered into the “SPR TIME” tells the software how often to
check the users heart beats per minute (BPM) during the P12 Heart Rate Program. The
software will increase or decrease the resistance to control the heart BPM.
“SPR time" will be flashing. Press the ENTER key and a value between 20 and 60 seconds
will start flashing. Select the flashing value using the LEVEL ▲▼ keys and then press
ENTER to confirm. The word “SPR time” will start flashing again.
Press the LEVEL ▲ key to edit the Max “MANUAL T" Exercise Time.
If you wish to exit the personalization mode press the STOP key.
7. MAX. EXERCISE TIME
“MANUAL T" will be flashing. Press the ENTER key and a figure 0 or between 10 and 60
minutes will start flashing. If 0 is selected the exercise time is unlimited. Select the flashing
value using the LEVEL ▲▼ keys and then press ENTER to confirm. The word “MANUAL
T” will start flashing again.
Use the LEVEL ▲ key to edit the Welcome Message.
If you wish to exit the personalization mode press the STOP key.
Page 21
BH Fitness SK9000B
CONSOLE OPERATION
8. CHANGING THE WELCOME MESSAGE
•
For software version 2.0 the welcome message cannot be changed.
Use the LEVEL ▲ key to edit the “Sounds” setting.
If you wish to exit the personalization mode press the STOP key.
•
For software version 2.1 or higher: “TEXT” will be flashing. Press the ENTER key and
the word ON or OFF will start flashing. Select the option that is flashing by using the
LEVEL ▲▼ keys. Choosing the ON option allows you to change the monitor’s welcome
message.
Once the ON option has been selected, press the ENTER key and a flashing cursor will
appear on the alphanumeric screen (B). Use the LEVEL ▲▼ keys to enter a welcome
message letter by letter.
Once you have finished entering the message, press the ENTER key for a few seconds
and the word “TEXT” will start flashing.
Use the LEVEL ▲ key to edit the Sounds setting.
If you wish to exit the personalization mode press the STOP key.
9. CHANGING THE SOUND
•
It is suggested to leave “SOUNDS” in the ON position. The beep sounds can notify the
user as some things change.
“SOUNDS" will be flashing. Press the ENTER key and the word ON or OFF will start
flashing. Select the ON flashing value using the LEVEL ▲▼ keys and then press ENTER
to confirm. The word “SOUNDS” will start flashing again.
Press the STOP key to exit the personalization mode and the manual program will be
displayed on the LED array (A).
CONFIRMING FACTORY SETTINGS, MACHINE TYPE
Press and hold the RESET key and the 0 key at the same time for 3 seconds until “FACTORY
SETTINGS” appears on the alphanumeric screen (B), Figure 20. Press “2” key and the LED
should display “MACHINE TYPE = B/R”. If it displays something different than “B/R”, press
LEVEL Up/Down until “MACHINE TYPE = B/R” (Bike/Recumbent). Press “ENTER” to save the
setting and then press “STOP”.
Page 22
BH Fitness SK9000B
CONSOLE OPERATION
CONSOLE SELF TEST
Press and hold the RESET key and the 0 key at the same time for 3 seconds until “FACTORY
SETTINGS” appears on the alphanumeric screen (B), Figure 20. Press “1” key and “PRESS
ENTER” will display. Press the “ENTER” key to enter the following options of the test mode.
1. Software finished date: After entering the test mode, the date when the software was
finished will be displayed “SW VER
“. Press “ENTER” key to enter the Dot Matrix
and LED light test mode.
2. DOT Matrix and LED light test mode test if the screens light normally. Press ‘ENTER’ key to
enter the RPM test mode.
3. RPM test mode will display “TESTING RPM” followed by the RPM (Revolutions Per Minute)
while the bike is pedaled in order to test if the TPM function works normally. Pres the “ENTER”
key to enter the HR test mode.
4. HR test mode will display the “TESTING HR” heart rate while the handgrip pulse sensors
are held and the pulse signal is detected by the console. This can test if the HR test mode
works normally. Press ‘ENTER” key to enter the DAC test mode.
5. DAC test mode will display “TESTING DAC”. Press the LEVEL up/down KEY to change the
LEVEL. This can test if the DAC mode works normally. Press “ENTER” key to enter the test
mode.
6. Key test mode will display “TESTING KEY 1A”. Press any key on the console. A code will
display on the window with a Bi sound to test if the key function works properly. Press
“ENTER” key.
Page 23
BH Fitness SK9000B
CONSOLE OPERATION
PROGRAM MODE
The monitor has: 1 MANUAL profile program; 8 pre-programmed PROGRAM profiles; a user
programmable profile (USER) as well as a male TEST, female TEST, steady pulse rate (HRC)
and distance programs.
Illustrations of the programs are shown on page 32.
P0 MANUAL MODE
Once the monitor is on it will display the profile and the letter “M” for manual on the LED array
(A) Figure 21, and the “WELCOME TO HI – POWER” message on the bottom alphanumeric
screen (B) Figure 21.
You can start the program in manual mode by pressing the QUICK / START key.
The flashing top LED array (A), Figure 21, will indicate the exertion level being produced
during exercise. By pressing the level ▲▼ keys you can increase or decrease the exertion
levels between twenty different settings.
Every 10 seconds the alphanumeric screen (B), Figure 21, will switch between displayed
readings for values relating to: SPEED (MILES PER HOUR (MLH)); TIME; CALORIES; PULSE
RATE and in the second sequence: RPM; DISTANCE; WATT and PULSE RATE.
The monitor will calculate the average exercise values after the exercise program is finished or
interrupted by pressing the STOP key. These values will be displayed twice every five seconds
on the bottom alphanumeric screen (B), Figure 21. The average values for EXERCISE TIME
HHMMSS; DISTANCE COVERED ML; AVERAGE SPEED MLH; CALORIES BURNT KCAL
will be displayed.
If the keys are not touched and exercise does not occur while the average values are being
displayed, then the “M” will appear on the top LED array.
Page 24
BH Fitness SK9000B
CONSOLE OPERATION
P1 - P8 GRAPHIC PROGRAMS
Illustrations of the programs are shown on page 32.
With the monitor switched on, the top LED array (A), Figure 21, will display the profile and the
letter “M” for manual. The LEVEL ▲▼ keys are used to display and select one of these eight
graphic profiles. Once a specific profile has been selected press the ENTER key.
The top LED array (A) will ask for an age value (between 10 and 99), select your age by using
the number keys (F), Figure 22, and press ENTER. It will now ask for your weight (between 70
and 440 lbs or between 30 and 199 kg), select your weight by using the number keys (F),
Figure 22, press ENTER. It will now ask for an exercise time limit (between 10 and 60
minutes), select the time by using the number keys (F), Figure 22, press ENTER and this will
begin your exercise session.
There are four different difficulty levels (L1 – L4) within each pre-programmed profile, to select
any of these just press the LEVEL ▲▼ keys during the exercise.
The monitor will calculate the average exercise values after the exercise program is finished or
interrupted by pressing the STOP key. These values will be displayed twice every five seconds
on the bottom alphanumeric screen (B), Figure 21. The average values for EXERCISE TIME
HHMMSS; DISTANCE COVERED ML; AVERAGE SPEED MLH; CALORIES BURNT KCAL
will be displayed.
If the keys are not touched and exercise does not occur while the average values are being
displayed, then the “M” will appear on the top LED array.
Page 25
BH Fitness SK9000B
CONSOLE OPERATION
P9 USER PROGRAM (Illustrations of the programs are shown on page 32.)
With the monitor switched on, the top LED array (A), Figure 21, will display the profile and the
letter “M” for manual. Use the LEVEL ▲▼ keys to display the various pre-programmed
profiles. Once program 9 ( USER ) has been selected, press the ENTER key.
The top LED array (A), Figure 21, will ask for an age value (between 10 and 99). Select your
age by using the number keys (F), Figure 22, (If the value entered exceeds these limits it will
display the closest acceptable value). Press ENTER.
It will now ask for your weight (between 70 and 440 pounds or between 30 and 199 kg), select
your weight by using the number keys (F), Figure 22, press ENTER. It will now ask for an
exercise time limit (between 10 and 60 minutes), select the time by using the number keys (F),
and press ENTER. Now press the RESET key and you can begin to design a personalized
exercise profile on the LED array (A).
The profile to be designed is subdivided into 21 steps. The first three steps are for warm-up
purposes and only reach a limited value of four in order to prevent possible injuries. The rest of
the 21 steps reach maximum.
There are 21 vertical columns of red lights on the top LED display, Figure 21 display area (A).
Each vertical column represents one step. To select the difficulty level of each step:
•
Press the LEVEL ▲▼ keys to increase/decrease the difficulty level (number of vertical
lights) in one step (column). Press the ENTER key.
•
Do again until you have completed the graph for your own personal program.
•
To undo an entered step, press the RESET key and do the above steps again.
Next press the ENTER key and begin exercising with your custom designed program. As each
step is completed a beep will sound and the light on the lowest red LED dot will move to the
right. Time will display as test minutes remaining.
The monitor will calculate the average exercise values after the exercise program is finished or
interrupted by pressing the STOP key. These values will be displayed twice every five seconds
on the bottom alphanumeric screen (B), Figure 21. The average values for EXERCISE TIME;
DISTANCE COVERED ML; AVERAGE SPEED MLH; CALORIES BURNT KCAL will be
displayed.
If the keys are not touched and exercise does not occur while the average values are being
displayed, then the “M” will appear on the top LED array.
Page 26
BH Fitness SK9000B
CONSOLE OPERATION
P10 MALE – P11 FEMALE TEST PROGRAMS
Illustrations of the programs are shown on page 32.
•
For safety reasons it is better to exercise at below 85% of the maximum heart rate.
•
To prevent injuries, do a brief warm-up session before doing this test.
•
Both hands must be on the pulse sensors, located on the handlebars, during this test.
•
Before beginning the test, calculate your maximum heart rate. The maximum number of
heartbeats that a person must not exceed is referred to as the maximum heart rate and this
value drops with age. A simple formula to calculate this is to subtract your age, in years,
from the number 220. To ensure that you are exercising correctly, try to keep between 65%
and 85% of your maximum heart rate value.
•
The aim of this test is to assess the user’s level of fitness by maintaining a pedaling speed
of between 70 to 80 revolutions per minute (rpm) for 5 minutes. The difference between the
Male and Female programs is in the Watts. The value for the Male test is set at 150 W
whereas the Female test is set at 100 W.
With the monitor switched on, the top LED array ( A ), Figure 21, will display the profile and the
letter “M” for manual. The LEVEL ▲▼ keys are used to display the various pre-programmed
profiles. Once the Male TEST or Female TEST has been selected, press the ENTER key.
Next, the bottom alphanumeric screen ( B ), (Figure 21), will ask for an age value (between 10
and 99). Select your age by using the number keys (F), Figure 22, press ENTER.
Place your hands on the pulse sensors (handgrip) located on the handlebar or wear a
telemetric chest band such as the POLAR T41 transmitter. Begin the TEST at a pedaling rate
of between 70 to 80 RPM, pedaling for 5 minutes. As long as you stay within the 70 to 80 RPM
limit the monitor will display “OK” however if you go above or drop below this RPM then the
monitor will display the “RPM ↑” or “RPM ↓” prompt.
At the end of the 5 minute test you will be awarded a score between 1 (very poor) and 5
(excellent). A 0 score may also appear, which means that the test was not done correctly (the
75 rpm pedaling rate was not maintained or the heart rate measurement sensor was not used
correctly).
Page 27
BH Fitness SK9000B
CONSOLE OPERATION
The monitor will calculate the average exercise values after the exercise program is finished or
interrupted by pressing the STOP key. These values will be displayed twice every five seconds
on the bottom alphanumeric screen (B), Figure 21. The average values for EXERCISE TIME
HHMMSS; DISTANCE COVERED ML; AVERAGE SPEED MLH; CALORIES BURNT KCAL
will be displayed.
If the keys are not touched and exercise does not occur while the average values are being
displayed, then the “M” will appear on the top LED array.
Page 28
BH Fitness SK9000B
CONSOLE OPERATION
P-12 CONSTANT HEART RATE PROGRAM
Illustrations of the programs are shown on page 32.
•
For safety reasons the user must exercise at below 85% of the maximum heart rate.
•
To prevent injuries, do a brief warm-up session before doing this test.
•
The pulse rate must be measured by a telemetric chest band such as the Polar T41
transmitter. If the heart rate is not measured, then the heart symbol and a question mark
“♥ ?” appear on the screen. If the unit continues not to receive any heart rate information,
then the program will be cancelled and another program will have to be selected.
•
Before beginning the test, calculate your maximum heart rate. The maximum number of
heartbeats that a person must not exceed is referred to as the maximum heart rate and this
value drops with age. A simple formula to calculate this is to subtract your age, in years,
from the number 220. To ensure that you are exercising correctly, try to keep between 65%
and 85% of your maximum heart rate value.
For example, the maximum heart rate that a 30 year old user must not exceed is:
220 – 30 = 190 heart beats per minute (BPM).
190 x 0.65 = 123 heart beats per minute.
190 x 0.85 = 161 heart beats per minute.
So the heart rate exercise range for a 30 year old is between 123 and 161 BPM.
•
This program allows the user to enter a value for the heart rate (between 65% and 85% of
the maximum heart rate) and the machine will automatically adjust exertion levels to ensure
that the user maintains the selected heart rate value.
•
The value (in seconds) entered into the (Personalizing the Electronic Monitor) “SPR TIME”
tells the software how often to calculate the users heart beats per minute (BPM) during this
test. The software will increase or decrease the resistance to control the heart BPM.
With the monitor switched on, the top LED array ( A ), Figure 21, will display the profile and the
letter “M” for manual. Use the LEVEL ▲▼ keys to select the ♥ (P12 HEART) program. Press
the ENTER key.
Page 29
BH Fitness SK9000B
CONSOLE OPERATION
(P12 continued)
The LED window will display “INTRODUCE PULSE RATE SETTING <40-220>”. Press the
number keys to enter a value between 65% and 85% of the maximum heart rate (see formula
above). The LED window will show “PULSE RATE = xxx” and the entered value will flash. If the
entered number is not within these limits it will display a larger or smaller number. Press
ENTER to confirm.
The LED window will show “INTRODUCE EXERCISE TIME”. The dot matrix display will
prompt “? 10”. Press the number keys to modify and enter a number (between 10 and 60). If
the number is beyond these limits it will display the default time setting. Press ENTER to
confirm. You can now start the program.
After specifying the last setting, all of the values are stored together. The exertion level is 1 and
moves to the next line every minute. If the speed (RPM) is too slow, the dot matrix display will
show "RPM ↑" and switch to PAUSE mode after 15 seconds.
Begin the exercise at a pedaling rate of between 70 to 80 RPM.
Should you go above or drop below this RPM then the top LED array ( A ), Figure 21, will
display the "RPM ↑" or "RPM ↓" prompt.
This program uses a preset exertion level during the first three minutes in order to prevent any
type of injury.
After the third minute, the computer will automatically adjust the exertion setting to keep the
pulse rate at the previously programmed value.
The monitor will calculate the average exercise values after the exercise program is finished or
interrupted by pressing the STOP key. These values will be displayed twice every five seconds
on the bottom alphanumeric screen (B), Figure 21. The average values for EXERCISE TIME
HHMMSS; DISTANCE COVERED ML; AVERAGE SPEED MLH; CALORIES BURNT KCAL
will be displayed.
If the keys are not touched and exercise does not occur while the average values are being
displayed, then the “M” will appear on the top LED array.
Page 30
BH Fitness SK9000B
CONSOLE OPERATION
(P12 continued)
AUTOMATIC EXERTION SETTING
At the beginning of the exercise the machine sets the exertion level to minimum, i.e. 50W, until
the first pulse reading is taken.
Once the pulse rate is established the program calculates the user’s heart rate every X
seconds (this period is set between 20 to 60 seconds within the SPR program).
The exertion setting based on pulse rate is explained in the following steps.
1. TARGET HEART RATE greater than ACTUAL HEART RATE:
When the difference between the TARGET HEART RATE and the ACTUAL HEART RATE
is equal to or greater than 15 rpm, the AUTOMATIC EXERTION CONTROL will start
increasing in steps of 20 Watts.
When the difference is less than 15 rpm the setting will change in steps of 10 Watts until
both heart rates match.
2. ACTUAL HEART RATE greater than TARGET HEART RATE:
When the difference between the ACTUAL HEART RATE and the TARGET HEART RATE
is equal to or greater than 15 rpm, the AUTOMATIC EXERTION CONTROL will start
decreasing in steps of 20 Watts.
When the difference is less than 15 rpm the setting will change in steps of 10 Watts until both
heart rates match.
When the difference between the ACTUAL HEART RATE and the TARGET HEART RATE is
equal to or greater than 30 rpm, the bottom alphanumeric screen (B) will display the message
“DECREASE EXERTION OF EXERCISE. YOUR PULSE RATE IS TOO HIGH” and the
machine’s automatic control will drop the exertion level to minimum (50 W).
If no heart rate is detected during the exercise, the “♥ ?” (Heart symbol and a question mark)
will appear flashing. If this situation continues for more than 60 seconds the machine will go
back to manual mode.
Page 31
BH Fitness SK9000B
CONSOLE OPERATION
P-13 STEADY WATT RATE (Illustrations of the program are shown on page 32)
•
This program allows the user to select the power level (watts) at which to exercise. The user must
output power to oppose the resistance of the exercise unit and to develop speed. The unit
automatically regulates the exertion level to ensure that the user always develops the same power
output, independently of the pedaling rate.
•
This program uses a preset exertion level during the first forty seconds in order to prevent any type
of injury. After the fortieth second the unit controls the exertion settings based upon the users
pedaling rate.
•
During the exercise, the programmed WATT rate can be varied at any time by using the LEVEL ↑
and LEVEL ↓ keys. This does not affect the time settings. The programmed watt rate will be shown
flashing on the display.
With the monitor switched on, the top LED array ( A ), Figure 21, will display the profile and the letter
“M” for manual. Use the LEVEL ▲▼ keys to display the various pre-programmed profiles. Once the
WATT program has been selected, press the ENTER key.
The message “INTRODUCE WATT SETTINGS <25 – 400> will appear on the bottom alphanumeric
screen B. Use the number keys Figure 22, (F) to enter the WATTS value to exercise at. Press ENTER.
To enter the exercise time the LED window will state “INTRODUCE EXERCISE TIME”. The dot matrix
display will prompt “? 10”. Press the number keys to enter a two digit number between 10 and 60. If the
number is beyond these limits it will display the default time setting. Enter a value and press ENTER.
Press ENTER to store all the values.
The exertion level is 1 and moves to the next line every minute. If the speed (RPM) is too slow, the dot
matrix display shows RPM ↑ and switches to PAUSE mode after 15 seconds.
The program will calculate the WATT value output of the user based upon the time (between 20 and 60
seconds) entered into the personalization mode SWR time program.
The monitor will calculate the average exercise values after the exercise program is finished or
interrupted by pressing the STOP key. These values will be displayed twice every five seconds on the
bottom alphanumeric screen (B), Figure 21. The average values for EXERCISE TIME; DISTANCE
COVERED ML; AVERAGE SPEED MLH; CALORIES BURNT KCAL will be displayed.
If the keys are not touched and exercise does not occur while the average values are being displayed,
then the “M” will appear on the top LED array.
Page 32
BH Fitness SK9000B
CONSOLE OPERATION
PROGRAM PROFILES
P-0
P-1
P-2
P-3
P-4
P-5
P-6
P-7
P-8
P-9
P-10
P-11
P-12
P-13
Page 33
BH Fitness SK9000B
CONSOLE OPERATION
SYMBOLS AND THEIR MEANINGS
A series of symbols or words may appear on the screen, meaning the following:
Heart symbol and a question mark (♥ ?): The console did not receive the heart rate. Hold
onto the handlebars or wear a telemetric chest band such as POLAR T41 Transmitter. The
chest band must be worn during test P12, Constant Heart Rate Program.
“0” This symbol appears in the male and female tests, it means that you have not done the
test correctly. You have failed to maintain a speed of 70-80 rpm or your pulse was not
recorded. Hold onto the pulse sensors located on the handlebars or wear a telemetric chest
band such as POLAR T41 Transmitter.
Spanner (wrench) symbol: Mechanical fault. Switch the machine off for 2 minutes and then
switch it back on again. The machine has an automatic fault correction system, but if the
problem persists, then contacts the technical service center.
Page 34
BH Fitness SK9000B
CONSOLE OPERATION
TABLE OF DISPLAYED PHRASES
1.
“WELCOME TO HI POWER”
2.
“PRESS THE ARROWS TO SELECT PROFILE”
3.
“ PRESS QUICK/START TO BEGIN”
4.
“ PRESS ENTER TO BEGIN PROFILE”
5.
“ ERROR”
6.
“ CONSULT TECHNICAL SERVICE”
7.
“ INTRODUCE YOUR AGE <10-99>”
8.
9.
10.
“ INTRODUCE YOUR WEIGHT <30-199> KG”
“ INTRODUCE YOUR WEIGHT <70-440> LB”
“ INTRODUCE EXERCISE TIME <10-60> MINUTES”
“ INTRODUCE WATT SETTING <25-400>”
“ WATTS=”
11.
“ AGE=”
12.
“ INTRODUCE PULSE RATE SETTING <40-220>”
13.
“ PULSE RATE=”
14.
“ PRESS PAUSE TO CONTINUE THE EXERCISE. PRESS STOP TO FINISH”
15.
“ EXERCISE TIME=”
16.
“ DISTANCE COVERED=”
17.
“ AVERAGE SPEED=”
18.
21.
“ CALORIES BURNT=”
“ PRESS ENTER TO ACCEPT THE STORED PROFILE. PRESS RESET TO MODIFY
THE PROFILE.”
“ USE THE ARROWS TO SELECT THE EXERTION LEVELS FOR THE ACTIVE
COLUMN. PRESS ENTER TO MOVE TO THE NEXT COLUMN. PRESS RESET TO
RETURN TO MANUAL MODE”
“ DECREASE EXERTION OF EXERCISE. YOUR PULSE RATE IS TOO HIGH”
22.
“ THE RESULT OF THE TEST IS=”
19.
20.
Page 35
BH Fitness SK9000B
PARTS LIST
ITEM
QUANTITY
ITEM
1
1
12
1
4
1
1
2
2
1
4
4
4
8
2
4
1
71
19
FRAME ASSEMBLY
UPPER CHAIN COVER FIXER
SCREW
BELT WHEEL ASSEMBLY
BOLT
WIRELESS POLAR RECEIVER
BELT
LEFT & RIGHT CRANK
BOLT
DYNAMO
BOLT
NYLON NUT
WASHER
SCREW
NYLON NUT
FLAT WASHER
POP-PIN
20
POP-PIN PLASTIC WASHER
1
89
21
POP-PIN HOLDER
LOWER CONTROL BOARD
BATTERY
SCREW
1
1
1
2
90
1
1
4
1
95
40
CONTROL WIRE (L)
POWER CORD
FLAT WASHER
BATTERY POWER CORD
GRINDING WHEEL CONTROL
WIRE
GRINDING WHEEL CONTROL
WIRE
UPPER HOLLOW BUSHING
COVER
HOLLOW BUSHING
UPPER CHAIN COVER FIXER
UPPER CHAIN COVER FIXED PIN
REAR CHAIN COVER
LEFT CHAIN COVER
RIGHT CHAIN COVER
BH LOGO LABEL
FRONT CHAIN COVER
1
1
2
1
1
1
2
1
42
TURNPLATE COVER
2
1
2
3
4
5
6
7
8
9
10
11
12
13
15
16
17
22
23
24
DESCRIPTION
27
28
29
30
31
32
33
34
35
36
37
38
39
4
4
1
4
8
4
1
1
1
1
1
98
BOLT
NUT
UPPER CONTROL
SCREW
SELF TAPPING SCREW
BOLT
HAND PULSE SENSOR WIRE
CONTROL WIRE (U)
SEAT POST
SEAT PAD
PLASTIC END CAP
FOAM STICKER (SHOCK
ABSORBER)
SELF TAPPING SCREW
STABILIZER ASSEMBLY
ADJUSTMENT FOOT PAD
PROTECTING COVER
BOLT
SPRING WASHER
FRONT WHEEL ASSEMBLY
WHEEL
SELF TAPPING SCREW
1
99
ALLEN BOLT
4
1
100
BOUBLE SIDED TAPE
4
103
4
1
1
1
2
4
4
116
CAP
NUT
PANEL DOUBLE SIDED TAPE
POWER SUPPLY, 15V, 1 Amp.
SELF TAPPING SCREW
HAND PULSE SENSOR PLASTIC
HAND PULSE SENSOR PLATE
DOUBLE FOAM (DOUBLE SIDED
TAPE)
SCREW
SCREW
DOUBLE FOAM (DOUBLE SIDED
TAPE)
CONSOLE FILM
BOTTLE HOLDER
SCREW
118
SCREW
3
73
74
75
78
79
80
81
82
83
84
85
86
87
88
91
92
93
96
97
104
105
106
107
108
109
110
44
SCREW
1
112
45
RIGHT & LEFT PEDAL ASSEMBLY
1
113
46
CRANK ASSEMBLY
IDLER ASSEMBLY
IDLER PAD
ALLEN BOLT
BEARING
1
1
3
3
2
114
48
49
50
1
2
2
4
2
4
8
1
2
4
1
111
47
QUANTITY
2
1
1
1
6
72
94
26
DESCRIPTION
SELF TAPPING SCREW
RIGHT HANDRAIL COVER (U)
LEFT HANDRAIL COVER (B)
RIGHT HANDRAIL COVER (B)
SELF TAPPING SCREW
115
Page 36
4
1
1
4
1
1
2
BH Fitness SK9000B
ITEM
51
52
53
54
55
56
57
DESCRIPTION
C-SHAPED RING
SPRING
SPRING POTHOOK
PVC FOAM GRIP
BATTERY CASE HARNESS
COMPUTER SHELF
HIGH DENSITY FOAM
QUANTITY
ITEM
1
1
1
1
1
1
2
119
120
121
122
123
Y
A
1
1
62
UPPER COMPUTER COVER
FILMY KEY
TRANSPARENT COMPUTER
PANEL
COMPUTER LOWER COVER
63
PORE DECORATIVE COVER
1
64
SELF TAPPING SCREW
2
65
FAN JOIN TUBE
1
66
FAN
1
67
SCREW CAP
2
68
NECKLACE COVER
1
69
SELF TAPPING SCREW
1
70
LEFT HANDRAIL COVER (U)
1
59
60
61
1
1
Page 37
DESCRIPTION
QUANTITY
PLUG
END CAP
RUBBER FILLING
POLAR RECEIVER
O-RING
2
2
2
1
1
HARDWARE PACK
COMPUTER CONSOLE
ASSEMBLY
1
1
BH Fitness SK9000B
EXPLODED VIEW
Page 38
BH Fitness SK9000B
WARRANTY
North American Warranty
Warranties may vary in other countries. See your local BH Fitness Dealer.
WARRANTY SUBMITTAL
Please have the following information available when contacting your dealer or BH for warranty
support.
•
A copy of the dated purchase receipt or credit card statement.
•
An explanation of the problem/malfunction or parts that are missing or damaged.
•
Owner’s name, address and phone number.
•
Model (SK9000 bike) and Serial Number (when available).
Forward your information to BH North America by
FAX: (949) 206-0013
E-mail: [email protected]
Mail to: 20155 Ellipse, Foothill Ranch, California 92610, USA
For troubleshooting assistance or to confirm your claim please phone:
(949) 206-8152
(800) 475-7899 (USA only)
(866) 325-2339 (USA & Canada)
BH FITNESS extends the following exclusive, limited warranty, which shall apply only to the use of the
device in the home, or commercial facilities. Any other use of the device shall void this warranty.
FRAME – Lifetime (Home Warranty). 7 Years (Light/Full Commercial Warranty)
BH Fitness warrants the Frame against defects in workmanship and materials for Lifetime from the date
of original purchase, so long as it remains in the possession of the original owner for home use.
BH Fitness warrants the Frame against defects in workmanship and materials for seven years from the
date of original purchase, so long as it remains in the possession of the original owner for light/full
commercial use.
Page 39
BH Fitness SK9000B
PARTS – 10 Years (Home Warranty). 3 Years (Light/Full Commercial Warranty)
BH Fitness warrants all original parts against defects in workmanship and materials for a period of ten
years from the date of original purchase, so long as the device remains in the possession of the original
owner for home use.
BH Fitness warrants all original parts against defects in workmanship and materials for a period of three
years from the date of original purchase, so long as the device remains in the possession of the original
owner for light/full commercial use.
LABOR – 2 Years – (Home Warranty). 1 Year (Light/Full Commercial Warranty)
BH Fitness shall cover the labor cost for the repair of the device for a period of Two years from the date
of original purchase, so long as the device remains in the possession of the original owner for home
use. Labor warranty does not include the travel time and or expense that may result from the unit being
outside of the seller or repair technician’s normal service zone.
BH Fitness shall cover the labor cost for the repair of the device for a period of one year from the date
of original purchase, so long as the device remains in the possession of the original owner for light/full
commercial use. Labor warranty does not include the travel time and or expense that may result from
the unit being outside of the seller or repair technician’s normal service zone.
EXCLUSIVE REMEDY
The exclusive remedy for any of the above warranties shall be repair or replacement of defective parts,
or the supply of labor to cure any defect, provided that labor shall be limited as detailed above. All labor
shall be supplied by the local retailer and the product must be located within the retailer’s service area.
Travel time that is further than the retailer’s normal service area will not be included in the products
labor warranty.
EXCLUSIONS AND LIMITATIONS
This warranty applies only to the original owner and is not transferable. This warranty is expressly
limited to the repair or replacement of a defective Frame or defective part and is the sole remedy of the
warranty. The warranty does not cover normal wear and tear.
BH FITNESS expressly disclaims all other warranties, express or implied, including but not limited to all
warranties of fitness for a particular purpose or of merchantability. This warranty gives you specific legal
rights and your rights may vary from state to state.
WARRANTY REGISTRATION
Your warranty card must be completed and sent to BH FITNESS before a warranty claim can be
processed.
Page 40