1
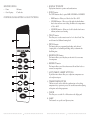
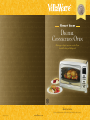
Digital
Convection Oven
Multi-purpose digital convection oven for all your
household cooking and baking needs
Instructions
Please read all instructions carefully and keep this booklet for future reference.
V410-41005-U00 (4/05)
www.villaware.com
I M P O RTA N T SA F EGUA R D S
When using electrical appliances, basic safety precautions should always be
followed, including the following:
1.
2.
3.
4.
5.
6.
7.
8.
9.
10.
11.
12.
13.
14.
15.
16.
17.
18.
19.
20.
21.
22.
Read all instructions before using.
This appliance is for household use only.
Do not use this appliance for other than intended use.
To protect against risk of electrical shock, do not put electrical cord, plug, or
any parts of the convection oven in water or other liquid.
Do not let cord hang over edge of table or counter, or touch hot surfaces.
Do not operate any appliance with a damaged cord or plug, or after the appliance
malfunctions or is dropped or damaged in any manner. Return appliance to
VillaWare for repair or replacement.
The use of attachments not recommended or sold by the manufacturer, may
cause a risk of injury to persons.
Do not use outdoors or anywhere the cord or oven body might come into
contact with water while in use.
When operating the convection oven, keep at least 4 inches of space on all
sides of the oven to allow for adequate circulation.
Do not place on or near a hot gas or electric burner, or in a heated oven.
A fire may occur if the convection oven is covered or touching flammable
material, including curtains, draperies, walls and the like, when in operation.
Do not store any item on top of the oven during operation.
Close supervision is necessary when the appliance is used by or near children.
Do not cover crumb tray or any part of the oven with aluminum foil. This
will cause the oven to overheat.
Extreme caution should be exercised when using containers constructed of
anything other than metal or glass.
Oversized foods or metal utensils must not be inserted in the convection oven
as they may involve a risk of fire or electric shock.
Do not place any of the following materials in the oven: cardboard, plastic,
paper, or any materials that may catch fire or melt.
When broiling, use extreme caution when removing drip tray or
disposing of hot grease.
Extreme caution should be used when moving an appliance containing
hot oil or other hot liquids.
Do not touch hot surfaces. Use handles.
The door and outer surfaces of the convection oven may get hot when in use.
Always unplug from outlet when not in use and before cleaning. Allow
appliance to cool completely before putting on or taking off parts, and before
cleaning the appliance.
To operate, plug cord into wall outlet. To disconnect, return the control to the
OFF position, then grip plug and pull from wall outlet. Never pull on cord.
ACACACACACACACACACAC
2 CACACACACACACACACACA
23. Do not clean the appliance with metal scouring pads. Pieces can break off
from the pad and touch electrical parts, creating a risk of electrical shock.
24. Do not store any materials, other than manufacturer’s recommended
accessories, in this oven when not in use.
CAUTION: Appliance surfaces are hot after use. ALWAYS wear insulated, heatproof oven mitts and potholders when touching hot oven or hot dishes and food,
or when inserting or removing rack, pans or baking containers.
H O US E H O L D US E O N LY
SAV E T H E S E I N ST RU C T I O N S
ELEC TRICAL REQUIREMENTS
A short power-supply cord is provided to reduce the hazard resulting from
entanglement or tripping over a longer cord. Longer extension cords are available
and may be used with care; if a longer extension cord is used, be sure the marked
electrical rating is at least as great as the electrical rating of this appliance. The
extension cord should be positioned such that it does not drape over the counter
or tabletop where it can be pulled on by children or tripped over. If the appliance is
of the grounded type, the extension cord should be a grounding-type 3-wire cord.
P O L A R I Z E D P LUG
This appliance has a polarized plug (one blade wider than the other). To reduce
the risk of electrical shock, this plug will fit in a polarized outlet only one way.
If the plug does not fit fully in the outlet, reverse the plug. If it still does not fit,
contact a qualified electrician. Do not modify the plug in any way.
F E A T U R E S O F Y O U R C O N V E C T I O N OV E N
•
Convection oven features include Bake, Fan Bake, Fan Broil, Toast,
Dehydrate, Defrost and Pizza
•
Touch pad control panel
•
LED display window
•
Digital timer and temperature control
•
Start and Stop/Cancel buttons
•
Adjustment buttons for temperature, time, toast color or pizza crispness
•
Removable crumb tray at bottom of convection oven for easy clean-up
•
Tray/Rack Handle for safe removal of the hot oven rack or baking pan
ACACACACACACACACACAC
3 CACACACACACACACACACA
S P E C I F I CAT I O N S
•
Power:
1200 watts
•
Oven Capacity:
0.7 cubic feet
1. D I S P L AY W I N D OW
Displays time, function in operation and countdown time.
2. OV E N Function
The OVEN function offers 3 options: BAKE, FAN BAKE or FAN BROIL.
C O N T R O L PA N E L S E T T I N G S A N D F U N C T I O N S
•
BAKE function – Allows you to bake foods at 150 to 400˚F.
•
FAN BAKE function – Allows you to bake with a fan that distributes
heat for faster and more even cooking. Fan Bake cooks at temperatures
of 150 to 400˚F.
•
FAN BROIL function – Allows you to broil foods with a fan for more
efficiency and more even browning.
3. T O A S T Function
This allows you to set the convection oven for 2 or 4 slices of bread. Toast
can be browned at 5 different browning levels.
4. P I Z Z A Function
This function offers pre-programmed pizza baking, with a choice of
3 crisping levels, or customized pizza baking, where you determine the
ideal baking time.
5. D E H Y D R A T E Function
This function allows you to dehydrate your favorite foods at a constant,
low temperature.
6. D E F R O S T Function
This function allows you to defrost frozen meats, fish and other foods at a
constant, low temperature.
7. A D J U S T M E N T A R R OW B U T T O N S
Up and down arrow buttons allow you to adjust time, temperature, toast
color and pizza crispness.
8. T I M E R / T E M P E R A T U R E
This button can be used to check the countdown time or the cooking
temperature of any operation in process. Also use this button when adjusting
cooking time and cooking temperature.
9. C L O C K
This allows you to set either 12 or 24 hour time on the display panel.
10. L A M P
Can be turned on to provide oven light at any time.
ACACACACACACACACACAC
4 CACACACACACACACACACA
ACACACACACACACACACAC
5 CACACACACACACACACACA
11. S T O P / C A N C E L
This button can be used to stop any oven operation in process. Press
STOP/CANCEL 1 time to pause; press STOP/CANCEL 2 times to cancel
an operation. Press START to re-start an operation on pause. When an
operation, such as a toast cycle, has been completed, this button must be
pressed to clear the convection oven unit for a new operation.
12. S T A RT
This button is used to start an operation or timer; can also be used to re-start
a program that has been paused by the STOP/CANCEL button.
B E F O R E U S I N G Y O U R C O N V E C T I O N OV E N
3. To remove a rack, open the oven door and pull the rack towards the front of
the convection oven. The oven rack will slide along the rack guides on the
inside of the oven.
TOA ST FU N C T I O N
Heavier breads, such as whole grain varieties, thick-sliced and cold (refrigerated or
frozen) breads will require a higher level setting. Four slices of bread will require a
higher level setting than 1 or 2 slices. Condensation may form on the inside of
the glass door during toasting. This is normal, and will evaporate during toasting.
•
Place 2 to 4 slices of bread on oven rack (middle rack position in oven).
•
Press TOAST one time for 2 slices of bread or two times for 4 slices of bread.
The number 2 will appear in the display window for 2 slices of bread;
4 will appear for 4 slices of bread. The default setting for medium toast
color (level 3) will appear at the bottom of the display window.
•
Press ARROW buttons to adjust browning level.
Press UP arrow for darker toast (level 4 or 5); press DOWN arrow for
lighter toast (level 1 or 2).
•
Press START.
The toasting will begin and - : - - will appear in the display window.
A countdown time will not appear until the last 58 seconds of toasting.
When the toast cycle is complete, the oven will beep four times; the series
of beeps will repeat every few seconds to remind you to remove your food.
The heating element will shut off automatically and the word, END, will
flash on and off on the display screen.
•
Press STOP/CANCEL.
The display screen will clear, the reminder beeps will stop, and the unit will
be ready to begin a new function, if desired.
1. Remove all packaging.
2. Read all instructions carefully and keep them for future reference.
3. Wash oven rack, baking pan, crumb tray and tray/rack handle in hot,
soapy water using a non-abrasive sponge.
4. DO NOT IMMERSE THE BODY OF THIS APPLIANCE IN WATER.
5. Be sure the entire convection oven and all its parts are thoroughly dried
before plugging the unit in.
6. Be sure that the crumb tray is in its place before using convection oven.
7. Select a location for the convection oven that is in an open area on a flat
counter where the plug will reach an outlet. Be sure there is a 4-inch
clearance between the convection oven and any other surface, including
cords, when the convection oven is on.
8. Plug power cord into a 110/120 volt AC wall outlet.
U S I N G Y O U R C O N V E C T I O N OV E N
1. Place oven rack in the desired position before heating the oven. To place
rack in the oven, align rack in rack guide and slide toward back of the oven.
Optimal positioning of the rack will depend on the oven function, size of the
food and browning/crisping level desired. Adjust rack downward to prevent
top from over-browning; adjust rack upward to prevent bottom from burning.
When toasting, baking, fan baking, dehydrating and defrosting, place oven
rack in the middle oven position. When broiling, place oven rack in the
position appropriate to food being broiled (see BROIL directions). When
using the pizza function place oven rack in the last or bottom position.
2. Use the handle to remove hot wire rack or baking pan from convection
oven. The handle works very well for safely transporting hot items.
ACACACACACACACACACAC
6 CACACACACACACACACACA
OV E N F U N C T I O N
The OVEN function can be set for BAKE, FAN BAKE and FAN BROIL.
The BAKE and FAN BAKE functions can be used as you would a regular oven.
•
Foods may be baked in or on an oven-proof container (baking dishes,
casseroles or baking pans) or, if baking potatoes, directly on the oven rack.
•
If using a glass cooking dish, be sure the dish or cover are never closer
than 1 inch from the heating element.
•
Aluminum foil may be used to cover the baking dish or pan. Be sure any
foil ends are tucked closely against the edge of the baking pan.
•
Avoid opening the door too often to prevent heat loss.
ACACACACACACACACACAC
7 CACACACACACACACACACA
The FAN BROIL function can be used as you would a regular oven broiler.
•
•
It is not necessary to preheat the broiler or open the door during broiling
to improve air circulation. The fan feature of the broil function helps to
circulate the heat for even and efficient cooking.
To minimize smoking and splattering during broiling, trim excess fat
from all meats. After broiling, be sure to clean oven rack and baking pan
used to catch drippings. Interior walls of convection oven should be
cleaned to prevent any grease build-up.
BAKE
•
Arrange food on oven rack (middle rack position in oven).
•
Press OVEN one time to set the BAKE function.
The default temperature of 300˚F will appear in the display window.
•
Press ARROW buttons to adjust the baking temperature.
Press UP arrow to increase temperature, up to 400˚F. Press DOWN
arrow to decrease temperature, down to 150˚F. Temperature will change
in 25˚F increments.
•
Press TIMER/TEMPERATURE to adjust the baking time.
The default time of 30:00 minutes will appear in the display window.
Press UP arrow to increase time, up to 90 minutes. Press DOWN arrow
to decrease time, as low as 10 seconds. The time will change in the
following increments:
0 to 5 minutes:
10-second increments
5 to 10 minutes:
30-second increments
10 to 30 minutes:
1-minute increments
30 to 90 minutes:
5-minute increments
•
Press START.
A countdown of the baking time will appear in the display window. When
complete, the oven will beep four times; the series of beeps will repeat every
few seconds to remind you to remove your food. The heating element will
shut off automatically and the word, END, will flash on and off on the
display screen.
•
Press STOP/CANCEL.
The display screen will clear, the reminder beeps will stop, and the unit will
be ready to begin a new function, if desired.
ACACACACACACACACACAC
8 CACACACACACACACACACA
FA N B A K E
•
Arrange food on baking pan or directly on oven rack (middle rack
position in oven).
•
Press OVEN two times to set the FAN BAKE function.
The default temperature of 300˚F will appear in the display window.
•
Press ARROW buttons to adjust the baking temperature.
Press UP arrow to increase temperature, up to 400˚F. Press DOWN
arrow to decrease temperature down to 150˚F. Temperature will change
in 25˚F increments.
•
Press TIMER/TEMPERATURE to adjust the baking time.
The default time of 30:00 minutes will appear in the display window.
Press UP arrow to increase time, up to 90 minutes. Press DOWN
arrow to decrease time, as low as 10 seconds. The time will change in
the following increments:
0 to 5 minutes:
10-second increments
5 to 10 minutes:
30-second increments
10 to 30 minutes:
1-minute increments
30 to 90 minutes:
5-minute increments
•
Press START.
A countdown of the baking time will appear in the display window. When
complete, the oven will beep four times; the series of beeps will repeat every
few seconds to remind you to remove your food. The heating element will
shut off automatically and the word, END, will flash on and off on the
display screen.
•
Press STOP/CANCEL.
The display screen will clear, the reminder beeps will stop, and the unit will
be ready to begin a new function, if desired.
ACACACACACACACACACAC
9 CACACACACACACACACACA
FA N B R O I L F U N C T I O N
PIZZA FUNC TION
Your oven is great for broiling foods such as open-faced sandwiches, crostini,
bruschetta, hot appetizers, broiled fruit and vegetables, au gratin dishes, cheesetopped casseroles and meringue-topped desserts. Place these foods directly on the
oven rack or on the baking pan included. If you wish to broil meats or foods with
a lot of drippings, be sure to use a broiler pan with a rack (not included).
•
Place pizza directly on oven rack (lower rack position of oven).
•
Press PIZZA one time for pre-programmed pizza baking or two times for
customized pizza baking.
•
Set oven rack.
Quicker cooking or thin foods (1 inch or less) should be broiled so surface
of food is 2 to 3 inches from the heating element. Slower cooking or thick
foods (more than 1 inch) should be broiled so surface of food is 3 to 5
inches from the heat. Place the oven rack so food placed on it will be the
proper distance away.
•
Place food to be broiled on oven rack.
•
Press OVEN three times to set the FAN BROIL function.
The default temperature of 450˚F will appear in the display window.
This temperature can not be adjusted.
•
Press TIMER/TEMPERATURE to adjust the cooking time.
The default time of 30:00 minutes will appear in the display window.
Press UP arrow to increase time, up to 90 minutes. Press DOWN arrow
to decrease time, as low as 10 seconds. The time will change in the
following increments:
•
a.
Press ARROW buttons to adjust crisping level.
Press UP arrow one time for crisp crust (level 2 or • • • •). Press UP
arrow two times for crisper crust (level 3 or • • • • •).
The pizzas will cook for the following times at these settings:
CRISPNESS LEVEL
BAKING TIME
Softer crust
level 1
••
15 minutes
Crisp crust
level 2
••••
18 minutes
Crisper crust
level 3
•••••
21 minutes
b. For customized pizza baking, “B-9” will appear in the display window.
The baking temperature is pre-programmed. The baking time can be
adjusted.
0 to 5 minutes:
10-second increments
5 to 10 minutes:
30-second increments
Press TIMER/TEMPERATURE to adjust the cooking time.
10 to 30 minutes:
1-minute increments
30 to 90 minutes:
5-minute increments
The default time of 30:00 minutes will appear in the display window.
Press UP arrow to increase time up to 90 minutes; press DOWN arrow
to decrease time as low as 10 seconds. The time will change in the
varying increments:
Press START.
A countdown of the cooking time will appear in the display window.
Foods that are broiled on both sides, such as toasts for crostini and bruschetta,
need to be turned over halfway through cooking. Press STOP/CANCEL to
pause the timer. Using the handle, carefully pull rack out just enough to turn
food. Turn food. Push oven rack back in; press START and continue cooking.
Foods that are broiled only on one side, such as a tuna melt sandwich, do not
need to be turned.
Press STOP/CANCEL.
The display screen will clear, the reminder beeps will stop, and the unit will
be ready to begin a new function, if desired.
ACACACACACACACACACAC
10 CACACACACACACACACACA
0 to 5 minutes:
10-second increments
5 to 10 minutes:
30-second increments
10 to 30 minutes:
1-minute increments
30 to 90 minutes:
5-minute increments
•
Press START for both pre-programmed and customized pizza baking.
When baking is complete, the oven will beep four times; the series of
beeps will repeat every few seconds to remind you to remove your food.
The heating element will shut off automatically and the word, END, will
flash on and off on the display screen.
•
Press STOP/CANCEL.
The display screen will clear, the reminder beeps will stop, and the unit will
be ready to begin a new function, if desired.
When broiling is complete, the oven will beep four times; the series of beeps
will repeat every few seconds to remind you to remove your food. The
heating element will shut off automatically and the word, END, will flash on
and off on the display screen.
•
For pre-programmed pizza baking, “A-9” will appear in the display
window. The baking temperature is pre-programmed. The baking time is
determined by the crisping level you select. The default setting for softer
crust (level 1 or • •) will appear at the bottom of the display window.
ACACACACACACACACACAC
11 CACACACACACACACACACA
DEFROST FUNC TION
•
Important: Always cook meats, poultry and fish immediately after defrosting.
Press ARROW buttons to adjust the dehydrating time.
Press UP arrow to increase time, up to 90 minutes. (For dehydrating longer
than 90 minutes, add additional time after function is complete.) Press
DOWN arrow to decrease time, as low as 10 seconds. The time will change
in the following increments:
•
Arrange meat, poultry and fish in single layer on baking pan.
•
Place frozen food on oven rack (middle rack position of oven).
•
Press DEFROST to set the DEFROST function.
The default time of 30:00 minutes will appear in the display window.
0 to 5 minutes:
10-second increments
5 to 10 minutes:
30-second increments
•
Press ARROW buttons to adjust the defrosting time.
Allow 15 to 20 minutes per side for meats or fish to defrost. Press UP arrow
to increase time, up to 90 minutes. Press DOWN arrow to decrease time, as
low as 10 seconds. The time will change in the following increments:
10 to 30 minutes:
1-minute increments
30 to 90 minutes:
5-minute increments
•
0 to 5 minutes:
10-second increments
5 to 10 minutes:
30-second increments
10 to 30 minutes:
1-minute increments
30 to 90 minutes:
5-minute increments
Press START.
A countdown of the cooking time will appear in the display window.
Meats, poultry and fish, plus any thick foods, should be turned over halfway
for more even defrosting. Press STOP/CANCEL button to pause the timer.
Using Tray/Rack handle, carefully pull pan out partway. Turn food. Return
pan; press START button to continue defrosting.
•
•
Press START.
A countdown of the dehydrating time will appear in the display window.
When complete, the oven will beep four times; the series of beeps will repeat
every few seconds to remind you to remove your food. The heating element
will shut off automatically and the word, END, will flash on and off on the
display screen.
•
Press STOP/CANCEL.
The display screen will clear, the reminder beeps will stop, and the unit will
be ready to begin a new function, if desired.
CLOCK FUNC TION
The display panel will show 0:00 when your unit is first plugged in.
When complete, the oven will beep four times; the series of beeps will repeat
every few seconds to remind you to remove your food. The heating element
will shut off automatically and the word, END, will flash on and off on the
display screen.
•
Press CLOCK one time for setting 24 hour time.
HR 24 will appear in the display panel.
•
Press CLOCK a second time for setting 12 hour time.
HR 12 will appear in the display panel.
Press STOP/CANCEL.
The display screen will clear, the reminder beeps will stop, and the unit will
be ready to begin a new function, if desired.
•
Press ARROW buttons until the hour digits begin to flash on and off.
Use ARROW buttons to set the hour.
•
Press CLOCK until the minute digits begin to flash on and off.
Use ARROW buttons to set the minutes.
•
Press CLOCK to complete the time setting.
D E H YD R AT E FU N C T I O N
•
Place food directly on oven rack (middle rack position of oven).
•
Press DEHYDRATE to set the DEHYDRATE function.
The default time of 30:00 minutes will appear in the display window.
ACACACACACACACACACAC
12 CACACACACACACACACACA
STO P/ CA N C E L BU T TO N
The STOP/CANCEL button can also be used to stop the oven while in operation.
•
Press STOP/CANCEL one time to pause the function in operation.
•
Press START to re-start the paused function, OR
•
Press STOP/CANCEL a second time to cancel the paused function.
ACACACACACACACACACAC
13 CACACACACACACACACACA
T I M E R / T E M P E R ATU R E BU T TO N
The TIMER/TEMPERATURE button can be pressed while the oven is in
operation to check what the set temperature is or how much time remains of
the set cooking time.
SA F E O P E R AT I O N O F
YO U R C O N V E C T I O N OV E N
C L E A N I N G YO U R C O N V E C T I O N OV E N
Your oven features a Quick-Cleaning coating.
1. Always unplug convection from wall outlet and cool before cleaning.
2. Wipe oven exterior, interior walls and oven door with damp, non-abrasive
sponge and mild soap. Avoid using steel wool, abrasive cleaners or metal
utensils, as they may cause damage to the finish and the Quick-Cleaning
interior. Thoroughly dry all parts and surfaces prior to plugging in oven.
3. DO NOT IMMERSE THE BODY OF THIS UNIT IN WATER.
4. To clean removable crumb tray at the bottom of the convection oven, slide
out pan. Empty crumbs, then wipe with a damp cloth. To remove any
drippings from crumb tray, allow to cool before removing. Removing pan
with hot drippings can be very hazardous. Use a damp, non-abrasive sponge
and mild soap; dry crumb tray thoroughly before replacing. Never operate
convection oven without the crumb tray in place.
NOTE: It is important to remove drippings and food particles from
your convection oven regularly. A large build-up of food could become a
fire hazard.
5. The wire oven rack and baking pan can be washed by hand or in the
dishwasher.
S T O R I N G Y O U R C O N V E C T I O N OV E N
O N E -Y E A R L I M I T E D WA R R A N T Y
This VillaWare product is protected against defects in materials and
workmanship for one year from the date of original purchase. If the
product proves to be defective in materials or workmanship during this
period, it will be repaired or replaced free of charge.
This warranty does not apply to damage resulting from misuse, accidents or
alterations to the product, or to damages incurred in transit. This warranty
does not apply to power cords or plugs.
If you experience a problem with your VillaWare product, please contact
Consumer Services. You will be instructed on where to send your
product for returns. All returns must be carefully packed and made
transportation prepaid with a description of the claimed defect.
VillaWare
Consumer Services 866-484-5529
[email protected]
For additional information on the VillaWare product line, see your dealer or visit our website at
www.villaware.com
T H E L I N E O F F I N E V I L L AWA R E P R O D U C T S I N C L U D E S :
Wafflers
Pizzelle Bakers
Panini & Contact Grills
Crepe Makers
Electric Meat Grinders
Imperia® & Al Dente™ Pasta Machines
Cookie Presses
Smoothee-Bar™ Blenders
Ice Cream Makers
Bravo™ Pizza Stones
VillaClassic™ Cookware
Italian Style Gadgets & Utensils
Disney Licensed Series by VillaWare
...and hundreds more Classic Italian
Kitchenware products from VillaWare
Also look for the award-winning UNO™ line of kitchen electrics including wafflers, panini
grills, warming trays, toasters and more.
1. Allow the convection oven to cool completely before storing.
2. If storing the unit for a long period of time, be sure it is clean and free of
food particles and pan drippings.
3. Store in a dry location.
Copyright © 2005 Tilia, Inc. All rights reserved. VillaWare, Moderno, Al Dente, Smoothee-Bar, Bravo,
VillaClassic and UNO are trademarks or registered trademarks of Tilia Int’l., Inc. in the United States
and other countries. VillaWare is distributed by Tilia Inc., a Jarden Company. This material may not be
reproduced or redistributed in any fashion without the express written consent of Tilia, Inc.
ACACACACACACACACACAC
14 CACACACACACACACACACA
ACACACACACACACACACAC
15 CACACACACACACACACACA