1
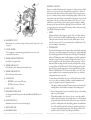
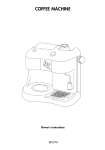
Prima
Espresso Maker
™
Make authentic Italian espresso and cappuccino in the comfort
of your own home with this retro-style espresso maker
Instructions
Please read all instructions carefully and keep this booklet for future reference.
V410-41006-U00 (5/05)
www.villaware.com
I M P O RTA N T SA F EGUA R D S
When using electrical appliances, basic safety precautions should always be
followed, including the following:
H O US E H O L D US E O N LY
SAV E T H E S E I N ST RU C T I O N S
1. Read all instructions before using.
ELEC TRICAL REQUIREMENTS
2. Do not use espresso maker without water because the pump will burn.
6. The cord must not touch any hot parts of the espresso maker.
A short power-supply cord is provided to reduce the hazard resulting from
entanglement or tripping over a longer cord. An extension cord may be used with
care; however, be sure the marked electrical rating is at least as great as the electrical
rating of this appliance. The extension cord should be positioned such that it does
not drape over the counter or tabletop where it can be pulled on by children or
tripped over. The electrical rating of this appliance is listed on the bottom panel
of the unit.
7. Do not use this appliance for other than intended household use.
P O L A R I Z E D P LUG
3. Disconnect the appliance from the wall outlet before filling with water.
4. Do not leave the espresso maker at a room temperature less than 32˚F
because the water remaining in the boiler could freeze and cause damage.
5. Do not leave cord in its housing during use. It must be completely unwound.
8. This appliance is for domestic use only.
9. To protect against risk of electrical shock, do not put espresso maker or
electrical cord in water or other liquid. If appliance falls into liquid, unplug
the cord from outlet immediately. DO NOT reach into the liquid.
This appliance has a polarized plug (one blade wider than the other). To reduce
the risk of electrical shock, this plug will fit in a polarized outlet only one way. If
the plug does not fit fully in the outlet, reverse the plug. If it still does not fit,
contact a qualified electrician. Do not modify the plug in any way.
10. Do not let cord hang over edge of table or counter, or touch hot surfaces.
11. Do not operate any appliance with a damaged cord or plug or after the
appliance malfunctions, or is dropped or damaged in any manner. Return
appliance to VillaWare for repair or replacement.
F E ATU R E S O F YO U R E S P R E S S O MA K E R
•
Retro stainless steel design for an authentic Italian espresso look
•
Temperature gauge allows you to monitor the unit’s boiler temperature at
any time to determine the optimal brewing and frothing temperatures
13. Close supervision is necessary when the appliance is used by or near children.
•
14. Do not use outdoors or anywhere the cord or motor body might come into
contact with water while in use.
15 BAR pump provides 217 psi (pounds per square inch) – the correct and
essential pressure necessary for full oil extraction from the coffee grinds
•
Thermocream system is designed with a filter that ensures constant pressure
for coffee brewing. It allows you to make very creamy coffee with an intense
aroma and full-bodied flavor.
16. Do not touch hot surfaces. Use handles.
•
Auto priming system allows a cup of coffee to be made immediately.
17. Do not touch the portafilter or the metal steam wand when operating the
espresso maker because they may cause burns.
•
High pressure safety valve
•
Power indicator lights
18. Use extreme caution when using hot steam.
•
19. Always unplug from outlet when not in use and before cleaning. Allow
appliance to cool completely before putting on or taking off parts, and before
cleaning the appliance.
Maxi Cappuccino attachment allows you to obtain a rich and dense froth
in less than 10 seconds.
•
Sturdy pull down lever for providing commercial quality steaming/frothing
cup warmer
20. To disconnect, grip plug and pull from wall outlet. Never pull on cord.
•
Pull-out drip tray
•
Built-in cord storage
12. Do not place on or near a hot gas or electric burner, or in a heated oven.
15. The use of attachments not recommended or sold by the manufacturer may
cause a risk of injury to persons.
ACACACACACACACACACAC
2 CACACACACACACACACACA
ACACACACACACACACACAC
3 CACACACACACACACACACA
S P E C I F I CAT I O N S
•
Power:
1000 watt
•
Pressure:
15 BAR (217 psi)
•
Boiler/water tank capacity:
8 cups
•
Volt:
120 V
1. POWER CORD HOUSING
Provides built-in storage area for power cord when unit is not in use.
2. STEAM MODE INDICATOR LIGHT
The red steam light indicates that the STEAM switch is ON, and the
thermostat is set for steaming. This light does not tell you when the unit is
ready for steaming – you must refer to the heating light. If you wish to brew
coffee, turn the STEAM switch to OFF, and allow the unit to cool down to
brewing temperature.
US I N G YO U R R E T RO E S P R E S S O MA K E R
1. Remove all packaging.
2. Read all instructions carefully and keep them for future reference.
3. Place espresso maker on a flat surface.
4. Before using, clean all parts with hot, soapy water and rinse with cold water.
5. To fill the water tank, unplug the espresso machine. Remove water tank and
re-fill with fresh, cold water within the MIN and MAX line on the tank.
Replace the tank to its housing, being sure that the water hose is properly
immersed in the water.
6. Plug the power cord into a 110/220 volt AC wall outlet.
7. Never pull or lift espresso maker by lifting with the cup warming rack.
G E T T I N G FA M I L I A R W I T H YO U R E S P R E S S O M AC H I N E
1
2
4
4. POWER INDICATOR LIGHT
The red power light will turn on when the power switch is ON.
5. TEMPERATURE GAUGE (ºC AND ºF)
6. POWER SWITCH
• UP position turns power ON
•
DOWN position turns power OFF
7. BREW SWITCH
• UP position begins BREWING
5
3
3. HEATING INDICATOR LIGHT
The red heating light will tell you that the boiler is on, and the unit is heating
up to the proper brewing or steaming temperatures. The red light will turn off
when these temperatures have been reached. Begin brewing and steaming only
when the red light is off. If the STEAM switch is OFF, the unit’s thermostat
will be set for brewing (approx. 200˚F). If the STEAM switch is in ON,
the unit’s thermostat will be set for steaming (approx. 300˚F).
6
•
7
8. STEAM SWITCH
• UP position sets the thermostat for STEAMING (Note: Actual steaming
will not turn on until the steam lever is pulled down)
8
•
DOWN position turns off the thermostat for steaming
9. POD PORTAFILTER
Filter holder for use with convenient E.S.E. (easy serving espresso) pods.
These pods contain pre-portioned amounts of ground coffee wrapped in
filter paper
9
ACACACACACACACACACAC
DOWN position STOPS drip
4 CACACACACACACACACACA
ACACACACACACACACACAC
5 CACACACACACACACACACA
16
15
14
13
17
12
18
11
10
19
20
10. MEASURING SCOOP
Measuring spoon for consistent dosage of coffee grounds (7 grams) for 1 shot
of espresso
11. COFFEE TAMPER
Tool for tamping or evenly pressing ground coffee for more even and
consistent flavor extraction
12. THERMOCREAM PORTAFILTER
Filter holder for ground coffee
13. THERMOCREAM DISC
Optional filter part for making a finer-textured crema
14. THERMOCREAM FILTER
Filter for making a frothier crema
15. STEAM LEVER
• UPRIGHT position turns OFF steam
• DOWN position turns ON steam
16. CORD + PLUG
17. REMOVABLE WATER TANK
See-through, removable 8-cup water tank with MAX and MIN fill lines for
easy refill
18. MAXI CAPPUCCINO
Attachment and nozzle for water and steam supply
19. WATER DRIP TRAY
20. REMOVABLE GRILL
ACACACACACACACACACAC
6 CACACACACACACACACACA
ESPRESSO BASICS
Espresso is considered the ultimate coffee experience to coffee connoisseurs. High
pressure is used to force hot water through finely ground coffee to produce a
concentrated, richly flavored and aromatic extraction. The brewing of superior
espresso is a balance of many elements, including high quality coffee beans, the
exact grind, how the grounds have been tamped, the right amount of pressure, the
temperature of the water, and the perfect extraction time. The process, a true
combination of science and art, requires practice, patience and passion, making
the mastery of the process all the more gratifying. Below are a few basics to help
you explore the espresso experience, while becoming a master of the process using
your VillaWare Prima Espresso Maker.
1. WATER
Fill water tank with fresh, cold water to avoid a “flat” taste. Water should be
filled to a level between the MIN and MAX markings on the water tank.
Change the water in the tank often. Use bottled, purified water if your tap
water does not taste good. Do not use mineral water or distilled water, as they
can cause damage to your machine.
2. TEMPERATURE
The boiler and the thermostat in your espresso maker ensure that the temperature
of the water is at an ideal temperature for brewing espresso and steaming milk.
The red heating light will turn ON when the unit is heating. The heating light
will turn OFF when temperatures for these functions are reached, signaling the
best times to begin brewing or steaming. This light will continue to go on
and off at regular intervals, showing that the boiler’s temperature is being
maintained while incoming cold water from the tank replenishes outgoing
hot water. When the STEAM switch is OFF, the thermostat will be set for
about 200˚F, the optimal temperature for extracting the full flavor of coffee.
When the STEAM switch is ON, the thermostat will be set for 300˚F. Your
espresso machine also has a temperature gauge that allows you to check the
temperature of the unit at any time.
To ensure that your freshly brewed espresso is still hot by the time you drink
it, it is best to heat your machine, portafilter, portafilter attachments, and
espresso or cappuccino cups before beginning to brew:
• The empty portafilter and desired Thermocream parts can be warmed by
attaching them to the brew head a few minutes before making espresso.
• Espresso and cappuccino cups can be warmed by placing on the warming
rack on top of the machine.
• When making multiple shots of espresso, be sure to rinse the portafilter
with hot water after brewing so the portafilter does not cool down. Knock
used grounds from the filter, rinse filter with very hot water, and dry filter
parts before re-filling with coffee. After filling, pull next shot immediately.
Note: The portafilter should not be attached to the brew head until you
are ready to immediately begin brewing. If the filled portafilter is left
attached to the hot brew head, the coffee grounds will burn.
ACACACACACACACACACAC
7 CACACACACACACACACACA
3. PRESSURE
Pressure is what forces the water to run through the ground coffee during the
brewing process. The correct amount of pressure applied is critical to making
the perfect espresso. Too much pressure causes the grounds to be over-extracted,
resulting in strong, bitter espresso. Too little pressure results in weak and bitter
espresso. The machine is equipped with a 15 BAR pump, resulting in a full
extraction of oils from the coffee.
The filter portion can be used on its own, producing espresso with a frothier
crema. The disc can also be used, along with the filter, producing espresso
with a finer-textured crema. If used, the disc portion should be placed at
the bottom of the portafilter; the filter fits above it, holding the ground
coffee. When the filter portion is used by itself, it fits directly onto the
portafilter. To secure the filter on, line up the 2 bumps on the filter portion
with the 2 V-shaped notches on the portafilter; turn to lock filter.
4. COFFEE
High-quality espressos start with quality Arabica beans. The grind should feel
slightly smaller than sugar granules when rubbed between the thumb and
finger. Be sure to use a freshly and finely ground coffee for the best flavor.
The best espresso is made with coffee that is ground immediately before
brewing. Purchase ground coffee or grind coffee in small batches to ensure
freshness. The proper grind is also essential. If the coffee grind is too coarse,
the water will pass through too quickly. The coffee will be weak and have
little crema. If the coffee grind is too fine, no or very little water will pass
through the coffee and the result will be too little coffee or coffee that is bitter
without crema.
Your espresso maker also uses E.S.E. (or Easy Serving Espresso) pods, which
contain pre-measured amounts of finely ground coffee, pre-packaged in a
paper filter. Espresso pods are easy to use and make no mess. To use, simply
place the pod onto the pod portafilter, printed side facing down. It is
important to handle the coffee pod as little as possible and only by its
edges, as the oils from your skin can compromise the quality. It is especially
important not to touch the coffee area of the pod. Attach the filled portafilter
to the brew head to begin brewing. Afterward, simply remove the used pod
and discard.
6. DOSING
Dosing is the process of measuring ground coffee into the filter.
Single shot of espresso
• Requires 1 level measure or 1⁄4 ounce (7 grams) of ground coffee
• Yields about 1.5 ounces espresso
• For extra strong espresso, up to 2 level measures or 1⁄2 ounce (14 grams)
of ground coffee may be used with the same volume of water.
Double shot of espresso
• Requires 2 level measures or 1⁄2 ounce (14 grams) of ground coffee
• Yields about 2.5 to 3 ounces espresso
Use the coffee measure provided to measure out the perfect amount. To
measure accurately, use a flat edge, such as a small spatula, to level coffee
grounds with top of measure. Refrain from overfilling the filter. An excess
amount of coffee may make it difficult to lock the filter, may cause coffee to
leak out the sides of the filter during brewing, or simply result in uneven
extraction and poor quality espresso.
5. PORTAFILTER WITH THERMOCREAM SYSTEM
The portafilter for coffee grounds holds 2 parts of a unique system that
allows you to make espresso specifically suited to your particular taste:
•
Thermocream filter and disk
•
Thermocream filter
ACACACACACACACACACAC
8 CACACACACACACACACACA
7. TAMPING
Tamping is the process of evenly pressing ground coffee into the filter. The
flat surface yields a more even extraction from the high-pressured water. After
dosing the coffee into the filter, level the top surface by smoothing with a
finger, or by moving tamp over the surface in a light circular motion. Use
tamp to press down firmly and evenly on coffee until a smooth, even disc
with no gaps is formed. Coffee that is tamped too lightly will result in a
rapid, uneven extraction and coffee that tastes weak. Coffee that is tamped
too firmly will result in slow extraction and bitter, over-extracted espresso.
ACACACACACACACACACAC
9 CACACACACACACACACACA
8. POD PORTAFILTER
This filter allows you to use E.S.E pods. Non-E.S.E. coffee pods may not fit
properly, and should not be used. Follow manufacturer’s directions for inserting
pod into portafilter. One coffee pod will produce 1 shot of espresso. If you
want 2 shots, you must brew them separately into the same cup. The filter can
not accommodate 2 pods at the same time. (See #4 above for more
information about using E.S.E. pods.)
the steam wand may be too high. Lower the container of milk as the volume
expands, always being sure to keep the wand immersed. When there is sufficient
foam, lower the steam wand into the bottom of the container and continue
steaming underneath until the temperature becomes almost too hot to handle.
This will also give the milk a finer texture. The milk should be about 140 to
165˚F. Care must be taken not to overheat the milk or it will scald (above
170˚F). The milk should double or nearly triple in volume. If you hear a
loud roaring or howling sound, the steam wand may be too deep into the
milk and may be scalding the milk. When done, turn the steam lever OFF by
returning it to its upright position.
9. THE POUR
The thick, rich and creamy brew that is produced pours out very dark at first,
but gets lighter toward the end of the cycle. The recommended amount and
time for single and double espressos:
• Single shot: about 1.5 ounces espresso – 18 to 24 seconds
• Double shot: about 2.5 to 3 ounces espresso – 20 to 25 seconds
Espresso will be dispensed from both spouts of the portafilter. When making
one cup, be sure cup is centered under both spouts.
Steamed milk is used to make lattes. Begin making steamed milk in much the
same way as foamed milk, but immerse the wand all the way to the bottom
of the pitcher.
10. CREMA
Crema is the creamy, golden foam that forms at the surface of espresso,
marking the sign of a high-quality extraction. Incorporating emulsified coffee
oils, the crema captures the essence of the coffee flavor and adds a smoothness
and creaminess to espresso that is not found in other coffee drinks. Good
crema should be thick and cling to the side of a cup when tilted.
11. FROTHING AND STEAMING MILK
Steamed and frothed milk, characterized by its light, foamy consistency, can
be used to prepare cappuccino, lattes, mochas and other milk-based drinks.
Nonfat, low-fat, whole milk and, even half and half can all be used. Some
prefer nonfat milk for its ability to foam quickly and easily. Some prefer
whole milk for its richness and the nice body it produces. Everyone agrees,
however, that the freshest and coldest milk (below 40˚F) will produce the
most foam.
Select a narrow, heatproof container or pitcher made of stainless steel,
ceramic or glass to hold your milk while steaming. The container should
allow you to feel how hot the milk is during steaming. Do not fill the
container more than 1⁄3 full with milk.
When frothing milk, first build the volume of the milk by creating the foam.
Tilt the container, then position the steam valve just below the milk’s surface
(about 1⁄4 inch) to begin frothing. If large bubbles form or the milk splatters,
ACACACACACACACACACAC
10 CACACACACACACACACACA
12. DISPENSING HOT WATER
You may dispense hot water through the steam wand. This hot water can be
used for preparing hot tea, instant hot chocolate, instant soup, etc.
FIVE STEPS TO MAKING PERFEC T ESPRESSO
1. Set up Espresso Maker
•
Add fresh, cold water.
•
Be sure all controls are OFF, and the steam lever is in the
upright position.
•
Plug in espresso maker.
•
Turn POWER switch ON. The POWER light will turn on.
2. Run hot water rinse for first-time use or when the unit has not been used
for a long time
•
Attach empty portafilter with Thermocream parts to the brew head;
turn counterclockwise about 45˚ to lock.
•
Use Thermocream filter and disc to obtain a finer crema
•
Use Thermocream filter only to obtain a frothier crema
•
Place an empty mug underneath.
•
Turn BREW switch ON.
•
Allow hot water to drain into mug until almost full; turn BREW
switch OFF.
•
Discard water; check water tank and refill, if necessary.
ACACACACACACACACACAC
11 CACACACACACACACACACA
3. Dose and Tamp Coffee Grinds when the HEATING light goes OFF
(temperature will be approx. 200˚F)
•
Assemble warmed portafilter and Thermocream part(s).
(Attach portafilter to brew head 1 to 2 minutes to warm, if desired.)
If you wish to prepare more espresso, check and refill the water tank, if necessary,
and allow the unit to cool to brewing temperature (approx. 200˚F), or when the
ICON HEATING light turns on.
For more rapid cooling,
•
Place an empty mug under the steam wand.
•
Turn BREW switch ON.
•
Turn steam lever ON (down position). Hot water will dispense from the
steam wand into the mug.
•
When heating light turns ON, the unit is cooled sufficiently for brewing.
When using E.S.E. pods:
•
Turn BREW switch OFF, then turn steam lever OFF (upright position).
•
Assemble pod portafilter.
•
Your espresso machine is ready to brew again.
•
Center pod on portafilter, printed side facing down.
•
Attach filled portafilter to brew head.
•
Dose ground coffee:
1 level measure for 1 espresso
2 level measures for 2 espressos
•
Tamp coffee to make surface smooth and level.
•
Place espresso or cappuccino cup(s) under portafilter.
H OW T O M A K E T E A
1. When the HEATING light goes off, place a cup under the steam wand.
4. Brew Espresso
•
Turn BREW switch ON.
2. Turn BREW switch ON.
•
When the desired amount of espresso has dispensed, turn BREW
switch OFF.
3. Immediately turn steam lever ON (down position) to release hot water
into the cup.
•
Single shot: about 1 to 1.5 ounces espresso – 18 to 20 seconds
4. Turn steam lever OFF (upright position) to stop water flow.
•
Double shot: about 2 to 3 ounces espresso – 20 to 25 seconds
5. Turn BREW switch OFF.
5. Steam/Froth Milk for cappuccino or latte, if desired
•
Check to make sure black attachment is screwed tightly onto steam wand.
•
Turn STEAM switch ON. The STEAM and the HEATING lights will
turn ON. (Note: While the unit is heating, small spurts of steam may
come out of the portafilter. This is normal.)
H OW T O C L E A N Y O U R C O F F E E M A K E R
Warning: All cleaning operations must be done with the coffee maker turned off
and unplugged.
1. Portafilter, Thermocream parts and brew head
•
When the HEATING light goes OFF (temperature will be approx. 300˚F),
turn steam lever ON (down position) to purge residual water into an
empty cup. A little water will come out initially, followed by a strong jet
of steam.
•
Remove portafilter by turning clockwise about 45˚ to unlock; knock out
used coffee grinds or remove pod. Note: The used pod may stick to the
top of the brew head when the portafilter is removed. To remove, tilt
portafilter down until pod falls out onto the filter.
•
When steam appears, turn steam lever OFF (upright position).
•
•
Fill container 1⁄3 full with cold milk.
•
Immerse steam wand into milk; turn steam lever ON (down position) to
steam or froth milk. Turn steam lever OFF (upright position).
Disassemble portafilter and Thermocream parts; rinse with warm water
to remove remaining coffee grounds. Make sure that the holes are free of
coffee oils and are not blocked. If necessary, clean with mild soap and
scrub lightly with non-abrassive sponge or small brush; rinse parts and
dry before re-using.
•
Turn STEAM switch OFF. The STEAM light will turn OFF.
•
•
Pour steamed milk and/or spoon frothed milk over freshly brewed espresso.
Hold filter up to the light – make sure the tiny hole (or holes on pod
portafilter) is not blocked. Clean with a pin, if necessary.
ACACACACACACACACACAC
12 CACACACACACACACACACA
ACACACACACACACACACAC
13 CACACACACACACACACACA
•
Clean the brew head by wiping with a damp cloth. With use, coffee
grounds may build up in the brew head where the portafilters are placed.
If necessary, remove coffee grounds with a wooden pick or cotton swab.
2. Maxi Cappuccino steam wand and attachment
•
It is important to clean these parts after each use to prevent hardened
milk from becoming deposited.
•
Clean only when the chrome wand is cool; wipe wand clean with a soft,
damp cloth.
•
Unscrew the black attachment from the wand; rinse with warm water,
using mild soap, if necessary.
•
For added cleaning, place a large cup underneath the steam wand; pull
steam lever forward to release steam for a few seconds.
•
Re-screw the black attachment until tightened. If necessary, clean the
hole where the steam flows through with a pin.
3. Drip tray and grid
•
Carefully pull out drip tray and empty accumulated liquid.
•
Wash periodically with a non-abrasive sponge and mild soap.
TROUBLESHOOTING
PROBLEM
SOLU T ION
The espresso maker
does not supply
boiling water for
making tea.
Air has possibly entered the circuit Make sure the tank is properly inserted and
that the water level is not below the MIN
and deactivated the pump.
level. Before brewing coffee again, run a
hot water rinse through the machine.
The espresso maker
does not supply
steam.
Wand could be clogged or no
water in tank.
Use a pin to unclog the wand.
Make sure there is adequate water in the
water tank.
Coffee is overflowing
from the edges of the
portafilter.
An excess amount of ground
coffee may have been placed in
the portafilter, preventing it from
being properly secured to the
brew head.
Pour out and refill the portafilter with the
correct amount of ground coffee. Check to
make sure there are no residual grounds along
the edge of the filter. If problem persists, go
to an Authorized Assistance Center.
Output of the first
coffee does not occur
or occurs too slowly.
It is possible that fat or lime
residues that have accumulated
over a few months of use, are
obstructing the disc in the brew
head. There could also be
an insufficient amount of water
and the pump does not suction.
Check the portafilter containing the ground
coffee. If the holes are clogged, clean them
with a brush, or use a utensil to hold the
filter over a gas burner for a few seconds.
The grounds will burn, unclogging the holes.
4. Water tank
•
CAUSE
Periodically clean the inside of the water tank with a sponge or
damp cloth.
Important: Never immerse espresso maker in water or any other liquid.
Never clean appliance under running water. Never use scouring agents.
Be sure the water tank is inserted and
filled correctly.
SA F E O P E R AT I O N O F YO U R E S P R E S S O MA K E R
•
Do not use espresso maker without water because the pump will burn.
•
Disconnect the appliance from the wall outlet before filling with water.
•
Do not leave the espresso maker at a room temperature less than 32˚F
because the water remaining in the boiler could freeze and cause damage.
•
Do not leave cord in its housing during use. It must be completely unwound.
•
The cord must not touch any hot parts of the espresso maker.
•
Do not touch the portafilter or the metal steam wand when operating the
espresso maker because they may cause burns.
•
Use extreme caution when using hot steam.
•
Always unplug from outlet when not in use and before cleaning.
ACACACACACACACACACAC
14 CACACACACACACACACACA
Operate the espresso maker without the
portafilter to make the water flow. If the
water still does not flow out uniformly
from all the holes, the disc in the brew
head must be clogged. You will need to go
to an Authorized Assistance Center to have
it cleaned.
The coffee is too
watery and cold.
The blend has been ground too
coarsely.
ACACACACACACACACACAC
A more finely ground blend of coffee must
be used to obtain a more concentrated and
hotter coffee. The problem may be eliminated
by using the Thermocream® disc, which
always ensures an extremely hot coffee and
rich crema, even with coarsely ground coffee.
15 CACACACACACACACACACA
ESPRESSO DRINKS
DRINK
Americano
WHAT IT IS
Espresso served at dripcoffee strength
HOW TO MAKE
• Combine 1 shot espresso with
enough fresh, hot water to fill
6-ounce coffee cup
ESPRESSO DRINKS
HOW TO SERVE
Often consumed
“American style” with
milk and/or sugar
DRINK
WHAT IT IS
Espresso Macchiato
An espresso that is marked
or spotted by a small
amount of frothed milk
HOW TO MAKE
• Top 1 shot espresso with 1 to 2
tablespoons frothed milk
Café Latte or Latte
Italian version of the
French Cafe au Lait
• Combine 1 or 2 shots espresso
with about 5 ounces steamed milk
espresso + steamed milk
• Can flavor with 1 to 2 ounces
Italian syrup, such as hazelnut
or almond
Café Mocha or Mocha espresso + steamed milk
+ chocolate syrup
Cappuccino – basic
espresso + steamed milk
+ frothed milk
Serve in 8 to 10-ounce
glass latte mug, tall
glass or bowl-shaped
heavy cup
espresso + frothed milk
An espresso that is “pulled
short or restricted” to yield
a shorter serving that is
more intensely flavored
• Brewed with 7 grams ground coffee Serve in a warmed 2 to
with less water for a slightly shorter 3-ounce espresso or
extraction time
demitasse cup
• The coffee is ideally ground slightly
finer to slow the extraction time.
Applying extra pressure to the
tamping process can also produce
the same result.
Can top with a little
frothed milk.
• Combine 1 shot espresso with about Serve in a tall glass
2 ounces steamed milk and 1 ounce
Top with whipped
chocolate syrup (or to taste)
cream and garnish with
chocolate shavings or
sprinkles, if desired
• Combine 1 shot espresso with
about 11⁄2 ounces steamed milk
and 11⁄2 ounces frothed milk
Espresso Ristretto
Serve in a warmed 2 to
3-ounce demitasse cup
Can garnish with cocoa
powder
espresso + hot water
Serve in 6-ounce
coffee cup
HOW TO SERVE
• Yields 3⁄4 to 1 ounce coffee
Espresso Romano
An espresso served with
fresh lemon peel.
• Same as plain espresso above.
Serve in a warmed 2 to
3-ounce espresso or
demitasse cup
Serve in a cappuccino
or other 6-ounce cup
Sprinkle top with cocoa
powder and/or ground
cinnamon
Cappuccino – classic
Common version in Italy,
and gaining popularity in
North America.
• Combine 1 shot espresso with 11⁄2
to 2 ounces frothed milk
Sprinkle top with cocoa
powder and/or ground
cinnamon
espresso + frothed milk
Espresso
Rich, dark roast of coffee
that is brewed quickly
under pressure.
Serve in a cappuccino
or other 6-ounce cup
• Brewed with 7 grams of ground
coffee with an extraction time of
18 to 24 seconds
Serve in a 2 to 3-ounce
espresso or demitasse cup
• Yields 1 to 11⁄2 ounces coffee
Espresso Breve
espresso + half & half
• Combine 1 shot espresso with
heated half and half
Serve in a 2 to 3-ounce
espresso or demitasse cup
Espresso con Panna
espresso + whipped cream
• Serve 1 or 2 shots espresso topped
with whipped cream
Serve in a 2 to 3-ounce
espresso or demitasse cup
Espresso Dopio
double espresso
• Double shots of espresso produced
in a single pour
Serve in a warmed
cappuccino cup
Espresso Lungo
An espresso that is “pulled • Brewed with 7 grams ground
long” to yield a larger serving
coffee with more water for a
slightly longer extraction time
Serve in a warmed 2 to
3-ounce espresso or
demitasse cup
• Yields about 2 ounces coffee
ACACACACACACACACACAC
16 CACACACACACACACACACA
ACACACACACACACACACAC
17 CACACACACACACACACACA
O N E -Y E A R L I M I T E D WA R R A N T Y
This VillaWare product is protected against defects in materials and
workmanship for one year from the date of original purchase. If the
product proves to be defective in materials or workmanship during this
period, it will be repaired or replaced free of charge.
This warranty does not apply to damage resulting from misuse, accidents or
alterations to the product, or to damages incurred in transit. This warranty
does not apply to power cords or plugs.
If you experience a problem with your VillaWare product, please contact
Consumer Services. You will be instructed on where to send your
product for returns. All returns must be carefully packed and made
transportation prepaid with a description of the claimed defect.
VillaWare
Consumer Services 866-484-5529
[email protected]
For additional information on the VillaWare product line, see your dealer or visit our website at
www.villaware.com
T H E L I N E O F F I N E V I L L AWA R E P R O D U C T S I N C L U D E S :
Wafflers
Pizzelle Bakers
Panini & Contact Grills
Crepe Makers
Electric Meat Grinders
Imperia® & Al Dente™ Pasta Machines
Cookie Presses
Smoothee-Bar™ Blenders
Ice Cream Makers
Bravo™ Pizza Stones
VillaClassic™ Cookware
Italian Style Gadgets & Utensils
Disney Licensed Series by VillaWare
...and hundreds more Classic Italian
Kitchenware products from VillaWare
Also look for the award-winning UNO™ line of kitchen electrics including wafflers, panini
grills, warming trays, toasters and more.
Copyright © 2005 Tilia, Inc. All rights reserved. VillaWare, Moderno, Prima, Al Dente, Smoothee-Bar,
Bravo, VillaClassic and UNO are trademarks or registered trademarks of Tilia Int’l., Inc. in the United
States and other countries. All other trademarks are property of their respective owners. VillaWare is
distributed by Tilia Inc., a Jarden Company. This material may not be reproduced or redistributed in
any fashion without the express written consent of Tilia, Inc.
ACACACACACACACACACAC
18 CACACACACACACACACACA