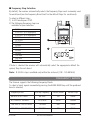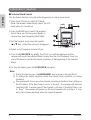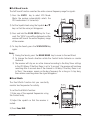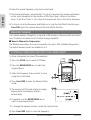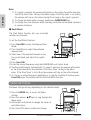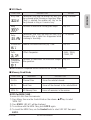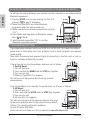
1
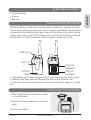
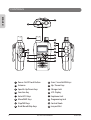
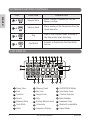
AE 82 H / AE 82 H BT
Scanning Receiver
CONTENTS
1.
2.
3.
4.
5.
6.
ENGLISH
CAUTIONS................................................................................. 4
ABOUT AE 8 H/BT MODELS .............................................
4
SUPPLIED EQUIPMENT ................................................................. 5
INSTALLING THE BATTERIES ....................................................... 5
INSTALLING THE ANTENNA ........................................................ 5
CONTROLS .................................................................................... 6
Power On/Off Lock Button....................................................... 7
Antenna............................................................................... 7
Squelch Up/Down Keys ........................................................... 7
Function Key .......................................................................... 7
Enter/VFO Keys ...................................................................... 7
Menu/MW Keys ..................................................................... 7
Step/MR Keys ........................................................................ 7
Bank/Band&Skip Key ............................................................ 7
Scan / Search&DW Key ......................................................... 7
Up / Down Keys ..................................................................... 7
Charger Jack ......................................................................... 7
LCD Display .......................................................................... 7
Earphone and Programming Jack .......................................... 7
Control Knob ........................................................................ 7
Lanyard Slot .......................................................................... 7
7. EXTENDED KEYPAD CONTROLS .................................................... 8
8. LCD DISPLAY ............................................................................... 8
9. GENERAL OPERATION ................................................................. 9
Turning the unit On or Off....................................................... 9
KEY Lock................................................................................ 9
Volume...................................................................... 9
Squelch................................................................................ 9
Func Key................................................................................ 9
Menu Key .............................................................................. 9
E/VFO Key [Enter/VFO]............................................................. 9
Control Knob ........................................................................ 10
INSTRUCTION MANUAL
AE 8 H/BT
AE 8 H/BT
INSTRUCTION MANUAL
ENGLISH
10
10
10
11
12
12
12
13
14
14
15
15
15
15
16
16
17
17
18
18
19
19
19
10. SELECTING FREQUENCIES .............................................................
Mode Selection .....................................................................
Frequency Step Selection........................................................
11. FREQUENCY BANDS......................................................................
12. FREQUENCY SEARCH.....................................................................
Selected Band Search .............................................................
Full Band Search .....................................................................
Dual Watch ............................................................................
13. MEMORY BANKS ..........................................................................
14. STORING FREQUENCIES INTO THE MEMORIES .............................
15. RECALLING FREQUENCIES FROM THE MEMORIES .........................
16. CHANNEL SCAN ...........................................................................
Selected Bank Scan ................................................................
Full Band Scan ........................................................................
Dual Watch ............................................................................
17. MENU SETTINGS ...........................................................................
VFO Mode ...............................................................................
Memory Read Mode ...............................................................
18. BLUETOOTH COMPATIBLE OPERATION .........................................
19. TROUBLE SHOOTING ....................................................................
20. SPECIFICATIONS ...........................................................................
General....................................................................
Receiver .................................................................................
CAUTIONS
ENGLISH
Please read these instructions carefully before operating your receiver. Your scanner is
a complex and powerful unit with many functions. Please retain this manual for future
reference. Any illegal use offending the national law is not allowed.
Never connect the receiver to the power source other than the specified battery. Otherwise the damage to your receiver may occur.
Never use the receiver in or near the mining area, near explosives or where signs
indicate ‘Blasting Area’. Never use or charge the receiver in a potentially explosive
atmosphere.
Do Not place the receiver in front of the vehicle air bag.
Do Not operate the receiver on board the aircraft.
Always charge the receiver at normal room temperature.
Always replace the accessory jack cover when the jack is not in use.
Use only manufacturer-supplied rechargeable battery in your receiver.
Do Not expose the receiver to water. It is not waterproof.
Avoid storing or charging the receiver in direct sunlight.
Avoid storing the receiver in temperatures below -107C to +607C
Never try to charge Alkaline batteries or any dry cells.
ABOUT AE 82 H/BT MODELS
We offer two models of your scanner receivers.
AE 8 H is the basic version and AE 8 H-BT additionally includes the Bluetooth
compatible operation.
Except for this Bluetooth compatible operation, all other features, functions and specifications are same.
Please carefully check whether your receiver is the Bluetooth compatible model or not
before starting your use.
INSTRUCTION MANUAL
AE 8 H/BT
INSTALLING THE BATTERIES
Battery installation is made more convenient when the belt clip is removed. To do this,
release the spring clip securing the belt clip to radio and slide the belt clip downward
and away from the radio body. Next, press down with the thumb at the arrow, slide the
battery cover down and lift off the battery cover. Insert four AAA batteries (alternate
positive ends (+) toward the bottom of the transceiver (starting right to left).
SPRING CLIP
BELT CLIP
NEGATIVE
TERMINALS
BATTERY
POSITIVE
COVER
TERMINALS
1. Using thumb, press down on battery cover at arrow and slide cover down to open.
2. Slide the cover down and then lift cover at bottom to open. Remove cover.
3. Insert four AAA batteries (positive(+) end toward the bottom beginning at right
side
INSTALLING THE ANTENNA
1) Place the antenna onto the antenna socket
on top of the radio.
2) Rotate the antenna clockwise to screw into
place.
AE 8 H/BT
INSTRUCTION MANUAL
3) Do not over tighten.
ENGLISH
SUPPLIED EQUIPMENT
• Scanner Receiver
• Antenna
• Belt Clip
CONTROLS
ENGLISH
16
1
2
15
14
13
12
3
4
5
6
7
ACC
10
9
CHG
11
8
1 Power On/Off Lock Button
9 Scan / Search&DW Keys
2 Antenna
10 Up / Down Keys
3 Squelch Up/Down Keys
11 Charger Jack
4 Function Key
12 LCD Display
5 Enter/VFO Keys
13 Earphone Jack
6 Menu/MW Keys
14 Progamming Jack
7 Step/MR Keys
15 Control Knob
8 Bank/Band&Skip Keys
16 Lanyard Slot
INSTRUCTION MANUAL
AE 8 H/BT
1 Power On/Off Lock Button
Turns the receiver on and off. Also locks the keypad.
2 Antenna
ENGLISH
Provides reception of signals.
3 Squelch Up/Down Keys
Opens and closes the squelch.
4 Function Key
Enables extended keypad control functions.
5 Enter/VFO Keys
Confirms selections and selects the VFO mode.
6 Menu/MW Key
Provides access to setup menus and also access to write memories.
7 Step/MR Key
Provides access to setup frequency steps and also access to read memories.
8 Bank/Band&Skip Key
Used to change Memory Banks or Frequency Bands, and also used to skip chan nels or frequencies.
9 Scan/Search&DW Key
Used to activate or deactivate the Scan function in memory read mode or the
Search function in VFO mode. Also used to activate or deactivate Dual Watch
function.
10 Up/Down Keys
Adjust the Volume and selects Menu items and frequency steps.
11 Charger Jack
Provides Charging connection. (Optional accessories are required.)
12 LCD Display
Shows frequencies and selected functions.
13 Programming Jack
Provides connection for programming kit. (Optional accessories are required.)
14 Earphone Jack
Provides earphone connection.
15 Control Knob
Selects frequencies and channels and selects values from menus.
16 Lanyard Slot
AE 8 H/BT
INSTRUCTION MANUAL
Allows connection of the Lanyard to protect the receiver from being accidentally
dropped.(Optional accessory required.)
EXTENDED KEYPAD CONTROLS
ENGLISH
KEY
Extended Function DESCRIPTION
Keys
FUNCTION
+
Manual Write
Allows storage of frequencies into the
Memory storage.
+
Memory Read
Allows reading of the frequencies from the
stored memories.
+
Skip
Used to Skip channels when Scanning or
Skip frequencies when Searching.
+
Dual Watch
Activates or Deactivates the Dual Watch
function.
LCD DISPLAY
2
3 4
5 6 7 8 9 10 11 12
1
13
21
14
15 16
17
18 19 20
1 Power Save
8 Memory Read
15 AM/FM WFM Mode
2 Scan
9 Key Tone
16 Scan Delay Timer
3 Function
10 Keypad Lock
17 Channel Indicator
4 Search
11 Skip
18 Bank Number
5 Memory Write
12 Battery Balance Level
19 Frequency Step
6 Dual Watch
13 Attenuator
20 Bluetooth compatible
7 Delta
14 Frequency Display
21 Signal Meter
INSTRUCTION MANUAL
AE 8 H/BT
Key Lock
Briefly press the RED Button on the top of the unit to turn the Key
Lock ON.
Briefly press the RED Button again to turn the Key Lock OFF again.
Volume
Press the p key to increase the volume.
Press the q key to decrease the volume.
The volume level will be displayed from 00 to 3.
Squelch
Func Key
Menu Key
Press the p key on the side of the radio to increase the Squelch setting and theq key on to decrease the Squelch setting. The Squelch
level will be displayed from 00 to 09. 00 is open status and 09 is
near the closed squelch. At maximum Squelch setting, ‘AT’ is selected
which represents an automatic (preset) level setting.
The Function key provides access to secondary (extended) keypadfunctions associated with the front panel keys. The secondary function
labels are printed below respective keys.
The Menu key provides access to the radio settings.
E/VFO Key[Enter/VFO]
Press the E/VFO key to select the VFO mode or confirm any selections.
Note: The receiver always selects the VFO mode each time it is turned
on.
AE 8 H/BT
INSTRUCTION MANUAL
9
ENGLISH
GENERAL OPERATION
Turning the unit On or Off
Press and hold the RED Button on the top of the unit to turn the unit
ON.
Press and hold the RED Button again to turn the unit OFF.
Control Knob
ENGLISH
The Control knob is used to change the current display option.
In VFO mode, rotate the Control knob to change the displayed frequency at the selected frequency steps. Rotate clockwise to increase
the frequency and counter clockwise to decrease the frequency.
In Menu mode, rotate the Control knob to change the selected setting.
In Channel memory mode, rotate the Control knob to step up or
down through the memories.
SELECTING FREQUENCIES
The receiver always selects the VFO mode when it is turned on. You can select frequencies using the Control Knob.
Rotate the Control knob to step up or down in frequency from the starting point. The
frequency will change in the selected frequency step.
• To change frequency in 1 MHz step, press the Func key, then use the Control knob to change the frequency. Func is displayed while the Function
mode is activate).
Note : The Func mode clears a few seconds after the last key press or control knob
change.
n Mode (AM,FM,WFM) Selection
By default, the receiver automatically selects the suitable modulation Mode used for
each band(see the Frequency Band chart for the default modes for each band).
10
INSTRUCTION MANUAL
AE 8 H/BT
ENGLISH
n Frequency Step Selection
By default, the receiver automatically selects the frequency Steps most commonly used
for each band (see the Frequency Band chart for the default Steps for each band).
To select a different step :
1) In VFO mode press STEP.
2) The following frequency steps are
available for your selection.
5 kHz
6.25 kHz (6.2 displayed)
8.33 kHz (8.3 displayed)
10 kHz
12.5 kHz
15 kHz
20 kHz
25 kHz
30 kHz
50 kHz
100 kHz
500 kHz
Auto
1
2
If Auto is selected the receiver will automatically select the appropriate default frequency Step for each band.
Note : 8.33 KHz step is available only within the air band. (108 - 135.99 MHz)
FREQUENCY BANDS
The Scanner supports the following Frequency Bands.
To select a band, repeat momentarily pressing the BANK BAND key until the preferred
band is selected.
Frequency Band
Start up Frequency
Default Mode
Default Step
66 MHz to 87.5 MHz
66 MHz
FM
25kHz
87.5 MHz to 108 MHz
87.5 MHz
WFM
100kHz
108 MHz to 135.975 MHz
118 MHz
AM
25kHz
136 MHz to 174.000 MHz
150 MHz
FM
25kHz
AE 8 H/BT
INSTRUCTION MANUAL
11
FREQUENCY SEARCH
ENGLISH
n Selected Band Search
Use the Search function to locate active frequencies in one or more bands
1) Press the E/VFO key to select VFO Mode.
(Note: the receiver automatically selects the VFO
mode when it is turned on).
2) Press the BAND key to select the required
Band. There are 4 factory preset Bands to
choose from (see Frequency Band Table).
3) Set the Squelch level using the Squelch
porq keys so that the noise just disappears.
4
3
1
2
5 6
4) Select a start frequency to Search from.
5) Press the SCAN SRCH key briefly. The ‘SRCH’ icon will be displayed and the
receiver will search the selected Band starting from the start frequency. Once the
end of the band is reached the Search continues at the beginning of the selected
Band.
6) To stop the Search, press the SCAN SRCH key again.
Note:
1) During the Search, press the BANK BAND key to move to the next Band.
2) To change the Search direction rotate the Control knob clockwise or counter
clockwise.
3) The receiver will stay on an active channel according to the Busy Timer settings in
the VFO Menu. If the Busy Timer is set to ‘5 Seconds’, the receiver will continue
searching after 5 seconds even if the channel is still busy. If the Busy Timer is set
to ‘Busy’, the receiver will remain on the busy frequency for as long as it stays
busy, then resume searching when the signal disappears.
12
INSTRUCTION MANUAL
AE 8 H/BT
n Full Band Search
The Full Search function searches the entire scanner frequency range for signals.
ENGLISH
1) Press the E/VFO key to select VFO Mode.
(Note: the receiver automatically selects the
VFO mode when it is turned on).
2) Set the Squelch level using the Squelch porq
keys so that the noise just disappears.
2
3) Press and hold the SCAN SRCH key for 2 seconds. The ‘SRCH’ icon will be displayed and the
receiver will Search the entire frequency range
of the receiver.
1
3 4
4) To stop the Search, press the SCAN SRCH key
again.
Note:
1) During the Search, press the BANK BAND key to move to the next Band.
2) To change the Search direction rotate the Control knob clockwise or counter
clockwise.
3) The receiver will stay on an active channel according to the Busy Timer settings
in the VFO Menu. If the Busy Timer is set to ‘5 seconds’, the receiver will continue
searching after 5 seconds even if the channel is still busy. If the Busy Timer is set
to ‘Busy’, the receiver remain on the busy frequency for as long as it stays busy,
then resume searching when the signal disappears.
n Dual Watch
The Dual Watch function lets you constantly
monitor two frequencies for activity.
1 4
To set the Dual Watch function:
1) Enter one of the required frequencies using
the Control knob,
2
2) Adjust the squelch so that the receiver is
muted.
3 6
3 6
3) Press Func DW.
AE 8 H/BT
INSTRUCTION MANUAL
13
4) Enter the second frequency using the Control knob.
ENGLISH
5) The Dual watch begins automatically. If a signal is received, the receiver will remain
on the active frequency for the duration of the ‘Busy Timer’ setting in the Menu
setup. If the ‘Busy Timer’ is set to Busy the receiver will stay on the active frequency.
6) To stay on an active frequency indefinitely or to stop the Dual Watch function press
Func DW again. The receiver will exit the Dual Watch function.
MEMORY BANKS
The scanner memory storage has a capacity of 00 locations. These are split and stored
into 10 banks. Each bank has 0 channel storage capability.
n How to Memorize Frequencies
The Memory area allows the user to manually store up to 200 individual frequencies.
The default memory banks are labelled 0 to 9.
STORING FREQUENCIES INTO THE MEMORIES
To store a frequency into one of the memories:
3 7
1) Press the E/VFO key to select VFO Mode.
2) Press the BANK BAND key to select the
required Band.
3) Select the frequency that you want to store
using the control knob.
1
4 8
4) Press Func MW to enter the Memory Write
mode.
5) The receiver will find and display an empty
memory bank and memory location
automatically.
2 6
4 5
6) If required, use the BANK BAND key to
select a new memory bank.
7) To change the memory location, rotate the control knob.
8) Press Func MW again to store the frequency.
14
INSTRUCTION MANUAL
AE 8 H/BT
RECALLING FREQUENCIES FROM THE MEMORIES
ENGLISH
1) Press the E/VFO key to select VFO Mode.
2) Press Func MR. The receiver will enter the Memory Read mode.
3) To step through the memory banks press the BANK BAND key.
Memory banks are numbered 0 to 9.
4) Select the required channel using the control knob.
CHANNEL SCAN
n Selected Bank Scan
Use the Scan function to locate active channels among the memorized channels in
one bank.
1) Press Func MR to select the Memory Read
mode.
2) Press Bank/Band to select the preferred memory
bank.
3) Set the squelch level to a point where the receiver
is just quiet.
4) Press SCAN/SRCH. The receiver will begin scanning the selected Band.
3
1
1
4
2
Note:
1) If a signal is received, the receiver will remain on the active channel for the duration of the ‘Busy Timer’ setting in the Menu setup. If the ‘Busy timer’ is set to Busy
the receiver will stay on the active channel for as long as the signal is present.
2) To change the bank while scanning, briefly press BANK/BAND key.
3) To change the scan direction while scanning, rotate the control knob clockwise
or counter clockwise.
n Full Bank Scan
The Full Bank Scan function scans the entire memorized channel range for signals.
1) Press Func MR to select the Memory Read mode.
2) Press Bank/Band to select the preferred memory
bank.
3) Set the squelch level to a point where the
receiver is just quiet.
4) Press and hold Scan/Srch for 2 seconds.
The receiver will begin scanning the entire full
Bands.
AE 8 H/BT
INSTRUCTION MANUAL
3
1
1
4
2
15
ENGLISH
Note:
1) If a signal is received, the receiver will remain on the active channel for the duration of the ‘Busy Timer’ setting in the Menu setup. If the ‘Busy timer’ is set to Busy
the receiver will stay on the active channel for as long as the signal is present.
2) To change the bank while scanning, briefly press BANK/BAND key.
3) To change the scan direction while scanning, rotate the control knob clockwise
or counter clockwise.
n Dual Watch
The Dual Watch function lets you constantly
monitor two channels.
3 5
To set the Dual Watch function:
1) Press Func MR to enter the Memory Read
3
Mode.
2) Press Bank/Band to select the preferred
7
memory bank.
4 7
1
3) Select one of the required channels using
5 2
the control knob, and adjust the squelch
level.
4) Press Func DW.
5) Enter the second frequency using the BANK/BAND and Control knob.
6) The Dual watch begins automatically. If a signal is received, the receiver will remain
on the active channel for the duration of the ‘Busy Timer’ setting in the Menu
setup. If the ‘Busy Timer’ is set to Busy the receiver will stay on the active channel.
7) To stay on an active frequency indefinitely or to stop the Dual Watch function press
Func DW again. The receiver will exit the Dual Watch function.
MENU SETTINGS
The Menu settings will vary depending on the selected mode.
1) Press the MENU Key to access the Menu
settings
2) Press the volume pq keys to step through the
Menu items.
3) Rotate the Control knob to change the values of
each Menu item.
4) Press the E/VFO key to confirm the change.
16
INSTRUCTION MANUAL
3
4
1
2
AE 8 H/BT
FUNCTION
Busy Timer
VALUES
DESCRIPTION
Determines how long the receiver will wait on a Busy, 5 Seconds
busy channel while Scanning or Searching. When
‘Busy’ is selected, the receiver will stay on the
busy channel as long as it remains busy.
Beep
Activates or deactivates the key-press beeps.
Delay
Determines how long the radio will wait on a 1-10 Seconds
frequency after a signal has disappeared while
scanning or Searching.
Attenuation
Reduces the receive sensitivity by -10dB.
ON, OFF
Delta
Offsets frequencies.
-5kHz, -10kHz,
-15kHz, OFF
Bluetooth
Compatible
Operation
Activates or deactivates the Bluetooth compat- ON, OFF
ible operation.
ENGLISH
n VFO Mode
ON, OFF
NOTE: Bluetooth compatible function works with AE 82 H-BT model only.
n Memory Read Mode
FUNCTION
MEANING
DESCRIPTION
CH CLr
Channel Clear
Erases the selected channel.
BK CLr
Bank Clear
Erases all the channels in the selected Bank.
MEM CLr
All Memory Clear
Erases all memories in the receiver.
NOTES for MEM CLEAR :
To erase ALL data from the memories
1) Press Menu, then use the Control Knob or the volume pqkeys to select
’MEM CLR.’
2) Press E/VFO. ‘dEF yES’ will be displayed.
3) To continue with the MEM Clear, press E/VFO again.
4) To cancel the MEM Clear, use the Control knob to select ‘dEF NO’ then press
E/VFO.
AE 8 H/BT
INSTRUCTION MANUAL
17
BLUETOOTH COMPATIBLE OPERATION (ONLY FOR AE 82 H-BT MODEL)
ENGLISH
To activate the paring between your receiver and your headset or any other external
Bluetooth equipment ;
1
1) Pressing E/VFO, turn on your receiver. On the LCD,
5
pairing (
) is displayed.
2) Make your headset or any other Bluetooth
equipment enter the pairing mode too.
3) Make sure that your receiver automatically confirms
“OK”.
4) Press MENU and step down to Bluetooth compat
4
1
ible (
) Mode.
4
5) Select Bluetooth compatible “ON” to start the
Bluetooth compatible operation.
TROUBLESHOOTING
If you experience problems with your AE 8 H or AE 8 H-BT, first check the battery
power level as low battery can cause problems such as weak reception and reduced
sound quality.
Then check the manual and receiver display to ensure that a function such as Lock or
Scan has not been activated by accident.
1 3
If these steps do not solve the problem, reset your unit as follows.
1. Partial Reset
1) Turn off your unit.
2) Press and hold the MENU and the STEP keys together.
3) Turn on your unit.
4) Memory Clear(MEM CLr) appears.
This will erase all the memory data from the channel
memory banks.
2
2
If you find problems not solved by this partial reset, try all reset as follows.
2. All Reset
1
1) Turn off your unit.
2) Press and hold the E/VFO and the STEP keys together.
3) Turn on your unit.
4) All clear (ALL CLr) appears.
This will not only erase all the memory data but also reset
all the basic operation data to the original factory default
2
settings. This should resolve most problems.
2
In case of further difficulties,
please consult your dealer or visit our website at www.alan-albrecht.info
18
INSTRUCTION MANUAL
3
AE 8 H/BT
SPECIFICATIONS
n General
ENGLISH
- Frequency coverage: 66-174 MHz
- Number of memory channels : 200 Units
- Frequency resolution : 5, 6.25, 8.33 *,10, 12.5, 15, 20, 25, 30, 50, 100, 500KHz & Auto.
*8.33kHz step works in 108-135.99MHz range only.
- Operation temperature range : -107C to +607C
- Reference frequency stability : 6 ppm 7C (-107C to +607C)
- Power supply requirement : AAA x 4 Ni-MH or ALKALINE
- Current drain
Standby (power saved) : 50mA typical
max. audio : 320mA typical
charging(at 9V DC) : 300mA typical
- Antenna connector : SMA (50 )
- Dimensions (proj. not included) : 56(W) x 116.5(H) x 35.8(D)mm
- Weight(w/o Battery) : 160g
*Specifications are subject to change without prior notice or obligation.
n Receiver
- Receive system : Double superheterodyne.
- Intermediate frequencies
1st : 19.65 MHz, 2nd : 450 KHz
- Sensitivity and squelch sensitivity (except spurious points):
FM (1 kHz/3.5 kHz Dev. 12dB SINAD)
66-87.5MHz: 0.5V
136-173.995MHz: 0.5uV
WFM (1 kHz/52.5 kHz Dev. 12dB SINAD)
87.5 - 108.000 MHz : 0.5uV
AM (1 kHz/30% MOD. 10dB SINAD)
108-135.995MHz: 0.56uV
- Selectivity
AM/FM : More than 15 kHz/-9dB
Less than 150 kHz/-60dB
WFM : More than 150 kHz/-6dB
- AF output power : 500mW typical at 40% distortion with
an 8 load
- Ext.speaker connector : 3-conductor 3.5(d) mm (1/5”) 8
AE 8 H/BT
INSTRUCTION MANUAL
19
DECLARATION OF CONFORMITY
ENGLISH
Where to find our collection of service hints and documentation. Our technical documentation is updated regularly. You can download the latest
versions of user manuals, technical documents and also the dual language
original Declaration of Conformity, as well as service hints or FAQ’s any
time from our server under
http://www.alan-albrecht.info
Service Address (for scanners sold in Germany)
PST professional support technologies GmbH
Breitscheider Weg 117a
D - 40885 Ratingen
The service hotline can be reached from the German fixed telephone
network (14 Cent per minute) or mobile network (55 Cent or less per minute) under 01805-0104
E-mail: [email protected]
Disposal of defective electronic items
The European WEEE Directive does not any more allow to
dispose any used electronic items via household trash bins. The
local communities provide containers for disposal of
electronic waste. Please use these facilities, it will be your
contribution to proper recycling of electronic material, and it is
free of charge for you!
European 2 years warranty
The distributor, dealer or retail shop warrants to the original retail purchaser of this product
that should this product or any part of it, under normal use and conditions, be proven defective in material or workmanship within years from the date of original purchase, such defects
will be repaired or replaced with new reconditioned product (at the company´s option) without charge for parts and repair labor. To obtain repair or replacement within terms of European
warranty rules, the product is to be delivered with proof of warranty coverage (e.g. a copy of
your bill of sale), specification of defect(s), to the distributor, dealer or his authorized repair
center. The warranty does not apply to any product or part there of which, in the opinion of the
company, has suffered or been damaged through alteration, improper installation,
mishandling, misuse, neglect or accident. Warranty does not apply to accessory parts or problems caused through not authorized or not recommended accessories like batteries, external
power supplies and over voltage caused through external power supplies, broken antennas
broken belt clips or damaged acrylic glass windows and cabinet parts.
© 010 Alan Electronics GmbH
20
INSTRUCTION MANUAL
AE 8 H/BT