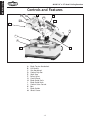
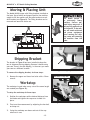
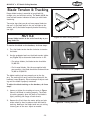
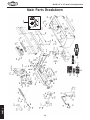
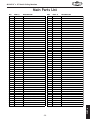
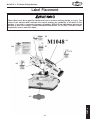
1
Model M1054
10" x 18" Metal Cutting Bandsaw
Manual Insert
(For Models Manufactured Since 4/10)
Phone #: (360) 734-3482 • Online Tech Support: [email protected] • Web: www.shopfox.biz
The Model M1054 is the same machine as the Model M1048 except for improvements to the headstock,
belt tension mechanism, vise, and other small changes. The Data Sheet and parts breakdowns in this
insert replace the corresponding sections in the M1048 manual. All other content in the Model M1048
owner's manual applies to this machine. Before operating your new machine, you MUST read and
understand this insert and the entire Model M1048 manual to reduce the risk of injury when using this
machine.
If you have any further questions about this manual insert or the differences between the Model M1054
and the Model M1048, contact Technical Support at (360) 734-3482 or email [email protected].
COPYRIGHT © October, 2010 BY WOODSTOCK INTERNATIONAL, INC.
#13340JB
WARNING: NO PORTION OF THIS MANUAL MAY BE REPRODUCED IN ANY SHAPE OR FORM WITHOUT
THE WRITTEN APPROVAL OF WOODSTOCK INTERNATIONAL, INC.
Printed in Taiwan
Model M1054 (Mfg. Since 4/10)
MACHINE
SPECIFICATIONS
© Woodstock International, Inc. • Phone #: (360) 734-3482 • Web: www.shopfox.biz
MOdEl M1054
10" x 18" METAl CuTTINg bANdSAw
Product Dimensions:
Weight .................................................................................................................................. 705 lbs.
Length/Width/Height ............................................................................................67 3⁄4 x 24 1⁄2 x 41 1⁄2 in.
Foot Print (Length/Width) ....................................................................................................... 47 x 21 in.
Shipping Dimensions:
Type ...........................................................................................................................Wood Slat Crate
Weight .................................................................................................................................. 770 lbs.
Length/Width/Height ...................................................................................................... 69 x 27 x 46 in.
Electrical:
Required Power Source .................................................................................. 220V-240V, Single-Phase, 60Hz
Minimum Circuit Size ................................................................................................................. 20 Amp
Switch ................................................................................................................... Push Button ON/OFF
Switch Voltage .............................................................................................................................220V
Cord Length ................................................................................................................................ 7 ft.
Cord Gauge .......................................................................................................................... 14 Gauge
Plug Included ................................................................................................................................ No
Recommended Plug Type ..............................................................................................NEMA L6-20 or 6-20
Motor:
Type ........................................................................................................ TEFC Capacitor Start Induction
Horsepower .............................................................................................................................1 1⁄2 HP
Voltage ......................................................................................................................................220V
Phase .............................................................................................................................. Single-Phase
Amps .......................................................................................................................................15.5A
Speed ................................................................................................................................. 1725 RPM
Cycle .......................................................................................................................................60 Hz
Power Transfer ................................................................................................................. Pulley + Gear
Bearings .............................................................................................................. Shielded & Lubricated
Main Specifications:
Operation Information
Blade Speeds ................................................................................................114, 196, 288, 377 FPM
Blade Length .................................................................................................................121 1⁄2 in.
Table Information
Table Length ..................................................................................................................... 30 in.
Table Width......................................................................................................................6 1⁄2 in.
Floor-To-Vise Height ......................................................................................................... 22 3⁄4 in.
Model M1054
Page 1 of 2
-2-
Model M1054 (Mfg. Since 4/10)
Cutting Capacities
Angle Cuts .................................................................................................................. 45–90 deg.
Vise Jaw Depth .................................................................................................................. 12 in.
Vise Jaw Height .................................................................................................................... 5 in.
Max. Capacity Rectangle Width at 90° ...................................................................................... 18 in.
Max. Capacity Rectangle Height at 90°...................................................................................... 10 in.
Max. Capacity Rectangle Height at 90° and Maximum Width .............................................................. 5 in.
Max. Capacity Round at 90° ................................................................................................... 10 in.
Max. Capacity Rectangle Width at 45° .....................................................................................9 3⁄8 in.
Max. Capacity Rectangle Height at 45°........................................................................................ 7 in.
Max. Capacity Round at 45° ..................................................................................................... 6 in.
Construction
Table Construction ..................................................................................... Precision-Ground Cast Iron
Stand Construction ................................................................................................ Pre-Formed Steel
Bow Construction ............................................................................................................ Cast Iron
Wheel Construction ......................................................................................................... Cast Iron
Base Construction ........................................................................................................... Cast Iron
Paint. .............................................................................................................................. Epoxy
Miscellaneous
Wheel Size ..................................................................................................................... 11 1⁄2 in.
Blade Guides Upper ......................................................................................................Ball Bearing
Blade Guides Lower ................................................................................. Ball Bearing + Carbide Guide
Coolant Capacity.......................................................................................................... 1 1⁄2 Gallons
Other Specifications:
ISO Factory ............................................................................................................................ ISO 9001
Country Of Origin ...................................................................................................................... Taiwan
Warranty................................................................................................................................. 2 Years
Serial Number Location .................................................................................... ID Label on Front of Machine
Assembly Time..................................................................................................................... 90 Minutes
Features:
Centralized control panel on top of saw bow
Heavy-duty all-steel 1-piece base
Adjustable hydraulic downfeed
Worm gear box has hardened and ground gears
Quick-release vise for fast job changes
Miter cutting ability
Blade wheels have heavy-duty ball bearings
Magnetic safety switch
Model M1054
Page 2 of 2
-3-
Model M1054 (Mfg. Since 4/10)
Parts Breakdown
38
39
41
59-12
37
36
40
59-8
59-6
59-11
59-1
59-2
128
129
132-1
59-10
134
42
43
44
50
51
72-4
72-3
132
133
48
49
45
46
47
53-1
123
124
125
57
58
58-1
214-2
214-1
200
210
211
216
214 217
218
307-1
307-7
223
307-2
212
212-1
219-1
310
313
308
219
226-1 220
224
225
317
311
328
327
312
206
207
208
213
222-1
222
221
226-2
302
304
301
226
318
305
306
321
322
323
314
324
315
326
325
316
-4-
6
303
8
319
320
315
309
205
204
300
307-3
214-5
214-6
213-1
307-4
307
64
60
201
202
215
71
72
7
307-6
74
73
209
214-4
214-3
63
72-2
130
54 53
307-5
61
62
72-1
52
55
122-6
126
59-4
59-5
56
122-5
122-1
122-3
122-2 122-4
59-7
59-3
59
75
117
121
122
59-9
9
305-6
305-7
305-1
305-4
305-2
305-3
305-5
Model M1054 (Mfg. Since 4/10)
615
616
614
617
358
348
349
359
362
365
366
623
360
363
339
361
370
354
352
351
340
353
345
345-1
343
375
350
341-1
341
608
609
374
30
31
35
34
32
33
612
625-3
26
24
15
13
613
14
625-6
625-5
613-8
613-7
613-6
613-5
613-4
613-2
613-3
613-1
12
625
332
331
625-4
626
330
625-7
625-2
606
610
610-1
611
611-1
376
612-1
16
342
371
372
373
355
29
604
605
364
624
357
368
369
620
356
367
377
603
625-1
337
336
335
338
334
333
054
329
-5-
M1
5
Model M1054 (Mfg. Since 4/10)
Parts List
REF PART #
DESCRIPTION
REF
PART #
DESCRIPTION
5
6
7
8
9
12
13
14
15
16
24
26
29
30
31
32
33
34
35
36
37
38
39
40
41
42
43
44
45
46
47
48
49
50
51
52
53
53-1
54
55
56
57
58
58-1
59
59-1
59-2
59-3
59-4
59-5
59-6
59-7
59-8
MODEL NUMBER LABEL
MACHINE ID LABEL
BLADE TENSION LABEL
CUTTING SELECTION
MOTOR LABEL
ELECTRICITY WARNING LABEL
VISE LEADSCREW WASHER 1/2"
VISE LEADSCREW NUT
VISE LEADSCREW
COMPRESSION SPRING
VISE LEADSCREW WASHER 12MM
VISE LEADSCREW BEARING
LEVER CAP
VISE QUICK RELEASE LEVER
VISE QUICK RELEASE HUB
FLAT WASHER 3/8
HEX BOLT 3/8-16 X 1-1/4
FLAT WASHER 12MM
VISE LEADSCREW PILLOW BLOCK
PHLP HD SCR M5-.8 X 8
CONTROL PANEL
FLAT HD SCR M6-1 X 12
CONTROL BOX
FLAT WASHER 6MM
HEX BOLT M6-1 X 12
CAP SCREW M8-1.25 X 10
LOCK WASHER 8MM
PRESS BOARD
HEX BOLT M10-1.5 X 60
LOCK WASHER 10MM
THREADED INSERT
CAP SCREW M8-1.25 X 20
FLAT WASHER 8MM
HEX NUT M16-2
BLADE WHEEL BASE
SET SCREW M6-1 X 16
BLADE WHEEL BASE WAY
TENSION SCALE
BLADE LEADSCREW
CONCAVE WASHER 16MM
TENSION INDICATION RING
THRUST BEARING 51203
BLADE TENSION HANDWHEEL
BLADE TENSION HANDLE
3 WAY VALVE ASSEMBLY
HOSE CLAMP 12MM
STRAIGHT CONNECTOR 1/4 NPT
L CONNECTOR
HOSE CLAMP 19MM
CUTTING FLUID HOSE 1/4"ID X 31-1/2"
3 WAY VALVE
STRAIGHT CONNECTOR 1/4 NPT
CAP SCREW M6-1 X 30
59-9
59-10
59-11
59-12
60
61
62
63
64
71
72
72-1
72-2
72-3
72-4
73
74
75
117
121
122
122-1
122-2
122-3
122-4
122-5
122-6
123
124
125
126
128
129
130
132
132-1
133
134
200
201
202
204
205
206
207
208
209
210
211
212
212-1
213
213-1
XM1054059-9
XM1054059-10
XM1054059-11
XPS68M
XM1054060
XPSS16M
XM1054062
XPVA32
XPSS16M
XM1054071
XM1054072
XM1054072-1
XPW03M
XM1054072-3
XPCAP04M
XPW03M
XPB04M
XPB87M
XPW01M
XM1054121
XM1054122
XM1054122-1
XM1054122-2
XM1054122-3
XPC800
XM1054122-5
XM1054122-6
XPB08M
XPW03M
XM1054125
XM1054126
XM1054128
XM1054129
XPN09M
XM1054132
XM1054132-1
XPN02M
XM1054134
XPLW06M
XPCAP61M
XM1054202
XM1054204
XPK136M
XM1054206
XPLW05M
XPB27M
XPSS09M
XM1054210
XPCAP129M
XM1054212
XPRIV001M
XM1054213
XM1054072-1
CUTTING FLUID HOSE 1/4"ID X 52"
CUTTING FLUID HOSE 1/4"ID X 12-1/2"
HOSE CLIP
PHLP HD SCR M6-1 X 10
SPEED INDICATOR LABEL
SET SCREW M8-1.25 X 10
MOTOR PULLEY
V-BELT A32
SET SCREW M8-1.25 X 10
SPINDLE PULLEY
MOTOR PULLEY COVER ASSEMBLY
KNOB BOLT M6-1 X 10
FLAT WASHER 6MM
BLADE COVER BRACKET
CAP SCREW M6-1 X 10
FLAT WASHER 6MM
HEX BOLT M6-1 X 10
HEX BOLT M8-1.25 X 15
FLAT WASHER 8MM
KEY 8 X 7 X 30
MOTOR 1HP 110/220V 60HZ
MOTOR FAN COVER
MOTOR FAN
CAPACITOR COVER
S CAPACITOR 800M 125V 1-3/4 X 3-3/8
MOTOR JUNCTION BOX
THERMAL OVERLOAD
HEX BOLT M6-1 X 20
FLAT WASHER 6MM
MOTOR BRACKET
MOTOR PLATE
SHAFT
CAP SCREW M10-1.5
HEX NUT M12-1.75
THREADED ROD END M10
KNOB
HEX NUT M10-1.5
GEARBOX ASSEMBLY 30:1 DRIVE
LOCK WASHER 10MM
CAP SCREW M10-1.5 X 20
DRIVE WHEEL
BLADE 1 X 1/32 X 121-1/2
KEY 8 X 8 X 30
DRIVE WHEEL WASHER
LOCK WASHER 12MM
HEX BOLT M12-1.75 X 30
SET SCREW M8-1.25 X 20
COLUMN
CAP SCREW M12-1.75 X 20
SCALE
RIVET 2 X 5MM
COVER
KNOB BOLT M6-1 X 10
XM1054005
XM1054006
XM1054007
XM1054008
XM1054009
XM1054012
XM1054013
XM1054014
XM1054015
XM1054016
XM1054024
XM1054026
XM1054029
XM1054030
XM1054031
XPW02
XPB24
XPW06M
XM1054035
XPS05M
XM1054037
XPFH02M
XM1054039
XPW03M
XPB02M
XPCAP52M
XPLW04M
XM1054044
XPB34M
XPLW06M
XM1054047
XPCAP14M
XPW01M
XPN13M
XM1054051
XPSS11M
XM1054053
XM1054053-1
XM1054054
XM1054055
XM1054056
XP51203
XM1054058
XM1054058-1
XM1054059
XM1054059-1
XM1054059-2
XM1054059-3
XM1054059-4
XM1054059-5
XM1054059-6
XM1054059-2
XM1054059-8
-6-
Model M1054 (Mfg. Since 4/10)
REF
PART #
DESCRIPTION
REF
PART #
DESCRIPTION
214
214-1
214-2
214-3
214-4
214-5
214-6
215
216
217
218
219
219-1
220
221
222
222-1
223
224
225
226
226-1
226-2
300
301
302
303
304
305
305-1
305-2
305-3
305-4
305-5
305-6
305-7
306
307
307-1
307-2
307-3
307-4
307-5
307-6
307-7
308
309
310
311
312
313
314
315
316
XM1054214
XM1054214-1
XM1054214-2
XM1054214-3
XPN03M
XM1054214-5
XPBHS35M
XPN08
XM1054216
XM1054217
XM1054218
XM1054219
XPR26M
XM1054220
XPB09M
XM1054222
XM1054222-1
XPN03M
XPLW04M
XM1054225
XM1054072-1
XPW02M
XPBHS35M
XM1054300
XPCAP100M
XPN01M
XM1054303
XPBHS09M
XM1054305
XM1054305-1
XM1054305-2
XPW03M
XPN01M
XPB52M
XPB04M
XPW03M
XM1054306
XM1054307
XM1054307-1
XM1054307-2
XM1054307-3
XM1054307-4
XPLW03M
XPBHS09M
XM1054307-7
XM1054308
XM1054309
XM1054310
XM1054311
XPCAP02M
XM1054313
XM1054314
XP608-2RS
XPR39M
SAW BOW
PIPE CONNECTOR 1/2 NPT
CUTTING FLUID HOSE
RUBBER FOOT M8-1.25 X 40
HEX NUT M8-1.25
FILTER
BUTTON HD CAP SCR M5-.8 X 10
HEX NUT 3/8-16
HANDLE
SHAFT
IDLER WHEEL
TAPERED ROLLER BEARING 6025
INT RETAINING RING 52MM
STEEL WASHER 16 X 30 X 3MM
HEX BOLT M8-1.25 X 20
BLADE COVER
FOAM PAD
HEX NUT M8-1.25
LOCK WASHER 8MM
REAR BLADE COVER
KNOB BOLT M6-1 X 10
FLAT WASHER 5MM
BUTTON HD CAP SCR M5-.8 X 10
HANDLE
CAP SCREW M8-1.25 X 15
HEX NUT M6-1
REAR BLADE GUARD
BUTTON HD CAP SCR M6-1 X 12
BRUSH ASSEMBLY
BRUSH SUPPORT BRACKET
BLADE BRUSH
FLAT WASHER 6MM
HEX NUT M6-1
HEX BOLT M6-1 X 35
HEX BOLT M6-1 X 10
FLAT WASHER 6MM
LOWER BLADE GUIDE BLOCK
VALVE ASSEMBLY
CUTTING FLUID VALVE
HOSE 6MM
HOSE FITTING
HOSE CLIP
LOCK WASHER 6MM
BUTTON HD CAP SCR M6-1 X 12
HOSE CLAMP 12MM
UPPER BLADE GUIDE BLOCK
SET SCREW M6-1 X 5
BEARING SHAFT
CARBIDE GUIDE
CAP SCREW M6-1 X 20
LONG ECCENTRIC SHAFT
SHORT ECCENTRIC SHAFT
BALL BEARING 608-2RS
EXT RETAINING RING 8MM
317
318
319
320
321
322
323
324
325
326
327
328
329
330
331
332
333
334
335
336
337
338
339
340
341
341-1
342
343
345
345-1
348
349
350
351
352
353
354
355
356
357
358
359
360
361
362
363
364
365
366
367
368
369
370
371
XM1054317
XM1054318
XPW04M
XM1054320
XPW01M
XPLW04M
XPB07M
XM1054072-1
XM1054325
XM1054326
XPLW03M
XPW03M
XPB39M
XPB15M
XPW07
XPN03M
XPN01M
XM1054334
XPB18M
XPLW02
XPS68M
XM1054338
XM1054339
XPS51M
XPW05M
XPN04M
XM1054342
XPCAP25M
XM1054345
XPW03M
XPLW06M
XPW04M
XPN02
XPW07
XPB07
XM1054353
XM1054354
XM1054355
XPW02
XPN08
XPCAP84M
XM1054359
XPSS01M
XM1054361
XM1054362
XPW04M
XPSS19M
XM1054365
XPW04M
XPCAP84M
XPW04M
XM1054369
XM1054370
XPB118M
GIB
BLADE GUIDE ARM
FLAT WASHER 10MM
BLADE GUIDE KNOB BOLT
FLAT WASHER 8MM
LOCK WASHER 8MM
HEX BOLT M8-1.25 X 25
KNOB BOLT M6-1 X 10
SAW DIRECTION LABEL
FRONT BLADE GUARD
LOCK WASHER 6MM
FLAT WASHER 6MM
HEX BOLT M6-1 X 50
HEX BOLT M8-1.25 X 40
FLAT WASHER 5/16
HEX NUT M8-1.25
HEX NUT M6-1
FILTER
HEX BOLT M6-1 X 15
LOCK WASHER 1/4
PHLP HD SCR M6-1 X 10
BASE
PIVOT SHAFT
PHLP HD SCR M4-.7 X 30
FLAT WASHER 4MM
HEX NUT M4-.7
SAFETY SWITCH
CAP SCREW M6-1 X 12
LIMIT SWITCH SUPPORT
FLAT WASHER 6MM
LOCK WASHER 10MM
FLAT WASHER 10MM
HEX NUT 5/16-18
FLAT WASHER 5/16
HEX BOLT 5/16-18 X 3/4
EXTENSION SPRING
SPRING ADJUSTING ROD
SPRING HANDLE BRACKET
FLAT WASHER 3/8
HEX NUT 3/8-16
CAP SCREW M10-1.5 X 35
BUSHING
SET SCREW M6-1 X 10
REAR VISE JAW
VISE FENCE LOCK KNOB
FLAT WASHER 10MM
SET SCREW M8-1.25 X 30
VISE LOCK KNOB BOLT
FLAT WASHER 10MM
CAP SCREW M10-1.5 X 35
FLAT WASHER 10MM
BUSHING
FRONT VISE JAW
HEX BOLT M8-1.25 X 45
-7-
Model M1054 (Mfg. Since 4/10)
REF
PART #
DESCRIPTION
REF
PART #
DESCRIPTION
372
373
374
375
376
377
603
604
605
606
608
609
610
610-1
611
611-1
612
612-1
613
613-1
613-2
613-3
XPN03M
XPSS16M
XM1054374
XPS05M
XM1054376
XPB14M
XPLW06M
XM1054604
XM1054605
XPB09M
XPW07
XM1054609
XM1054610
XM1054610-1
XPTLW08M
XM1054611-1
XM1054612
XPK20M
XM1054613
XPSS01M
XM1054613-2
XM1054613-3
HEX NUT M8-1.25
SET SCREW M8-1.25 X 10
ANGLE SCALE
PHLP HD SCR M5-.8 X 8
BASE
HEX BOLT M10-1.5 X 35
LOCK WASHER 10MM
PIVOT BRACKET SPACER
REAR PIVOT BRACKET
HEX BOLT M8-1.25 X 20
FLAT WASHER 5/16
POSITION BRACKET
PIVOT BRACKET
PIVOT SPACER
EXT TOOTH WASHER 10MM
SPANNER NUT M10-1.25
HANDWHEEL
KEY 5 X 5 X 15
WORK STOP SET
SET SCREW M6-1 X 10
DISTANCE SET ROD
THUMB SCREW
613-4
613-5
613-6
613-7
613-8
614
615
616
617
620
623
624
625
625-1
625-2
625-3
625-4
625-5
625-6
625-7
626
XPLW02
XM1054613-5
XM1054613-6
XPN02M
XPB32M
XPB73M
XPCAP13M
XPLW01
XM1054617
XPR07M
XM1054623
XM1054624
XM1054625
XM1054625-1
XM1054625-2
XM1054625-3
XM1054625-4
XPW06
XPS12
XM1054625-7
XM1054626
LOCK WASHER 1/4
SUPPORT ROD
DISTANCE SET BRACKET
HEX NUT M10-1.5
HEX BOLT M10-1.5 X 25
HEX BOLT M10-1.5 X 50
CAP SCREW M8-1.25 X 30
LOCK WASHER 5/16
CYLINDER UPPER BRACKET
EXT RETAINING RING 18MM
CYLINDER ASSEMBLY
PIVOT SHAFT
PUMP SET 1/8HP 110/220V
CUTTING FLUID TANK
HOSE 13X19-350MM
COUPLER PT1/2X1/4
PUMP 1/8HP 110/220V
FLAT WASHER 1/4
PHLP HD SCR 1/4-20 X 5/8
HOSE CLAMP 19MM
CONTROL BOX ASSEMBLY
-8-
MODEL M1048
10" X 18" METAL CUTTING
BANDSAW
OWNER'S MANUAL
Phone: (360) 734-3482 • Online Technical Support: [email protected]
COPYRIGHT © JULY, 2006 BY WOODSTOCK INTERNATIONAL, INC. REVISED AUGUST, 2007 (TR)
#8373PC
WARNING: NO PORTION OF THIS MANUAL MAY BE REPRODUCED IN ANY SHAPE OR FORM WITHOUT
THE WRITTEN APPROVAL OF WOODSTOCK INTERNATIONAL, INC.
Printed in Taiwan
�����������������������������������������������������������������������
��������������������������������������������������������������
����������������������������������������������������������������������
��������������������������������������������������������������������
������������������������
�����������������������������������������������������������������������
������������������������������������������������������������������������
�������������������������������������������������������������������
�����������������������������������������������������������������
����������������������������������������������������������������������
�����������������������������������������������
����������������������������������������������������������������
��������������������������������������������������������������������
�������
��������������������������������������������������������������������
�����������������������������������������������������������������������
����������������������������������������������������������������������
�������������������������������������
�� ����������������������������
�� ������������������������������������������������������������������
�� ����������������������������������������������������
������������������������������������������������������������������
������������������������������������������������������������������
��������������������������������������������������������������������
���������������������������������������������������������������������
��������������������������
SAFETY............................................................................................................6
Standard Safety Instructions ............................................................................. 6
Additional Safety Instructions for Bandsaws ........................................................... 8
OPERATIONS
MAINTENANCE
OPERATIONS ................................................................................................... 16
General .....................................................................................................16
Vise ..........................................................................................................16
Blade Guide Arms .........................................................................................18
Blade Selection ............................................................................................19
Blade Speed ................................................................................................20
Feed Rate ..................................................................................................20
Coolant System ............................................................................................21
Cutting Fluid ...............................................................................................22
Operation Tips .............................................................................................23
Bandsaw Accessories .....................................................................................23
SETUP
SETUP ........................................................................................................... 10
Unpacking ..................................................................................................10
Inventory ...................................................................................................10
Machine Placement .......................................................................................11
Cleaning Machine .........................................................................................11
Mounting to Shop Floor ..................................................................................12
Moving & Placing Unit ....................................................................................13
Shipping Bracket ..........................................................................................13
Workstop ...................................................................................................13
Chip Tray ...................................................................................................14
Feed Stop ...................................................................................................14
Recommended Adjustments .............................................................................14
Test Run ....................................................................................................15
ELECTRICAL
ELECTRICAL ......................................................................................................9
220V Operation ............................................................................................. 9
Extension Cords ............................................................................................ 9
Grounding ................................................................................................... 9
SAFETY
INTRODUCTION ..................................................................................................3
Woodstock Technical Support ............................................................................ 3
Specifications ............................................................................................... 3
Control Panel ............................................................................................... 5
INTRODUCTION
Contents
SERVICE
PARTS
USE THE QUICK GUIDE PAGE LABELS TO SEARCH OUT INFORMATION FAST!
INTRODUCTION
SAFETY
ELECTRICAL
SERVICE ......................................................................................................... 26
Troubleshooting ...........................................................................................26
Blade Change ..............................................................................................28
Blade Tension & Tracking................................................................................29
Blade Guide Bearings .....................................................................................30
Squaring Blade to Table..................................................................................31
Electrical Components ...................................................................................32
Model M1048 220V Wiring Diagram .....................................................................33
Blade Guides Parts Breakdown..........................................................................34
Blade Guides Parts List...................................................................................35
Drive Wheel Parts Breakdown ...........................................................................36
Drive Wheel Parts List ....................................................................................37
Main Parts Breakdown ....................................................................................38
Main Parts List .............................................................................................39
Main Parts List .............................................................................................40
Label Placement ..........................................................................................41
PARTS
SERVICE
MAINTENANCE
OPERATIONS
SETUP
MAINTENANCE ................................................................................................. 24
General .....................................................................................................24
Cleaning ....................................................................................................24
Lubrication .................................................................................................24
USE THE QUICK GUIDE PAGE LABELS TO SEARCH OUT INFORMATION FAST!
INTRODUCTION
Woodstock Technical Support
Your new SHOP FOX® 10" x 18" Metal Cutting Bandsaw has been specially designed to provide many
years of trouble-free service. Close attention to detail, ruggedly built parts and a rigid quality control
program assure safe and reliable operation.
Woodstock International, Inc. is committed to customer satisfaction. Our intent with this manual is to
include the basic information for safety, setup, operation, maintenance, and service of this product.
We stand behind our machines! In the event that questions arise about your machine, please contact
Woodstock International Technical Support at (360) 734-3482 or send e-mail to: tech-support@shopfox.
biz. Our knowledgeable staff will help you troubleshoot problems and process warranty claims.
If you need the latest edition of this manual, you can download it from http://www.shopfox.biz.
If you have comments about this manual, please contact us at:
Woodstock International, Inc.
Attn: Technical Documentation Manager
P.O. Box 2309
Bellingham, WA 98227
Specifications
Bandsaw Motor Size .................................................. 2HP, 15A, 220V, Single-Phase
Motor Speed ..................................................................................... 1,725 RPM
Power Transfer ............................................... V-Belt Drive and Worm-Gear Reduction
Angle Cuts ............................................................................................. 45-90°
Rear Vise Jaw Size ........................................................................... 121⁄2"W x 5"H
Maximum Rectangular Height Capacity .......................................................5" at 90°
Maximum Rectangular Width Capacity ................................................... 183⁄8" at 90°
Maximum Rectangular Height Capacity .......................................................7" at 45°
Maximum Rectangular Width Capacity .................................................... 93⁄8" at 45°
Maximum Round Capacity ..................................................................... 10" at 90°
Maximum Round Capacity ...................................................................... 6" at 45°
Table Size ............................................................................................ 22" x 8"
Floor To Cutting Height ..................................................................................23"
Coolant Capacity ................................................................................. 2-1⁄2 gal.
Footprint ............................................................................................ 47" x 19"
Overall Dimensions ..............................................................68" L x 24" W x 411⁄2" H
Blade Speeds ......................................................................114, 196, 288, 377 FPM
Blade Size .................................................................................... 1293⁄8" x 11⁄16"
Bearings ......................................................... Permanently-Lubricated Ball Bearings
Power Control .............................................................. Push Button ON/OFF Switch
Net Weight ..................................................................................... 770 lbs.
-3-
INTRODUCTION
M1048 10" x 18" Metal Cutting Bandsaw
INTRODUCTION
M1048 10" x 18" Metal Cutting Bandsaw
Controls and Features
A
K
I
G
H
M
J
B
L
F
C
D
M
E
Figure 1. M1048 Machine Identification.
A.
B.
C.
D.
E.
F.
G.
H.
I.
J.
K.
L.
M.
Blade Tension Handwheel
Lift Handle
Vise Handwheel
Coolant Drip Pan
Work Stop
Pulley Cover
Control Panel
Blade Guide Scale
Blade Guide Knob
Coolant Valve Control
Bow
Blade Guides
Wheel Covers
-4-
INTRODUCTION
M1048 10" x 18" Metal Cutting Bandsaw
Control Panel
A
B
C
F
D
E
Figure 2. M1048 control panel.
A. Coolant Pump Switch: Turns the coolant
pump ON.
B.
EMERGENCY STOP/OFF Button: Interrupts
power to the system and turns the motor
OFF. Twist the button until it pops out to
re-energize the system. Also works as a standard OFF button.
Note: The bandsaw has an automatic shutoff (limit switch) that turns the motor and
coolant pump OFF at the bottom of the
cut.
C. START Button: Turns the motor ON and
begins the sawing action.
D. Power Light: When lit, indicates that system
is energized and machine is ready to operate.
E.
Feed Rate Dial: Fine tunes the feed rate by
controlling the hydraulic valve. Range is from
0 being slowest to 9 being fastest.
F.
Feed Control Knob: Turning the knob to
the left lowers the bow at the feed rate you
have set. Turning the knob to the right locks
the bow in position.
-5-
M1048 10" x 18" Metal Cutting Bandsaw
SAFETY
SAFETY
READ MANUAL BEFORE OPERATING MACHINE.
FAILURE TO FOLLOW INSTRUCTIONS BELOW WILL
RESULT IN PERSONAL INJURY.
Indicates an imminently hazardous situation which, if not avoided, WILL
result in death or serious injury.
Indicates a potentially hazardous situation which, if not avoided, COULD
result in death or serious injury.
Indicates a potentially hazardous situation which, if not avoided, MAY
result in minor or moderate injury.
NOTICE
This symbol is used to alert the user to useful information about proper
operation of the equipment, and/or a situation that may cause damage
to the machinery.
Standard Safety Instructions
1.
READ THROUGH THE ENTIRE MANUAL BEFORE STARTING MACHINERY. Machinery presents serious
injury hazards to untrained users.
2.
ALWAYS USE ANSI APPROVED SAFETY GLASSES WHEN OPERATING MACHINERY. Everyday eyeglasses only have impact resistant lenses—they are NOT safety glasses.
3.
ALWAYS WEAR AN NIOSH APPROVED RESPIRATOR WHEN OPERATING MACHINERY THAT PRODUCES
DUST. Wood dust is a carcinogen and can cause cancer and severe respiratory illnesses.
4.
ALWAYS USE HEARING PROTECTION WHEN OPERATING MACHINERY. Machinery noise can cause
permanent hearing damage.
5.
WEAR PROPER APPAREL. DO NOT wear loose clothing, gloves, neckties, rings, or jewelry which may
get caught in moving parts. Wear protective hair covering to contain long hair and wear non-slip
footwear.
6.
NEVER OPERATE MACHINERY WHEN TIRED, OR UNDER THE INFLUENCE OF DRUGS OR ALCOHOL.
Be mentally alert at all times when running machinery.
7.
ONLY ALLOW TRAINED AND PROPERLY SUPERVISED PERSONNEL TO OPERATE MACHINERY. Make
sure operation instructions are safe and clearly understood.
8.
KEEP CHILDREN AND VISITORS AWAY. Keep all children and visitors a safe distance from the work
area.
9.
MAKE WORKSHOP CHILD PROOF. Use padlocks, master switches, and remove start switch keys.
-6-
M1048 10" x 18" Metal Cutting Bandsaw
10. NEVER LEAVE WHEN MACHINE IS RUNNING. Turn power off and allow all moving parts to come to
a complete stop before leaving machine unattended.
11. DO NOT USE IN DANGEROUS ENVIRONMENTS. DO NOT use machinery in damp, wet locations, or
where any flammable or noxious fumes may exist.
13. USE A GROUNDED EXTENSION CORD RATED FOR THE MACHINE AMPERAGE. Undersized cords overheat and lose power. Replace extension cords if they become damaged. DO NOT use extension cords
for 220V machinery.
14. ALWAYS DISCONNECT FROM POWER SOURCE BEFORE SERVICING MACHINERY. Make sure switch is
in OFF position before reconnecting.
15. MAINTAIN MACHINERY WITH CARE. Keep blades sharp and clean for best and safest performance.
Follow instructions for lubricating and changing accessories.
16. MAKE SURE GUARDS ARE IN PLACE AND WORK CORRECTLY BEFORE USING MACHINERY.
17. REMOVE ADJUSTING KEYS AND WRENCHES. Make a habit of checking for keys and adjusting
wrenches before turning machinery ON.
18. CHECK FOR DAMAGED PARTS BEFORE USING MACHINERY. Check for binding and alignment of
parts, broken parts, part mounting, loose bolts, and any other conditions that may affect machine
operation. Repair or replace damaged parts.
19. USE RECOMMENDED ACCESSORIES. Refer to the instruction manual for recommended accessories.
The use of improper accessories may cause risk of injury.
20. DO NOT FORCE MACHINERY. Work at the speed for which the machine or accessory was designed.
21. SECURE WORKPIECE. Use clamps or a vise to hold the workpiece when practical. A secured
workpiece protects your hands and frees both hands to operate the machine.
22. DO NOT OVERREACH. Keep proper footing and balance at all times.
23. MANY MACHINES WILL EJECT THE WORKPIECE TOWARD THE OPERATOR. Know and avoid conditions that cause the workpiece to "kickback."
24. ALWAYS LOCK MOBILE BASES (IF USED) BEFORE OPERATING MACHINERY.
25. BE AWARE THAT CERTAIN DUST MAY BE HAZARDOUS to the respiratory systems of people and
animals, especially fine dust. Make sure you know the hazards associated with the type of dust you
will be exposed to and always wear a respirator approved for that type of dust.
-7-
SAFETY
12. KEEP WORK AREA CLEAN AND WELL LIT. Clutter and dark shadows may cause accidents.
M1048 10" x 18" Metal Cutting Bandsaw
Additional Safety Instructions for Bandsaws
SAFETY
READ and understand this
entire instruction manual
before using this machine.
Serious personal injury
may occur if safety and
operational information is
not understood and followed. DO NOT risk your
safety by not reading!
USE this and other machinery with caution
and respect. Always consider safety first,
as it applies to your individual working
conditions. No list of safety guidelines can
be complete—every shop environment is
different. Failure to follow guidelines could
result in serious personal injury, damage
to equipment or poor work results.
1.
BLADE CONDITION. Do not operate with dull, cracked or badly worn blade. Inspect blades for cracks
and missing teeth before each use.
2.
HAND PLACEMENT. Never position fingers or thumbs in line with the cut. Hands could be crushed
by falling machine components or cut by the blade.
3.
ENTANGLEMENT HAZARDS. Do not operate this bandsaw without blade guard in place. Otherwise,
loose clothing, jewelry, long hair and work gloves can be drawn into working parts.
4.
BLADE REPLACEMENT. When replacing blades, make sure teeth face toward the workpiece. Wear
gloves to protect hands and safety glasses to protect eyes, and always disconnect from power.
5.
WORKPIECE HANDLING. Always support the workpiece with table, vise, or other support fixture.
Flag long pieces to avoid a tripping hazard. Never hold the workpiece with your hands during a
cut.
6.
LOSS OF STABILITY. Unsupported workpieces may jeopardize machine stability and cause the
machine to tip and fall, which could cause serious injury.
7.
POWER INTERRUPTION. Unplug machine after power interruption. Machines without magnetic
switches can start up after power is restored.
8.
FIRE HAZARD. Use EXTREME CAUTION if cutting magnesium. Using the wrong cutting fluid will lead
to chip fire and possible explosion.
9.
CUTTING FLUID SAFETY. Always follow manufacturer’s cutting fluid safety instructions. Pay particular attention to contact, contamination, inhalation, storage and disposal warnings. Spilled cutting fluid is a slipping hazard and a toxicity hazard.
10. ATTENTION TO WORK AREA. Never leave a machine running and unattended. Pay attention to the
actions of others in the area to avoid unintended accidents.
11. HEARING PROTECTION & HAZARDS. Noise generated by blade and workpiece vibration, material
handling, and power transmission can cause permanent hearing loss over time and interfere with
communication and audible signals. Always wear hearing protection.
12. HOT SURFACES. Due to friction, the workpiece, chips, and some machine components can be hot
enough to burn you.
-8-
M1048 10" x 18" Metal Cutting Bandsaw
ELECTRICAL
220V Operation
The Model M1048 is wired for 220V operation. Always
connect this machine to a dedicated circuit (wire, breaker, plug, receptacle) with a verified ground, using the
recommended circuit size and plug/receptacle listed at
the bottom of this page.
Electrocution or severe shock could
occur if machine is not grounded.
ELECTRICAL
Never replace a circuit breaker with one of higher amperage without consulting a qualified electrician to ensure
compliance with wiring codes. If you are unsure about
the wiring codes in your area or plan to connect your
machine to a shared circuit, you may create a fire hazard—consult a qualified electrician to reduce this risk.
Extension Cords
We do not recommend using an extension cord for 220V
operation. When it is necessary to use an extension cord,
use the following guidelines:
•
•
•
•
Use cords rated for Standard Service
Never exceed a length of 50 feet
Ensure cord has a ground wire and pin
Do not use cords in need of repair
Replacing an existing circuit breaker
with one rated for higher amperage
may result in a fire. Get help from an
electrician if your circuit is too small
for the machine.
Grounding
This machine must be grounded! Verify that any existing electrical outlet and circuit you intend to plug into
is actually grounded. If it is not, it will be necessary to
run a separate copper grounding wire, of the appropriate size, from the outlet to a known ground. Under no
circumstances should you connect your machine to an
ungrounded power source or electrocution or severe
shock could occur.
6-20P
6-20R
Figure 3. Plug & receptacle examples.
Operating Voltage
Amp Draw
Min. Circuit Size
Plug/Receptacle
Extension Cord
220V Operation
15 Amps
20A
NEMA 6-20
12 Gauge
-9-
M1048 10" x 18" Metal Cutting Bandsaw
SETUP
Unpacking
The SHOP FOX® Model M1048 has been carefully packaged for safe transporting. If you notice the machine has
been damaged, please contact your authorized SHOP
FOX® dealer immediately.
Inventory
The following is a description of the main components
shipped with the SHOP FOX® Model M1048. Lay the components out to inventory them.
SETUP
Note: Some parts and hardware may already be installed
on the machine. Make sure to check the machine when
you use this inventory list.
If any parts are missing, examine the packaging for the missing parts. For any missing
parts, find the part number in the back
of this manual and contact Woodstock
International, Inc. at (360) 734-3482 or at
[email protected]
SUFFOCATION HAZARD!
Immediately discard all
plastic bags and packing materials to eliminate choking/suffocation
hazards for children and
animals.
Box Inventory (Figure 4)
Qty
A. Model M1048 Metal Cutting Bandsaw...................1
Hardware and Tools (Not Shown)
—Chip Tray .................................................1
—Triagle Screw 5⁄16-18 x 3⁄4" .............................1
—Flat Washer 5⁄16 ..........................................1
—Hex Nut 5⁄16-18 ...........................................1
—Hex Bolts M12-1.75 x 50 (Leveling) ...................4
—Hex Nuts M12-1.75 (Leveling) .........................4
—Handwheel ................................................1
—Knob .......................................................1
Figure 4. Model M1048 inventory.
-10-
UNPLUG-power cord before you do
any assembly or adjustment tasks!
Otherwise, serious personal injury to
you or others may occur!
M1048 10" x 18" Metal Cutting Bandsaw
Machine Placement
•
Floor Load: This machine distributes a
heavy load in a small footprint. Some
residential floors may require additional
bracing to support both machine and
operator.
•
Working Clearances: Consider existing and
anticipated needs, size of material to be
processed through the machine, and space
for auxiliary stands, work tables or other
machinery when establishing a location for
your bandsaw.
•
Cleaning Machine
The table and other unpainted parts of your
Bandsaw are coated with a waxy grease that
protects them from corrosion during shipment.
Clean this grease off with a solvent cleaner or
citrus-based degreaser. DO NOT use chlorinebased solvents such as brake parts cleaner or
acetone—if you happen to splash some onto a
painted surface, you will ruin the finish.
Lighting: Lighting should be bright enough
to eliminate shadow and prevent eye strain.
USE helpers and power
lifting equipment to
lift this 10" x 18" Metal
Cutting
Bandsaw.
Otherwise, serious personal injury may occur.
ALWAYS work in wellventilated areas far from
possible ignition sources
when using solvents to
clean machinery. Many
solvents are toxic when
inhaled or ingested. Use
care when disposing
of waste rags and
towels to be sure they
DO NOT create fire or
environmental hazards.
MAKE your shop “child
safe.” Ensure that your
workplace is inaccessible
to youngsters by closing
and locking all entrances
when you are away. NEVER
allow untrained visitors in
your shop when assembling, adjusting or operating equipment.
-11-
SETUP
NEVER use gasoline or
other petroleum-based
solvents to clean with.
Most have low flash
points, which make them
extremely
flammable.
A risk of explosion and
burning exists if these
products are used. Serious
personal injury may occur
if this warning is ignored!
M1048 10" x 18" Metal Cutting Bandsaw
Mounting to Shop Floor
Although not required, we recommend that you mount
your new machine to the floor. Because this is an
optional step and floor materials may vary, floor mounting hardware is not included. Generally, you can either
bolt your machine to the floor or mount it on machine
mounts. Both options are described below. Whichever
option you choose, it will be necessary to use a precision
level to level your machine.
Bolting to Concrete Floors
SETUP
Lag shield anchors with lag bolts (Figure 5) and anchor
studs (Figure 6) are two popular methods for anchoring
an object to a concrete floor. We suggest you research
the many options and methods for mounting your
machine and choose the best that fits your specific application.
Figure 5. Typical lag shield anchor and lag
bolt.
NOTICE
Anchor studs are stronger and more permanent alternatives to lag shield anchors; however, they will stick
out of the floor, which may cause a tripping hazard if
you decide to move your machine at a later point.
Using Machine Mounts
Using machine mounts, shown in Figure 7, gives the
advantage of fast leveling and vibration reduction. The
large size of the foot pads distributes the weight of the
machine to reduce strain on the floor.
Figure 6. Typical anchor stud.
Figure 7. Machine mount example.
-12-
M1048 10" x 18" Metal Cutting Bandsaw
Moving & Placing Unit
The Model M1048 comes with lifting brackets installed on
the base. Use a forklift and straps rated for the machine
weight to lift the machine off the pallet and onto a suitable location (see Figure 8). The lifting brackets can be
removed and saved for future use.
The Model M1048 is
an extremely heavy
machine. Serious personal injury may occur if
safe moving methods are
not followed. To be safe,
you will need assistance
and power equipment
when moving the shipping crate and removing
the machine from the
crate.
SETUP
Figure 8. M1048 lifting points.
Shipping Bracket
The bracket in Figure 9 has been installed to keep the
saw in alignment during shipping. Remove it before using
your saw. Store it for safe keeping, in the event you move
your saw to a different location.
Figure 9. Shipping bracket.
To remove the shipping bracket, do these steps:
1.
Remove the upper and lower hex bolts with a 12mm
wrench.
Hex Bolt & Stop Nut
Workstop
Cap screw
The workstop is used when many cuts of the same length
are needed (see Figure 10).
Arm
To setup the workstop do these steps:
1.
Position the workstop rod the desired distance from
the blade and tighten the cap screw to hold it in
place.
2.
Fine tune the measurement by adjusting the hex bolt
and stop nut.
3.
Swing the workstop arm down and out of the way
when not in use.
-13-
Workstop Rod
Figure 10. Workstop assembly.
M1048 10" x 18" Metal Cutting Bandsaw
Chip Tray
The chip tray fits over the lip of the base as illustrated in
Figure 11.
Feed Stop
Depending on how the Model M1048 was shipped, it may
be necessary to adjust the feed stop before the test run.
The blade should not make contact with any part of the
vise assembly.
To adjust the feed stop bolt, do these steps:
SETUP
1.
Adjust the feed stop bolt and jam nut (Figure 12),
so the bandsaw blade teeth are 1⁄16" below the vise
table surface.
Recommended
Adjustments
Figure 11. Chip tray installation.
Feed Stop
The adjustments listed below have been performed at
the factory. However, because of the many variables
involved with shipping, we recommend that you at least
verify the following adjustments to ensure accurate cutting results.
Jam Nut
Step-by-step instructions on verifying these adjustments
can be found in the SERVICE section.
Figure 12. Feed stop.
Factory adjustments that should be verified:
1.
Blade Tracking (Page 29).
2.
Blade Guide Bearings (Page 30).
-14-
M1048 10" x 18" Metal Cutting Bandsaw
Test Run
Complete this process once you have familiarized yourself
with all instructions in this manual.
To test run the bandsaw, do these steps:
Read the entire instruction manual.
2.
Make sure all tools and foreign objects have been
removed from the machine.
3.
Put on safety glasses and secure loose clothing or
long hair.
4.
Connect the bandsaw to power.
5.
Raise the bandsaw and close the feed control knob
to keep the saw in place.
6.
Start the bandsaw while keeping your finger near
the EMERGENCY STOP/OFF button (Figure 13) at all
times during the test run. The bandsaw should run
smoothly with little or no vibration.
Note: If the EMERGENCY STOP/OFF button is
pressed, it needs to be twisted until it pops out or
the bandsaw will not start.
— Immediately turn the bandsaw OFF if you suspect any problems, and refer to Page 26 to
troubleshoot/fix any problems before starting the
bandsaw again.
— If the source of an unusual noise or vibration is
not readily apparent, contact our technical support for help at (360) 734-3482 or contact us
online at [email protected].
7.
Projectiles thrown from the machine
could cause serious eye injury. Wear
safety glasses during assembly and
operation.
SETUP
1.
Loose hair and clothing could get
caught in machinery and cause serious
personal injury. Keep loose clothing
rolled up and long hair tied up and
away from machinery.
E-STOP/OFF Button
ON
Feed control knobs
Push the emergency stop button to test safety shutoff.
Figure 13. Control panel.
-15-
M1048 10" x 18" Metal Cutting Bandsaw
OPERATIONS
General
The Model M1048 will perform many types of operations
that are beyond the scope of this manual. Many of these
operations can be dangerous or deadly if performed
incorrectly.
The instructions in this section are written with the
understanding that the operator has the necessary knowledge and skills to operate this machine. If at any time
you are experiencing difficulties performing any operation, stop using the machine!
OPERATIONS
If you are an inexperienced operator, we strongly recommend that you read books, trade articles, or seek training
from an experienced bandsaw operator before performing
any unfamiliar operations. Above all, your safety should
come first!
READ and understand this entire instruction manual before using this machine.
Serious personal injury may occur if
safety and operational information is not
understood and followed. DO NOT risk
your safety by not reading!
Always turn the saw OFF and allow the blade to come
to a complete stop before using the vice! Failure to
follow this caution may lead to injury.
Vise
The vise has a quick release feature that allows jaw width
to be quickly adjusted when changing from one sized material to another.
To rapidly change the vise jaw gap, do these steps:
1.
Turn the handwheel counterclockwise to relieve any
pressure on the vise jaw.
2.
Pull or push the jaw in the desired direction.
3.
Finish tightening the jaw against the workpiece with
the handwheel.
Note: Figure 14 shows correct methods of holding
different workpiece shapes.
-16-
Figure 14. Workholding options by
material shape.
M1048 10" x 18" Metal Cutting Bandsaw
The vise can be adjusted to cut any angle from a straight
90 degree cut-off, to a 45 degree angle by loosening the
two vise lock handles. Positive stops at 90° and 45° allow
you to quickly return the rear jaw to either angle. Angles
between 90° and 45° can be read using the scale on the
side of the vise table. Use a combination square or bevel
protractor if higher precision is required when finding
these angles.
Vise Lock Handle
To adjust the positive stops, do these steps:
1.
Check the current vise jaw-to-blade angle with a
machinist square (see Figure 15).
2.
If the angle is not 90°, loosen the vise lock handle
then adjust the set screw as needed to set the positive stop to 90° (see Figure 16).
3.
With the rear vise jaw making contact with the positive stop, tighten the rear vise jaw and re-check the
angle.
4.
Loosen the rear vise lock handle and swing the rear
jaw until it reaches the 45° positive stop.
5.
Tighten the rear jaw and check the angle.
6.
If the angle is not at 45°, loosen the vise jaw and
adjust the set screw as needed to set the positive
stop to 45°.
7.
With the rear vise jaw making contact with the positive stop, tighten the rear vise jaw and re-check the
angle.
8.
After the final angle has been chosen, loosen the
lock handle in Figure 17 on the opposite jaw so the
jaw can float, and match the angle of the workpiece
and rear jaw.
Rear Vise Jaw
45° Stop
90° Stop
Figure 16. Positive stop adjustments.
Vise Lock Handle
Tighten the vise against the workpiece then tighten
the jaw lock handle.
Figure 17. Front vise jaw lock handle.
-17-
OPERATIONS
9.
Figure 15. Squaring vise to blade.
M1048 10" x 18" Metal Cutting Bandsaw
Blade Guide Arms
The blade guide bearings are mounted on the front and
rear arms. The rear arm is adjustable and should be set as
close to the workpiece as possible. This will help ensure
straight cuts by keeping the blade from twisting and drifting off of the cut line.
Knob
Blade Guides
To adjust the rear blade guide arm:
Loosen the knob shown in Figure 18 and slide the rear
blade guide as close to the workpiece as possible, then
tighten the knob.
The front blade guide arm has a self-adjusting wire brush
that makes contact with the blade to help clear away chips
and extend blade life (see Figure 19).
Figure 18. Blade guides.
OPERATIONS
Blade Brush
Figure 19. Blade brush.
-18-
M1048 10" x 18" Metal Cutting Bandsaw
Blade Selection
The Model M1048 uses 1293⁄8" x 11⁄16" bandsaw
blades.
Selecting the right blade for the job depends on
a variety of factors, such as the type of material being cut, hardness of the material, material
shape machine capability, and operator technique.
The chart below is a basic starting point for
choosing blade type based on teeth per inch (TPI)
for variable tooth pitch blades and for standard
raker type bi-metal blades/HSS blades. However,
for exact specifications of bandsaw blades, contact the blade manufacturer.
To select the correct blade TPI do these steps:
1.
2.
Refer to the "Material Width/Diameter"
row of the blade selection chart in Figure
20 and read across to find your workpiece
thickness you need to cut.
3.
Refer to the "Material Shapes" row and find
the shape and material to be cut.
4.
In the applicable row, read across to the
right and find the box where the row and
column intersect. Listed in the box is the
minimum TPI recommended for the variable tooth pitch blades.
5.
The "Cutting Speed Rate Recommendation"
section of the charts offers guidelines for
various metals, given in feet per minute
(speed FPM) and meters per minute in
parenthesis. Choose the speed closest to
the number shown in the chart.
Measure the material thickness. This measurement is the length of cut taken from
where the tooth enters the workpiece,
sweeps through, and exits the workpiece.
Material Width/Diameter
Teeth Per Inch Variable Pitch Blades
���������������
�� ��
��
��� ���
���
���
���
���
���
���
����
� �� �
�� � �
�
���
���
���
���
���
���
���
���
������
�������
������
�������
�
���
�
�
��
��
��
��
��
��
��
��
��
��
���������������������������������
��������
���������
�������
��������
���������
�������
��������
������
�����
�������
����������
����������
���
����
�����
�����
�����
�����
�������
���������
����������
����������
������
���������
����
����
�������
���������
���������
����������
�������� �������
����������
�����
������
�����
�������
����������
���������
�������
��������
���������
�������
������� ��������������
���������� ���������������
�������
���������
����������
�������
���������
����
���������
�������
���������
������
���������
�����
���������
����������
�������
���������
�������
����������
���������
�����
���������
��������
����������
���
����
���������
����������
�������
����������
���������
���������
���
����
�������������
����������
�������
���������
����������
����������
�������
����������
��������
���
����
Figure 20. Model M1048 Blade selection and speed chart.
-19-
OPERATIONS
Material Shapes
M1048 10" x 18" Metal Cutting Bandsaw
Blade Speed
The Model M1048 has four speed settings—114, 196, 288,
and 377 feet per minute (FPM). Refer to the chart on
Page 19 for cutting speed recommendations by material
type.
To change blade speeds, do these steps:
1.
UNPLUG THE BANDSAW!
2.
Open the belt cover.
3.
With one hand, support the weight of the motor.
With the other hand, loosen the belt tension knob
(see Figure 21). The motor will drop and the V-belt
will slacken.
4.
Move the V-belt to the desired pulley combination
(see Figure 22).
196
5.
Lift the motor to tension the belt and tighten the
belt tension knob.
377
OPERATIONS
6.
Close the belt cover.
Figure 21. Belt tension knob.
114
288
Drive Wheel
Motor
Figure 22. V-belt positions in FPM.
Feed Rate
The speed at which the saw blade will cut through a
workpiece is controlled by blade type, feed rate, and
feed pressure. The feed rate is controlled by two knobs
on the control panel.
Note: If a lubricant is used on the cut, the feed rate can
be increased by approximately 15%.
To set the feed rate, do these steps:
ENTANGLEMENT HAZARD! DO NOT
operate bandsaw with pulley cover
open. Personal injury could occur.
1.
Raise the bow to the highest position.
2.
Set the "Feed Rate Dial" in Figure 23 to the desired
feed rate—0 is the slowest, 9 is the fastest.
3.
Turn the feed control knob to the left to lower the
bow at the feed rate you have set. Turning the knob
to the right locks the bow in position.
Feed Rate Dial
Feed Control Knob
Continued on next page
Figure 23. Feed rate controls.
-20-
M1048 10" x 18" Metal Cutting Bandsaw
4.
Look for the following signs to determine the best
feed rate setting for your workpiece.
• If you get warn tightly-curled shavings, that are
brown to black in color, you are using too much
downward pressure.
• Blue looking chips are from extreme heat caused
by high blade speed.
• Thin powder-like chips are from insufficient feed
pressure. This will dull your blade faster.
• The best cut and feed rate will give you evenly
shaped spiraled-curled chips with very little color
change, if any at all.
Coolant System
This bandsaw has a built-in coolant system that extends
the life of your bandsaw blades by lowering the temperature of the blade and workpiece when cutting.
Figure 24. Coolant system reservoir and
cover.
Coolant Control Valve
See Cutting Fluid on Page 22 for additional information.
To use the coolant system do these steps:
Access the reservoir by removing the rear panel on
the base (see Figure 24).
2.
Thoroughly clean and remove any foreign material
that may have fallen inside the reservoir during shipping.
Figure 25. Coolant control valve.
3.
Fill the reservoir with your chosen cutting fluid solution and replace the rear panel.
NOTICE
4.
Make sure the coolant control valve is turned OFF.
5.
Turn the coolant pump switch ON before making
your cut.
6.
Adjust the valve on the coolant hose to control the
flow of coolant (see Figure 25). Make sure that the
pressure is not so high that coolant spills on the floor
and creates a slipping hazard.
7.
When the bandsaw reaches the bottom of the cut,
the motor and coolant system will shut OFF.
-21-
Keep the tray chip screen clear so coolant can recycle to the pump reservoir.
NEVER operate the pump with the
reservoir below the low mark or you
will over-heat the pump and void your
warranty!
OPERATIONS
1.
M1048 10" x 18" Metal Cutting Bandsaw
Cutting Fluid
NEVER attempt to cut magnesium
when using soluble oils or emulsions (oil-water solutions) as a
cutting fluid! The water in the
solution will increase the risk of an
accidental magnesium-chip fire.
For cutting magnesium alloys, use
a specific cutting fluid intended
for magnesium.
While simple in concept and function, many issues must
be taken into account and addressed to find and use the
correct cutting fluid. Always follow all product warnings
and contact the fluid manufacturer for unanswered questions.
Use the selections below to choose the appropriate
cutting fluids:
OPERATIONS
•
•
•
For cutting low alloy, low carbon, and general-purpose category metals with a bi-metal blade—use a
water soluble cutting fluid.
For cutting stainless steels, high carbon, and high
alloy metals, brass, copper and mild steels—use
"Neat Cutting Oil" (commonly undiluted mineral oils)
that have extreme pressure additives (EP additives).
For cutting cast iron, cutting fluid is not recommended.
Remember: Too much flow at the cutting fluid nozzle
will make a mess and can make the work area unsafe;
and not enough fluid at the cut will heat the blade, causing the blade teeth to load up and break.
Adjust the flow rate lever so the coolant will cool and
lubricate the blade, and flush the chips away so they do
not stick to the blade. If the chips build up on the blade,
eventually they will bind and skid in the next cut, breaking blade teeth, and damaging the bandsaw wheels.
-22-
BIOLOGICAL and POISON
HAZARD!
The reservoir on this machine is designed
to store cutting fluid. During storage
some fluids grow dangerous microbes,
or due to the collection of toxic metal
chips in the fluid, the fluid can become a
potent and extremely poisonous solution
to humans and animals.
USE the correct personal protection
equipment when handling cutting fluids
to prevent infections and poisoning.
USE a good bactericide and fugicide for
additional protection.
FOLLOW federal, state, and the fluid
manufacturer requirements to properly
dispose of cutting fluid when it becomes
unsafe.
NOTICE
Throughly clean and flush coolant system when switching between coolant
types to prevent possible contamination.
M1048 10" x 18" Metal Cutting Bandsaw
Operation Tips
The following tips will help you safely and effectively
operate your bandsaw, and help you get the maximum
life out of your saw blades.
Tips for horizontal cutting:
Use the work stop to quickly and accurately cut
multiple pieces of stock to the same length.
•
Clamp the material firmly in the vise jaws to ensure
a straight cut through the material and use the
quick release vise feature to speed production.
•
Let the blade reach full speed before engaging the
workpiece.
•
Never start a cut with the blade in contact with the
workpiece.
•
Examine chip color and form for signs of proper feed
and speed rates.
•
Keep drains free of chips for rapid return of coolant
to the coolant pump.
•
Wait until the blade has completely stopped before
removing the workpiece from the vise, and avoid
touching the cut end—it could be very hot!
•
Support long pieces so they won't fall when cut, and
flag the ends to alert passers-by of potential danger.
•
Adjust the blade guides as close as possible to the
workpiece to minimize side-to-side blade movement.
•
Use coolant when possible to increase blade life.
NOTICE
Loosen blade tension at the end of each day to prolong blade life.
-23-
The following bandsaw accessories may
be available through your local Woodstock
International Inc. Dealer. If you do not
have a dealer in your area, these products are also available through online
dealers. Please call or e-mail Woodstock
International Inc. Customer Service to get
a current listing of dealers at: 1-800-5458420 or at [email protected].
Figure 26. Bandsaw blades.
D3660—1293⁄8"
D3661—1293⁄8"
D3662—1293⁄8"
D3663—1293⁄8"
D3664—1293⁄8"
D3665—1293⁄8"
D3666—1293⁄8"
x
x
x
x
x
x
x
11⁄16"
11⁄16"
11⁄16"
11⁄16"
11⁄16"
11⁄16"
11⁄16"
x
x
x
x
x
x
x
.035
.035
.035
.035
.035
.035
.035
10 TPI Raker
14 TPI Raker
3-4 VP
4-6 VP
5-8 VP
6-10 VP
8-12 VP
OPERATIONS
•
Bandsaw
Accessories
M1048 10" x 18" Metal Cutting Bandsaw
MAINTENANCE
General
Regular periodic maintenance on your SHOP FOX®
Model M1048 will ensure its optimum performance. Make
a habit of inspecting your machine each time you use it.
Check for the following conditions and repair or
replace when necessary:
•
•
•
•
•
•
•
Loose mounting bolts.
Damaged or dull saw blade.
Worn or damaged wires, or other unsafe condition.
Clean after each use.
Proper blade tension and coolant level.
Check gear box fluid level.
Change gear box oil (every four months if being used
daily).
MAKE SURE that your machine is
unplugged during all maintenance procedures! If this warning is ignored, serious personal injury may occur.
Cleaning
Frequently brush-off metal chips with a brush, or use a
shop vacuum to remove the chips. Keeping metal chips
away from bandsaw mechanisms is important to making
sure that your bandsaw lasts a long time.
MAINTENANCE
This machine is equipped with a cutting fluid system,
which pumps water and oil based cutting lubricants. It is
especially important to make sure the internal working
parts of the motor and electrical switches are kept dry
and splash free.
Lubrication
Since all bearings are sealed and permanently lubricated,
simply leave them alone until they need to be replaced.
Do not lubricate them. However, you must periodically
lubricate threaded adjustment locations and check the
gear box oil level.
Lubricate the following areas as follows:
•
Blade Tension Mechanism: Open the main blade
guard and drop a few drops of oil on the tension
knob lead screw (see Figure 27).
Tension
Knob Lead
Screw
Blade Guide
Figure 27. Main lubrication points.
-24-
M1048 10" x 18" Metal Cutting Bandsaw
•
Blade and Guides: Drop a few drops of light
machine oil on the blade and the blade guides daily,
especially when cutting cast iron, as no cutting fluid
is recommended (see Figure 27).
•
Table and Machined Surfaces: Tables can be kept
rust-free with regular applications of products like
SLIPIT®. For long term storage you may want to consider products like Boeshield T-9™.
•
Vise lead screw: Place a few drops of light machine
oil on the vise lead screw weekly (see Figure 28).
•
Grease Fittings on Pivot Point: Grease these with
general purpose grease as needed to keep the pivot
moving freely (see Figure 29).
Leadscrew
Figure 28. Vise leadscrew lubrication
area.
The gearbox should be drained and refilled after the first
50 hours of use and then once every year. Use a high
quality, ISO 68 or SAE 90 gear oil.
To change the gear oil, do these steps:
1.
Run the bandsaw for a couple of minutes to warm
up the oil in the gearbox.
2.
DISCONNECT THE BANDSAW FROM THE POWER
SOURCE!
Raise the bow to the highest angle and close the
feed control knob to lock the bow in position.
4.
Drain the gearbox by removing the drain plug shown
in Figure 29.
5.
Replace the drain plug, then lower the bow to its
lowest position.
6.
Open the fill cap and fill the gearbox with oil until
you see the oil level reach the halfway point in the
sight glass (see Figure 30).
7.
Tighten the fill plug, connect the machine to power
and run the saw for a minute or two, then check the
oil level. Add more oil if needed to maintain level at
the halfway mark in the sight glass.
-25-
Grease Fittings
Figure 29. Lubrication points.
Fill Cap
Sight Glass
Figure 30. Gear box.
MAINTENANCE
3.
Drain Plug
M1048 10" x 18" Metal Cutting Bandsaw
SERVICE
Troubleshooting
This section covers the most common symptoms and corrections with this type of machine. WARNING!
DO NOT make any adjustments until moving parts have come to a complete stop and power is
disconnected! If you require additional machine service not included in this section, please contact
Woodstock International Technical Support at (360) 734-3482 or send e-mail to: tech-support@shopfox.
biz.
Motor & Electrical
SYMPTOM
POSSIBLE CAUSE
CORRECTIVE ACTION
Machine does not start or a 1. E-Stop button pressed.
breaker trips.
2. Plug/receptacle is at fault or wired
incorrectly.
3. Start capacitor is at fault.
4. Wall fuse/circuit breaker is blown/
tripped.
5. Motor connection wired incorrectly.
6. Power supply is at fault/switched
OFF.
7. Motor ON/OFF switch is at fault.
8. Wiring is open/has high resistance.
9. Motor is at fault.
1. Twist E-Stop button until it pops out.
2. Test for good contacts; correct the wiring.
3. Test/replace capacitor if faulty.
4. Ensure correct size for machine load; replace weak
breaker.
5. Correct motor wiring connections.
6. Ensure hot lines have correct voltage on all legs and
main power supply is switched ON.
7. Replace faulty ON/OFF switch.
8. Check for broken wires or disconnected/corroded
connections, and repair/replace as necessary.
9. Test/repair/replace.
SERVICE
Machine stalls or is under- 1. Wrong blade for the workpiece 1. Use blade with correct properties for your type of
powered.
material.
cutting.
2. Wrong workpiece material.
2. Use metal with correct properties for your type of
cutting.
3. Feed rate/cutting speed too fast 3. Decrease feed rate/cutting speed.
for task.
4. Blade is slipping on wheels.
4. Adjust blade tracking and tension.
5. Low power supply voltage.
5. Ensure hot lines have correct voltage on all legs.
6. Motor bearings are at fault.
6. Test by rotating shaft; rotational grinding/loose
shaft requires bearing replacement.
7. Plug/receptacle is at fault.
7. Test for good contacts; correct the wiring.
8. Motor connection is wired incor- 8. Correct motor wiring connections.
rectly.
9. Clean off motor, let cool, and reduce workload.
9. Motor has overheated.
10. Test/repair/replace.
10. Motor is at fault.
Machine has vibration or 1.
noisy operation.
2.
3.
4.
5.
Motor fan is rubbing on fan cover.
Blade is at fault.
Gearbox is at fault.
Wrong blade for material.
Speed is set too slow.
-26-
1. Replace dented fan cover; replace loose/damaged
fan.
2. Replace/resharpen blade.
3. Rebuild gearbox for bad gear(s)/bearing(s).
4. Change blade.
5. Adjust speed as required.
M1048 10" x 18" Metal Cutting Bandsaw
Bandsaw Operations
SYMPTOM
POSSIBLE CAUSE
CORRECTIVE ACTION
Machine is loud 1. Excessive feed rate.
1. Refer to Feed Rate on Page 20, or Changing Blade
when cutting or
Speed on Page 20, and adjust as required.
bogs down in the 2. The blade TPI is too great, or the 2. Refer to Blade Selection on Page 19 and adjust as
cut.
material is too coarse.
required.
Blades break often. 1. Blade is not tensioned correctly.
2. The workpiece is loose in the vise.
3. The feed or cut speed is wrong.
1. Check to see that blade is not excessively tight or too
loose.
2. Clamp the workpiece tighter, or use a jig to hold the
workpiece.
3. Refer to Feed Rate on Page 20, or Changing Blade
Speed on Page 20, and adjust as required.
4. Refer to Blade Selection on Page 19, and adjust as
required.
5. Refer to Blade Tracking on Page 29, and adjust as
required.
6. Start bandsaw and then slowly lower the headstock by
setting the feed rate.
7. Refer to Blade Tracking on Page 29, or Blade Guides on
Page 30 and adjust as required.
4. The blade TPI is too great, or the
material is too coarse.
5. The blade is rubbing on the wheel
flange.
6. The bandsaw is being started with the
blade resting on the workpiece.
7. The guide bearings are misaligned,
or the blade is rubbing on the wheel
flange.
8. The blade is too thick, or the blades 8. Use a higher quality blade.
are of low quality.
1. Refer to Changing Blade Speed on Page 20, and adjust
as required.
2. Refer to Blade Selection on Page 19, and adjust as
required.
The blade feed pressure is too light. 3. Refer to Feed Rate on Page 20, and adjust as required.
The workpiece has hard spots, welds, 4. Increase the feed pressure, and reduce the cutting
or scale is on the material.
speed.
The blade is twisted.
5. Replace the blade.
The blade is slipping on the wheels.
6. Refer to Blade Tension on Page 29, and adjust as
required.
Blade dulls prema- 1. The cutting speed is too fast.
turely.
2. The blade TPI is too coarse.
3.
4.
5.
6.
Blade wears on one 1. The blade guides are worn or mis- 1. Refer to Blade Guides on Page 30 and replace or
adjusted.
side.
adjust.
2. The blade guide slide bracket is 2. Tighten the blade guide bracket.
loose.
3. The wheels are out of alignment.
3. Refer to Blade Tracking on Page 29, and adjust as
required.
Teeth are ripping 1. The feed pressure is too heavy and the 1. Refer to Blade Selection on Page 19 and decrease the
from the blade.
blade speed is too slow; or the blade
feed pressure. Refer to Feed Rate on Page 20, and adjust
TPI is too coarse for the workpiece.
as required.
2. The workpiece is vibrating in the 2. Re-clamp the workpiece in the vise, and use a jig if
vise.
required.
3. The blade gullets are loading up with 3. Use a coarser-tooth blade.
chips.
1. Refer to Feed Rate on Page 20, and adjust as required.
2. Refer to Blade Guides on Page 30 and replace or
of adjustadjust.
from the
3. Refer to Blade Tension on Page 29, and adjust as
required.
4. Refer to Blade Change on Page 28 and replace the
blade.
5. Refer to Blade Speed on Page 20, and adjust as
required.
6. Refer to Squaring Blade to Table on Page 31.
are 1. The feed pressure is too high.
2. The guide bearings are out
ment, or too far away
workpiece.
3. The blade tension is low.
4. The blade is dull.
5. The blade speed is wrong.
6. Blade not square to table.
-27-
SERVICE
The
cuts
crooked.
M1048 10" x 18" Metal Cutting Bandsaw
Blade Change
Tension Handle
CUTTING HAZARD! Blades are sharp! Wear heavy
leather gloves when handling blades to prevent
cuts.
Blades should be changed when they become dull, damaged, or when you are using materials that require a
blade of a certain type or tooth count.
SERVICE
To change the blade on the bandsaw, do these steps:
Blade Guard
Figure 31. Tension handle and blade.
1.
DISCONNECT THE BANDSAW FROM POWER!
2.
Raise the bow of the bandsaw about six inches then
close the feed control valve by turning the knob to
the right.
3.
Loosen and slide the both blade guides toward the
center of the bow as shown in Figure 31.
4.
Remove the two screws to open the upper blade
guard (see Figure 32).
5.
Open both wheel covers and clean out all the chips
and shavings.
6.
Loosen the blade tension handle in Figure 31 and
slip the old blade off of the wheels then out of the
blade guide roller bearings.
7.
Install the new blade into front and rear blade guide
roller bearings, as shown in Figure 33, then around
the bottom and top wheels.
Upper Blade Guard
Figure 32. Opened upper blade guard.
Note: It is sometimes possible to flip the blade
inside out, and the blade teeth will be pointing in
the wrong direction. Make sure the blade teeth are
facing toward the workpiece, as shown in Figure
34, before mounting on the bandsaw.
8.
9.
Apply a light amount of tension to hold the blade
in place. Work your way around the blade to adjust
the position so the back of the blade is against the
flange of the wheels.
Complete the blade change by following the steps in
the next section—Blade Tension & Tracking.
-28-
Figure 33. Installing the blade.
M1048 10" x 18" Metal Cutting Bandsaw
Blade Tension & Tracking
Proper blade tension is essential to long blade life,
straight cuts, and efficient cutting. The Model M1048 features a blade tension indicator to assist you with blade
tensioning.
��
��
���
��
��
�
Two major signs that you do not have proper blade tension are: 1) the blade stalls in the cut and slips on the
wheels, and 2) the blade frequently breaks from being
too tight.
NOTICE
Loosen blade tension at the end of each day to prolong blade life.
Figure 34. Blade cutting direction.
To tension the blade on the bandsaw, do these steps:
1.
Turn the blade tension handle clockwise to tension
the blade.
2.
Use the graduated scale on the blade tension indicator (Figure 35) to determine blade tension in PSI.
— For carbon blades, the blade tension should be
20,000 PSI.
— For bi-metal blades, like the one supplied with
your machine, the blade should be tensioned from
30,000 to 35,000 PSI.
The blade tracking has been properly set at the factory. The tracking will rarely need to be adjusted if the
bandsaw is used properly. Do not attempt to adjust tracking until the blade is properly tensioned.
Blade Tension Guide
Figure 35. Blade tension guide.
Tracking Set Screw
To adjust the blade tracking on the bandsaw, do these
steps:
Loosen or tighten the tracking set screw in Figure
36 until the blade is tracking properly. The blade
is tracking properly when the back of the blade is
lightly touching the flange of both wheels.
2.
Remove the V-belt from the motor pulley and spin
either wheel by hand to observe how the blade is
tracking. Make sure the blade teeth are not cutting
into any part of the saw. Adjust as needed.
-29-
SERVICE
1.
Figure 36. Tracking set screw.
M1048 10" x 18" Metal Cutting Bandsaw
Blade Guide Bearings
The blade guide bearings are adjusted at the factory
but due to shipping and storage may need adjustment.
Use Figures 37 & 38 to guide you through the following
steps.
To adjust the blade guide bearings, do these steps:
1.
Before making adjustments, make sure the blade is
tensioned and tracking correctly.
2.
DISCONNECT THE BANDSAW FROM POWER!
3.
Raise the bow high enough to give you room to work,
then lock in place.
4.
Remove both blade guards.
5.
The back of the blade (A) in Figure 37 should make
light contact with the backing bearing (C).
B
C
A
Figure 37. Blade guide adjustments.
Set Screw
— If it does not, loosen the set screw (B) shown in
Figure 37, and move the bearing (C) up or down
until it lightly touches the back of the blade.
Eccentric Bushing
The blade guide roller bearings also need to be adjusted.
The front bearing is mounted on an eccentric and can be
easily adjusted to suit the blade thickness.
SERVICE
To adjust the blade guide roller bearings, do these
steps:
1.
Loosen the set screw in Figure 38 to allow the
eccentric bushing to turn.
2.
Turn the square nut on the eccentric shaft to adjust
the distance of the guide bearing. The guide bearings and blade should make light contact or have a
maximum clearance of 0.002".
3.
Adjust the carbide blade guides so they make the
same contact with the blade as the bearings.
4.
Adjust the eccentric blade guide rollers bearing on
the front arm the same way.
-30-
Guide Bearings
Carbide Blade Guide
Figure 38. More blade guide adjustments.
M1048 10" x 18" Metal Cutting Bandsaw
Squaring Blade to Table
This adjustment has been made at the factory
and should not need to be adjusted under normal
circumstances. However, if you find the saw is not
cutting square, you may need to adjust the blade. Only
make this adjustment after factors such as excessive
feed rate or the blade guide being set too far away from
the workpiece have been ruled out.
To square the blade the to the table, do these steps:
1.
DISCONNECT THE BANDSAW FROM POWER!
2.
Examine your workpiece for clues as to which way
the blade is twisted, or set up a machinist square on
the table and blade as shown in Figure 39.
3.
Check for gaps along several points of the blade
length between the two blade guides. Set the
machinist square between the blade teeth for a
more accurate reading.
4.
Adjust the blade by loosening the lock nuts and
turning the set screws. This will cause the bearing
bracket to pivot (see Figure 40).
5.
Adjust the set screws in pairs. Tightening the upper
pair will pivot the bearing block toward the table.
Tightening the lower pair will pivot the bearing
bracket away from the table.
6.
Figure 39. Square blade to table.
Lock Nut
Set Screw
Bearing Bracket
Figure 40. Bearing block pivot.
Cut a small section from a scrap piece of material
with a known square end and measure for uniform
thickness. If the thickness is not uniform, repeat
Steps 1-5 until your personal requirements are met.
SERVICE
-31-
M1048 10" x 18" Metal Cutting Bandsaw
Electrical Components
SB4
SB1
SB3
L
Figure 41. Limit switch (SQ1).
Figure 43. Control panel wiring.
Figure 42. Junction box (M1).
Figure 44. Pump motor wiring and
capacitor(M2).
(TC)
Transformer
(KM-1)
Relay
SERVICE
(KM-1)
Contactor
(KM-2 Relay
Fuse (FU)
Figure 45. M1048 Contactor & relay electrical box.
-32-
M1048 10" x 18" Metal Cutting Bandsaw
Model M1048 220V Wiring Diagram
��
����
����
��
��
��
�
������
�
�
�����
Disconnect power to the
machine before performing
any electrical work, service, or
adjustment.
�
���
���
�
�����
�
���
�
�� ��
�
���
�
�� ��
���
���
OFF
��
��
����
�����
����
�����
�
���
�
���
���
�
��
�
LEGEND
-33-
SERVICE
M = Motor
KM1 = Contactor Main Motor
KM2 = Pump Motor Relay
KM1 = Thermal Relay Main Motor
L = Indicator Lamp
SB1 = Emergency Stop Button
SB3 = Start Button
SB4 = Pump Motor Switch
SQ1 = Limit Switch
TC = Transformer for Control System (24V)
FU2A = Fuse
���
��� ���
-34-
���
���
���
���
�����
�����
�����
���
���
PARTS
���
���
���
���
���
������
���
���
�����
���
�����
���
��� ���
���
������
������
���
���
���
���
���
���
���
���
���
���
������
���
���
���
������
������
������
�����
����� �����
������ �����
�����
�����
��� ���
���
���
���
���
���
���
���
���
���
��� ���
���
���
���
���
���
���
���
���
���
���
���
��� ���
���
���
���
���
���
���
���
���
���
���
���
���
���
���
���
���
���
M1048 10" x 18" Metal Cutting Bandsaw
Blade Guides Parts Breakdown
M1048 10" x 18" Metal Cutting Bandsaw
Blade Guides Parts List
REF
PART�#
DESCRIPTION
REF
PART�#
DESCRIPTION
101
101-1
101-2
101-3
101-4
101-5
101-6
101-7
101-8
101-9
101-10
101-11
101-12
101-13
101-14
101-15
101-16
102
103
104
105
106
107
108
109
110
141
142
143
144
145
146
147
148
149
150
151
152
152-3
152-4
153
154
155
156
XM1048101
XM1048101-1
XM1048101-2
XPN10
XPW04M
XPSB134M
XM1048101-6
XM1048101-7
XM1048101-8
XPW01
XM1048101-10
XM1048101-11
XPS05M
XPB32M
XPLW06M
XM1048101-15
XM1048101-16
XPRP49M
XM1048103
XM1048104
XPK20M
XM1048106
XM1048107
XPRP30M
XM1048109
XM1048110
XPSB72M
XPLW06M
XM1048143
XPSB130M
XM1048145
XM1048146
XPS68M
XM1048148
XPSB77M
XPSB06M
XM1048151
XM1048152
XPB70M
XPW04M
XPSB11M
XM1048154
XM1048155
XM1048156
SLIDE�SET
SLIDE
SPECIAL�SET�SCREW
HEX�NUT�7/16-20
FLAT�WASHER�10MM
CAP�SCREW�M10-1.5�X�65
DISC�SPRING
INDICATOR�DIAL
BEARING�51204
FLAT�WASHER�1/2
SPECIAL�SCREW
SCALE
PHLP�HD�SCR�M5-.8�x�8
HEX�BOLT�M10-1.5�x�25
LOCK�WASHER�10MM
GIB
BRACKET
ROLL�PIN�5�X�25
COLLAR
LEADSCREW
KEY�5�X�5�X�15
HANDWHEEL�&�HANDLE
COMPRESSION�SPRING
ROLL�PIN�5�X�50
BRACKET
SHAFT
CAP�SCREW�M10-1.5�X�30
LOCK�WASHER�10MM
IDLER�WHEEL�BOX
CAP�SCREW�M10-1.5�X�16
TENSION�LABEL
RIVET
PHLP�HD�SCR�M6-1�X�10
BRACKET
CAP�SCREW�M12-1.75�X�30
CAP�SCREW�M6-1�X�25
BUSHING
IDLER�WHEEL�ASSY
HEX�BOLT�M10-1.5�X�16
FLAT�WASHER�10MM
CAP�SCREW�M8-1.25�X�16
HANDLE
SPEED�INDICATOR�LABEL
IDLER�WHEEL�COVER
157
158
159
160
161
163
164
167
168
169
170
171
172
173
174
175
176
177
178
179
180
181
182
183
184
185
186
187
188
189
190
191
192
193
194
195
200
203
204
205
206
207
208
209
XM1048157
XPSB04M
XPLW02
XM1048160
XPLW01
XM1048163
XM1048164
XPLW02
XPSB04M
XM1048169
XM1048170
XPSB77M
XPSS09M
XM1048173
XPSB84M
XPW04M
XPRP49M
XM1048177
XPSB05M
XPLW04M
XPLW01
XM1048181
XM1048182
XPLW02
XPSB02M
XPN03M
XPSS09M
XM1048187
XPW04M
XM1048189
XM1048190
XM1048191
XPS05M
XM1048193
XPW04M
XPSB71M
XM1048200
XM1048203
XPSS20M
XM1048205
XPSB02M
XM1048207
XM1048208
XM1048209
PLASTIC�BUSHING
CAP�SCREW�M6-1�X�10
LOCK�WASHER�1/4
HEX�NUT�M8
LOCK�WASHER�5/16
BLADE�GUARD
BLADE�LABEL
LOCK�WASHER�1/4
CAP�SCREW�M6-1�X�10
SCALE
RIVET
CAP�SCREW�M12-1.75�X�30
SET�SCREW�M8-1.25�X�20
COLUMN
CAP�SCREW�M10-1.5�X�35
FLAT�WASHER�10MM
ROLL�PIN�5�X�25
LEFT�COLUMN�SUPPORT
CAP�SCREW�M8-1.25�X�50
LOCK�WASHER�8MM
LOCK�WASHER�5/16
SUPPORT�SEAT
ADJ�FIXING�PLATE�(IDLER)
LOCK�WASHER�1/4
CAP�SCREW�M6-1�X�20
HEX�NUT�M8-1.25
SET�SCREW�M8-1.25�X�20
BLADE�ADJUSTABLE�KNOB
FLAT�WASHER�10MM
ARM�(LEFT)
GIB
HOSE�CLAMP
PHLP�HD�SCR�M5-.8�X�8
ARM�(RIGHT)
FLAT�WASHER�10MM
CAP�SCREW�M10-1.5�X�60
BEARING�SPACER
BEARING�BRACKET�(IDLER)
SET�SCREW�M8-1.25�X�8
CARBIDE�GUIDE
CAP�SCREW�M6-1�X�20
ECCENTRIC�SHAFT�SET
BEARING�SHAFT�ASSY
MICRO�CONTROL�BLOCK
PARTS
-35-
PARTS
-36-
���
���
���
��� ���
���
���
���
���
���
������ ������
���
���
���
���
���
���
���
���
��� ���
���
��� ���
���
���
���
���
������
���
���
���
���
���
���
���
���
���
���
���
���
���
��� ���
���
���
���
���
���
���
���
���
���
��� ���
���
������
������
������
������
���
���
���
���
���
���
���
���
���
���
���
���
���
���
���
���
���
���
���
���
���
���
���
���
���
���
���
���
���
���
���
���
���
���
��� ���
���
���
���
���
���
���� ���
M1048 10" x 18" Metal Cutting Bandsaw
Drive Wheel Parts Breakdown
M1048 10" x 18" Metal Cutting Bandsaw
Drive Wheel Parts List
REF
PART�#
DESCRIPTION
REF PART�#
DESCRIPTION
216
217
218
219
220
221
222
223
224
225
226
227
228
229
230
231
232
233
234
235
236
237A
237A-1
237A-2
237A-3
237A-4
237A-5
238
240
241
242
243
244
245
246
247
248
249
252
253
XM1048216
XM1048217
XPSB72M
XM1048219
XPR05M
XPSS09M
XPSB130M
XM1048223
XPW04M
XM1048225
XPN03M
XPW07
XM1048228
XPB15M
XPB15M
XPW07
XM1048232
XPW07
XPN03M
XPSS01M
XM1048236
XM1048237A
XM1048237A-1
XM1048237A-2
XM1048237A-3
XM1048237A-4
XM1048237A-5
XPK20M
XM1048240
XM1048241
XPLW06M
XPSB61M
XPSB06M
XM1048245
XM1048246
XPRP49M
XPSB84M
XPW04M
XM1048252
XM1048253
GEAR�BOX�ASSY
PIVOT�SHAFT
CAP�SCREW�M10-1.5�X�30
DRIVE�WHEEL�BOX
EXT�RETAINING�RING�15MM
SET�SCREW�M8-1.25�X�20
CAP�SCREW�M10-1.5�X�16
BELT�TENSION�KNOB
FLAT�WASHER�10MM
MOTOR�ADJUSTABLE�ROD
HEX�NUT�M8-1.25
FLAT�WASHER�5/16
BRACKET
HEX�BOLT�M8-1.25�X�40
HEX�BOLT�M8-1.25�X�40
FLAT�WASHER�5/16
MOTOR�PLATE
FLAT�WASHER�5/16
HEX�NUT�M8-1.25
SET�SCREW�M6-1�X�10
PIVOT�SHAFT
2�HP�MOTOR�220V
MOTOR�COVER
MOTOR�FAN
CAPACITOR�COVER
CAPACITOR�800MFD�125VAC
JUNCTION�BOX
KEY�5�X�5�X�15
HOSE�5/8"
HOSE�FITTING�PT�1/2"
LOCK�WASHER�10MM
CAP�SCREW�M10-1.5�X�20
CAP�SCREW�M6-1�X�25
BRACKET
COLUMN�RIGHT�SUPPORT
ROLL�PIN�5�X�25
CAP�SCREW�M10-1.5�X�35
FLAT�WASHER�10MM
EXT�TOOTH�WASHER�25MM
COLLAR
254
255
256
257
258
259
260
261
262
263
270
271
272
273
274
275
276
277
278
279
280
281
285
287
288
289
291
292
293
294
295
296
316
317
318
319
320
321
322
SET�SCREW�M8-1.25�X�8
BLADE�129-3/8"�X�1�X�.035�5-8�VP
DRIVE�WHEEL
KEY�7�X�7�X�30
WHEELCOVER
SPEED�LABEL
PHLP�HD�SCR�M6-1�X�10
BRUSH�COVER
LOCK�WASHER�1/4
HEX�NUT�M8-1.25
HEX�NUT�M12-1.75
COMPRESSION�SPRING
BLADE�ADJUSTABLE�DRIVE
SET�SCREW�M8-1.25�X�8
ROLL�PIN�3�X�10
ADJ�FIXING�PLATE�(DRIVE)
LOCK�WASHER�1/4
CAP�SCREW�M6-1�X�20
HEX�NUT�M8-1.25
SET�SCREW�M6-1�X�10
BEARING�SPACER
BRUSH�ASSY
MOTOR�PULLEY�COVER
SPINDLE�PULLEY
MOUNT�PULLEY
PHLP�HD�SCR�M8-1.25�X�10
KEY�5�X�5�X�15
SET�SCREW�M8-1.25�X�10
V-BELT�A-32�4L320
PHLP�HD�SCR�M8-1.25�X�10
FLAT�WASHER�5/16
SPEED�INDICATOR�LABEL
HOSE�CLAMP�1/2"
HOSE�5/16�X�600MM
HOSE�FITTING�PT1/4�X�1/4
VALVE�PT�1/4
HOSE�FITTING�PT�1/4�X�1/2
HOSE�1/4�X�1400MM
NOZZLE�PT�1/4
XPSS20M
D3664
XM1048256
XPK61M
XM1048258
XM1048259
XPS68M
XM1048261
XPLW02
XPN03M
XPN09M
XM1048271
XM1048272
XPSS20M
XPRP44M
XM1048275
XPLW02
XPSB02M
XPN03M
XPSS01M
XM1048280
XM1048281
XM1048285
XM1048287
XM1048288
XPS39M
XPK20M
XPSS16M
XPVA32
XPS39M
XPW07
XM1048296
XM1048316
XM1048317
XM1048318
XM1048319
XM1048320
XM1048321
XM1048322
PARTS
-37-
-38-
���
���
���
���
���
���
���
���
���
���
���
PARTS
���
���
���
���
���
���
���
���
���
���
���
���
���
���
���
���
���
���
���
���
���
���
���
���
���
���
���
���
���
���
���
���
��������������
���������������������
���
���
���
���
�����
���
���
���
���
���
���
���
���
���
��� ���
���
���
���
���
���
���
���
���
���
���
���
���
��� ���
���
��� ���
��� ���
��� ���
���
���
���
���
���
���
��� ���
���
���
���
��� ���
���
���
��� ��� ���
���
��� ���
���
���
���
���
���
���
���
���
���
���
���
���
���
���
���
���
��� ���
���
���
���
���
���
���
���
����� �����
�����
����� �����
���
M1048 10" x 18" Metal Cutting Bandsaw
Main Parts Breakdown
M1048 10" x 18" Metal Cutting Bandsaw
Main Parts List
REF
PART�#
DESCRIPTION
REF
PART�#
DESCRIPTION
330
331
332
333
334
335
336
337
338
339
340
341
342
343
344
358
359
360
361
362
363
364
365
366
367
368
369
370
371
372
373
374
375
378
379
380
381
382
383
384
385
386
400
401
402
403
XM1048330
XPB26M
XPW07
XPN03M
XPW01
XPN13
XM1048336
XPB15M
XM1048338
XM1048339
XPRP10M
XM1048341
XM1048342
XM1048343
XPK20M
XPB87M
XM1048359
XM1048360
XPB17M
XPW07
XPN03M
XM1048364
XPSB48M
XPSB13M
XM1048367
XPB32M
XPN03M
XM1048370
XM1048371
XPLW02
XM1048373
XPSS01M
XPR11M
XPB14M
XPLW06M
XM1048380
XM1048381
XM1048382
XM1048383
XM1048384
XPB141M
XPN09M
XPW04M
XM1048401
XPSB72M
XPW04M
SPRING�COVER
HEX�BOLT�M8-1.25�X�30
FLAT�WASHER�5/16
HEX�NUT�M8-1.25
FLAT�WASHER�1/2
HEX�NUT�1/2-13
SPRING�BRACKET
HEX�BOLT�M8-1.25�X�40
EYE�BOLT
EXTENSION�SPRING
ROLL�PIN�5�X�36
BRACKET
ACME�NUT�ASSY
ACME�SCREW
KEY�5�X�5�X�15
HEX�BOLT�M8-1.25�X�15
FIXED�PLATE
FIXED�PLATE
HEX�BOLT�M8-1.25�X�10
FLAT�WASHER�5/16
HEX�NUT�M8-1.25
BRACKET
CAP�SCREW�M6-1�X�35
CAP�SCREW�M8-1.25�X�30
DISTANCE�SET�ROD
HEX�BOLT�M10-1.5�x�25
HEX�NUT�M8-1.25
DISTANCE�SET�BRACKET
SUPPORT�ROD
LOCK�WASHER�1/4
PLUM�SCREW
SET�SCREW�M6-1�X�10
EXT�RETAINING�RING�25MM
HEX�BOLT�M10-1.5�X�35
LOCK�WASHER�10MM
BUSHING
REAR�PIVOT�BRACKET
COLLAR
STAR�WASHER�AW05
BEARING�6904RNA
HEX�BOLT�M12-1.75�X�80
HEX�NUT�M12-1.75
FLAT�WASHER�10MM
THUMB�SCREW
CAP�SCREW�M10-1.5�X�30
FLAT�WASHER�10MM
387
388
389
390
391
394
395
396
397
398
399
404
405
406
407
408
410
411
412
412-1
413
415
416
417
418
419
420
421
422
423
426
429
429-1
429-2
429-3
429-4
431
432
433
434
435
436
437
438
439
440
XM1048387
XPW07
XPSB14M
XM1048390
XM1048391
XPW04
XM1048395
XPS05M
XM1048397
XPSS16M
XM1048399
XM1048404
XPSS01M
XM1048406
XPSS19M
XM1048408
XPB02M
XPLW02
XM1048412
XM1048412-1
XPS14M
XM1048415
XPS70M
XM1048417
XM1048418
XPLW01
XPB03M
XPSB04M
XM1048422
XPS70M
XPS70M
XM1048429
XM1048429-1
XM1048429-2
XM1048429-3
XM1048429-4
XM1048431
XPS68M
XPLW01M
XPB18M
XM1048435
XPN01M
XPB26M
XPN03M
XPW07
XPB15M
POSITION�SET�BRACKET
FLAT�WASHER�5/16
CAP�SCREW�M8-1.25�X�20
GREASE�NIPPLE
BUSHING
FLAT�WASHER�7/16
BASE
PHLP�HD�SCR�M5-.8�X�8
DEGREE�SCALE
SET�SCREW�M8-1.25�X�10
VISE�JAW�BRACKET
BUSHING
SET�SCREW�M6-1�X�10
BUSHING
SET�SCREW�M8-1.25�X�30
VISE�JAW�BRACKET�(REAR)
HEX�BOLT�M6-1�X�12
LOCK�WASHER�1/4
CONTROL�BOX
EMERGENCY�STOP�SWITCH
PHLP�HD�SCR�M6-1�X�12
NAME�PLATE
PHLP�HD�SCR�M5-1�X�8
COLUMN
LOWER�BLADE�GUARD
LOCK�WASHER�5/16
HEX�BOLT�M8-1.25�X�16
CAP�SCREW�M6-1�X�10
UPPER�BLADE�COVER
PHLP�HD�SCR�M5-1�X�8
PHLP�HD�SCR�M5-1�X�8
COMPLETE�ELECTRICAL�BOX
COMPLETE�FUSE�HOLDER
CONTACTOR�LCK09
THERMAL�OVERLOAD�LR7K0332
RELAY�240/24V
STAND
PHLP�HD�SCR�M6-1�X�10
LOCK�WASHER�5MM
HEX�BOLT�M6-1�X�15
FILTER
HEX�NUT�M6-1
HEX�BOLT�M8-1.25�X�30
HEX�NUT�M8-1.25
FLAT�WASHER�5/16
HEX�BOLT�M8-1.25�X�40
PARTS
-39-
M1048 10" x 18" Metal Cutting Bandsaw
Main Parts List
PART�#
DESCRIPTION
REF
PART�#
DESCRIPTION
XPSB30M
XPB22M
XM1048443
XM1048446
XM1048447
XPW06
XPS07
XM1048450
XM1048451
XPS68M
XPLW02
XM1048458
XM1048459
XPSB13M
XPLW01
XM1048462
CAP�SCREW�M6-1�X�45
HEX�BOLT�M8-1.25�X�50
CHIP�TRAY
COOLANT�TANK
COOLANT�PUMP
FLAT�WASHER�1/4
PHLP�HD�SCR�1/4-20�X�3/8
COUPLER�PT�1/2�X�1/4
HOSE�3/4�X�1.5
PHLP�HD�SCR�M6-1�X�10
LOCK�WASHER�1/4
SWITCH�BRACKET
PIVOT�PIN
CAP�SCREW�M8-1.25�X�30
LOCK�WASHER�5/16
CYLINDER�UPPER�BRACKET
463
470
471
472
473
474
475
476
477
478
479
480
481
482
483
XPSS01M
XM1048470
XM1048471
XM1048472
XPB03M
XPW07
XM1048475
XM1048476
XLABEL-12
XLABEL-01
XLABEL-02
XM1048480
XM1048481
XM1048482
XM1048483
SET�SCREW�M6-1�X�10
HOSE�W/TUBE�FITTING
HOSE�W/TUBE�FITTING
VALVE
HEX�BOLT�M8-1.25�X�16
FLAT�WASHER�5/16
CYLINDER�ASSY
PIVOT�SHAFT
READ�MANUAL�LABEL
SAFETY�GLASSES�LABEL
UNPLUG�POWER�LABEL
MACHINE�ID�LABEL
M1048�LABEL
BLADE�SAFETY�LABEL
LOGO�PLATE
PARTS
REF
441
442
443
446
447
448
449
450
451
456
457
458
459
460
461
462
-40-
M1048 10" x 18" Metal Cutting Bandsaw
Label Placement
Safety labels warn about machine hazards and how to prevent machine damage or injury. The
owner of this machine MUST maintain the original location and readability of all labels on this
machine. If any label is removed or becomes unreadable, REPLACE that label before allowing the
machine to enter service again. Contact Woodstock International, Inc. at (360) 734-3482 or www.
shopfoxtools.com to order new labels.
478
481
480
477
479
482
483
PARTS
-41-
Warranty
Woodstock International, Inc. warrants all SHOP FOX® machinery to be free of defects from workmanship and materials for a period of two years from the date of original purchase by the original
owner. This warranty does not apply to defects due directly or indirectly to misuse, abuse, negligence
or accidents, lack of maintenance, or reimbursement of third party expenses incurred.
Woodstock International, Inc. will repair or replace, at its expense and at its option, the SHOP FOX®
machine or machine part which in normal use has proven to be defective, provided that the original
owner returns the product prepaid to the SHOP FOX® factory service center or authorized repair
facility designated by our Bellingham, WA office, with proof of their purchase of the product within
two years, and provides Woodstock International, Inc. reasonable opportunity to verify the alleged
defect through inspection. If it is determined there is no defect, or that the defect resulted from
causes not within the scope of Woodstock International Inc.'s warranty, then the original owner must
bear the cost of storing and returning the product.
This is Woodstock International, Inc.'s sole written warranty and any and all warranties that may be
implied by law, including any merchantability or fitness, for any particular purpose, are hereby limited
to the duration of this written warranty. We do not warrant that SHOP FOX® machinery complies
with the provisions of any law or acts. In no event shall Woodstock International, Inc.'s liability under
this warranty exceed the purchase price paid for the product, and any legal actions brought against
Woodstock International, Inc. shall be tried in the State of Washington, County of Whatcom. We shall
in no event be liable for death, injuries to persons or property or for incidental, contingent, special or
consequential damages arising from the use of our products.
Every effort has been made to ensure that all SHOP FOX® machinery meets high quality and durability standards. We reserve the right to change specifications at any time because of our commitment to
continuously improve the quality of our products.
M1048 10" x 18" Metal Cutting Bandsaw
Warranty Registration
Name ___________________________________________________________________________________
Street __________________________________________________________________________________
City _________________________ State ___________________________Zip ________________________
Phone # ______________________ Email __________________________Invoice # ___________________
Model #_________Serial #______________Dealer Name__________________Purchase Date___________
CUT ALONG DOTTED LINE
The following information is given on a voluntary basis. It will be used for marketing purposes to help us
develop better products and services. Of course, all information is strictly confidential.
1.
How did you learn about us?
_____ Advertisement
_____ Mail Order Catalog
2.
How long have you been a woodworker/metalworker?
_____ 0-2 Years
_____ 2-8 Years
____ 8-20 Years
_____ 20+ Years
3.
How many of your machines or tools are Shop Fox®?
_____ 0-2
_____ 3-5
____ 6-9
_____ 10+
4.
Do you think your machine represents a good value?
_____ Yes
____ No
5.
Would you recommend Shop Fox® products to a friend? _____ Yes
____ No
6.
What is your age group?
_____ 20-29
_____ 50-59
7.
What is your annual household income?
_____ $20,000-$29,000
____ $30,000-$39,000
_____ $50,000-$59,000
____ $60,000-$69,000
8.
Which of the following magazines do you subscribe to?
____
____
____
____
____
____
____
____
____
____
9.
Cabinet Maker
Family Handyman
Hand Loader
Handy
Home Shop Machinist
Journal of Light Cont.
Live Steam
Model Airplane News
Modeltec
Old House Journal
____ Friend
____ Website
____ Local Store
____ Other:
____ 30-39
____ 60-69
____
____
____
____
____
____
____
____
____
____
Popular Mechanics
Popular Science
Popular Woodworking
Practical Homeowner
Precision Shooter
Projects in Metal
RC Modeler
Rifle
Shop Notes
Shotgun News
____ 40-49
____ 70+
____ $40,000-$49,000
____ $70,000+
____
____
____
____
____
____
____
____
____
Today’s Homeowner
Wood
Wooden Boat
Woodshop News
Woodsmith
Woodwork
Woodworker West
Woodworker’s Journal
Other:
Comments:__________________________________________________________________
_____________________________________________________________________________
_____________________________________________________________________________
_____________________________________________________________________________
FOLD ALONG DOTTED LINE
Place
Stamp
Here
WOODSTOCK INTERNATIONAL INC.
P.O. BOX 2309
BELLINGHAM, WA 98227-2309
FOLD ALONG DOTTED LINE
TAPE ALONG EDGES--PLEASE DO NOT STAPLE