1
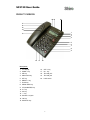
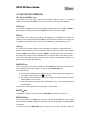
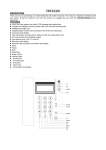
• User Manual •
SC3130
Caller ID Phone
SC3130 User Guide
!
•
Please ensure the phone is placed in a dry and ventilated place without corrosive air.
•
Please install 3 x AA batteries for viewing the LCD display. If the LCD does not display
clearly, please change the batteries.
•
Please check if you had applied caller ID service from Telecom provider for caller ID
display.
FEATURES:
•
FSK/DTMF dual system
•
30 incoming call memories, call back function
•
5 outgoing call memories, conversation time review and redial back
•
35 VIP Memory for storing important telephone numbers
•
8 normal and 1 VIP ringing tone selection
•
Area code filter setting
•
PABX code setting
•
Anti Share or prevent parallel telephone connection
•
Pre-dial and edit dialing number
•
LCD display of year, month, date and time
•
Calculator function
•
IDD ‘0’ Lock function
•
Pulse/Tone function
•
Date/Time function
•
Handsfree Speakerphone
•
3 Alarm function
1
SC3130 User Guide
TABLE OF CONTENT
PRODUCT OVERVIEW ..................................................................................... 3
1. INSTALLING OR REPLACING THE BATTERY ......................................................... 4
2. SWITCH OPERATION................................................................................... 4
IDD LOCK switch....................................................................................... 4
3. SOFTWARE SETTING .................................................................................. 4
4. FUNCTION KEY OPERATION .......................................................................... 6
UP/- key and DOWN/+ key........................................................................... 6
OUT/x key.............................................................................................. 6
DEL key ................................................................................................. 6
CAL key ................................................................................................. 6
PAUSE/VIP key ......................................................................................... 6
BRIGHT/÷ key.......................................................................................... 6
RING/HOLD key........................................................................................ 6
FLASH key (600ms) .................................................................................... 7
REDIAL/BACK key...................................................................................... 7
HF (HANDSFREE) key.................................................................................. 7
5. ADDITIONAL NOTES ................................................................................... 7
INCOMING CALL LCD INDICATOR ..................................................................... 7
LCD BACKLIGHT FUNCTION .......................................................................... 7
TROUBLESHOOTING GUIDE.............................................................................. 7
DECLARATION OF CONFORMITY ........................................................................ 8
2
SC3130 User Guide
PRODUCT OVERVIEW
18 19
20
17
16
15
14
1
2
3
4
13
5
6
7
8
9
12
11
10
Description:
1. LCD Display
16.
OUT/x key
2. DOWN/+ key
17.
UP/- key
3. DEL key
18.
TEL LINE jack
4. RING/HOLD key
19.
TEL LINE jack
5. SET key
20.
LOCK switch
6. BRIGHT/÷ key
7. FLASH key
8. REDIAL/BACK key
9. HF (HANDSFREE) key
10. #/= key
11. 0-9 key
12. */. key
13. Handset Cord jack
14. CAL key
15. PAUSE/VIP key
3
SC3130 User Guide
1. INSTALLING OR REPLACING THE BATTERY
Install 3 Alkaline AA batteries into the battery compartment and re-fit the cover before use.
IMPORTANT—before removing the battery compartment cover, ensure the base unit
is disconnected from the telephone line.
Connection and conditions for use
You can connect your SC3130, to public networks in the United Kingdom or to an
approved PBX using DTMF signaling. Each item of telephone equipment (phones, fax
machines, etc.) has a ringer equivalence numbers (REN). The RENs of all
equipment connected to an exchange line must not add up to more than 4
otherwise, one or more phones may not ring and/or answer calls correctly.
SC3130 has a REN of 1, and most other telephones have a REN of 1 unless marked
otherwise.
2. SWITCH OPERATION
IDD LOCK switch
Use the keys provided in the package. The telephone allows all outgoing number if the key is
on red point. It cannot dial outgoing number starting with digit 0 when the key is on green
point.
3. SOFTWARE SETTING
In on-hook mode, press SET key to enter menu setting, the phone LCD will display SET 1
DATE, press UP/- or DOWN/+ key to select different options. Press SET key again to confirm.
Use UP/- or DOWN/+ key to select the mode you need. After completing the setting, press
SET key to go to the next item. To exit menu, press DEL key.
By pressing SET key (under the on-hook mode), you can select the following:
SET ITEM
DATE/TIME
OPERATIONS
LCD panel displays SET 1 DATE, press SET key to enter this mode. The
year value would flash, use UP/- or DOWN/+ key to select value, then
press SET key to move to next item.
4
SC3130 User Guide
AREA CODE
LCD panel display SET 2 CODE, press SET key to confirm, LCD display
CODE, press SET key to enter this mode. Use UP/- or DOWN/+ key to
select value, then press SET key to move to next item.
Area Code can be used to filter the number for incoming calls. E.g.
Area code = 75 when there is incoming call with 75 6554556, it will be
displayed as 655 4556 only.
PABX CODE
LCD panel display SET 3 PCODE, press SET key to enter this mode. LCD
displays PCODE, use UP/- or DOWN/+ key to select value, then press
SET key to move to next item.
Once the value is set, e.g. 9, the telephone will pause 2 seconds for
any telephone number that begins with 9. Then it will continue the rest
of the numbers.
AUTO-IP
LCD display SET 4 AUTO IP, press SET key to enter this mode. LCD
display AUTO IP OFF and OFF will flashes, use UP/- or DOWN/+ key to
select value. When LCD displays AUTO IP ON, press SET key. Then the
LCD will display INPUT CODE for you to enter the IP numbers. Use DEL
key to correct any wrong input. After entered all IP number, press SET
key to enter into next item. The outgoing call will automatically use IP
mode.
After you have set a number on Auto IP, e.g. 1455. If you need to call
any number that starts with 14550, just type 0 to represent 1455 then
follow by the subsequent numbers. To illustrate:
1. Press 0 288888 follow by REDIAL button
2. The telephone will call out 1455 0 288888.
P/T MODE
LCD display SET 5 P-T, press SET key to enter this mode. LCD display
TONE. Use UP/- or DOWN/+ key to change it into PULSE, press SET key
to move to next item.
ANTI SHARE
LCD display SET 6 ALAr, press SET key to enter this mode. LCD display
STEAL OFF. Use UP/- or DOWN/+ key to change it into ON, press SET
key to move to next item.
The Anti Share feature is to ensure other telephone is unable to share
the same line as your telephone. If another telephone is sharing the
same line, there will be constant noise when it is off hook.
ALARM
LCD display SET 7 ALERT, press SET key to enter this mode. LCD
display 1 00-00 OFF. Press SET to navigate on the HOUR/MINUTE. Use
the UP/- or DOWN/+ key to change the values. Change OFF to ON to
enable the alarm function. You can set up to 3 alarms and the
telephone will ring at the time set.
5
SC3130 User Guide
4. FUNCTION KEY OPERATION
UP/- key and DOWN/+ key
In any mode, press either key to check all the incoming numbers. If there is no incoming
number, the unit will display END. The unit can receive up to 16-digit phone numbers.
OUT/x key
In any mode, press OUT key to check the outgoing numbers with time. Use UP/- or DOWN/+
key to select the outgoing number. Press BACK key to dial the selected number.
DEL key
In any mode, when checking the incoming and outgoing call, press DEL key to delete the
number you are checking. Press and hold DEL key for 4 sec and it will delete all incoming call
or outgoing call numbers. When you pre-dial, press DEL key to delete digit one by one.
CAL key
You can use the calculator function to perform addition, subtraction, multiplication and
division. Press the CAL key to go into calculator mode. Press the first number follow by UP/(minus)/ DOWN/+ (plus)/ OUT/x (multiply)/ BRIGHT/÷ (divide) key and the second number.
Press #/= (result) key to see the calculated value. To reset the values, press CAL key again.
If you need to insert decimal point, press the */. key. The LCD can only display result up to 10
digits. To exit this mode, press DEL key.
PAUSE/VIP key
In the on-hook mode, pre-dial the number then press PAUSE key to add a 3.6 seconds pause
before dialing the rest of the numbers. To call out, press REDIAL/BACK key.
For the VIP function:
A) Press VIP key to add and cancel VIP calls when you check incoming and outgoing call.
VIP number is marked with a lock
on the LCD.
B) VIP number cannot be deleted individually. To delete all the VIP numbers, press and
hold the DEL key for 4 seconds.
C) If you have a new incoming call and the VIP memory is full, it will replace the normal
and VIP number.
The unit will use VIP ring tone if the incoming call is a VIP number.
BRIGHT/÷ key
To adjust the contrast of the LCD, press the BRIGHT/÷ key to adjust from Level 1-5.
RING/HOLD key
In the on-hook mode, press RING key, the phone LCD will display RING 1-8, which means
there are eight selectable ringing tones. Select your preferred ringing tone by pressing RING
continuously.
In off-hook mode, press RING/HOLD key to activate music on hold. To disable, press the
6
SC3130 User Guide
RING/HOLD key again.
FLASH key (600ms)
In the on-hook mode, press this key to auto-hang up for 600ms, after that you can press
REDIAL key or dial out another number.
REDIAL/BACK key
In the on-hook mode, pre-dial the number then press REDIAL/BACK key to auto pick up and
dial out the number. In the off-hook mode, press this key to redial the last dialed number.
When checking the incoming number or outgoing number, press REDIAL/BACK key to auto
pick up and dial out the number directly.
HF (HANDSFREE) key
While on-hook, press the HF key to go into handsfree mode. You can talk through the
microphone and listen from the speakerphone without lifting the handset. While off-hook,
press the HF key and put down the handset to go into handsfree mode.
5. ADDITIONAL NOTES
INCOMING CALL LCD INDICATOR
When there is incoming call, the unit will be automatically display the caller number, date
and time, and also display its serial number. If the incoming call is in private mode, it will
display “__p__”; it will display “__0__” if exchange cannot determine the number; it will
display “—E—“ if the call signal contains error.
LCD BACKLIGHT FUNCTION
When there is incoming call or handset is off-hook, the LCD backlight will lit up. It will be on
for about 6 seconds before going off. Without batteries, LCD backlight will not lit up at all.
TROUBLESHOOTING GUIDE
(Q) I do not hear any dial tone from the handset.
(A) Ensure the handset cord is connected correctly from the handset to the handset cord jack
at the base. Ensure you have plug in the telephone cable from the telephone to the wall
socket correctly. If the problem persists, please check with your local dealer.
(Q) I could not see the caller’s number on the LCD when there is incoming call.
(A) Ensure that you have subscribed Caller ID service from your local telecom provider.
(Q) There is no LCD Display / Backlight after I have connected the telephone line. I can
call out normally.
(A) Ensure that you have inserted the batteries on the battery compartment. If there is still
no display, change the batteries and ensure it is not empty. If the problem persists, please
7
SC3130 User Guide
check with your local dealer.
(Q) I cannot hear the VIP ringing tone when there is a VIP incoming call.
(A) Ensure that you have inserted the batteries on the battery compartment. If there is still
no VIP ringing tone, change the batteries and ensure it is not empty. If the problem persists,
please check with your local dealer.
DECLARATION OF CONFORMITY
The telephone complies with the essential protective requirements and objectives of:
•
EC R& TTE Directive 1999/5/EC
•
EC Low Voltage Directive 73/23/EEC
•
EC EMC Directive 89/336/EEC
And conforms to the following relevant harmonized standards:
•
EMC: EN55022, EN55024
•
Safety: EN 60950
Created on 28th October 2005. SC3130 Caller ID Phone.
Please visit us at www.shirocorp.com.
8