1
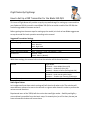
Flight Notes By Flightengr
How to Set Up a DX9 Transmitter for the Blade 350 QX3
This issue of Flight Notes will provide a step-by-step walkthrough for setting up a new model on
your Spektrum DX9 for use with a stock Blade 350 QX3 or an earlier model of the 350 QX that
has been upgraded to firmware version 3.
Before getting into the exact steps for setting up the model, let’s look at how Blade suggests we
set up the model for basic operation according to the manual.
Suggested Transmitter Settings
Model Type
Switch Mapping
Servo Direction
Servo Travel Limit Changes
Throttle Cut
Airplane
Gear: Switch B
Aux1: Switch A
Aux2: Right Knob
All Normal
Aux1: 140 (top / + end) 120 (bottom / - end)
Position: -130%
Switch: Switch I (Button)
With those settings, the manual tells us that the switches will do these functions:
Switch B
Switch A
Switch I (Button)
Flight Modes
Position 0 = Smart Mode (Green LED)
Position 1 = AP Mode (Purple LED)
Position 2 = Return to Home (flashing Red LED)
Gimbal Control Mode
Position 0 = Knob controls gimbal angle
Position 1 = Throttle stick controls gimbal angle
Press button to shut off motors after landing
Radio Signal Values
Let’s understand how those switch settings will tell the aircraft what to do. The switches will
cause different values to be sent to the aircraft on a given radio channel in order to perform the
various control functions.
Experienced users of the 350QX will also notice that two flight modes – Stability and Agility –
are not directly accessible from that basic setup. Fortunately they’re still in there, but we just
have to know which values will access them.
Radio Channel
Control Sticks
(channels 1-4)
Gear (5)
Aux1 / Flaps (6)
Aux2 (7)
Control Values and Their Function
Normal operation
Do not use trim! Also, ensure sticks are calibrated such that they send exactly 0 value
when centered.
+140% = Agility Mode (Red LED)
+125% = Stability Mode (Blue LED)
+100% = Smart Mode (Green LED)
0% = AP Mode (Purple LED)
-100% = Return to Home (flashing Red LED)
+140% = Knob controls gimbal tilt angle
-120% = Throttle stick controls gimbal tilt angle
Range from -100% to +100% tilts gimbal
Notice that there are really five modes controlled by the Gear channel, with Agility and Stability
hiding in there at the high end of the value range. Since we can’t map five functions to a threeposition switch, we’ll have to be creative about how to access all of them. More on that later.
Step-by-Step Instructions
Armed with all of that information, let’s go ahead and set up the transmitter.
Along the way, I’ll present two different options for setting up the different flight modes. One
option will let you choose from all five modes using two switches, and the other option will
allow you to choose any three of the five modes and then assign them to one switch.
1. Go to the System Setup menu, and find and select Model Utilities.
2. Choose “Create New Model”. Verify that yes, you want to CREATE a new model.
3. You’re returned to the System Setup menu with your new model selected as the current
model.
4. Go to Model Type, and select the type “Airplane”. Verify that YES, data will be reset.
(Although this seems unnecessary since the default for a new model is Airplane, I’ve
read that it’s best to make sure the model is reset to default settings. Maybe that’s due
to an old bug in a Spektrum transmitter a long time ago. Now it’s habit.)
5. Go to Model Name and give the model a name.
Hint: To erase the default text provided, click to select the first character (probably a
number, since the default format is something like “10: Acro”) and then press the CLEAR
button TWICE. (Pressing it just one clears just the one character.) Select “BACK” in the
upper right corner when you’re done.
6. Go to Aircraft Type. On the first screen where it shows the wing type, just ignore that
and scroll down to “NEXT” in the lower right corner. On the second screen (Aircraft
Options), scroll over until the picture of the plane is highlighted. Select that, and then
change the picture to a quadcopter! Then choose “LIST” in the upper right corner.
7. Go to Channel Assign. On the first screen (Rx Port Assignments), ignore those settings
and go to “NEXT” in the lower right corner. On the second screen (Channel Input
Config), you map switches to radio channels. Make these changes:
Set GEAR to B
Set AUX1 to A
Set AUX2 to RKnb
Set AUX3 to Inh (which means Inhibit, or “off”)
Set AUX4 to Inh
NOTE: If you don’t like these switch mappings, now is the time where you can change
them to different switches if you prefer.
When you’re done, choose “LIST” in the upper right corner.
8. Back on the System Setup menu, choose “< Main Screen >“. Then, click the scroll wheel
again to get into the Function menu.
9. Choose Servo Setup. The screen initially shows “Travel”, and that’s what we want to
adjust because Blade told us to in their instructions. Scroll down to the numbers above
“AX1”. Set Switch A (the switch we assigned to Aux1) to position 0, and then set the top
number to 140. Next, flip Switch A to position 1 and change the bottom number to 120.
Then choose “LIST” in the upper right corner to go back to the menu.
10. Select Throttle Cut from the menu. Throttle Cut is how we can make the motors stop by
pressing the button (Switch I). Change it from “Inhibit” to Switch I. It should default to a
position of -130%, which is what we want. Select “LIST” in the upper right corner to go
back to the menu.
11. Select Timer from the menu. This is where you adjust the countdown timer so you know
how long your battery will last. Change the time to 7:00. That’s a good place to start
unless you already know how long you can run your batteries. Note that it is not good
for the batteries to keep flying until the 350 QX flashes a low voltage warning. You want
to land just before that happens. Over time you’ll find the optimum setting for the timer
based on your flying habits.
You should also change the “Over” setting to a lower number such as 5%. The timer will
start when you raise the throttle stick beyond that level, but it would also stop the timer
if you lower the throttle stick below that level during flight (unless you change “One
Time” from “Inhibit” to “Active”, in which case the timer will never stop). Based on the
way the throttle stick is used in Smart Mode and AP Mode, you might lower the throttle
stick quite a bit during flight but you don’t want the timer to stop in that case.
Then choose “NEXT” in the lower right corner.
Change the Alert settings to your liking. I prefer to have the voice call out each minute,
so I set Every Minute, 1 Minute, 30 Seconds, and Expiration to Voice. Having the tone
from 10sec to 1sec makes it start beeping at 10 seconds.
Choose “LIST” when you’re done making changes to go back to the Function menu.
12. Choose Custom Voice Setup. Let’s add a voice callout to the button so it talks when we
press the button for throttle cut. Choose “< Add New Sound Event >” to add a new
event. Next, select “Switch Change Report”. Then choose Switch I, and for position 1
choose the phrase “Throttle Cut”. To get back to the menu, choose “BACK” in the upper
right corner, and then choose “< BACK >” from the list of events.
We’re going to take advantage of the fact that the DX9 understands up to five “flight
modes”. However, understand that what the DX9 calls a flight mode is not exactly the same
as what the 350 QX calls a flight mode. On the 350 QX, you get totally different behavior
from the aircraft when you change flight modes. In contrast, a flight mode on a transmitter
means that you have more options for defining advanced features like throttle curves. This
became popular with helicopter pilots who need may need very different transmitter
settings based on whether or not they’re flying upside down. Nonetheless, we can apply the
transmitter’s flight modes to the 350 QX. Doing so will make the setup across two switches
a little easier if you’d like to have all five, and it will also display the name of the flight mode
on the screen.
Decision time! If you would like to have all five flight modes on two switches, follow Option
1. If you would rather have only three flight modes on a single switch (the one you just
selected for GEAR in step 7), then follow Option 2.
Option 1 – All Five Flight Modes
13. Go into the System Setup menu, and choose F-Mode Setup. Set Switch 1 to the main
switch for the flight mode control (the GEAR channel), which is switch B unless you
changed it. Set Switch 2 to the switch you’d like to use for Stability and Agility modes. I’ll
suggest Switch G.
At the bottom of the screen, you should see that there are 5 enabled flight modes. You
can even test it. If you flip Switch B through its positions, you should see the text change
at the bottom of the screen. If you put Switch B in position 1 (middle) and then flip
Switch G, the text will change some more!
Choose “LIST” in the upper right corner to go back to the menu. It’s not necessary to
change any of the other flight mode settings. In fact, you don’t want to change the flight
mode table on the second screen because it won’t work correctly with the 350 QX if you
change it.
14. Go to Spoken Flight Mode. This screen lets you change the flight mode names as well as
the voice alert assigned to each mode. Set the names as follows. There are matching
voice alerts for all of them except AP Mode, so be creative with that one.
To change the mode you’re editing, actually flip the switches to that mode.
Switch B = position 0, Switch G = position 0 = Smart Mode
Switch B = position 1, Switch G = position 0 = AP Mode
Switch B = position 2, Switch G = position 0 = Return Home
Switch B = position 1, Switch G = position 1 = Stability Mode
Switch B = position 1, Switch G = position 2 = Agility Mode
Choose “BACK” in the upper right corner when you’re done with all five modes.
15. Choose “< Main Screen >” from the menu. You can play with the flight mode switches at
this point and test them if you like. The voice should call out your changes and the name
of the flight mode is displayed on the second line of the screen.
16. Go into the Function Menu, and choose Mixing. Scroll down to “P-Mix 1” and select it.
Select the word “Normal”. Next, edit the screen so it looks like the following:
Mix 1
ON > GER
Rate: 125% 0%
Offset: 0%
Switch: Flight Mode
Once you select the Flight Mode as the Switch, a row of five boxes will appear,
representing the five flight modes. Turn on box 4 (make it black) and turn off any other
boxes (box 2 might have been turned on by default). This mix should only be effective
when flight mode 4 is active.
You might recall that we needed a value of +125% on the Gear channel to get Stability
Mode. That’s what this is doing – adding 125 to the current value of Gear. We have the
flight modes set up so that Switch B must be in position 1 – which equates to 0% on the
Gear channel – in order to access the other modes using Switch G. So when you flip
switch G, this mix takes the current value of Gear (0%) and adds 125%.
Select “BACK” in the upper right corner to go back to the list of mixes.
17. Now select “P-Mix 2”. Again, select the word “Normal”, and then set it up as follows:
Mix 2
ON > GER
Rate: 125% 0%
Offset: -12%
Switch: Flight Mode
This time, choose box number 5 (turn it black) and turn off any other boxes.
The effect of this is very similar to the first mix. However, to get Agility Mode, we need a
value of +140% on the Gear channel. You can only turn the mix up to 125, so we need
another way to get to a total of 140. That’s what the offset is doing – it’s moving 0 down
the scale so that we get a net result of 140. (Why the value is -12 and not -15 is a bit
confusing. In short, mixing applies values using a curve and not exactly a straight line
based on the offset.)
Again, select “BACK” to go back to the list of mixes and then select “< BACK >” to get
back to the Function menu.
From here, you can skip to the next section on Testing.
Option 2 –Three Flight Modes on One Switch
13. Go into the System Setup menu, and choose F-Mode Setup. Set Switch 1 to the main
switch for the flight mode control (the GEAR channel), which is switch B unless you
changed it. Set Switch 2 to “Inhibit”.
At the bottom of the screen, you should see that there are 3 enabled flight modes. You
can even test it. If you flip Switch B through its positions, you should see the text change
at the bottom of the screen.
Choose “LIST” in the upper right corner to go back to the menu. It’s not necessary to
change any of the other flight mode settings.
14. Go to Spoken Flight Mode. This screen lets you change the flight mode names as well as
the voice alert assigned to each mode. Set the names for the three modes you’d like to
have on the switch and in the order you’d like. There are matching voice alerts for all of
them except AP Mode, so be creative with that one. To change the mode you’re editing,
actually flip the switch to that mode.
Choose “BACK” in the upper right corner when you’re done with all five modes.
15. Go to Digital Switch Setup. Select the switch you want to work with – the flight mode
switch, Switch B. For Position 0, 1, and 2, set the values on each to match the names you
just set in step 14 based on this table.
Smart Mode
AP Mode
Return to Home
Stability Mode
Agility Mode
100%
0%
-100%
125%
140%
Choose “LIST” in the upper right corner when you’re done.
Testing Your Setup
You can check your work without the quad! For that, we’re going to use the Monitor screen. If
you’re still in a menu, exit back out to the main model screen.
From there, roll the scroll wheel once to the right. That will show you the Monitor screen. It has
9 vertical graphs – one for each channel – that visually show the current value on that channel
as well as reporting an actual number above each graph.
The THR, AIL, ELE, and RUD channels will move with the sticks. Go ahead and play with it. By the
way, if your sticks are not showing exactly 0 when they’re centered, then you need to calibrate
the sticks. If the 350 QX sees a value other than 0 when the stick is centered, it won’t use GPS
to lock into a column for you in AP and Stability Modes.
Now let’s test the switches. With all switches in position 0 (the normal “starting point”), you
should have a value of 100 on GER, 140 on AX1, and some number on AX2 depending on the
position of the Knob. AX3 and AX4 are not used, and if you set them to “Inh” during Channel
Assignment, they’ll read 0 now.
Let’s flip through the flight modes. As you flip the switches, you should see the value of GER
change as follows:
Smart Mode
AP Mode
Return to Home
Stability Mode
Agility Mode
100%
0%
-100%
125%
140%
If you don’t get the correct value on GER to match the mode you think you’re in, then
something is wrong.
Next, flip Switch A. It should show 140 in position 0 and -120 in position 1.
Next, turn the Knob. You should be able to watch the value of AX2 change as you turn the knob.
Finally, move the throttle stick up. No matter where you leave the throttle stick, pressing the
button should drop the value of THR all the way to -130.
If all tests out well, go ahead and bind the 350 QX to the transmitter. Turn off the transmitter,
and then turn on the 350 QX. When the LED starts flashing blue quickly, hold down the bind
button and turn on the DX9. Keep holding the bind button until the DX9 announces “Binding”.
In the future, after your quad is bound, you should always turn on the transmitter first and then
turn on the quad. You only do those steps “backwards” this one time in order to bind it.
Without arming the motors, flip the flight mode switch(es) through their paces and verify that
the quad displays the correct color light to acknowledge the changes.
You’re ready to fly now!
The “Stagility Mode” Mix
“Stagility” is a term that was coined on the Internet by user Indoorheli. It’s not a true flight
mode on the 350 QX. Instead, it’s a mixing trick on the transmitter that will automatically put
the 350 QX into Agility Mode if you’re in Stability Mode and you move the aileron/elevator stick
all the way to one side. That will allow you to flip the quad over (something you can only do in
Agility Mode), but then it returns to Stability Mode as soon as you release the stick.
Let’s add this to our setup. It will require two more mixes to be created. Both mixes will be
associated with the same switch. I’ll use Switch H, a two-position switch that’s not doing
anything else.
1. Go into the Function menu, and choose Mixing. Select the next available “P-Mix” that’s
not being used.
2. Select the word “Normal”, and set up the first mix as follows:
Mix #
AIL > GER
Rate: 20% -20%
Offset: 0%
Switch: H
(Box 0 should be light and Box 1 should be dark, indicating this is active in position 1)
This mix adds up to 20% to the value of the Gear channel based on the value of the
Aileron channel. That’s how the flight mode changes as you move the stick farther out
from the center. Although the difference between Stability Mode and Agility Mode is
15%, it’s necessary to add a little more in case you’re using lower rates on the Aileron
channel (such as 70% instead of 100%).
3. Select “BACK” to get back to the list, and then select the next unused “P-Mix”. Set that
up as follows:
Mix #
ELE > GER
Rate: 20% -20%
Offset: 0%
Switch: H
(Box 0 should be light and Box 1 should be dark, indicating this is active in position 1)
This mix adds up to 20% to the value of the Gear channel based on the value of the
Elevator channel.
4. Select “BACK” to get back to the list, and then “< BACK >” to get back out to the
Function menu.
5. Choose Custom Voice Setup. Let’s add a voice callout to the button so it talks when we
press the button for throttle cut. Choose “< Add New Sound Event >” to add a new
event. Next, select “Switch Change Report”. Then choose Switch H, and for each
position choose a phrase that makes sense to you.
You can test this with the Monitor screen. Choose Stability Mode and then put the mix switch
(Switch H) in position 1. With the mix on, moving the elevator or aileron stick should gradually
move the value of GER from 125 to 140.
You can also test this with the 350 QX without the motors being armed. Go into Stability Mode,
and then see how far you need to move the stick before the quad changes to Agility Mode.