1
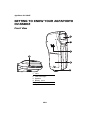
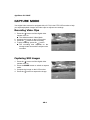
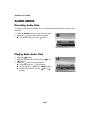
DV-5580Z Quick guide AgfaPhoto DV-5580Z GETTING TO KNOW YOUR AGFAPHOTO DV-5580Z Front View 1 2 3 6 4 5 1. 2. 3. 4. 5. 6. Lens LED assist light Speaker Battery cover Strap holder Tripod mount GB-1 AgfaPhoto DV-5580Z Rear View 1 2 3 4 5 6 7 8 9 10 11 12 13 14 15 16 1. Microphone 2. Status LED 3. Play button 4. S Up button MODE Mode button 5. X Right button O Focus button 6. T Down button MENU Menu button 7. OK / Record / Shutter button 8. T Zoom in (telephoto) button 9. W Zoom out (wide-angle) button / Thumbnail button 10. W Left button Assist light button 11. Power button 12. USB or AV OUT terminal 13. HDTV terminal 14. SD/SDHC memory card slot 15. Earphone jack 16. LCD monitor GB-2 AgfaPhoto DV-5580Z GETTING STARTED Preparation 1. Attach the camera strap. 2. Open the battery cover. 3. Insert the supplied battery with correct orientation as shown. (Label side to the back) Close the battery cover and make sure it is locked securely. 4. Insert an SD/SDHC memory card. The digital video camera does not have a built-in memory and cannot operate without an SD/SDHC memory card inserted. Make sure to insert an SD/ SDHC memory card before use. Open the SD card slot cover carefully. Insert an SD/SDHC memory card (optional) into the card slot. Close the cover and make sure it is locked securely. Be sure to format the SD/SDHC memory card with this video camera before its initial usage. Turning the Power On/Off Load the battery and insert an SD/SDHC memory card before starting. Press the button until the digital video camera turns on. To turn the power off, press the button again. GB-3 AgfaPhoto DV-5580Z CAPTURE MODE Your digital video camera is equipped with a 2.5" full color LTPS LCD monitor to help you capture/playback images and video clips or adjust menu settings. Recording Video Clips 1. Press the button until the digital video camera turns on. The default mode is Video Mode. 2. Compose the image on the LCD monitor. 3. Press the button to start recording. 4. To stop recording, press the button. The recording time depends on the storage media size and the subject to be recorded. Capturing Still Images 1. Press the button until the digital video camera turns on. 2. Press the MODE button to switch to capture mode. 3. Compose the image on the LCD monitor. 4. Press the button to capture the image. GB-4 AgfaPhoto DV-5580Z PLAYBACK MODE You can play back all the recorded files on the LCD monitor. Playing Back Video Clips 1. Press the button. The last recorded file appears on the LCD monitor. 2. Select the desired video clip with the e ( )/ f (O) buttons. 3. Press the button to start video playback. To pause video playback, press the button. To cancel pause, press the button again. To adjust the volume, use the W/T buttons. 4. To stop video playback, press the d (MENU) button and return to the start of the video clip. Playing Back Still Images 1. Press the button. The last recorded file appears on the LCD monitor. 2. Select the desired image with the e ( )/f (O) buttons. 3. Press the T button to adjust the zoom ratio. The magnification factor is displayed on the LCD monitor. 4. To view a different section of the image, press the c (MODE) / d (MENU) / e ( ) / f (O) buttons to adjust the display area. GB-5 AgfaPhoto DV-5580Z Deleting Images/Video Clips 1. Press the button. 2. Select the file you wish to delete with the e( ) / f (O) buttons. 3. Press the MENU button. 4. Select [Delete File] or [Delete All] with the c (MODE) / d (MENU) buttons and press the button. [Delete File]: Deletes the current file. [Delete All]: Deletes all files. 5. Select [Yes] to delete. Select [No] to cancel. 6. Press the button to confirm. GB-6 Play Delete File Delete All Slide Show Protect DPOF : Exit No Yes 5 Sec. Single Next Menu : OK AgfaPhoto DV-5580Z AUDIO MODE Recording Audio Files The digital video camera enables you to record and playback audio files anytime and anywhere. 1. Press the MODE button to switch to audio mode. 2. Press the button to start audio recording. To stop recording, press the button. Playing Back Audio Files 1. Press the button. 2. Select the desired audio clip with the e ( )/f (O) buttons. 3. Press the button to begin playback. To pause, press the button again. To stop playback, press the d (MENU) button. To adjust the volume, use the W/T buttons. GB-7 AgfaPhoto DV-5580Z INSTALLING THE SOFTWARE 1. Make sure you have Windows Media Player 9 or QuickTime 7.0 installed on your computer first. 2. Install the decoder program (available in the CD). H.264 files can be played back with Windows Media Player 9. (Decoder is designed for H.264 decode) MP4/H.264 playback system requirements: At least 512MB of RAM 64MB or higher video card Windows 2000 Service Pack 4 or XP or Vista 32 or Vista 64 DirectX 9.0b or higher Audio format 48KHz HE-AAC or AAC Resolution fps 640 x 480 30 fps CPU requirements 2.4 GHz Intel Pentium 4 or higher 1280 x 720 30 fps 3.2 GHz Intel Pentium D (dual-core) or higher 1440 x 1080 30 fps Core 2 Duo 2.0 & 128MB independent memory for image display GB-8 AgfaPhoto DV-5580Z Customer care More information on the complete AgfaPhoto digital camera product range can be found at www.plawa.com and www.plawausa.com. Service & Repair (USA/ Canada): 1-866 475 2605 www.plawausa.com Support Service (USA/ Canada) [email protected] Service & Repair Hotline (EU): 00800 752 921 00 (from a landline only) Service & Support Hotline (Germany): 0900 1000 042 (1.49 euros/min. from a German landline only) Online Service / International contact: [email protected] Manufactured by plawa-feinwerktechnik GmbH & Co. KG Bleichereistraße 18 73066 Uhingen Germany AgfaPhoto is used under license of Agfa-Gevaert NV & Co. KG. Agfa-Gevaert NV & Co. KG. does not manufacture this product or provide any product warranty or support. For service, support and warranty information, contact the distributor or manufacturer. Contact: AgfaPhoto Holding GmbH, www.agfaphoto.com GB-9 AgfaPhoto DV-5580Z Disposal of Waste Equipment by Users in Private Households in the European Union This symbol on the product or on its packaging indicates that this product must not be disposed of with your other household waste. Instead, it is your responsibility to dispose of your waste equipment by handing it over to a designated collection point for the recycling of waste electrical and electronic equipment. The separate collection and recycling of your waste equipment at the time of disposal will help to conserve natural resources and ensure that it is recycled in a manner that protects human health and the environment. For more information about where you can drop off your waste equipment for recycling, please contact your local city office, your household waste disposal service or the shop where you purchased the product. FCC Compliance and Advisory This device complies with Part 15 of the FCC Rules. Operation is subject to the following two conditions: 1.) this device may not cause harmful interference, and 2.) this device must accept any interference received, including interference that may cause unsatisfactory operation. This equipment has been tested and found to comply with the limits for a Class B peripheral, pursuant to Part 15 of the FCC Rules. These limits are designed to provide reasonable protection against harmful interference in a residential installation. This equipment generates, uses, and can radiate radio frequency energy and, if not installed and used in accordance with the instructions, may cause harmful interference to radio communication. However, there is no guarantee that interference will not occur in a particular installation. If this equipment does cause harmful interference to radio or television reception, which can be determined by turning the equipment off and on, the user is encouraged to try to correct the interference by one or more of the following measures. Reorient or relocate the receiving antenna. Increase the separation between the equipment and receiver. Connect the equipment to an outlet on a circuit different from that to which the receiver is connected. Consult the dealer or an experienced radio/TV technician for help. Any changes or modifications not expressly approved by the party responsible for compliance could void the user's authority to operate the equipment. When shielded interface cables have been provided with the product or when specified additional components or accessories have elsewhere been designated to be used with the installation of the product, they must be used in order to ensure compliance with FCC regulations. GB-10