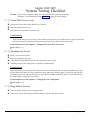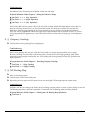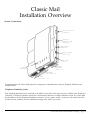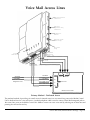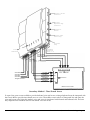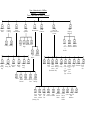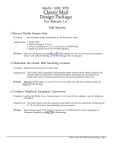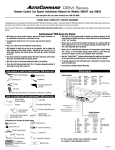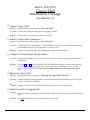
1
Merlin 1030/3070
Classic Mail
Installation Package
For Release 1.6
❏ Unpack Classic Mail
Reference: System Reference Guide Chapter 2 - The Classic Mail
Procedure: Confirm that all the parts are within the shipping container.
❉ Note:
Contact AT&T Corporation if any parts are missing.
❏ Identify Classic Mail Connections
Reference: System Reference Guide Chapter 2 - The Classic Mail
Procedure: Confirm the location of the Merlin Voice Terminal jacks that will be used for Telephone Emulation
and the Merlin line jacks that will be used for voice mail access.
❉ Note:
See page 7 of the Classic Mail 1030/3070 Design Package for this information.
❏ Complete Pre-Installation Requirements
Procedure: Confirm that all Merlin Voice Terminal ports and Line. ports conform to Classic Mail installation
requirements.
❉ Note:
See pages 14 and 15 of the Classic Mail 1030/3070 Installation Package for instructions regarding
specific Merlin 1030/3070 Control Units. Switches for Voice Terminal ports 11, 12, 13 and 14
must be set to ATTENDANT. Power Down the Merlin 1030/3070 for one minute, then power
up.
❏ Mount the Classic Mail
Reference: System Reference Guide Chapter 3 - Mounting The Classic Mail to the Wall
Procedure: Position the paper mounting template to the wall and install the three mounting screws using the
enclosed wall anchors if needed.
❉ Note:
See page 7 of the Classic Mail 1030/3070 Design Package for the mounting location.
❏ Install Control Unit Upgrade Kit
Procedure: Install the Control Unit Upgrade Key that enables Merlin 1030/3070 software features in the Classic
Mail.
❉ Note:
This must be done before the Classic Mail unit is powered up.
Classic Mail 1030/3070 Installation Package - Page 1
❏ Connect Voice Mail Access Lines
Reference:
System Reference Guide Chapter 4 - Maximizing Telephone System Performance
System Reference Guide Chapter 3 - Interposing between your Outside Line and Control Unit
Procedure: Connect voice mail access lines to the Classic Mail using the primary method of dedicating vacant
Line. ports. Or, use the secondary method by interposing existing telephone lines to provide timeshare voice mail access. These connections provide internal access to voice mail services. You may
use a combination of dedicated and time-share voice mail access.
❉ Note:
If possible, always dedicate voice mail access using vacant line ports on the Merlin Control Unit.
See page 7 of the Classic Mail 1030/3070 Design Package for this information. For an explanation of
connection methods see pages 17 through 19 of this package.
❏ Complete TEST 1
Reference: System Reference Guide Chapter 3 - Test 1
Procedure: Test each outside telephone line that is interposed with the Classic Mail.
❉ Note:
Make sure a call can be completed on each line.
❏ Connect Telephone Emulation
Reference: System Reference Guide Chapter 3 - Connecting the Telephone Emulation Cables
Procedure: Connect the Classic Mail Telephone Emulation jacks to Merlin Voice Terminal ports 11, 12, 13 and
14. The switch for each Voice Terminal port must be set to ATTENDANT. Power Down the
Merlin 1030/3070 for one minute, then power up.
❉ Note: See page 7 of the Classic Mail 1030/3070 Design Package for this information.
❏ Test Power Source Grounding
Procedure: Use a ground tester to confirm that the 110 VAC power source is properly grounded.
❉ Note:
Enter the results of this test on page 6 of the Classic Mail 1030/3070 Design Guide. Do not install the
Classic Mail if the ground test fails. Arrange for proper A/C grounding before continuing with the
installation.
❏ Install the Power Supply
Reference: System Reference Guide Chapter 3 - Installing the Power Supply
Procedure: Connect the Classic Mail to a grounded 110 VAC electrical outlet. Power up the Classic Mail. Never
power off the Classic Mail during self-initialization.
❉ Note:
Both the Merlin Control Unit and the Classic Mail should be plugged into the same power source.
The power source must be effectively grounded for the Classic Mail to operate properly. Use
only the enclosed power supply.
Classic Mail 1030/3070 Installation Package - Page 2
❏ Complete TEST 2
Reference: System Reference Guide Chapter 3 - Test 2
Procedure: Verify that all voice mail access lines are functional.
❉ Note:
After the Self-Initialization process is complete, lamp #5 on the Classic Mail will be a steady
green. The Classic Mail should answer each voice mail access line when the access code is
entered.
❏ Complete TEST 3
Reference: System Reference Guide Chapter 3 - Test 3
Procedure: Verify that all telephone lines are in service.
❉ Note:
This test confirms that all incoming telephone lines are functioning normally.
❏ Label Merlin Telephones
Reference: System Reference Guide Chapter 3 - Labeling Your Telephones
Procedure: Label voice mail the pool button or access lines on the Merlin Voice Terminals with green voice mail
labels.
❉ Note:
The stickers indicate which lines allow internal access to voice mail services.
❏ Complete TEST 4
Reference: System Reference Guide Chapter 3 - Test 4
Procedure: Confirm that each Merlin Voice Terminal can access voice mail from labeled buttons.
❉ Note:
Be certain only the voice mail access lines are labeled.
❏ Initialize the Classic Mail.
Reference: System Reference Guide Chapter 3 - Initial Administration Tasks
Procedure: Access voice mail and enter the administrator's mailbox number and the default password (0000).
❉ Note:
The first mailbox, opened and set up, automatically becomes the Administrator's Mailbox, the
General Delivery Mailbox and the Attendant's Intercom Number. These designations can be
reassigned as required.
❏ Verify the Results of Self-Initialization
Reference: System Reference Guide Chapter 3 - Initial Administration Tasks
Procedure: Compare in-service line assignments to the information prompted by the Classic Mail after system
initialization.
❉ Note:
The Self-Initialization process takes about five minutes. See pages 6 and 7 of the Classic Mail
1030/3070 Design Package for confirming data.
Classic Mail 1030/3070 Installation Package - Page 3
❏ Set the Date and Time
Reference: System Reference Guide Chapter 3 - Initial Administration Tasks
Procedure: Set the system clock to the correct date and local time.
❉ Note: The date and time entries are made using a two-number format. Two numbers each for month, day
and year. Two numbers each for hour and minute. The AM/PM designation is prompted "...press 1
for AM or 2 for PM."
❏ Initialize the Administrator's Mailbox
Reference: System Reference Guide Chapter 3 - Initial Administration Tasks
Procedure: Enter the administrator's new password, directory name recording and spelling.
❉ Note: Write down the Administrator's mailbox number and password on page 9 of the Classic Mail
1030/3070 Design Package.
❏ Complete TEST 5
Reference: System Reference Guide Chapter 3 - Test 5
Prcedure: Confirm Attendant's intercom and mailbox number.
❉ Note: Be certain the correct mailbox has been opened for the Attendant.
❏ Unlock the Assigned Mailboxes
Reference: System Reference Guide Chapter 6 - Assigning, Unlocking and Locking Mailboxes
Procedure: Unlock all mailboxes that are assigned to owners including those used by call routing.
❉ Note: See page 15 through 17 of the Classic Mail 1030/3070 Design Package. Do not unlock mailboxes that are
unassigned.
❉ Note: Fast Track key sequences begin from the administration mode top-level menu
Reference: System Reference Guide Figure 5A or page 20 of this package.
▲ Fast Track: 7
❏ Set the Access Code
Reference: System Reference Guide Chapter 9 - Changing the Classic Mail Access Code
Procedure: If required, set the Classic Mail access code to be a different single digit on the telephone.
❉ Note: See page 9 of the Classic Mail 1030/3070 Design Package for this information. The default is the star
key. Before changing the Access Code, confirm that the star key causes undesirable affects such as
last-number-redial.
▲ Fast Track: 6 - 1
Classic Mail 1030/3070 Installation Package - Page 4
❏ Set Rings Before Answering Transferred Calls
Procedure: Set the number of rings the Classic Mail will wait before re-connecting with a caller after a transfer.
The caller may then leave a message and/or transfer to another intercom.
❉ Note: See page 9 of the Classic Mail 1030/3070 Design Package for this information. The default value is
four rings.
▲ Fast Track: 6 - 2
❏ Block Lines for Off-Site Message Alert (OSA)
Reference: System Reference Guide Chapter 9 - Blocking Lines for Off-Site message Alert
Procedure: If required, block individual lines from performing Off-Site Message Alert.
❉ Note: See page 6 of the Classic Mail 1030/3070 Design Package for this information. The Classic Mail will only
unblocked lines when performing Off-Site Alert functions.
▲ Fast Track: 6 - 3
❏ Enable the Touch-Tone Gate
Reference: System Reference Guide Chapter 9 - Enabling the Touch-Tone Gate
Procedure: If required, enable the Classic Mail Touch-Tone Gate to enhance access for callers with rotary-dial
telephones.
❉ Note: See page 9 of the Classic Mail 1030/3070 Design Package for this information. The default setting is
Touch-Tone Gate Disabled. To activate this feature, enable the Touch-Tone Gate and include the phrase
"If you have a Touch-Tone telephone, press any key." in the recorded Company Greeting.
▲ Fast Track: 6 - 9
❏ Set the Administration Password
Reference: System Reference Guide Chapter 6 - Changing the Administration Password
Procedure: Assign a new password to secure the administration menus. Use an eight digit password for
maximum security.
❉ Note: Write down the Administration Password on page 7 of the Classic Mail 1030/3070 Design
Package.
▲ Fast Track: 5 - 4
❏ Administrator's Mailbox Number
Reference: System Reference Guide Chapter 6 - Changing the Administrator's Mailbox Number
Procedure: If required, reassign the administrator's functions to a different mailbox.
❋ Note: This mailbox must be unlocked before reassignment can be done. See page 9 of the Classic Mail
1030/3070 Design Package for the Administrator's Mailbox Number.
▲ Fast Track: 5 - 5
Classic Mail 1030/3070 Installation Package - Page 5
❏ Attendant's Intercom Number
Reference: System Reference Guide Chapter 7 - Changing the Attendant's Intercom Number
Procedure: If required the attendant transfer function can be assigned to a different intercom or it may be
disabled entirely.
❉ Note:
See page 9 of the Classic Mail 1030/3070 Design Package for the Attendant's Intercom Number. If no
individual is responsible for answering incoming calls, disable the attendant transfer feature.
▲ Fast Track: 5 - 6
❏ General Delivery Mailbox
Reference: System Reference Guide Chapter 7 - Changing the General Delivery mailbox Number
Procedure: If required, the general delivery mailbox function can be moved to a different mailbox or may be
disabled entirely.
❉ Note:
See page 9 of the Classic Mail 1030/3070 Design Package for the General Delivery Mailbox Number. If
no one is responsible for reviewing and forwarding messages sent to this mailbox it is very important
that this function be disabled.
▲ Fast Track: 5 - 7
❏ Assign Group Call Distribution Mailboxes
Reference: System Reference Guide Chapter 7 - Assigning Group call Distribution Mailboxes
Procedure: Calls into Group Call Distribution intercom numbers (850 - 855) may be routed to a single mailbox.
❉ Note:
See page 9 of the Classic Mail 1030/3070 Design Package for the Group Distribution Mailbox numbers.
▲ Fast Track: 5 - 9
❏ Business Hour Schedule
Reference: System Reference Guide Chapter 8 - Setting the Business Hour Schedule
Procedure: Define the opening and closing time for Monday through Sunday.
❉ Note:
See page 9 of the Classic Mail 1030/3070 Design Package for the Business Hour Schedule. Time is
entered using a two-number format, two numbers for the hour and two numbers for the minute.
The A/M P/M designation is then prompted "... press one for AM or 2 for PM."
▲ Fast Track: 5 - 2
Classic Mail 1030/3070 Installation Package - Page 6
❏ Rings Before Answering Incoming Calls
Reference: System Reference Guide Chapter 8 - Setting the Number of Rings
Procedure: Set the rings before the Classic Mail answers incoming calls in either day operation, night
operation or by individual line as required.
❉ Note:
See page 9 of the Classic Mail 1030/3070 Design Package for this information. Setting the RingsBefore-Answer for an individual line overrides the Business Hour Schedule for that line.
▲ Fast Track: 5 - 1
❏ Set the Call Transfer Type
Reference: System Reference Guide Chapter 9 - Changing the Call Transfer Type
Procedure: Select either direct or announced transfer method.
❉ Note:
See page 9 of the Classic Mail 1030/3070 Design Package for this information.
▲ Fast Track: 6 - 7
❏ Record Company Greetings
Reference: System Reference Guide Chapter 8 - Recording Company Greetings
Procedure: Using the written script, record the greetings that will be played to callers during day and night
operation.
❉ Note:
See page 10 of the Classic Mail 1030/3070 Design Package for the day and night company greeting script.
▲ Fast Track 1 - 1 for Day 1 - 2 for Night
❏ Initialize Mailboxes
Reference: Mailbox User's Guide Chapter 2 - First-Time Use
Procedure: Assist all mailbox owners with mailbox set up. Instruct users on how to send and receive messages.
❉ Note:
It is important to set up any mailboxes that are used by Call Routing before the Call Routing Map is
defined. All mailboxes except the general delivery mailbox must be set up with the owner's
password before any messages can be deposited in them.
❏ Mailbox Greetings
Reference: Mailbox User's Guide Chapter 2 - Recording a Greeting
Procedure: Assist all mailbox owners with recording personal greetings. The mailboxes used by Call Routing
must be set up before the route is defined.
❉ Note:
A generic greeting will be played to callers if a custom greeting is not recorded.
Classic Mail 1030/3070 Installation Package - Page 7
❏ Call Routing Maps
Reference: System Reference Guide Chapter 8 - Entering Advanced Answering Service Information
Procedure: Using the Call Routing work sheets, enter the call routing map and record the Top-Level menu of
instructions for day and night operation.
❉ Note:
See pages 11 through 14 of the Classic Mail 1030/3070 Design Package for Call Routing information.
Read System Reference Guide Chapter 8 - Entering Advanced Answering Service Information
before first attempting to set up a Call Routing application.
▲ Fast Track: 2
Classic Mail 1030/3070 Installation Package - Page 8
Merlin 1030/3070
System Testing Checklist
❉ Note: Fast Track key sequences begin from the administration mode top-level menu
Reference: System Reference Guide Figure 5A or page 20 of this package.
1. ❏ Classic Mail Access Code
❥ Call into the Classic Mail from a Merlin Voice Terminal
❥ Enter the specified access code
❥ Verify that the Classic Mail answers the call
Troubleshooting
Make certain that you are accessing a voice mail access line before you conduct this test. If the Classic Mail
still does not answer, reset the line status and control unit type and reboot the Classic Mail..
❋ System Reference Guide Chapter 9 - Changing the Classic Mail Access Code
▲ Fast Track: 6 - 1
2. ❏ Simultaneous Access
❥
❥
❥
❥
Select a voice mail access line
Enter the specified access code
Verify that the Classic Mail answers the call, then put the line on hold
Continue until all Classic Mail ports are operating simultaneously
Troubleshooting
Make certain that you are using a voice mail access lines. If all four ports do not answer simultaneously, reset
the line status and control unit type, reboot the system and execute this test again. If it still fails, reset the line
status and control unit type and connect the Classic Mail to a different Merlin Control Unit. If the test fails on
the second Merlin, replace the Classic Mail.
❋ System Reference Guide Chapter 9 - Changing the line Configuration
▲ Fast Track: 6 - 4
3. ❏ Rings Before Answer:
❥ Force the Classic Mail into day or night operation
❥ Call into the Classic Mail using an outside line and verify the rings before answer
Classic Mail 1030/3070 Installation Package - Page 9
Troubleshooting
Use different Voice Terminal ports or Merlin control unit and retest.
❋ System Reference Guide Chapter 9 - Setting the Number of Rings
▲ Fast Track: 5 - 1 - 1 (Day Operation)
▲ Fast Track: 5 - 1 - 2 (Night Operation)
▲ Fast Track: 5 - 1 - 3 (Line Operation)
If the Classic Mail will not answer a line at all, first check to make certain that Rings-Before-Answer has not
been set to 99 rings for that line. If so, the Classic Mail would wait 99 rings to answer calls into that line.
Otherwise, check the programming on the Voice Terminal ports you are using for Telephone Emulation.
They may not be programmed with the line appearance of the telephone line in question. If this is so, correct
it by programming line appearances so the Classic Mail will know when calls are coming in on the telephone
lines.
4. ❏ Company Greetings
❥ Verify that the correct greeting (Day or Night) plays
Troubleshooting
If the correct greeting does not play when the Classic Mail is in forced operation (either day or night),
then the recording may have been created improperly. Record the day and night greetings again. Make
certain the system prompt confirms that you are recording the correct greeting for both day operation and
night operation.
❋ System Reference Guide Chapter 8 - Recording Company Greetings
▲ Fast Track: 1 - 1 (Day Greeting)
▲ Fast Track: 1 - 2 (Night Greeting)
5. ❏ . Call Routing Map
❥ Select a call routing option
❥ Verify that the correct action takes place
❥ Repeat the previous steps until all options for the day and night Call Routing maps have been tested
Troubleshooting
Problems with the call routing map usually involve making incorrect entries to create a path or failing to save the
Call Routing map after it has been completed. Confirm that all Call Routing paths have been defined.
❋ System Reference Guide Chapter 8 - Entering the Call Routing Map Information
▲ Fast Track: 2
Classic Mail 1030/3070 Installation Package - Page 10
6. ❏ Attendant's Intercom Number
❥ Press 0 to transfer to the attendant
❥ Verify that the correct intercom rings
Troubleshooting
If you press 0 and are not transferred to the Attendant, or if you are transferred to the wrong intercom, use the Set
Attendant's Intercom Number option to confirm the correct Attendant Intercom number. If the Attendant's Intercom
is correct, connect a 34 button Merlin Voice Terminal to the Merlin Control Unit at port 10. Try to transfer a call to
the Attendant's Intercom using the Intercom Auto-Dial button for the Attendant's Intercom. If this does not work,
the Intercom Auto dial button for port 10 is not programmed correctly. See your Merlin User Guide for
instructions on button programming.
❋ System Reference Guide Chapter 7 - Changing the Attendant's Intercom Number
▲ Fast Track: 5 - 6
7. ❏ General Delivery Mailbox
❥ Do not answer the attendant voice terminal
❥ Verify that the General Delivery Mailbox greeting plays
❥ Record a test message in the General Delivery Mailbox
Troubleshooting
If the call does not reach the General Delivery Mailbox, make certain you have defined a mailbox number. This can
be confirmed by using the Set General Delivery Mailbox Number option.
❋ System Reference Guide Chapter 7 - Changing the General Delivery Mailbox Number
▲ Fast Track: 5 - 7
8. ❏ Message Lamps
❥
❥
❥
❥
❥
Call into the Classic Mail using an outside line
Leave at least a three second message in an initialized Regular mailbox
Verify that the correct message lamp illuminates
Delete the message from the mailbox
Verify that the message lamp extinguishes
❥ Repeat for each initialized Regular mailbox.
Troubleshooting
If none of the message lamps work, confirm that Classic Mail Telephone Emulation jack #1 is connected to Merlin
Voice Terminal port 11. Confirm that Merlin Station ports 11, 12, 13 and 14 are set to ATTENDANT operation.
❋ System Reference Guide Chapter 10 - Troubleshooting Tables
Classic Mail 1030/3070 Installation Package - Page 11
9. ❏ Disconnect Supervision
❥ Call into the Merlin using an outside line
❥ Answer the call on this line, then disconnect the far end.
❥ Listen on the Merlin end for dial-tone, busy, howler or silence.
Troubleshooting
If nothing but silence is returned after a far-end disconnect the Classic Mail may have difficulty releasing a line.
Confirm that silence is the response to a far-end disconnect. If you enable disconnect supervision, test auto
attendant transfer a number of times making certain that no random disconnects occur. The disconnect
parameters allow fine-tuning to adjust for varying type of telephone lines.
●
❋ System Reference Guide Chapter 9 - Adjusting Disconnect Parameters
▲ Fast Track: 6 - 8
10. ❏ Off-Site Message Alert
❥ Call into the Classic Mail using an outside line
❥ Leave a message in a mailbox that has Off-Site Message Alert activated
❥ Verify the pager or off-site telephone number is contacted by the Classic Mail.
Troubleshooting
If the Classic Mail does not call an outside telephone number to deliver a new message, check the following items:
Confirm that the Classic Mail is not blocked from dialing out on the outside telephone lines. If any of the
Merlin Voice Terminal ports connected to the Classic Mail are call restricted remove this restriction. Verify the
line blocking defined for the Classic Mail. If all lines have been blocked for Off-Site Message Alert, reprogram
the Classic Mail to allow at least one line to dial out. Make certain that all lines that the Classic Mail is allowed
to use for Off-Site Message Alert are not inbound-only lines.
●
❋ Mailbox User's Guide Chapter 4 - How Off-Site Message Alert Works
▲ Fast Track: 6 - 3
●
If the Classic Mail is not activating a pager check the items listed above first. If you do not uncover the
source of the problem, manually activate the pager. If you can't do this manually, contact the pager service
provider. If you successfully activate the pager then the likely cause of the failure is an incorrect dialing
sequence. To determine the correct dialing sequence you must estimate the timing of two events. First
manually determine the approximate time in seconds that it takes for the paging service to answer your call
and beep to indicate that digits may now be entered. Next determine how long (in seconds) the paging
service allows for entering the first digit before the disconnecting. When setting up the dialing sequence,
include a long enough timed pause after the dialing number to allow the paging service to answer but not so
much that it disconnects before the Classic Mail dials digits for display or pager identification.
❋ Mailbox User's Guide - Page 31
Classic Mail 1030/3070 Installation Package - Page 12
11. ❏ Blocking Lines for Off-Site Message Alert
❥
❥
❥
❥
Call into the Classic Mail using an outside line
Busy out all but the blocked line/s.
Leave a message in a mailbox that has Off-Site Message Alert activated
Verify the Classic Mail does not call out on any of the blocked lines
Troublehooting
If the Classic Mail calls out on the blocked line, double check the line number and make certain that it has been
correctly defined to the Classic Mail.
❋ System Reference Guide Chapter 9 - Blocking Lines for Off-Site Message Alert
▲ Fast Track: 6 - 3
Classic Mail 1030/3070 Installation Package - Page 13
Pre-Installation
Requirements
Merlin 1030/3070
1. Set voice terminal ports 11 through 14 to attendant mode
●
Set switches B, C, D, and E from Normal to Attendant.
●
Turn the 1030/3070 off for at least 60 seconds and back on again. Using an operator's console, verify that the
ATTENDANT template has been installed on ports 11, 12, 13 and 14.
2. Check Voice Terminal ports 11 through 14
●
Connect an operator console into ports 11, 12, 13 and 14.
❉ When doing this check, use the Telephone Emulation Cable that will be connected to the Classic Mail to verify that the
cord is good. If the telephone does not work, replace the cord and repeat this check.
●
Verify that the ports are good. If the intercom light goes on and you get intercom dial tone when you lift the
handset the port is good.
●
Verify that the ports have access to all necessary C.O. lines by touching the button, if the red and green lights
come on you have access, if the lights remain dark there is no access to this line. Confirm that you can generate
DTMF tones on each line.
●
If all ports are good and have access to all of the necessary lines proceed with installation.
●
If the necessary lines don't appear proceed to the next step.
3. Check all vacant Merlin 1030/3070 line ports
●
Move an existing C.O. line to a vacant 1030/3070 line port.
●
Verify that the port is good by making a call on that line. If dial tone can be broken and a working connection is
established the port is operational.
●
Repeat the previous steps for each vacant line port.
●
If all ports are good and have proceed with installation.
●
If any line port is not functioning, notify the Merlin 1030/3070 system owner before proceeding with the
installation.
Classic Mail 1030/3070 Installation Package - Page 14
4.
5.
If the 1030/3070 is squared
●
Confirm that all voice terminals have the line appearances to access voice mail.
●
Assign ghost lines for voice terminals that do not have all line appearances.
If Automatic Route Selection is used
●
6.
Install an SMDR card and perform a data dump
If the 1030/3070 is pooled
●
Assign four lines to a pool for Classic Mail access. Use four vacant line ports, if possible, for access to voice mail.
If C.O. lines must be used for voice mail access, do not mix vacant line ports and C.O. lines in the voice mail
access pool.
●
If Automatic Route Selection is used and pooled C.O. lines are needed to provide voice mail access, document
where in the ARS tables these pools are referenced.
●
Remove the lines used for voice mail access from the current pool and assign them to a new pool. This will be the
voice mail access pool.
●
Add the voice mail access pool to all ARS routes into the position immediately following the pool that originally
contained the lines used for voice mail access.
●
Test all ARS routes to verify correct programming and routing.
Classic Mail 1030/3070 InstaIlation Package - Page 15
Classic Mail
Installation Overview
System Connections:
Optional RS-232
Connector
Optional
Expansion Key
Connector
Diagnostic
Button
Message Light
Panel Plug
DC Power
Plug
Telephone
Emulation
Jacks. 1-4
Status
Indicators
Interposed
Line Jacks. 1-4
Outside
Line Jacks. 1-4
To understand how the Classic Mail operates it is important to understand the concept of Telephone Emulation and
Interposed lines.
Telephone Emulation Jacks:
Each Telephone Emulation jack is connected to the Merlin Control Unit in the same manner as a Merlin Voice Terminal is
connected. A Telephone Emulation connection is electronically identical to a Merlin attendant console. The Classic Mail
has the ability to use this Telephone Emulation. connection - just as a person would - to answer a call, transfer the call to
an intercom and, if needed, record a confidential message in the caller's own words.
Classic Mail 1030/3070 Installation Package - Page 16
Interposed Lines:
Even though Classic Mail Telephone Emulation operates just as a person does when answering calls coming in on outside
Lines, it can’t answer a call from someone calling on a Merlin intercom line. The reason is simple: The Classic Mail interacts
with a caller, offering a menu of choices and taking action on the caller's selections. A caller may indicate which menu
choices they would like to select by pressing the touch tone key that corresponds with the desired selection. The Classic
Mail detects and decodes this touch tone key press and takes the appropriate action. Without the tones, the Classic Mail
can’t interact with callers and, unfortunately, the Merlin does not generate touch tone on the intercom lines.
So how can a mailbox owner interact with the Classic Mail to send and receive messages? One way is to call in on an
outside line. This is exactly what mailbox owners do when they call the Classic Mail from outside the office. But how can
they use a Merlin telephone to get their messages? The Classic Mail can be connected to vacant Line. ports to provide voice
mail access. Since Merlin telephones can generate touch tone when connected to a Merlin Line. line connection, a mailbox
owner may access voice mail by selecting any one of up to four Line. lines that have been dedicated to the Classic Mail., If
vacant ports are not available to provide dedicated voice mail access, the Classic Mail can be interposed with existing
telephone lines to provide voice mail access. By interposing the incoming telephone lines with the Classic Mail, the user can
time-share inbound and outbound calls with voice mail access calls. Instead of making a call, the user may select an
interposed voice mail access line and signal the Classic Mail that they wish to open a mailbox. Mailbox owners do this by
pressing the star button on a Merlin telephone after selecting a voice mail access line. The Classic Mail will recognize this
signal and ask the caller for a mailbox number and password before allowing entry into any mailbox. As long as the user is
connected to the Classic Mail via the Merlin outside line connection, they can navigate the Classic Mail menus to send and
receive messages. Of course, while the mailbox owner is using a time-shared line to interact with the Classic Mail, that line
is busy, just as it would be if an outside call was being made. All incoming calls to that line will receive a busy signal. For
this reason, dedicated voice mail access is recommended for installations that have vacant Line. ports available. A
combination of dedicated and time-share access may also be used as well.
Other Connections:
Power Plug - connects an external wall-mounted power supply.
Message Light Panel - ❉ Note: Not operational on the 1030/3070
Diagnostic Button - used to reset administration passwords.
Expansion Key Connector - used to upgrade to 4 port and 1030/3070 operation.
RS-232 - used for manufacturing testing only.
Classic Mail 1030/3070 Installation Package - Page 17
Voice Mail Access Lines
Optional RS-232
Connector
Optional
Expansion Key
Connector
Diagnostic
Button
Message Light
Panel Plug
DC Power
Plug
Status
Indicators
Telephone
Emulation
Jacks. 1-4
11 12 13 14
954-9500
954-9500
954-9501
954-9501
Telephone Lines
A
Voice Terminals
B
Voice Mail Access
Voice Mail Access
C
Line. Ports
D
Merlin Control Unit
Primary Method - Dedicated Access
The preferred method of providing voice mail access for internal users is to use vacant Line. ports on the Merlin Control
Unit to dedicate lines for voice mail access. A modular telephone cable is used to connect Classic Mail interposed jacks to
the vacant Line. ports on the Merlin Control Unit. Mailbox owners can access voice mail by selecting one of these lines and
pressing the voice mail access key.
Classic Mail 1030/3070 Installation Package - Page 18
Optional RS-232
Connector
Optional
Expansion Key
Connector
Diagnostic
Button
Message Light
Panel Plug
DC Power
Plug
Status
Indicators
Telephone
Emulation
Jacks. 1-4
11 12 13 14
954-9500
954-9501
954-9502
954-9503
Telephone Lines
954-9500
954-9501
954-9502
954-9503
A
Voice Terminals
B
C
Line Ports
D
Merlin Control Unit
Secondary Method - Time Shared Access
If vacant Line. ports are not available to provide dedicated voice mail access, existing telephone line an be interposed with
the Classic Mail to provide time-shared access to voice. The mailbox owner selects an interposed line and enter the
voice mail access code. Using this method, voice mail access is time-shared with inbound and outbound calls. The least
busy telephone lines should be used for time-shared voice mail access.
Classic Mail 1030/3070 Installation Package - Page 19
Open Administrator's Mailbox
Mailbox:
Password:
Press 9 then enter the Admin Password
Return to
Previous
Menu
Record
Company
Greetings
Call
Routing
Administration
Night
Day
Greeting Greeting
Change
System
Operation
Force
Day
Mailbox
Administration
Change
System
Parameters
Change
Control Unit
Type & Control Unit
Software
Locking
and
Unlocking
Mailboxes
Lock
Or
Unlock
a
Mailbox
Force Release Return
Night
UnlLock
Lock
Multiple
Multiple
Mailboxes Mailboxes
Change
List All
A
Subscribers
Mailbox
Scan
Record
Administer
and Change Top Level
Other
Menu
Routing Map
Routing
Map
Copy
Routing
Map
Return
Initialize
Routing
Map
Return
Return
Record
Reset
Reset
Mailbox Mailbox Directory
Name
Password
Set
Block
Rings Off-Site
Before Message
Answer Alert
(Transferred Calls)
Change
Access
Code
Change
Line
Config.
Reset
Line
Status
&
Control
Unit
Type
Change Change Disconnect Set Up
Control Transfer Parameters Touch
Unit Type Type
Tone
&
Gate
Control
Unit
Software
Change
Company
Directory
Set
Set
Change Change
Admin.
Business Date
Rings
and
Before
Hour
Password
Time
Answer Schedule
(Incoming Calls)
Set
Set
Admin. Attendant's
Mailbox Intercom
Number
Reset
Set Up
Return
Set
General System Group Call
Dist.
Delivery
Mailbox
Mailboxes
Number