1
®
Virtual Iron® Software Release Notes
Virtual Iron® version 4.0.0
PRELIMINARY
Copyright (c) 2007 Virtual Iron Software, Inc.
This information is the intellectual property of Virtual Iron Software, Inc. This content is for your personal use
only, subject to Terms and Conditions. No redistribution allowed.
Contents
Enterprise Edition Upgrade Instructions ............................................................... 3
Single Server Edition Upgrade Instructions .......................................................... 3
New in this Release ............................................................................................... 4
Workaround for Issue 504 ...................................................................................... 4
Fixed in this Release.............................................................................................. 7
Open Issues in this Release ................................................................................. 12
Product Documentation ....................................................................................... 17
Contacting Virtual Iron Support.......................................................................... 17
-2-
ENTERPRISE EDITION UPGRADE INSTRUCTIONS
If you are running an earlier version of Virtual Iron®, use this link and follow the
instructions to upgrade to the current version of the product. Install the new VS
Tools onto each of your Virtual Servers.
http://virtualiron.custhelp.com/cgi-bin/virtualiron.cfg/php/enduser/std_adp.php?p_faqid=100&p_created=1173142157
SINGLE SERVER EDITION UPGRADE INSTRUCTIONS
If you are running an earlier version of Virtual Iron®, use this link and follow the
instructions to upgrade to the current version of the product.
http://virtualiron.custhelp.com/cgi-bin/virtualiron.cfg/php/enduser/std_adp.php?p_faqid=100&p_created=1173142157
-3-
NEW IN THIS RELEASE
The following major enhancements are included in this release:
• SUSE Linux Enterprise Server 10 kernel and drivers have been integrated in Virtual Iron’s core virtualization architecture. Users have access to complete Novell
certification and global commercial support for servers, storage, and networking
hardware supported by Novell in SUSE LINUX Enterprise Server. This includes
systems from IBM, HP, Dell, Network Appliances, Cisco, and others.
• This release integrates the Xen 3.1 64-bit hypervisor, which provides support for
up to 128 GB of physical memory and per-guest virtual machine limits of 32 GB.
The new hypervisor also supports up to 8-way SMP per guest and leverages
ACPI to support dynamic hot-plugging of CPU, network, and storage running
into virtual machines.
• Release 4.0.0 adds support for several new 32- and 64-bit operating systems,
including Windows Vista, Windows 2000, and Red Hat Enterprise LINUX 3.
• This release includes Windows SMP support for virtual machines with up to
eight CPUs. This provides administrators the ability to virtualize more demanding workloads, such as Microsoft Exchange and SQL server.
• LiveConvert TM physical-to-virtual and virtual-to-virtual conversion capabilities
have been added in this release. LiveConvertTM allows the migration of data,
applications, and operating systems across physical, virtual, blade, and imagebased infrastructures.
• Release 4.0.0 contains changes and additions to the Virtualization Manager
interface. Included are new management wizards for creating and managing virtual machines, and new graphing and reporting tools for measuring resource utilization and performance, including CPU, memory, disk, and network I/O.
WORKAROUND FOR ISSUE 502
VIRTUAL
CONSOLE KEYBOARD HARD-WIRED TO US ENGLISH 101
You must use the US-English 101 keyboard in order to enter text for the Virtual
Console. Non-English keyboards do not map their keys properly.
Users of Japanese, German, and other non-English 101 keyboard types, can use
the following workaround to set the Virtual Console’s keyboard.
Workaround
Java 1.6 fixed a number of long standing key map/keyboard issues. Therefore, for
Virtual Iron’s virtual server console to work with non-English keyboards, it must be
run in a Java 1.6 runtime environment.
Following are instructions for installing Java 1.6 on a client that has a non-English
keyboard, and for configuring a guest OS and virtual server to use the corresponding key map.
Install Java 1.6
Download the latest Java 1.6 from http://www.java.com/en/download/manual.jsp
and install it on the computer used to run the Virtualization Manager.
-4-
When you start the Virtualization Manager, check the first two lines of Java Console
output to make sure that you're using the correct version. You should see something similar to the following:
Java Web Start 1.6.0
Using JRE version 1.6.0 Java HotSpot(TM) Client VM
Configure Keyboard
Configure the guest OS to use the correct keyboard. If it isn't already configured:
• Start the virtual server (it will use the default en-us key map).
• Start a virtual server console.
• Configure the guest OS to use the correct keyboard. You must use the en-us key
map to do this. For example, if you're using a German keyboard (QWERTZ not
QWERTY—the Z and Y are swapped), and need to enter the letter Y, type the Z
key (German keyboard, English key map).
The API has methods to set and get the name of the key map used by virtual server
consoles. The default key map name is en-us. It can be overridden at the foundry,
virtual data center, or virtual server level. The key map names correspond to the
names of the QEMU key map used by Xen.
Each key map name consists of an ISO 639-1 language code:
(http://www.loc.gov/standards/iso639-2/php/English_list.php)
These are optionally followed by a dash and an ISO 3166-1 country code:
(http://www.iso.ch/iso/en/prods-services/iso3166ma/02iso-3166-codelists/list-en1.html)
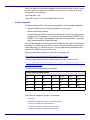
The following key map names are supported.
Supported Key Map Names
ar
da
de
de-ch
en-gb
en-us
es
et
fi
fo
fr
fr-be
fr-ca
fr-ch
hr
hu
is
it
ja
lt
lv
mk
nl
nl-be
no
pl
pt
pt-br
ru
sl
sv
th
tr
Use runner to configure key maps. For example:
# ./runner.sh
Virtualization Manager API Runner: v3.0 Interactive Mode
>>> from com.virtualiron.vce.mgmt.api import *
>>> from com.virtualiron.vce.mgmt.api.physical import *
>>> from com.virtualiron.vce.mgmt.api.virtual import *
-5-
>>> cm = VirtualizationManager.getConfigurationManager()
>>> vs = cm.findObject(VirtualServer, 'VS123')
>>> vs.getKeymapName()
'en-us'
>>> # configure VS123 to use German keymap
>>> vs.setKeymapName('de')
>>> vs.getKeymapName()
'de'
>>> # configure VS123 to inherit keymap from its VDC
>>> vs.setKeymapName(None)
>>> vs.getKeymapName()
'en-us'
>>> vdc = vs.getAssociatedVirtualDataCenter()
>>> vdc.getKeymapName()
'en-us'
>>> vdc.setKeymapName('de')
>>> vdc.getKeymapName()
'de'
>>> # by default all virtual servers in this VDC will use 'de'
>>> vs.getKeymapName()
'de'
If a virtual server is running, restart it for the new key map to take effect.
Note that there are still a few key map issues, even if you use Java 1.6, as when for
example, a virtual server console displays a text console (the one that looks like a
vt100 terminal). This is alleviated once you start up a graphical desktop such as
Gnome. Only dead keys continue to be a problem when a graphical desktop is
used.
Using the virtual server console to interact with a graphical desktop on the guest
OS, you can configure VNC or Remote Desktop. If you need to use dead keys to
produce diacritical marks above letters, don’t use the virtual server console.
Instead, switch to a native VNC or Remote Desktop client.
-6-
FIXED IN THIS RELEASE
The following issue has been resolved in this release.
CANNOT USE DISKS LARGER THAN 128 GB IN THE VS WITHOUT VS TOOLS
Virtual Iron does now supports disks larger than 128GB without VS Tools.
Reference Number: 462
VIRTUAL
CONSOLE KEYBOARD HARD-WIRED TO US ENGLISH 101
There is now a workaround for this issue. Refer to Workaround For Issue 502.
Reference Number: 502
3COM ETHERNET CARDS DO NOT PROPERLY DISPLAY ETHERNET CARRIER UP/DOWN
STATUS.
In previous releases, 3Com Ethernet cards did not provide Ethernet carrier status
prior to starting a virtual server connected to that port. As a result, the port status
could be displayed as down even though the port was working properly. This issue
has been resolved.
Reference Number: 579
CLOCK ISSUES HAVE BEEN OBSERVED WHEN RUNNING MANY VIRTUAL SERVERS UNDER
HEAVY LOAD
In previous releases, when running multiple virtual servers on a single physical
node under heavy load, the virtual server's clock was observed to run faster than
"true" time as measured by an external time source. Over time, the clock skew
would result in virtual server time differing from external time by minutes or hours.
This issue has been resolved with this release.
Reference Number: 671
WINDOWS® GUESTS NOT SUPPORTED WITH MORE THAN
4GB OF MEMORY
In previous releases, when running Windows® on a virtual server, you could not
configure your virtual server with more than 4GB of memory. This issue has been
resolved.
Reference Number: 897
VDISK CLONE PROGRESS BAR IS INACCURATE
The progress of a vDisk clone, import, or export operation is now accurately
reflected by a progress bar every ten to fifteen seconds.
Reference Number: 1029
RED HAT
4 CAN BOOT INTO A BLANK SCREEN AFTER INSTALLATION
In previous releases, if you installed RHEL-4, when you booted into runlevel 5 the
-7-
first time after install you would see a blank screen. This issue has been resolved.
Reference Number: 1122
SOME CONSOLE-MODE INSTALLATIONS DO NOT WORK USING WINDOWS REMOTE
DESKTOP
Prior to 4.0.0 it was not possible to install Cygwin in a virtual server using Windows
RDP. This issue has been resolved in this release.
Reference Number: 1184
ADD A NEW ETHERNET NIC REQUIRES A NODE REBOOT
With Release 4.0.0, it is no longer necessary to delete, then add, and then rediscover a new Ethernet NIC added to a server.
Reference Number: 2010
MULTIPLE VIRTUAL
NICS IN LINUX VIRTUAL SERVER REQUIRES MANUAL CONFIGURATION
Workaround:
1. When you add multiple virtual NICs to a RedHat virtual server, copy and edit
/etc/sysconfig/network-scripts/ifcfg-eth0
to add the additional device.
2. For a SLES virtual server, run yast and in the network devices configuration,
select Other to bring up the interface configuration and enter the correct eth
number.
This workaround has been added to the Virtualization Manager Administration
Guide, Chapter 7.
Reference Number: 2013
VIRTUALIZATION MANAGER DOES NOT SEE LOCAL DRIVES WITH
SMART FEATURES
It is not longer necessary to disable SMART in the node's BIOS for the disks to be
accessible.
Reference Number: 2064
SINGLE SERVER EDITION INSTALL FAILS “UNABLE TO FIND THE INSTALLATION MEDIA”
In previous releases, if you installed Single Server Edition systems with a USB
CDROM drive and had USB2 enabled in the BIOS, you would see the message:
“Unable to find the installation media. This release now supports the EHCI (USB
2.0) controller.
Reference Number: 2433
-8-
HOW TO CHANGE THE IP ADDRESS OF THE VIRTUALIZATION MANAGER
The following information has been added to Chapter 9 of the Virtualization Manager Administrator Guide:
Follow these steps to change the Virtualization Manager IP address:
1. Stop the Virtualization Manager.
2. Change the IP address on the Virtualization Manager system via the host oper-
ating system.
3. Copy the file VirtualizationManager\etc\dhcpd.conf_default to VirtualizationMan-
ager\etc\dhcpd.conf
4. Copy the file VirtualizationManager\etc\dhcpd.leases_default to Virtualization-
Manager\etc\dhcpd.leases
5. Start the Virtualization Manager and reboot all nodes.
Reference Number: 2571
SINGLE NODE TO MULTI-NODE MANAGEMENT SERVER CONVERSION
The following information has been added to Chapter 9 of the Virtualization Manager Administrator Guide:
Management Server IP address changing now allows single node to multi-node
conversion. Use the following procedure.
NOTE: Before converting, assure that your single node and multi-node management servers are both running the same version of Virtual Iron Management software, and that the time and date settings are the same.
1. Launch the Virtual Iron Administration Manager on your single node manage-
ment server.
2. In the Administration Manager, click the pulldown arrow next to Backup and
select Database Only.
3. In the Administration Manager, click the File Management pulldown and select
Get a File from the Virtualization Manager.
4. Navigate to your backup directory and select your backup file named
backDB.X.Y.tar, where X is the date of the backup and Y is the product version
number.
5. At this point, unplug the public Ethernet from your single node management
server’s primary Ethernet port and plug it into the secondary. Take a new Ethernet cable and plug your primary network interface into the network managed by
the new multi-node management server. Make sure that the BIOS on the former
single node is set to PXE boot.
6. Launch the Administration Manager on the multi-node management server
7. In the Administration Manager, click the pulldown arrow next to File Manage-
ment and select Put a File onto the Management Server.
8. Locate the backupDB.tar file on your local machine and place it in the backup
directory on your multi-node management server.
WARNING: Before performing the next step, note that if you have any data
on the multi-node install, it will be erased.
-9-
9. In the command line in your Virtualization Manager console, type the following:
restore.sh/ .bat backupDB.tar.datetime.4.0.x.x.tar
10. Restart the management server.
11. Power cycle the node that was originally the single node management server.
12. Run the VI script to fix DHCP.
13. Login to your management server. Use the same password for your Enterprise
Edition Virtualization Manager that you used for your Single Server Edition, and
log in.
Reference Number: 2572/2700/2701
ONLINE HELP DOES NOT REFLECT CHANGES IN RELEASE 3.7.0.
This issue, which originally occurred in 3.7.0, has been resolved in Release 4.0.0.
Reference Number: 2760
SSE RAID CONSIDERATIONS, REV 3.
The following information has been added to Chapter 2 of Virtualization Manager
Administrator Guide:
When using RAID on SSE, you should consider the layout of the RAID set prior to
SSE installation. If you are going to use RAID to configure your physical storage
prior to VI installation, you should configure one physical volume to be excluded
from the RAID set and it will be used for the Virtual Iron install. You should create
another volume(s) using the remaining storage to store virtual/logical disks for use
by Virtual Servers.
During the installation process, the SSE installer will clear the all disk data on the
boot volume of the physical server; so is not recommended to store logical disks on
that volume. Logical disks created on the boot volume can be saved, but it requires
that you export the drives prior to the re-install process. This is a time consuming
process. Therefore, if you have multiple physical volumes on your node, combining
them into one single large RAID'ed volume is not an optimal practice.
A better approach is to use one physical volume for the Virtual Iron software and
then create separate volumes to be used for logical disks. We recommend at least
36 GB for this volume. Then you can configure the remaining physical volumes for
logical disks.
Here's an example. If you have four 250 GB disks in your system, you should not
create one large 1,000 GB volume. Instead, use one 250 GB volume for the boot/
install disk, and then you can create one 750 GB RAID-set volume to be used for
storing logical disks.
Reference Number: 3031
NBD FILE .ISO EXTENSION MUST BE LOWER CASE
For iso files to appear in the VS Configuration & Boot Options > Network (image)
Boot menu, the .iso extension must be in lower case letters.
Reference Number: 3049
-10-
DISABLING WRITE-CACHING ON WINDOWS FOR THE VIRTUALIZATION MANAGER
The following information has been added to Chapter 2 of the Virtualization Manager Administrator Guide:
If you run the Enterprise Edition of Virtualization Manager on a Windows system, it
is considered a best practice to disable write-caching on the drives used by the Virtualization Manager. Disabling write-caching helps to avoid file corruption problems
that can sometimes result if the system loses power suddenly while running.
To disable disk write-caching,
1. Right-click My Computer, and then click Properties.
2. Click the Hardware tab.
3. Click Device Manager.
4. Click the plus sign (+) next to the Disk Drives branch to expand it.
5. Right-click the drive on which you want to enable or disable disk write caching,
and then click Properties.
6. Click the Disk Policies tab.
7. Click to clear the Write Cache Enabled check box.
8. Click OK.
Reference Number: 3059
-11-
OPEN ISSUES IN THIS RELEASE
Following are known issues related to this release.
LINUX TIMER ISSUE
Occasionally during Linux boot or kernel calibration issues, the following error will
appear and the operating system will crash:
MP-BIOS bug: 8254 timer not connected to IO-APIC Kernel panic - not syncing:
IO-APIC + timer doesn't work! Try using 'noapic'
Please report crashes to Virtual Iron Technical Support.
Reference Number: 29
QLOGIC HBAS NOT REPORTING PERFORMANCE INFORMATION
QLogic HBAs are currently not reporting disk performance information to the Virtualization Manager.
Reference Number: 172
DIFFERENT PHYSICAL CARDS/PORTS ON THE SAME MANAGED NODE CANNOT BE
ASSOCIATED WITH THE SAME SUBNET.
Virtualization Manager does not support connecting multiple physical ports to the
same network. At present, each port can be assigned to exactly one network.
Reference Number: 322
JBOD SAN DISKS ARE NOT RECOMMENDED AS VIRTUAL SERVER STORAGE DEVICES
JBODs can be used for storage devices for Virtual Servers, but they are not recommended. If JBOD disks go off-line and then back on-line while connected to managed nodes, the node will go into an error state that requires a node reboot. Use
SAN disks connected via a SAN controller.
Reference Number: 355
CTRL-ESCAPE, ALT-ESCAPE AND ALT-TAB ARE NOT FUNCTIONAL IN THIS RELEASE
In the Virtual Server Console window, there is a pull-down menu titled Commands.
Ctrl-Escape, Alt-Escape, and Alt-Tab, are not currently functional.
Reference Number: 458
KEYBOARD INPUT INTO VIRTUAL CONSOLE OCCASIONALLY RESULTS IN REPEATED
CHARACTERS
When you type into a virtual console that contains an X windows display, occasionally the keyboard output will be repeated. For example if you type ls into a terminal
window in X, you may see lllllssss output in the virtual console. The workaround is
to disable the keyboard repeat function.
-12-
Reference Number: 537
VIRTUALIZATION MANAGER SHUTDOWN CAUSES
DEVICE TO HANG
VSS BOOTED FROM A NETWORK BOOT
Stopping or Restarting the management server takes down the NBD server. This
takes down all VSs booted using NBD. To resolve this issue, restart the management server. Then, perform a hard reset on each impacted VS.
Reference Number: 619
POOR NETWORK PERFORMANCE ON
3COM NICS
Poor network performance has been observed on 3COM NICs. This may impact
the performance of virtual server network operations.
Reference Number: 723
APPLICATIONS THAT ATTEMPT TO COMMUNICATE DIRECTLY TO AN
SUPPORTED
HBA ARE NOT
Kernel-level management applications or agents (such as Emulex HBAnywhere,
QLogic SANSurfer) in a guest operating system that communicate directly to an
HBA or directly to other specific devices are not supported. Running these types of
applications may cause virtual servers to become unresponsive.
Reference Number: 892
ADDING OR REMOVING
LUNS MAY REQUIRE A NODE REBOOT
When adding or removing LUNs to the system to modify storage capacity, it may be
necessary to reboot the nodes to accurately display the LUN configuration. If a LUN
is removed or offline and the Virtualization Manager shows it as online, errors may
result if a user attempts to perform operations on that LUN such as creating virtual
hard disks.
Reference Number: 1182/1189
THE VIRTUALIZATION MANAGER USER INTERFACE MAY RUN SLOWLY IF ANTI-VIRUS
SOFTWARE IS RUNNING ON THE MANAGEMENT SERVER HOST.
Some anti-virus software inspects Java applications. This may result in reduced Virtualization Manager client performance. If this occurs, designate Virtualization Manager a trusted application in the virus scanning software.
Reference Number: 1504
VIRTUALIZATION MANAGER INSTALL FAILS WITH BONDED ETHERNET
The Virtualization Manager installer does not handle bonded Ethernet controllers.
Make sure the network controller on the node that will be running the management
server is not bonded before starting the installation.
Reference Number: 1816
-13-
DATACORE THIN PROVISIONING CANNOT BE USED WITH VIRTUAL IRON VDISKS
DataCore LUNs used for vdisks must have sufficient backing storage for the size of
the Virtual Iron volume group. Set the Datacore NMV chunk size to be 4 MB
Reference Number: 1962
RH3-U8 CONSOLE KEYBOARD NOT WORKING WITH KUDZU
If RedHat 3 is installed while the virtual server is configured in the Virtualization
Manager with a USB mouse (for example, RHEL4 LINUX) instead of a PS2 mouse,
you will be in Kudzu after you boot with a PS2 mouse configuration. Kudzu can not
use the mouse or keyboard at that point and will timeout. The system will continue
to boot.
Workaround: Configure the virtual server properly in the Virtualization Manager
prior to installing.
If the problem does occur, correct the Virtualization Manager virtual server configuration. Then, boot the virtual server and manually invoke Kudzu from a console window. Remove the USB drive when you are prompted to do so.
Reference Number: 2028
IT IS RECOMMENDED TO RUN SLES 9 WITH THE BIGSMP KERNEL.
It is recommended for optimal performance to run SLES 9 with the bigsmp kernel.
Reference Number: 2167
THE ADMINISTRATION MANAGER IS NOT COMPATIBLE WITH JAVA BUILD
1.5.0_06_B05.
Virtual Iron® recommends running the latest Java Version 1.5.0 (build 1.5.0_10-b03
or later) on the system that is running the Administration Manager client.
Reference Number: 2244
WHEN ADDING A NEW LUN FROM DELL AX150I THE NODE MUST BE REBOOTED TO BE
SEEN BY VIRTUALIZATION MANAGER.
When a new LUN is added from a Dell AX150i, each node that needs to access the
LUN must be rebooted. First LiveMigrate all virtual servers off the node. Then
reboot the node. Then you can LiveMigrate servers back onto the node.
Reference Number: 2278
DYNAMIC RESIZING OF
LUNS
Use the following procedure if you have to resize a LUN.
1. Cause the LUN you wish to resize to go offline, which is depicted in the Manage-
ment Server Hardware view as offline.
2. Delete that LUN from the Management Server Hardware view and Commit this
operation
3. Resize the LUN to your needs.
-14-
4. Rediscover the LUN in your Management Server Hardware view with the Node-
-> Rediscover option or the Node--> Rescan SAN Ports option.
Reference Number: 2549
IPV6 NETWORKS ARE NOT SUPPORTED.
Reference Number: 2763
EXISTING WINDOWS GUESTS LOSE TABLET MOUSE
When a QEMU Windows guest that was installed on an earlier hypervisor is booted,
the USB table mouse configuration in the guest is lost. The device managers shows
a PCI device and an unknown device.
Workaround: Use the hardware wizard in this release. If you go through the steps it
will fail to find a driver for the PCI device, but it will automatically configure the
unknown device, which is actually the USB table mouse. After you go through the
steps in the wizard, the USB table mouse is restored.
Reference Number: 3045
WINDOWS 2000 GUESTS USING 100% CPU WHILE IDLE WITHOUT ADS
Windows 2000 guests without accelerated drivers (ADs) use 100% of a CPU when idle,
which is a a known issue when running virtualized Windows 2000.
Workaround: Download and install a third party fix. Install Virtual Iron’s VSTools (accelerated drivers).
Reference Number: 3600
WINDOWS 2000 IDLE LOOP CONSUMING TOO MUCH OF CPU
Windows 2000 spins in its idle loop when running with multiple processors. This
occurs with or without VSTools or ADs (accelerated drivers) installed.
Workaround:
1. In the Virtualization Manager, navigate to the system/vstools/win directory.
Download the following files into the Windows 2000 OS (via the browser):
Win2000_idler_on.reg
This .reg file turns the idler on.
Win2000_idler_off.reg
This .reg file turns the idler off.
2. Double click on the appropriate file to turn the idler on or off.
3. Answer Yes to Are you sure you want to add the information...
4. Navigate to My Computer > Manager > Services and Applications > Services.
5. Right-click Virtual Iron Service and select Restart.
Reference Number: 3715
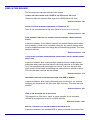
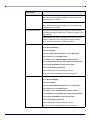
HOW TO UPDATE WINDOWS HALS
The following table outlines the procedure for changing various Windows OS HALs
from uni-processor to multi-processor and back again.
-15-
Windows OS
Windows 2003 64-bit
If you boot a uni-processor virtual server with a multi-processor
HAL, Windows automatically installs the uni-processor HAL
and prompts you to reboot.
If you boot a multi-processor virtual server with a uni-processor
HAL, Windows automatically installs the uni-processor HAL
and prompts you to reboot.
Windows 2003 32-bit
Windows automatically detects a change to multi-processor
and loads the multi-processor HAL. A reboot is required to run
the new HAL.
Windows 2003 32b does not downgrade the HAL to uni-processor if it detects 1 CPU running on the multi-processor
HAL—it keeps running the multi-processor HAL.
Windows 2000 32-bit
To change a uni-processor HAL to a multi-processor HAL:
Open Device Manager.
Expand Computer.
Right-click ACPI Uni-processor PC. Select Properties.
Select Driver tab and Update Driver...
Click Next to get to Install Hardware Device Drivers.
Select Display a list of the known drivers for this device...
Select Show all hardware of this device class.
Select ACPI multi-processor PC.
Answer Yes to the pop-up warning to proceed.
Close out of Device Manager and reboot the system.
To change a multi-processor HAL to a uni-processor HAL:
Open Device Manager.
Expand Computer.
Right-click ACPI Multi-processor PC. Select Properties.
Select Driver tab and Update Driver...
Click Next to get to Install Hardware Device Drivers.
Select Display a list of the known drivers for this device...
Select Show all hardware of this device class.
Select ACPI Uni-processor PC.
Answer Yes to the pop-up warning to proceed.
Close out of Device Manager and reboot the system.
-16-
Windows OS
Vista 32-bit
Vista does not call out a uni- or multi-process ACPI in Device
Manager. However, when you install a uni-HAL and later boot
with two CPUs, you must reboot for the HAL to change.
If you later boot with 1 CPU on a multi-processor HAL, no
changes occur.
Reference Number: 3732
SAN MULTIPATH SUPPORT
SAN multipath has been tested on limited configurations in Virtual Iron. Supported
configurations include:
•
•
EMC CLARiiON AX150 Active/Active array with round robin policy for failover
HP MSA 1500 Active/Active array with round robin policy for failover
The following failure scenarios have been tested: HBA and array cable pulls and
switch port disable.
Other configurations may work but are not fully supported. Please contact Virtual
Iron® technical support if you want to use SAN multipath in alternate configurations.
Reference Number: None
PRODUCT DOCUMENTATION
The following documents are available on the CD that ships with the product.
• Virtualization Manager™ Quick Start Guide - Guides you through the process of
getting a virtual server up and running
• Virtualization Manager™ Administrator Guide - Explains how to configure and
manage virtual data centers and virtual servers.
CONTACTING VIRTUAL IRON SUPPORT
Use this information to reach Virtual Iron® customer support.
Phone: 1-800-314-9872 (Select option 2)
Mail: [email protected]
Web: http://virtualiron.custhelp.com
-17-