1
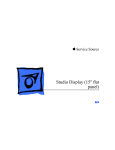
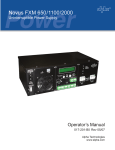
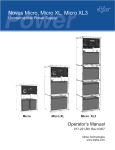
Splash PCI Series v5.0
Install Manual
July 4, 1997
Splash Technology, Inc.
Sunnyvale, California USA
Trademarks and Copyright
Splash and the Splash logo are trademarks of Splash Technology Inc. Apple, Macintosh, LaserWriter, and AppleTalk are registered
trademarks of Apple Computer, Inc. MajestiK, Regal, and DocuColor are trademarks of Xerox, Incorporated. Acolor is a trademark
of Fuji Xerox, Inc. Novell NetWare is a trademerk of Novell, Inc. Adobe, the Adobe logo, Adobe Illustrator, PostScript, Adobe Type
Manager, Adobe PageMaker, and Adobe Photoshop are trademarks of Adobe Systems Incorporated, which may be registered in
certain jurisdictions. QuarkXPress is a registered trademark of Quark, Inc. Stuffit Expander Copyright © 1990-1997. All other brand
or product names are trademarks of their respective holders.
Copyright © 1997 Splash Technology, Inc.
PN: 0014115-0102 Last revised: July 4, 1997. Your rights of ownership are subject to the limitations and restrictions imposed by the
copyright laws as outlined below.
PROPRIETARY RIGHTS NOTICE. The digitally encoded machine readable outline data for producing the typefaces provided
as part of your laser printer is copyrighted © 1981 Linotype-Hell AG. Copyright © 1993 Adobe System Incorporated. All Rights
Reserved. This data is the property of Linotype-Hell AG and Adobe Systems Incorporated and may not be reproduced, used,
displayed, modified, disclosed or transferred without the express written approval of Linotype-Hell AG and Adobe Systems
Incorporated.
LZW Patent Notice: This Licensed System includes an implementation of LZW licensed under U.S. Patent 4,558,302.
U.S. Government Users: The Adobe Licensed System provided with this product is a “commercial item” as that term is
defined at 48 C.F.R. 2.101 (OCT 1995), and more specifically “commercial computer software” and “commercial computer
software documentation” as such terms are used in 48 C.F.R. 12.212 (SEPT 1995). Consistent with 48 C.F.R. 12.212 and
48 C.F.R. 227.7202-1 through 227.7202-4 (JUNE 1995), the Licensed System is provided to U.S. Government End Users
(a) only as a commercial end item and (b) with only those rights as are granted to all other End Users pursuant to the terms
and conditions herein.
It is against the law to copy, reproduce, or transmit including, without limitation, electronic transmission over any network any part
of the manual or program except as permitted by the Copyright Act of the United States, Title 17, United States Code. Under the law,
copying includes translation into another language or format. However, you are permitted by law to write the contents of the
program into the machine memory of your computer so that the program may be executed. You are also permitted by law to make
working copies of the program, solely for your own use, subject to the following restrictions: (1) Working copies must be treated in
the same way as the original copy; (2) If you ever sell, lend, or give away the original copy of the program, all working copies must
also be sold, lent, or given to the same person, or destroyed; (3) No copy (original or working) may be used while any other copy
(original or working) is in use except within the terms of this license. The copyright notice that is on the original copy of the program
must accompany any working copies of the program.
The above is not an inclusive statement of the restrictions imposed on you under the Copyright Act. For a complete statement of
the restrictions imposed on you under the copyright laws of the United States of America, see Title 17, United States Code.
FCC Compliance
Note: This equipment has been tested and found to comply with the limits for a Class A digital device, pursuant to Part 15 of the
FCC Rules. These limits are designed to provide reasonable protection against harmful interference when the equipment is operated
in a commercial environment. This equipment generates, uses and can radiate radio frequency energy and, if not installed and used in
accordance with the instruction manual, may cause harmful interference to radio communications. Operation of this equipment in a
residential area is likely to cause harmful interference in which case the user will be required to correct the interference at his or her
own expense.
Shielded cables must be used with this equipment to maintain compliance with FCC regulations.
Page 2
Splash PCI Series v5.0 Install Manual
Canadian DOC Notice
This Class A digital apparatus meets all requirements of the Canadian Interference-Causing Equipment Regulations.
CET APPAREIL NUMERIQUE DE LA CLASSE A RESPECTE TOUTES LES EXIGENCES DU REGLEMENT SUR LE
MATÉRIAL BROUILLEUR DU CANADA.
Japanese VCCI Statement
CE Mark
DECLARATION OF CONFORMITY
We, Splash Technology, Inc, declare under our sole responsibility that the Splash products
to which this declaration relates are in conformity with the following standards or other normative documents:
EN55022/CSPR22 CLASS B
EN0082-1/IEC 801-2,3,4
following the provisions of :
89/336/EEC-EMC Directive
Splash Technology, Inc. 555 Del Rey Avenue, Sunnyvale, CA, 94086 USA
The signed and dated Declaration of Conformance is on file at the above address.
Page 3
Page 4
Splash PCI Series v5.0 Install Manual
Table of Contents
Introduction. . . . . . . . . . . . . . . . . . . . . . . . . . . . . . . . . . . . . . . . . . . . . . . . . . . . . . . . . . . . . . 7
Product Features . . . . . . . . . . . . . . . . . . . . . . . . . . . . . . . . . . . . . . . . . . . . . . . . . . . . . . . . 7
Splash PCI Series v5.0 Server Kit Models . . . . . . . . . . . . . . . . . . . . . . . . . . . . . . . . 11
System Requirements . . . . . . . . . . . . . . . . . . . . . . . . . . . . . . . . . . . . . . . . . . . . . . . . . . . 11
System Notes . . . . . . . . . . . . . . . . . . . . . . . . . . . . . . . . . . . . . . . . . . . . . . . . . . . . . . . 12
Unpacking . . . . . . . . . . . . . . . . . . . . . . . . . . . . . . . . . . . . . . . . . . . . . . . . . . . . . . . . . . . . 12
Registration Card . . . . . . . . . . . . . . . . . . . . . . . . . . . . . . . . . . . . . . . . . . . . . . . . . . . 12
Compatible Applications . . . . . . . . . . . . . . . . . . . . . . . . . . . . . . . . . . . . . . . . . . . . . . . . 13
Splash Server Manuals . . . . . . . . . . . . . . . . . . . . . . . . . . . . . . . . . . . . . . . . . . . . . . . . . . 13
An Overview of Splash Adobe PostScript Printing . . . . . . . . . . . . . . . . . . . . . . . . . . . . 14
Chapter 1 — Installing the Splash Interface Hardware . . . . . . . . . . . . . . . . . . . . . . . . 17
Discharging Static Electricity . . . . . . . . . . . . . . . . . . . . . . . . . . . . . . . . . . . . . . . . . . . . . 18
Installing the Splash PCI Interface Card . . . . . . . . . . . . . . . . . . . . . . . . . . . . . . . . . . . . 19
Attaching the Xerox Asset Tag to the Computer . . . . . . . . . . . . . . . . . . . . . . . . . . . . 19
Installing the Splash Memory DIMMs . . . . . . . . . . . . . . . . . . . . . . . . . . . . . . . . . . . 19
Installation for Power Macintosh 7300 or
Power Macintosh 7600 . . . . . . . . . . . . . . . . . . . . . . . . . . . . . . . . . . . . . . . . . . . . . . . 20
Connecting the Printer/Copier . . . . . . . . . . . . . . . . . . . . . . . . . . . . . . . . . . . . . . . . . . . . 23
Splash Key . . . . . . . . . . . . . . . . . . . . . . . . . . . . . . . . . . . . . . . . . . . . . . . . . . . . . . . . . . . 23
Chapter 2 — Installing the Splash Software . . . . . . . . . . . . . . . . . . . . . . . . . . . . . . . . . 25
Before You Begin . . . . . . . . . . . . . . . . . . . . . . . . . . . . . . . . . . . . . . . . . . . . . . . . . . . . . . 25
Easy Splash Server Installation . . . . . . . . . . . . . . . . . . . . . . . . . . . . . . . . . . . . . . . . . . . 26
Custom Splash Server Installation . . . . . . . . . . . . . . . . . . . . . . . . . . . . . . . . . . . . . . . . . 27
Setting Up the Splash Server for
Client File Sharing . . . . . . . . . . . . . . . . . . . . . . . . . . . . . . . . . . . . . . . . . . . . . . . . . . . . . 29
Contents
Page 5
Chapter 3 — Setting Up the Splash Server . . . . . . . . . . . . . . . . . . . . . . . . . . . . . . . . . . 31
Setting Up the Splash Server . . . . . . . . . . . . . . . . . . . . . . . . . . . . . . . . . . . . . . . . . . . . . 32
Copier Set-Up Notes . . . . . . . . . . . . . . . . . . . . . . . . . . . . . . . . . . . . . . . . . . . . . . . . . . . 34
Disable the Built-In Auto Tray Switching Option in Regal, Acolor 93x, and
DocuColor 5799 Copiers . . . . . . . . . . . . . . . . . . . . . . . . . . . . . . . . . . . . . . . . . . . . . 34
Installing the Splash Client Software . . . . . . . . . . . . . . . . . . . . . . . . . . . . . . . . . . . . . . . 35
Setting Up TCP/IP and Novell NetWare
Client Printing . . . . . . . . . . . . . . . . . . . . . . . . . . . . . . . . . . . . . . . . . . . . . . . . . . . . . . . . 35
Installing the Splash Plug-Ins for
Adobe Photoshop . . . . . . . . . . . . . . . . . . . . . . . . . . . . . . . . . . . . . . . . . . . . . . . . . . . . . . 35
Splash Server System Performance . . . . . . . . . . . . . . . . . . . . . . . . . . . . . . . . . . . . . . . . 37
Managing System Extensions for 24 MB Servers . . . . . . . . . . . . . . . . . . . . . . . . . . 37
Disk Size . . . . . . . . . . . . . . . . . . . . . . . . . . . . . . . . . . . . . . . . . . . . . . . . . . . . . . . . . . 38
Memory Size . . . . . . . . . . . . . . . . . . . . . . . . . . . . . . . . . . . . . . . . . . . . . . . . . . . . . . . 42
Splash Server On-Line Manuals . . . . . . . . . . . . . . . . . . . . . . . . . . . . . . . . . . . . . . . . . . . 43
Index. . . . . . . . . . . . . . . . . . . . . . . . . . . . . . . . . . . . . . . . . . . . . . . . . . . . . . . . . . . . . . . . . . . 45
Page 6
Splash PCI Series v5.0 Install Manual
Introduction
Thank you for purchasing a Splash Professional Color Imaging Series Server Kit
for the Xerox MajestiK™ or Regal™ Color Series, DocuColor™ 5750 copier,
DocuColor 5799, or Fuji Xerox Acolor series copiers. The Splash™ PCI Interface
card connects your printer/copier to your Apple® Power Macintosh, and uses true
Adobe™ PostScript processing to deliver high-quality color images.
This manual describes how to install the Splash hardware and software, and how to
set up the system to function as a printer server. Detailed information about Splash
printing options and product specifications are provided in other on-line manuals
(provided on the Splash CD-ROM).
Product Features
The Splash Professional Color Imaging Series Server Kit provides:
■
The Splash Server application. This true Adobe PostScript CPSI software
(Configurable PostScript Interpreter Raster Image Processor) converts
Level 1 and Level 2 PostScript code into a pixel-by-pixel page description
that the printer/copier uses to print an image. The open platform Macintosh
architecture allows you to use virtually all commercially available Macintosh
hardware and software applications with Splash, including color management
systems and a variety of media input devices.
■
Printer drivers for local and network printing on a Macintosh. These drivers
convert the output from your applications to PostScript code.
■
Printer driver software for network printing from a personal computer running
Microsoft® Windows NT, plus custom printer description files for printing to
Splash from Windows 95 for Windows 3.1. This software requires a PC-toMacintosh network bridge (such as Novell Netware or Miramar MACLAN
Connect), or a TCP/IP network connection (Windows 95 or Windows NT).
Introduction
Page 7
Page 8
■
Direct IPX printing. Provides an easy way for computers connected to a
Novell Netware server to print to Splash. You do not need to install AppleTalk
connection software. Splash creates a native Novell IPX connection from the
Splash Server to the Novell server. Once set up and activated, it operates
automatically to send print jobs to the Splash Server each time a Novell client
computer prints to the Splash print queue on the Novell Netware server. Splash
IPX printing is simple to set up and supports all Novell Ethernet frame types.
See the chapter “Setting Up TCP/IP and NetWare Direct Printing to Splash” in
the Splash Reference on-line manual for more information.
■
TCP/IP Direct Printing. Allows UNIX-style LPD/LPR printing to Splash over
a TCP/IP network. See the chapter “Setting Up TCP/IP and Netware Direct
Printing to Splash” in the Splash Reference on-line manual for information.
■
Selectable full-color, screened, or high-speed grayscale printing for a wide
variety of page image sizes. (See the Splash Reference on-line manual for a
complete list of supported page image sizes.)
■
RGB color correction that allows each client workstation to match printed
output to their specific monitor. The powerful RGB color correction provides,
for the first time, the ability to color correct problem files properly and to
show true blue colors without any purple shift.
■
CMYK color correction that provides highly accurate press ink matching
for your color press proofs. Splash CMYK color correction automatically
compensates for differences between toner colors and press ink colors to
produce the closest possible match to press inks in the copier output.
■
Powerful mixed file color correction support. Splash is the first PostScript
server to separately color correct RGB and CMYK color types for a file. This
allows you to properly print many “problem” files with no adjustment.
■
ICC color output profiles for use with Apple’s ColorSync™ 2.0 color
management software. The custom ICC profiles allow Splash to support
multiple platforms and multiple CMS capabilities.
■
Adobe Photoshop Separation Tables for Splash. Allows you to use the
Adobe Photoshop Separations feature to create CMYK separations for
printing to Splash.
■
Separations support. Prints a composite proof for your separations documents
(including DCS files). With this Splash feature you can use any number of
color plates in your document. Splash simulates the full range of colors and
tints for PANTONE, DIC, or Toyo colors. You no longer need to convert spot
colors to process colors before you print. Splash separations enhances
workflow for color plate production.
Splash PCI Series v5.0 Install Manual
■
The Splash Acquire plug-in module, for scanning locally with the printer/
copier using Adobe Photoshop. Scanning is performed directly into the Splash
Server (not over the network) to avoid network transfer delays.
■
The Splash Export plug-in module, for printing scanned images in
Adobe Photoshop directly to the printer/copier. This command prints directly
to the copier to avoid network transfer delays.
■
RIP While Receive. Splash RIPs a file as it is received whenever it is not
processing another job, which adds tremendous productivity gains in most
customer environments.
■
Continual Print. For many documents, Splash can process and print files at
copier-rated speeds. This feature is applied to print jobs at the printer driver.
■
Spool File Handling Options. For situations where the same, complex
PostScript file is reprinted from time to time, the ability to save the spool file
at the Server can lead to significant productivity gains. The Splash Server can
be configured, if necessary, to spool all incoming files.
■
Job Ticketing. Macintosh users can enter identification or job information to a
comment field for each job. Comments entered at the printer driver can be
viewed at the Splash Server and in the server’s printing log.
■
Save as TIFF. This feature allows designers to send a file to the Splash
Server—and then to view a bitmap of the processed file—without leaving their
workstations. Combined with separations support, this allows a designer to
view overprint and trapping effects during the design process, without the need
to actually make a print and go to the printer/copier to retrieve it. Most DTP
applications do not allow these effects to be viewed directly on the screen in
the application. This can significantly increase productivity during the
design process.
■
Progressives support. You can print up to four sheets of paper for a color
document with any combination of C, M, Y, and K color passes on each sheet.
This allows you to examine the result of adding each color pass to a print job.
Introduction
Page 9
Page 10
■
Splash ColorCal. Software that calibrates Splash for consistent, accurate color,
regardless of changes in the copier’s color output that occur over time and
with changes in the environment. Splash ColorCal is a powerful tool for the
professional color image designer, but it is useful also for anyone who creates
business graphics or other less-technical color documents. Splash ColorCal
requires no special color knowledge and does not require the use of an
expensive densitometer. Splash ColorCal allows you to create and use
your own CMYK color profiles. See the chapter “Calibrating With Splash
ColorCal” in the Splash Reference on-line manual for more information.
■
Look Ahead Routing. This smart look-ahead capability determines if there are
any other files in the queue before yours. If not, then the Splash Server will
immediately begin to RIP your file. If another file is ahead of yours, the Splash
Server automatically spools your file. Multiple files can be received by the
Server at the same time. Jobs are placed in the print queue in the order in which
they have completed spooling. This prevents large jobs from blocking smaller
jobs that are sent to the server at the same time.
■
Print Job Preflighting. Select an option at the Splash Server to screen print jobs
for errors before they print.
■
Splash Drop Printing. Print TIFF, EPS, and files in text-based processed
PostScript format, at the Splash Server or from any AppleTalk network client,
without using a special PostScript file downloader utility. Simply drag the
graphics file directly onto the Splash Server application window, or place them
in the shared Drop Folder on the Splash Server Power Macintosh.
■
A Macintosh Client Status Desk Accessory (DA). The Splash Status DA lets
you view and control print jobs, and receive printer/copier and server status
remotely from any Macintosh Client.
■
Optional Internet or Intranet Web Print Queue Manager. Allows remote clients
on any computer platform to view and control their print jobs at the Splash
Server. Requires a TCP/IP connection to the Splash Server and Netscape
Navigator 3.x or Microsoft Internet Explorer 3.x web browser. See the chapter
“Setting Up the Splash Web Queue Manager” in the Splash Reference
on-line manual for more information.
■
35 Adobe Roman fonts. (See the Splash Reference on-line manual for a
complete list of fonts supplied with the Splash software.)
■
Adobe PostScript Level 2 support for automatic decompression of embedded
JPEG files prior to printing. This results in a significantly reduced transfer time
when printing JPEG files over a network.
■
A detailed, accurate log of print activity, to simplify tracking and billing.
Format commands let you show customer subtotals in the printed log.
Splash PCI Series v5.0 Install Manual
Splash PCI Series v5.0 Server Kit Models
The Splash PCI 640 Kit provides:
■
64 MB of frame buffer memory to support the on-board PostScript Level 2
RIP. Upgradable to 128 MB.
■
400 x 400 dpi full contone printing for page sizes up to A4; visually lossless
400 x 400 dpi for page sizes up to A3.
The Splash PCI 1280 Kit provides:
■
128 MB of frame buffer memory to support the on-board PostScript
Level 2 RIP.
■
400 x 400 dpi full contone printing for all page sizes (with Document
Mode off).
System Requirements
The Splash Server PCI Kit can be installed in an Apple Power Macintosh 7300/180,
Power Macintosh 7600/120, or Power Macintosh 7600/132. Additional models may
also be compatible. Refer to the Splash PCI Series Product Update Notice for the
latest system compatibility information.
The Splash System application requires:
■
System 7.5.3 (or later) on the Splash Server computer
■
Open Transport 1.1.1 (or later) on the Splash Server computer
■
System 7.1 (or later) on remote (Node) Macintosh computers
■
A minimum of 24 MB of RAM
■
A minimum of 50 MB of free hard disk space (for Server or local Macintosh)
■
A color display that supports a minimum resolution of 832 x 624 pixels
■
CD-ROM disk drive (for software installation)
In addition to these requirements, you must provide networking hardware and
software for all client workstations that will print to the Splash Server. Refer to
the instructions provided with your network products for instructions on how to
connect the Splash Server and client workstations to the network.
Additional internal memory may be required to run other applications on the Splash
Server (the Macintosh directly connected to the printer/copier), or to run multiple
Splash applications at the same time (see page 42).
Introduction
Page 11
To run the Splash Web Queue Management option you must install additional
system memory on the Splash Server computer.
If your Power Macintosh has the minimum required system memory (24 MB), turn
off system extensions and control panels that are not needed by the Splash Server.
See page 37 for instructions on how to do this.
IMPORTANT: Applications running on the Splash Server may respond slowly
while the Splash Server is processing print jobs. Avoid using other application
software on the Splash Server computer while the Server application is running.
System Notes
IMPORTANT: All of the sections and procedures that appear in this manual
assume that the Xerox printer/copier has been correctly installed, and is currently
functioning as a copier. In addition, the Xerox IFU Port Kit, part number
98K32870, must be installed in the Xerox MajestiK, Regal, DocuColor 5750, or
DocuColor 5799 series copier by a Xerox Service Representative. The IFU Port Kit
provides the connection port necessary for the Splash Server.
If there is a problem with the copier, contact Technical Support before you proceed
with setup of the Splash Server Kit.
Unpacking
Compare the contents of your Splash PCI Kit package with the packing list
provided in the Splash PCI Kit package. If any item is missing, contact Technical
Support. You must provide the Xerox asset tag number for your Splash Server Kit.
(See page 19 for information about the Xerox asset tag.)
Registration Card
Be sure to complete the Splash Registration Card and mail it to Splash Technology.
You will receive software upgrade notifications for your Splash Server.
Page 12
Splash PCI Series v5.0 Install Manual
Compatible Applications
The Splash Server prints PostScript-based files. The following Macintosh and
Windows applications have been tested with Splash:
■
QuarkXPress®
■
Adobe Illustrator™
■
Adobe PageMaker®
■
Macromedia FreeHand®
■
Adobe Photoshop™
■
Microsoft Excel
■
Microsoft Word
■
Microsoft PowerPoint
The Splash Acquire and Export plug-ins require Adobe Photoshop 3.0 or later to
operate. Other applications that support Adobe Photoshop plug-ins may work with
Splash Acquire and Export, but have not been tested with the Splash Server.
Splash Server Manuals
This manual explains how to install the Splash PCI Kit hardware and software and
how to set up the Splash Server. Information about how to set up remote clients for
printing to Splash is provided in other on-line manuals provided on the Splash
software CD-ROM. See “Splash Server On-Line Manuals” on page 43 for a list of
on-line manuals.
To use the Splash Server, you should be familiar with Macintosh procedures and
conventions, such as how to start an application, how to open and close files,
and how to use the mouse. To review this information, refer to your Macintosh
User’s Guide.
In certain geographical areas, such as the Asia/Pacific region, the printer/copier is
sold as the Xerox Acolor printer/copier. In other areas, the printer/copier is sold as
the Xerox MajestiK, Regal, or DocuColor printer/copier. The hardware and software described in this manual are compatible with and operate in the same way on
either printer/copier. The MajestiK, the Regal, the DocuColor, and the Acolor are
all referred to as “the printer/copier” throughout the Splash Server manuals.
For more information about the MajestiK, Regal, or DocuColor Color Series or the
Acolor printer/copier, refer to the manuals provided with your printer/copier.
Introduction
Page 13
An Overview of Splash Adobe PostScript Printing
The Splash Server application is the software that controls printing and
color correction.
The Splash Professional Color Imaging Series Server computer is called the Splash
Server. The Splash Server is directly connected to the printer/copier.
Network (Client) Printing
Splash
Server
Local Printing
Printer/copier
UNIX
Network
server
PC
PC
Mac
Mac
Splash
Server
Printer/copier
Mac
Client Workstations
A Macintosh or Windows-based personal computer (Windows 95, Windows 3.1, or
Windows NT v4.0 or later) attached to the Splash Server by a network connection is
called a Node, or a Client workstation.
The Splash Server supports:
■
Network printing from client workstations connected to the Splash Server.
■
Local printing from applications run on the Splash Server.
Client workstations need to install the Splash printer driver software to apply the
Splash printing features (such as color correction) to print jobs. Splash provides
custom client print drivers for Macintosh and PC workstations.
The Splash Server spools, processes, and performs color correction on the files
you print. The Splash Server application and the Splash printer driver control
the printing.
When you print a file to the printer/copier:
1.
Page 14
The Page Setup options available in each application come from the custom
Splash printer driver. When a file is sent to print, the printer driver converts the
commands generated by the application into PostScript code.
Splash PCI Series v5.0 Install Manual
2.
When you print from a Node or Client workstation, the Splash printer driver
sends the PostScript code over the network to the Splash Server. Large files
take longer to transfer—the length of the transfer depends on file size and
network traffic.
Splash allows multiple jobs to be received off the network simultaneously.
3.
The Splash Server spools (temporarily stores) the intermediate PostScript
files on the hard disk where the Server application is located.
When you print from the Splash Server, the PostScript code is immediately
spooled and queued on the Splash Server hard disk.
4.
The Server application uses true Adobe PostScript code to calculate, pixel-bypixel, the image that will be generated by the printer. This is called Raster
Image Processing (RIP).
5.
If Splash Color Correction is enabled, the Splash Server application corrects
the color of the printed output to match the screen image of the selected
display type or to match the standard process ink colors used by commercial
printing presses. If both RGB and CMYK colors are present in the same
document, Splash color corrects separately for both color types.
6.
The file is sent to the printer/copier, where it is printed.
Introduction
Page 15
Page 16
Splash PCI Series v5.0 Install Manual
Chapter 1
Installing the Splash Interface Hardware
In this chapter:
Discharging Static Electricity ........................................................... 18
Installing the Splash PCI Interface Card.......................................... 19
Attaching the Xerox Asset Tag to the Computer .............................. 19
Installing the Splash Memory DIMMs .............................................. 19
Installation for Power Macintosh 7300 or Power Macintosh 7600.... 20
Connecting the Printer/Copier.......................................................... 23
Splash Key.......................................................................................... 23
This chapter explains how to install the Splash Kit in your computer, and how to
connect the interface hardware to a MajestiK, Regal, DocuColor 5750,
DocuColor 5799, or Acolor printer/copier. Read the instructions in this chapter
completely before you unpack or install the card.
While your computer might appear slightly different from those illustrated on the
following pages, the steps for opening the case and installing the card are nearly
identical for all computers. Please refer to the manuals provided with your
computer for more model-specific information about how to remove the cover and
install add-on cards.
Chapter 1: Installing the Splash Interface Hardware
Page 17
Discharging Static Electricity
Before you remove the Splash Interface card from its antistatic bag, you must put
on the 3M™ Disposable Grounding Wrist Strap. The wrist strap is provided to
control static electricity as you install the provided Memory DIMMs on the Splash
card, and as you install the Splash card in the Power Macintosh. Failure to wear the
wrist strap can result in damage to the card or to your computer.
Follow these steps to attach the wrist strap,
1.
Unwrap the first two folds of the wrist strap and wrap the exposed adhesive
side firmly around your wrist.
2.
Unroll the rest of the wrist strap and peel the liner from the copper foil at the
opposite end.
3.
Follow the instructions in this chapter to remove the cover of your Macintosh
(see page 20).
4.
Attach the copper foil to the exposed metal on the Macintosh power supply.
WARNING: A current limiting resistance is fabricated into the plastic ribbon on
the grounding strap. If it appears damaged, cut off, or missing, discard the wrist
strap immediately. If you cannot wear the wrist strap, you can touch something
metal (the Macintosh power supply casing, for example) to discharge any static
electricity you might have acquired. Always work in a clean and static-free area.
Page 18
Splash PCI Series v5.0 Install Manual
The 3M Disposable Grounding Wrist Strap controls static electricity accumulated
on your body. It will not increase nor decrease your risk of receiving electric shock
when using or working on electrical equipment. Follow the same safety precautions
you would use without the wrist strap, including:
1.
Ground equipment properly.
2.
Do not contact grounded objects unless you are wearing the 3M
Disposable Grounding Wrist Strap.
3.
Do not use the wrist strap in areas where the individual may come in
contact with electrical circuitry exceeding 250 volts.
Installing the Splash PCI Interface Card
This section explains how to install the Splash interface card in supported
Power Macintosh computers. Read the following general instructions completely,
then turn to the instructions provided for your specific Macintosh.
■
Always leave the computer plugged in, with the power turned off. This
properly grounds the system during the installation process.
■
Wear the 3M Disposable Grounding Wrist Strap during installation.
■
Handle the card only by its edges. Avoid touching the connectors and other
components on the card.
■
Each installed expansion card uses power from the computer’s power supply.
All your installed expansion cards must not exceed the maximum power
consumption of your computer. Refer to the manuals supplied with your
Macintosh for the maximum power specification.
Attaching the Xerox Asset Tag to the Computer
Locate the metal Xerox asset tag provided in the Splash Accessory Kit. Attach the
asset tag to the left side of the Power Macintosh, in the upper-left corner. This tag is
provided for future reference, if you should require customer support from Xerox.
You must provide the asset tag number to receive Customer Support.
Installing the Splash Memory DIMMs
Before you install the Splash PCI Interface card in the Power Macintosh, install the
provided Splash Memory DIMMs in the memory sockets on the board. Refer to the
Splash Memory Installation Instructions sheet, included with your Splash Kit, for
step-by-step instructions.
Chapter 1: Installing the Splash Interface Hardware
Page 19
Installation for Power Macintosh 7300 or
Power Macintosh 7600
This procedure describes how to install the Splash Interface card in
Power Macintosh 7300 or Power Macintosh 7600 model computers:
1.
If the computer is running, shut it down. Remove the keyboard, mouse,
monitor, and any other peripheral equipment from the computer before you
install the Splash interface card.
Leave the power cable plugged into the computer and a power outlet to ground
the computer as you install the card.
2.
Press the two release buttons under the front panel and slide the computer
cover forward approximately two inches. Lift the cover up and away from the
computer chassis.
The release buttons are
located under the front
panel, on the right and
left sides.
Press on the release
buttons, then slide the
cover forward.
Page 20
Splash PCI Series v5.0 Install Manual
3.
Touch the metal power supply case inside the computer to discharge any static
electricity that may be present on your body.
Power supply case
Expansion card cover
4.
Open the expansion card cover in the computer.
5.
Install the Splash board into the PCI expansion slot in the computer.
Locate an empty PCI slot on the floor of the computer chassis. Align the
connector on the Splash PCI board to the access port. Align the other end of the
Splash board with the plastic guide provided for the expansion slot.
Access port
PCI slot
Expansion card cover
Interface card guides
Align the gold fingered PCI connector on the board with the PCI slot, then
firmly but carefully press down on the top edge of the Splash board until
the PCI connector firmly seats in the expansion slot. The connector on the
Splash board should be visible through the access port.
Chapter 1: Installing the Splash Interface Hardware
Page 21
Do not force the Splash board into place. If the board does not seat properly in
the PCI slot, remove it completely from the computer, then try again.
6.
Close the expansion card cover. (Be sure that the cover snaps shut on
both ends.)
7.
Replace the cover on the computer. Lower the cover onto the computer,
leaving a two-inch gap between the back panel of the computer and the back
edge of the cover. Push the cover toward the back of the computer until it snaps
into place.
8.
Connect the power cable, display, keyboard, and other peripheral equipment to
the Splash Server computer.
The Splash PCI board install procedure is complete.
Page 22
Splash PCI Series v5.0 Install Manual
Connecting the Printer/Copier
Make sure your printer/copier has a Port Kit installed on it by Xerox service.
The Port Kit is necessary for connecting the Splash Server to the printer/copier.
1.
Push the 68-pin connector on the interface cable into the port on the Splash
interface card. (See the following figure for the port location.)
2.
Push the 100-pin end of the interface cable into the port on the back of the
printer/copier and hand tighten the two screws to secure the cable.
Printer/copier port
with 100-pin connector
Interface card
port, with 68-pin
connector
Splash Key
The Splash Key is a hardware device that connects to the ADB port on your
computer. The Splash Key prevents unauthorized use of the Splash Server software
and also provides maximum security by locking the Splash Server application when
the key is removed.
To install the Splash Key,
1.
Shut down the Splash Server Macintosh (if it is powered on).
2.
Disconnect the ADB keyboard cable from the connector on the back of your
Macintosh. (The ADB keyboard cable connects to the keyboard ADB port and
the ADB port on your computer.)
3.
Connect the large end of the Splash Key to the ADB keyboard cable.
Chapter 1: Installing the Splash Interface Hardware
Page 23
4.
Connect the small end of the Splash Key to the ADB port on the back of
your Macintosh.
Splash Key
5.
Start up the computer.
The Splash Server application runs normally when the Splash Key is connected to
the keyboard cable. To prevent unauthorized printing, remove the Splash Key from
the keyboard cable. This locks the Splash Server application until the Splash Key is
replaced on the keyboard cable.
IMPORTANT: If you remove the Splash Key from the ADB chain on the Splash
Server, be careful that you do not lose the Key, or you will not be able to use the
Splash Server.
Page 24
Splash PCI Series v5.0 Install Manual
Chapter 2
Installing the Splash Software
In this chapter:
Before You Begin................................................................................ 25
Easy Splash Server Installation ....................................................... 26
Custom Splash Server Installation .................................................. 27
Setting Up the Splash Server for Client File Sharing ..................... 29
This chapter explains how to install the Splash Server software on the Server CPU,
and how to set up the Splash Server for file sharing with client workstations.
Before You Begin
The Installer lets you perform an Easy Installation or a Custom Installation. You
automatically install all the files you need, including PostScript fonts, when you
perform the Easy Installation. Perform a Custom Installation when you want to
install only some of the files; for example, to restore lost and damaged files or to
install files on more than one hard disk.
Splash Servers require at least 50 MB of free hard disk space; Macintosh Client
machines require at least 5 MB of free hard disk space; Windows Client machines
require at least 2 MB of free hard disk space. We recommend that you install the
software on the startup disk of the Splash Server if the hard disk has sufficient space
available. Be sure that slash characters (“/”) do not appear in the hard disk name or
any folder names in the path of the Splash folder. If a slash appears, the Splash
Server application will not start.
The Splash Server must run on System 7.5.3 or later operating system to work with
the Splash Server software. In addition, Open Transport v1.1.1 or later must be
installed on the Splash Server Power Macintosh.
Chapter 2: Installing the Splash Software
Page 25
Client computers that print to Splash can run on System 7.1 or later. If you are
using System 7.1 or later on a Client Macintosh (with the exception of Power
Macintosh computers), always enable 32-bit addressing in the Memory control
panel before you use the Splash software.
If the startup disk has insufficient space, you can install the Splash Server
application on a second hard disk. To do this, perform two Custom Installations.
During the first Custom Installation, install the appropriate files, except the Splash
Server application, on your startup disk. During the second Custom Installation,
install the Splash Server application on your second hard disk. (See page 27 for
Custom Installation instructions. Refer to the Splash Reference on-line manual on
for a list of files to install.)
Easy Splash Server Installation
1.
Insert the Splash CD-ROM in the CD-ROM drive on your computer. Open the
Splash Install folder. Double-click the Splash Installer icon.
The Splash Installer welcome screen appears.
Page 26
Splash PCI Series v5.0 Install Manual
2.
Click Continue. The Server Easy Install dialog box appears.
3.
If you have more than one hard disk on your system, click the Switch Disk
button until your intended location for the software appears in the dialog box.
4.
Click the Install button, then follow the instructions on the screen.
5.
When you are prompted to restart your Macintosh, click Restart.
Installation of the Splash Server software is complete.
Custom Splash Server Installation
1.
Insert the Splash CD-ROM in the CD-ROM drive on your computer.
Double-click the Splash Installer icon.
2.
Click Continue in the Splash Installer Welcome screen. The Easy Install dialog
box appears.
Chapter 2: Installing the Splash Software
Page 27
3.
Choose Custom Install in the dialog box. A list of files appears.
4.
Select the checkboxes for the files you want to install.
If you have more than one hard disk on your system, click the Switch Disk
button until your intended location for the files appears in the dialog box.
5.
Click Install, then follow the instructions on the screen.
6.
When you are prompted to restart your Macintosh, click Restart.
Custom installation of the Splash software is complete.
Page 28
Splash PCI Series v5.0 Install Manual
Setting Up the Splash Server for
Client File Sharing
Note: You must provide networking hardware and software for all client
workstations that will print to the Splash Server. Refer to the instructions provided
with your network products for instructions on how to connect the Splash Server
and client workstations to the network.
You can configure the Splash Server CPU to let client workstations install their own
Splash client software over the network. This way, the network administrator does
not have to install client software at each client computer. (PC clients that are
unable to connect to Apple File Sharing, such as Novell NetWare clients, must
install the Splash client software with the install disks provided with your Splash
Server.) To set up the Splash Server for network installs:
1.
At the Splash Server, create a new folder on the Macintosh desktop for the
Splash software. Give the folder the name “Splash Network Install.”
2.
Insert the Splash CD-ROM in the CD-ROM drive on the Server.
3.
Locate the Splash System Software folder on the Splash CD-ROM.
4.
Drag the contents of the Splash System Software folder to the folder you
created on the Splash Server.
5.
Turn File Sharing on with the Sharing Setup Control Panel. (See the Macintosh
User’s Guide included with your computer.)
6.
Select the Splash Network Install folder icon and choose Sharing from the File
menu. The Sharing window for the folder appears.
7.
Configure the Sharing options so that any Guest can access the folder:
■
To share the folder, check the “Share this item and its contents” box.
■
To share the contents of the folder, check the “Make all currently enclosed
folders like this one” box.
■
To prevent users from changing or deleting the shared items over the
network, check the “Can’t be moved, renamed, or deleted” box.
■
Configure the FileShare privileges. Guests should be able to see the
folders and files, but they should not be able to make changes.
For more information about using FileShare, see the Macintosh User’s Guide
included with your computer.
Chapter 2: Installing the Splash Software
Page 29
Page 30
Splash PCI Series v5.0 Install Manual
Chapter 3
Setting Up the Splash Server
In this chapter:
Setting Up the Splash Server ........................................................... 32
Copier Set-Up Notes.......................................................................... 34
Installing the Splash Client Software............................................... 35
Setting Up TCP/IP and Novell NetWare Client Printing .................. 35
Installing the Splash Plug-Ins for Adobe Photoshop ..................... 35
Splash Server System Performance ................................................ 37
Managing System Extensions for 24 MB Servers............................ 37
Disk Size .......................................................................................... 38
Memory Size .................................................................................... 42
Splash Server On-Line Manuals....................................................... 43
This chapter describes how to set up the Splash Server for local and client printing,
and how to configure your Splash Server for best printing performance.
Chapter 3: Setting Up the Splash Server
Page 31
Setting Up the Splash Server
When you start up the Splash Server application for the first time, you are asked to
provide the product registration number for the Splash Server software. To prepare
the Splash Server for printing:
1.
Open the Splash Folder and double-click the Splash Server application.
A product registration dialog box appears.
2.
Enter your name, the name of your company, and the serial number for the
Splash Server software. The serial number is located on the back side of the
Splash CD-ROM jewel case. Look for a number with the “SMT” prefix.
All alpha and number characters must be entered.
3.
When you have entered the software registration information, click OK.
The Splash Server application initializes the PostScript interpreter used for
printing. This process may take more than a minute.
4.
Page 32
When initialization is complete, Splash prints a start-up page to the
printer/copier. The appearance of the start-up page confirms that the Splash
Server is functioning correctly, and is properly connected to the printer/copier.
Splash PCI Series v5.0 Install Manual
The Splash Server window appears.
5.
To complete setup for the Splash Server, choose Preferences from the Server
menu. The Splash Server Preferences appear.
Chapter 3: Setting Up the Splash Server
Page 33
6.
Select the model of your Xerox or Fuji Xerox copier from the
“Connected To” menu:
■
Select MajestiK for a Xerox MajestiK or Acolor 630 series printer/copier.
■
Select Regal for a Xerox Regal or Acolor 930 series printer/copier.
■
Select DocuColor 5799 for a DocuColor 5799 printer/copier.
■
Select DocuColor 5750 for a DocuColor 5750 or Fuji Xerox Acolor 620
series printer/copier.
Note: Be sure to select the correct copier model. If the wrong copier model is
selected Splash will produce incorrect output for print jobs.
7.
Click OK.
To cause the Splash Server application to open automatically each time you start up
the Splash Server CPU, create an alias for the Splash Server application (select the
Splash Server icon and press Command-M) and place it in the Startup Items folder
in the Splash Server CPU System folder.
You have completed set up of the Splash Server. For instructions on how to use the
features of your Splash Server, refer to Chapter 2, “Using the Splash Server” in the
Splash Set-Up Manual provided on the Splash Server Software CD-ROM.
See the section “Splash Server On-Line Manuals” on page 43 for a list of
the Splash on-line manuals.
Copier Set-Up Notes
Disable the Built-In Auto Tray Switching Option in Regal,
Acolor 93x, and DocuColor 5799 Copiers
To avoid problems printing to Regal, Acolor 93x series, or DocuColor 5799 copiers
from Splash, you must disable the “Automatic Tray Switching” feature of these
copiers. To do this:
Page 34
1.
At the copier, press the yellow “Clear-All” button.
2.
At the copier keypad, press *, 0, 1, 2, 3, * to display the Tools Mode window.
3.
Under “Auto Tray Switching” select “Off”.
Splash PCI Series v5.0 Install Manual
Installing the Splash Client Software
Your Splash Server includes software that allows clients running on a Macintosh,
Windows 3.1, Windows 95, or Windows NT computer to send print jobs to Splash
over the network. Splash provides an on-line manual for each supported client
platform. The Splash client manuals describe how to set up a client for printing to
Splash and how to use the Splash color printing features. Refer to the appropriate
Splash on-line manual for complete instructions on how to set up all client
computers that will send print jobs to Splash.
See the section “Splash Server On-Line Manuals” on page 43 for a list of
the Splash on-line manuals.
Setting Up TCP/IP and Novell NetWare
Client Printing
Splash makes it easy to print files to the printer/copier from clients on TCP/IP and
Novell NetWare networks. Splash supports LPR print jobs and jobs from TCP/IP
print queues set up on Windows NT or Novell NetWare servers. No AppleTalk
bridge software is needed.
See the chapter “Setting Up TCP/IP and NetWare Direct Printing to Splash” in the
Splash Reference on-line manual for complete instructions on how to enable print
services for TCP/IP and Novell NetWare clients.
Installing the Splash Plug-Ins for
Adobe Photoshop
Your Splash Server provides plug-in software for use with Adobe Photoshop 3.0 or
later. The Splash Acquire plug-in allows you to use the Xerox or Fuji Xerox printer/
copier as a scanner. The plug-in adds the command, “Splash Acquire” to the
Acquire submenu in Adobe Photoshop. When you choose the Splash Acquire
command, Splash scans the image that is placed on the printer/copier platen.
You can apply color correction to the scanned image, crop, rotate, and set the
resolution for the image, then save it as an Adobe Photoshop file.
Chapter 3: Setting Up the Splash Server
Page 35
The Splash Export plug-in lets you print directly to the Xerox or Fuji Xerox printer/
copier from Adobe Photoshop. The plug-in adds the command, “Splash Export”
to the Export submenu in Adobe Photoshop. If your AppleTalk network is used
heavily, you can use Splash Export to avoid transferring the print job over the
network. Use Splash Export as an alternative to the Adobe Photoshop “Print”
command.
Note: Adobe Photoshop is not provided with the Splash Server. You must install
Adobe Photoshop or Adobe Photoshop LE on the Splash Server to scan or print
with the Splash Acquire and Export commands.
The Splash Acquire and Export plug-ins are located in the Splash Folder on the
Splash Server. Open the Splash Extras folder, then open the Photoshop Plug-in
folder to find the Splash Acquire and Splash Export plug-ins. To install the plug-ins
move them to the folder where your other Adobe Photoshop plug-ins are located.
Usually, this is the Acquire/Export folder within the Plug-ins folder. However, if
you used the Preferences command in Adobe Photoshop to move your plug-ins to a
different folder, drag the Splash plug-ins to this new folder.
Note: The Splash Acquire and Splash Export plug-ins work only on the Splash
Server computer. The Splash plug-ins do not work when used on client computers.
See the Splash Reference on-line manual for complete instructions on how to use
the Splash Acquire and Splash Export plug-ins.
Page 36
Splash PCI Series v5.0 Install Manual
Splash Server System Performance
This section explains possible hardware configurations that will enhance the
capabilities of the Splash Server.
Managing System Extensions for 24 MB Servers
If your Power Macintosh uses the minimum required system memory (24 MB),
turn off system extensions that use up system memory and are not needed to run the
Splash Server application. To do this:
1.
In the MacOS Finder, point to Control Panels in the Apple Menu, then choose
Extensions Manager in the list of Macintosh control panels.
2.
Click to uncheck all system extensions except the following:
■
Apple CD-ROM
■
AppleScript
■
AppleShare
■
Energy Saver Extension
■
File Sharing Extension
■
Find File Extension
■
Finder Scripting Extension
■
Foreign File Access
■
LaserWriter 8
■
NetWare Client
■
Splash driver extension
IMPORTANT: Before turning off the “Energy Saver” extension be sure to set
the “Put the system to sleep whenever it’s inactive” setting to NEVER. If not,
the server will cycle down during idle time, and will not wake until someone
presses a key or clicks the mouse button.
Chapter 3: Setting Up the Splash Server
Page 37
3.
4.
Click to uncheck all control panels except the following:
■
Apple Menu Options
■
Date & Time
■
General Controls
■
Macintosh Easy Open
■
MacIPX
■
Memory
■
Monitors & Sound
■
Mouse
■
PC Exchange
■
TCP/IP
Close the Extensions Manager control panel and restart the Splash Server.
All unchecked extensions and control panels are deactivated when the Power
Macintosh restarts.
You can turn system extensions on and off as needed with the Extensions Manager
control panel.
Disk Size
During normal operation of the Splash Server, free disk space is used in
several ways:
■
Images scanned with Adobe Photoshop are stored on the hard disk drive, and
remain there until they are deleted or moved onto another drive.
■
Files that are transmitted to the Splash Server for printing are temporarily
stored on the hard disk drive as they are processed. When a print job is
complete, its corresponding file is removed from the hard disk drive.
If the “Print and Save” option is selected in the printer driver, the print job
spool file is placed in the Hold queue on the Splash Server after it prints. If the
“Send and Hold” option is selected in the printer driver, the print job spool file
is sent to the Hold queue on the Splash Server but the job does not print.
Print jobs that are placed in the Hold queue on the Splash Server remain stored
on the hard disk drive until they are deleted.
Page 38
Splash PCI Series v5.0 Install Manual
If you have the optional Color Central Lite software, be aware that if you have
quit the Splash Server application but the Color Central application is still
running, print jobs continue to be accepted and stored on the hard disk drive for
future printing.
■
High-resolution files used with the optional Color Central’s APR feature are
stored on the hard disk drive.
■
Print jobs saved as TIFF files are placed in the TIFF folder, located in the
Splash folder. TIFF files remain in this shared folder until they are deleted.
To delete files from this folder, drag them to the Trash and choose Empty Trash
in the Special menu from the Finder on the Splash Server.
Conserving Disk Space
Before adding more disk storage to the Splash Server, you should make sure that
the existing space is used to the best advantage:
■
Remove unused jobs spooled for printing. This can be done at the Splash
Server or from a Client Macintosh with the Splash Status DA (see the on-line
manual Printing to Splash From a Macintosh for information). If the optional
Splash Web Queue Manager is enabled for your server, any client computer
can delete spool files stored at the Splash server. A print job placed on hold
consumes disk space. The Hold queue of the Splash Server is designed for
short term use.
Likewise, a print job that resulted in a PostScript error will remain in the
Splash Server Error queue on the hard disk drive until it is removed. Use the
Splash Server application to delete errored jobs so they do not remain in the
Error queue.
■
Use the Adobe Photoshop file format for scanned images. Adobe Photoshop
provides the capability of saving scanned images in a variety of file formats.
The Photoshop file format is the most compact of the available formats, and the
difference can be significant. For example, a scanned image saved in the TIFF
file format may be ten times the size of the same image saved in the Photoshop
file format. The Adobe Photoshop file format retains complete compatibility
with the Sample Image feature of Color Central.
■
Delete TIFF files you are no longer using from the TIFF folder (located in the
Splash folder).
■
Delete files from the Unprintable Files folder (located in the Splash folder).
Chapter 3: Setting Up the Splash Server
Page 39
Note: Back up the contents of the Splash Server hard disk to safeguard against the
loss of information (image files and other data) stored on the Server hard disk. Frequent back ups serve to minimize the risk of data loss.
Disk Upgrades
If you commonly encounter the error message that the disk is full on the Splash
Server, or if you want to install other Macintosh applications on the Splash Server
CPU, you should connect an external Macintosh SCSI hard disk drive. Replacing
the factory-supplied internal hard disk drive in the Splash Server CPU is not
recommended.
When choosing the size of an external hard disk drive, consider the network
printing demands of the Splash Server. For example, if the network has 10 users
who commonly print Adobe Photoshop files that are 30MB in size, the result is
300MB of storage space that is in constant use for print spooling. In this case, a
500MB hard disk drive is the minimum size required for a disk upgrade.
When connecting an external hard disk drive,
■
Be sure to use an external SCSI hard disk drive that is Macintosh-compatible.
■
Make sure that the external hard disk drive is correctly terminated for use with
a Power Macintosh.
■
Make sure that the SCSI address of the external hard disk drive does not
conflict with any other SCSI address for peripherals connected to the Splash
Server. The internal hard disk drive is set to SCSI ID 0 (zero). You may use any
unoccupied SCSI ID number (1, 2, 4, 5, or 6).
■
Always shut down (power off) the Splash Server before you connect a
peripheral to the SCSI port.
The Macintosh User’s Guide, supplied with your Power Macintosh, contains
detailed instructions for connecting and using an external hard disk drive.
Page 40
Splash PCI Series v5.0 Install Manual
Copying Files to the External Hard Disk Drive
Once you have connected a suitable hard disk drive to the Splash Server, you
must transfer the Splash Server files to the new drive. If you have the optional
Color Central Lite application, transfer this also to the new drive.
To copy the required files to the external hard disk drive:
1.
Create a backup copy of the internal hard disk drive of the Splash Server.
2.
Copy the Splash folder to the external hard disk drive.
3.
Copy the optional Color Central folder (if present) to the external hard disk.
4.
Delete the original copy of the Splash folder from the internal hard disk drive.
To do this, drag the Splash folder to the Trash and choose Empty Trash from
the MacOS Special menu.
5.
Delete the original copy of the optional Color Central folder (if present) from
the internal hard disk in the same way.
6.
Notify all network users that file sharing for the Splash server will be turned
off, then stop Apple file sharing on the Splash Macintosh. To do this:
■
Open the MacOS Sharing Setup control panel.
■
Under File Sharing, click Stop.
■
Click OK in the dialog box that appears to confirm file sharing shutdown.
7.
Click the name (text box) under the internal hard disk drive icon on the MacOS
desktop. The name becomes highlighted and surrounded by a white border to
show it is selected.
8.
Choose Copy from the Edit menu.
9.
Type a new name for the internal hard disk drive. Choose any name, so long as
it is different from the original hard disk drive name.
10. Click the name under the new external hard disk drive icon to select the text.
11. Choose Paste from the Edit menu. The name of the internal hard disk drive is
pasted to rename the external hard disk drive.
12. Restart the Splash Server.
13. Reactivate file sharing for the Splash Server.
Transfer of the files to the external hard disk drive is complete.
Chapter 3: Setting Up the Splash Server
Page 41
Memory Size
The Splash Server must have adequate memory to function as a high-performance
print server or scanner workstation. If your Splash Server CPU uses the minimum
required memory (24 MB system memory) you may need to quit the Splash Server
application to run other applications on the Splash Server computer.
If you add memory to your system, you can optimize printing efficiency in
several ways:
■
Enterprise Networking is configured to support up to three Novell NetWare
print queue connections and four TCP/IP connections to Splash. You must
install additional memory on the Splash Server computer to support additional
IPX and TCP/IP print queues (about 100K per additional print queue).
See “Setting Up TCP/IP and NetWare Direct Printing to Splash” in the
Splash Reference on-line manual for information about how to set up Novell
NetWare print queues for printing to Splash.
■
The optional Color Central Lite package includes the Sampler application.
If more memory is available to the Sampler, it will be able to open larger color
image files.
■
As shipped by Adobe, the Adobe Photoshop memory partition is set to 13 MB.
For optimum performance, RAM available to Adobe Photoshop should be
three times the size of the image file. For example, when working with a 10MB
image file, Adobe Photoshop should have 30MB of RAM available. If there is
not sufficient RAM available, Photoshop will temporarily store the color image
data on the hard disk drive instead of RAM. This reduces performance for
Adobe Photoshop when used for image processing.
■
The following minimum application memory configurations are
recommended for use with the Splash Server:
■
Splash Server: 8.8 MB minimum
■
Enterprise Networking: 1.028 MB minimum
■
Splash ColorCal: 2.7 MB minimum
■
Optional Color Central: 2.5 MB minimum
■
Optional Sampler: 1.5 MB minimum
■
Adobe Photoshop: 13 MB minimum
IMPORTANT: The Virtual Memory option for your computer must remain off in
the Memory control panel while you use the Splash Server application.
Page 42
Splash PCI Series v5.0 Install Manual
Splash Server On-Line Manuals
Electronic versions of the manuals for the Splash Server are provided on the
Splash Server software CD-ROM. The documentation files are located in the folder
named “Splash On-Line Documentation.” All files are in Adobe Acrobat format,
and can be reviewed or printed using the Acrobat Reader application on your client
Macintosh or Windows machine.
The following on-line manuals are provided with the Splash Server:
■
Splash PCI Series v5.0 Set-Up Manual describes how to set up a preconfigured
Splash PCI Series Server and how to use the Splash Server application.
■
Splash PCI Series v5.0 Install Manual (this manual).
■
Printing to Splash From a Macintosh describes how to install the Macintosh
Client software and how to print to the Splash Server from a Macintosh.
■
Printing to Splash From Windows 3.1 describes how to install the Windows 3.1
Client software and how to print to the Splash Server from a PC.
■
Printing to Splash From Windows 95 describes how to install the Windows 95
Client software and how to print to the Splash Server from a PC.
■
Printing to Splash From Windows NT describes how to install the Windows NT
Client software and how to print to the Splash Server from a PC.
■
Splash Reference describes how to use the Splash Acquire and Export plug-in
modules for Adobe Photoshop. This manual also provides supported page
sizes and product specifications for the Splash Servers, a list of provided fonts,
error message descriptions, a diagnostic procedure, and the Adobe PostScript
Language Addendum.
■
Pantone Application Notes explains how to install and use the PANTONE
Professional Color Toolkit, provided with your Splash Server.
Note: The Acrobat Reader is needed to view the Splash on-line manuals from a
client machine. (The Acrobat Reader is not required for printing to Splash).
Chapter 3: Setting Up the Splash Server
Page 43
Page 44
Splash PCI Series v5.0 Install Manual
Index
A
ColorSync profiles for Splash 8
Custom server install 27
Acquire plug-in 9, 13, 35
Customer support, Xerox asset tag 12, 19
Adobe Illustrator 13
Adobe PageMaker 13
Adobe Photoshop
compatibility 13
file size 40
memory requirements/
recommendations 42
scanned image storage 38
separation tables for Splash 8
Splash Acquire plug-in 9, 13, 35
Splash Export plug-in 9, 13, 35
D
DIMMs, installing 19
Disabling printing to the Splash Server 23
Disk drive, adding an external drive 40
Disk space needed for software install 25
Drop folder 10
Adobe Roman fonts 10
E
C
Export plug-in 9, 35
Calibration application 10
F
Client 14
Client workstations, hard disk space
required for install 25
CMYK profiles, custom 10
CMYK separations for Adobe Photoshop 8
Color Central Lite
copying files 41
notes 39
Sampler application 42
Fonts provided with Splash 10
G
Grounding, using the grounded
wrist strap 18
Guest access to Server 29
Color correction 8, 14, 15
ColorCal 10
Page 45
I
N
ICC color profiles 8
NetWare Direct
introduction 8
minimum memory configuration 42
Installation instructions
hardware 20
software, custom installation 27
J
NetWare Direct, memory requirements for
multiple print queues 42
Network printing 14
Node 14
JPEG files 10
L
Local printing 14
Log file 10
Novell NetWare
introduction 8
Novell NetWare, print queue limits due to
server system memory 42
P
Look Ahead Routing 10
PCI board 17
M
Macintosh System software 26
Macromedia FreeHand 13
Memory DIMMs, installing 19
Memory requirement 11
Microsoft Excel 13
Microsoft PowerPoint 13
Microsoft Word 13
PostScript error, job remains on Server 39
Postscript file printing 10
Preflighting 10
Print file spooling 15
Print processing on Splash Server 14
Print queues 8, 42
Printer drivers
Splash 14
Windows 7
Printing activity log file 10
Product registration 32
Page 46
Splash PCI Series v5.0 Install Manual
Q
Splash Key 23
Splash on-line manuals 43
QuarkXPress 13
R
RAM requirement 11
Raster image processing (RIP),
definition 15
Registration number 32
Splash Server
hard disk space required for install 25
memory requirements 42
minimum memory configuration 42
print processing 14, 38
registration number 32
replacing the internal disk drive 40
system performance 37
virtual memory 42
Splash Status DA 10
Replacing the Splash Server internal
disk drive 40
Spool file 38
Requirements, system 11
Spool File options 9, 38
RIP While Receive 9
System configuration, virtual memory 42
RIP, definition 7
Running other applications on
Splash Server 12
T
Technical Support, Xerox asset tag 12, 19
S
TIFF files 39
TIFF files and server disk space 39
Save as TIFF 9, 39
Scanning plug-in 9, 35
Export plug-in 13
V
SCSI addresses 40
Virtual memory 42
Separations 8
Specifications, system requirements 11
Splash CD-ROM 26
Splash ColorCal, minimum memory
configuration 42
Splash interface card 17
Page 47
W
Windows 3.1, printer driver 7
Windows 95, printer driver 7
Windows NT, printer driver 7
Workstation 14
Wrist strap for grounding 18
X
Xerox asset tag 12, 19
Xerox IFU Port Kit 12
Page 48
Splash PCI Series v5.0 Install Manual