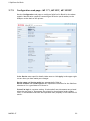
1
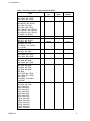
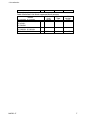
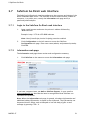
SafeCom Go Ricoh Administrator’s Manual D60703-17 April 2012 Trademarks: SafeCom, SafeCom Go, SafeCom P:Go, SafeCom ePay and the SafeCom logo are trademarks of SafeCom a/s. Company and product names mentioned in this manual are trademarks or registered trademarks of their respective owners. SafeCom a/s cannot be held responsible for any technical or typographical errors and reserves the right to make changes to products and documentation without prior notification. Third Party Software: This software may contain third party software which requires notices and/or additional terms and conditions. Such required third party software notices and/or additional terms and conditions are located in the SafeCom Third Party Notice document. Patent: SafeCom has received the following British patent GB 2350 713 B, US patent US 6,952,780 B2 and Europe patent EUR EP1 120 701. Feedback: If you have any feedback or ideas concerning this manual or the SafeCom product, then please send an e-mail to [email protected] © Copyright 1999 - 2012 SafeCom a/s SafeCom a/s Lautrupvang 12 DK-2750 Ballerup Denmark Phone: +45 4436 0240 E-mail: [email protected] Web: safecom.eu D60703-17 2 Table of contents 1 Introduction ............................................................................................5 1.1 SafeCom Go Ricoh.......................................................................... 5 1.2 Requirements ............................................................................... 5 1.3 SafeCom Go Ricoh products .............................................................. 8 1.4 SafeCom P:Go Ricoh products ......................................................... 10 1.5 SafeCom ID devices ...................................................................... 11 1.6 Available documentation ............................................................... 12 1.7 About this manual........................................................................ 12 1.8 Document history ........................................................................ 13 2 SafeCom Go Ricoh................................................................................... 15 2.1 Overview ................................................................................... 15 2.2 SafeCom Go Ricoh hardware installation ............................................ 15 2.2.1 Newer devices type F, H, I, J, K, L, N, O and U .................... 15 2.2.2 Legacy devices Type B................................................... 16 2.3 Increase Heap and Stack sizes on Ricoh device ..................................... 17 2.4 Ricoh Java software installation ...................................................... 18 2.4.1 Newer devices type F, H, I, J, K, L, N and O ........................ 18 2.4.2 Legacy device type B .................................................... 19 2.5 SafeCom Go Ricoh software installation ............................................. 20 2.5.1 Send SafeCom Go Ricoh (*.b87) file ................................... 20 2.6 Additional configuration ................................................................ 20 2.7 SafeCom Go Ricoh web interface ..................................................... 21 2.7.1 Login to the SafeCom Go Ricoh web interface ...................... 21 2.7.2 Information web page ................................................... 21 2.7.3 Configuration web page ................................................. 22 2.7.4 Configuration web page – printers .................................... 27 2.7.5 Configuration web page - MP 171, MP 201F, MP 201SPF .......... 29 2.7.6 Register web page........................................................ 31 2.7.7 Log web page ............................................................. 32 2.7.8 Language web page ...................................................... 32 2.7.9 Password web page ...................................................... 33 2.7.10 Advanced web page ...................................................... 33 2.8 SafeCom Go Ricoh – How to ............................................................ 34 2.8.1 Get the SafeCom Go Ricoh software .................................. 34 2.8.2 Specify SafeCom server ................................................. 34 2.8.3 Resend configuration .................................................... 35 2.8.4 Register device ........................................................... 35 2.8.5 Set password to prevent unauthorized access ...................... 36 2.8.6 Check SNMP settings ..................................................... 36 2.8.7 Select user identification – user code or card ....................... 36 2.8.8 Login with Windows without specifying the domain ............... 37 2.8.9 How to make SafeCom stay always on top ........................... 37 2.8.10 Enable copy control and access control to other functions ....... 37 2.8.11 Enable E-mail ............................................................. 39 2.8.12 Enable Send to Fax ....................................................... 41 2.8.13 Enable Address Book ..................................................... 42 2.8.14 Control max length of encryption keys ............................... 42 2.8.15 Control user access rights .............................................. 43 2.8.16 Enable single sign-on for Nuance DigiDocFlow ...................... 43 2.8.17 Enable single sign-on for NSi AutoStore .............................. 43 2.8.18 Enable Extended Feature Shortcut .................................... 45 2.8.19 Restore factory default ................................................. 45 2.8.20 Determine the version ................................................... 45 2.8.21 Uninstall SafeCom Go Ricoh ............................................ 45 2.9 All printing through SafeCom .......................................................... 46 D60703-17 3 2.10 Install SafeCom Go Ricoh via web page .............................................. 46 3 Using SafeCom Go Ricoh ........................................................................... 48 3.1 Ricoh Aficio MFPs ........................................................................ 48 3.1.1 Control panel.............................................................. 48 3.1.2 Login ........................................................................ 48 3.1.3 Pull print ................................................................... 50 3.1.4 Copy ........................................................................ 51 3.1.5 E-mail ...................................................................... 52 3.1.6 Send to Fax ................................................................ 54 3.1.7 Address Book .............................................................. 55 3.1.8 Logout ...................................................................... 56 3.1.9 Register card at device .................................................. 56 3.1.10 Register card with Windows logon .................................... 57 3.1.11 Register card with PUK code ........................................... 57 3.2 Ricoh Aficio MP 171, SP 201F, SP 201SPF ............................................ 58 3.2.1 Control Panel.............................................................. 58 3.2.2 Login with card ........................................................... 58 3.2.3 Pull Print ................................................................... 58 3.2.4 Copy ........................................................................ 58 3.2.5 Logout ...................................................................... 58 4 Using SafeCom P:Go Ricoh ........................................................................ 59 4.1 Pull Print ................................................................................... 59 5 Troubleshooting ..................................................................................... 60 5.1 SafeCom Go Ricoh Device Trace Facility ............................................. 60 5.2 SafeCom Help Desk Assistant .......................................................... 60 5.3 SafeCom Administrator: Cannot add Pull Device with no MAC Address ........ 60 6 Regulatory information ............................................................................ 61 7 Index ................................................................................................... 62 D60703-17 4 1 Introduction 1 Introduction 1.1 SafeCom Go Ricoh SafeCom Go Ricoh is the internal solution for Ricoh MFPs. It integrates with the touch-screen control panel of the Ricoh MFP and offers user authentication by code and/or card. The Ricoh MFPs are also supported when sold under the Gestetner, Lanier, Nashuatec, Rex-Rotary and Savin brands. SafeCom Go Ricoh works together the SafeCom G3 Server software and is designed to help companies and organizations gain control over their printing costs and document security. The SafeCom solution can be enhanced with addon modules to build customer specific and scalable solutions. 1.2 Requirements SafeCom Go Ricoh supports all MFPs in Table 1 and printers in Table 2 with the listed JVM version and installed Java VM Card. SafeCom device license. MFP must be connected to the network. If users are to be identified by card a SafeCom ID Device needs to be installed at the MFP. Note: During printing activity it is not possible to scan or copy. D60703-17 5 1 Introduction Table 1 SafeCom Go Ricoh supported Ricoh MFPs SafeCom VM Card MFP Go Type MP 4002, MP 5002, 210xxx MP C3002, MP C3502, MP C4502, MP C5502 MP 2352SP, 147xxx MP 2852SP, MP 3352SP MP C300, MP C400, MP C2051, MP C2551, MP C3001SP, MP C3501SP, MP C4501SP, MP C5501SP, MP C6501SP, MP C7501SP, SP 5200S, SP 5210SF MP 2852, MP 3352 147xxx N MP 171, 120xxx L MP 201F, MP 201SPF MP 6001, MP 7001, 100xxx J MP 8001, MP 9001, Pro 907EX, Pro 1107EX, Pro 1357EX MP 2851, MP 3351, 090xxx MP 4001, MP 5001 MP C2050, MP C2550, 090xxx I MP C2800, MP C3300, MP C4000, MP C5000 MP 2550, MP 3350, 060xxx F MP 4000, MP 5000, MP C6000, MP C7500 MP 1100, MP 1350, 030xxx C MP 5500, MP 6000, MP 6500, MP 7000, MP 7500, MP 8000, MP 9000, MP C2000, MP C2500, MP C3000, MP C3500, MP C4500, Pro906EX, Pro1106EX, Pro1356E MP 2510, MP 3010, 020xxx B MP 3500, MP 4500 2051 (DSm651), 2060 (DSm660), 2075 (DSm675), 3025 (DSm725), 3030 (DSm730), 3035 (DSm735), 3045 (DSm745), 3224C (DSc424), 3228C (DSc428), 3232C (DSc432), 3235C (DSc435), 3245C (DSc445), 3260C (DSc460), D60703-17 JVM version 10.01 7.15 7.15 6.07 5.04 4.17 4.17 4.17 2.12 1.41 6 1 Introduction 5560C (CS555) Table 2 SafeCom P:Go Ricoh supported Ricoh printers SafeCom VM Card Printer P:Go Type SP C431DN, SP 5210DN 150xxx SP C320DN, SP C430DN, 150xxx O SP 4310N, SP 5200DN SP 4210N, 110xxx K SP C820DN, SP C821DN SP C420DN, SP 8200DN 080xxx H D60703-17 JVM version 7.02 7.02 5.04 4.17 7 1 Introduction 1.3 SafeCom Go Ricoh products SafeCom Go Ricoh MP 2352SP, MP 2852SP, MP 3352SP , MP C300, MP C400, MP C2051, MP C2551, MP C3001SP, MP C3501SP, MP C4501SP, MP C5501SP, MP C6501SP, MP C7501SP, MP 2851, MP 3351, MP 4001, MP 5001, SP 5200S, SP 5210SF MP C3002, MP C3502 MP 4002, MP 5002, MP C4502, MP C5502, Order license and USB ID device separately. Devices are supplied with Java VM Card. MP 2852, MP 3352 SafeCom Go Ricoh Type N Order license and USB ID device separately. Java VM Card Type N is required and MUST be ordered through a Ricoh reseller. MP 171, MP 201F, MP 201SPF SafeCom Go Ricoh Type L SafeCom Go Ricoh Type J SafeCom Go Ricoh Type I SafeCom Go Ricoh Type F D60703-17 Order license and USB ID device separately. Java VM Card Type L is required and MUST be ordered through a Ricoh reseller. MP 6001, MP 7001, MP 8001, MP 9001, Pro 907EX, Pro 1107EX, Pro 1357EX Order license and USB ID device separately. Java VM Card Type J is required and MUST be ordered through a Ricoh reseller. MP C2050, MP C2550, MP C2800, MP C3300, MP C4000, MP C5000 Order license and USB ID device separately. Java VM Card Type I is required and MUST be ordered through a Ricoh reseller. MP 2550, MP 3550, MP 4000, MP 5000, MP C6000, MP C7500 Order license and USB ID device separately. Java VM Card Type F is required and MUST be ordered through a Ricoh reseller. 8 1 Introduction MP 1100, MP 1350, MP 5500, MP 6000, MP 6500, MP 7000, MP 7500, MP 8000, MP 9000, MP C2000, MP C2500, MP C3000, MP C3500, MP C4500, Pro906EX, Pro1106EX, Pro1356E SafeCom Go Ricoh Type C SafeCom Ricoh SD ID Kit: SafeCom Go Ricoh SD Card, SD ID Kit, a switch mode power supply (Input: 100-240V~, 50-60Hz/150mA, Output: 5V, 1.0A). Order license and serial ID device separately. Java VM Card Type C is required and MUST be ordered through a Ricoh reseller. Identification by USB ID device is possible if the MFP has a USB port (extra Ricoh accessory). However, you still need the SD ID Kit to have copy control. MP 2510, MP 3010, MP 3500, MP 4500, 2051 (DSm651), 2060 (DSm660), 2075 (DSm675), 3025 (DSm725), 3030 (DSm730), 3035 (DSm735), 3224C (DSc424), 3228C (DSc428), 3232C (DSc432), 3235C (DSc435), 3245C (DSc445), 3260C (DSc460), 5560C (CS555) SafeCom Go Ricoh Type B SafeCom Ricoh SD ID Kit: SafeCom Go Ricoh SD Card, SD ID Kit, a switch mode power supply (Input: 100-240V~, 50-60Hz/150mA, Output: 5V, 1.0A). Order license and serial ID device separately. Java VM Card Type B is required and MUST be ordered through a Ricoh reseller. D60703-17 9 1 Introduction 1.4 SafeCom P:Go Ricoh products SP C431N, SP 5210DN SafeCom P:Go Ricoh Order license and USB ID device separately. Devices are supplied with Java VM Card. SP C320DN, SP C430N SP 4310N, SP 5200DN SafeCom P:Go Ricoh Type O SafeCom P:Go Ricoh Type K Order license and USB ID device separately. Java VM Card Type O is required and MUST be ordered through a Ricoh reseller. SP 4210N, SP C820DN, SP C821DN Order license and USB ID device separately. Java VM Card Type K is required and MUST be ordered through a Ricoh reseller. SP C420DN, SP 8200DN SafeCom P:Go Ricoh Type H D60703-17 Order license and USB ID device separately. Java VM Card Type H is required and MUST be ordered through a Ricoh reseller. 10 1 Introduction 1.5 SafeCom ID devices Table 3 SafeCom Go Ricoh supported SafeCom ID Devices Identification Method SafeCom AWID Reader SafeCom Bar Code Scanner SafeCom Bar Code Reader SafeCom Casi-Rusco Reader SafeCom Cotag Reader SafeCom EM Reader [E] SafeCom EM Reader [R] SafeCom Felica Reader SafeCom HID Reader 35 bit [E] SafeCom HID Reader 35 bit [R] SafeCom HID Reader 37 bit SafeCom iCLASS Reader [E] SafeCom iCLASS Reader [R] SafeCom Indala Reader 26bit SafeCom Indala Reader 29bit SafeCom IoProx SafeCom Legic Reader [E] SafeCom Legic Reader [R] SafeCom Magnetic Card Reader SafeCom Magnetic Card Reader SafeCom Magnetic Card Reader SafeCom Magnetic Card Reader SafeCom Magnetic Card Reader SafeCom Magnetic Card Reader SafeCom Mifare Reader [E] SafeCom Mifare Reader [R] SafeCom Nedap Reader SafeCom NexWatch Reader (Tr 1) (Tr 2) (Tr 3) DD (Tr 1) DD (Tr 2) DD (Tr 3) USB p/n Serial p/n 696020 694120 694020 652420 678020 674120 674420 697420 673120 673420 671120 654120 654420 670420 651020 658420 679120 679420 696010 n/a 694010 652010 674110 697310 673110 671110 654110 670010 651010 658010 679110 959010 954010 657010 692010 691020 692020 970120 970420 653020 698420 970110 978990 698010 Additional information about the ID devices is available in SafeCom G3 Administrator’s Manual D60603. D60703-17 11 1 Introduction 1.6 Available documentation SafeCom Smart Printing SafeCom Smart Printing Administrator’s Quick Guide D10600 How to install a SafeCom Smart Printing solution. SafeCom G3 SafeCom G3 Administrator’s Manual D60603 A comprehensive Manual that the administrator should consult to make a successful SafeCom solution. Includes information about SafeCom Tracking, SafeCom Rule Based Printing, SafeCom Client Billing, and SafeCom Pay. SafeCom Go Ricoh SafeCom Go Ricoh Administrator’s Manual D60703 (this manual) Manual on how to install, configure and use SafeCom Go Ricoh. SafeCom Go Ricoh User’s Guide D20703 User's Guide on how to use SafeCom Go Ricoh. 1.7 About this manual This manual applies to SafeCom G3 Server version S82 070.440*03 and SafeCom Go Ricoh S87 nnn.020*10. This manual is organized as follows: D60703-17 Chapter 1 Introduction lists the supplied SafeCom documentation, system requirements and describes how this manual is organized. Chapter 2 SafeCom Go Ricoh describes the installation and the web interface of the internal solution for Ricoh MFPs. Chapter 3 Using SafeCom Go Ricoh describes how to interact with the Ricoh MFP’s control panel when SafeCom Go Ricoh is installed. Chapter 4 Using SafeCom P:Go Ricoh describes how to login by card and Pull Print on Ricoh printers. Chapter 5 Troubleshooting, contains hints for troubleshooting. Chapter 6 Regulatory information, contains regulatory information. 12 1 Introduction 1.8 Document history Revision D60703-17 SafeCom Go Ricoh version S87 nnn.020*10 Support for Ricoh MFPs: MP 4002, MP 5002, MP C3002, MP C3502, MP C4502, MP C5502. New feature, called job build, allows scanning of multiple documents to a single file when sending E-mails. Support for User access rights (2.8.15). Support for delegated print. Revision D60703-16 SafeCom Go Ricoh version S87 nnn.020*08 Corrected to reflect that SP 5200S, SP 5210SF and SP 5210DN does not require Java VM Card. Revision D60703-15 SafeCom Go Ricoh version S87 nnn.020*08 Support for Ricoh MFPs: MP 171, MP 201F, MP 201SPF, MP 2352SP, MP 2852, MP 2852SP, MP 3352, MP 3352SP, SP 5200S, SP 5210SF. Support for Ricoh printers: SP 4310N, SP 5200DN, SP 5210DN. The MP 171, MP 201F and MP 201SPF have a different configuration web page (2.7.5) and user control panel (3.2). Supports login by card only. Revision D60703-14 SafeCom Go Ricoh version S87 nnn.020*04 Updated to reflect SafeCom G3 Server version S82 070.410*07. Resend configuration (2.8.3). The document list can now be set up to show newest documents first. The Configuration web page features the check box "Show newest first". Revision D60703-13 SafeCom Go Ricoh version S87 nnn.020*03 Support for Ricoh MFPs: MP C300, MP C400, MP C2051, MP C2551, MP C3001SP, MP C3501SP, MP C4501SP, MP C5501SP, MP C6501SP and MP C7501SP. Support for Ricoh printers: SP C320DN, SP C430DN, and SP C431DN. The main screen will show the name of the logged in user. If the user is a Pay user, the credits is also shown. Support for single sign-on for NSi AutoStore (2.8.17). New section on How to Uninstall SafeCom Go Ricoh (2.8.21). Revision D60703-12 D60703-17 SafeCom Go Ricoh version S87 nnn.020*02 Updated to reflect the introduction of SafeCom G3 Server. 13 1 Introduction Revision D60703-11 SafeCom Go Ricoh version S87 nnn.020*01 Support for device with embedded Java and Java Type J and K devices. Possible to control default scan settings for E-mail (2.8.11) and Send to Fax (2.8.12). Supports SafeCom G3 Server features: Unicode and Enhanced encryption. Added section: Control max length of encryption keys (2.8.14). Revision D60703-10 SafeCom Go Ricoh version S87 nnn.010*29 Introduction of SafeCom P:Go for Ricoh printers (1.4 and 2.7.4). Device can reference multiple SafeCom servers (2.8.2). How to install SafeCom Go Ricoh via web page (2.10). Revision D60703-09 SafeCom Go Ricoh version S87 nnn.010*28 Support for Windows authentication (2.7.3). To increase security it is now possible to enable masking of user code with asterisk (*) when this is entered at the device to login (2.7.3). Support for High speed print (2.7.3). Support for single sign-on for Nuance DigiDocFlow (2.8.16). Users with a network logon can register their card at the device by entering their Windows logon, password, and domain (3.1.9). Revision D60703-08 SafeCom Go Ricoh version S87 nnn.010*25 Updated to reflect SafeCom G2 version S82 070.380*07. Revision D60703-07 SafeCom Go Ricoh version S87 nnn.010*25 Address Book support with E-mail and Send to Fax (3.1.7) Revision D60703-06 D60703-17 SafeCom Go Ricoh version S87 nnn.010*24 Send documents to LAN Fax-server with Send to Fax (2.8.12 and 3.1.6) 14 2 SafeCom Go Ricoh 2 SafeCom Go Ricoh 2.1 Overview Make sure the SafeCom G3 Server software installation has been completed as described in theSafeCom Smart Printing Administrator’s Quick Guide D10600. 1. 2. 3. 4. 5. 2.2 SafeCom Go Ricoh hardware installation: Newer devices Type F, H, I, J, K, L, N and O (2.2.1). Legacy devices Type B and C (2.2.2). Increase heap and stack sizes on Ricoh device (2.3). Ricoh Java software installation: Newer devices Type C, F, H, I, J, K, L, N and O (2.4.1). Legacy device Type B (2.4.2). SafeCom Go Ricoh software installation (2.5). Additional configuration (2.6). SafeCom Go Ricoh hardware installation Refer to the appropriate section: 2.2.1 If the device has Java embedded connect the USB SafeCom ID Device to the device’s USB port and proceed to section 2.5. Newer devices Type F, H, I, J, K, L and O (2.2.1). Legacy devices Type B (2.2.2). Newer devices type F, H, I, J, K, L, N, O and U Install the VM Card (SD card) that was supplied by Ricoh: 1. 2. 3. Press the operation switch to turn off power. Wait for the On indicator to go off (stop blinking) and then turn off the main power switch. Disconnect the power cable. Locate the printer’s SD card slots (typically located at the rear of the printer near the RJ-45 network socket). On some printers you have to remove a plastic cover first. Insert the SD card labeled VM Card in SD card slot 2 or 3. Install SafeCom ID Device: 4. Connect the USB SafeCom ID Device to the device’s USB port. Reconnect power: 5. 6. Connect the power cable. Turn on the main power switch. Press the operation switch to turn on power. The printer’s control panel displays Please wait… for 30 seconds. Proceed to section 2.3. D60703-17 15 2 SafeCom Go Ricoh 2.2.2 Legacy devices Type B SafeCom Ricoh SD ID Kit mounted on Type B device. Install the VM Card (SD card) that was supplied by Ricoh: 1. 2. 3. Press the operation switch to turn off power. Wait for the On indicator to go off (stop blinking) and then turn off the main power switch. Disconnect the power cable. Locate the printer’s SD card slots (typically located at the rear of the printer near the RJ-45 network socket). On some printers you have to remove a plastic cover first. Insert the SD card labeled VM Card in SD card slot 2 or 3. Install the supplied SafeCom Ricoh SD ID Kit: 4. 5. 6. Insert the SafeCom Ricoh SD Card into an available SD slot. Insert the SafeCom Ricoh SD ID Kit in an available interface board slot. Connect the white female connector at the end of the cable to the corresponding male 8-pin connector on the SafeCom Ricoh SD Card. It only fits in one way. Connect the external power supply (5V, 1.0A) to the SafeCom Ricoh SD ID Kit. Install MFP cable and/or SafeCom ID Device: 7. Connect the SafeCom MFP cable’s white 4-pin connector to the Ricoh MFP’s FIH connector. The FIH connector is typically located on the right side of the MFP behind a plastic cover. Connect the blue PS/2 connector to the serial port of the SafeCom Ricoh SD ID Kit. If a serial SafeCom ID Device was supplied connect it to the black female connector of the SafeCom MFP cable. If there is no MFP cable then connect the ID Device directly to the serial port of the SafeCom Ricoh SD ID Kit. If the Type C MFP has a USB port (extra Ricoh accessory) a USB SafeCom ID device can be used. However, the SafeCom Ricoh SD ID Kit still needs to be installed to have copy control. Reconnect power: 8. 9. Connect the power cable. Turn on the main power switch. Press the operation switch to turn on power. The printer’s control panel displays Please wait… for 30 seconds. Proceed to section 2.3. D60703-17 16 2 SafeCom Go Ricoh 2.3 Increase Heap and Stack sizes on Ricoh device On Ricoh Type C, F, H, I, J, K, L, N and O 1. 2. 3. 4. 5. 6. 7. 8. Open a web browser and enter the printer’s address. Use of JavaScript (Active Scripting) must be enabled. Click Login and enter Login User Name (admin) and Login Password (by default there is no password) and then click Login. Click Configuration on the left menu. Under Extended Feature Settings click Administrator Tools. Change Heap Size to 16 MB. Change Stack Size to 64 KB. Click Apply. Restart the printer. On Ricoh Type B: 1. 2. 3. 4. 5. 6. 7. 8. On the printer tap Menu to open Application Manager. Tap Login. Tap the # button to login. If a password has been set then enter it and tap #. Tap the Option tab. Tap heap/stack size setting. Tap Heap Size and change value to 16 MB. Tap #. Tap Stack Size and change value to 64 KB. Tap #. Tap Setting. Restart the printer. Proceed to section 2.4. D60703-17 17 2 SafeCom Go Ricoh 2.4 Ricoh Java software installation Refer to the appropriate section: 2.4.1 Newer devices (2.4.1). Legacy device Type B (2.4.2). Newer devices type F, H, I, J, K, L, N and O Install the JavaTM platform: 1. 2. 3. 4. 5. 6. 7. 8. 9. 10. 11. Open a web browser and enter the printer’s address. Use of JavaScript (Active Scripting) must be enabled. Click Login and enter Login User Name (admin) and Login Password (by default there is no password) and then click Login. Click Configuration on the left menu. Under Extended Feature Settings click Install. Select SD Card Slot. Click Display Extended Feature List. In Install to select SD Card Slot N, where N is the slot with the VM Card. In Auto Start click On. On the Extended Feature List click JavaTM Platform. Click Install. On the Confirm web page click OK. Proceed to section 2.5. D60703-17 18 2 SafeCom Go Ricoh 2.4.2 Legacy device type B Install the Java VM software from the card: 1. 2. 3. 4. 5. On the printer press the User Tools button (<>/123). Tap Extended Feature Settings. Tap Extended Features. Tap the Install tab. Tap SD Card Slot N, where N is the slot with the VM Card. JavaTM SVR Platform: 1. 2. 3. 4. 5. Tap JavaTM SVR Platform. Tap Run from SD Card Slot N, where N is the slot with the VM Card. Tap OK. Information concerning the JavaTM SVR Platform is displayed. Tap OK to accept and install. The control panel displays: Installing the Extended Feature… After installation the control panel displays: Completed Extended Feature Installation. Tap Exit. JavaTM Platform: 1. 2. 3. 4. 5. 6. Tap JavaTM Platform. Tap Run from SD Card Slot N, where N is the slot with the VM Card.. Allocate the extended feature to the Printer function button, by pressing the Printer function button. Tap OK. Information concerning the JavaTM Platform is displayed. Tap OK to accept and install. The control panel displays: Installing the Extended Feature… After installation the control panel displays: Completed Extended Feature Installation. Tap Exit. Tap Exit. Tap Exit. Power cycle printer: 1. Press the operation switch to turn off power. Wait for the On indicator to go off (stop blinking) and then turn off the main power switch. Turn the main power switch on to power on the printer. Proceed to section 2.5. D60703-17 19 2 SafeCom Go Ricoh 2.5 SafeCom Go Ricoh software installation 2.5.1 Send SafeCom Go Ricoh (*.b87) file 1. 2. 3. 4. Make sure the printer is powered on and ready. Start SafeCom Administrator and login to the server. Invoke the Add device function from the A) Devices menu, B) System overview or C) SafeCom Assistant as part of step 2 Add a SafeCom Pull Printer. Enter the Printer address. Click Next. Printer address: 5. 6. 7. 8. 9. 10. 11. 2.6 Additional configuration D60703-17 Information is retrieved from the device to establish the type of device. Click Next. On the Settings tab specify the properties of the device (Duplex supported and Color supported). Click Add to register the device and save it in the database. Browse to the SafeCom Go Ricoh Software file. Example: 090xxx.b87. Click Send to send the SafeCom Go Ricoh Software (*.b87) file to the device. If file is not present you need to get the file first (2.8.1). The printer restarts and after a few minutes the printer’s control panel says Ready. After another 2-7 minutes (depending on model) the control panel will say Loading SafeCom. After 1-2 minutes more a SafeCom login message is displayed. Open the Configuration web page (2.7.3) and specify the SafeCom server (2.8.2). How to make SafeCom stay always on top (2.8.9) Enable copy control and access control to other functions (2.8.10) Enable E-mail (2.8.11) Enable Send to Fax (2.8.12) Enable Address Book (2.8.13) Enable single sign-on for Nuance DigiDocFlow (2.8.16) 20 2 SafeCom Go Ricoh 2.7 SafeCom Go Ricoh web interface The SafeCom Go Ricoh web interface adheres to the structure and design of the Ricoh Embedded Web Server. The SafeCom Go Ricoh web interface consists of two parts, 1) a public part, namely the Information web page and 2) a password-protected part. 2.7.1 Login to the SafeCom Go Ricoh web interface 1. Open a web browser and enter the printer’s address followed by :8080/safecom. Example: http://172.16.6.55:8080/safecom Note: Use of JavaScript (Active Scripting) must be enabled. 2. 2.7.2 Click Configuration on the left menu to access the SafeCom Configuration web page. Enter user name (admin) and password (nimda). Click OK. Information web page The Information web page shows version and configuration summary. 1. Click SafeCom on the menu to access the Information web page. If you have a support issue, use Mail to SafeCom Support. In your email to [email protected], describe the issue in enough detail that SafeCom can reproduce the problem. Note: When the Information web page is opened, the above information and additional debug information is copied to the clipboard. The information can be pasted into an editor such as Notepad or into the body of your e-mail message by pressing CTRL+ V. D60703-17 21 2 SafeCom Go Ricoh 2.7.3 Configuration web page Use the Configuration web page to configure your SafeCom Go Ricoh MFP, as described below. The configuration web page for printers is described in section 2.7.4. The configuration web page for Ricoh MP 171, MP 201F, and MP 201SPF are described in 2.7.5. Under SafeCom Server, click Broadcast to get a complete list of servers to select from, or enter Group name, SafeCom server TCP port (default is 7500) and the SafeCom server IP address in Add server. See also 2.8.2. Note: Broadcast is not available on type B and C devices. Note: After you click Apply, it takes one minute before the new SafeCom Server settings take effect. Not waiting long enough may result in a login error at the printer. D60703-17 22 2 SafeCom Go Ricoh Under Device enter specific details. Make sure to click Apply in the upper right corner when you have made your changes. Device name and Device model are automatically filled-in. Device location and Contact person are important references for the SafeCom solution so it’s a good idea to fill them in. User identification controls how users identify themselves at the MFP. In the drop-down box select an identification method: User code Card Card or User code Card or Windows Identification by card requires connecting an ID Device (card reader). The option Card or Windows allows the user to login by either card or by entering their Windows user name, password, and domain. The SafeCom G3 server must be a member of the domain or trusted by the domain. D60703-17 23 2 SafeCom Go Ricoh Pre-fill domain: controls how users fill-in the domain field. In the drop-down box select: Blank (default). Default domain Hide If users belong to different domains Pre-fill domain should be left Blank. This means that all users need to enter their domain when they login with their Windows user name and password. If most users belong to the same domain select Default domain. Default domain is then filled-in for users making login easy. Users only need to use their Windows user name and password. If all users belong to the same domain select Hide. Users won’t be prompted for the domain when they login with their Windows user name and password. Make sure the Default domain is specified, otherwise Pre-fill domain reverts back to Blank when you click Apply. Note: The SafeCom G3 server must be a member of the domain or trusted by the domain. Mask user code increases security. Use an asterisk (*) to mask the entered user code. Print all at login is a printer setting. If selected all user documents are printed when the user logs in. Documents are printed in chronological order (oldest first). If checked this overrules the equivalent user property on the SafeCom G3 server. Show newest first lists and prints documents in a last-in first-out order. MFP authentication lists the functions you can select that the SafeCom solution should authenticate. Select as many as appropriate. Pull Print – collect documents at any printer. E-mail - send scanned documents as attachments to e-mail (2.8.11). Send to Fax – send scanned documents to LAN Fax-server (2.8.12). Copy - make hardcopies of scanned documents. Folder - send scanned documents to a network folder. Fax – send scanned documents via fax. Scanner – scan documents. Post track is relevant only with SafeCom Tracking. Refer to SafeCom G3 Administrator’s Manual D60603 High speed print allows faster printing. Print speed becomes comparable to that of printing the document directly to the printer. One disadvantage is that other documents submitted via a standard TCP/IP port may print between the logged in user’s print and copy jobs. Printer output does not necessarily belong to the logged in user. If directly printed document are submitted via a SafeCom Push Port that references the same tracking device then these documents are not printed until after the logged in user’s jobs are done. D60703-17 24 2 SafeCom Go Ricoh Drivers safeguards document fidelity in the SafeCom solution. When Pull Printing SafeCom compares the name of the printer driver embedded in the print job with the list of driver names returned by the SafeCom device. If there is no match a question mark is displayed in the document list on the device. This way the user is warned that fidelity is in question and the document may print incorrectly. 1. 2. 3. 4. Click Get all to retrieve a list of driver names from the SafeCom server. Click Apply. Select individual driver names on the list and click Remove to remove them. To enter a driver name manually, click Add driver and then Add. Timeout automatically logs users out after the specified amount of time. Timeout is configured in seconds with a default of 60. If there the printer requires intervention (IRQ), timeout is stopped so a user is not logged out while the issue is being resolved. Use E-mail if SafeCom handles user authentication for E-mail (E-mail is checked in MFP authentication). Refer to 2.8.11. D60703-17 25 2 SafeCom Go Ricoh Use Send to Fax if SafeCom handles user authentication for Send to Fax (Send to Fax is checked in MFP authentication). Refer to 2.8.12. Use Address Book to configure Address Book in E-mail and Send to Fax. Refer to 2.8.13. Use Encryption to configure the maximum length of encryption keys. Refer to 2.8.14. Use Restore factory default to reset all settings back to their default values. Click Restore. D60703-17 26 2 SafeCom Go Ricoh 2.7.4 Configuration web page – printers Use the Configuration web page to configure your SafeCom Go Ricoh printer. Identification requires connecting an ID Device (card reader) to the USB port at the back of the printer. Under SafeCom Server, click Broadcast to get a complete list of servers to select from, or enter Group name, SafeCom server TCP port (default is 7500) and the SafeCom server IP address in Add server. See also 2.8.2. Note: After you click Apply, it takes one minute before the new SafeCom Server settings take effect. Not waiting may result in a login error at the printer. The Device name and Device model are automatically filled-in. Device location and Contact person are important references for the SafeCom solution so it’s a good idea to fill them in. Post track is only relevant with SafeCom Tracking. Refer to SafeCom G3 Administrator’s Manual D60603 High speed print allows faster printing. Print speed becomes comparable to that of printing the document directly to the printer. One disadvantage is that other documents submitted via a standard TCP/IP port may print between the logged in user’s print and copy jobs. Printer output does not necessarily belong D60703-17 27 2 SafeCom Go Ricoh to the logged in user. If directly printed document are submitted via a SafeCom Push Port that references the same tracking device then these documents are not printed until after the logged in user’s jobs are done. Drivers safeguards document fidelity in the SafeCom solution. When pull printing, SafeCom compares the name of the printer driver embedded in the print job with the list of driver names returned by the SafeCom device. If there is no match a question mark is displayed in the document list on the device. This way the user is warned that fidelity is in question and the document may print incorrectly. 1. 2. 3. 4. Click Get all to retrieve a list of driver names from the SafeCom server. Click Apply. Select individual driver names on the list and click Remove to remove them. To enter a driver name manually, click Add driver and then Add. Use Encryption to configure the maximum length of encryption keys. Refer to 2.8.14. Use Restore factory default to reset all settings back to their default values. Click Restore. D60703-17 28 2 SafeCom Go Ricoh 2.7.5 Configuration web page - MP 171, MP 201F, MP 201SPF Use the Configuration web page to configure SafeCom Go Ricoh for the above models. Identification requires connecting an ID Device (card reader) to the USB port at the back of the printer. Under Device enter specific details. Make sure to click Apply in the upper right corner when you have made your changes. Device name and Device model are automatically filled-in. Device location and Contact person are important references for the SafeCom solution so it’s a good idea to fill them in. Print all at login is a printer setting. If selected all user documents are printed when the user logs in. Documents are printed in chronological order (oldest first). If checked this overrules the equivalent user property on the SafeCom G3 server. D60703-17 29 2 SafeCom Go Ricoh MFP authentication lists the functions you can select that the SafeCom solution should authenticate. Select as many as appropriate. Pull Print – collect documents at any printer. Copy - make hardcopies of scanned documents. Scanner – scan documents. Post track is relevant only with SafeCom Tracking. Refer to SafeCom G3 Administrator’s Manual D60603. High speed print allows faster printing. Print speed becomes comparable to that of printing the document directly to the printer. One disadvantage is that other documents submitted via a standard TCP/IP port may print between the logged in user’s print and copy jobs. Printer output does not necessarily belong to the logged in user. If directly printed document are submitted via a SafeCom Push Port that references the same tracking device then these documents are not printed until after the logged in user’s jobs are done. Drivers safeguards document fidelity in the SafeCom solution. When Pull Printing SafeCom compares the name of the printer driver embedded in the print job with the list of driver names returned by the SafeCom device. If there is no match a question mark is displayed in the document list on the device. This way the user is warned that fidelity is in question and the document may print incorrectly. 1. 2. 3. 4. Click Get all to retrieve a list of driver names from the SafeCom server. Click Apply. Select individual driver names on the list and click Remove to remove them. To enter a driver name manually, click Add driver and then Add. Timeout automatically logs users out after the specified amount of time. Timeout is configured in seconds with a default of 60. If there the printer requires intervention (IRQ), timeout is stopped so a user is not logged out while the issue is being resolved. Use Encryption to configure the maximum length of encryption keys. Refer to 2.8.14. Use Restore factory default to reset all settings back to their default values. Click Restore. D60703-17 30 2 SafeCom Go Ricoh 2.7.6 Register web page Use the Register web page to register the device with the SafeCom server. The printer can be used with SafeCom once it has been registered with the SafeCom server. 1. 2. Enter the User logon and PIN code of a user with Technician or Administrator rights. The user must have a PIN code. Click Register. The device can also be registered with the SafeCom solution by: D60703-17 Using the Add device in SafeCom Administrator. Logging in at the device with Technician or Administrator rights. 31 2 SafeCom Go Ricoh 2.7.7 Log web page Use the Log web page to enable, disable and view log information. Only enable logging if advised to do so as part of a troubleshooting process. 1. 2. Click Enable to start logging. Click Disable to stop logging (text changes on the button). If the printer has a hard disk, logging data will be written to the hard disk for best performance. When the log file reaches the 1Mb maximum the log file is overwritten with new data. 2.7.8 Language web page Use the Language web page to select language. The new language takes effect the next time someone logs in at the printer. 1. 2. Select a Language. Click Apply. All language texts are stored in the XML file captions.xml. Additional languages can be added to this file if required. D60703-17 32 2 SafeCom Go Ricoh 2.7.9 Password web page Use the Password web page to change the password. 2.7.10 Advanced web page Use the Advanced web page to configure parameters required for SafeCom Go Ricoh to authenticate the Nuance DigiDocFlow solution (2.8.16) NSi AutoStore (2.8.17) or Extended Feature Shortcut (0.) D60703-17 33 2 SafeCom Go Ricoh 2.8 SafeCom Go Ricoh – How to The following subsections contain step-by-step instructions for some common administrator tasks. 2.8.1 Get the SafeCom Go Ricoh software The SafeCom Go Ricoh software files (*.b87) and SafeCom Go Ricoh uninstall files (*.uin) were installed from the SafeCom CD or can be downloaded using the SafeCom Administrator function Check for updates. Alternatively a software package can be downloaded: 1. 2. 3. 4. Download the safecom_go_ricoh_xxx.exe file from the link supplied to you. Double-click the safecom_go_ricoh_xxx.exe file. Click Next. Choose the destination folder. Click Next. Normally the destination folder is: C:\Program Files\SafeCom\SafeComG3\device_software 5. 6. Click Install. Click Finish. To install software via Ricoh’s deployment tool, RiDeploy, use the files located in the Ricoh type specific subfolders, /ricoh_deploy_files_type_? 2.8.2 D60703-17 Specify SafeCom server 1. 2. Open the Configuration web page (2.7.3). To exclude broadcast results from SafeCom servers that do not belong to a particular SafeCom group in a multi-server solution, enter the Group name. 3. Click Broadcast. It takes approx. 5 seconds for the broadcast results to populate the SafeCom server IP address list. 34 2 SafeCom Go Ricoh If the SafeCom server has multiple IP addresses there will be an entry for each. If the SafeCom server is clustered you must ensure that it is only the entry matching the IP address of the virtual server and not the nodes. In a multi server solution click Move up and Move down to prioritize the order in which the servers are contacted in case the first one on the list becomes unavailable. If the device is added via SafeCom Administrator the list of SafeCom servers will include the list of prioritized failover servers. For additional information about failover servers refer to SafeCom G3 Administrator’s Manual D60603 If broadcasting fails you may have to directly enter the IP address in Add server and click Add. 4. Click Apply. Note: After you click Apply, it takes one minute before the new SafeCom Server settings take effect. Wait, otherwise there may be a login error at the printer. 2.8.3 Resend configuration If a device added in the SafeCom Administrator is not configured correctly, or if the device must be reconfigured to a different server, it is possible to resend configuration details (Server address and Group name) to the device. 1. 2. Browse to Devices in the SafeCom Administrator. Right-click the device and click Resend configuration. The configuration details are now sent to the device and the configuration is successful when Server is reconfigured appears. Note: The Resend configuration functionality does not work with devices that are SafeCom enabled via the device server. 2.8.4 Register device 1. 2. 3. Open the Register web page. Enter the User logon and PIN code of a user with Technician or Administrator rights. The user must have a PIN code. Click Register. Once the device is registered it appears in SafeCom Administrator. The device can also be registered with the SafeCom solution when: D60703-17 Using the Add device function in SafeCom Administrator. Login at the device if the user has Technician or Administrator rights. 35 2 SafeCom Go Ricoh 2.8.5 Set password to prevent unauthorized access 1. 2. 3. Open the Password web page (2.7.9). Enter the Old password, New password and Confirm new password. The password is 8 characters maximum. Click Apply. Warning: Make sure to store the password in a secure place. If you forget the password you need to uninstall SafeCom Go Ricoh. 2.8.6 Check SNMP settings If SNMP v1/v2 is disabled, SafeCom Go Ricoh is unable to obtain the correct MAC address of the printer and will report the MAC address 111badadd111 instead. Follow these steps to check and correct the SNMP settings. 1. 2. 3. 4. 5. 6. 2.8.7 Open the printer’s web page by entering its IP address in a web browser. Click Login and supply the user name (admin) and password (blank). Click Configuration on the menu. Click Network on the menu. Enable SNMPv1/v2 Function. Click Apply. Select user identification – user code or card Identification by card requires the installation of a SafeCom ID Device (card reader) and possibly a SafeCom Go Ricoh SD ID Kit. 1. 2. 3. D60703-17 Open the Configuration web page (2.7.3). Change User identification from to Card, Card or User code, or Card or Windows. Click Apply. 36 2 SafeCom Go Ricoh 2.8.8 Login with Windows without specifying the domain It is possible to login by entering your Windows user name, password, and domain. If all users belong to the same domain you can avoid prompting users to enter the domain at the device. 1. 2. 3. 4. 2.8.9 Open the Configuration web page (2.7.3). Specify a Default domain. Change Pre-fill domain to Hide. Click Apply. How to make SafeCom stay always on top 1. 2. 3. 4. 5. 6. 7. 8. On the device press the User Tools button (<>/123). Tap System Settings and then tap the General Features tab. Tap Function Priority and then tap JavaTM/X. Tap OK. Tap Print Priority and then tap the Display Mode tab. Tap OK. Tap Exit. Tap Extended Feature Settings and then tap Extended Feature Settings. Tap the Startup Setting tab. Tap Priority next to SafeCom Go if SafeCom is not selected under Extended Feature Name. Tap Exit and then Exit to leave User tools. 2.8.10 Enable copy control and access control to other functions To enable copy control and access control to other functions, on all devices (except types B and C): Have your Ricoh technician bring the Ricoh device into SP mode. SP-5401 Access Control: Default Document ACL (103) set to 3 Commit changes by pressing the # key SDK Certification Device (230) set to 00000001 Commit changes by pressing the # key SP-5113 Optional Counter Type External Optional Counter Type (1) set to 1:Expansion Device 1 Commit changes by pressing the OK button. Then press Exit and Exit. SP-5113-2 (Only applicable to devices using S87 210.xxx) Has to be set to “1”. User tools “Enhanced external charge unit management” has to be enabled. See also section 2.8.15 Control user access rights. D60703-17 37 2 SafeCom Go Ricoh 1. 2. 3. 4. 5. 6. 7. 8. 9. 10. On the printer press the User Tools button (<>/123). On the touch-screen, tap System Settings and then tap Administrator Tools tab. Tap Enhanced External charge Unit Management and select the functions you want to have access control for. The relevant functions include Copier, Document Server, Facsimile and Scanner). Do NOT select the Printer and JavaTM/X function. Press OK to save changes. Tap Exit and Exit to leave User Tools. Open the Configuration web page (2.7.3). Check Copy in MFP authentication. Please check the additional functions that are controlled by SafeCom. Make your selections in the E-mail (2.8.11) and Send to Fax (2.8.12) sections. Click Apply. Restart the device. On Type C and B devices: 1. 2. 3. 4. 5. 6. 7. 8. 9. 10. 11. D60703-17 On the printer press the User Tools button (<>/123). On the touch-screen, tap System Settings and then tap Administrator Tools tab. Tap Key Counter Management and select the Copier function and deselect the Printer function. Tap OK. Tap User Authentication Management. Select Off. Tap OK. If you intend to have a mix of user authentication methods, you should ensure that no other methods are conflicting with the ones controlled by SafeCom (that is Copy and/or Scan). Tap Exit and Exit to leave User Tools. Open the Configuration web page (2.7.3). Check Copy in MFP authentication. Please check the additional functions that are controlled by SafeCom. Make your selections in the E-mail (2.8.11) and Send to Fax (2.8.12) sections. Click Apply. Restart the device. 38 2 SafeCom Go Ricoh 2.8.11 Enable E-mail SafeCom Go Ricoh comes with its own intuitive E-mail function (3.1.5). 1. 2. 3. 4. Open the Configuration web page (2.7.3). Check E-mail in MFP authentication. Make your selections in the E-mail section. Click Apply. By default the From: field is not Editable and the To: field is Editable. By default, both fields are pre-filled with the User e-mail. Default From: address: Can be pre-filled with User e-mail, Device name, Blank or Default From: address. An e-mail sent with pre-filled User e-mail of the user John Smith with the email address [email protected] will appear as: From: [email protected] If the user does not have an e-mail address, the Default From: address is used. If this is not configured then [email protected] is used. An e-mail sent from pre-filled Device name MP 2550 will appear as: From: MP 2550 <[email protected]> where [email protected] is replaced with the what is specified in Default From: address. Default To: address: This field can be pre-filled with User e-mail, Blank or Default To: address. The CC: and BCC: fields are only editable if the To: field is editable. SMTP Server: This must be configured with the address (IP address or hostname) of the mail system. D60703-17 39 2 SafeCom Go Ricoh Default domain is the optional e-mail domain that is appended if the @ character is not found in the text entered in the To:, CC: and BCC: fields. Example: The software will automatically expand ‘js’ to ‘[email protected]’ if the specified default domain is safecom.eu. Default subject is the optional text that appears as the subject of the e-mail. Default body is the optional text that appears in the body of the e-mail. Address Book buttons are available in the E-mail dialog on the services touchscreen if you check Show (3.1.5.) Default file attachment can be Single-file or Multi-file. Default scan format can be TIFF or PDF. Default color mode can be Color, Grayscale, or Mono. Default job build can be Yes or No defining whether or not several documents are scanned into a single file by default. D60703-17 40 2 SafeCom Go Ricoh 2.8.12 Enable Send to Fax SafeCom Go Ricoh comes with its own intuitive Send to Fax function (3.1.6). Note: The SafeCom Go Send to Fax function is a LAN Fax-server solution. If you want to use the built-in phone line solution, then you must disable Counting control for the Facsimile function (2.8.10). 1. 2. 3. 4. Open the Configuration web page (2.7.3). Check Send to Fax in MFP authentication. Make your selections in the Send to Fax section. Click Apply. By default the From: field is not Editable and can be pre-filled with User email, Device name, Blank or Default From: address. A fax sent with pre-filled User e-mail of the user John Smith with the e-mail address [email protected] will appear as: From: [email protected] Default From: address: Use if the user does not have an e-mail address. If this is not configured then [email protected] is used. A fax sent from prefilled Device name MP 2550 will appear as: From: MP 2550 <[email protected]> where [email protected] is replaced with the what is specified in Default From: address. Scan format should specify whether scanning is in TIFF or PDF format. Default domain is the optional fax domain that is appended if no @ character is found in the text entered in the To: field. For example, the software will automatically expand the phone number ‘12345667’ to ‘[email protected]’ if the specified default domain is safecom.eu. Default subject is for optional fax subject text. Default body is for optional text for the body of the fax. D60703-17 41 2 SafeCom Go Ricoh Address Book buttons are shown on the device’s touch screen in the Send to Fax. Click Show. (3.1.5). 2.8.13 Enable Address Book SafeCom Go Ricoh can use the Ricoh Address Book with E-mail (3.1.5) and Send to Fax (3.1.6). 1. 2. 3. 4. Open the Configuration web page (2.7.3). Scroll to the Address Book section at the bottom of the page. Enter User name and Password of the administrator of the Ricoh MFP. Click Apply. Note: Refer to the documentation l that came with the Ricoh MFP in order to learn how to build and maintain the Address Book. Note: Address Book support is NOT available on Type B models. 2.8.14 Control max length of encryption keys1 1. 2. 3. 4. Open the Configuration web page (2.7.3). Scroll to the Encryption section at the bottom of the page. Asymmetric key max length can be: Default, 512, 1024 or 2048. Symmetric key max length can be: Default, 128 or 256. Click Apply. Choose Default to leave it to the device to decide if it has sufficient processing power and memory to comply with the length of the encryption keys that has been specified on the Encryption tab in the Server properties dialog of the SafeCom G3 server. SafeCom control data to and from the device is always encrypted. Pull printed documents are sent encrypted to the device only if Encryption is checked in the Device properties dialog and if the user has Encrypt documents checked on the Settings tab in the User properties dialog. Otherwise print data is NOT encrypted. 1 D60703-17 Skip this section if you use the SafeCom G2 server. 42 2 SafeCom Go Ricoh 2.8.15 Control user access rights When using SafeCom G3 Server version S82 070.440*03 or newer, you can control users’ access rights to specific features via SafeCom Administrator, refer to SafeCom G3 Administrator’s Manual D60603. You can control access rights to the following features: Copy E-mail Scan Fax Print all 2.8.16 Enable single sign-on for Nuance DigiDocFlow 1. 2. 3. 4. Open the Advanced web page (2.7.10). Enter Computer IP address and Port (default 21) of the computer hosting the Nuance DigiDocFlow solution. Enter User name and Password required to access the Nuance DigiDocFlow solution. The External authentication section is only used for NSi AutoStore (2.8.16). Leave Enable unchecked. Click Apply. 2.8.17 Enable single sign-on for NSi AutoStore From SafeCom obtain the file scNotifyExtAuth.dll. From NSi AutoStore obtain the client2 package that contains ASEQAT.exe. Note: Both SafeCom server and AutoStore MUST be in the same domain3. SafeCom service MUST be started by a user with remote access rights on the AutoStore server. The steps below need to be repeated on each SafeCom server: 1. 2. 3. 4. 5. 6. Run the ASEQAT.exe as administrator and enter the IP address of the AutoStore Server. After installation you should see a new service called ASEQAT. Stop the SafeCom Service and copy the scNotifyExtAuth.dll into the SafeCom installation folder. Right-click SafeCom Service and click Properties. Click Log on tab and click This account. Enter the name and password of an account that has remote access rights on the AutoStore server. Click OK. Restart the SafeCom Service. Note: The SafeCom Service loads the IP address of the AutoStore server when it is started. This implies that a change of the AutoStore server’s IP address should be followed by a restart of the SafeCom Service. 2 The client package is generic in nature, but is most likely known as ”AutoStore EquiTrac Client”. 3 At this point in time no testing has been performed with trusted domains. D60703-17 43 2 SafeCom Go Ricoh The steps below need to be performed on the Ricoh device: 1. 2. 3. 4. D60703-17 Increase the Heap Size on the Ricoh device to about 24 MB (2.3). Open the Advanced web page (2.7.10). Check Enable under External authentication. Leave all other fields at their default. Click Apply. 44 2 SafeCom Go Ricoh 2.8.18 Enable Extended Feature Shortcut To add a shortcut to the SafeCom main screen that takes users to another application, add the “Extended Feature Shortcut.” Note: Not available on all Ricoh models. 1. 2. 3. 4. 5. Open the Advanced web page (2.7.10). Check Enable under Extended Feature Shortcut. Enter the software ID number in Product ID. Enter the name you want displayed on the SafeCom Main Screen in Label. Click Apply. 2.8.19 Restore factory default 1. 2. Open the Configuration web page (2.7.3). Click Restore. 2.8.20 Determine the version The version of the SafeCom Go Ricoh software can be determined from the Information web page. 1. Open the Information web page (2.7.2). The version can also be seen in the Device properties dialog in SafeCom Administrator. 2.8.21 Uninstall SafeCom Go Ricoh 1. 2. 3. 4. 5. 6. Make sure the printer is powered on and ready. Start SafeCom Administrator and login to the server. Right-click the Ricoh device and click Update software. Browse to the SafeCom Go Ricoh uninstall file. Example: 090xxx.uin. Click Send to send the SafeCom Go Ricoh Software (*.uin) file to the device. If file is not present you need to get the file first (2.8.1). After uninstall the device will restart. Note: If the device gets stuck with the message “Please wait”, then restart it again. D60703-17 45 2 SafeCom Go Ricoh 2.9 All printing through SafeCom Follow the steps below to restrict printing to SafeCom. 1. 2. 3. 4. 5. 6. Open the printer’s web page by entering its IP address in a web browser. Click Login and supply the user name (admin) and password (blank). Click Configuration on the menu. Under Security click Access Control. Enter the IP Address of the SafeCom server as both the start and end point of the Access Control Range. Click OK. You may also need to disable selected network printing protocols, such as the Internet Printing Protocol (IPP). 7. 2.10 Under Network click the protocols you want to disable. Install SafeCom Go Ricoh via web page Before proceeding, check that the device_software folder (2.8.1) contains the Ricoh type specific subfolders, /ricoh_deploy_files_type_? Type C, F, I, J, L and N: 1. 2. 3. 4. 5. 6. 7. 8. 9. 10. 11. Open a web browser and enter the printer’s address. Use of JavaScript (Active Scripting) must be enabled. Click Login and enter Login User Name (admin) and Login Password (by default there is no password) and then click Login. Click Configuration on the left menu. Under Extended Feature Settings click Install. Select Local File and click Browse… to locate the Ricoh type specific subfolders, /ricoh_deploy_files_type_? and select the nnnxxx_servlet.zip file. Click Open. Click Display Extended Feature List. Leave Install to as is. In Auto Start click On. On the Extended Feature List click RicohServlet. Click Install. On the Confirm web page click OK. Install SafeCom Go (SafeCom Go Xlet): 12. 13. 14. 15. 16. 17. 18. 19. D60703-17 Select Local File and click Browse… to locate the Ricoh type specific subfolders, /ricoh_deploy_files_type_? and select the nnnxxx_xlet.zip file. Click Open. Click Display Extended Feature List. Leave Install to as is. In Auto Start click On. On the Extended Feature List click SafeCom Go. Click Install. On the Confirm web page click OK. Restart the printer. 46 2 SafeCom Go Ricoh Types H, K and O: 1. 2. 3. 4. 5. 6. 7. 8. 9. 10. 11. 12. D60703-17 Open a web browser and enter the printer’s address. Use of JavaScript (Active Scripting) must be enabled. Click Login and enter Login User Name (admin) and Login Password (by default there is no password) and then click Login. Click Configuration on the left menu. Under Extended Feature Settings click Install. Select Local File and click Browse… to locate the Ricoh type specific subfolders, /ricoh_deploy_files_type_h and select the 080xxx_servlet.zip file. Click Open. Click Display Extended Feature List. In Install to select SD Card Slot 1, where 1 is the slot with the VM Card. In Auto Start click On. On the Extended Feature List click RicohServlet. Click Install. On the Confirm web page click OK. Restart the printer. 47 3 Using SafeCom Go Ricoh 3 Using SafeCom Go Ricoh 3.1 Ricoh Aficio MFPs 3.1.1 Control panel 3.1.2 Login The recommended login sequences are described in the following. Login with card: 1. 2. 3. D60703-17 Press the Other Function function button on the device. (Type B devices, press the Printer function button and tap JavaTM Platform.) This will give you the SafeCom login screen Use card to login. Use card reader. Tap the Pull Print or E-mail icon or press the Copy function button. 48 3 Using SafeCom Go Ricoh Login with card and PIN code: 1. 2. 3. 4. Press the Other Function button on the device. (Type B devices, press the Printer function button and tap JavaTM Platform.) This will give you the SafeCom login screen Use card to login. Use card reader. Enter PIN code on the keypad or touch-screen. Tap OK. Tap the Pull Print or E-mail icon or press the Copy function button. Login with user code: 1. 2. 3. 4. Press the Other Function button on the device. (Type B devices press Printer function button and tap JavaTM Platform.) This opens the SafeCom login screen Touch screen to login. Tap the screen. Enter User code on the touch-screen. Tap OK. Tap the Pull Print or E-mail icon or press the Copy function button. Login with user code and PIN code: 1. 2. 3. 4. 5. Press the Other Function button on the device. (Type B devices press Printer function button and tap JavaTM Platform.) This will give you the SafeCom login screen Touch screen to login. Tap the screen. Tap User code and enter User code on the touch-screen. Tap OK. Tap PIN code and enter PIN code on the keypad or touch-screen. Tap OK. Tap the Pull Print or E-mail icon or press the Copy function button. Login with Windows: If User identification (2.8.7) is Card or Windows it is possible to login by either using your card or entering your Windows login credentials: 1. 2. 3. 4. 5. 6. Press the Other Function button on the device. (Type B devices press Printer function button and tap JavaTM Platform.) This will give you the SafeCom login screen Touch screen to login. Tap the screen. Tap User name and enter User name on the touch-screen. Tap OK. Tap Password and enter Password on the touch-screen. Tap OK. Tap Domain and enter Domain on the touch-screen. Tap OK. The solution can be configured to NOT prompt for the domain (2.8.8). Tap Login. Note: User name and Password cannot be blanks. D60703-17 49 3 Using SafeCom Go Ricoh 3.1.3 Pull print Tap Pull Print to access the Document list that allows you to print individual documents. Documents are listed chronologically with the newest at the top. If Print all at login is checked, documents pending collection are printed first. D60703-17 50 3 Using SafeCom Go Ricoh In the document list a document with a preceding R shows the document is retained. A delegated document will have a preceding D. Tap the Info button to see information about who delegated the document. A group print document will have a preceding G. The figure 0.35 is the cost of the document. 3.1.4 Tap Print all to print all documents, excluding any retained documents. Documents are printed in chronological order (oldest first). Tap Print to print the selected documents. Tap Retain if you want the selected documents to remain on the list (server) after they have been printed. Tap Delete to delete the selected documents. Tap Info for information about the selected documents, including cost, driver name, use of color and duplex. Tap Refresh to update the list of documents with pending documents that have finished spooling after the user logged in. Use the physical keypad or the up and down buttons to enter the number of Copies you want of the selected documents. Press the red Clear/Stop button to reset copies to 1. Copy After login (3.1.2) press the Copy function button and then the Start button to copy the documents placed in the automatic document feeder (ADF). D60703-17 51 3 Using SafeCom Go Ricoh 3.1.5 E-mail Tap the E-mail icon. The To: field can be pre-filled with the User e-mail, Blank or Default To: address. The From: field can be pre-filled with User e-mail, Device name, Blank or Default From: address. See 2.8.11. To enter an email address, tap the field enter the address using the touchscreen, keypad, or Address Book button to the right of the field (3.1.7). Tap Scan to scan the document. Tap Back to go back to the main-screen. D60703-17 52 3 Using SafeCom Go Ricoh Tap Configure to choose scan properties. Scanned documents are always in a PDF format. Scan properties include: Orientation [Long edge, Short edge] Sides [1-sided, 2-sided] Original [Mixed, Photo, Text] Attachment [PDF | TIFF] Color mode [Color, Grayscale, B/W] Resolution (dpi) [200, 300, 600] Single file attachment [Yes, No] Job Build [Yes, No] – allows multiple documents to be scanned to a single file. By default Job Build is turned off. Tap OK to return to sending e-mail. D60703-17 53 3 Using SafeCom Go Ricoh 3.1.6 Send to Fax Tap the Send to Fax icon. In the To: and CC: field enter the receiver’s fax number. The From: field can be pre-filled with User e-mail, Device name, Blank or Default From: address. See 2.8.12. Tap To, CC and Subject and use the touch-screen keypad or the Address Book to the right of the field (3.1.7) to enter fax recipient(s) and subject. Tap Send to scan and fax the document. Tap Back to return to the main-screen. D60703-17 54 3 Using SafeCom Go Ricoh 3.1.7 Address Book Enable the Ricoh MFP’s Address Book (2.8.13) and use it for easy selection of Email (3.1.5) and Send to Fax (3.1.6) recipients. Address Book support is NOT available on Type B models. Tap any Address Book button in E-mail or Send to Fax. In Find enter the text to perform a case insensitive search for recipients. Tap OK. E-mail recipients look like this: D60703-17 55 3 Using SafeCom Go Ricoh Send to Fax recipients look like this: Select the recipients and tap Add. 3.1.8 Logout There is a configurable Timeout with a default time of 60 seconds. Users are logged out if the device is idle for this period of time. To logout actively: 3.1.9 Tap Logout in the List of icons. Use card again (if a card reader is connected and you logged in by card). Register card at device There are two ways the user can register a card at the device: D60703-17 Register card with Windows logon User must have a network logon and the User identification (2.7.3) must include card. Register card with PUK code PUK code must be supplied to the user in advance, typically via e-mail. 56 3 Using SafeCom Go Ricoh 3.1.10 Register card with Windows logon 1. 2. 3. 4. 5. Use card reader. If there are any available PUK codes on the system tap Cancel in the Please enter PUK dialog. The Login to register card dialog appears. If there are NO available PUK codes the user gets the Login to register card dialog. To abort the registration of the card tap Cancel in this dialog. Tap User name and enter User name on the touch-screen. Tap OK. Tap Password and enter Password on the touch-screen. Tap OK. Tap Domain and enter Domain on the touch-screen. Tap OK. The solution can be configured to NOT prompt for the domain (2.8.8). Tap Login. Note: User name and Password cannot be blanks. 3.1.11 Register card with PUK code 1. 2. 3. 4. Use card reader. If the card is unknown and there is an available PUK code in the SafeCom system the user is asked to enter his PUK code. Enter PUK code on the keypad or touch-screen. Tap PIN code and enter PIN code on the keypad or touch-screen. Tap PIN again and enter PIN again on the keypad or touch-screen. The card is now registered with the user. D60703-17 57 3 Using SafeCom Go Ricoh 3.2 Ricoh Aficio MP 171, SP 201F, SP 201SPF 3.2.1 Control Panel 3.2.2 Login with card Use card reader 3.2.3 Pull Print Press the start key to start printing all jobs sent to the device. 3.2.4 Copy Press the Copy function button and then the Start button to copy the documents placed in the automatic document feeder (ADF). 3.2.5 Logout Press the Logout selection key. D60703-17 58 4 Using SafeCom P:Go Ricoh 4 Using SafeCom P:Go Ricoh 4.1 Pull Print 1. 2. 3. Use card reader. If there are documents to be printed the data LED starts flashing and the documents are printed. User is logged out. Note: As there is no communication with the device’s display the user’s name or credits are not displayed. D60703-17 59 5 Troubleshooting 5 Troubleshooting 5.1 SafeCom Go Ricoh Device Trace Facility Use the Mail to SafeCom Support button on the SafeCom Go Ricoh Information web page (2.7.2) to collect information from the device, such as version and last printer states. The SafeCom Go Ricoh log facility is also useful in troubleshooting situations, but it should only be enabled upon request from SafeCom support personnel. The log facility is enabled on the SafeCom Go Ricoh Log web page (2.7.7). 5.2 SafeCom Help Desk Assistant We want your SafeCom solution to be one that reduces not only print costs, but is also easy to support. In the following you will find useful troubleshoot hints. The most common problems reported by end-users have been compiled into an online SafeCom Help Desk Assistant available at safecom.eu/help 5.3 SafeCom Administrator: Cannot add Pull Device with no MAC Address If the SafeCom Administrator reports: Cannot add pull device with no MAC address, then try the following: 1. 2. 3. 4. 5. 6. 7. 8. Open a web browser and enter the printer’s address. Use of JavaScript (Active Scripting) must be enabled. Click Login and enter Login User Name (admin) and Login Password (by default there is no password) and then click Login. Click Configuration on the left menu. Under Network click IPv6. For IPv6 click Disable. For Stateless Address Auto Configuration click Disable. Click OK. Restart the printer. If the above still fails then install the software through the web page (2.10). D60703-17 60 6 Regulatory information 6 Regulatory information WARNING NOTE: This equipment has been tested and found to comply with the limits for a Class A digital device, pursuant to part 15 of the FCC Rules. These limits are designed to provide reasonable protection against harmful interference in a residential installation. This equipment generates uses and can radiate radio frequency energy and, if not installed and used in accordance with the instructions, may cause harmful interference to radio communications. However, there is no guarantee that interference will not occur in a particular installation. If this equipment does cause harmful interference to radio or television reception, which can be determined by turning the equipment off and on, the user is encouraged to try to correct the interference by one or more of the following measures —Reorient or relocate the receiving antenna. —Increase the separation between the equipment and receiver. —Connect the equipment into an outlet on a circuit different from that to which the receiver is connected. —Consult the dealer or an experienced radio/TV technician for help. CAUTION: Changes or modifications not expressly approved by SafeCom a/s could void the user’s authority to operate this equipment according to part 15 of the FCC rules. This equipment generates, uses, and can radiate radio frequency energy and if not installed and used in accordance with the instruction manual, may cause interference to radio communications. It has been tested and found to comply with the limits for a Class A computing device pursuant to Subpart B of Part 15 of FCC Rules, which are designed to provide reasonable protection against such interference when operated in a commercial environment. Operation of this equipment in a residential area is likely to cause interference in which case the user will be required to take whatever measures may be required to correct the interference at his own expense. CE conformance: This product has been developed and produced in accordance with the EMC directive and the Low Voltage directive and therefore carries the CE mark. EMC directive: This product observes the rules and regulations of the EMC directive. If so required, a declaration of conformity in local language stipulating the applied rules and regulations can be obtained. D60703-17 61 7 Index 7 Index Copy Control, 24, 30 Default job build, 40 Document history, 13 Help Desk Assistant, 60 High speed print, 24, 27, 30 Idle timeout, 25, 30 Inactivity timeout, 25, 30 Install software SafeCom Go Ricoh, 20 Job Build, 40, 53 Manuals, 12 MFP authentication, 24, 30 Patent, 2 Post track, 24, 27, 30 Print all at login, 24, 29 D60703-17 Regulatory information, 61 Resend Configuration, 35 SafeCom Go Ricoh, 5, 8, 15 Printer firmware, 6, 7 SafeCom Help Desk Assistant, 60 Send to e-mail, 24, 30 Send to folder, 24, 30 System requirements SafeCom Go Ricoh, 5, 8 Timeout, 25, 30 Trace facility, 60 Tracking data adjustment, 24, 27, 30 Trademarks, 2 Troubleshooting, 60 Update software SafeCom Go Ricoh, 20 User code, 23 62