1
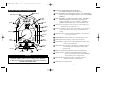
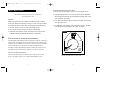
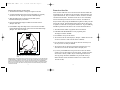
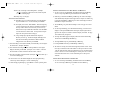
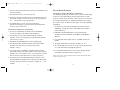
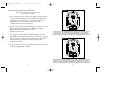
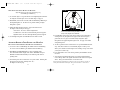
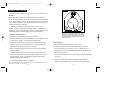
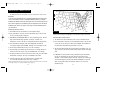
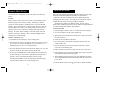
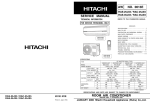
BRUNTON MAN. MECH. 7/97
9/29/98 9:08 AM
Page 1
POWER
LIGHT
TRUE
CLOCK
TIMER
DECLIN
DAMPING
BASIC
TRL BLZR
MULTILEG
BEARING
ADVANCED
ENTER
MENU
OPERATION MANUAL
BRUNTON MAN. MECH. 7/97
9/29/98 9:08 AM
Page 2
CONGRATULATIONS on your purchase of the Brunton Outback Compass.
The Outback is the most sophisticated hand-held compass on the market, incorporating
technology developed for the U.S. military. The Outback has been designed with
a variety of options. For the novice outdoors enthusiast, the Basic menu option has
all the features of a traditional compass , plus a few more. The advanced features
of Trail Blazing, Multi-Leg, Bearing, Clock, Timer, Declination, and Damping
offer the serious user features not found in traditional compasses, such as storing
courses and bearing points.
OUTBACK FEATURES:
¥ Tilt compensation provides accuracy of 2¡ even when tilted up to ±15¡.
¥ Heading is displayed in digits, cardinal points and on the compass rose.
¥ Heading is easily referenced to magnetic or true north.
¥ Multiple declination angles can be stored.
¥ Trail Blazing memorizes your course as you travel.
¥ Multi-Leg stores a pre-planned route to follow later.
¥ Day and Night Navigation keep you on a chosen course.
¥ Automatic return reverses a route and guides you back to your starting point.
¥ Bearings are stored with a press of a button.
¥ Clock displays in either standard or military time format.
¥ The timer counts up or down and stores a time.
¥ Damping reduces errors caused by movement of the compass.
¥ Magnetic distortion alarm warns when outside magnetic
interference is causing errors in the compass heading.
¥ Resistant to water from rain, dew or being splashed.
¥ Power and Backlight Auto Shut-off
¥ Extended battery life of 200 hours
IMPORTANT
To provide tilt compensation, the magnetic sensors inside the Outback are mechanically
gimbaled. This may cause a ÒrattlingÓ noise if the Outback is shaken or jarred.
This is not a defect in the compass, but a result of the movement of the magnetic sensors.
TABLE OF CONTENTS
BUTTON AND DISPLAY INFORMATION ...............................................................................................1
INTRODUCTION ..................................................................................................................................3
Conventions Used in this Manual ...............................................................................3
Error Messages ............................................................................................................3
Backlight .....................................................................................................................4
Menu Options of the Outback .....................................................................................4
BASIC MENU OPTION ........................................................................................................................5
True or Magnetic North Heading Reference ...............................................................5
Power Auto Shut-Off........................ ...........................................................................0
Backlight Auto Shut-Off.............................................................................................. 0
Calibration ...................................................................................................................8
TRAIL BLAZING AND MULTI-LEG MENU OPTIONS ..........................................................................9
Memorizing Legs in Trail Blazing and Multi-Leg ....................................................10
Day and Night Navigation in Trail Blazing and Multi-Leg ......................................15
Automatic Return in Trail Blazing and Multi-Leg ....................................................18
BEARING MENU OPTION ............................................................................................................... 20
Storing and Viewing Bearings ..................................................................................20
Erasing Bearings ....................................................................................................... 21
CLOCK ........................................................................................................................................... 00
Choosing Time Format...............................................................................................00
Setting the Clock........................................................................................................00
TIMER MENU OPTION .................................................................................................................... 22
Setting the Timer .......................................................................................................22
Starting and Stopping the Timer ............................................................................... 23
Erasing the Timer ..................................................................................................... 24
DECLINATION MENU OPTION .........................................................................................................24
Storing Declination Angles ......................................................................................24
Choosing Declination Angles ...................................................................................25
DAMPING MENU OPTION ................................................................................................................26
Choosing Damping Values .......................................................................................26
CHANGING BATTERIES ....................................................................................................................27
TROUBLE SHOOTING .......................................................................................................................28
WARRANTY .....................................................................................................................................30
INDEX ..............................................................................................................................................31
BRUNTON MAN. MECH. 7/97
9/29/98 9:08 AM
Page 3
1 POWER: Press and hold POWER to turn the Outback on.
BUTTON AND DISPLAY INFORMATION
Press POWER momentarily to turn the Outback off.
14 GUN SIGHT
NIGHT NAVIGATION 6
2 LIGHT: Press LIGHT to turn the back-light of the LCD on or off. Hold LIGHT for
more than 2 seconds to turn Night Navigation on or off in either Trail Blazing
or Multi-Leg.
7 NUMERIC
HEADING
2 LIGHT
POWER 1
POWER
LIGHT
POINTS
PROGRAM 11
MAG
illuminate the PROGRAM symbol and enter programming mode.
(Example: press MENU once to move from Basic to Trail Blazing or
hold MENU until PROGRAM flashes to enter programming mode)
4 ADVANCE: Press ADVANCE to see the next option or value. (Example: press
8 CARDINAL
PROGRAM
3 MENU: Press MENU to step from one menu option to another. Hold MENU to
12 TRUE/MAG
SYMBOL
ADVANCE to increase a digit from 1 to 2)
5 ENTER: Press ENTER to select an option, value or bearing, to start calibration, or
to start or stop a timer of a leg. (Example: press ENTER to store a
bearing)
6 NIGHT NAVIGATION: For use in Trail Blazing and Multi-Leg, the red and green
9 COMPASS
ROSE
MENU
OPTIONS
10
CLOCK
TIMER
DECLIN
DAMPING
BASIC
TRL BLZR
MULTILEG
BEARING
ADVANCED
ENU
10 M
OPTIONS
13 DISPLAY
WORD
ADVANCE 4
14
3
GUN SIGHT
5 ENTER
MENU
IMPORTANT
To provide tilt compensation, the magnetic sensors inside the Outback are
mechanically gimbaled. This may cause a ÒrattlingÓ noise if the Outback
is shaken or jarred. This is not a defect in the compass, but a result of the
movement of the magnetic sensors.
1
8 CARDINAL POINTS: Direction letters ( N, NE, E, SE, S, SW, W, NW).
9 COMPASS ROSE: A solid arrow points to North. During Day Navigation, arrows
guide you in the right direction.
ENTER
MENU
arrows keep you on course.
7 NUMERIC HEADING: Heading is displayed in 1¡ increments from 0¡ to 359¡.
10 MENU OPTIONS: The menu options of the Outback are continuously displayed.
A box around the menu option indicates which option the
Outback is using.
11 PROGRAM: The PROGRAM symbol flashes while in programming mode.
12 TRUE/MAG SYMBOL: The TRUE symbol is illuminated when the heading
reference is true north and the MAG symbol is illuminated
when the heading reference is magnetic north.
13 DISPLAY WORD: Six alphanumeric characters. The display word shows
instructions, information, options and values.
14 GUN SIGHTS: Used for taking bearings.
2
BRUNTON MAN. MECH. 7/97
9/29/98 9:08 AM
Page 4
INTRODUCTION
CONVENTIONS USED IN THIS MANUAL
¥ The names of buttons are capitalized. (Example: press POWER)
¥ The LCD symbols are capitalized and italicized. (Example: PROGRAM)
¥ When the manual says press a button, it means press the button for less than
2 seconds. (Example: press ENTER)
¥ When the manual says hold a button, it means hold the button down for more
than 2 seconds. (Example: hold MENU)
¥ Quotation marks indicate the characters are shown in the display word.
(Example: ÒL2 210¡Ó)
ERROR MESSAGES
ÒbAT LOÓ Error Message
The Outback will alert you when the batteries are low by displaying ÒbAT LOÓ in
the display word when the power is turned on. Pressing MENU, ENTER or
ADVANCE will override this message. The Outback will function for a short
period of time after ÒbAT LOÓ is displayed, although it is recommended the
batteries be changed immediately. See Changing Batteries on page 32 for details
on how to change batteries.
ÒdISTÓ Error Message
When the Outback detects magnetic inference causing errors in the compass heading,
ÒdISTÓ is shown on the display word, indicating magnetic distortion. This is a sign
the Outback may need to be calibrated. See Calibration on page 10 for details. If
ÒdISTÓ is still displayed after performing calibration, the compass is most likely close
to some object with very strong magnetic fields such as steel. Try moving the
Outback away from the source of the magnetic field; even a slight separation helps.
3
BACKLIGHT
The Outback has a built-in backlight which allows the entire LCD to be visible in low
lighting. Pressing LIGHT turns the backlight on or off. The light functions in all
menu options and stays on until LIGHT is pressed, the chosen power or backlight
auto shut-off value is reached (see page 9 for details) or the Outback is turned off.
It is recommended the backlight be turned off when not being used to conserve
batteries.
MENU OPTIONS OF THE OUTBACK
1) The Outback has eight menu options: Basic, Trail Blazing, Multi-Leg, Bearing,
Clock, Timer, Declination and Damping. Each menu option is continuously
displayed. A box around the menu option indicates which option the Outback is using.
2) Pressing MENU steps from one menu option to another.
3) All menu options have both an operating and programming mode, except
damping which only has an operating mode. In programming mode, values or
parameters are stored or selected. In operating mode, stored values or
parameters are used. (Example: A course is stored in programming
mode of Multi-Leg, whereas a course is followed in operating mode of
Multi-Leg)
4) The Outback is by default in operating mode if it is not in programming
mode. (Example: If the PROGRAM symbol is not flashing, the Outback is
in operating mode)
5) Throughout this manual, the Outback is assumed to be in operating mode
unless otherwise stated.
6) Programming mode is achieved by holding MENU for more than 2 seconds
until PROGRAM flashes.
7) Pressing MENU returns the Outback to operating mode from programming
mode.
4
BRUNTON MAN. MECH. 7/97
9/29/98 9:08 AM
Page 5
BASIC MENU OPTION
CHANGING FROM TRUE TO MAGNETIC NORTH
1) The Outback must be in Basic to change from true to magnetic north.
The Outback must be in Basic to use any of the features
described in this section.
FEATURES
In Basic, the Outback functions similarly to a traditional compass: heading is
shown on the Numeric Display and the compass rose points to North. In addition
to the traditional compass features, Basic has the following additional features:
1) Choosing magnetic north or true north as the heading reference.
2) Choosing the Auto Shut-Off values for the power and backlight.
3) Calibration of the Outback to cancel out interference from magnetic fields.
Calibration must be performed before initial use to be accurate.
2) When the heading reference is true north, the TRUE symbol is illuminated
and the display word shows the current declination angle being used for true
north. (Example: ÒdCL:10¡WÓ)
3) Press ADVANCE and the display word flashes the magnetic north reference.
(Example: ÒMAG:130¡Ó)
4) Press ENTER to select magnetic north as the heading reference. The MAG
symbol illuminates and the display word is blank. See Figure 1.
FIGURE 1
TRUE OR MAGNETIC NORTH HEADING REFERENCE
The MAG/TRUE symbol indicates whether the Outback is referenced to either true or
magnetic north. The difference between true and magnetic north is called magnetic
declination. For the Outback to be referenced to true north, the proper declination
must be stored and chosen. See page 29 for details on declination angles.
If the MAG symbol is illuminated, the Outback is referenced to magnetic north.
If the TRUE symbol is illuminated, the Outback is referenced to true north.
CHANGING THE HEADING REFERENCE
Pressing ADVANCE toggles the Outback between magnetic and true north.
However, the heading reference is not changed until ENTER is pressed.
5
MAG
CLOCK
TIMER
DECLIN
DAMPING
BASIC
TRL BLZR
MULTILEG
BEARING
The Outback is in operating mode of Basic, pointing 130¡
South East. The heading reference is magnetic north.
6
BRUNTON MAN. MECH. 7/97
9/29/98 9:08 AM
Page 6
CHANGING FROM MAGNETIC TO TRUE NORTH
1) The Outback must be in Basic to change from magnetic to true north.
2) A magnetic declination angle must be stored for the Outback to be accurately
referenced to true north. See page 29 for details on declination angles.
3) When the heading reference is magnetic north, the MAG symbol is
illuminated and the display word is blank.
4) Press ADVANCE and the display word flashes the true north reference.
(Example: ÒTRU:140Ó)
5) Press ENTER to change the heading reference to true north. Now the TRUE
symbol is illuminated and the display word shows the current declination angle.
(Example: ÒdCL:10¡WÓ) See Figure 2.
POWER AUTO SHUT-OFF
Power Auto shut-off allows the user to select the interval at which the Outback will
automatically turn off. The Outback can be programmed to automatically shut-off at
6 predetermined intervals. They are 5 minutes, 15 minutes, 30 minutes , 60 minutes,
120 minutes and 180 minutes. The Outback can also be set to never automatically
shut-off. The default power auto shut-off value is 15 minutes. The Outback can
always be turned off the pressing the POWER button, regardless of which power auto
shut-off value is chosen. When the Outback reaches the auto shut-off value, it turns
off regardless of which mode or menu option the Outback is in. Legs in Trail Blazing
and Multi-leg and the timer will continue to run even when the Outback shuts-off.
1) The Outback must be in Basic to program the Power Auto Shut-Off.
2) Hold MENU until PROGRAM flashes to enter programming mode.
The display word flashes ÒPOWERÓ.
FIGURE 2
3) Press ENTER to select power auto shut-off.
TRUE
5) The chosen auto shut-off value is displayed. (Example: Ò15MINÓ if the auto shut
off value is 15 minutes or ÒOFFÓ if the auto shut-off is disabled)
6) Press ADVANCE to step from one auto shut-off value to the next until you see
the one you want to use, then press ENTER.
BASIC
TRL BLZR
MULTILEG
BEARING
CLOCK
TIMER
DECLIN
DAMPING
The Outback is in operating mode of Basic, pointing 140¡ SE.
The heading reference is true north and the declination angle is
10¡W.
IMPORTANT NOTE: When changing the reference from true to magnetic north or magnetic to true north, all stored headings
in Trail Blazing, Multi-Leg, and Bearing are automatically converted to whichever north the Outback is currently referenced to,
regardless of which north the headings were stored in. (Example: The Outback is referenced to true north while Multi-Leg
headings are stored. The OutbackÕs reference is now changed to magnetic north. The Multi-Leg stored headings are automatically converted to magnetic north. The Outback is now changed back to true north, all the stored headings are automatically
converted back to true north)
7
7) The chosen auto shut off value does not flash when in the display word. Any
value which is not the chosen value flashes when in the display word.
8) If you do no press ENTER while viewing an auto shut-off value, the Outback
continues to uses the value which was previously selected. (Example: If the auto
shut-off value is currently Ò15MINÓ, and you scroll through the auto shut-off
values by pressing ADVANCE, and ENTER is not pressed while viewing a
different auto shut-off value, the Outback continues to use 15 minutes as the
auto shut-off value)
8
BRUNTON MAN. MECH. 7/97
9/29/98 9:08 AM
Page 7
BACKLIGHT AUTO SHUT-OFF
CALIBRATION
Backlight Auto shut-off allows the user to select the interval at which the backlight of
Outback will automatically turn off. The backlight on the Outback can be programmed
to automatically shut off at 3 predetermined intervals. They are: 10 seconds, 30
seconds and 60 seconds. The backlight can also be programmed to never automatically shut-off. The default auto shut-off value is 10 seconds. Keep in mind, the backlight
uses significantly more power than the compass itself, therefore it is recommended the
backlight be turned off when it is not being used. The backlight can always be shut-off
by pressing the LIGHT button regardless of which backlight auto shut-off value is
chosen.
Calibration allows the Outback to separate the earthÕs magnetic field from the local
magnetic fields thereby providing accurate heading information. The Outback must
be calibrated because the internal electronics of the Outback generate magnetic fields.
1. The Outback must be in Basic to program the backlight auto shut-off
2. Hold MENU until PROGRAM flashes to enter programming mode. The display
word flashes ÒPOWERÓ.
3. Press ADVANCE once and ÒLIGHTÓ flashes in the display word. Press ENTER
to select the backlight auto shut-off.
5. The chosen backlight auto shut-off value is displayed. (Example: Ò10 SECÓ if 10
seconds is chosen as the backlight auto shut-off or ÒOFFÓ if the backlight auto
shut-off is disabled)
6. Press ADVANCE to step from one backlight auto shut-off value to the next until
you see the one you want to use, then press ENTER.
7. The chosen auto shut off value does not flash when in the display word. Any
value which is not the chosen value, flashes when in the display word.
8. If you do not press ENTER while viewing a different backlight auto shut-off value,
the Outback uses the value which was previously selected. (Example: If the auto
shut-off value is currently Ò10 SECÓ, and you scroll through the backlight auto
shut-off values by pressing ADVANCE, and ENTER is not pressed while viewing
a different auto shut-off value, the Outback continues to use 10 seconds as the
backlight auto shut-off value)
9
WHEN TO CALIBRATE
The Outback must be calibrated when:
1) It is being used for the first time.
2) The magnetic distortion flag, ÒdISTÓ, is displayed.
3) The batteries are removed or replaced.
4) The Outback seems to be consistently inaccurate.
There are two methods of calibration for the Outback. Option one is a 180¡ calibration method and option two is a 720¡ method. The 720¡ calibration method is more
accurate, but it is also the more difficult to perform correctly. With 720¡ calibration,
the Outback must be constantly level during calibration. This is best achieved by
placing the Outback on a level, nonmagnetic surface such as a solid wood or plastic
table which is at least three feet away from any source of magnetic interference.
The 180¡ calibration is also performed by also placing the Outback on a level,
nonmagnetic surface such as a solid wood or plastic table which is at least three feet
away from any source magnetic interference, but if one is not available, the 180¡
calibration can be performed by holding it level in your hand. Only one calibration
method needs to be performed. If both are performed, the Outback will only store
calibration data from the last calibration.
180¡ CALIBRATION
1. The Outback must be in Basic to perform 180¡ calibration.
2. Hold MENU until PROGRAM flashes to enter programming mode. The display
word flashes, ÒPOWERÓ.
3. Press ADVANCE twice until the display word flashes ÒCALIB 180¡Ó.
Then press ENTER.
10
BRUNTON MAN. MECH. 7/97
9/29/98 9:08 AM
Page 8
4. The display words shows ÒPOINT FWDÓ and the arrow on the compass rose
points to the 12 oÕclock position.
5. Slowly rotate the compass in a circle, turning no more than one full circle in 10
seconds. The Outback is storing calibration data while the circles are being made.
5. Placing the Outback on a level, nonmagnetic surface which is at least three feet
away from any source of magnetic interference, or holding the Outback level in
your hand, align the compass to any point and press ENTER. This stores the first
calibration point.
6. The Outback stores data from two approximately two circles, but sometimes more
or less data is needed. Continue rotating the Outback in a circle until ÒCMPLTEÓ
is shown in the display word.
6. Now the display words shows ÒTURN 180¡Ó. Again with the Outback level,
turn it 180¡ (half circle) and press ENTER.
7. The display word shows ÒCMPLTEÓ for two seconds, indicating calibration is
completed and the Outback returns to operating mode of Basic.
8. The direction the Outback is pointing when taking calibration points does not
matter. The important thing is that the two calibration points are 180¡ apart and
the Outback is as level as possible.
9. If the calibration process is not completed within 2 minutes, the Outback automatically returns to operating mode and does not change the previous calibration.
10. If POWER is pressed at anytime during the calibration process, the Outback
discontinues calibration and shuts off. The previous calibration will not change.
720¡ CALIBRATION
1. The Outback must be in Basic to perform calibration
2. Hold MENU until PROGRAM flashes to enter programming mode. The display
word flashes, ÒPOWERÓ.
3. Press ADVANCE three times until the display word flashes, ÒCALIB 720¡Ó.
Then press ENTER.
4. The display word scrolls ÒTURN TWICEÓ, and the arrow on the compass rose
rotates clockwise around the compass rose. It is best to have the Outback placed
on a level, nonmagnetic surface such as a wood or plastic table which is at least
three feet from any source of magnetic interference.
11
7. The direction the Outback is pointing when beginning or ending the rotations does
not matter, the important thing is the Outback is rotated until enough data is stored.
8. After calibration is completed, the Outback will automatically return to operating
mode of Basic.
9. If the calibration process is not completed within 2 minutes, the Outback
automatically returns to operating mode and does not change the previous calibration.
10. If POWER is pressed at anytime during the calibration process, the Outback
discontinues calibration and shuts off. The previous calibration will not change.
TRAIL BLAZING AND MULTI-LEG MENU OPTIONS
The Outback must be in Trail Blazing or Multi-Leg to use any
of the features described in this section.
FEATURES
Trail Blazing tracks your course as you travel, whereas Multi-Leg allows you
to follow a previously planned course. The only difference between MultiLeg and Trail Blazing is when and how the legs are stored. With Trail
Blazing, legs are stored as you travel on your journey. With Multi-Leg, legs
are planned and stored before your journey begins. Since Trail Blazing and
Multi-Leg have the same features, they are described in the same section of
the manual. Both Trail Blazing and Multi-Leg have the following features:
1) Memorizing Legs: Both Trail Blazing and Multi-Leg allow you to store and
follow up to 10 legs with a heading and time for each leg. The legs are
numbered L0 through L9.
12
BRUNTON MAN. MECH. 7/97
9/29/98 9:08 AM
Page 9
2) Day and Night Navigation: These features are designed to easily help you stay
on course. Your desired heading is automatically compared to your actual
heading and the Outback alerts you when you are Ôoff-track.Õ
3) Automatic Return: The Outback automatically calculates your return course
and guides you back to your starting point.
MEMORIZING LEGS
STORING LEGS IN TRAIL BLAZING
1) The Outback must be in Trail Blazing to store legs for Trail Blazing.
2) A timer can not be running while storing a leg. Press ENTER to stop a timer
that is running.
3) Press ADVANCE to step from one leg to the next. The display word shows the
heading for three seconds and then the timer for three seconds. (Example:
ÒL2 210¡Ó and Ò0:45:20Ó) If a leg is unprogrammed, the display word shows
dashes in place of the heading and zeros for the timer. (Example: ÒL3:Ñ-¡Ó
and Ò0:00:00Ó)
4) To store a leg, press ADVANCE until you see an unprogrammed leg.
(Example: ÒL3:Ñ-¡Ó) The Outback will display only one unprogrammed
leg. (Example: If L0 through L2 are programmed, pressing ADVANCE while
viewing L3 will take you back to L0)
STORING LEGS IN MULTI-LEG
1) The Outback must be in Multi-Leg to store legs for Multi-Leg.
2) Press ADVANCE to step from one leg to the next until you see the one you
want to program.
3) The display word shows the heading for three seconds and then the timer
for three seconds. (Example: ÒL2 210¡Ó and Ò0:45:20Ó) If a leg is unprogrammed, the
display word will show dashes in place of the heading and zeros for the timer.
(Example: ÒL3 Ñ-Ó and Ò0:00:00Ó) The Outback allows you to view only one
unprogrammed leg. (Example: If L0 through L2 are programmed, pressing
ADVANCE while viewing L3 will take you back to L0)
4) Hold MENU until PROGRAM flashes to enter programming mode.
The display word flashes, ÒPROGRMÓ. Then press ENTER and ÒMANUALÓ
is displayed.
5) The Outback stores Multi-Leg headings two ways: manually and automatically.
Headings are stored manually if the desired headings are already known in
degrees. (Example: 210¡, then 60¡ and then 340¡) Headings are stored
automatically if a map and the Outback will be used to determine the headings.
6) If headings are to be entered manually, press ENTER while ÒMANUALÓ is
displayed. Otherwise skip to the Automatic Entry section on page 15.
5) Point the Outback in the direction you want to go, lining up the gun sights.
Press ENTER to store that heading and start the timer running. The timer has a
maximum of 9 hours, 59 minutes and 59 seconds Ò9:59:59Ó, at which time it
resets itself and begins to count up from zero.
MANUAL ENTRY OF HEADINGS.
1M) After selecting to enter headings manually, the first digit of the
heading flashes. (Example: ÒL2 000¡Ó if a heading is not stored
or ÒL2 348¡Ó if a heading is already stored)
6) Day Navigation arrows appear on the compass rose and the colons in the display
word flash when the timer starts. See page 18 for details on Day Navigation.
2M) Press ADVANCE to change the value of the digit until the first
digit of the heading is displayed. (Example: 2 for 210¡) Then
press ENTER.
7) Press ENTER to stop the timer when a leg is complete. Press ADVANCE to
move to the next unprogrammed leg, and repeat step 5 to store another leg.
13
14
BRUNTON MAN. MECH. 7/97
9/29/98 9:08 AM
Page 10
3M) Now the second digit of the heading flashes. (Example:
ÒL2 200¡Ó). (Example: 1 and then 0 for 210¡) Follow step 2M
to store the remaining digits
4M) Skip to step 7 on this page.
AUTOMATIC ENTRY OF HEADINGS.
1A) If headings are to be stored automatically, press ADVANCE to
step from ÒMANUALÓ to ÒAUTOÓ and then press ENTER.
2A) The display word scrolls, ÒSET NORTH.Ó Place the map being
used on a flat surface in any direction, and align the Outback to
the mapÕs relative North. This is necessary to correct for any
difference in the mapÕs North and actual North. Press ENTER to
store this direction as relative North. It is important to keep the
map in the same position while storing legs.
3A) Using a straight edge, align the Outback on the map in the
direction you want to go. The numeric display and display word
show the current heading of the Outback. When the Outback
is aligned in the correct direction, press ENTER.
7) After the heading is stored (either manually or automatically), the first digit of
the timer flashes. (Example: Ò0:00:00Ó)
8) Press ADVANCE to change the value of the digit until the correct digit is
displayed, and then press ENTER. (Example: 0 for Ò0:45:20Ó) The timer
has a maximum of 9 hours, 59 minutes and 59 seconds, Ò9:59:59Ó.
9) Now the second digit of the timer flashes. (Example: Ò0:00:00Ó) Follow step 7
to store the remaining digits
10) After the timer is set, the Outback displays the next unprogrammed leg.
Follow steps 1M/1A through 9 to store the remaining legs.
11) When through programming legs, press MENU to return to operating mode.
15
STARTING AND STOPPING LEGS IN TRAIL BLAZING AND MULTI-LEG
1) To start or stop a leg in Trail Blazing, the Outback must be in Trail Blazing.
To start or stop a leg in Multi-Leg, the Outback must be in Multi-Leg.
2) When a leg is started in Trail Blazing or Multi-Leg, the colons in the display
word flash and Day Navigation arrows appear on the compass rose. When a leg
is stopped in Trail Blazing or Multi-Leg, the colons in the display word do not
flash and the compass rose is blank.
3) In Trail Blazing, a leg starts when a heading is stored. See page 13 for more
details.
4) To start a leg in Multi-leg, press ADVANCE until the leg you want to start is
displayed. Then press ENTER and the timer begins, Day Navigation arrows
appear on the compass rose and the colons in the display word flash. See page
19 for details on Day Navigation.
5) Pressing ADVANCE toggles the display word between the desired heading
and the timer in Trail Blazing and Multi-Leg.
6) Pressing ENTER stops a leg in Trail Blazing or Multi-Leg.
7) Pressing ENTER restarts a leg in Trail Blazing or Multi-Leg.
8) The timer for each leg can be started and stopped any number of times. Each
time a leg is restarted, the timer will continue to count up or down from where
it left off. When the timer reaches the maximum of 9 hours, 59 minutes and 59
seconds, Ò9:59:59Ó, it resets itself and begins to count up from zero. If a timer
counts down and reaches zero, it resets itself and begins to count up from
Ò0:00:00Ó.
VIEWING LEGS IN TRAIL BLAZING AND MULTI-LEG
1) To view a stored leg in Trail Blazing, the Outback must be in Trail Blazing.
To view a stored leg in Multi-Leg, the Outback must be in Multi-Leg.
16
BRUNTON MAN. MECH. 7/97
9/29/98 9:08 AM
Page 11
2) A timer can not be running while viewing a stored leg. Press ENTER to stop a
timer which is running.
3) Press ADVANCE to step to from one leg to the next.
4) The display word shows the heading for three seconds and then the timer for
three seconds. (Example: ÒL2 210¡ and Ò0:45:20Ó if a leg is programmed or
ÒL2 Ñ-Ó and Ò0:00:00Ó if a leg is unprogrammed)
5) The Outback allows you to view only one unprogrammed leg.
(Example: If L0 through L2 are programmed, pressing ADVANCE while
viewing L3, takes you back to L0)
ERASING LEGS IN TRAIL BLAZING AND MULTI-LEG
1) To erase legs in Trail Blazing, the Outback must be in Trail Blazing.
To erase legs in Multi-Leg, the Outback must be in Multi-Leg.
2) If erasing only one leg, press ADVANCE until that leg is displayed.
(Example: ÒL2 210¡Ó) If erasing all legs, pressing ADVANCE repeatedly
is not necessary. (see step 6)
3) Hold MENU until PROGRAM flashes to enter programming mode.
4) Press ADVANCE until ÒERASEÓ is displayed, and then press ENTER.
The display word flashes the leg you were previously viewing.
(Example: ÒL2 210¡Ó)
5) To erase only this leg, press ENTER. The Outback returns to operating
mode and all stored legs with a higher position are moved down one position.
(Example: L0, L1, L2, L3 and L4 are stored. L1 is erased and L2, L3, and L4
all move down one position and become L1, L2, and L3, respectively)
6) To erase all legs, press ADVANCE and the display word flashes, ÒALL.Ó
Then press ENTER. The Outback returns to operating mode, and the display
word shows the first leg without any stored values. (Example ÒL0Ñ-¡Ó and
Ò0:00:00Ó)
17
DAY AND NIGHT NAVIGATION
THE OFF-TRACK ANGLE IN TRAIL BLAZING AND MULTI-LEG
In Trail Blazing and Multi-Leg, the Outback warns you when your actual heading
deviates from your desired heading by an amount greater than the Ôoff-trackÕ
angle. The Ôoff-trackÕ angle is the number of degrees you can be off course before
Day or Night Navigation warn you. Trail Blazing and Multi-Leg have independent Ôoff-trackÕ angles. The default Ôoff-trackÕ angle is 10¡ for both Trail Blazing
and Multi-Leg.
1) To change the Ôoff-trackÕ angle in Trail Blazing, the Outback must be in
Trail Blazing. To change the Ôoff-trackÕ angle in Multi-Leg, the Outback
must be in Multi-Leg.
2) Hold MENU until PROGRAM flashes to enter programming mode.
The display word flashes ÒRETURNÓ in Trail Blazing or ÒPROGRMÓ in
Multi-Leg.
3) Press ADVANCE until the display word says, ÒOFFTRKÓ and then press
ENTER.
4) The display word flashes the current angle. (Example: ÒOT 10¡Ó)
5) The Ôoff-trackÕangle can be set from 1¡ to 20¡. The Ôoff-trackÕ angle can also be
set to ÒOFFÓ which turns Day and Night Navigation off.
6) Press ADVANCE until the desired Ôoff-trackÕ angle is displayed, and then
press ENTER. The Outback returns to operating mode.
NOTE: A narrow Ôoff-trackÕ angle may be difficult to maintain. Experiment with different angles until you
find the one that works best for you.
18
BRUNTON MAN. MECH. 7/97
9/29/98 9:09 AM
Page 12
DAY NAVIGATION IN TRAIL BLAZING AND MULTI-LEG
Day Navigation only functions while running a leg
in Trail Blazing or Multi-Leg.
FIGURE 3
1) If the Ôoff-trackÕ angle is set to ÒOFFÓ, Day Navigation is off and the compass
rose shows a solid North pointing arrow and a flashing arrow pointing to the
stored heading. An Ôoff-trackÕ angle of 1¡ or greater must be set for Day
Navigation to function. To change the Ôoff-trackÕ angle, see the
ÒOff-Track AngleÓ section on the previous page.
2) While Ôon-courseÕ in Trail Blazing and Multi-Leg, the compass rose shows one
flashing arrow pointing straight ahead. Press ADVANCE to toggle the
display word between the timer and desired heading.
See Figure 3 on the next page.
3) An Ôoff-trackÕ arrow appears when your actual heading differs from your
desired heading by an amount greater than the set Ôoff-trackÕ angle. Additional
arrows fan out as you get farther off course. The direction the arrows fan out,
indicates the direction you should turn towards to get back on course.
See Figure 4 on next page.
MAG
BASIC
TRL BLZR
MULTILEG
BEARING
CLOCK
TIMER
DECLIN
DAMPING
The Outback is in operating mode of Trail Blazing with L 2 running. The stored heading is 210¡ and
Ôoff-trackÕ angle is 10¡. The current heading is 205¡and Night Navigation is on. The Outback is
Ôon-trackÕ therefore one Day Navigation arrow is illuminated and the green Night Navigation arrow is
illuminated. Both arrows point straight ahead indicating continue straight ahead to stay on course.
FIGURE 4
4) As you proceed back on course, the fanned out arrows disappear until only one
arrow, pointing straight ahead, is displayed.
MAG
CLOCK
TIMER
DECLIN
DAMPING
BASIC
TRL BLZR
MULTILEG
BEARING
The Outback is in operating mode of Trail Blazing with L 2 running. The stored heading is 210¡ and
the Ôoff-trackÕ angle is 10¡. The current heading is 230¡and Night Navigation is on. The Outback is
Ôoff-trackÕ by 20¡, therefore additional Day Navigation arrows are illuminated and the left red Night
Navigation arrow is illuminated. All arrows are pointing left, indicating bear left to get back on course.
19
20
BRUNTON MAN. MECH. 7/97
9/29/98 9:09 AM
Page 13
NIGHT NAVIGATION IN TRAIL BLAZING AND MULTI-LEG
Night Navigation only functions while running a leg
in Trail Blazing and Multi-Leg.
FIGURE 5
1) An Ôoff-trackÕ angle of 1¡ or greater must be set for Night Navigation to function.
To change the off-track angle, see the ÒOff-Track AngleÓ on page 18.
2) Hold LIGHT (for more than 2 seconds) while in Trail Blazing or Multi-Leg to
turn Night Navigation on. The timer for a leg must be running for Night
Navigation to operate.
3) Follow the Night Navigation arrows to keep on the desired course.
See Figures 3 and 4 on the previous page.
Green Arrow: On course, continue straight ahead.
Left Red Arrow: Off course, bear left until the green arrow appears.
Right Red Arrow: Off course, bear right until the green arrow appears.
4) To turn Night Navigation off, hold LIGHT for more than 2 seconds.
AUTOMATIC RETURN IN TRAIL BLAZING AND MULTI-LEG
EXECUTING AUTOMATIC RETURN IN TRAIL BLAZING AND MULTI-LEG
1) To reverse a course in Trail Blazing, the Outback must be in Trail Blazing.
To reverse a course in Multi-Leg, the Outback must be in Multi-Leg.
2) Hold MENU until PROGRAM flashes to enter programming mode.
Press ADVANCE until the display word flashes, ÒRETURNÓ then press
ENTER. The Outback automatically reverses all the legs and returns to
operating mode.
3) The return legs have an ÔRÕ instead of an ÔLÕ in front of them, indicating that
the legs have been reversed. (Example: ÒR2: 300Ó)
See Figure 5 on the next page.
21
MAG
CLOCK
TIMER
DECLIN
DAMPING
BASIC
TRL BLZR
MULTILEG
BEARING
The Outback is in operating mode of Trail Blazing, the course
has been reversed, and L2 is running. The Outback is Ôon-trackÕ,
therefore one Day Navigation arrow is illuminated..
4) Press ENTER to start the timer of the first reversed leg (last completed leg)
counting down. Day Navigation arrows appear if the Ôoff-trackÕ angle is
greater than zero. See page 19 for details on Day Navigation. Night
Navigation arrows appear if Night Navigation is on. See page 21 for details
on Night Navigation.
5) To end a leg before the timer counts down to zero, press ENTER and the timer
stops. If the timer reaches zero, it automatically begins to count up. This
allows you to estimate how much longer it took returning on a leg or how much
you may have overshot a leg.
6) Press ADVANCE to move to the next leg, and then press ENTER to start the
next timer.
7) After using the Automatic Return feature, re-executing Automatic Return
reverses the legs back to the original order and resets the timers to the original
values. The legs are denoted with an ÔLÕ instead of an ÔRÕ.
Note: If after selecting Automatic Return, you decide not to return, you can continue on your journey by
executing the Automatic Return command again. The legs are denoted with an ÔLÕ instead of an ÔRÕ.
22
BRUNTON MAN. MECH. 7/97
9/29/98 9:09 AM
Page 14
BEARING MENU OPTION
FIGURE 6
The Outback must be in Bearing to use any of the features described in this section.
FEATURES
Bearing mode takes and stores up to 10 bearings (headings) in memory, b0
through b9. For example, you can store the bearings to a mountain on the horizon
and to a nearby windmill. With two bearings and a map of the area, you can find
your position by triangulation. The more bearings used, the more accurately you
can pinpoint your location on the map.
In Bearing, the Outback can be used as a compass as well as to store
bearings: the Numeric Display shows the current heading, a solid arrow on the
compass rose points to North, a flashing arrow on the compass rose points in the
stored bearing direction, and the display word shows the stored bearing.
STORING AND VIEWING BEARINGS
1) The Outback must be in Bearing to store or view bearings.
2) Press ADVANCE to step from one stored bearing to the next, until the memory
position where you want to store bearing is in the display word.
3) Bearings can be stored in any memory position, whether there is a bearing
previously stored or not. The Outback allows you to view all programmed
and unprogrammed memory positions, b0 through b9.
4) Point the Outback in the direction you want to store, line up the gunsights
and press ENTER.
5) A flashing arrow on the compass rose points in the direction of the stored
bearing and a solid arrow points North. The display word shows the stored
bearing (Example: Òb1 110¡Ó), and the numeric display shows the current
heading. See Figure 6 on the next page.
6) To store another bearing repeat steps 1 through 4.
NOTE: Pressing ENTER while viewing a stored bearing will erase that stored bearing and store a new one.
Take care not to accidentally erase a stored bearing.
23
MAG
CLOCK
TIMER
DECLIN
DAMPING
BASIC
TRL BLZR
MULTILEG
BEARING
The Outback is in operating mode of Bearing. The current
heading is 192¡, and the heading reference is magnetic north.
The display word shows the stored bearing of 110¡. The solid
arrow points North and the flashing arrow points to the stored
bearing direction of 110¡.
ERASING BEARINGS
1) The Outback must be in Bearing mode to erase bearings.
2) If erasing one bearing press ADVANCE until that memory position is
shown in the display word. (Example: Òb1 110¡Ó) This bearing can be
reprogrammed over by pressing ENTER while lining up a new bearing, or it
can be erased completely.
3) If erasing all stored bearings, it is not necessary to press ADVANCE repeatedly.
(see step 6)
4) To erase one or all bearings completely, hold MENU until PROGRAM
flashes to enter programming mode. The display word flashes ÒERASE.Ó
24
BRUNTON MAN. MECH. 7/97
9/29/98 9:09 AM
Page 15
5) Press ENTER, and the previously viewed bearing flashes.
(Example: Òb1 110¡Ó) If erasing only this bearing, press ENTER and the
Outback returns to operating mode and the display word shows an
unprogrammed bearing. (Example: Òb1 Ñ-Ó)
6) If erasing all stored bearings, press ADVANCE once and the display word
flashes ÒALL.Ó Then press ENTER. The Outback returns to operating
mode and all bearings are erased.
CLOCK MENU OPTION
The Outback must be in Clock to use any of the features described in this section.
The clock displays time in either military or standard time formats. Military time
refers to a 24 hour clock format, 00:00 to 23:59. Standard time refers to two 12 hour
formats, 1 to 12:59am and 1 to 12:59pm. The default time format is standard time.
CHOOSING TIME FORMATS
1. The Outback must be on the Clock Menu Option to change the time format.
2. The time format is changed by pressing ADVANCE.
3. In standard time format, the display word shows the time followed by either A
which represents AM, or P which represents PM. (Example: Ò10:30PÓ which
means 10:30 PM)
4. Press ADVANCE and the display word shows the military time format. Military
time format does not denote AM or PM. (Example: Ò22:30Ó)
5. Press ADVANCE again, and the display returns to the standard time format.
SETTING THE CLOCK
1. The Outback must be on the Clock Menu Item to program the clock. The clock
must be operating in which ever time format you want to set the clock in. (Example:
If you want to program the clock with a standard time, you need to choose the standard time format before you begin programming. See ÒChoosing Time FormatsÓ in
the section on the preview page.)
2. Hold MENU until PROGRAM flashes to enter programming mode. The display
word shows the current time with the first 2 digits flashing. If no time has been programmed, the default is Ò12:00AÓor Ò00:00Ó. (Example: Ò12:00AÓor Ò00:00Ó.)
3. Press ADVANCE to increase the digits until the correct hour is displayed. Then
press ENTER. (Example: Ò10:00PÓ for 10:30PM standard time or Ò22:00Ó for 22:30
military time)
4. Now the 3rd digit flashes. (Example: Ò10:00PÓ in standard time format or
Ò22:00Ó in military time format)
5. Press ADVANCE to increase the digit until the correct digit is displayed. Then
press ENTER. (Example: Ò10:30PÓ for 10:30PM standard time or Ò22:30Ó for 22:30
military time)
6. Now the 4th digit flashes. (Example: Ò10:30PÓ in standard time format or
Ò22:00Ó in military time format)
7. Press ADVANCE to increase the digit until the correct digit is displayed. Then
press ENTER. (Example: Ò10:30PÓ for 10:30PM standard time or Ò22:30Ó for 22:30
military time)
8. The Outback automatically returns to operating mode after the time is set.
NOTE: After reaching 11:00A in programming mode in the standard time format, the time changes to 12:00P.
When programming in standard time, make sure the correct AM or PM is displayed in addition to the
correct hour before pressing ENTER.
25
26
BRUNTON MAN. MECH. 7/97
9/29/98 9:09 AM
Page 16
4) If you want to count down, press ADVANCE once and ÒCNT DNÓ is
displayed. Then press ENTER. (Example: Ò1:30:00Ó to Ò1:29:59Ó...)
TIMER MENU OPTION
The Outback must be in Timer to use any of the features described in this section.
FEATURES
The timer is a standard counter that counts up or down. The timer has a maximum
of 9 hours, 59 minutes and 59 seconds, Ò9:59:59Ó. The Outback can be used as a
compass while still using the timer: the numeric display shows the current heading,
the compass rose points North and the display word shows the timer.
When counting up, the timer starts at Ò0:00:00Ó or a time you set such as 4 hours
and 30 minutes Ò4:30:00Ó, and counts up . When counting down, the timer is set to a
certain time such as 15 minutes Ò0:15:00Ó, and counts down from that time. If the
timer reaches the maximum, it resets to Ò0:00:00Ó and begins to count up. If the
timer reaches zero while counting down, it resets and begins to count up.
SETTING THE TIMER:
1) The Outback must be in Timer to set the timer.
2) If 0:00:00 is displayed in the timer and you want to count up from zero, skip to
ÒStarting and Stopping the TimerÓ on the next page. Otherwise hold MENU
until PROGRAM flashes to enter programming mode.
3) The display words flashes ÒPROGRMÓ and press ENTER. Then the display
word flashes ÒCNT UPÓ. If you want the timer to count up, press ENTER
while ÒCNT UP,Ó is displayed. (Example: Ò0:20:00Ó to Ò0:20:01Ó...)
5) After selecting whether to count up or count down, the first digit of the timer
flashes. (Example: Ò0:00:00Ó if a time is not stored or Ò1:30:00Ó if a time is
previously stored).
6) Press ADVANCE to change the value of the flashing digit. When the correct
digit is displayed press ENTER. (Example:Ò3:00:00 for Ò3:40:00Ó)
7) Now the next digit of the timer flashes. Repeat step 6 for the remaining
4 digits. The digit flashing is the one being set.
8) The Outback returns to operating mode after all the digits are set.
STARTING AND STOPPING THE TIMER:
1) The Outback must be in Timer to start or stop the timer.
2) Press ENTER to start or stop the timer. When a timer is running, the colons flash.
3) If a time has not been entered and ENTER is pressed, the timer starts counting
up from zero.
4) Press ENTER to restart a stopped timer from where it left off.
ERASING THE TIMER
1) The Outback must be in Timer to erase a stored timer.
2) Hold MENU until PROGRAM flashes to enter programming mode.
The display word flashes ÒPROGRM.Ó
3) Press ADVANCE and the display word flashes ÒERASEÓ. Then Press ENTER .
The timer is now erased and a new time can be stored.
4) Alternately, a stored time can be reprogrammed over without erasing it.
Follow the steps 1 through 7 in ÒSetting the TimerÓ to program over an existing
time.
27
28
BRUNTON MAN. MECH. 7/97
9/29/98 9:09 AM
Page 17
DECLINATION MODE OPTION
The Outback must be in Declination to use any of the features in this section.
FEATURES
To use true north as the heading reference, a magnetic declination angle must be stored and
chosen. The Outback can store up to 10 different declination angles, d0 - d9. Magnetic
declination is the difference between true and magnetic north. It is measured in degrees to the
East or West of magnetic north. Declination angles vary throughout the world. The default
declination angle is 100 West. See Figure 7 on next page to locate the declination angle for
your area in the U.S..
STORING DECLINATION ANGLES
1) The Outback must be in Declination to store declination angles.
N
FIGURE 7
2) Press ADVANCE to step from one stored declination angle to the next until
the one you want program is displayed.
Declination angles of the U.S. For local declination, download the magnetic field calculation
software free from www.interpex.com/magfield.htm, or contact the Brunton company at 307 856 6559.
3) Hold MENU until PROGRAM flashes to enter programming mode. The first
digit of the declination angle will flash. (Example: ÒdO 000EÓ if no
declination is stored or ÒdO 100EÓ if an angle has already been programmed)
CHOOSING DECLINATION ANGLES:
1) The Outback must be in Declination mode to choose a declination angle.
4) Press ADVANCE to change the value of the flashing digit, and when the
correct digit is displayed, press ENTER. (Example: 1 for the first digit of 12¡E )
5) The next digit will flash. Repeat step 3 to set the second digit.
6) Then the display word flashes the letter E for East. For an angle which is to
the East of true north, such as 12¡E, press ENTER while ÒEÓ is flashing.
7) For an angle which is to the West of true north, such as 5¡W, press ADVANCE
and W flashes. (Example: d0 5¡W) Press ENTER to select West.
8) After selecting East or West, the Outback returns to operating mode.
To store another declination angle, repeat steps 1 through 7.
NOTE: Even though declination angles have been stored, a declination angle must be chosen to use true north
as the heading reference. See ÒChoosing a Declination AngleÓon page 30.
29
2) Press ADVANCE to step from one stored declination angle to the next until
you see the one you want to use, and then press ENTER. The Outback now
uses that chosen declination when referenced to true north.
3) The chosen declination angle does not flash when in the display word. Any
angle, which is not the chosen declination angle, flashes when in the display
word.
4) If ENTER is not pressed while viewing a declination angle other than the
chosen one, the Outback uses the angle which was previously chosen.
(Example: If the declination angle is currently 12¡E and you scroll through
the declination angles by pressing ADVANCE, and ENTER is not pressed
while viewing another angle, the Outback continues to use 12¡E as the
declination angle)
30
BRUNTON MAN. MECH. 7/97
9/29/98 9:09 AM
Page 18
CHANGING BATTERIES
DAMPING MENU OPTION
The Outback must be in Damping to use any of the features described in this
section.
FEATURES
Tilting or jarring a compass can create errors in the compass heading because it
shakes the magnetic sensors inside the compass. In Damping, the Outback
averages the compass headings to minimize the effects of errors in individual
headings. This is useful when there is erratic movement, such as in a boat. The
selected damping value is used for every heading reading in all menu options.
Damping can be set 0 to 9, with 0 being no damping and 9 being maximum
damping. The chosen value for damping is shown in the display word when
damping is first selected. (Example: ÒdP5Ó) The default damping value is 5,
meaning there is moderate damping.
CHOOSING A DAMPING VALUE:
1) The Outback must be in Damping to choose a damping value.
2) Press ADVANCE to step from one damping value to the next until you see the
one you want to use, then press ENTER. Choose 0 for no damping, 1 for a
little damping and so on, up to 9 for maximum damping.
3) The chosen damping value does not flash when in the display word. Any value
which is not the chosen value, flashes when in the display word.
4) If you do not press ENTER while viewing a damping value, the Outback uses
the value which was previously selected. (Example: If the damping value is
currently 5, and you scroll through the damping values by pressing
ADVANCE, and ENTER is not pressed while viewing a different damping
value, the Outback continues to use 5 as the damping value)
Battery life of the Outback is approximately 200 hours, depending on usage. Night
Navigation and the LCD backligh take significantly more power than the
compass alone. Therefore to maximize battery life, use Night Navigation and
backlighting only when necessary. Also, turning the power off when not using the
Outback and setting on auto shut-off value is highly recommended.
The Outback uses 2 lithium coin cell batteries, #2032. These are common
batteries and are available anywhere watch, camera, calculator or hearing aid batteries
are sold such as Radio Shack, Walmart, Target or Kmart.
CHANGING BATTERIES
1) When the display word shows ÒbAT LOÓ, the batteries need to be changed.
2) To remove the batteries, turn the compass upside down.
3) Turn the battery door counterclockwise from the lock to open position, until it
can easily be removed.
4) Gently take out the old batteries and discard.
5) Place one new battery into the battery compartment with the positive side
toward the battery door.
6) Place the other battery on top of the previously inserted battery, with the
positive side toward the battery door.
7) Replace the battery door and turn clockwise from the open to lock position.
8) When the batteries are first inserted, the Outback will go through a test pattern,
momentarily illuminating all the LCD segments.
9) Turn the Outback right side up and press power. If the Outback does not turn on,
remove the batteries and re-insert them. Both batteries must make contact for the
power to turn on.
10) Since the batteries have been removed, it is necessary to calibrate the Outback.
31
32
BRUNTON MAN. MECH. 7/97
9/29/98 9:09 AM
Page 19
TROUBLE SHOOTING
ACCURACY PROBLEMS
PROBLEM: The Outback seems to give inaccurate readings.
SOLUTION 1: Calibrate the Outback. Due to the internal electronics of the Outback
and stray magnetic fields from outside sources, the Outback must be calibrated to be
accurate. The Outback must be calibrated upon initial use, and when the batteries are
removed or replaced. See page 10 for details on how to calibrate the Outback.
SOLUTION 2: Change the batteries. As the batteries in the Outback wear down, it can
cause the Outback to give inaccurate or jumpy readings. See page 32 for details on
changing batteries.
PROBLEM: The Outback is supposed to be tilt-compensated. When the Outback is
tilted, it gives inaccurate readings.
SOLUTION: The Outback does provide tilt-compensation within a range of ±15¡ from
level. Keep in mind 15¡ is not a large amount. 1¡ is approximately the thickness of a
sheet of paper. Tilt-compensation is provided to allow the Outback to be accurate
even when not held perfectly level, not to allow for use at large tilt angles.
POWER PROBLEMS
PROBLEM: When the light button is pressed, the Outback shuts off.
SOLUTION: Change the batteries. The backlight and night navigation LEDÕs take
more power than the compass alone. Therefore when the light button is pressed, the
Outback may need more power than available and shuts off. See page 32 for details
on changing batteries.
33
PROBLEM: When pressing and holding POWER to turn the Outback on, it goes
through the LCD test pattern, momentarily illuminating all the LCD segments, and
then shuts off.
SOLUTION: Change the batteries. Initially powering up the Outback takes more
power than only having the compass on. Therefore when powering up the Outback,
it may need more power than available and it resets itself by going through the LCD
test pattern. See page 32 for details on changing batteries.
Problem: After pressing a button, the Outback goes through the LCD test pattern,
momentarily illuminating all the LCD segments, and then shuts off.
Solution: Change the batteries. Pressing a button on the Outback takes more power
than the only having the compass on. Therefore when a button is pressed, the Outback
may need more power than available and it resets itself by going through the LCD test
pattern. See page 32 for details on changing batteries.
DISPLAY PROBLEMS
Problem: ÒdISTÓ is shown on the display word.
Solution: Calibrate the Outback. When the Outback detects magnetic interference
causing errors in the compass heading, ÒdISTÓ is shown on the display word indicating
magnetic distortion. If after recalibrating the Outback ÒdISTÓ is still displayed, the
Outback is most likely close to some object with very strong magnetic fields, such an
underground steel tank. Try moving away from the source of the magnetic field; even
a slight separation helps. See page 10 for details on calibration.
Problem: The Outback is ÒstuckÓ. No matter what button is pressed, nothing happens.
Solution: Remove the batteries, wait 60 seconds and reinsert the batteries.
Sometimes there is an abrupt change in power which causes the Outback to get
ÒstuckÓ. Generally, this will only happen once and it will not harm the Outback.
See page 32 for details on removing batteries.
34
BRUNTON MAN. MECH. 7/97
9/29/98 9:09 AM
Page 20
WARRANTY
INDEX
CALIBRATION
Calibration method 10-12
When to calibrate 3,5,10,33-34
AUTOMATIC RETURN 21-22
1 YEAR LIMITED WARRANTY
The Brunton Company warrants the Outback Electronic Compass against all
defects in material and workmanship for a period of one (1) year from the date of
the original purchase, subject to the following terms and conditions:
1. This Warranty does not apply if the Outback has been subjected to physical abuse,
improper installation modification, or the serial number has been removed.
2. This Warranty does not apply to damage caused by improper battery use.
3. THERE ARE NO EXPRESSED OR IMPLIED WARRANTIES WHICH
EXTEND BEYOND THE FACE HEREOF, AND THE BRUNTON COMPANY
IS NOT LIABLE FOR ANY INCIDENTAL OR CONSEQUENTIAL
DAMAGES ARISING FROM THE USE OR MISUSE OF THE OUTBACK
COMPASS THIS WARRANTY GIVES YOU SPECIFIC RIGHTS. YOU
MAY HAVE OTHER LEGAL RIGHTS WHICH VARY FROM STATE TO
STATE.
Riverton, Wyoming
For the most prompt service on your Outback, return it to the place of purchase.
The consumer is responsible for any transportation, shipping
or insurance related to the return of this product. If returning the Outback
directly to Brunton, authorization and proof of place and date
of purchase is needed.
35
AUTOMATIC SHUT-OFF
Backlight Auto Shut-Off 4-5,9
Explanation 5, 8-9
Power Auto Shut-Off 5,8,32
CLOCK
Choosing time formats 25-26
Setting the time 26
BACKLIGHT 2,4,32-33
COMPASS ROSE 1-2,5,11,16,18-19,23
BASIC MENU OPTION
Calibration 3,5,10-12
Explanation 5
Referencing true or
magnetic north 5-7,29
DAY NAVIGATION 13,16,18-20,22
DAMPING
Choosing a damping value 31
Explanation 31
BATTERIES
ÒbAT LOÓ error message 3,32
Changing batteries 3,32-34
DECLINATION MENU OPTION
Choosing declination angles 30
Explanation 5,29-30
Storing declination angles 29
BEARING MENU OPTION
Erasing bearings 24
Explanation 23
Storing bearings 23-24
DISPLAY INFORMATION 1-2
ERROR MESSAGES
ÒbAT LOÓ 3,32
ÒdISTÓ 3,10
BUTTONS
Advance 1-3
Enter 1-3
Light 1-4,21
Menu 1-3
Power 1-3
GUN SIGHTS 1-2,13,23
36
BRUNTON MAN. MECH. 7/97
9/29/98 9:09 AM
Page 21
INDEX (CONTINUED)
OPERATING MODE 4,6,7,11-12,17-18,20,
22,24-26,28-29
MAGNETIC DISTORTION
Definition 3
ÒdISTÓ 3,10,34
PROGRAM SYMBOL 1-2,4,8-11,14,17-18,
21,24,26-29
MENU OPTIONS
Basic 5-12
Bearing 4,23-25
Clock 4,25-26
Declination 4,29-30
Damping 4,31
Multi-leg 4,12-22
Timer 4,27-28
Trail Blazing 4,12-13,16-22
PROGRAMMING MODE 4,8-11,14,17-18
21,24,26-29
TIMER MENU OPTION
Erasing 28
Explanation 27
Setting the timer 27-28
Starting and stopping the timer 28
MULTI-LEG MENU OPTION
Day Navigation 18-20,22
Erasing legs 17
Explanation 12
Night Navigation 18-22
Reversing legs 21-22
Starting and stopping legs 16
Storing legs 14-16
Automatic entry 15
Manual entry 14-15
Viewing legs 16-17
TRAIL BLAZING MENU OPTION
Day Navigation 18-20,22
Erasing legs 17
Explanation 12
Night Navigation 18-22
Reversing legs 21-22
Starting and stopping legs 16
Storing legs 13
Viewing legs 16-17
TRUE/MAG SYMBOL 1-2,5-7
NIGHT NAVIGATION 1-2,18,20-22,32
OFF-TRACK ANGLE 18-21
37