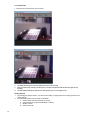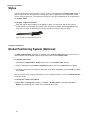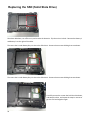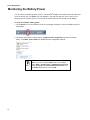
1
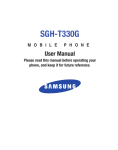
xTablet T7200
User Manual
1
MobileDemand, LC
1501 Boyson Squa re
Drive
Suite 101
Hiawatha, IA 52233
U.S.A.
Phone: 877.784.4338
Fax: 319-363-4122
Web: www.RuggedTabletPC.com
No parts of this work may be reproduced in any form or by any means - graphic, electronic, or mechanical, including
photocopying, recording, taping, or information storage and retrieval systems - without the written permission of the publisher.
While every precaution has been taken in the preparation of this document, the publisher and the author assume no
responsibility for errors or omissions, or for damages resulting from the us e of information contained in this document or
from the us e of programs and source code that may accompany it. In no event shall the publisher and the author be liable
for any loss of profit or any other commercial damage caused or alleged to have been caused directly or indirectly by this
document.
© 2009 - 2012 MobileDemand LC
Products that are referred to in this document may be either trademarks and/or registered trademarks of the respective
owners.The publisher and the author make no claim to these trademarks.
MobileDemand is a registered trademark of MobileDemand, LC. MobileDemand logos are registered trademarks of
MobileDemand, LC. Windows is a trademark of the Microsoft group of companies.
The Bluetooth word mark and logo are registered trademarks and are owned by the Bluetooth SIG, Inc.
Last Updated: 8/22/2012
Contents
Contents
....................................
You Begin.............................................................................................................1
1 Before
.
Inventory......................................................................................................................................2
.......................
Safety and
Maintenance................................................................................................................3
.......................................................................................................................................3
Checklists
.
Features......................................................................................................................................4
.....................................................
About Your
xTablet T7200 Rugged Tablet PC...................................................................................4
About W.................................
indows 7 Professional ......................................................................................................5
.....................
Start............................................................................................................................6
2 Quick
........................................................
Turning On
the xTablet T7200 for the First Time................................................................................7
...............................
Turning Off the xTablet T7200..........................................................................................................8
...................................................
and Software .............................................................................................9-10
3 Hardware
......
Front View..................................................................................................................................11
LED...............
Indicators.........................................................................................................................12
Front
...............
View buttons...................................................................................................................13
Function
......................
Keys……...................................................................................................................14
Quick Menu Utility…………………………………………………………………………………………….………15
.......................
Right and
Bottom View.................................................................................................................16
Configuration
..........................
A - I/O A .............................................................................................................16
Configuration
..........................
B - I/O B .............................................................................................................17
...
Top View.....................................................................................................................................18
...
Left View.....................................................................................................................................19
......
Back View..................................................................................................................................19
.
Camera..................................................................................................................................20-21
Stylus ........................................................................................................................................22
Global ............................................
Positioning System (Optional) ............................................................................................22
..........................................
Imager/Bar Code Scanner (Optional)..............................................................................................23
Replacing the SSD…………………………………………………………………………………..……….......24
...........................................
Management.......................................................................................................25
4 Power
................................
Monitoring
the Battery Power........................................................................................................27
.........................................
Configuring
the Low Battery Alarms...............................................................................................28
....................
Charging the Battery....................................................................................................................29
..............................
Replacing
the Battery Pack .......................................................................................................... 30
......................
Calibration ........................................................................................31-32
5 Touchscreen
..................................................................................................................................................33
6 Appendix
Federal.............................................................
Communications Commission Statement...........................................................................34
..............
European
Notice..........................................................................................................................35
...........
Safety Caution.............................................................................................................................36
Battery..............
Disposal..........................................................................................................................36
............................
CAUTION
FOR ADAPTER............................................................................................................36
....................
BATTERY CAUTION................................................................................................................36-37
1
1
Before You Begin
Before You Begin
Congratulations on your purchase of this xTablet® T7200 rugged tablet PC!
This xTablet T7200 is a fully-functional PC with built-in wireless connectivity. W ith your xTablet T7200,
you will be able to organize and access important business and personal information. In addition, you
will be able to send and receive e-mail and access the Internet.
This user's guide contains all the information you need to set up and use your xTablet T7200. It
describes all the features of the xTablet T7200 in an easy-to-read yet thorough manner.
Inventory
This xTablet T7200 is designed for years of productive and pleasurable computing. Use this section to
keep details of your purchase. This information will be required should you need to make repairs to your
xTablet T7200 during the warranty period. Update this section when you add new options.
DATE OF PURCHASE:
PLACE OF PURCHASE:
DEALER'S NAME:
DEALER'S ADDRESS:
TELEPHONE:
E-MAIL ADDRESS/WWW :
CONTACT PERSON:
MODEL NUMBER:
SERIAL NUMBER:
2
Before You Begin
Safety and Maintenance
You can use your xTablet T7200 under a wide range of environmental conditions. However, to ensure
long use and continued high performance, consider the following factors when setting up your xTablet
T7200:
Follow all warnings and instructions noted in this documentation and in the Window s Help program.
The first time you use your xTablet T7200, we recommend that you carefully read the "Power
Management" chapter of this user guide and initialize the battery packs to ensure optimum battery
performance.
Unplug the xTablet T7200 from the power outlet before cleaning. Use a damp cloth for regular
cleaning and products like Formula 409 for heavy-duty cleaning. Do not use aerosols, solvents, or
strong detergents.
Slots and openings in the system cabinet are for ventilation purposes. Do not block or cover these
openings or the system could overheat. Do not use or store the xTablet T7200 near a source of heat
or dust.
On the bottom of your xTablet T7200, there is a label with information on the power requirements of
this system. These requirements must be followed. If you are unsure of your local power supply,
consult your dealer or local power company.
Do not step on or place anything on the power cord.
If you use the xTablet T7200 with an extension cord, ensure that the total ampere ratings of all the
devices sharing the extension do not exceed the rating of the extension cord or the rating of the wall
outlet.
Never push foreign objects into the xTablet T7200 through any of the slots or openings. Dangerous
voltages are present, which could cause electric shock or fire, or damage sensitive components.
Checklists
After opening the package, carefully inspect the contents. If any of the items are missing or appear
damaged, contact your dealer. The shipping carton should contain the following:
Standards
An xTablet T7200 rugged tablet PC with a hard disk drive
One AC power supply and power cord
Two high-capacity Lithium Ion batteries
One auto adapter (optional)
Hand strap and Briefcase handle
Stylus
.
3
Before You Begin
Optional
These items are normally optional, but some vendors may include them in the standard package. Some
items may not be available in some countries, or some vendors may choose not to carry all the items.
GPS/WWAN/Barcode modules
Credit Card Reader
External QW ERTY keyboard
Caution: When purchasing any of the accessories listed
above, purchase only those accessories that are approved
for use with your xTablet T7200. The above accessories
are proprietary items. Your system vendor can obtain
these approved accessories. If you use items that are not
approved for use with this xTablet T7200, you may cause
your xTablet T7200 to malfunction, or to emit or receive
electro-magnetic radiation in excess of local regulations.
For non-proprietary accessories such as PC cards or
printers, ensure that the accessory functions properly in
your xTablet T7200 before making the purchase. Your
system vendor may be able to recommend reliable brands
and models.
Features
High performance Processors
Intel® Atom™ Processor N2600/N2800 (1.6GHz/1.83Ghz)
Data Storage
The xTablet T7200 has a solid state drive to store your favorite programs and large multimedia files.
Built-in Wireless LAN Bluetooth, and LAN Capability
A built-in 802.11a/b/g/n, B l u e t o o t h 4 . 0 , and an optional 10/100/1000 Mbps Ethernet port allow you
to access the Internet or a local area network (LAN).
About Your xTablet T7200 Rugged Tablet PC
This User’s Guide (installed in the main disk of the xTablet T7200) describes the key elements of your
xTablet T7200. New users can find a simple step-by-step orientation in the "Quick Start" chapter. Use
the XPS Viewer on your xTablet T7200 to view this guide.
You can also enter the following URL in your Internet browser and see the MobileDemand xTablet T7200
webpage for physical, environmental, performance, wireless, and GPS characteristics, regulatory
approvals, and an online form that you can use to request more information about MobileDemand rugged
computer products, options, and accessories.
http://www.ruggedtabletpc.com/rugged-tablet-pc/xtablet-T7200-rugged-tablet-pc.php
4
Before You Begin
About Windows 7 Professional
Windows ® 7 is all about making your life easier. To make it easy, Microsoft recommends "Compatible
with Windows 7" devices and printers because they have passed Microsoft-designed tests for
compatibility and reliability with Windows 7. Simply put, they install without worry - simply connect the
device - and are compatible with all versions of Windows 7.
"Compatible with Window s 7" hardware and devices:
Passed Microsoft designed tests for reliability on PCs running W indows 7.
Installs easily and can automatically download device driver updates using W indows Update.
Installs without worry -
just connect the device.
Are compatible with Windows 7.
Can be added to a security-enhanced wireless network in less than a minute (for "Compatible with
Windows 7" wireless products).
Are ready to use out of the box.
5
2
6
Quick Start
Quick Start
Use the following procedures to turn on your xTablet T7200 rugged tablet PC and get it up and running:
"Turning On the xTab let T7200 for the First Time"
"Turning Off Your xTab let T7200
Turning On the xTablet T7200 for the First Time
Use the following instructions the first time an xTablet T7200 is turned on. After which you will only
need to press the
ready to go.
power button on the keypad as the xTablet T7200 should be fully charged and
To turn on the xTablet T7200
1. Connect the AC adapter power cord to the AC adapter.
2. Connect the AC adapter power cord to an AC outlet.
3. Connect the AC adapter to the DC power port on the left side of your xTablet T7200.
4. Press the
power button on the keypad to turn on the power.
Note: The battery is not fully charged. Allow your battery to
fully charge before using it (i.e., before disconnecting AC
power).
7
Quick Start
Turning Off the xTablet T7200
Turning off the xTablet T7200 properly is important to maintaining your rugged tablet PC.
To turn off the xTablet T7200
Select Start > Shut down.
Caution: Shutting off the xTablet T7200 improperly
may result in loss of data.
If you are going to be away from the xTablet T7200 for a short period, there are ways of conserving
power without shutting down the system. See the "Power Management" chapter for more information.
To conserve power
Select Start > Control Panel > Power Options, then follow the instructions to edit the applicable
plan settings.
Press [Fn] + [E] on the QWERTY keyboard to put the xTablet T7200 in hibernation.
8
3
9
Hardware and
Software
Hardware and Software
Before you begin using your xTablet T7200 rugged tablet PC, read this chapter to familiarize yourself
with the main components installed in the system. This chapter introduces the different components and
controls of your xTablet T7200, including hardware components, software, audio and video systems,
and a full array of ports and connectors, including standard input/output (I/O) ports for quickly and easily
adding peripheral devices. Select any of the following sections to continue:
"Front View"
"Right and Bottom View"
"Top View"
"Left View"
"Back View"
"Camera"
"Stylus"
"Global Positioning System" - optional
"Imager/Bar Code Scanner" - optional
10
Hardware and Software
Front View
1. Microphone
2. Light sensor
3. LED indicators
4. Speaker
5. Keypad
11
Hardware and Software
LED Indicators
The following LED indicators (reading from left to right) are on the upper right corner of the display, above
the display.
Icon
12
Light
De s cription
Green
Power is on
Flashing Green
System is in standby mode
Green
Battery is fully charged
Orange
Battery is charging
Flashing Orange
Battery is overheated, is of f -line, and will come online when cooled down
Flashing Red
Battery is at slow -power (critical) state and needs recharging
Green
xTablet T7200 is reading from or writing to the built-in disk drive
No light
WLAN is not powered and Bluetooth is not powered
Blue
WLAN or Bluetooth is enabled
Hardware and Software
Front View Buttons
There are 25 keys located in the keypad on the right side of the front panel, their functions are as
follows:
Icon
Function
Power Button
Press it to turn on/off the system
Yellow Button
To trigger Barcode scan f unction
Numeric Key
Same f unction as on a standard keyboard
Decimal-point Key
Same f unction as on a standard keyboard
Back s pace Button
Same f unction as on a standard keyboard
Enter Button
Same f unction as on a standard keyboard
Tab Button
Same f unction as on a standard keyboard
Function Button
Access to secondary operation of some buttons (shown in the front view )
Plus /Minus Button
Same f unction as on a standard keyboard
Up/Dow n/Left/Right Buttons
Same f unction as on a standard keyboard
Security Button
Similar f unction as pressing [Ctrl] + [Alt] + [Delete ] on a standard keyboard
Blue Button
To trigger Camera shutter in xCam software, also use to enter boot order menu from splash screen (BBS)
13
Function Keys
Hold the
14
Fn key while pressing keys listed in this table.
Ke ys
De s cription
Fn + Up
Volume up
Fn + Dn
Volume down
Fn + Le ft
Brightness decrease
Fn + Right
Brightness increase
Fn + 0
Turn on/off Stealth Mode (All indicator LEDs and screen go dark)
Fn + 1
F1 function key
Fn + 2
F2 function key
Fn + 3
F3 function key
Fn + 4
Turn on/off keypad LED backlight
Fn + 5
F5 function key
Fn + 6
Y key (for answering yes/no question in battery calibration utility)
Fn + 7
Screen Rotate
Fn + 8
Turn on/off WLAN and Bluetooth devices
Fn + 9
Escape (same as standard keyboard Esc key)
Fn +
Ctrl+C (Copy)
Fn +
, (comma key)
Fn +
F8 function key
Fn + Tab
Ctrl+V (Paste)
Fn +
/ (forward slash or divide key)
Fn +
* (asterisk of multiply key)
Quick Menu Utility
The Quick Menu Utility is a system control utility that boots with Windows, and sits in the system tray, as seen below.
To access the Quick Menu Utility, double click the blue and yellow icon in the system tray.
The Quick Menu Utility controls a number of system functions, such as power to the WLAN, Bluetooth, WWAN, GPS,
Barcode Scanner, and Keypad Backlight. The devices that are powered on are highlighted in blue (or yellow for the barcode
scanner). If the devices are not powered on or not detected, the icon will be greyed out.
You can access other functions such as automatic backlight control, and keypad backlight timeout settings by clicking on the
green wrench/hammer icon.
Here you can see the automatic backlight control
Here you can see the Keypad Backlight Control
15
Hardware and Software
Right and Bottom View
The following jacks, ports, and connectors can be built into the right and bottom sides of the xTablet
T7200 unit. View the Configuration I/O options on the next section.
USB port(s)
Gigabit Ethernet
Serial Port
Configuration A
1. 9-pin communications jack
2. RJ-45 jack
3. USB port
9-pin Serial communications jack
Use this jack to connect to your printer for hard-copy printing, or other serial devices.
LAN RJ-45 jack
With the built-in Ethernet G i g a b i t LAN, you can make LAN connection without installing PC cards.
Connection speed is 10/100/1000 Mbps.
USB port
The Universal Serial Bus (USB) is the latest standard for attaching monitors, input devices, scanners,
and other devices to a PC. USB devices can be chained together on a single cable.
16
Hardware and Software
Configuration B
1. USB port #1
2. USB port #2
3. 9-pin communications jack
This connector is reserved specifically for connecting to cradle or docking devices.
USB port #1 & #2
The Universal Serial Bus (USB) is the latest standard for attaching monitors, input devices, scanners,
and other devices to a PC. USB devices can be chained together on a single cable.
9-pin Serial communications jack
Use this jack to connect to your printer for hard-copy printing, or other serial devices.
17
Top View
1. GPS Antenna Cover
2. mini-PCIe WWAN, PC card slot (PCMCIA), or Smart Card Slot
The upper slot can hold any of the following cards:
mini-PCIe card for embedded WWAN
Built in at the factory - contact a MobileDemand support representative for information.
Example: GOBI 3000 Module for Wireless WAN connectivity
PC card (PCMCIA)
Insert the card into the card slot until it latches and a button pushes up - depress this button to
release the PC card.
Smart Card Reader
Insert the card into the card slot until it latches - press the card again to release.
3. Barcode Scanner Cover
4. SD card slot
The SD card slot can be used as an interface between your xTablet T7200 and a variety of devices.
Press an SD card into the SD card slot until it latches into place.
18
Hardware and Software
Left View
1. Security lock slot (Kensington slot)
Install an anti-theft device to this lock
2. DC-in jack
Connect with the AC adapter that is included
Back View
1. Camera
2. Battery 1
3. Battery 1 latch
4. Battery 2 latch
5. Battery 2
Hardware and Software
Camera / Video
The Camera application c a l l e d x C a m C a m e r a U t i l i t y is installed on the xTablet T7200 desktop for
you. It accompanies the 5-Megapixal integrated camera that is built in the back of the xTablet T7200. See
"Back View" for an illustration.
When you are ready to use the camera, you must take the xTablet T7200 out of its dock before you
can use the camera.
To take a picture or record a video
Start the “Camera Utility” application in the Windows Start Menu.
To take a picture
1 . Simply press the Blue button, there will be a beep a n d t h e p i c t u r e w i l l s h o w i n t h e a p p l e t
window.
2 . T h e p i c t u r e w i l l b e s a v e d i n t h e c u r r e n t u s e rs “ P i c t u r e s ” f o l d e r .
To record a Video
1. Press the Red record button shown below.
3.
4.
5.
The display will change and show the elapsed time for the video recording
When you want to stop recording, use the stylus or your finger and press the Red Record button again to stop
recording.
The video will automatically be saved into the Video directory of the current logged in user.
Setting Options
1. By pressing the Options button, you will have the ability to change options for Image (Pictures) and
Video settings.
2. The following changes can be made in OPTIONS
a. Set the paths where the pictures are stored
b. Image format for the pictures (BITMAP or JPEG)
c. Quality of video
d. Video frame-rate.
21
Hardware and Software
Stylus
You can use the stylus (touch pen) like a mouse, a pen, or your finger on the xTablet T7200 display to
perform regular left-click and right-click functions and to write in applications where applicable. W hen
you are not using the stylus, you should store the stylus in the stylus holder that is on the right side of
the xTablet T7200.
To perform a right-click function
Point and hold the stylus steadily on the display for about 3 to 5 seconds, wait for the cursor to
change (about 3 to 5 seconds), then lift the stylus away from the display and the appropriate right
click menu will show up. Note that you can also perform this function using your finger.
Stylus pen with cord wrapped around upper end.
Hardware and Software
Global Positioning System (Optional)
The GPS Software Setup application is installed on the xTablet T7200 desktop as a shortcut for you
and will activate the 50-channel u-Blox 6 engine that is built into the xTablet T7200.
To activate the u-center
1. Double-tap the GPS Software Setup shortcut icon on the xTablet T7200 desktop.
2. Select a language from the Installer Language drop-down list, then tap OK (default is English).
3. Follow the instructions in the wizard to install the device driver, tap Finish, then tap Finish to activate
the u-center.
Use the u-center User's Guide for information on how to operate the GPS. You will need Adobe Reader
to view this guide.
To access the u-center User's Guide
Select Start > All Programs > u-blox > u-center > Documentation, then double-tap User's
Guides, then double-tap the u-center User's Guide.pdf file to open.
22
Imager/Bar Code Scanner (Optional)
The ScanWizard application is installed on the xTablet T7200 desktop as a shortcut for you. It
activates the bar code scanner that is built into your xTablet T7200, such as the Intermec EA15 2-D
Imager Engine. Contact the MobileDemand technical support at 319-363-4121 for assistance.
To configure the bar code scanner
1. Double-tap the ScanWizard shortcut icon on the xTablet T7200 desktop to access the
MobileDemand Scanner Wizard, then tap Continue.
2. In the Wedge Setup screen, do the following:
a. Select the applicable Driver Registry Location/Startup Mode option.
b. In the Please pick your scanner type group, select your scanner type, then click Autodetect
Scan Engine for the wizard to determine your scanner type for you.
c. Complete the applicable information in the rest of this screen.
d. Click Next to continue.
3. In the Final Setup screen, check any of the options that apply, then click FINISH to start using your
bar code scanner.
23
Replacing the SSD (Solid State Drive)
Shut down Windows, turn off the unit, and remove the batteries. Flip the unit on its back. Remove the Battery 1
and Battery 2 on the right of the tablet.
The cover that is under Battery Bay 1 is where the SSD drive is. Remove those screws holding that cover down.
The cover that is under Battery Bay 1 is where the SSD drive is. Remove those screws holding that cover down.
Carefully remove the screws that hold the drive down,
and swap the drive, and repeat the steps in reverse to
get the unit back together again.
24
4
Power Management
Power Management
Use the information in this chapter to get the optimum performance out of your batteries:
"Monitoring the Battery Power"
"Configuring the Low Battery Alarms"
"Charging the Battery"
"Replacing the Battery Pack "
Caution: The xTablet T7200 Rugged Tablet PC processor w
as specially designed to consume little pow er, and
generates very little heat. How ever, w orking in a hot
environment, or w orking for long periods may raise the
temperature. If the temperature continues to rise, processor
activity w ill be reduced. You may notice a slight loss of
performance w hen this happens.
26
Power M anagement
Monitoring the Battery Power
You can check the remaining battery power in the W indows ® Power icon located at the lower right-hand
corner of the task tray. The Power icon only appears in the task tray while the unit is running on the
battery power but not while the unit is running off an external power source through the AC adapter.
To view the available battery power
1. Tap the Power icon on the taskbar (circled in the following illustration) to view the available power for
each battery.
2. Tap another power plan to switch options, tap Adjust screen brightness to view the information
better, or tap More power options for additional power management settings.
Note: If you do not see the Power icon in the taskbar,
select Start > Control Panel > Notification Area Icons,
select the Show icon and notifications behavior from
the Power drop-down list, then tap OK.
27
Power Management
Configuring the Low Battery Alarms
You can configure how your xTablet T7200 will respond to a low battery condition or a critical battery
condition.
To configure the alarms
1. Select Start > Control Panel > Power Options, then click Change plan settings on the power
plan you want to modify, such as the recommended Balanced plan.
2. In the Edit Plan Settings page, select options from the drop-down lists and adjust the brightness if
needed.
3. Tap Change advanced power settings to configure additional settings.
4. Scroll down to the bottom of the list, then tap (+) to expand the Battery option.
5. Tap (+) to expand the following to configure the actions, notifications, or program to run when the
applicable battery alarm is triggered. You can tap Restore plan defaults to reset everything back to
original settings.
Critical battery alarm
Specify the action to take when the battery reaches a critical level (Sleep, Hibernate, Shutdown)
default is Hibernate
Low battery level
Set the percent battery capacity remaining that initiates the low battery action (default is 10%)
Critical battery level
Set the percent battery capacity remaining that initiates the critical battery action (default is 7%)
Low battery notification
Specify whether a notification is shown when the battery capacity reaches the low level (default is
On)
28
Power M anagement
Low battery action
Specify the action your computer takes when the battery capacity reaches the low level (Do
nothing, Sleep, Hibernate, or Shut down) default is Do nothing
Reserve battery level
Set the percent battery capacity remaining that initiates the reserve power mode (default is 7%)
6. Tap OK, tap Save changes, then close out of the Control Panel.
Warning: When battery power is low , the applicable
Battery Charge indicator will flash red, and the alarm will
display a warning on your screen. Take immediate
action, such as saving files or connecting to the AC
adapter, or data may be lost.
Charging the Battery
When you use the AC adapter to connect your xTablet T7200 to a power outlet, the internal battery will
automatically begin to recharge. W hile the battery is charging, the
Battery Charge indicators on
the LED indicator panel will be active after 6 to12 seconds. W hen the battery is fully charged, these icons
will become green.
If your xTablet T7200 is turned off, a fully-discharged battery will take about four hours to recharge.
Refer to the following table:
29
Tw o Batte ry Pack s
Charging Tim e
System On
Approximately 8 hours
System Off
Approximately 4 hours
Power Management
Replacing the Battery Pack
Note: The battery packs are hot-swappable.
Over time, battery capacity gradually decreases. MobileDemand recommends that you replace your
battery packs when you notice that they begin to store significantly less charge. This is usually
every 2 years.
To change the battery
1. Turn off the xTablet T7200.
2. Slide the latch to the UNLOCK position to release the depleted battery pack.
3. Lift the depleted battery pack on the bottom (like in the illustration) and remove it from the bay.
4. Insert the top of the fully-charged battery pack into the battery bay (like in the illustration) and lower
into place.
5. Press and hold the bottom of the battery pack as you slide the latch to the LOCK position.
BATTERY DISPOSAL
THIS PRODUCT CONTAINS LITHIUM-ION BATTERY PACKS. IT MUST BE DISPOSED OF
PROPERLY. CONTACT LOCAL ENVIRONMENTAL AGENCIES FOR INFORMATION ON RECYCLING
AND DISPOSAL PLANS IN YOUR AREA.
5
31
Touchscreen Calibration
Calibration
The touch screen is a thin membrane on the top of the display that responds to mechanical
pressure on the screen’s surface. The cursor on the screen is controlled by the stylus or your
fingertip. If you notice the tip touch-point not matching up with the cursor, you can calibrate the
touch screen.
To calibrate the touch screen
1. Select Start > Touch Panel Utility > Touch Panel Utility to launch the Pen-Mount Control Panel
2. Press Configure, and then Advanced Calibration to start the Touchscreen calibration utility
3. Use the pen tip to click on the red square where the screen says Touch the red square.
4. Press and hold the stylus to the red square until the utility tells you to lift off.
5. The red square will move to the next point on the screen.
6. Repeat the process until the calibration screen closes.
32
6
33
Appendix
Appendix
The following documents are provided in this appendix:
"Federal Communications Commission Statement"
"European Notice"
"Safety Caution" "Battery
Disposal" "CAUTION FOR
ADAPTER" "BATTERY
CAUTION"
Federal Communications Commission Statement
This equipment has been tested and found to comply with the limits for a Class B digital device,
pursuant to Part 15 of the FCC Rules. These limits are designed to provide reasonable protection against
harmful interference in a residential installation. This equipment generates, uses, and can radiate radio
frequency energy and, if not installed and used in accordance with the instructions, may cause harmful
interference to radio communications. However, there is no guarantee that interference will not occur in a
particular installation. If this equipment does cause harmful interference to radio or television reception,
which can be determined by turning the equipment off and on, the user is encouraged to try to correct
the interference by one or more of the following measures:
Reorient or relocate the receiving antenna.
Increase the separation between the equipment and the receiver.
Connect the equipment into an outlet on a circuit different from that to which the receiver is connected.
Consult the dealer or an experienced radio/TV technician for help.
Shielded interconnect cables and shielded AC power cable must be employed with this equipment to
insure compliance with the pertinent RF emission limits governing this device. Changes or modifications
not expressly approved by the system's manufacturer could void the user's authority to operate the
equipment.
CAUTION
Any changes or modifications not expressly approved by the party responsible for compliance could void
the user's authority to operate the equipment.
RF Exposure Warning
The equipment complies with FCC RF exposure limits set forth for an uncontrolled environment. The
equipment must not be co-located or operating in conjunction with any other antenna or transmitter.
Radiation Exposure Statement:
This equipment complies with FCC radiation exposure limits set forth for an uncontrolled environment.
End users must follow the specific operating instructions for satisfying RF exposure compliance. To
maintain compliance with FCC RF exposure compliance requirements, please follow operation
instruction as documented in this manual.
34
Appendix
According to FCC 15.407(e), the device is intended to operate in the frequency band of 5.15GHz to
5.25GHz under all conditions of normal operation. Normal operation of this device is restricted to
indoor use environment only.
The availability of some specific channels and/or operational frequency bands are country dependent
and are firmware programmed at the factory to match the intended destination. The firmware setting
is not accessible by the end user.
This device complies with part 15 of the FCC rules. Operation is subject to the following conditions:
This device may not cause harmful interference.
This device must accept any interference received, including interference that may cause undesired
operation.
European Notice
CE Declaration of Conformity
For the following equipment: Tablet built-in 802.11a/b/g/n W LAN module
Is herewith confirmed to comply with the requirements set out in the Council Directive on the
Approximation of the Laws of the Member States relating to Electromagnetic Compatibility (2004/105/
EC), Low-voltage Directive (2006/95/EC), the procedures given in European Council Directive 1999/5/EC.
The equipment was passed. The test was performed according to the following European standards:
EN 300 328 V.1.4.1 (2003-04)
EN 301 489-1 V.1.3.1 (2001-09) / EN 301 489-17 V.1.1.1 (2000-09)
EN 301 893 V.1.2.2 (2003-06)
EN 50371: 2002
EN 60950: 2000
Regulatory Statement (R&TTE/WLAN IEEE 802.11b & 802.11g)
European standards dictate maximum radiated transmit power of 100mW EIRP and frequency range
2.400-2.4835GHz; In France, the equipment must be restricted to the 2.4465-2.4835GHz frequency
range and must be restricted to indoor use.
35
Appendix
Safety Caution
To reduce the risk of fire, use only No. 26 AW G or larger telecommunication line cord.
IMPORTANT SAFETY INSTRUCTIONS
When using your telephone equipment, basic safety precautions should always be followed to reduce
the risk of fire, electric shock and injury to persons, including the following:
Do not use this product near water, for example, near a bathtub, wash bowl, kitchen sink or laundry tub,
in a wet basement or near a swimming pool.
Avoid using a telephone (other than a cordless type) during an electrical storm. There may be a remote
risk of electric shock from lightning.
Do not use the telephone to report a gas leak in the vicinity of the leak.
Use only the power cord and batteries indicated in this manual. Do not dispose of batteries in a fire.
They may explode. Check with local codes for possible special disposal instructions.
Battery Disposal
THIS PRODUCT CONTAINS LITHIUM-ION BATTERY PACKS. IT MUST BE DISPOSED OF
PROPERLY. CONTACT LOCAL ENVIRONMENTAL AGENCIES FOR INFORMATION ON RECYCLING
AND DISPOSAL PLANS IN YOUR AREA.
CAUTION FOR ADAPTER
THIS TABLET PC IS FOR USE W ITH MODEL NO. FSP065-RAB
BATTERY CAUTION
DANGER OF EXPLOSION IF BATTERY IS INCORRECTLY REPLACED.
REPLACE ONLY W ITH THE SAME OR EQUIVALENT TYPE RECOMMENDED BY THE
MANUFACTURER. DISPOSE OF USED BATTERIES ACCORDING TO THE MANUFACTURER'S
INSTRUCTIONS.
Regulatory Information/Disclaimers
Installation and use of this Wireless LAN device must be in strict accordance with the instructions
included in the user documentation provided with the product. Any changes or modifications (including
the antennas) made to this device that are not expressly approved by the manufacturer may void the
user’s authority to operate the equipment. The manufacturer is not responsible for any radio or television
interference caused by unauthorized modification of this device, or the substitution of the connecting.
36
Appendix
cables and equipment other than manufacturer specified. It is the responsibility of the user to correct any
interference caused by such unauthorized modification, substitution or attachment. Manufacturer and its
authorized resellers or distributors will assume no liability for any damage or violation of government
regulations arising from failing to comply with these guidelines.
IMPORTANT NOTE (CO-LOCATION)
FCC RF Radiation Exposure Statement: This equipment complies with FCC RF radiation exposure limits
set forth for an uncontrolled environment. This device and its antenna must not be co-located or
operating in conjunction with any other antenna or transmitter.
Radio Frequency Interference Requirements
This device is restricted to INDOOR USE due to its operation in the 5.15 to 5.25GHz frequency range.
According to FCC 15.407(e), requires this product to be used indoors for the frequency range 5.15 to
5.25GHz to reduce the potential for harmful interference to co-channel of the Mobile Satellite Systems.
High power radars are allocated as primary user of the 5.25 to 5.35GHz and 5.65 to 5.85GHz bands.
These radar stations can cause interference with and / or damage this device
SAR Exposure
This device has been tested for compliance with FCC RF Exposure (SAR) limits in typical flat
configurations.
WLAN
“To prevent radio interference to the licensed service, this device is intended to be operated indoors and
away from windows to provide maximum shielding. Equipment (or its transmit antenna) that is installed
outdoors is subject to licensing.”
Please note that the manufacturer must guarantee that it has no Ad-hoc capability for
5250~5350 and 5470~5725 MHz frequency band.
For LPD
“Operation is subject to the following two conditions: (1) this device may not cause interference, and (2)
this device must accept any interference, including interference that may cause undesired operation of
the device.”
W/detachable antenna
“To reduce potential radio interference to other users, the antenna type and its gain should be so chosen
that the Equivalent Isotropically Radiated Power (EIRP) is not more than that required for successful
communication.”
37