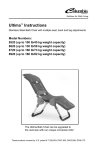
1
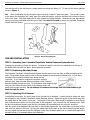
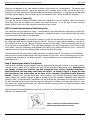
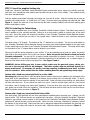
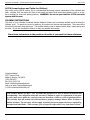
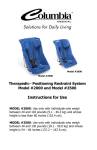
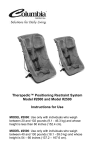
Solutions for Daily Living
TheraPedic™ Vehicle Restraint System
Model #2000 & 2500
Although Federal standards have not been established for body weights in this range, Columbia TheraPedic Vehicle Restraint
Systems have been crash tested and successfully withstood impacts using a 130 lbs (59 kg) test dummy at 30 mph (48 kph).
•
•
•
•
•
•
•
•
•
•
•
•
•
•
•
WARNING! DEATH OR SERIOUS INJURY CAN OCCUR:
Model #2000 is for use only with individuals who weight between 20 - 102 lbs (9.09 - 46.36 kg) and
whose shoulder height when sitting is 12 -20 in.
Model #2500 is for use only with individuals who weight between 50 - 130 lbs (29.5 - 59 kg) and
whose shoulder height when sitting is 13 -24 in.
Model #2500 - Do not use with individuals under 65 lbs (29.5 kg).
Failure to follow each of the following instructions can result in your child striking the vehicle's interior
during a sudden stop or crash.
Secure this TheraPedic Restraint System with the vehicle's seat belt as specified in the manufacturer's
instructions located in the pocket on the side of this seat.
The harness must fit snugly for proper protection. A snug strap should not allow any slack, without
sagging, while not pressing into the individual's body.
Do not use with your vehicle's LATCH connector system. The LATCH system is not designed for
individuals over 50 lbs.
Your Columbia TheraPedic Vehicle Restraint System must not be used in front seats protected by
airbags, unless your vehicle has a switch to turn the airbag off. Passenger-side airbags can cause
serious injury or death to children in safety seats.
Your Columbia TheraPedic Vehicle Restraint System is designed to fit a wide range of individuals. To
insure a proper fit for the occupant, it is important that your seat be correctly set up and installed
before using it for the first time.
This seat must not be used with:
1. Vehicle seats that face to the side or rear;
2. Vehicle seats with backs that can fold forward in a crash or sudden stop. Some seat backs
automatically lock in an emergency. Check your owner's manual or with your dealer if you're not
sure;
3. Seating positions with belts that automatically surround the passenger as the door is closed;
4. Seating positions with emergency-locking seat belts.
See the section below on seat belts to determine which of your vehicle's seat belts may be used.
Your Columbia TheraPedic Vehicle Restraint System must be secured forward facing with both your
vehicle's seat belt and the included tether strap.
To maintain its safety, if your seat or harness becomes badly worn or damaged, or if your seat is
involved in an accident, regardless of speed and regardless how minor, your Columbia TheraPedic
Vehicle Restraint System may no longer be effective and should immediately be replaced.
Metal tabs, etc., can become hot inside a closed automobile in the sun. Check that the metal parts are
not too hot before putting the occupant in your seat. If you park in the sun, covering your seat with a
blanket, towel, etc., will help keep the metal parts from heating up.
Heavy, loose objects are dangerous in your vehicle. Always have your Columbia TheraPedic™ Restraint
System secured with your vehicle's seat belt, even when the Restraint System is unoccupied, as a
safety precaution for yourself and other occupants.
1-7
2000/2500 TheraPedic™ Vehicle Restraint System Instructions
•
•
•
•
•
Rev: 10.06
The harness assembly must only be used with the Columbia TheraPedic Vehicle Restraint System. Do
not try to use the harness independently of the seat.
The Federal government recommends that children under twelve years of age ride in the rear seat.
The center of the rear auto seat is the safest seating position in most vehicles, followed by the
passenger-side rear seat, and then the driver-side rear seat. Use the center rear seat whenever
possible.
Make sure that the front seats are far enough away from your Columbia TheraPedic Vehicle Restraint
System to minimize the risk of your child striking them in an accident.
Never leave the occupant unattended in your automobile.
Register your Columbia TheraPedic Vehicle Restraint System with the manufacturer.
WHERE TO INSTALL YOUR VEHICLE RESTRAINT SYSTEM
Placement of your TheraPedic Vehicle Restraint System in your vehicle's seat:
If the lip of the Vehicle Restraint System projects more than one inch over the edge of the car’s seat bench,
then the seat bench is too small, and the Columbia TheraPedic Vehicle Restraint System must not be installed
in that seating position.
Seat Belts
Your Columbia TheraPedic Vehicle Restraint System is designed for use only with certain kinds of lap or
combination shoulder/lap belts. Read the section below on seat belts to determine which of your vehicle's seat
belts are suitable.
Your Columbia TheraPedic Vehicle Restraint System cannot be used in seats that have "passive restraint" -type
seat belts, such as any kind of self-locking seat belt that the passengers do not have to fasten themselves. For
example, some vehicles have shoulder belts that slide into place automatically when the passenger closes the
door, and then slide out of the way automatically when the passenger opens the door. Because the seat belt
tension cannot be properly controlled, your Columbia Restraint System must not be used with this kind of
passive restraint, or any other kind of passive restraint systems.
Vehicle Lap Belts and your Columbia TheraPedic Vehicle Restraint System:
Yes! Lap belts that have no retractor, but rely on the passenger to pull on the free end of the belt to set the
lap belt to the proper tension can be used to secure the Columbia TheraPedic Vehicle Restraint System.
Simply attach the locking clip as shown in Figure 1 once you have adjusted the belt to the proper tension.
Snug the locking clip within 1/2" of the buckle.
Yes! Another kind of lap belt feeds into and out of a retractor. When you pull on the free end of the belt, if
you stop pulling, or allow the belt to go back into the retractor, the belt "locks up" and can't be pulled out any
further until you let the belt go all the way back into the retractor. Because you can control the tension of this
kind of seat belt, it can be used to secure the Columbia TheraPedic Vehicle Restraint System. You do not
need to use a locking clip with this type of seat belt.
No! Some lap belts only lock up when the nose of the car dips, for example, during an accident, or when the
driver steps on the brake. These are "emergency-locking" seat belts. Because the tension on this kind of belt
cannot be controlled, it cannot be used to secure the Columbia TheraPedic Vehicle Restraint System.
Vehicle Combination Lap/Shoulder Belts and your Columbia TheraPedic Vehicle Restraint
System:
Yes! “Continuous-Loop” lap and shoulder belts are those that have a lock plate (the “male” part of the seat
belt buckle) that slides freely along a continuous piece of webbing running from the hip to the shoulder
retractor. These belts can be used to secure the Columbia TheraPedic Vehicle Restraint System. Once you
2-7
2000/2500 TheraPedic™ Vehicle Restraint System Instructions
Rev: 10.06
have set the belt to the right tension, simply attach the locking clip within 1/2” (13 mm) of the locking plate as
shown in Figure 1.
No!
Some combination lap and shoulder belts have what is called a “sewn lock plate”. The lap belt is sewn
to the side of the lock plate (the “male” part of the seat belt buckle), while the shoulder belt is sewn to the top
of the lock plate. Each belt feeds into its own emergency-locking retractor. Because the seat belt tension
cannot be properly controlled with this type of belt, they cannot be used to secure the Columbia TheraPedic
Vehicle Restraint System
USE AND INSTALLATION
Figure 1: Use of the locking clip
STEP 1: Operating Your Columbia TheraPedic Vehicle Restraint System Buckle
Pressing the red button will open the buckle. To fasten the buckle, insert the two metal tabs into the top of
the buckle until they click into place. Never lubricate the buckle.
STEP 2: Positioning Shoulder Straps
The Columbia TheraPedic Vehicle Restraint System has four pairs of pre-cut slots, at different heights up its
back. The shoulder straps must be used in the slots located at the occupant's shoulder level. Do not use a
slot where the occupant's shoulders are above the top
of the slot. If you need to re-adjust the shoulder straps to
different slots, feed the metal slides on the back of the Columbia
Restraint System through the slots. To fit the black metal slides through the
slots, turn the slide to the short side of the rectangle and it will
easily push through the slots. Do not attempt to unthread the straps from the metal slides to get
them through the slots.
STEP 3: Adjusting Fit of Harness
In adjusting the harness, the crotch strap is the first part to be adjusted. Loosen the other straps and place
the occupant in the Columbia TheraPedic Vehicle Restraint System. Adjust the length of the crotch strap with
the metal slide on the bottom of the seat. The length of the crotch strap should be adjusted so that the lap
belt of the harness is down over the bony part of the occupant's hips, not over the soft stomach area. With
the lap belt positioned correctly over the hips, the buckle will be located quite low, where it should be.
With the crotch strap adjusted, take up slack in the shoulder straps with the metal slides on the back of the
seat, and with those on the front. By using the metal slides on the back of the seat to control the belt length,
you may adjust the harness so that the adjusters on the front shoulder straps rest on a comfortable part of the
occupant's body, (For example: below the collarbone).
3-7
2000/2500 TheraPedic™ Vehicle Restraint System Instructions
Rev: 10.06
Using the fine adjusters on the front, adjust the length of the harness for a comfortable fit. The harness must
fit snugly for proper protection. Adjust the tightness of the shoulder straps so that you can fit one or two
fingers (but no more) between the shoulder strap and the clavicle (collarbone). A snug strap should not allow
any slack, without sagging, while not pressing into the individual's body. Never lubricate the adjusters.
STEP 4: Location of Chest Clip
The chest clip serves to keep the shoulder straps from sliding down off the shoulders. Make sure that the
chest clip is even with an imaginary line drawn from armpit to armpit. If it is too high, it poses a choking
hazard, while if it is too low it will not keep the shoulder straps in place.
STEP 5: Head Pads and Lateral Positioning Pads
The head pads may be adjusted for height. Located behind, and underneath each head pad is a plastic ball,
attached to the lace that passes through the head pad. Squeeze the button on each ball and slide the ball up
or down to change the height of the head pads.
Lateral Positioning Pads: If the occupant is slender or small, the car seat may be too wide. You can narrow
the inside seat width with this Lateral Positioning Pad Set. Use only as many pads as needed for a correct fit.
First decide how far up the car seat you will want to narrow the inside width. Use the Positioning Pads as they
are or cut them to a customized fit. Then, peel back the edge of your car seat upholstery cover from the sides
of the shell. Insert the Positioning Pads between the inside of the plastic shell and the cover. Stretch the
upholstery cover back over the Positioning Pads, and over the edge of the shell.
You can experiment with the number of pads you insert to create the best fit. For comfort, you should leave
about one inch of space between either side of the occupant and the cover. As the individual grows, you may
change the pad arrangement to maintain a good fit. Larger individuals may not need the head pads or the
lateral pads at all.
Step 6: Securing the Seat in Your Vehicle
The Columbia TheraPedic Vehicle Restraint System is designed to face forward in the car in an upright position.
The seat is held in place with the vehicle’s own seat belt and with the included tether strap. Important: do
not attempt to place your vehicle's seat belt around the front of your Columbia TheraPedic™
Restraint System, the way many infant seats are held in. As shown in Figure 2, thread the seat
belt through the two metal tubes on the back of the Columbia TheraPedic Vehicle Restraint
System. Connect your seat belt buckle and, while kneeling in the Columbia TheraPedic Vehicle Restraint
System, adjust your vehicle's seat belt as tight as possible to hold the Columbia TheraPedic Vehicle Restraint
System in place. If the seat belt is a combination lap and shoulder belt, pull upward on the shoulder portion of
the belt to tighten the lap portion, and then install the locking clip. Kneeling in the seat helps secure it; when
you remove your weight from the seat, your vehicle's upholstery will spring back into shape and keep the seat
in place even more securely.
Make sure that the seat belt buckle lies to one side or the other of a Columbia TheraPedic™ Restraint System’s
side tube, not resting across it.
Figure 2: Securing Columbia TheraPedic Vehicle
Restraint System with vehicle's seat belt.
4-7
2000/2500 TheraPedic™ Vehicle Restraint System Instructions
Rev: 10.06
STEP 7: Use of the supplied locking clip
Install your Columbia TheraPedic Vehicle Restraint System as described above, using your vehicle's seat belt.
Hold your car’s shoulder/lap belt webbing and the seat belt tab to stop it from sliding. Then release the tab
from your seat belt buckle.
Fold the webbing and thread it through the locking clip, one side at a time. Keep the locking clip as close as
possible to the seat belt tab - no further than 1/2” away. Snug the locking clip against your seat belt tab. See
Figure 1. Buckle the seat belt to see that the clip has been correctly installed, with all slack webbing gone
and the seat tightly in place.
STEP 8: Installing the Tether Strap
A tether strap is supplied with your Columbia TheraPedic Vehicle Restraint System. This tether strap must be
used in addition to your vehicle's seat belt. Failure to do so may result in death or serious injury in the event
of a crash. Use of the tether will enhance the stability of your Columbia TheraPedic Vehicle Restraint System,
particularly if your vehicle has very soft or very upright seats. Install the tether in your vehicle as instructed
below.
The tether strap is "V"-shaped. The bottom of the "V" attaches to your vehicle. The two top ends attach to
your Columbia TheraPedic Vehicle Restraint System by hooking onto metal brackets located on the upper ends
of each metal tube on the sides of the Columbia TheraPedic Vehicle Restraint System. The metal anchor plate
on the bottom of the "V"-shaped tether must be bolted to your vehicle.
Where you install the anchor depends on your vehicle. If you are installing the car seat in a sedan, the anchor
plate bolts to the parcel shelf in front of the rear window. Note: the parcel shelf must be fixed and made
of metal underneath. You can tell if it is made of metal underneath by looking in the trunk. If the parcel
shelf is adjustable or is not metal underneath, follow the instructions for a hatchback, van, or station wagon; in
these cars the tether anchor bolts to the cargo floor. See Figure 3 and 4.
WARNING: before drilling any hole in your vehicle, make sure the gas tank, pipes, cables, etc.,
are not in the way and will not be damaged. The tether anchor must be mounted directly in a
secure metal panel. If necessary for access, trim the carpeting, hardboard parcel shelf, or other
trim for clearance. Make certain that the tether webbing does not rub against any sharp edges.
Sedans with a fixed rear parcel shelf built in or after 1989:
Mounting nut: Most cars built in 1989 and after feature a tether-mounting nut welded to the underside of the
parcel shelf by the manufacturer. Because of its location, this mounting nut is not normally visible. To find it,
open the trunk and look up at the bottom of the parcel shelf. Some cars have one mounting nut, while others
will have more than one. If your vehicle has such a nut, use it. Insert a pointed object (nail, etc.) into the nut
from below, and up through your parcel shelf carpeting. From the other side, using the protruding object as
your guide, trim a small hole in the carpeting. This will allow the tether bolt to screw into the nut from above.
Attach the tether anchor as shown in Figure 3.
Sedans with a fixed rear parcel shelf built before 1989:
Cars built before 1989 generally will not have manufacturer-installed tether mounting nuts. Instead, you will
need to drill a 7/16” hole and use the nut supplied with the tether. With the Columbia TheraPedic™ Restraint
System in your vehicle, mark a location on the centerline of the Columbia TheraPedic Vehicle Restraint System,
and about 8” behind the seat, on the parcel shelf. Open the trunk, and using a flashlight if necessary, inspect
the bottom of the parcel shelf. Make sure there are no dangerous obstructions underneath the spot that you
have chosen. If it is clear, drill a hole for the anchor bolt. Attach the tether anchor as shown in Figure 3.
5-7
2000/2500 TheraPedic™ Vehicle Restraint System Instructions
Rev: 10.06
Hatchbacks, vans, station wagons, and sedans without a fixed metal parcel shelf:
With the Columbia TheraPedic Vehicle Restraint System in your vehicle, mark a location on the center line of
the seat and far enough back so that the tether strap will create no greater than a 45-degree angle from the
horizontal (the floor of your vehicle). See Figure 4. Look under your vehicle and make sure there are no
dangerous obstructions (e.g., gas tank, pipes, cables) underneath this spot, and that you will be able to reach
it easily. If it is clear, drill a hole for the anchor plate bolt. Attach the anchor as shown in Figure 5. The
anchor plate to be as close to horizontal as possible, so that the force on the tether anchor acts from the side.
Figure 3: Tether anchoring on parcel
shelf
Figure 4: Tether anchoring on vehicle floor
Figure 5: Tether anchoring methods
Pickup Trucks:
You can install the Columbia TheraPedic Vehicle Restraint System in the passenger-side front seat only if
there is no airbag on that side (or if the airbag can be switched off). If the pickup truck has a rear seat,
install the Columbia TheraPedic Vehicle Restraint System there. You can install the tether in the rear wall of
the cab, a few inches below the rear window.
Attaching the tether strap to a rear seat belt:
You can attach the Columbia TheraPedic Vehicle Restraint System’s tether to the seat belt of the seat behind it,
but only if the seat belt is one of the usable kinds described above. You may need a second locking clip to
secure the rear seat belt. This is a good option when installing in minivans and some school buses, when you
cannot easily reach the floor of the vehicle.
Connecting the tether strap:
With your Columbia TheraPedic Restraint System in place in your vehicle and the seat belt firmly tensioned,
hook the tether onto the metal “eyes” on the upper ends of your car seat’s side tubes. Cinch the tether tight
with the tether strap adjusters.
6-7
2000/2500 TheraPedic™ Vehicle Restraint System Instructions
Rev: 10.06
LATCH (Lower Anchors and Tether for Children)
Also known as the ISOFIX system, this is a standardized anchorage system independent of the vehicle’s seat
belts. Vehicles 2001 and newer will have a user-ready top tether strap anchorage hardware (such as a ring,
bar or bracket) for three rear seating positions. WARNING: Do not use your vehicle's LATCH connector
system with this seat.
CLEANING INSTRUCTIONS
The cover of your Columbia TheraPedic Vehicle Restraint System may be machine-washed and dried using the
'delicate' cycle. To remove the cover for washing, first remove the harness and head pads. Then remove the
foam block inside each head pad cover. The harness webbing may be washed with a damp, soapy sponge and
air-dried. Do not use chemicals or bleach, as they may weaken the harness.
Store these instructions in the pocket on the side of your seat for future reference.
Columbia Medical
13577 Larwin Circle
Santa Fe Springs, CA 90670
(310) 454-6612
Fax: (310) 305-1718
Email: [email protected]
Visit us at www.ColumbiaMedical.com
© 2004 Columbia Medical Mfg LLC
COLUMBIA MEDICAL MFG. LLC warrants this product to be free of defects in material and
workmanship. Our obligation under this warranty is limited to repair or replacement of any part
or entire unit at our option for a period of one year from date of delivery to the original purchaser.
The warranty does not include cost of inconvenience, property damage, misuse, abuse, accident or
similar incidents. The warranty will not apply if product has been tampered with or repaired by
unauthorized individuals. “This warranty gives you specific rights which vary from State to State.”
7-7