1
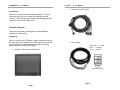
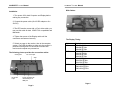
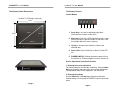
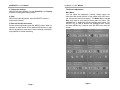
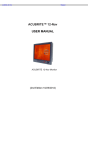
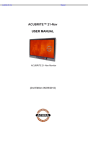
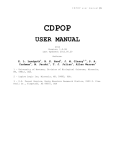
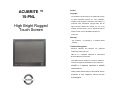
ACUBRITE ™ 15-PNL Preface Copyright The material in this document is the intellectual property of Acura Embedded Systems Inc. This publication, including all photographs, illustrations and software, is High Bright Rugged Touch Screen protected under international copyright laws, with all rights reserved. Neither this manual, nor any of the material contained herein, may be reproduced without written consent of Acura Embedded Systems Inc. Version 2.0 Warranty The Acubrite™ is protected by a standard limited warranty. Trademark Recognition Microsoft, MS-DOS and Windows are registered trademarks of Microsoft Corp. IBM PC is a registered trademark of International Business Machines Corporation. Intel, MMX, Pentium, Pentium-II, Pentium-III, Pentium-4, Celeron are registered trademarks of Intel Corporation. AWARD is a registered trademark of AWARD International Inc. Other product names used in this manual are the properties of their respective owners and are acknowledged. ACUBRITE™ 15-PNL Manual Disclaimer Acura Embedded Systems Inc. takes every care in the ACUBRITE™ 15-PNL Manual Content Introduction................................................................................1 preparation of this document, but no guarantee is given as to the correctness of its contents. Our products are under Hardware Installation............….................................................1 continual improvement and we reserve the right to make The Display Timing.........……....................................................4 changes without notice. The manufacturer makes no representations or warranties with respect to the contents hereof and specifically disclaim any implied warranties of merchantability or fitness for any particular purpose. The The Display Outline Dimensions…............................................5 The Display Controls.....................................….........................6 The Screen Adjustment.............................….........................…8 manufacturer reserves the right to revise this publication and to make changes from time to time in the content hereof without obligation of the manufacturer to notify any person of such revision or changes. In general, the manufacturer will not be liable for loss of data or other direct, indirect, special, incidental or consequential damages arising from the use or inability to use the product or documentation, even if advised of the possibility of such damages. Installing TouchKit …....................................…........................9 ACUBRITE™ 15-PNL Manual ACUBRITE™ 15-PNL Manual Cable (VGA, USB, Serial) Power cable Introduction Welcome to enjoy the fantastic sightseeing world. This new technology will bring you the whole new feeling about the “monitor”. We show here some of the major advantages of the Acubrite™ touch screen LED monitor. Hardware Installation This section will guide you through the correct installation procedures of the monitor. Unpacking After you unpack your LED Monitor, please make sure that the following items are included in the carton and in good condition. If you find that any of these items are damaged or missing, please contact your dealer immediately. Acubrite™ touch screen LED monitor Page 1 Pin 1& pin 3 --- Power Pin 2 --- Ground Pin 4 --- Ignition Page 2 ACUBRITE™ 15-PNL Manual ACUBRITE™ 15-PNL Manual With Cables: Installation 1. Turn power off for both Computer and Display before making any connection. 2. Connect the power cable (12v AC/DC adapter or 8v – 30v DC). 3. The LED monitor comes with a 15-pin video cable; you may use this cable for both IBM PC’s & compatibles and Macintosh. 4. Tighten the screws of the Display cable until the connectors are fastened securely. 5. Switch on power to the monitor, then to the computer system. Red LED should be on when only the monitor is powered on and green LED should be on when both monitor and computer are powered on. The following picture provides the connection outline Cooling Fan The Display Timing Mode Resolution VGA 640x480 @60Hz 640x480 @72Hz 640x480 @75Hz 800x600 @56Hz 800x600 @60Hz 800x600 @72Hz 800x600 @75Hz 1024x768 @60Hz 1024x768 @70Hz 1024x768 @75Hz SVGA DC +12V Input VGA XGA SXGA DC 8~30V Input 1280x1024 @60Hz 1280x1024 @70Hz 1280x1024 @75Hz Touch controller can use RS232 port or USB port Page 3 Page 4 ACUBRITE™ 15-PNL Manual ACUBRITE™ 15-PNL Manual The Display Outline Dimensions The Display Controls Control Button Acubrite™ 15"(Weight: 8 pounds) 350mm 1 300mm 380mm 230mm 306mm 2 3 4 5 1. Down Key <: Hot key for adjusting bright level. Decrease item number or item value. 2. Menu Key: Enter to the OSD adjustment menu. It also used for go back to previous menu for sub-menu, and the change data don’t save to memory. 3. Up Key >: Increase item number or value of the selected item. 4. Power LED: Power ON-Green (or Red) / Power OFFNo. 5. POWER SWITCH: Pushing the power switch will turn the monitor on. Pushing it again to turn the monitor off. Screen Adjustment Operation Procedure 1. Entering the screen adjustment The setting switches are normally at stand-by. Push the Menu Key once to display the main menu of the screen adjustment. The adjustable items will be displayed in the main menu. 55mm Thick 247mm 2. Entering the settings Use the Down Key < and Up Key > buttons to select the desired setting icon and push the SELECT button to enter submenu. Page 5 Page 6 ACUBRITE™ 15-PNL Manual ACUBRITE™ 15-PNL Manual 3. Change the settings After the sub-menu appears, use the Down Key < and Up Key > buttons to change the setting values. 4. Save After finishing the adjustment, push the SELECT button to memorize the setting. 5. Return & Exit the main menu Exit the screen adjustment: push the “MENU” button. When no operation is done around 30 sec (default OSD timeout), it goes back to the stand-by mode and no more switching is accepted except MENU to restart the setting. Page 7 The Screen Adjustment Main Menu You can adjust the brightness, contrast, display colors, the horizontal and vertical position of the display and OSD menu, etc. through the main menu display. The Down Key < and Up Key >are used to scroll through items within the menu. The selected item is highlighted as the scrolling move along. The SELECT key is used to activate the highlighted item. During this state, MENU key is used to close the OSD menu from the screen. Page 8 ACUBRITE™ 15-PNL Manual ACUBRITE™ 15-PNL Manual Menu key function: Contrast & Brightness Setup the contrast and brightness. Signal source Not available in this model Speaker Not available in this model Color To adjust image colors. <General> property page contains devices add/remove. Picture Setup the image position and size within the panel. There are five functional groups in <Setting> property page, they are Beep option, Linearization style, Double click time, Double click area, Mouse Mode. OSD OSD functions <Tools> property page contains 4Points Calibration, Clear and Calibration, Linearization, and Draw Test. Exit Exit setting <Edge Coefficient> property page contains the functions of Edge Compensation for Top, Bottom, Left, Right, X Axis and Y Axis. There are three functions in <Display> property page, and they are Display map, Multiple Monitors, Map to main display if system has only one display monitor. <Hardware> property page information of model, Firmware Version, Location, and Hardware settings. <About> contains the information about TouchKit 3. Follow the on-screen instructions installation. complete the Configuration Utility There are seven property pages in TouchKit utility, and they are General, Setting, Tools, Edge coefficient, Display, Hardware, and About. Each property page contains different functions for users to do the adjustments. Therefore users can easily manage all the TouchKit controllers through TouchKit utility. Installing Touch Screen Controller software TouchKit is the software which contains drivers of the touch panel controllers. to Follow these steps to install TouchKit. 1. Insert the CD to CD-ROM. 2. Choose the appropriate OS (for example, if you are using windows 2000 or XP, choose Win2000 / XP) Page 9 Page 10 ACUBRITE™ 15-PNL Manual ACUBRITE™ 15-PNL Manual Troubleshooting Tips In the event that you experience trouble with your Display, check the following items before contacting the dealer from whom the Display was purchased. The most common problems usually involve an incorrect connection from the Video Card to the Display. We recommend that you also consult your Video Card User’s manual during the Troubleshooting Procedure. Do not exceed the maximum refresh rate recommended for the display. Problem No image on display screen Abnormal image Colors of image on screen are abnormal Disturbances on screen Troubleshooting Tip Check that power cord of Computer has been connected securely into wall outlet or grounded extension cable or strip. Check that power switch of the Display has been pressed and LED on the front of Display is lit. Check that Video(Signal) cable from the Display has been securely and correctly connected. Check that Video Card is firmly seated in card slot of Computer motherboard. Check that the video input from the Video Card falls within the timing range Check that the video input from the Video Card falls within the timing range. Check that Video(Signal)Cable from the Display has been securely and correctly connected to the video connector at the rear side of the Computer. Check that Video(Signal)Cable from the displays has been securely and correctly connected to the 15-pin Video Connector at the rear side of the computer OSD adjustment is incorrect. Please consult section for OSD screen adjustment procedures. Page 11 Toll Free 1.866.502.9666 www.acuraembedded.com