1
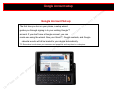
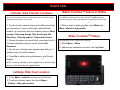
! ! y nl VZW DROID by Motorola Launch Package EXCLUSIVE DESIGN •3.7” Touch Screen 480x854 WVGA Display – supports up to 16M colors •Slide‐Out QWERTY Keyboard BLUETOOTH v2.1+ EDR BLUETOOTH •Bluetooth Profiles supported: Headset, Handsfree, Stereo, Phonebook Access. CAMERA/VIDEO •5.0MP w/Auto Focus, dual LED Flash & Image Stabilization •DVD Quality Video Capture w/1‐touch playback and easy uploading to YouTube •Dedicated Camera /Video Key MUSIC •Download MP3s from Amazon Music Store •Create and manage playlists •3.5mm Headset Jack GENERAL •Android (Éclair 2.0 ) OS; Google Experience Device •Integrated Google , Exchange, and Facebook Contacts •Push Email Support: Gmail and Exchange •Google Calendar & Corporate Calendar •Cortex A8 processor with dedicated HW Acceleration •16 GB microSD card pre‐installed on‐device •WiFi Capable •Bilingual Interface: English/Espanol •aGPS capable for E911 emergency location/sGPS •Speakerphone •Advanced Speech Recognition •Polyphonic and MP3 Ringtones •Embedded ring tones, vibrating alerts and silent •Phonebook Contact capacity dependent upon optional removable memory •TTY compatible •Device Insurance Available •Hearing Aid Compatibility = M3/T3 SERVICES •Visual Voice Mail Capable •Text, Picture & Video Messaging with threaded messaging feature. •Full Suite of Google Apps incl.: Google Search, Google Maps with Street View, transit and Wikipedia information; GTalk with Presence; Gmail; YouTube™, Latitude, Google Calendar •1000’s of apps &100’s of widgets available on Android Market •Android Webkit HTML5 based browser •Photosharing capable: Picasa •Google Over the Air Updates SPECIFICATIONS •All‐Digital, 800/1900, CDMA EVDO rev A •OMAP3430 – 550MHz •Memory‐ ROM: 512MB, RAM: 256MB •Dimensions: 4.56(h) x 2.36(w) x .54(d) inches Weight: 5.96oz SAR: Body: 1.50 W/kg; Head: 1.49 W/kg Usage Time ‐ Up to approx. 385 Mins or Standby Time ‐ Up to approx. 270 Hours en nd a l a i t Co id f n pr op n n o The Wireless Device Group introduces DROID by Motorola to the product line-up! This device will launch in all channels on November 6th, 2009! s es on iz r e W l e ir p s r e Check it out. DROID by Motorola is fast. Like scary fast. You can blaze across the Web with a massive processor and Verizon's powerful 3G network. You don't even need to type! With Google Search™ by Voice, you just tell it what you want and DROID searches the Web to find it. You can switch between up to six apps at once! Choose a few (or a few hundred) from Android Market™ and try it yourself. DROID won't bother you while you're running those apps. It keeps disruptive alerts at bay in a handy expandable notification panel. e z i r d V ho t u power plant. It’s location-aware. VoiceIt’s a pint-sized recognizing.aApp-mashing and multitasking. It can see through walls. And connect you to anyone or anything at or speed. break-neck At some point, power and intelligence f mean something more than a phone. At some point, you l a yourself a DROID by Motorola. rihave te a Product Codes m y r SKU/UPC ta rie o l e MOTA855 723755811560 CLNR FRUMOTA855 Launch Kit SKU Vision MockMock-Up 16842 MOTA855MOCK 723755811584 MOTA855LK 723755811577 $100.00 MIR Device Insurance Tier TEC/WPP Adv. Device Tier National Retail Price at launch only (*Prices before rebate) 2 Year 1 Year Full Retail Prepaid $299.99* $369.99* $559.99 N/A Standard Packaging ¾ DROID by Motorola Phone ¾ Standard Lithium Ion Battery ¾ Wall/USB Charger ¾ 16 GB microSD memory card preinstalled ¾ Getting Started Brochure ¾ Product Safety & Warranty Brochure ! ! y nl DROID IN-BOX ACCESSORIES o l e n n o s r e Micro USB Wall Charger p with Detachable USB Cable ss Standard Battery 1400 mAh e MOTA855BAT on e z i r r o f l a i er t a Standard Battery Door MOTA855BATDR y r ta nd a l a i t ie r p m ho t au d iz r e W l e ir V Note: Your Droid will not power off when connected to a charger. 16GB SanDisk® microSD™ Memory Card o pr Direct Fulfillment i f n o C n e d Launch packet accessories support the initial launch of this device. Accessories and part #’s may change throughout the course of the handset life. Always refer to the accessory section of the Equipment Guide to view most updated accessories listing. Click on accessory link found on the Equipment Guide Confidential and proprietary material for authorized Verizon Wireless personnel only. Use, disclosure or distribution of this material is not permitted to any unauthorized persons or third parties except by written agreement. ! ! y nl DROID ACCESSORIES Micro USB Vehicle & Wall Combo Vehicle Power Charger Wall Charger MICUSBTVL MICUSBDUALCHR MICUSBVPC s es on e z i r MOTA855MNT y r ta s r e Charging Cradle – Includes Cable MOTA855DOCK te a m ie r p o pr n n o V ho t Battery Only u ChargingaCradle – No Charger or f MOTBTONCHR l a i r Vehicle Mount nd a l a i t d iz r e W l e ir p o l e Limited Stock Post Launch Limited Stock Stock soon after launch Launch packet accessories support the initial launch of this device. Accessories and part #’s may change throughout the course of the handset life. Always refer to the accessory section of the Equipment Guide to view most updated accessories listing. Click on accessory link found on the Equipment Guide i nf n e d Cellbrite Cables Celebrite cable CEL-100MULTI Co PST Tools USB cable PSTMICUSB & Charger PSTMICTVL Confidential and proprietary material for authorized Verizon Wireless personnel only. Use, disclosure or distribution of this material is not permitted to any unauthorized persons or third parties except by written agreement. ! ! y nl DROID COVER SOLUTIONS (Back Only) s es on MOTA855SILB Black MOTA855SILP Pink iz r MOTA855BCOVBL MOTA855BCOVRD Ve Blue Red d e MOTA855BCOVPK z i r Pink ho t au or f 2 PIECE lSNAP ON COVERS ia r te a m Post Launch W Post Launch Post Launch y r ta nd a MOTA855COVLTHR l Black Leatheria Wrapped t n e d i f n Co n DISPLAY PROTECTORS on SNAP ON COVERS SNAP ON GEL COVERS o l e l e ir p s r e MOTA8553PKSP Screen 3 Pack MOTA855PRP Privacy Single Pack ie r p o pr MOTA855COVC Clear MOTA855COVPRP Purple MOTA855COVBLU Blue MOTA855COVCH Chrome Post Launch Confidential and proprietary material for authorized Verizon Wireless personnel only. Use, disclosure or distribution of this material is not permitted to any unauthorized persons or third parties except by written agreement. ! ! y nl CARRYING SOLUTIONS n n o BODY GLOVE rs Leather Pouch Leather Pouch MOTA855CAS PDASDPCH6 pe o l e Hard Cover/Case MOTA855COVBG ss e l on e z i r d iz r e W ire V o cases with magnetic closures could place IMPORTANT : Due to the magnet imbedded in the device, h t the device in Car or Desktop Mode. Do NOT offerucustomers cases with a magnet closure only. or y r ta a f l HOLSTERS ia r e at m ie r p o pr i f n o C n e d nd a l Swivel Holster – Display Facing In a i MOTA855HOL t Shell / Holster Combo MOTA855HOC Confidential and proprietary material for authorized Verizon Wireless personnel only. Use, disclosure or distribution of this material is not permitted to any unauthorized persons or third parties except by written agreement. ! ! y nl DROID ACCESSORIES Stereo Headsets Mono Headsets s es on MEH50BLKT35 MEH25BLUT35 W l e ir p n n o s r e izPLANFLXBOMT25 r JABBUZWAVT25e V d e z i r ho MEH25PNKT35 o l e M175RT25 t u a VZWBUDSHSB1 or f l a i er SHA25 DIGCRVSHST35 t a m y r ta Verizon Wireless Branded SanDisk ie r p ro p TADP-8GB TADP-2GB nd a l a i t n TADP-4GB TADP-16GB e d fi n o TADP-2GBVZ TADP-4GBVZ JABSBUDBLK JABSBUDSLV (2.5mm; SHA25 required) (2.5mm; SHA25 required) Memory Card Reader MICROREADHC1 MCREADERHC MICROREADHC Launch packet accessories support the initial launch of this device. Accessories and part #’s may change throughout the course of the handset life. Always refer to the accessory section of the Equipment Guide to view most updated accessories listing. Click on accessory link found on the Equipment Guide C Confidential and proprietary material for authorized Verizon Wireless personnel only. Use, disclosure or distribution of this material is not permitted to any unauthorized persons or third parties except by written agreement. ! ! y nl BLUETOOTH HEADSETS Jawbone Prime w/Noise Assassin Technology JAWPRIMEB Plantronics Voyager Pro PBTVPRO Motorola H790 MBT790Z Motorola H15 MBTH15Z Plantronics 975 PBT975Z o l e ss e l on iz r e W n n Motorola so H710 r MBT710Z pe ire V Talk time: Up to 4.5 hrs Standby: Up to 8 days LG HBM-570 LBT570SLV Talk time: Up to 6 hrs Standby: Up to 5 days Talk Time: Up to 5 hrs Standby: Up to 7 days r LG HBM-520 LBT520Z o Plantronics 232 f l PBT232Z ia er t ma y r ta d e z i Up to 4.5 hrs Talk Time: r Standby: ho Up to 200 hrs t au Jabra 2050 VBT2050 Talk time: Up to 5 hrs Standby time: Up to 7days LG 210 LBT210Z Talk Time: Up to 6.5 hrs Standby time: Up to 200 hrs Motorola H215 MBT215HF ie r p o pr d Time: Up to 7 hrs nTalk a Time: Up to l Standby a 250 hrs ti i n e d Talk Time: Up to 5 hrs Standby Time: Up to 150 hrs C f n o Talk Time: Up to 8 Hrs Standby Time: Up to 180 hours Talk Time: Up to 6 Hrs Talk Time: Up to 7 Hrs Standby Time: Up to Standby Time: Up to 250 hours 240 hours Talk time: Up to 36 hrs Standby time: Up to 1 month For all other Bluetooth Headsets please refer to your Bluetooth Accessory matrix Confidential & proprietary for authorized Verizon Wireless personnel only. Use, disclosure or distribution of these material is not permitted to any unauthorized persons or third parties except by written agreement. ! ! y nl BLUETOOTH STEREO ACCESSORIES Moto Stereo Bluetooth Headset w/ Arm Band MBTS9SHSZ2 •Music mutes when call received •Barely 1 ounce •Music Time: Up to 6 hours on ed JBL EQ7 Bluetooth Speaker System MBTEQ7 •Wireless speakers that deliver music and speakerphone calls y r ta ie r p C f n o i n e d nd a l a i t r o f l a i er t a m roBluetooth Stereo Speakerphone pLG LGCOMSSBT •Up to 20 hours talk time •Up to 900 standby s r e Moto Stereo Bluetooth Headset MBTS305SHS •Music Time: Up to 6 hours •Standby Time: Up to 4 days s es au iz r o th W l e ir p n n o iz r e Moto Bluetooth In-Car V o l e Speakerphone & Digital FM Transmitter MBT505HF •Up to 20 hours usage •Up to 6 hours music time •Up to 340 hours standby Jabra Bluetooth In-Car Speakerphone with FMTransmitter JBT700 •Up to 14 hours talk time •Up to 11 days standby Altec Lansing Orbit–M Speaker IMT207VZW •Up to 24 hrs on 3 AAA batteries ! ! y nl target market n n o o l e s r e C f n o i n e d p s es • Primary Consumer Market: Singles/Couples and Young Adults l e ir – Target Characteristics: W n o new mobile applications, and z • Willing to try both new and advanced handsets iand r paced lives (e.g. one touch desire features that also help manage their fast e V shortcuts) dexperience as well a high-tier messaging e • Looking for an outstanding internet/web z i r device hoachievement, demonstrates they have the best in • A phone represents success and t au to the world (not only to friends and family, but life, and allows them to connect media, email, news and orsearch sites) f • Their phones needlto be stylish or have the flexibility to be personalized, as the a phone is a seenrias a fashion statement, and a representation of who they are or e want to beat • Keen to m adopt new technology, especially where they feel it matches their lifestyle y and rreflects their image ta a device to manage both work and personal life • eNeed •ri Their phones need to be the ‘latest and greatest’ across all aspects of design, and p o features pr nd a l a i t ! ! y nl support Launch kits for DROID by Motorola will be available for order the week of October 26th, 2009. Product Training s es s r e n n o Should you require any product training or support, please contact the Motorola Account Manager for your Area. Launch Kit Contents: • One Working DROID by Motorola Phone with Preloaded DROID Demo App • Wall/USB Charger • One DROID by Motorola Die Cut • Pre-installed 16GB microSD card Northeast South ed Midwest Area inventory teams need to order mock ups for the Droid launch. Mock units will not be included in the live launch kit. r o f l ia to Store locations are to use the DROID by Motorola liverunit merchandise their locations for the DROID launch. te a m y ar t ie r p o pr nd a l a i t n e d i f n Co If your location does not receive a Launch Kit, please contact your Area Inventory Manager for a replacement kit. p o l e iz West r o th au on W l e ir Sue Dunkin V iz r e (610) 247-6700 Matt Hrynkiewicz (732) 616-1258 Mike Borrelli (330) 421-7117 John Benevento (408) 202-9500 Install and Launch DROID Demo App **FOR LIVE LAUNCH KIT DEMO UNITS ONLY** The DROID DEMO application will provide you with quick access to important product information including key features, Tips & Tricks, demo videos, and more. Use it to help familiarize yourself with the device, and share it with consumers to show them all DROID by Motorola has to offer. 1: Open the Applications Tab and touch the Install icon. 2: The Demo application is automatically downloaded and installed. 3: Re-open the Applications Tab and find the DROID DEMO icon. Touch it to start the demo. TIP: Feel free to “drop” it on your home screen. From the Applications Tray, touch and hold the DROID DEMO icon and then place it on the home screen for easy demo access. ! ! y nl DROID by Motorola Getting Started 3.5mm Headset Jack Earpiece Power/Lock Key - Powers device on/off - Locks touch screen - Turns display on/off 3.7” WVGA Touch screen s es on Micro USB Connector: Charge or connect to PC e z i r C i r te Key: a Search mSearch the Web & device content d n n o s r e V ho t au Full QWERTY Keyboard Directional Key with Center Select Camera Key Back Key: Returns you to previous screen. y r ta ie r p Microphone o pr nd a l a i t n e d i or f l a Menu Key: Press to open menu options. f n o iz r e Volume Keys W l e ir p including apps, contacts, music, browser, and YouTube o l e Shift Space Search Press for text search Home Key: Returns you to home screen from any screen Alternate To enter numbers and symbols Menu Memory Card Delete Return ! ! y nl Getting Started – Home screen Home Screen Your home screen has 3 panels. Touch the Home Key to go to the home screen. s es on e z i r r C f n o i n e d o f Touch Screen Motions ial er t ma y r ta e ri p o pr nd a l a i t ho t au d V iz r e W l e ir p s r e n n o o l e ! ! y nl Widgets and shortcuts • What is a widget? – A widget is a home screen icon that adds some content to that page that is not static – Widgets often take the form of on-screen tools (clocks, event countdowns, auction-tickers, stock market tickers, flight arrival information, daily weather etc) e z i r r • nd a l a i t n e d i f n o o f l a i er t a pr o ie r p m on d iz r e W p s Widgets es l ire V ho t au What is a Shortcut? – A shorcut is an icon displayed on the device main screen that will open any of the following: • Applications • Web Bookmarks • Contacts • Contact Direct Dial • Contact Direct Message • Directions to a specific location via maps • Email Accounts • Gmail Labels (Icon can access separate functions such as Sent Items, Outbox, Drafts etc.) • Music Playlists • Settings Functions (Bluetooth, Battery Use, WiFi, etc..) y r ta C s r e n n o Shortcuts o l e ! ! y nl removing shortcuts, widgets, and apps How to remove an icon, widget, or application ss e on e z i r Long Press On the icon l ria y r ta C f n o i n e d nd a l a i t pr o ie r p te a m o h t Draguand a into the Drop r foTrash can d V iz r e W l e ir p s r e n n o o l e ! ! y nl Touch screen pe From the home screen, touch the Applications button to open the application tab. Open an application simply by touching it. r C f n o i n e d nd a l a i t p p o r rie y r ta o f l a i er t a m n n o Touch Screen Gestures rs Applications Tab o l e ss e l There are several touch motions recognized by the device: e iror open an application Touch – to select a menu item W n an object that you want to Touch and hold – toograb iz menu move or open an r option e V Drag – to move an object or scroll slowly on a list or web ed page iz r o Flick h – to scroll quickly on a list or web page (touch the t auscreen again to stop the scrolling action) Double tap – to zoom in/out on a web page or picture Sleep Mode Your display will go dark if untouched for a period of time. Press the Power/Lock Key to wake it up again. From any screen, you can put your display back into sleep mode. Just press the Power/Lock Key . This will prevent false key presses as well as help you conserve battery life. ! ! y nl File syncing o l e n n o s r e r y r ta Co i nf n e d nd a l a i t pr o ie r p o f l a i er t a p s es and more from • Transferring music, video, pictures, l your PC over to your Droid isn't ire any different than transferring files from one Wfolder to another on your n computer* o z i rDroid via USB into your PC e – Just plug your V d music, pictures, and other files from your e – To z transfer i r computer to your phone’s storage card, you need to o th set the phone’s storage card as a USB drive. u a – Connect the phone to the computer and Open the Notifications Panel – In the Notifications Panel, touch USB connected and then touch Mount m • Audio Formats Supported for playback: AMR-NB/WB, MP3, PCM/WAV, AAC, AAC+, eAAC+, MIDI, OGG, WMA • Image(Graphic) Formats Supported: JPEG, GIF, PNG, BMP • Video Formats Supported: MPEG-4, H263, H264 . * DRM content not supported Notification panel o l e ! ! y nl n n Notifications let you know when an event has occurred that may require require your attention such as voicemail, missed so calls, text r messages, Android Market download, calendar reminder, etc. pe ss e l e To View the Notification Panel: ir Touch the status bar at the top of the screen and drag it W down. Touch each notification to view the details. When n o you are done, touch the Home Key to return to the home z i r screen. e V d e z i r ho t Types of information that is delivered via the notifications panel: au or f •All messaging – Email, text, picture, l video, IM a i •Missed Calls er •Voice Mail t •System updates ma y •Android market updates r •Application updates ta e •Calendar events ri p o as scoreboard apps, weather apps •Apps Such r p •Twitter via TWIDROID nd a l a i t n e d i f n Co ! ! y nl Making calls Make a Call 1: Go to the home screen by touching the Home Key. s es 2: Touch Phone. 3: Use the dial pad to enter the phone number, then touch the green phone icon on iz r e OR touch the Contacts tab, scroll to and touch the contact you want to call, then touch the appropriate calling option. 4: Touch End to end the call. or f 1: Touch the Answer button and drag it to the right. l ia r Ignore a Call te a m left. 1: Touch the Ignore button and drag it to the y r ta Change Phone to e Silence Mode i r device, you can do so If you would like to silence your p ro home screen. Simply awaken without having to accesspthe your device from sleep nd mode, touch and hold the grey a speaker icon onl the right of the screen and drag it all the tiaof the screen. Your device’s sound will now way to thenleft e be off. To turn sound back on, simply follow the above d i f in the reverse order. n steps Co Answer a Call e z i r d W l e ir p o l e n n o s r e V ho t au Remove an App from Android Market 1: From your home screen, touch Market . 2: Touch Downloads. 3: Touch the application that you want to remove. 4: Touch Uninstall, then confirm by touching OK. ! ! y nl Google Account setup s es Google Account Set-up The first time you turn on your phone, a setup wizard on iz r e guides you through signing in to your existing Google™ account. If you don’t have a Google account, you can W l e ir V d contacts, and Google create one using the wizard. Now your Gmail™, Google e z calendar events will all be loaded to your deviceriautomatically. ho t au TIP: Remember to write down your username and password, and keep them in a safe place. r y r ta C f n o i n e d nd a l a i t pr o ie r p m o f l a i er t a p s r e n n o o l e Internet browser and wifi ! ! y nl o l e n Toggle Between up to 8 Open n o Browser Windowsers Browse the Web To open the browser screen: 1: From the home screen, touch Browser . To go to a specific web address: 1: With the browser screen open, slide open the QWERTY keypad. 2: Type the web address. 3: Press Return Key . Tip: To zoom in or out on a web page, just tap twice on the screen. r o f Turn On WiFi l a i er> 1: From your home screen, touch the Menu Key t Settings > Wireless & networks > Wi-Fi ma y r ta e Set-up a WiFi ri Network p ro p NOTE: Make sure WiFi is ON first. d n a 1: From your home screen, touch the Menu Key > l Settings >ia Wireless & networks > Wi-Fi settings > ntWi-Fi network that you wish to connect to > selectethe id > enter security code if applicable. Connect f n o C p s Your DROID by Motorola allows yous to open up to 8 le browser windows at once, andre toggle easily between them: i 1: From your home screen, Wtouch Browser. n o to bring up the browser window. 2: Touch the Menuzkey i r window to enter a specific website Touch the browser e Veither the virtual or physical QWERTY address. Use d e keyboard to enter the URL. Touch Go once complete. z i r o open a new browser window, touch the Menu key > 3:hTo t au New Window. Repeat step #2 to enter a specific website address. Repeat up to 8 times (you can have up to 8 browser windows open at once). 4: To quickly toggle between the open browser windows, touch the Menu key > Windows > select the browser window you would like to switch to. Change Notification Tone 1: From the home screen touch the Menu key > Settings. 2: Touch Sound & display > Notification ringtone. 3: Select the ringtone you’d like, then touch OK. 4: Touch the Home key to go back to the home screen. Contacts o l e Join Contacts (to Avoid Duplicates) nn Add a New Contact 1: From the home screen, touch Contacts . 2: Touch the Menu Key . 3: Touch New contact. 4: Continue to follow the on-screen prompts then touch Done when you are finished. (When filling out data fields, touch the field to bring up the touchpad so you can enter data. When you are done with a field, touch Next.) Set Contact as a Favorite ! ! y nl r o f 1: From the home screen, touch Contacts. al 2: Touch the contact you wish to set as a favorite.ri te That 3: Touch the star to the right of the contact’s a name. m tab of the contact will now be visible on the Favorites y ar Contacts app. t ie r pfrom an SD Card Import Contacts o r p NOTE: Contacts must d be vCards, i.e. vcf format. n a into the memory slot. 1: Insert the SDlcard ia screen, touch Contacts > Menu Key > 2: From thethome n e Import/Export > Import from SD card > then follow the id f remaining on-screen prompts to complete the task. n o C so r e Gmail, Your device allows you to sync contactspfrom Facebook, Corporate Email, and more. ss While your device e l does a great job at joining mostecontacts to reduce r i duplicates, you may have a few duplicates that remain due W to the contact names not matching exactly. Here’s how to n o manually join thoseizcontacts: r e 1: From the home V screen, touch Contacts. dand touch a duplicate contact entry > Menu e 2: Locate z riEdit contact. keyo> t3:hTouch the Menu key > select Join. u a 4: Your device will suggest contacts that are likely to be duplicates of the contact you selected. If for some reason the contact you are looking for is not in the Suggested contacts, simply scroll down to view all of your contacts. Once you locate the contact you would like to join with, select it and touch Done. NOTE: If the device has joined too many contacts to one, you also have the option to separate them. ! ! y nl Personal email Add Personal Email Accounts n n o o l e s r e set up your Your device will provide instant access to your Gmail, Google Contacts, and Google Calendar as soon aspyou Google account during activation. Linking all of your other email addresses to your device is quick and sseasy: e l 1: From the home screen, open the Applications Tray, then touch Email. e ir 2: Follow the prompts on screen and enter the Email address and Password for the account you W would like to add, then n touch Next. o z riExchange. 3: Select the type of email account you’d like to set up by touching POP3, IMAP,eor Vbased on the type of account you select). 4: Enter the pertinent information about your account (this information will vary d e z The required information should be retrieved from the email service provider’s website, and/or company’s IT department. i r When finished, touch Next. ho t 5: Select the frequency with which you would like to check your auemail (Push will deliver your email in real time). Remember, longer frequency intervals will allow you to obtain better battery or life from your device. f l 6: Select the amount of email you would like to synchronize. Larger amounts of email will take up more memory on your a i device. er t a 7: Make your selections for the remaining m fields, then touch Next. 8: Give your account a name (in orderry a to identify it from other accounts on your device) and type your name as you would t like it to be displayed on outgoing iemessages, then touch Done. r pdownload to your device. To add additional accounts, simply touch the Menu key > Your email will automatically o prAdd Account, then follow steps #2-8 again. Accounts > Menu key > nd Gmail to be merged with your other personal and corporate email accounts, you must add If you would likeayour l your Gmail account to the Email application. Otherwise, it will remain separate, within the Gmail app. Adding your a i t n to the Email application essentially provides you with a universal inbox. Gmail account e id f n o C ! ! y nl Bluetooth pairing How to Turn On Bluetooth ® s es 1: From the home screen, touch the Menu Key . 2: Touch Settings. on 3: Touch Wireless & networks. 4: Touch Bluetooth to turn on Bluetooth power. ho t How to Pair your Bluetooth® Headset au \\ Droid With Your or f l a i NOTE: Make sure Bluetooth is ON first. er t 1: From the home screen, touch the Menu a Key . m 2: Touch Settings. y 3: Touch Wireless & networks. ar 4: Touch Bluetooth settings. et ri sure your headset is in 5: Touch Scan for devicesp(make pairing mode). ro p 6: Touch on the device name that you want to pair with (if prompted to enter nda passcode, enter 0000). a 7: Touch againl on the device name to connect to it. ia t n e id f n o C e z i r d V iz r e W l e ir p s r e n n o o l e ! ! y nl Android market • Users can choose among Apps, Games, and Downloads • Choose among a list of featured apps • • y r ta C f n o i n e d nd a l a i t pr o ie r p s es l e ir W n Go straight to highlighted categories o z i • Inside a category, users can explore er free, titles that are Top paid,VTop and Just in d e • For each title, users z i can now see r screenshots osubmitted by developers thto reviews from other users in addition u a r o search so users can easily search New soft f l specific app or game forathe i r •teWithin the downloads tab, users will find all of a m their previously downloaded apps • Since a gmail account is required to browse and download in the Android market, all application downloads are tracked via the gmail account, and not via the mobile number • This enables easy application re-downloads when a customer upgrades or receives a replacement Google handset p s r e n n o o l e ! ! y nl Helpful hints n Google Maps: Latitude – Set-up n o Cut, Copy, and Paste s r e To cut or copy part of the text in a text box, slide open the handset’s keyboard, then hold the shift key, and use the directional key to highlight the needed text. Then touch and hold the text, and select Cut or Copy. 2: To paste the recently cut or copied text, touch and hold the text box you would like to add the text to, and then select Paste. y r ta C f n o i n e d nd a l a i t pr o ie r p r o f l a i er t a m p s and then invite your friends to view your location esor accept their invitations. l Setting up Latitude: ire W 1: From the home screen, touch Maps > Menu Key > n o z Join Latitude. i r e Once you join Latitude, you will see your location, as well V d the GPS located you. Your location will as the lastetime z ivisible to users whom you accept as friends on now be r ho Latitude. t au See where your friends and family are on Google Maps. Don’t worry, your location is not shared unless you agree to it. You need to join Latitude, 1: To cut or copy the entire contents of a text box, just touch and hold the text box, then select either Cut all, or Copy all. . o l e In order to someone’s location, you must first add them as a friend on Latitude. Here’s how: 1: From the Latitude application, touch the Menu Key > Add friends. 2: You can Select from Contacts, or you can Add via email address. Tap the desired option, then either select a contact, or enter an email address and touch Add friends. 3: A sharing request will be sent to your friend. In order to connect, they must confirm you as a friend. ! ! y nl Helpful hints n Watch YouTubeTM Videos in Hi nRes Latitude: View Friends’ Locations so r Your DROID by Motorola comes with YouTube already epreloaded. p Access it quickly by opening the Applications Tab and touching YouTube. ss e l e 1: While a video is loading to play, ir touch Menu Key > W More > Watch in high quality. n o z i r e V YouTubeTM Videos Share d e z Send someone i a link to a video you’re watching. r o 1:th Touch Menu > Share. au2: Address and complete your email, then tap Send. TM Once your friend has confirmed, Latitude allows you to view their location and select several options. Here’s how: 1: Touch a friend’s name to bring up the different actions you can perform. If your contact has updated his/her location, you can select from the following options: Show on map, Chat using Google Talk, Send email, Get Directions, “Sharing options”, Remove this friend. 2: Choose the option you would like to select and touch it. For demonstration purposes, we will choose Get Directions. r o f l a i r efriend’s 4: Touch Go to obtain driving directions to your t location. ma yand on certain mobile NOTE: Latitude is available on your computer r ta . phones, not all mobile devices support latitude. e ri p o r p Latitude: Hide Your Location nd a l > Latitude to show your friend’s list. 1: Touch Menu a i t 2: Touchnyour contact name, then touch Menu > e d i Privacy > Hide your location. f n Co 3: You will see a Google maps window open with your location and your friend’s location. o l e ! ! y nl Helpful hints o l e n n o Set-up Facebook App and Widget Set Searchable Items DROID by Motorola comes with a Facebook App pre -loaded on the phone, enabling you to place a Facebook live widget to your home screen. The widget streams your Facebook contacts updates and allows you to quickly update your status and post with 1 click. The app also enables you to import your Facebook contacts and their details, including their profile picture. You can select the items you want to search on the phone when performing an on- and off-device search (i.e. when typing a search term into the Google search window on your home screen). 1: Touch and hold a blank area of the home screen (ensuring that it has at least two consecutive rows of blank space for the widget). 2: Once the menu pops up, touch Widgets > Facebook. 3: Read the end-user license agreement, and if you are in agreement, touch I agree. or 4: Enter your Facebook Email and Password into the ftext l fields provided, and then touch Login. a i ertime you NOTE: If you don’t want to have to log into the app every t open it, simply tap Remember me. ma y all friends, Sync 5: Select whether you would like to Sync r a then touch Next. tsync, only existing contacts, or Don’t e ri then touch Finish. Your 6: Read the Helpful tips section, p o device will now sync with pryour Facebook contacts. nd a l a i t n e d i f n Co s es W l e ir p s r e 1: From the home screen touch the Menu key > Settings > Search > Searchable items. on iz r e 2: Touch the checkboxes for the items you would like to search. e z i r d V 3: Touch the Home key to return to your home screen. ho t au Set Screen Timeout To preserve battery life, it’s best to set the device’s screen to stay on for the shortest period of time while it is idle. Letting your device “sleep” while you are not using it helps your device’s battery last longer between charges. 1: From the home Screen, touch the Menu Key > Settings. 2: Touch Sound & display > Screen timeout. 3: Touch the time interval that you would like to use. Your device’s display will time out and go into sleep mode if you have not interacted with it for this period of time. 4: Touch the Home key to go back to the home screen. NOTE: To awaken your device from sleep, either slide open the QWERTY keyboard, or press the Power/Unlock button on the top of the device. ! ! y nl Helpful hints Set an Unlock Pattern Take and Send a Photo 1: Press and hold the Camera Key on the right side of your device to activate the camera. 2: Rotate the device to the horizontal position (for landscape orientation) and frame your subject. n n o s r e For security, you can easily set an unlock pattern that only you know, effectively locking and protecting your phone and information. s es W l e ir 1: Press the Menu key > Settings. 3: Press half way on the Camera Key to focus, then press fully to capture the image. 2: on Touch Location & security > Set unlock pattern. iz r e 3: Read the explanation of an unlock pattern on the screen, and then touch Next. 4: Touch the captured image in the top right corner of the screen. e z i r d V 4:.Watch a brief demonstration of how to set an unlock pattern, and then touch Next. 5: Touch SHARE. 6: Touch the method of sharing (Bluetooth, Email, Gmail, Messaging, etc.) then continue following the onscreen prompts to finish the task. p o l e r o f l a i Send a Text Messageter a m 1: From the home screen, touch Messaging. y r 2: Touch New message. ta e ri name of a contact – a 3: In the To box, begin typingpthe ro with contacts matching drop down window willpappear your entry. Find the ndone you want and touch to select. a 4: Type your text l message and touch Send to send. a i t a little flair to your texts by inserting emoticons. To TIP: You cannadd eemoticon into your text, simply touch the Menu key > insertdan i f smiley. Scroll through the different available options and Insert n Cotouch the one you would like to select/insert into the message. ho t Set your own unlock pattern (Connecting at least four au5: dots), then touch Continue. 6: Draw your unlock pattern again (Connecting at least four dots), then touch Confirm. Now, whenever your device times out and goes into sleep mode, it can only be unlocked by entering the correct unlock pattern. NOTE: If the user enters an incorrect unlock pattern 5 times consecutively, they will need to wait 30 seconds before they can try again. Once the correct unlock pattern is entered, you will be taken to your home screen. ! ! y nl Helpful hints OTA Instructions Powering DROID by Motorola On and Off: 1. When you power on the phone for the first time, the Droid set-up wizard will appear on your screen. Touch the Android graphic to begin. 2. Touch Activate and listen to the instructions provided to activate the phone. 3. Touch 1 to program the phone. You will hear music playing while the programming process is taking place. Once the programming is complete, you will hear an audio message letting you know your phone is now activated. You will also see a message on the display saying “Phone is activated!” Touch Next. 4. Complete the set-up wizard to set-up your device. s es p n n o s r e Powering the Phone On: Press and hold the Power/Lock Key to turn the phone on. o l e Powering the Phone Off: Press and hold the Power/Lock Key, then touch Power off to turn the phone off. on iz r e W l e ir V Using the Wireless Web Browser d e z i r To Bypass the Setup Screen The DROID by Motorola is Internet capable – it comes equipped with a full HTML browser and incredible processing power for an amazing Web experience. 1. To bypass this screen, tap the corners of the screen starting from the top left, top right, bottom right, bottom left just above the options that are on the bottom of the screen. r o f l a i er t a m y r a t Manual Programming Instructions ie r 1. When you power on the phone p for the first time, the Droid set-up o wizard will appear on your screen. r ptap 2. To bypass this screen, the corners of the screen starting from the d top left, top right, bottom right, n of the screen.bottom left just above the options that a are on the bottom l then dial ##PROGRAM and touch the call key (green 3. Touch Phone, a i t icon) phone n e the passcode 000000 and touch Verify 4. dEnter 5. fi Enter necessary programming info n o C ho t From the home screen, touch Browser. a1:2:u To enter a specific URL, scroll up and touch the browser bar. 3: Enter the webpage URL you would like to visit and touch Go when complete. How to View Software, PRL and Browser Version 1: From the home screen, touch the Menu key > Settings. 2: Scroll to and touch About phone. 3: Scroll to and touch the information you would like to see. Features/advantage/operation n n Advantages Operation so r e p DROID by Motorola packs a HTML browser, To open the browser s screen: s the speediest processor on the planet and lescreen, touch Browser . 1: From the home Verizon’s lightning-fast 3G network that e ir streams your life just as well as it does your W music and videos. As the Web blasts across To go to a specific web address: n the brilliant 3.7” display, you can’t help but o izWith notice how much of that Website you can see r1: the browser screen open, slide open on your screen. And with DROID’s ability to e the QWERTY keypad. V switch between up to eight different browser djust 2: Type the web address. e windows, all those WWW dot whatevers z i got a whole lot better. 3. Touch Go or press the Return Key. r o th by Motorola Touch the Search by Voice icon Put your thumbs away. DROID u a tell it what you (microphone) on your home screen, then answers on command. You r want and DROID searches Web to find it, o Youthewant speak your search word when prompted. f based on your location. pizza? l aplace two blocks away. Results will display in your browser window. DROID foundia r te a m y r ta Features High-Speed Mobile Browsing GoogleTM Search by Voice C f n o i n e d nd a l a i t ie r p o pr o l e ! ! y nl Features/advantage/operation o l e ! ! y nl n n Features Advantages Operation so r e p No two DROIDs are ever alike once their Download Apps from Apps, Apps, Apps s the Android Market: s owners bring them to life with Google’s 1: From your home le screen, touch Market . thousands of applications and hundreds of e 2: Browse for iran application or game. widgets available on Android Market. Think W the purchase process, if 3: Complete of DROID’s home screen like your own n personalized desktop. Arrange applications o applicable. (You will need a credit card in any way you like, and toggle between your riz account to make a purchase). six most recently opened applications. Ve 4: Touch Install. d NOTE: You will receive a notification when your e z i application is fully downloaded. You can find your r o application in alphabetical order on the h t Applications tab. au DROID by Motorola shows r you everything in Large 3.7” Hi-Res Touch oWeb, sharp detail. Put the streaming video, f Screen l HTML emails, a Maps and more in i Google r widescreen on a brilliant 3.7” display with e t support afor up to 16M colors. With a width of 854m pixels and more than 400,000 pixels y DROID packs twice the pixels of most total, r ta phones. e ri p o pr nd a l a i t n e d i f n Co TM Features/advantage/operation Features Advantages DROID is your witness. You can capture every low-light, fleeting moment in vivid detail with a 5 megapixel camera loaded with the works, like dual-LED flash, Auto Focus and image stabilization. 5MP Camera DVD Quality Video Recorder d e z i the Capture your friends’ latest antics r on 16:9 cinematic display using DROID’s ho t DVD quality video camcorder. au toOne-touch playback and easy uploading orWi-Fi make it YouTube via 3Gfand simple to share. l ia r te a m y ar TM t C f n o i n e d nd a l a i t pr o ie r p ! ! y nl o l e n n Operationso r e p Key on the right 1: Press and hold the Camera s s side of your device tole activate the camera. ire to the horizontal position (for 2: Rotate the device W landscape orientation) and frame your subject. n ohalf way on the Camera Key to focus, 3: Press z i r press fully to capture the image. then e V 1. Press and hold the Camera Key on the right side of your device to activate the camera. 2: Rotate the device to the horizontal position (for landscape orientation) and frame your subject. 3: Touch and drag the tab on the left hand side of the display up – to select video capture. 4: Touch the video record button that appears in the lower left hand side of the display to begin recording. Touch it again to stop recording. Features/advantage/operation Features Advantages DROID lets work and life co-exist in seamless fashion. Work and personal emails and contacts are integrated and pushed directly to you. Stay up to date with your favorite accounts including Exchange & GmailTM Push Email NOTE: Push not supported for MSN® Hotmail, AOL® d e z i etc.. r y r ta o Corporate Calendar pr C f n o i n e d nd a l a i t ie r p o f l a i er t a r o th au m DROID by Motorola lets you keep up with your corporate calendar too! Set up new events, see calendar reminders, and more. You can even add the Corporate Calendar as a widget to your home screen. ! ! y nl o l e n n Operationso r e p In addition to Gmail, yoursdevice supports the esPOP3, IMAP and following account types: l re Corporate Sync i(Exchange). To set up anW email account: n othe home screen, touch the 1: From z i r Applications Tab. e V 2: Touch Email. 3: Follow the on-screen prompts to complete the setup. NOTE: If syncing corporate mail, you will need your Exchange Server name and your Domain. Once you have set up your email sync, your corporate contacts and calendar will also automatically sync. If you would like your Gmail to be merged with your other personal and corporate email accounts, you must add your Gmail account to the Email application. Otherwise, it will remain separate, within the Gmail app. Adding your Gmail account to the Email application essentially provides you with a universal inbox. When you set up your corporate email (Exchange) account within the Email application, your Corporate Calendar will automatically be set up as well. However, you will need to launch the Corporate Calendar application to initiate first sync after you’ve set up your corporate email account. Features/advantage/operation Features DROID by Motorola consolidates your personal, corporate, and even Facebook contacts in one place…so you never miss a family member or friend! ed Threaded Messaging t C f n o i n e d nd a l a i t pr o ie r p V iz r The DROID by Motorola organizes your text ho you t messages by contact and provides a true u a chat-like view of your conversations. Read r your sent message along your friend’s fo thewith reply so you canl follow flow and not miss a beat. Easilyia follow the flow of multiple r conversations at e once and effortlessly keep t your mailbox organized. ma y r a o l e n n Operation so r pe Your Gmail contactsswill be synced s automatically. le Your corporate irecontacts will be synced (if W when you set up your you so choose) n o email account. corporate z i erYour Facebook contacts will be synced (if Advantages Integrated Contacts ! ! y nl you so choose) when you set up the Facebook application. 1: From the home screen, touch Messaging. 2: Touch New message. 3: In the To box, begin typing the name of a contact – a drop down window will appear with contacts matching your entry. Find the one you want and touch to select. 4: Type your text message and touch Send. TIP: You can add a little flair to your texts by inserting emoticons. To insert an emoticon into your text, simply touch the Menu key > Insert smiley. Scroll through the different available options and touch the one you would like to select/insert into the message.