1
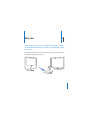
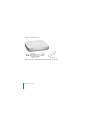
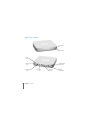
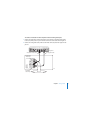
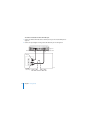
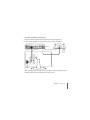
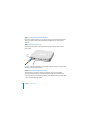
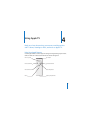
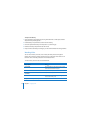
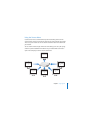
Apple TV User’s Guide K Apple Computer, Inc. © 2007 Apple Computer, Inc. All rights reserved. Under the copyright laws, this manual may not be copied, in whole or in part, without the written consent of Apple. The Apple logo is a trademark of Apple Computer, Inc., registered in the U.S. and other countries. Use of the “keyboard” Apple logo (Option-Shift-K) for commercial purposes without the prior written consent of Apple may constitute trademark infringement and unfair competition in violation of federal and state laws. Every effort has been made to ensure that the information in this manual is accurate. Apple is not responsible for printing or clerical errors. Apple 1 Infinite Loop Cupertino, CA 95014-2084 408-996-1010 www.apple.com Apple, the Apple logo, AirPort, iLife, iPhoto, iTunes, Mac, Macintosh, Mac OS, and QuickTime are trademarks of Apple Computer, Inc., registered in the U.S. and other countries. Apple Store is a service mark of Apple Computer, Inc., registered in the U.S. and other countries. iTunes Store is a service mark of Apple Computer, Inc. Intel and Intel Core are trademarks of Intel Corp. in the U.S. and other countries. PowerPC™ and the PowerPC logo™ are trademarks of International Business Machines Corporation, used under license therefrom. Other company and product names mentioned herein may be trademarks of their respective companies. Mention of third-party products is for informational purposes only and constitutes neither an endorsement nor a recommendation. Apple assumes no responsibility with regard to the performance or use of these products. Contents 5 6 7 8 Chapter 1: Welcome Apple TV Components What You Need to Set Up Apple TV Apple TV at a Glance 11 Chapter 2: Getting Started 12 Setting Up Apple TV 17 Configuring Apple TV 19 19 20 23 24 Chapter 3: Managing Your Content Importing Content into iTunes Adding Movies, TV Shows, and Music Adding Podcasts Importing and Syncing Photos 27 27 30 33 Chapter 4: Using Apple TV Using Your Apple Remote Watching Video Listening to Music, Audiobooks, and Podcasts 3 35 Viewing Photos 36 Changing Apple TV Settings 37 Using the Sources Menu 39 Chapter 5: Tips and Troubleshooting 43 Apple TV Status Light 45 Chapter 6: Learning More, Service, and Support 46 Finding Your Apple TV Serial Number 46 Important Care and Cleaning Information 4 Contents 1 Welcome 1 Congratulations on purchasing Apple TV. Read this section to learn about the features of Apple TV and what you need to set it up. Buy movies, TV shows, music, and more from the iTunes Store, organize it all in your iTunes library, and enjoy it on Apple TV. 5 Apple TV Components M U EN AC power cord Apple Remote Note: Your power cord may look different from the one pictured here. 6 Chapter 1 Welcome What You Need to Set Up Apple TV  A Macintosh computer with:  Mac OS X system software version 10.3.9, or 10.4.8 or later  1 GHz Power PC G4 or G5, or an Intel processor  QuickTime 7.1.5 or later  256 MB RAM  16 MB video RAM, or  A Windows-based computer with:  Windows XP (Home or Professional, with SP2)  2.0 GHz Pentium processor or better  QuickTime 7.1.5 or later (included with iTunes 7.1)  512 MB RAM  32 MB video RAM  iTunes 7.1 or later, which you can download from www.apple.com/itunes/download  A widescreen, enhanced definition (ED), or high definition (HD) TV with an HDMI, DVI, or component video port and analog audio or optical digital audio ports  An HDMI, HDMI-to-DVI, or component video cable and analog or optical digital audio cables (see “Connecting the cables” on page 12)  An Ethernet or wireless network and a broadband Internet connection (DSL/Cable/LAN)  An iTunes account and iTunes content, such as movies, TV shows, and music, is recommended Chapter 1 Welcome 7 Apple TV at a Glance IR receiver Status light d USB port d G £ Power port G Ethernet port 8 Chapter 1 Welcome video L £ HDMI port audio R optical audio Component video ports Optical digital audio port Analog audio ports Status light The status light blinks amber when Apple TV starts up. When Apple TV is on, the status light is solid white. For more information about the status light, see “Apple TV Status Light” on page 43. IR receiver Use with the included Apple Remote to control Apple TV. ≤ Power port Plug the included AC power cord into Apple TV. d USB port For service and diagnostics. Z Built-in WiFi/AirPort wireless Connect Apple TV to your wireless network. G Ethernet port If you connect to your network using Ethernet, connect an Ethernet cable. £ HDMI port Connect Apple TV to a widescreen TV that has an HDMI port using an HDMI cable, or a DVI port using an HDMI-to-DVI cable. Component video ports Connect Apple TV to a widescreen TV that has component video (Y, Pb, and Pr) ports, using a component video cable with green, blue, and red connectors. Analog audio ports Connect Apple TV to a widescreen TV or home theater receiver with analog audio ports (red and white), using an analog audio cable. Optical digital audio port Connect Apple TV to a home theater receiver that has an optical digital audio port, using an optical digital audio (also called S/PDIF or TOSLINK) cable. Chapter 1 Welcome 9 2 Getting Started 2 Use the information in this chapter to set up and configure Apple TV. To get started you need to:  Connect audio and video cables to Apple TV and your widescreen TV or home theater receiver  Connect Apple TV to your wireless or Ethernet network  Install the latest version of iTunes on your computer  Sync the content of your iTunes library with Apple TV You can connect Apple TV to a widescreen TV that has:  An HDMI port using an HDMI cable for both video and audio  Component video (Y, Pb, and Pr) ports using a component video cable with green, blue, and red connectors, and an audio cable  A DVI port using an HDMI-to-DVI cable for video and an audio cable You can also connect Apple TV to a home theater receiver. Important: Read all of the following installation instructions and the safety information in the included Apple TV Safety and Regulatory Compliance Information booklet carefully before you plug Apple TV into a power outlet. 11 Setting Up Apple TV Before you begin, look at the back of your TV or receiver and find the audio and video ports. Make sure you have the appropriate cables for your setup. Step 1: Connecting the cables Choose the setup that matches the ports on your TV or receiver. To connect a widescreen TV with an HDMI port: 1 Connect one end of an HDMI cable to the back of your TV. 2 Connect the other end to the back of Apple TV. d G £ video L audio R optical audio Apple TV HDMI port HDMI cable TV HDMI port 12 Chapter 2 Getting Started To connect a widescreen TV with component video and analog audio ports: 1 Connect the green, blue, and red connectors on one end of a component video cable to the Y, Pb, and Pr ports on your TV and the connectors on the other end to Apple TV. 2 Connect an analog audio cable, with red and white connectors, between Apple TV and your TV. d G £ video L audio R optical audio Apple TV Component video cable Analog audio cable Component video input Y Pb Pr AUDIO L R TV Analog audio input Chapter 2 Getting Started 13 To connect a widescreen TV with a DVI video port 1 Connect an HDMI-to-DVI video cable to the DVI port on your TV and the HDMI port on Apple TV. 2 Connect an optical digital or analog audio cable between your TV and Apple TV. d G £ video L audio R optical audio Apple TV HDMI-to-DVI cable HDMI port Analog audio cable DVI port AUDIO L R TV Analog audio input 14 Chapter 2 Getting Started To connect a widescreen TV and a receiver: 1 Connect an HDMI or component video cable between your TV and Apple TV. 2 Connect an optical digital or analog audio cable to your receiver and Apple TV. Speakers d G £ video L audio R optical audio Apple TV HDMI port HDMI cable Optical digital audio port Home theater receiver TV HDMI port Note: Alternatively, you can connect a video cable between Apple TV and your receiver and then connect a video cable between your receiver and TV. Chapter 2 Getting Started 15 Step 2: Connect an Ethernet cable (optional) If you have a wireless network, you can skip this step. If you have an Ethernet network, connect an Ethernet cable from your network to the Ethernet port on the back of Apple TV. Step 3: Connect the power cord Plug one end of the power cord into the back of Apple TV and the other end into a power outlet. Power port d G £ video L audio R optical audio Important: Don’t place anything on top of Apple TV. Objects placed on top may cause interference with the wireless signal. Step 4: Turn on your TV and select the input The first time you use Apple TV it takes you through a series of steps including choosing a language, selecting a network, configuring Apple TV to work with your network if necessary, and connecting to iTunes. Simply follow the onscreen instructions as you refer to the following section. 16 Chapter 2 Getting Started Note: If you see just a black screen the first time you use Apple TV, make sure the input you’ve selected on your TV matches the input you’ve plugged the cables into on your TV or receiver. If the input matches, you might need to select a screen resolution your TV supports. See “Tips and Troubleshooting” on page 39, and see the documentation that came with your TV for information about its inputs. Configuring Apple TV Apple TV helps you select and configure your wireless network connection, choose a language, and connect to iTunes on your computer. You’ll also update the iTunes software on your computer to the latest version. Connecting to Your Wireless Network Apple TV will help you connect to your wireless network. If you use a password to access your network, have it ready. Use the Apple Remote to enter:  Your network from the list, or enter your network name if the network is hidden  Your password (if you have one)  Your IP address, subnet mask, router, and DNS address (if you’re manually configuring your network) To connect to your wireless network, follow the onscreen instructions. Note: If you connect to a wired Ethernet network using DHCP, Apple TV automatically detects your network. If you don’t connect using DHCP, you may have to enter your IP address, subnet mask, router, and DNS addresses. Choose a language, and then go to “Updating Your iTunes Software” in the next section. Chapter 2 Getting Started 17 Updating Your iTunes Software To use Apple TV, you need iTunes 7.1 or later installed on your computer. You can download the latest version of iTunes at www.apple.com/itunes/download. On a Mac, you can also use Software Update to update to the latest version of iTunes. To use Software Update, choose Apple () > Software Update. To use iTunes 7.1 on a Mac, you need to update your system software to Mac OS v10.3.9, or 10.4.8 or later and update to QuickTime 7.1.5. On a Windows-based computer, you can also go to iTunes Help to update to the latest version of iTunes. Open iTunes, and then choose Help > iTunes Help > check for updates. To use iTunes 7.1 on a Windows-based computer, you need to be running Windows XP. Connecting to iTunes After you set up your network connection, your TV screen displays a five-digit passcode, which you’ll need to enter in iTunes to sync or stream content to Apple TV. To set up Apple TV with your iTunes library: 1 Open iTunes on your computer. 2 Select the Apple TV icon with “Click to set up” next to it in the Devices list. 3 Enter the 5-digit passcode from your TV screen. After you enter your passcode, you can name your Apple TV and set up iTunes to manage your content. 18 Chapter 2 Getting Started 3 Managing Your Content 3 Use iTunes to manage the movies, TV shows, music, and other content you purchase and download from the iTunes Store. Organize your content in iTunes and watch or listen to it on Apple TV. On Apple TV you can watch or listen to:  Movies and TV shows you purchase from the iTunes Store  Music in your iTunes library  Audio and video podcasts you download or subscribe to in iTunes  Audiobooks you purchase from the iTunes Store  Slideshows with music and photo albums from your photo library Importing Content into iTunes To purchase movies, TV shows, music, and other content from the iTunes Store, set up an account in iTunes, find the items you want, and then buy them. They’re automatically downloaded to the iTunes library on your computer. If you already have an Apple account, or if you have an America Online (AOL) account (available in some countries only), use that account to sign in to the iTunes Store and buy content. For more information about iTunes, open iTunes and choose Help > iTunes Help. 19 Adding Movies, TV Shows, and Music You can set up iTunes to add content to Apple TV in the following ways:  Automatically sync content  Sync selected content  Stream content Automatically Syncing Content Syncing is the simplest way to add content to Apple TV. Syncing copies content from your iTunes library and stores it on Apple TV. By default, iTunes automatically syncs your content to Apple TV. Your computer doesn’t have to be on to view content you sync to Apple TV. If you have a slow network, syncing is recommended. Content is synced to Apple TV in this order:  Movies  TV shows  Music  Podcasts  Photos If your movies and TV shows fill Apple TV, for example, your music, podcasts, or photos are not added. Content is removed from Apple TV in reverse order, as needed. Syncing a new movie might result in photos and podcasts being removed from Apple TV. 20 Chapter 3 Managing Your Content To sync content: 1 On your computer, open iTunes and select Apple TV in the Devices list. 2 Choose the content you want to sync from the Movies, TV Shows, Music, or other tabs. iTunes automatically syncs content whenever iTunes is open and Apple TV is on. To turn off syncing: 1 On Apple TV, choose Sources in the main menu. 2 Select Syncing > Turn Off Syncing. To sync Apple TV to a different iTunes library: 1 On Apple TV, choose Sources in the main menu. 2 Select Syncing > Change iTunes Library. Content from the new iTunes library replaces the content that was on Apple TV. Syncing Selected Content Setting iTunes to sync selected content to Apple TV is useful if you have more content in your iTunes library than fits on Apple TV. Only the content you specify is synced to Apple TV. You can sync your most recent movie purchases or only movies you haven’t watched, or create an iTunes playlist and sync that playlist. To set iTunes to sync unwatched content: 1 On your computer, open iTunes and select Apple TV in the Devices list. 2 Click a tab, for example, Movies. 3 Select “Sync: … unwatched movies” and choose the number you want from the pop-up menu. 4 Click Apply. Chapter 3 Managing Your Content 21 To set iTunes to sync selected content: 1 On your computer, open iTunes and select Apple TV from the Devices list. 2 Click a tab, for example, Movies. 3 Select “Sync movies.” 4 Choose “Selected Movies” or “Selected Playlists” from the pop-up menu. 5 Select the movies or playlists you want. 6 Click Apply. Streaming Content When you stream content, it isn’t stored on Apple TV. Streaming carries the content over your local network while you watch or listen to it. You can browse all of your content, no matter how large an iTunes library you have. You can stream content from up to five iTunes libraries on your local network, in addition to the iTunes library Apple TV is synced with. However, you can stream from only one iTunes library at a time. To stream content to Apple TV: 1 Open iTunes on the computer you want to stream from. 2 On Apple TV, choose Sources from the main menu. 3 Choose “Connect to New iTunes” and make a note of the passcode displayed. 4 In iTunes, select the Apple TV icon with “Click to set up” next to it. 5 Enter the passcode. While content is being streamed, the computer must remain on and iTunes must remain open. 22 Chapter 3 Managing Your Content Note: The time it takes to begin viewing streaming video on Apple TV is dependent upon your network speed. To stream content from a different library that’s been set up for streaming, go to the Sources menu on Apple TV and then choose another library. If Apple TV is synced with an iTunes library, it is already set up to stream content from that library. Adding Podcasts Listen to audio podcasts or watch video podcasts from your iTunes library on Apple TV. Most podcasts are free, and you can download or subscribe to them from the iTunes Store. You don’t need an iTunes Store account to download or subscribe to podcasts. The settings for adding podcasts to Apple TV are unrelated to the settings for adding music. Podcast settings don’t affect song settings, and vice versa. Set iTunes to automatically sync all podcasts or selected podcasts. To set iTunes to automatically sync podcasts: 1 In iTunes, select the Apple TV icon in the Devices list. 2 Click the Podcasts tab. 3 In the Podcasts pane, select “Sync … episodes of” and choose the number of episodes you want in the pop-up menu. 4 Click “All podcasts” or “Selected podcasts.” If you click “Selected podcasts,” also select the podcasts in the list that you want to sync. 5 Click Apply. You can also stream podcasts from an iTunes library that you’ve set up for streaming. Chapter 3 Managing Your Content 23 Importing and Syncing Photos Import digital photos to your computer and sync them to Apple TV. View photos individually or as a photo slideshow. Read this section to learn how. To import photos to a Mac using iPhoto: 1 Connect the camera or photo card reader to your computer. 2 Open iPhoto if it doesn’t open automatically. 3 Click Import. Images are imported into iPhoto. You can import other digital images into iPhoto, such as images you download from the web. For information about importing and working with photos and other images, open iPhoto and choose Help > iPhoto Help. iPhoto is available for purchase as part of the iLife suite of applications at www.apple.com/ilife. iPhoto might already be installed on your Mac, in the Applications folder. If you don’t have iPhoto, import photos using Image Capture. To import photos to a Mac using Image Capture: 1 Connect the camera or photo card reader to your computer. 2 Open Image Capture if it doesn’t open automatically. 3 To choose specific items to import, click Download Some. Or to download all items, click Download All. To import photos to a Windows PC: m Follow the instructions that came with your digital camera or photo application. 24 Chapter 3 Managing Your Content Syncing Photos to Apple TV You can sync photos to Apple TV from iPhoto or from a folder on your hard disk. If you have a Mac and iPhoto 4.0.3 or later, you can add iPhoto albums automatically. If you have a Windows PC and Adobe Photoshop Album 2.0 or later, or Adobe Photoshop Elements 3.0 or later, you can sync photo collections automatically. You can’t stream photos to Apple TV. To sync photos from a Mac or Windows PC to Apple TV using a photo application: 1 In iTunes, select the Apple TV icon in the Devices list. 2 Click the Photos tab. 3 Select “Sync photos from: . . .”  On a Mac, choose iPhoto from the pop-up menu.  On a Windows PC, choose Photoshop Album or Photoshop Elements from the pop-up menu. Note: Some versions of Photoshop Album and Photoshop Elements don’t support collections. You can still use them to sync all your photos. 4 If you want to sync all your photos, select “All photos and albums.” If you want to sync photos from only some albums or collections, select “Selected albums” and select the albums or collections you want. 5 Click Apply. Chapter 3 Managing Your Content 25 To sync photos from a folder on your hard disk to Apple TV: 1 Drag the images you want into a folder on your computer. If you want images to appear in separate photo albums on Apple TV, create folders inside the main image folder, and drag images into the new folders. 2 In iTunes, select the Apple TV icon in the Devices list. 3 Select “Sync photos from: . . .” 4 Choose “Choose Folder” from the pop-up menu and select your image folder. 5 Click Apply. To delete photos from Apple TV: 1 In iTunes, select the Apple TV icon in the Devices list and click the Photos tab. 2 Select “Sync photos from: . . .”  On a Mac, choose iPhoto from the pop-up menu.  On a Windows PC, choose Photoshop Album or Photoshop Elements from the pop-up menu. 3 Choose “Selected albums” and deselect the albums or collections you want to delete. 4 Click Apply. 26 Chapter 3 Managing Your Content 4 4 Using Apple TV Read on to learn about using your remote, watching movies and TV shows, listening to music, and more on Apple TV. Using Your Apple Remote Use the Apple Remote to control Apple TV settings and navigate through your content. Make sure there are no obstructions between the remote and Apple TV. Menu up/scroll IR window Previous/Rewind Next/Fast-forward MENU Menu down/scroll Select/Play/Pause Menu Battery compartment 27 Pairing Apple TV with a Remote The Apple Remote works with the built-in IR receiver on Apple TV. You can set Apple TV to work only with the included remote by pairing Apple TV and the remote. To pair Apple TV with the included remote: 1 Choose Settings from the Apple TV main menu. 2 Choose Pair Remote Control. You can also press and hold » and ‘ for 6 seconds to pair Apple TV and the remote. When you’ve successfully paired your Apple Remote, Apple TV displays a chainlink ( ) symbol above a picture of a remote. Apple TV now works only with the paired remote. Unpairing Apple TV with a Remote If you lose the Apple Remote that you paired with Apple TV, you can use any Apple Remote to unpair Apple TV from the lost remote by pressing and holding » and ] for 6 seconds. You can also follow these steps. To unpair Apple TV with a previously paired remote: 1 Choose Settings from the Apple TV main menu. 2 Choose Unpair Remote. When you’ve successfully unpaired the lost remote, Apple TV displays a broken chainlink ( ) symbol above a picture of a remote. You can now pair Apple TV with a new remote. 28 Chapter 4 Using Apple TV Basic Remote Functions Your Apple Remote has a few basic functions described below. To Do this Move through the menu options Press ∂ or D Select an option from a menu Press ’ Return to a previous menu Press » Return to the main menu Press and hold » Put Apple TV in standby mode Press and hold ’ for about 6 seconds Reset Apple TV Press and hold » and D for about 6 seconds Changing the Remote Battery When the battery charge in your Apple Remote is low, Apple TV displays a picture of a remote and a warning (·) symbol. Replace the battery with a CR2032 battery. Press this button with a small object. M EN U Positive (+) side faces up. Pull the battery compartment free. Chapter 4 Using Apple TV 29 To replace the battery: 1 Open the battery compartment by pressing the button with a small object until the compartment is partially ejected. 2 Pull the battery compartment out and remove the battery. 3 Insert the replacement battery with the positive (+) side facing up. 4 Reinsert the battery compartment into the remote. 5 Dispose of the used battery according to your local environmental laws and guidelines. Watching Video You can watch movies, TV shows, music videos, and video podcasts on Apple TV. Movies and TV shows are in their respective menus on Apple TV. Music videos are in the Music menu and video podcasts are in the Podcasts menu. To watch video, use the remote as described below. 30 To Do this Play or pause Press ’ Fast forward Press and hold ‘ to fast forward; press ‘ again to increase the fast-forward speed Move forward or back in slow motion Press ’ and then press and hold ‘ or ] Skip forward or back in 10 second increments Press ’ and then press ‘ or ] Rewind Press and hold ] to rewind; press ] again to increase the rewind speed Skip to the next or previous chapter Press ‘ or ] Chapter 4 Using Apple TV Movies In the Movie menu, you have a choice of watching:  Previews of movies available on the iTunes Store  Trailers of movies in theaters  Movies in your iTunes library that you sync or stream to Apple TV Movies are listed by title. Use ∂ or D on the remote to choose a movie. You’ll see the title and other information about the movie. Press ’ to watch the movie. TV Shows Purchase and download your favorite TV shows from the iTunes Store and watch them on your TV. In the TV Shows menu, you have a choice of watching:  Previews of TV shows available on the iTunes Store  TV shows in your iTunes library that you sync or stream to Apple TV You can choose your TV shows by the date they were downloaded or by the title. Press ‘ or ] on the remote to toggle between viewing by date or by show. When you choose a TV show, you’ll see the title and other information about the show. Press ’ to watch the show. Chapter 4 Using Apple TV 31 Music Videos You can purchase your favorite music videos from the iTunes store and watch them on Apple TV. To watch music videos: 1 Choose Music from the Apple TV menu. 2 Choose Music Videos, and then select a music video. 3 Press ’ on the remote to watch the music video. Video Podcasts You can watch the video podcasts in your iTunes library on Apple TV. Most podcasts are free and you can download or subscribe to them from iTunes. To watch video podcasts: 1 Choose Podcasts from the Apple TV menu, and then choose a show. 2 Choose an episode to play. 3 Press ’ on the remote to watch the podcast. If the podcast you’re watching has chapters, press ‘ to skip to the next chapter in the podcast or press ] to skip to the beginning of the current chapter. Note: You don’t need an iTunes Store account to download or subscribe to podcasts. For information about podcasts, open iTunes and choose Help > iTunes Help. Then search for “podcasts.” 32 Chapter 4 Using Apple TV Listening to Music, Audiobooks, and Podcasts Import songs and other audio into your iTunes library on your computer and listen to them on Apple TV. You can also listen to audiobooks purchased from the iTunes Store and audio podcasts. To listen to music and other audio, use the remote as described below. To Do this Play or pause a song, audiobook, or podcast Press ’ Skip to the next song Press ‘ Fast forward though a song, audiobook, or podcast Press and hold ‘ Rewind a song, audiobook, or podcast Press and hold ] Skip to the next song Press ‘ Restart a song or play the previous song Press ] to restart a song; press ] twice to skip to the previous song From the Music menu, you can choose songs by playlist, artist, album, song, genre, or composer. To listen to songs in random order, select Shuffle Songs. Viewing Album Artwork By default, iTunes displays album artwork on Apple TV. If artwork is available, you’ll see it on Apple TV when you play music from the album. For information about album artwork, open iTunes and choose Help > iTunes Help. Chapter 4 Using Apple TV 33 Audiobooks To listen to audiobooks that you purchased from the iTunes store, choose Audiobooks in the Music menu. If you stop listening to an audiobook on Apple TV and go back to it later, the audiobook begins playing from where you left off. If the audiobook you’re listening to has chapters, you can press ‘ on the remote to skip to the next chapter. Press ] on the remote to skip to the beginning of the current chapter or to the previous chapter in the audiobook. Note: Audiobooks from sources other than the iTunes Store don’t work with Apple TV. Audio Podcasts You can listen to the audio podcasts in your iTunes library on Apple TV. Most podcasts are free in iTunes and you don’t need an iTunes Store account to download or subscribe to them. To listen to an audio podcast: 1 Choose Podcasts from the Apple TV menu, and then choose a podcast. 2 Choose an episode to play. 3 Press ’ on the remote to listen to the podcast. During an audio podcast, the screen displays the episode, name of the show, author or provider, along with elapsed and remaining time. If the podcast includes artwork, you’ll see it onscreen. Podcast artwork can change during an episode, so you might see several pictures during the podcast. 34 Chapter 4 Using Apple TV If the podcast you’re watching has chapters, press ‘ to skip to the next chapter or press ] to skip to the beginning of the current chapter. For information about podcasts, open iTunes and choose Help > iTunes Help. Then search for “podcasts.” Viewing Photos View photos on Apple TV as albums or as a slideshow with music. To view photos on Apple TV: 1 Choose Photos from the Apple TV menu. 2 Choose the album or slideshow you want to view. 3 Press ’ on the remote to watch the slideshow. To view photos or watch a slideshow, use the remote as described below. To Do this Play or pause a slideshow Press ’ Skip to the next photo Press ‘ Skip back to the previous photo Press ] Chapter 4 Using Apple TV 35 Changing Apple TV Settings Use the Settings menu to manage Apple TV settings. 36 Choose To do this About View the name of your Apple TV, as well as the available space, the serial number, information about your TV connection and resolution, and more TV Resolution Select a screen resolution your TV supports Network View, configure, or change your Ethernet or wireless network settings Screen Saver Choose the type of screen saver and how quickly it turns on Sound Check Turn sound check on to adjust the volume of the music on Apple TV so that it’s all at the same level Sound Effects Turn sound effects on to hear sounds from Apple TV when you’re clicking through menus, for example Repeat Music Turn repeat music on or off Pair Remote Pair or unpair your Apple Remote with Apple TV Update Software See if any updates are available for Apple TV Language Choose a language Legal View the legal requirements for Apple TV Reset Settings Reset Apple TV to its original settings Chapter 4 Using Apple TV Using the Sources Menu Use the Sources menu to switch between synced and streaming content. To view synced content, choose Sources from the Apple TV main menu, and then select Apple TV to access your content. You can also stream content from other iTunes libraries on your network. You can stream content to Apple TV from the iTunes library you’ve set up for syncing and from up to five additional iTunes libraries on your network. Make sure iTunes is open on the computer you want to stream content from. Synced iTunes library Streaming iTunes library 1 Streaming iTunes library 2 Streaming iTunes library 5 Streaming iTunes library 3 Streaming iTunes library 4 Chapter 4 Using Apple TV 37 To stream content from another iTunes library: 1 Select “Connect to New iTunes” from the Apple TV Sources menu. 2 Make a note of the passcode on your TV screen. 3 Open iTunes on your computer. 4 Select the Apple TV icon with “Click to set up” next to it in the Devices list. 5 Enter the 5-digit passcode from your TV screen. Choose Sources from the Apple TV main menu, and then select the name of the iTunes library you want to access. 38 Chapter 4 Using Apple TV 5 Tips and Troubleshooting 5 Most problems with Apple TV can be solved quickly by following the advice in this chapter. When you have a problem with Apple TV, there’s usually a quick and simple solution. First, make sure:  The audio and video cables between Apple TV and your TV are pushed in all the way.  The power cords for Apple TV and your TV are securely connected to a working power source.  Your TV is turned on and switched to the correct input.  Apple TV is connected to the network. Go to the Settings menu on Apple TV, select Network, and see if Apple TV has an IP address.  Your network and Internet connections are on and working properly. If you are still having trouble, you can try to reset your equipment by unplugging Apple TV, your TV, your wireless networking equipment or AirPort Base Station, and your router from the power outlet. Wait 30 seconds and then plug everything back in again. 39 If your TV screen appears fuzzy or black:  Make sure you’re using the correct video cables (see page 12) and that they are connected firmly to Apple TV and to your TV.  Make sure the input setting you’ve selected on your TV matches the input you have your video cables connected to. See the documentation that came with your TV for more information. If your TV screen still appears fuzzy or black, you may need to select a video mode your TV supports. To select a video mode: 1 Press and hold both » and ∂ on the Apple Remote for about 6 seconds. Apple TV cycles through display resolutions. 2 When Apple TV reaches an acceptable display resolution and “If you can see the Apple logo, select OK” appears on your TV screen, press ’. If you can see a picture but Apple TV isn’t responding:  Press and hold » on the Apple Remote to return to the Apple TV main menu.  Reset Apple TV by unplugging it from the power outlet, waiting about five seconds, and plugging it in again. You can also press and hold both » and D on the Apple Remote for about 6 seconds to reset Apple TV. Your movies and other content will remain on Apple TV.  Make sure your TV is turned on and functioning correctly. See the documentation that came with your TV for more information.  If you paired an Apple Remote with Apple TV, make sure you’re using the paired remote. See “Pairing Apple TV with a Remote” on page 28. 40 Chapter 5 Tips and Troubleshooting If you can’t hear sound:  If Apple TV is connected to a receiver, make sure the receiver is turned on.  Make sure the input setting you’ve selected on your receiver matches the input you have your audio cables connected to. See the documentation that came with your receiver for more information.  Make sure the volume on your TV or receiver is turned up and isn’t muted.  Make sure you’re using the correct audio cable (see page 12) and that it’s connected firmly to Apple TV and to your TV.  If you’re connected to the HDMI port on your TV and Apple TV, make sure your TV supports audio through its HDMI port. The HDMI ports on some older TVs support only video. If the remote isn’t working:  If you’ve paired Apple TV and an Apple Remote, make sure you’re using the paired remote:  If you’re using the paired remote and the Apple TV status light flashes white, the problem isn’t with the remote. See “If you can see a picture but Apple TV isn’t responding:” on page 40.  If you’re using an unpaired remote, the Apple TV status light flashes amber.  If you’ve paired Apple TV and an Apple Remote, and you can’t find the paired remote, set Apple TV to work with any remote by pressing and holding » and ] for 6 seconds.  Point the remote directly at Apple TV.  Make sure the IR receiver on the front of Apple TV isn’t blocked. Chapter 5 Tips and Troubleshooting 41  If Apple TV displays a picture of a remote and a warning (·) symbol, you need to replace the battery in the remote. See “Changing the Remote Battery” on page 29. If Apple TV doesn’t appear in iTunes:  Make sure Apple TV is turned on and connected to your network. Go to the Settings menu on Apple TV, select Network, and see if Apple TV has an IP address.  Choose Preferences in iTunes, click Apple TV, and make sure “Look for Apple TVs” is selected.  If Firewall is on (in the Sharing pane of System Preferences), make sure “Apple TV Sharing” is selected to allow content to pass through the firewall. If other Apple TVs show up periodically in your iTunes Devices list:  This means that iTunes has found other Apple TVs on your network.  To prevent this, choose Preferences in iTunes, click Apple TV, and make sure “Look for Apple TVs” is not selected. If Apple TV isn’t playing your photo albums or slideshows:  Make sure you have photos in your photo library or in a folder on your computer. See “Syncing Photos to Apple TV” on page 25. If Apple TV still doesn’t respond, try restoring it to the original factory settings:  Press and hold both » and D on the Apple Remote for 6 seconds or until the status light blinks amber.  Choose a language.  Choose Factory Restore. During a factory restore, the progress indicator (a spinning gear) may spin for a while, so be patient. 42 Chapter 5 Tips and Troubleshooting Apple TV Status Light Apple TV has a status light on the front that indicates what’s happening. If Apple TV is The status light On Is solid white Off or in standby Is off Starting up Blinks amber Accepting a command from the remote Flashes white once Rejecting a command from the remote (you’ve paired a remote with Apple TV but you’re using a remote that’s not paired) Flashes amber once Having problems, refer to “Obtaining warranty service” on page 45 Alternates between white and amber Chapter 5 Tips and Troubleshooting 43 6 Learning More, Service, and Support 6 More information about using Apple TV is available in onscreen help and on the web. The following table describes where to get software and service information. To learn about Do this Service and support, discussions, tutorials, and Apple software downloads Go to: www.apple.com/support/appletv Using iTunes Open iTunes and choose Help > iTunes Help. For an onscreen iTunes tutorial (available in some areas only), go to: www.apple.com/support/itunes Using iPhoto (in Mac OS X) Open iPhoto and choose Help > iPhoto Help. The latest Apple TV information Go to: www.apple.com/appletv Safety and regulatory compliance information See the Apple TV Safety and Regulatory Compliance Information booklet that comes with Apple TV. Obtaining warranty service First follow the advice in this booklet, the Apple TV Safety and Regulatory Compliance Information booklet, the onscreen help, and online resources. If the unit still doesn’t function, go to www.apple.com/support/appletv for information about how to obtain warranty service. Registering Apple TV Go to: www.apple.com/register 45 Finding Your Apple TV Serial Number The serial number is printed on the bottom of Apple TV. You can also find the serial number in the Apple TV Settings menu. On Apple TV, choose Settings > About. Important Care and Cleaning Information WARNING: Failure to follow these care and cleaning instructions could result in damage to Apple TV or other property. Using Connectors and Ports Never force a connector into a port. Check for obstructions on the port. If the connector and port don’t join with reasonable ease, they probably don’t match. Make sure that the connector matches the port and that you have positioned the connector correctly in relation to the port. Keeping Apple TV Within Acceptable Temperatures Operate Apple TV in a place where the temperature is always between 0º and 40º C (32º to 104º F). Keeping the Outside of Apple TV Clean To clean Apple TV, unplug the power cord and all cables. Then use a soft, slightly damp, lint-free cloth. Avoid getting moisture in openings. Don’t use window cleaners, household cleaners, aerosol sprays, solvents, alcohol, ammonia, or abrasives to clean Apple TV. 46 Chapter 6 Learning More, Service, and Support Disposing of Apple TV Properly For information about the proper disposal of Apple TV, and other important regulatory compliance information, see the Apple TV Safety and Regulatory Compliance Information booklet. Chapter 6 Learning More, Service, and Support 47