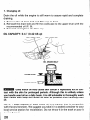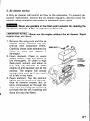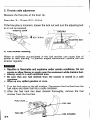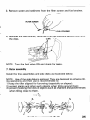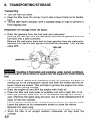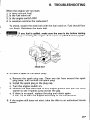
1
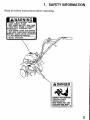
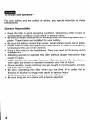
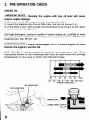
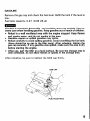
Thank
you for purchasing
a Honda
tiller.
This manual covers operation and maintenance
mation
in this publication
is based on the
available at the time of approval for printing.
Honda
without
of the F2 10 tiller. All inforlatest product
information
Motor Co., Ltd. reserves the right to make changes
notice and without
incurring any obligation.
No part of this publication
may be reproduced
This manual is considered
with the tiller if resold.
a permanent
READ THIS OWNER’S
MANUAL
these symbols and any’instructions
m
without
written
part of the tiller
CAREFULLY.
that follow:
permission.
and it must stay
Pay special
-Indicates
serious injury or death
instructions
are not followed.
-Indicates
a strong
death could result
at any time
attention
WILL
to
result
if
possibility
that serious injury or
if instructions
are not followed.
-Indicates
a possibility
that minor injury canresult
instructions
are not followed.
1 IMPORTANT NoTtCE 1 -Indicates
that equipment
or property
result if instructions
are not followed.
NOTE:
Gives
helpful
damage
if
can
information.
Honda tillers are designed to give safe and dependable
service if operated
according
to instructions.
Operating
this tiller requires special effort on
your part to ensure your safety and the safety of others.
m
Using this product for a purpose
or property
damage. Read and understand
operating
this tiller.
not intended may cause injury
this Owner’s
Manual before
If a problem should arise, or if you have any questions
consult an authorized
Honda tiller dealer.
HONDA
MOTOR
CO., LTD.
1989,
ALL RIGHTS
about
your tiller,
RESERVED
1
CONTENTS
1.
2.
3.
4.
5.
6.
7.
8.
9.
10.
11.
2
.......................................................
SAFETY INFORMATION
COMPONENT
IDENTIFICATION
.............................................
PRE-OPERATION
CHECK ......................................................
STARTING THE ENGINE .......................................................
.............................................................
TILLER OPERATION
STOPPING THE ENGINE .......................................................
..................................................................
MAINTENANCE
..................................................
TRANSPORTING/STORAGE
...........................................................
TROUBLESHOOTING
................................................................
SPECIFICATIONS
WARRANTY
SERVICE ..........................................................
3
7
8
13
15
17
19
26
27
28
29
1. SAFETY
Read all safety
instructions
before
operating.
INFORMATION
To ensure
safe operation-
For your safety
precautions:
Operator
and the safety
of others,
pay special
attention
to these
Responsibility
Keep the tiller in good operating
condition.
Operating
a tiller in poor or
questionable
condition
could result in serious injury.
Be sure all safety devices are in working order and warning labels are in
place. These items are installed for your safety.
Be sure the safety covers (Fan cover, recoil starter cover) are in place.
Know how to stop the engine and tines quickly in case of emergency.
Understand
the use of all controls.
Keep a firm hold on the handlebars.
They may tend to lift during clutch
engagement.
Allowing
anyone to operate this tiller without
proper instruction
may
result in injury.
Wear sturdy, full-coverage
footwear.
Operating
this tiller barefoot or
with open toe shoes or sandals increases your risk of injury.
Dress sensibly. Loose clothing may get caught in moving parts, increasing your risk of injury.
Be alert. Operating
this tiller when you are tired, ill or under the influence of alcohol or drugs may result in serious injury.
Keep all persons and pets away from the tilling area.
Be sure drag bar is in place and properly adjusted.
4
Child
l
l
l
Safety
Keep children
indoors and supervised
at all times when any outdoor
power equipment
is being used nearby. Young children move quickly
and are attracted
especially
to the tiller and the tilling activity.
Never assume children will remain where you last saw them. Be alert
and turn the tiller off if children enter the area.
Children should never be allowed to operate the tiller, even under adult
supervision.
Rotating
Tines
Hazard
The rotating tines are sharp and they turn at high speed. Accidental
contact can cause serious injury.
l
Keep your hands and feet away from the tines while engine is running.
l
Stop the engine and disengage
the tines clutch before inspection
or
maintenance
of tines.
l
Disconnect
the spark plug cap to prevent any possibility
of accidental
starting. Wear heavy gloves to protect your hands from the tines when
cleaning the tines or when inspecting
or replacing the tines.
Thrown
Object
Hazard
Objects hit by the rotating tines can be
force, and may cause serious injury.
l
Before tilling, clear the tilling area of
etc. Till only in daylight.
l
Always
inspect the tiller for damage
Repair or replace any damaged parts
l
Pieces thrown
from worn or damaged
Always inspect the tines before using
thrown
from the tiller
sticks,
large stones,
with
wire,
great
glass,
after striking
a foreign object.
before continuing
use.
tines can cause serious injury.
the tiller.
5
Fire and Burn Hazard
Gasoline is extremely
flammable,
and gasoline vapor can explode.
Use extreme care when handling gasoline. Keep gasoline out of reach of
children.
l
Refuel in a well-ventilated
area with the engine stopped.
l
Allow the engine to cool before refueling.
Fuel vapor or spilled fuel may
ignite.
l
The engine and exhaust system become very hot during operation
and
remain hot for a while after stopping.
Contact with hot engine components can cause burn injuries and can ignite some materials.
l
Avoid touching
a hot engine or exhaust system.
l
Allow the engine to cool before performing
maintenance
or storting the
tiller indoors.
Carbon
Monoxide
Poisoning
Hazard
Exhaust contains
poisonous
carbon monoxide,
a colorless
and odorless
gas. Breathing
exhaust can cause loss of consciousness
and may lead to
death.
l
If you run the engine in an area that is confined or even partially enclosed, the air you breathe could contain a dangerous. amount of exhaust
gas. To keep exhaust
gas from building up, provide, adequate
ventilation.
Operation
on Slope
When tilling on
fuel spillage.
Till across the
down it.
Be very careful
Do not use the
l
l
l
l
6
slopes,
slope
keep the fuel tank less than half full to minimize
(At equally
spaced
intervals)
rather
when changing the direction
of the tiller
tiller on a slope of more than 20’.
than
up and
on a slope.
2. COMPONENT
IDENTIFICATION
...-...-
/
NUMBER
THROTTLE LEVER
fiAC PAD
/
HANDLE ADJUSTER
FUEL SALVE
MUFFLER y
//_
FRONT WHEEL
m
RECOIL STARTER
\
SPARK PLUG CAP
*ENGINE SERIAL NUM
ENGINE OIL
FILLER CAP
TRANSMISSION
FILLER CAP
01
LEVER
ENGINE OIL
DRAIN BOLT
ROiOR
TliANSMISSION
CHECK BOLT
OIL LEVEL
* Record the frame and engine serial numbers for your reference. Refer to
the serial numbers when ordering parts, and when making technical
or
warranty
inquiries (see page 29).
Frame
serial
number:
Engine serial number:
7
I
3. PRE-OPERATION
ENGINE
CHECK
OIL
IMPORTANT
NOTICE 1 Running
the engine with low oil level will cause
serious engine damage.
1. Remove the oil filler cap and wipe the dipstick clean.
2. [nsert the dipstick into the oil filler hole, but do not screw it in.
3. If the level is low, add enough recommended
oil to bring it to the upper
level mark on the dipstick.
Use high-detergent,
premium quality 4-stroke engine oil, certified to meet
or exceed U.S. automobile
manufacturer’s
requirements
for API Service
Classification
SG, SF/CC, CD.
1 IMPORTANT
shorten
NOTICE 1 u sing
the engine’s
service
nondetergent
life.
oil or 2-stroke
engine
SAE low-30
is recommended
for general,
all-temperature
viscosities
shown in the following
chart may be used when
temperature
in your area is within the-indicated
range.
oil could
use. Other
the average
I
-30
1
-20
OIL FILLER CAP
UPPER LEVEL
LOWER LEVEL
8
I
-10
0
10
20
Ambient temperature
30
40°C
GASOLINE
Remove the gas cap and check the fuel level.
low.
Fuel tank capacity:
0.9 L’ (0.95 US qt)
Refill the tank if the level is
Gasoline is extremely
flammable,
and gasoline vapor can explode. Use extreme care when handling gasoline. Keep gasoline out of reach of children.
l
Refuel in a well ventilated
area,with
the engine stopped. Keep flames
and sparks away, and do not smoke in the area.
l
Gasoline vapors or spilled gasoline may ignite.
l
Refuel carefully to avoid spilling gasoline. Avoid overfilling
the fuel tank
(there should be no gas in the filler neck). After refueling,
tighten the
gas cap securely. If any gasoline was spilled, make sure the area is dry
before starting the engine.
l
After use, part the tiller on a level surface. Be sure the storage area is
well ventilated,
do not allow flames or sparks in the storage area.
After
refueling,
be sure to tighten
the GAS cap firmly.
GAS CAP
\
FUEL FILLER HOLE
9
Gasoline
Recommendation
Pump octane
rating:
86 or higher
We recommend
unleaded gasoline because it produces fewer
spark plug deposits and extends the exhaust system life.
engine
and
If “spark knock” (metallic rapping noise) or persistent
“pinging”
occurs
a steady engine speed under normal load, change brands of gasoline.
spark knock or pinging persists, see an authorized
Honda tiller dealer.
at
If
1 IMPORTANT
or
pinging
Running
misuse,
damaged
NOTICE 1 R unning
can cause
engine
the engine
damage.
with
persistent
spark
knock
the engine with persistent
spark knock or pinging is considered
and the Distributor’s
Limited Warranty
does not cover parts
by misuse.
Occasionally
you may hear light spark knock while operating under heavy
loads. This is no cause for concern.
It simply means your engine is
operating
efficiently.
Never use stale or contaminated
gasoline
getting dirt or water in the gas tank.
10
or an oil/gasoline
mixture.
Avoid
GASOLINES
CONTAINING
ALCOHOL
If you decide to use a gasoline containing
alcohol (gasohol), be sure its octane rating is at least as high as that recommended
by Honda (see
Gasoline Recommendation
on page 9). There are two types of “gasohol”:
one containing
ethanol, and the other containing
methanol.
Never use gasoline containing
more than
cosolvents
and corrosion
inhibitors.
1-IMPORTANT
or gasoline
also contain
serious fuel
5%
methanol,
even
if it has
NoTlCE 1 Using -- gasohol that contains more than 10% ethanol,
containing
methanol
(methyl or wood alcohol) that does not
cosolvents
and corrosion
inhibitors
for methanol,
can cause
system damage and poor engine performance.
Honda cannot endorse
evidence of its suitability
the use of gasoline
is as yet incomplete.
containing
methanol
since
NOTE: Fuel system damage or engine performance
problems
resulting
from the use of gasoline that contains alcohol is not covered under the
warranty.
Before buying gasoline from an unfamiliar
station, first determine
if the
gasoline contains alcohol; if it does, find out the type and percentage
of
alcohol used.
I
NOTE: If you notice any undesirable
operating
symptoms
while using a
gasoline that contains
alcohol,
or one that you think contains
alcohol,
switch to a gasoline that you know does not contain alcohol.
11
l
Transmission
gear oil
Place the tiller on a level surface and remove the transmission
oil filler cap.
The oil should be level with the lower edge of the oil filler hole.
Add recommended
engine oil if the level is low (see page 8).
TRANSMISSION
CHECK BOLT
l
OIL LEVEL
Air cleaner
Check
cleaner
for dirt or obstruction
AIR CLEANER COVER
ELEMENTS
12
of elements
(see page 21).
4. STARTING
m
of the tines,
THE ENGINE
Be sure the clutch is disengaged,
to prevent immediate rotation
which may cause loss of control and possible injury.
1. Turn the fuel valve
ON.
FUEL VALVE
2. Pull the choke
rod out.
CHOKE ROD
NOTE: Do not use the choke if
the engine
is warm
or the air
temperature
is high.,
3. Turn the engine
position.
switch
to the ON
ENGINE
13
4. Move the throttle
the left.
lever slightly
to
.E LEVER
5. Pull the starter
grip lightly
until
resistance
is felt, then pull briskly.
~PORTANT
NOTICE
] ~~
not
allow
STARTER GRIP
the starter
grip to snap back
against the engine. Return it gently to prevent
damage
to the
starter.
6. Push the choke
rod
engine warms up.
14
in
as the
CHOKE ROD
5. TILLER OPERATION
1. Handlebar
height
adjustment
1 IMPORTANT NoT’CE 1 Before adjusting the handlebar,
level ground to prevent the handle from collapsing
place the tiller on firm
accidentally.
To adjust
the
handlebar
height,
loosen the adjuster,
select the appropriate
holes
and tighten
the
adjuster.
2. Clutch
The clutch engages and disengages
the power from the engine to the
tines.
When
the clutch
lever
is
squeezed, the clutch is engaged and
power is transmitted
to the tines.
When
the lever is released,
the
clutch
is disengaged
and power is
not transmitted
to the tines.
3. Front
l
wheel
To move the tiller from place to place when not tilling:
Working from the right side of the tiller, pull the wheel arm toward you,
pivot the wheel down and then release the wheel arm. Be sure that the
arm locks in place.
15
l
To prepare for tilling:
Pull the wheel arm out, pivot
the wheel
up and release the arm.
hen used in the field.
4. Tilling
-------When
depth
Tilling depth can be adjusted
by
removing
the retainer and sliding
the drag bar up or down
as
necessary.
5. Handling
moved on road.
aErArNER
tips
Adjust the handlebar
normal tilling).
height
to a comfortable
position
(waist
height
The drag bar should always be used when tilling. It enables you
pensate for the hardness of the soil. The ideal height of the drag
depend on the type of soil being tilled and soil conditions
at the
tilling. In general, however,
the drag bar should be adjusted so
tiller is tilted slightly backward.
for
to combar will
time of
that the
If the machine
jerks forward
while
tilling,
press down
on the
handlebars.
This will cause the tines to dig more deeply into the soil.
If tines dig in but the machine
handlebars
from side to side.
will
not
When turning, push down on the handlebars
to the rear; this will make turning easier.
16
move
forward,
move
to bring the tiller’s
the
weight
6. STOPPING
1. Move the throttle
right.
lever fully to the
THROTTLE
2. Turn the engine
position.
THE ENGINE
switch
LEVER
to the OFF
FF
ENGINE
SWITCH
FUEL VALVE
3. Turn the fuel valve
OFF.
NOTE: In case of an emergency,
tion immediately.
turn the engine
switch
to the OFF posi-
17
High Altitude
Operation
At high altitude,
the standard carburetor
air-fuel mixture will be too rich.
Performance
will decrease, and fuel consumption.will
increase. A very rich
fuel mixture may also foul the spark plugs and cause hard starting.
High altitude performance
can be improved by installing a,snialler diameter
main fuel jet in the carburetor
and readjusting
the pilot screw.
If you
always operate the engine at altitudes
higher than 6,000 feet above sea
level, have an authorized
Honda tiller dealer perform
this carburetor
modification.
Even with carburetor
modification,
engine horsepower
will decrease about
3.5% for each 1,000 feet increase .in altitude.
The effect of altitude on
horsepower
will be greater than this if no carburetor
modification
is made.
IMPORTANT NoT’CE 1 Once a carburetor
is jetted for high altitude
use,
operation
at lower altitudes without
rejetting may result in reduced performance, overheating,
and serious engine damage.
It is especially
important
to rejet a carburetbr
altitude
to a lower one. At lower altitudes,
become excessively
lean.
18
when going
the air/fuel
from a higher
mixture
may
!,
’
2
2
7. MAINTENANCE
The purpose of the maintenance
schedule is to keep the tiller in the best
operating
condition.
Inspect or service as scheduled
in the table below.
m
Shut off the engine before performing
engine must be run, makesure
the aCea is weli
contains poisonous
carbon monoxide
gas.
..
‘0
any maintenance.
If the
ventilated.
The exhaust
1 IMPORTANT NoTlCE 1 Use only genuine HONDA parts or-their equivalent.
The use, of replacement
parts which are not of equivalent
quality may
damage the engine.
Maintenance
Schedule
REGULAR
SERVICE
PERIOD
Performed
at every indicated
month
or operating
hour interval,
whichever
comes
first.
EACH USE
FIRST
MONTH
EVERY
3 MONTHS
OR
50 HRS
2O’:RS
EVERY
6 MONTHS
OR
100 HRS
EVERY
YEAR
300o:RS
\
Engine
Check
oil
level
0
level
0
Change
Transmission
Air
oil
cleaner
Check
0
0
Check
Clean
Combustion
end valves
chamber
Clean-Relap
Fuel
tank
Clean
Fuel
line
Check
IReolace
NOTE
(1):
(2):
Every
if necesserv)
Service
more frequently
when
used in dusty
areas.
These items should
be serviced
by an authorized
Honda dealer,
is mechanically
proficient.
See the Honda
Shop Manual.
unless
2 Years
the owner
12)
has the proper
tools
and
19
1. Changing
oil
Drain the oil while
draining.
the engine
is still warm
to assure
rapid and complete
1. Rernove the oil drain bolt and filler cap to drain.
2. Reinstall the drain bolt and fill the crankcase to the upper level with
recommended
oil (P. 8).
3. Reinstall and tighten the filler cap.
OIL CAPACITY:
0.4 ! (0.42
OIL FILER
the
US qt)
HOLE
OIL FILLER CAP
CilL DRAIN
BOLT
UPPER LEVEL
LOWER LEVEL
/
m
Used motor
tact with the skin for
you handle used oil on
your hands with soap
oil.
oil may cause skin cancer if repeatedly
left in conprolonged
periods. Although
this is unlikely unless
a daily basis, it is still advisable to thoroughly
wash
and water as soon as possible after handling used
NOTE: Please dispose of used motor oil in a manner that is compatible
with the environment.
We suggest you take it in a sealed container to your
local service station for reclamation.
Do not throw it in the trash or pour it
on the ground.
20
,:
!
2. Air cleaner
A dirty
buretor
quently
air cleaner will restrict air flow to the carburetor.
To prevent carmalfunction,
service the air cleaner regularly.
Service more frewhen operating
the engine in extremely
dusty areas.
,)
m
air cleaner
2.
1 IMPORTANT
engine
_
.?
J
1
service
wear
Never use gasoline or low flash point solvents
element. A fire or explosion
could result.
NOTICE 1 N ever
run the engine
without
for cleaning
the air cleaner.
the
Rapid
will result.
1. Remove the wing nuts and the air
cleaner
cover.
Remove the elements
and
separate
them.
Carefully
check both elements for
holes
or tears
and replace
if
damaged.
2. Foam element:
Clean in warm
soapy water,
rinse and allow to
dry thoroughly.
Or clean in high
flash-point
solvent
and allow to
dry. Dip the element
in clean
engine oil and squeeze out all the
excess.
The engine
will’ smoke
during initial start-up
if too much
oil is left in the foam.
Tap the element
3. Paper element:
lightly several times on a hard surface to remove
excess
dirt, or
blow compressed
air through the
filter from the inside out. Never try
to brush the dirt off; brushing will
force dirt into the fibers.
FOAM
ELEMENT
PAPER
ELEMENT
21
I
3. Spark plug service
Recommended
spark plug:
To ensure proper engine
ped and free of deposits.
1. Remove
the spark
BMR4A (NGK)
WI 4MR-U (ND)
operation,
the spark plug must be properly
gap-
plug cap.
,.
-4
m
careful
If the engine has been running,
not to touch the muffler.
2. Visually
chipped.
inspect the sp
Clean the spark plug with
the muffler
a wire
will be very hot. Be
if the insulator is cracked or
brush if it is to be reused.
3. Measure the plug gap with a feeler gauge. The gap should be 0.6-0.7
mm (0.024-0.028
in). Correct
as necessary
by bending
the side
electrode.
0.6-0.7
mm
(0.024~0.028
in)
4. Thread the plug in by hand to prevent cross-threading.
5. After seating it by hand, tighten
a new spark plug l/2 turn with the
wrench to compress the washer. If you are reusing a plug, it should only
take l/8-1/4
turn.
HWORTANT NOTlCE The spark plug must be securely tightened.
An improperly
tightened
plug can become very hot and possibly damage the
engine. Never use a spark plug with an improper heart range.
22
4. Clutch cable adjustment
1. Check
Clutch
the clutch
lever free play at the lever tip as illustrated.
lever free play:
2-6
mm (0.08-0.24
in)
2-6
mm (0.08-0.24
in)
2. If the clearance is incorrect,
loosen the lock nut and turn the adjusting
bolt in or out as required.
3. After adjustment,
tighten the lock nut securely. Then start the engine
and check for proper clutch lever operation.
ADJUSTiNG
BOLT
LOCK NUT
5. Throttle
Measure
cable adjustment
the free play at the lever tip.
Free play:
5-
10 mm (0.2-0.4
If the free play is incorrect
in or out as required.
THROTTLE
I
loosen
in)
the lock nut and turn the adjusting
bolt
LEVER
5-10 mm
(0.2-0.4
in)
6. Fuel strainer
cleaning
Water or sediment
accumulated
in the fuel strainer can cause loss of
power or hard starting.
To prevent engine malfunction,
service the fuel
strainer regularly.
l
l
l
l
Gasoline is flammable
and explosive
under certain conditions.
Do not
smoke or allow flames or sparks near the equipment
while draining fuel.
Always
work in a well-ventilated
area.
Be sure that any fuel drained from the mower is stored in a safe
container.
Wipe up any spilled gasoline at once.
1. Turnthe
fuel valve to the off position. Disconnect
the fuel line from the
fuel valve and drain fuel into a safe container.
2. After the fuel tank has been drained thoroughly,
remove the fuel
strainer from the fuel line.
\h
FUEL VALVE
FUEL LINE
FUEL LINE
24
FUEL STRAINER
3. Remove
water
and sediment
from the filter
screen
and fuel strainer.
/
4. Reinstall the fuel strainer,
the clips.
NOTE:
reconnect
Turn the fuel valve
the fuel lines and secure them with
ON and check
for leaks.
7. Rotor assembly
Install
the tine assemblies
and side disks as illustrated
below.
NOTE: Use of the side disks is optional. They are designed to enhance tilling operations
and their use is recommended
to:
1) keep the tiller aligned for furrowing
(especially
on slopes);
2) protect plants and other such objects when tilling around them;
3) prevent hooking the tines in objects such as chainlink and picket fences
when tilling close to them.
FWD
“L”
side 4
“R”
side
25
8. TRANSPORTING/STORAGE
Transporting
l
l
l
Turn off the fuel valve.
Keep the tiller level. Do not lay it on it side or lean it back on its handlebars.
Tie the tiller down securely with a suitable strap or rope to prevent it
from tipping over.
-1
Preparation
for storage
(Over 30 days):
Drain the gasoline from the fuel tank and carburetor:
Remove the fuel line from the fuel valve, and drain all gasoline from the
fuel tank into a safe container.
Remove the carburetor
drain bolt to drain gasoline from the carburetor.
Reinstall the fuel line and tighten the drain bolt securely. Turn the fuel
valve OFF.
FUEL LINE
l
I’
c:
---Y
DRAIN BOLT
m
Gasoline is flammable
and exolosive
under certain conditions.
Do not smqke or allow flames or sparks near the equipment
while draining
fuel.
l
l
l
l
l
l
Pull the starter handle until resistance
is felt. At this point the piston is
coming up on its compression
stroke and both the intake and the exhaust valves are closed. This will help to protect the engine from internal corrosion
during storage.
Drain the engine oil and refill the engine with fresh oil.
Clean the tiller and coat areas of possible rust with a light film of oil.
Coat the cylinder
walls with oil. (If anticipated
storage will exceed 1
year.) Remove the spark plug and pour two or three tablespoonsful
of
clean oil into the cylinder.
Pull the starter handle slowly to distribute the oil over the cylinder walls.
Leave the piston on its compression
stroke to close the valves.
Reinstall the spark plug.
Cover the tiller and store on a level surface in a dry, dust-free
area.
Store the tiller in an upright
position;
otherwise,
oil may enter the
cylinder.
26
;
--td
ii
9. TROUBLESHOOTING
When
1. Is
2. Is
3. Is
4. Is
To check, loosen the drain bolt with the fuel valve on. Fuel should
out freely. Retighten the drain bolt.
5
-I
the engine will not start;
there enough fuel?
the fuel valve on?
the engine switch ON?
gasoline reaching the carburetor?
flow
m
If any fuel is spilled, make sure the area is dry before testing
the spark plug or starting the engine. Fuel vapor or spilled fuel may ignite.
DdAlN BOLT
5. Is there
p
?
-’
a spark at the spark plug?
a. Remove the spark plug cap. Clean any dirt from around the spark
plug base, then remove the spark plug.
b. Install the spark plug in the plug cap.
c. Turn the engine switch on.
d. Ground the side electrode to any engine ground and pull the recoil
starter to see if sparks jump across the gap.
e. If there is no spark, replace the plug and check again.
If OK, try to start the engine according to the instructions.
6. If the engine
dealer.
still does not start,
take the tiller to an authorized
Honda
27
10.
SPECIFICATIONS
F210
Model
Power products
descriotion
code
Dimensions
Dry Weight
F210
and weight
27.5
Length
1,250
kg (60.6
lb)
mm (49.2
in)
Width
585 mm (23.0
in)
Height
960 mm (37.8
in)
Engine
Model
GVIOOKI
Single
bwe
cylinder,
4-stroke,
forced
side valve, gasoline
Displacement
90 cm3 (5.5 cu in)
Bore x Stroke
Ignition
50 x 46 mm (I .97 x 1.81
System
Transistorized
Spark Plug
BMR4A
Oil Capacity
Fuel Tank
Capacity
Clutch
NOTE:
28
(NGK),
oil capacity
Specifications
are subject
Wl4MR-U
US qt)
0.9 0 (0.24
US gal)
0.95
to change
expanding
shoe
e (I .o us qt)
without
in)
ignition
0.4 P (0.42
Internal
Transmission
air cooled,
notice.
(ND)
11.
WARRANTY
SERVICE
Owner Satisfaction
c
ti
c
Your satisfaction
and goodwill
are important
to your dealer and to us. All
Honda warranty
details are explained
in the Distributor’s
Limited Warranty. Normally, any problems concerning
the product will be handled by your
dealer’s service department.
If, you have a warranty
problem that has not
been handled to your satisfaction,
we suggest you take the following
action:
l
l
Discuss your problem with a member of dealership management.
Often
complaints
can be quickly resolved at that level. If the problem has
already been reviewed with the Service Manager, contact the owner of
the dealership
or the General Manager.
If your problem
still has not been resolved
to your satisfaction,
contact:
American
Honda Motor Co., Inc.
P.O. Box 50
Gardena, California
90247-0805
Telephone:
(213) 604-2400
We will need the following
information
- Your name, address, and telephone
- Product model and serial number
- Date of Purchase
- Dealer name and address
- Nature of problem
in order to assist
you:
number
After reviewing
all the facts involved,
you will be advised of what action
can be taken. Please bear in mind that your problem will likely be resolved
at the dealership,
using the dealer’s facilities,
equipment,
and personnel,
so it is very important
that your initial contact be with the dealer.
Your purchase
of a Honda product is greatly appreciated
by both your
dealer and American Honda Motor Co., Inc. We want to assist you in every
way possible to assure your complete satisfaction
with your purchase.
29