1
0HPCHA00.book Page 1 Thursday, October 22, 2009 4:05 PM
Dell™ Wireless Dock
User Manual
Model Name: E16WD01
Model Type: E16WD01001
w w w. d e l l . c o m | s u p p o r t . d e l l . c o m
0HPCHA00.book Page 2 Thursday, October 22, 2009 4:05 PM
Notes, Cautions, and Warnings
NOTE: A NOTE indicates important information that helps you make better use of
your computer.
CAUTION: A CAUTION indicates potential damage to hardware or loss of data if
instructions are not followed.
WARNING: A WARNING indicates a potential for property damage, personal
injury, or death.
____________________
Information in this document is subject to change without notice.
© 2009 Dell Inc. All rights reserved.
Reproduction of these materials in any manner whatsoever without the written permission of Dell Inc.
is strictly forbidden.
Trademarks used in this text: Dell and the DELL logo are trademarks of Dell Inc.; Microsoft, Windows,
Windows Vista, and Aero are either trademarks or registered trademarks of Microsoft Corporation in
the United States and/or other countries; Wi-Fi is a registered trademark of the Wi-Fi Alliance.
Other trademarks and trade names may be used in this document to refer to either the entities claiming
the marks and names or their products. Dell Inc. disclaims any proprietary interest in trademarks and
trade names other than its own.
Model E16WD01
September 2009
P/N 0HPCH
Rev. A00
0HPCHA00.book Page 3 Thursday, October 22, 2009 4:05 PM
Contents
1
About Your Dell Wireless Dock .
Front and Back View.
2
. . . . . . . .
5
. . . . . . . . . . . . . . . . . . .
6
Configuring Your Dell Wireless Dock
Installing the Software
. . . .
7
. . . . . . . . . . . . . . . . . .
7
Turning Your Dell Wireless Dock On
. . . . . . . . . .
Associating Your Dell Wireless Dock .
. . . . . . .
17
Associating Your Dell Wireless Dock
Using PIN Association . . . . . . . .
. . . . . . .
19
. . . . . . . . . .
21
. . . . . . . . . . . . .
25
. . . . . . . . . . . . . . .
25
Using the Dell Wireless
USB Manager . . . . . . . .
Connection Manager .
UWB Radio and Host Settings
4
16
Associating Your Dell Wireless Dock
Using Cable Association . . . . . . .
Setting Up Your Dell Wireless Dock
3
. . . . . . . . .
16
. . . . . . . . . . .
Resetting the Dell Wireless Dock
. . . . . .
Contents
26
29
3
0HPCHA00.book Page 4 Thursday, October 22, 2009 4:05 PM
5
Troubleshooting .
General .
. . . . . . . . . . . . . . . . . .
. . . . . . . . . . . . . . . . . . . . . . . . .
. . . . . . . . . . . . . . . . . . . . . . .
32
Audio Output
. . . . . . . . . . . . . . . . . . . . . . .
33
6
Specifications
7
General Safety Information .
. . . . . . . . . . . . . . . . . . . .
. . . . . . . . .
. . . . . . . . . . . . . . . . . .
Earphone and Headphone Safety
Ergonomic Instructions
35
37
38
. . . . . . . . . . . .
39
. . . . . . . . . . . . . . . . .
39
Environmental Information .
. . . . . . . . . . . . . . .
39
Recycling Information
. . . . . . . . . . . . . . .
39
Waste Electrical and Electronic
Equipment (WEEE) Directive . .
. . . . . . . . . .
Registration, Evaluation, and Authorization
of Chemicals (REACH) . . . . . . . . . . .
Export Regulations .
40
. . . . . . . . . . . . .
40
. . . . . . . . . . . . . . . . . . .
40
Additional Country-Specific Safety, Regulatory,
and Environmental Information . . . . . . . . .
Korea (Korean)
39
. . . .
Finding Additional Information
. . . .
41
. . . . . . . . . . . . . . . . . . .
41
China (S. Chinese).
Contents
31
Video Output
General Power Safety
4
31
. . . . . . . . . . . . . . . . .
41
0HPCHA00.book Page 5 Thursday, October 22, 2009 4:05 PM
About Your Dell Wireless Dock
The Dell™ Wireless Dock enables you to connect USB peripherals such as
external storages, printers, keyboards, mice, etc. to your notebook through
the wireless USB technology. You can also extend your notebook’s audio and
video support by connecting an external display and speakers.
NOTE: The Dell Wireless Dock supports a screen resolution of
up to 1680x1050 (wide screen) or 1600x1200 (standard screen) through
a DVI-I connector. If you need to connect a VGA display, you must
use a DVI to VGA adapter.
Wireless USB technology performs best within a one-meter range;
generally within a single room environment. The technology is different
from Wi-Fi® technology and is not discoverable by any Wi-Fi device.
You can associate up to sixteen different notebooks with the Dell Wireless Dock.
However, you can connect the Dell Wireless Dock to only one of the
associated hosts at a given time.
NOTE: When the seventeenth host is associated, the first associated host
will no longer be associated with the Dell Wireless Dock.
NOTE: The Dell Wireless Dock provides integrity checking along with
AES-128/CCM encryption.
About Your Dell Wireless Dock
5
0HPCHA00.book Page 6 Thursday, October 22, 2009 4:05 PM
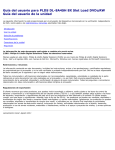
Front and Back View
1
2
3
1
power light
2
wireless link and
activity light
3
line out (speaker)
4
line in (microphone)
5
USB connectors (2)
6
antenna
7
reset button
8
mini-USB connector for
cable association
4
5
6
9
USB connectors (2)
7
10
DVI-I connector
11
DC-IN connector
8
9
10
11
6
About Your Dell Wireless Dock
0HPCHA00.book Page 7 Thursday, October 22, 2009 4:05 PM
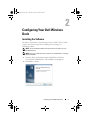
Configuring Your Dell Wireless
Dock
Installing the Software
The Drivers and Utilities media that ships with your Dell™ Wireless Dock
contains the software required for installing and associating your
Dell Wireless Dock.
NOTE: You must install the software and drivers before you begin to use your
Dell Wireless Dock.
NOTE: Ensure your notebook’s video card drivers are installed before continuing
with the installation.
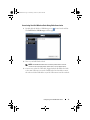
1 Insert the Drivers and Utilities media for Dell Wireless Dock into
your notebook’s CD/DVD drive. The installation wizard appears.
2 Click Next to continue.
Configuring Your Dell Wireless Dock
7
0HPCHA00.book Page 8 Thursday, October 22, 2009 4:05 PM
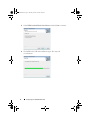
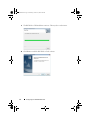
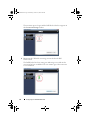
3 Select UWB Card and Wireless Dock drivers and click Next to continue.
4 The Dell Wireless USB card installation begins. This may take
several minutes.
8
Configuring Your Dell Wireless Dock
0HPCHA00.book Page 9 Thursday, October 22, 2009 4:05 PM
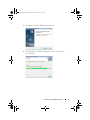
5 Click Next to install the Dell Wireless USB card.
6 The Dell Wireless USB card installation continues. This may take
several minutes.
Configuring Your Dell Wireless Dock
9
0HPCHA00.book Page 10 Thursday, October 22, 2009 4:05 PM
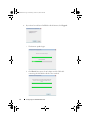
7 The Dell Wireless USB card firmware update wizard appears.
NOTE: The installer will skip this step if your firmware is already up to date.
a
Scroll and read the General Notes section and then click Next.
b
Click Next to continue.
c
Click Next to update the Wireless USB card firmware.
CAUTION: Do not disconnect your AC adapter during the firmware update.
10
Configuring Your Dell Wireless Dock
0HPCHA00.book Page 11 Thursday, October 22, 2009 4:05 PM
d
Click OK.
e
The firmware update for the Wireless USB card begins.
This may take several minutes.
f
Click Finish to close the firmware update wizard.
8 Click Finish to continue.
Configuring Your Dell Wireless Dock
11
0HPCHA00.book Page 12 Thursday, October 22, 2009 4:05 PM
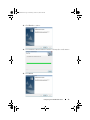
9 The Dell Wireless USB installation continues. This may take several minutes.
10 Click Next to install the Dell Wireless Dock software.
12
Configuring Your Dell Wireless Dock
0HPCHA00.book Page 13 Thursday, October 22, 2009 4:05 PM
11 The Dell Wireless Dock installation begins. This may take several minutes.
NOTE: Your notebook’s display may flicker or go blank for a few seconds
during the installation of the Dell Wireless Dock device drivers.
12 The Dell Wireless Dock Firmware Upgrade Utility appears.
a
Connect the AC adapter to the Dell Wireless Dock and the notebook.
Then connect the USB cable, shipped with the Dell Wireless Dock,
from the mini-USB connector of the Dell Wireless Dock to the
USB connector of the notebook.
b
If you have the latest Dell Wireless Dock firmware, click Finish.
Configuring Your Dell Wireless Dock
13
0HPCHA00.book Page 14 Thursday, October 22, 2009 4:05 PM
c
14
If you do not have the latest Dell Wireless Dock firmware, click Upgrade.
i
The firmware update begins.
ii
Click Finish. Disconnect the AC adapter and the USB cable
connecting the Dell Wireless Dock to the notebook.
Configuring Your Dell Wireless Dock
0HPCHA00.book Page 15 Thursday, October 22, 2009 4:05 PM
13 Click Finish to continue.
14 The Dell Wireless Dock installation continues. This may take several minutes.
15 Click Finish.
Configuring Your Dell Wireless Dock
15
0HPCHA00.book Page 16 Thursday, October 22, 2009 4:05 PM
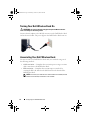
Turning Your Dell Wireless Dock On
WARNING: Use only the AC adapter shipped with your Dell Wireless Dock to
avoid damage to the docking station.
Connect the AC adapter to the DC-IN connector on the Dell Wireless Dock
and an electrical outlet. The power light on the Dell Wireless Dock turns on.
Associating Your Dell Wireless Dock
You can associate your Dell Wireless Dock with your notebook using one of
the following methods:
•
Cable association — Completes the association process using a one-time
cable connection to the Dell Wireless Dock.
•
PIN association — Completes the association process wirelessly by
entering the PIN code found on the label located on the bottom of the
Dell Wireless Dock.
NOTE: Ensure that your notebook has a wireless USB card installed (includes
hardware and software) and that the card is enabled.
16
Configuring Your Dell Wireless Dock
0HPCHA00.book Page 17 Thursday, October 22, 2009 4:05 PM
Associating Your Dell Wireless Dock Using Cable Association
1 Double-click the Wireless USB Manager icon
located on the taskbar.
The Dell Wireless USB Manager window appears.
2 Turn on your Dell Wireless Dock.
NOTE: The Dell Wireless Dock does not have a power button. You must
connect or disconnect the power cable to turn on or turn off the device.
3 Connect one end of the USB cable, shipped with the Dell Wireless Dock,
to the mini-USB connector on the Dell Wireless Dock and then connect
the other end of the USB cable to any of the USB connectors of the notebook.
Configuring Your Dell Wireless Dock
17
0HPCHA00.book Page 18 Thursday, October 22, 2009 4:05 PM
The association process begins and the Dell Wireless Dock icon appears in
the Connection Manager window.
4 Disconnect the USB cable connecting your notebook to the Dell
Wireless Dock.
The Dell Wireless Dock icon turns green indicating a successful wireless
connection has been established. The icon remains gray if the connection
is not established.
18
Configuring Your Dell Wireless Dock
0HPCHA00.book Page 19 Thursday, October 22, 2009 4:05 PM
Associating Your Dell Wireless Dock Using PIN Association
1 Turn on your Dell Wireless Dock.
NOTE: The Dell Wireless Dock does not have a power button. You must
connect or disconnect the power cable to turn on or turn off the device.
2 Double-click the Wireless USB Manager icon
located on the taskbar.
The Dell Wireless USB Manager window appears.
3 On the Wireless USB Manager screen, click Add New Device.
The notebook scans for wireless devices.
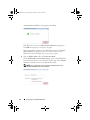
4 The Add new device window appears. Enter the PIN code found on the
label located on the bottom of your Dell Wireless Dock then click the
Connect button.
Configuring Your Dell Wireless Dock
19
0HPCHA00.book Page 20 Thursday, October 22, 2009 4:05 PM
A Connection successful! message appears. Click Next.
If the PIN code is incorrect, a PIN association failed message appears.
Click OK and repeat step 3 to step 6 to try again.
If the notebook does not detect your Dell Wireless Dock, a No wireless
devices found message appears. Move your notebook closer to the
Dell Wireless Dock and repeat step 3 to step 6 to try again.
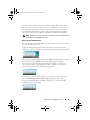
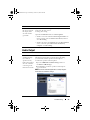
5 Type the Display Name and select Connection Mode.
Select Automatically connect within range to connect the Dell Wireless
Dock automatically when your notebook is within range. Select Manual
connect to manually connect to the Dell Wireless Dock.
NOTE: You can modify the Connection mode and Display Name in the
Connection Manager after setup completes.
20
Configuring Your Dell Wireless Dock
0HPCHA00.book Page 21 Thursday, October 22, 2009 4:05 PM
6 Click Finish.
The Dell Wireless Docking icon turns green indicating that a successful
wireless connection has been established.
Setting Up Your Dell Wireless Dock
NOTE: You can connect devices to the Dell Wireless Dock while your notebook
is turned on.
Adjusting Your Display Settings (If a Monitor is Connected)
1 Right-click the Wireless USB Display icon
located on the taskbar.
2 Select the display mode:
•
Extend mode — Provides additional screen space for you to use.
•
Mirror — Duplicates the notebook screen on the monitor
(default mode).
•
Set as Main Monitor — Disables the notebook monitor and moves
the display to the external monitor.
•
Off — Disables the external monitor.
Configuring Your Dell Wireless Dock
21
0HPCHA00.book Page 22 Thursday, October 22, 2009 4:05 PM
3 Select the desired screen resolution.
4 Set other display options:
•
Updates — Checks for available software updates for the
Wireless USB display.
•
Color Quality — Choose between Medium (16-bit) and
Highest (32-bit).
•
Screen Rotation — Rotates the monitor left, right, or upside-down.
•
Extend to — Extends your monitor to the left, right, above, or below
when in Extend mode.
•
Advanced — Opens your notebook operating system’s display
properties settings window.
Adjusting the Antenna Position
It is recommended that you keep the antenna in the upright position for best
video performance.
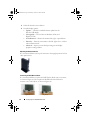
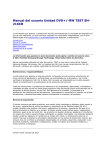
Positioning the Dell Wireless Dock
It is recommended that you place the Dell Wireless Dock next to a monitor,
as shown in Figure (a). Do not place the Dell Wireless Dock behind a
monitor or any other object, as shown in Figure (b).
Figure (a)
22
Figure (b)
Configuring Your Dell Wireless Dock
0HPCHA00.book Page 23 Thursday, October 22, 2009 4:05 PM
When the wireless link between the notebook and the Dell Wireless Dock
becomes weak, move the notebook closer to the Dell Wireless Dock or rotate
the notebook to find a position with a stronger wireless link. For example,
if you find that the wireless signal strength is reduced when the notebook
lid is closed, you can try to rotate the notebook to find the best reception.
NOTE: The wireless connection works best if there is a clear line-of sight between
your notebook and the Dell Wireless Dock.
Moving an Associated Notebook
You can move an associated notebook anywhere within a range of one meter
from the Dell Wireless Dock.
When the notebook is wirelessly connected and is moved away from the
Dell Wireless Dock, you may see the following message appear in the taskbar.
This indicates that the range between the Dell Wireless Dock and the notebook
is near the maximum allowable distance for maintaining a connection.
If you intend to continue using the Dell Wireless Dock, you must move
your notebook closer to the Dell Wireless Dock. Otherwise, the wireless
connection drops and the following message appears:
To reconnect, move the notebook closer to the Wireless Docking. If you
chose Automatically connect within range during setup, the wireless
connection automatically re-establishes. Otherwise, you must manually
establish the connection again.
Configuring Your Dell Wireless Dock
23
0HPCHA00.book Page 24 Thursday, October 22, 2009 4:05 PM
Working With Your Notebook Lid Closed
The wireless connection between your notebook (with the lid closed) and
the Dell Wireless Dock depends on your notebook’s power settings.
If the power option is set to Hibernate or Standby, then the wireless connection
will disconnect.
If the power option is set to Do Nothing, the notebook will retain the
wireless connection even when the lid is closed.
NOTE: When the lid is closed, the performance and maximum range may reduce.
If you need to use the Dell Wireless Dock for high performance or long range
applications, it is recommended to use the notebook with the lid open.
24
Configuring Your Dell Wireless Dock
0HPCHA00.book Page 25 Thursday, October 22, 2009 4:05 PM
Using the Dell Wireless
USB Manager
The Dell™ Wireless USB Manager interface allows you to monitor the
connection status of the Dell Wireless Dock. It also allows you to change
settings on your notebook and the Dell Wireless Dock, as well as other
devices that have been associated to your notebook.
Connection Manager
The Connection Manager section allows you to:
•
Observe the connection status of the Dell Wireless Dock
•
Modify the connected device name
•
Change the connection mode
•
Disconnect the device
•
Delete the device
Using the Dell Wireless USB Manager
25
0HPCHA00.book Page 26 Thursday, October 22, 2009 4:05 PM
To
Do
Rename
Click the device icon, expand the Options menu and
select Rename. This allows you to change the name that
is displayed under the device icon.
Delete
Click the device icon, expand the Options menu and
select Delete. The device associated will be deleted and you
will no longer be able to connect the device to the notebook
unless you re-associate the device with the notebook.
Disconnect
Click the device icon, expand the Options menu and select
Disconnect. The device will disconnect from the notebook and
the connection mode will automatically change to Manual.
To re-establish a connection to the device, you must click the
device icon and select Connect under the Options menu.
Connect
This will only be enabled under the Options menu if
the Dell Wireless Dock is in the manual connection mode.
Select Connect to manually connect the device to
the notebook.
NOTE: Both notebook and the Dell Wireless Dock must be turned
on to establish the connection.
Connection Mode - Select this if you want the Dell Wireless Dock to connect
Automatic
automatically to the notebook any time both the notebook
and the Dell Wireless Dock are turned on and within range
of each other.
Connection Mode - Select this if you do not want the Dell Wireless Dock to connect
automatically. To connect your Dell Wireless Dock to the
Manual
notebook in this mode, you must click the Dell Wireless Dock
icon and select Connect under the Options menu.
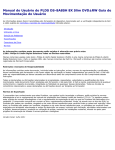
UWB Radio and Host Settings
The UWB Radio and Host Settings section allows you to:
26
•
Enable or disable the Wireless USB radio.
•
Select audio output
Using the Dell Wireless USB Manager
0HPCHA00.book Page 27 Thursday, October 22, 2009 4:05 PM
•
Change wireless USB channels
•
Run diagnostics
4
5
3
2
1
1
Diagnostics section allows you to run device diagnostics.
Click Check UWB Card Communication button to check if your notebook
is working properly.
Click Check for remote UWB devices button to check for other Wireless
USB Devices.
Click Check for Radio Status button to see what channel is running
at the moment.
2
Host Settings section displays the Host Name and Host Address
(Media Access Control address), and allows you to change channels.
For optimized performance, it is recommended to set the channel to Auto.
3
Move your mouse cursor on this area to change channel, select audio output,
turn radio on/off and run diagnostics.
4
Radio Status allows you to enable or disable the Wireless USB radio.
5
Audio Select allows you to send audio output to your notebook or to external
speakers connected to your Dell Wireless Dock.
Using the Dell Wireless USB Manager
27
0HPCHA00.book Page 28 Thursday, October 22, 2009 4:05 PM
28
Using the Dell Wireless USB Manager
0HPCHA00.book Page 29 Thursday, October 22, 2009 4:05 PM
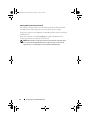
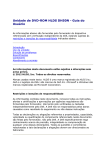
Resetting the Dell Wireless Dock
To delete all associations stored on your Dell™ Wireless Dock, press and hold
down the reset button for 10 seconds. All notebook-to-dock associations will
be lost and you will have to re-establish a connection.
To re-establish a connection to a notebook, you must repeat the association
process. For more information, see the "Associating Your Dell Wireless Dock"
on page 16.
NOTE: The previously associated device entries will remain in the Connection
Manager on your notebook, but will be grayed out. Delete these device entries to
avoid confusion.
Reset button
Resetting the Dell Wireless Dock
29
0HPCHA00.book Page 30 Thursday, October 22, 2009 4:05 PM
30
Resetting the Dell Wireless Dock
0HPCHA00.book Page 31 Thursday, October 22, 2009 4:05 PM
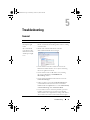
Troubleshooting
General
Problem
Possible Solution
The Dell™ Wireless
Dock power light
is Off.
• Ensure that the AC adapter shipped with the Dell Wireless
Dock is connected to the docking station and to a working
electrical outlet.
My notebook will
not connect to the
Dell Wireless Dock
and the power light
is on.
• Disable and enable the Dell Wireless Dock in
Microsoft® Windows® device manager.
• Ensure that the notebook is within six meters of the
Dell Wireless Dock and there are no objects obstructing
the line of sight between them.
• Ensure that the wireless USB radio is on by checking
the wireless USB manager’s UWB Radio and
Host Settings window.
• Ensure that the Dell Wireless Dock has an icon in the
Connection Manager.
• If there is a device icon in the Connection Manager for
your Dell Wireless Dock, click on the icon and select
Connect under the Options menu or select Automatically
connect within range under Connection Mode.
• If you continue to have connection problems, press and
hold the reset button for 10 seconds to reset the Dell
Wireless Dock to the original factory settings. This deletes
all associations. You must associate all the devices again.
Troubleshooting
31
0HPCHA00.book Page 32 Thursday, October 22, 2009 4:05 PM
Video Output
Problem
Possible Solution
The monitor is blank. • Ensure that the notebook connected to the Dell Wireless Dock
is functioning properly and is not in Standby or Hibernate
mode. When the notebook is in Standby and Hibernate
mode, the display is always blank.
• Ensure that the AC adapter is connected to the
Dell Wireless Dock and to a working electrical outlet.
• Ensure that the video cable is securely connected to the DVI
connector and is secured with the fixing screws on both sides.
• Ensure that the drivers and utilities for Dell Wireless Dock
software are installed. The Wireless USB display icon
for the docking station should be visible in the taskbar.
• If the problem persists, disconnect and reconnect the
AC adapter from the Dell Wireless Dock.
My monitor is not
correctly displaying
videos and images
from my
Windows Vista®
notebook.
To correctly display video and images in Windows Vista, you
must set the notebook to Windows Aero® mode.
To enable Aero:
1 Right-click the desktop background and select Personalize
to open the Personalize appearance and sounds window.
2 Click Window Color and Appearance.
3 Select Windows Aero from the Color Scheme list and
click OK.
The video playback To improve video playback performance, ensure that:
on my external
• The notebook is within the maximum operating range of
monitor is choppy
the Dell Wireless Dock.
or is dropping frames.
• The notebook has a clear line-of-sight to the
Dell Wireless Dock.
• The window size of the video being played is smaller
than 50% of the external monitor’s viewable area.
32
Troubleshooting
0HPCHA00.book Page 33 Thursday, October 22, 2009 4:05 PM
Problem
Possible Solution
When I close the
lid of my notebook,
the display of the
external monitor
goes blank.
By default, most notebooks go into Standby or Hibernate
mode when the lid is closed.
To change this setting:
Open the Control Panel and select Power Options.
• Windows Vista: Select Choose what closing the lid does on
the left column. Select the When I close the lid, and then
select Do nothing.
• Windows XP: Select the Advanced tab. In the Power buttons
section, under the option When I close the lid of my
computer, select Do nothing.
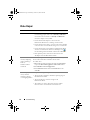
Audio Output
Problem
Possible Solution
I cannot hear
anything through
my notebook
speakers and my
built-in microphone
does not work after
connecting to the
Dell Wireless Dock.
By default, most notebooks send the audio output to the
Dell Wireless Dock when associated, thereby disabling
your notebook’s built-in speakers and microphone.
To enable the speakers and microphone:
1 Open the UWB Radio and Host Settings window in
the Wireless USB Manager.
2 Select Laptop to enable the speakers and microphone
on your notebook.
NOTE: You must restart the application currently using the
audio device to enable this change.
Troubleshooting
33
0HPCHA00.book Page 34 Thursday, October 22, 2009 4:05 PM
34
Troubleshooting
0HPCHA00.book Page 35 Thursday, October 22, 2009 4:05 PM
Specifications
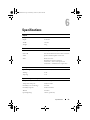
Physical
Height
172 mm
Depth
26–80 mm
Width
116 mm
Weight
320 g
I/O Connectors
USB
Four 4-pin USB 2.0 compliant connectors
mini-USB
One mini-USB connector for cable association
Audio
Speaker and microphone connectors
Video
DVI-I connector.
Maximum resolution supported:
1680x1050 — wide screen aspect ratio
1600x1200 — standard screen aspect ratio
AC Adapter Power
Input Voltage
100–240 VAC, 50/60 Hz
Wattage
65 W
Amperage
1.5 A
System Level Operational Specifications
Temperature (system external)
0ºC–35ºC, typical at 25ºC
Temperature ramp rate
0ºC/hr–35ºC/hr
Humidity (non-condensing)
10%–80%
Humidity ramp rate
20%/hr maximum
Altitude
0–3048 m
Operating Range
1 meter (optimum)
Specifications
35
0HPCHA00.book Page 36 Thursday, October 22, 2009 4:05 PM
System Level Non-Operational and Shipping Specifications
Temperature (system external)
-40ºC to 65ºC
Temperature ramp rate
0ºC/hr–20ºC/hr
Humidity (non-condensing)
5%–95%
Humidity ramp rate
20%/hr maximum
Altitude
0–10670 m
36
Specifications
0HPCHA00.book Page 37 Thursday, October 22, 2009 4:05 PM
General Safety Information
Use the following safety guidelines to help ensure your own personal safety,
and to help protect your equipment and working environment from
potential damage.
You can find additional Safety Best Practices information on the Regulatory
Compliance Homepage at www.dell.com/regulatory_compliance.
NOTE: In this document, the terms product, equipment, and device are used
interchangeably and refer to all portable devices (such as notebooks, port
replicators, media bases, docking stations, and similar devices), desktop
computers, printers, and monitors.
WARNING: Use of controls, adjustments, procedures, connections, or signal
types other than those specified in your documentation may result in exposure
to shock, electrical hazards, and/or mechanical hazards.
CAUTION: Dell products are not intended for use in patient healthcare
environments unless specially designated.
CAUTION: Dell products are not designed for use in flammable or
explosive environments.
When setting up the equipment for use:
•
Place the equipment on a hard, level surface.
•
Do not stack the equipment, place it in an enclosed space, or otherwise
install it where it is subject to heated air. The equipment should have at
least 10.2 cm (4 in) of clearance on all vented sides to permit the airflow
required for proper ventilation. Restricting airflow can damage the
equipment or cause overheating.
General Safety Information
37
0HPCHA00.book Page 38 Thursday, October 22, 2009 4:05 PM
When operating your equipment:
WARNING: Do not use your equipment in a wet environment. Protect equipment
from liquid intrusion.
•
Do not use damaged equipment, including exposed, frayed, or damaged
power cords.
•
Disconnect your device and all peripherals (including an integrated or
optional modem or TV tuner) from any wall connections during an
electrical (lightning) storm, or when you will be away for extended periods.
•
Do not push any objects into the air vents or openings of your equipment.
Doing so can cause fire or electric shock by shorting out interior components.
•
Do not allow your notebook or adapter to operate with the base resting
directly on exposed skin for extended periods of time. The surface
temperature of the base will rise during normal operation, particularly when
AC power is present. Allowing sustained contact with exposed skin can
cause discomfort or burn.
•
Contact Dell (or an authorized dealer or service center for retail
purchases) if your equipment does not operate normally.
General Power Safety
Observe the following guidelines when connecting your equipment to a
power source.
If your equipment uses an AC adapter:
38
•
Use only the Dell provided AC adapter approved for use with this device:
E16WD01:PA-2E. Use of another AC adapter may cause a fire or explosion.
•
Place the AC adapter in a ventilated area, such as a desk top or on the floor,
when you use it to run the Dell Wireless Dock.
•
The AC adapter may become hot during normal operation of your
Dell Wireless Dock. Use care when handling the adapter during or
immediately after operation.
General Safety Information
0HPCHA00.book Page 39 Thursday, October 22, 2009 4:05 PM
Earphone and Headphone Safety
WARNING: Excessive sound pressure from earphones or headphones can cause
hearing damage or loss. Adjustment of the volume control and/or the equalizer to
settings other than the center position may increase the earphones or headphones
output voltage, and therefore the sound pressure level.
The use of factors influencing the earphones or headphones output other
than those specified by the manufacturer (e.g. operating system, equalizer
software, firmware, driver) may increase the earphones or headphones output
voltage and therefore the sound pressure level.
The use of earphones or headphones other than those specified by the
manufacturer may lead to heightened sound pressure level.
Ergonomic Instructions
For information concerning ergonomics, please go to the Regulatory
Compliance Homepage at www.dell.com/regulatory_compliance.
Environmental Information
Recycling Information
Dell recommends that customers dispose of their used computer hardware,
monitors, printers, and other peripherals in an environmentally sound
manner. Potential methods include reuse of parts or whole products and
recycling of products, components, and/ or materials.
For specific information on Dell's worldwide recycling programs,
see www.dell.com/recyclingworldwide.
Waste Electrical and Electronic Equipment (WEEE) Directive
In the European Union, this label indicates that this product
should not be disposed of with household waste. It should be
deposited at an appropriate facility to enable recovery and
recycling. For information on how to recycle this product
responsibly in your country, visit www.euro.dell.com/recycling.
General Safety Information
39
0HPCHA00.book Page 40 Thursday, October 22, 2009 4:05 PM
Registration, Evaluation, and Authorization of Chemicals (REACH)
REACH is the European Union chemical substances regulatory framework.
Information on substances of very high concern contained in Dell products
in a concentration above 0.1% weight by weight (w/w) can be found at
www.dell.com/reach.
Finding Additional Information
For additional user information about your Dell Wireless Dock and individual
components (such as storage drives, PC cards, and other peripherals), see the
Dell Support website at support.dell.com/manuals.
For additional Safety Best Practices and Regulatory information, see the
Regulatory Compliance Homepage at www.dell.com/regulatory_compliance.
For additional recycling information, see the Global Recycling Homepage at
www.dell.com/recyclingworldwide.
Export Regulations
Customer acknowledges that these Products, which may include technology
and software, are subject to the customs and export control laws and
regulations of the United States ("U.S.") and may also be subject to the
customs and export laws and regulations of the country in which the Products
are manufactured and/or received. Customer agrees to abide by those laws
and regulations. Further, under U.S. law, the Products may not be sold,
leased or otherwise transferred to restricted end-users or to restricted countries.
In addition, the Products may not be sold, leased or otherwise transferred to,
or utilized by an end-user engaged in activities related to weapons of mass
destruction, including without limitation, activities related to the design,
development, production or use of nuclear weapons, materials, or facilities,
missiles or the support of missile projects, and chemical or biological weapons.
40
General Safety Information
0HPCHA00.book Page 41 Thursday, October 22, 2009 4:05 PM
Additional Country-Specific Safety, Regulatory,
and Environmental Information
Korea (Korean)
Energy Statement
Power consumption of this product can be 0 if it is unplugged.
China (S. Chinese)
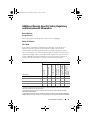
China RoHS
In accordance with China's Administrative Measures on the Control of
Pollution Caused by Electronic Information Products (also known as
China RoHS), the following information is provided regarding the names
and concentration levels of toxic and/or hazardous substances which may be
contained in Dell products. The China RoHS requirements can be found in
Chinese MII MCV standard: "Requirements for Concentration Limits for
Certain Hazardous Substances in Electronic Information Products."
Part Name
Lead (Pb)
Mercury (Hg)
Cadmium (Cd)
Hexavalent
Chromium (Cr VI)
Polybrominated
biphenyls (PBB)
Polybrominated
diphenyl ethers
(PBDE)
Toxic or Hazardous Substances and Elements
Chassis/Bezel
X
0
0
0
0
0
Printed Circuit Assembly (PCA)*
X
0
0
0
0
0
Cables/Cords/ Connectors
X
0
0
0
0
0
Power Supply/ Power Adapter
X
0
0
0
0
0
* Printed Circuit Assembly includes all Printed Circuit Boards (PCBs) and their respective population
of discrete components, ICs, and connectors.
"0" indicates the hazardous and toxic substance content of the part is lower than the threshold
defined by the MCV Standard.
"X" indicates the hazardous and toxic substance content of the part is over the threshold defined by
the MCV Standard. In all cases where an X is shown, Dell uses an allowable exemption per EU RoHS.
General Safety Information
41
0HPCHA00.book Page 42 Thursday, October 22, 2009 4:05 PM
42
General Safety Information