1
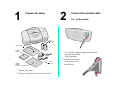
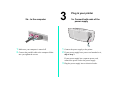
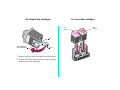
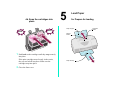
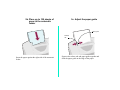
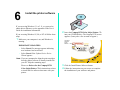
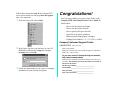
Getting Started
1
2
Prepare for setup
Connect the parallel cable
2a... to the printer
Print
cartridges
User’s Guide
Software
on CD
Getting
Started
booklet
1
2
Power
supply
Unpack your printer.
Remove all packing material from the printer.
1
Use a parallel cable that supports bidirectional
communication (IEEE
1284-compatible).
2
Fasten the metal clips
on the printer to the
parallel cable.
2b... to the computer
1
2
Make sure your computer is turned off.
Connect the parallel cable to the computer. Make
sure you tighten the screws.
3
1
2
Plug in your printer
3a. Connect both ends of the
power supply
Connect the power supply to the printer.
If your power supply has a power cord attached to it,
skip to step 3.
If your power supply has a separate power cord,
connect the power cord to the power supply.
3
Plug the power supply into an electrical outlet.
3b. Is the Power light on?
4
Install the print cartridges
4a. Raise the front cover
Power light
When you raise the front cover, the print cartridge
carrier moves to the loading position.
If the Power light is on, continue with step 4.
If not, check your connections.
4b. Unpack the cartridges
4c. Insert the cartridges
Color
cartridge
Tape
Do not touch the
gold contact area
1
2
Sticker
Remove each new print cartridge from its packaging.
Remove the sticker and the transparent tape covering
the gold area on the cartridges.
Black
cartridge
4d. Snap the cartridges into
place
5
Load Paper
5a. Prepare for loading
Paper support
SNAP
SNAP
Manual
feeder
1
Push back on the cartridges until they snap securely
into place.
If the print cartridges move loosely in the carrier,
they are not locked into place. Make sure the
cartridges snap into place.
2
Close the front cover.
Paper exit tray
Automatic
feeder
5b. Place up to 100 sheets of
paper in the automatic
feeder
5c. Adjust the paper guide
Paper guide
Release
tab
Insert the paper against the right side of the automatic
feeder.
Squeeze the release tab and paper guide together and
slide the paper guide to the edge of the paper.
6
Install the printer software
If you are using Windows 3.1 or 3.11, or you need to
obtain driver diskettes, see the appendix of the User’s
Guide for installation information.
If you are using Windows 95, 98, or NT 4.0 follow these
steps:
1
2
Make sure your computer is on, and Windows is
running.
Insert the Compaq IJ750 Color Inkjet Printer CD
into your CD-ROM drive. The Compaq IJ750 screen
appears. (It may take a few seconds to appear.)
Click this to
install the
printer
software.
IMPORTANT! READ THIS:
• Select Cancel if a message appears indicating
new hardware has been found.
• Select Cancel if the Update Device Driver
Wizard appears.
Note: If you are prompted to align the print cartridges
then the printer software is already installed on
your PC. Skip the remaining steps.
Please see Drivers for the Compaq IJ750
Color Inkjet Printer CD for instructions on how
to install the free software that came with your
printer.
3
4
Click the Install Printer Software button.
Follow the instructions on your screen to complete
the installation of your software and printer.
Follow these instructions only if the Compaq IJ750
screen shown on the previous page does not appear
after a few moments:
1
From the Start menu, choose Run.
Congratulations!
You have successfully set up your printer. Refer to the
Compaq IJ750 Color Inkjet Printer User’s Guide for
details about:
•
•
•
•
•
•
How to use the buttons and lights
How to use the printer software
How to print on all types of media
Quick Fixes for printer problems
Replacing and changing print cartridges
Printing from Windows 3.1, 3.11, NT 4.0, or DOS
Compaq Customer Support Center
1-281-927-5272
2
In the Open: text box, type the letter of your CDROM drive, followed by :\setup (for example,
d:\setup), then click OK.
(USA and Canada)
Hours of Operations:
During the warranty period, free technical support is available 24
hours a day, 7 days a week.
Or you may contact Compaq through our website:
http://www.compaq/athome
Please have the following information available so we may serve
you faster. The machine type and serial number are located on
the back of the printer.
Machine Type number_________________________
3
Follow the instructions on your screen to complete
installation of your software and printer.
Serial number ______________________________
Date purchased_____________________________
Store where purchased ______________________