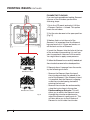
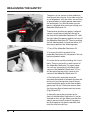
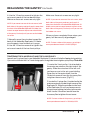
1
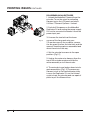
®
TROUBLESHOOTING
AND MAINTENANCE
TABLE OF CONTENTS
1TROUBLESHOOTING
Objects Do Not Stick to the Build Plate
Objects are Difficult to Remove from the Build Plate
Extrusion Stops
Replicator 2X Shakes
Filament Not Loading
Filament Stuck
Disassembling an Extruder
LCD Error Messages
Misaligned Nozzles
MakerBot MakerWare Error Messages
MakerBot Support
Dos and Don’ts
Tools You May Find Useful
Diagnosing Print Quality Issues
2MAINTENANCE
Leveling the Build Plate
Replacing Kapton Tape
Lubricating the Z-Axis Rod and Idler Pulley
Realigning the Gantry
Tightening the X- and Y-Axis Pulleys
Filament Care
Adjusting Extruder Spring Tension
04
05
05
06
07
08
09
10
11
14
16
21
21
22
23
28
29
31
32
34
35
36
36
TABLE OF CONTENTS
3
1
Troubleshooting
INTRODUCTION
This Troubleshooting and Maintenance Guide is designed as a companion
to your MakerBot Replicator 2X User Guide. In the first section you will
find troubleshooting solutions to common problems you may come
across when using your Makerbot Replicator 2X. In the second section
we explain several methods for keeping your MakerBot Replicator 2X well
maintained. Referring to this guide will help ensure that you continue to
make amazing things with your MakerBot Replicator 2X.
PRINTING ISSUES
OBJECTS DO NOT STICK TO THE
BUILD PLATE
If printed objects are not sticking to the
build plate, try these solutions:
• Re-level your build plate by going to the
LCD menu and navigating to Utilities
> Level Build Plate. Inconsistent plate
height will lead to inconsistent adhesion.
If any one part of your object does not
adhere well to the plate, the whole object
might peel off the plate. Try leveling the
plate again using a thinner piece of paper
or feeler gauge to check the distance
between the nozzle and the build plate.
• Ensure that the plate is clean. Bubbles,
scratches, dust, and oil from your hands
can prevent objects from sticking to the
Kapton tape. Wipe down the build plate
with a clean, lint-free cloth.
• Increase the temperature of the build
plate by five degrees. You can change
the temperature of the build plate in the
Advanced Options section in the Make
dialog in MakerWare.
• If you continue to have adhesion problems,
loosen each of the plate-leveling knobs
about a quarter of a turn to bring the plate
slightly closer to the nozzles.
OBJECTS ARE DIFFICULT TO REMOVE
FROM THE BUILD PLATE
If printed objects are difficult to remove
from the build plate, try these solutions:
• Wait for the build plate to cool down.
Objects will detach more easily when
both the plastic and the plate are cool.
• Use a metal craft spatula and carefully
work the blade under the edge of the
object. When the blade is under the
object, twist the handle slightly. The
object should come free.
TROUBLESHOOTING
5
PRINTING ISSUES CONTINUED
EXTRUSION STOPS
There are a few problems that can cause
your MakerBot Replicator 2X to stop
extruding. Use this checklist to determine
the cause and appropriate solution.
Fig. 1.1
Motor shafts
6
• Is your extruder motor rotating? Use a
marker to draw a line across the end
of the motor shaft that is visible at the
back of the motor. When the extruder is
running, you should be able to see the
shaft turning. The shaft may sometimes
reverse direction in order to retract
filament, but during extrusion it should
be moving at a slow but constant rate. If
the shaft does not turn, or stops turning,
please get in touch with MakerBot
Support and we’ll help you figure out
what’s going on. [Fig 1.1]
• Is your filament tangled? Check that the
spool is spinning smoothly on the mount.
• Is the build plate too close to the
extruder? If so, there might not be room
for the plastic to come out of the extruder.
If your extruder stops extruding during the
first or second layer of a build, this usually
indicates that the build plate is too close
to the extruder.
• Is the nozzle clogged? Go to the LCD
menu on your MakerBot Replicator 2X and
navigate to Utilities > Change Filament
> Load right or Load left. Run the Load
script. Observe the plastic as it emerges
from the nozzle. Does it drop straight
down, or curl up toward the extruder? If
it curls back up toward the extruder, the
nozzle may be partially clogged. Contact
MakerBot Support for assistance.
• Still having trouble? You can always get
in touch with [email protected] for
additional help and information.
PRINTING ISSUES CONTINUED
REPLICATOR 2X SHAKES
Your Replicator 2X will shake during printing
if you print at high speeds with acceleration
turned off. Attempting to print at high
speeds with acceleration turned off can
harm your MakerBot Replicator 2X.
To check and change the Acceleration
setting, go to the LCD menu on your
Replicator MakerBot 2X and navigate to
Info and Settings > General Settings >
Accelerate. You can turn acceleration off and
on. You can also do this using the Onboard
Preferences in MakerWare or ReplicatorG.
Acceleration is turned on by default. If you
have acceleration turned off, you should not
print at speeds above 40 mm/s.
TROUBLESHOOTING
7
PRINTING ISSUES CONTINUED
FILAMENT NOT LOADING
If you are having problems loading filament
into one of the extruders, perform the
following steps:
1. Go to the LCD panel and select Utilities
> Filament Options > Unload. This option
heats the extruders.
2. Set the extruder arm to the open position.
[Fig 1.2]
3. Make a fresh cut at the end of the
filament. It is important that the filament
have no bends in it. If there are bends, cut
off the bent section of filament.
4. Insert the filament into the hole at the top
of the extruder. Keep pushing it in until you
start to see plastic come out of the nozzle.
You might have to apply some pressure.
5. When the filament is successfully loaded, set
the extruder lever arm to the closed position.
If filament doesn’t emerge from the nozzle,
try the following solutions:
Extruder arms open
Extruder arms closed
Fig. 1.2
8
• Remove the filament from the top of
the extruder and check for a bend at the
end of the filament. If the filament is bent,
it is possible that the filament is slipping
under the extruder bearing instead of
entering the hot end.
• Remove the extruder fan and assembly
using the instructions in the section
Disassembling an Extruder. This will
allow you to watch the filament travel
through the extruder and determine
where the filament is getting stuck. This
will also allow you to see if a piece of
filament is stuck inside the extruder.
PRINTING ISSUES CONTINUED
FILAMENT STUCK
Filament can swell inside the extruder and
get stuck. If you cannot unload filament
from one of the extruders, do the following:
1. Go to the LCD panel and select Utilities
> Filament Options > Unload. This option
heats the extruders.
4. Try pulling the filament out of the
extruder again.
If you are unable to unload filament because
it has broken off inside the extruder, you
might not be able to reach inside the
extruder to clear the blockage. In that case,
see the section Disassembling an Extruder.
2. Set the extruder arm to the open position.
3. Push about half an inch of filament
through the extruder to clear the blockage.
TROUBLESHOOTING
9
PRINTING ISSUES CONTINUED
DISASSEMBLING AN EXTRUDER
1. Unload the MakerBot Filament from the
extruder. To run the script for unloading
filament, go to the LCD panel and select
Utilities > Filament Options > Unload.
2. Switch off the power on the MakerBot
Replicator 2X and unplug the power supply.
Pull on the connector to release it from the
power input port.
Fig. 1.3
3. Unscrew the two bolts at the lower
corners of the fan guard using your
2.5 mm hex wrench. As one piece, remove
the fan guard, the fan, the heat sink, and the
spacers. Keep these pieces assembled and
move them out of the way.
4. Set the extruder lever arm to the open
position. [Fig 1.2]
5. Unplug the motor wire harness from the
top of the extruder motor and slide the
motor assembly out of the extruder.
6. The extruder is now broken down into its
main assemblies. [Fig 1.3] To remove any
filament stuck in the thermal barrier tube,
turn on the Replicator 2X, run the Unload
script to heat the extruder and use a pair of
pliers to pull the filament free.
10
LCD ERROR MESSAGES
If your MakerBot Replicator 2X encounters problems during operation, the LCD menu will
display an error message. The following table describes each possible error message.
NOTE: If you see an error message in an unexpected context, please contact MakerBot Support by emailing
[email protected].
Error Message
Description
Use the LCD menu to check your target
extruder temperatures. Navigate to Info and
Settings > Preheat Settings to make sure
the extruder temperatures are not set higher
than 300C.
If the extruder temperatures are set to
below 300C, contact MakerBot support.
To clear this message, you will have to
restart your MakerBot Replicator 2X.
Your MakerBot Replicator 2X has
automatically disabled its heaters after a
period of inactivity as a safety precaution.
Re-start your print or the preheat routine to
reset your heaters.
TROUBLESHOOTING
11
LCD ERROR MESSAGES CONTINUED
These messages indicate that your
MakerBot Replicator 2X cannot read the
temperature for one of the extruders.
Ensure that the wires going into your
extruders are securely plugged in or contact
MakerBot Support by emailing
[email protected].
To clear Heating Errors #3 and 4, you will have
to restart your MakerBot Replicator 2X.
Your MakerBot Replicator 2X cannot read
SD cards larger than 2GB. Try a smaller card.
Your MakerBot Replicator 2X ran into a onetime problem while reading the SD card. The
problem should not reoccur.
12
LCD ERROR MESSAGES CONTINUED
Something might be wrong with your
extruder. Please contact MakerBot Support
by emailing [email protected].
This is just an informational message. If
you are loading or unloading filament, the
process times out after five minutes.
The onboard preheat sequence was
interrupted by instructions sent by the
software telling the MakerBot Replicator 2X
to change the extruder temperature.
These are the messages you could receive if
your SD card is not formatted correctly or if
there is something wrong with the card. Your
MakerBot Replicator 2X can read SD cards:
• formatted for FAT16 SDSC card
• no larger than 2GB.
Make sure your SD card has not been
removed from the MakerBot Replicator 2X
during printing. If the card is still in its port
on the MakerBot Replicator 2X, there might
be a problem with the card itself. Make sure
the card is formatted correctly.
TROUBLESHOOTING
13
MISALIGNED NOZZLES
MakerBot executes an alignment script
on every MakerBot Replicator 2X before
shipping. However, if plastic coming from the
two extruders does not appear to be aligned
correctly during dual extrusion prints, you
can run the alignment script again at home.
1. Make sure filament is loaded into
both extruders.
2. To start the nozzle alignment script, go
to the LCD menu and navigate to Utilities >
Calibrate Nozzles.
Fig. 1.4
3. The MakerBot Replicator 2X will heat the
build plate and extruders and then print a
test print for aligning the nozzles.
First, one extruder prints a series of
straight lines parallel to the front of the
build platform, starting at the front left
corner of the platform and extending to
the back left corner of the platform. The
other extruder then prints a second series
of lines, perpendicular to the front of the
build platform and starting at the center of
the platform and extending to the left. The
second extruder then prints a line alongside
each line printed by the first extruder.
4. When the test print has completed, you
will see two sets of lines. Each set includes
two sets of 13 parallel lines, one set printed
by each extruder. [Fig. 1.4]
After the test print is completed, the LCD
menu will provide new instructions and
prompt you for input.
14
MISALIGNED NOZZLES CONTINUED
5. Look closely at your test print. First look at
the set of lines to the left (the lines that are
parallel to the front of the build plate). Notice
that the first lines on the left are farther from
the front of the build plate than the first lines
on the right. Examine the lines and find the
pair of lines that match best. The best match
will look the most like a single continuous line,
with both test lines perfectly centered. Note
the number. This is the best line for the Y axis.
6. Look at the set of lines to the right (the
lines that are perpendicular to the front of the
build plate). Examine the lines and find the
pair that match best. The best match will look
the most like a single continuous line, with
both test lines perfectly centered. Note the
number. This is the best line for the X axis.
7. The LCD menu will prompt you to enter the
line number that is best for the X axis and the
line number that is best for the Y axis.
8. Use the arrow buttons to select a line
number and the M button to select a line
number. The MakerBot Replicator 2X will
store this information about the locations of
the extruder nozzles and use them to make
future prints align better.
TROUBLESHOOTING
15
MAKERBOT MAKERWARE ERROR MESSAGES
MakerWare displays error messages to help you avoid potential problems and diagnose
existing problems.
INSTALLATION
The following error message could appear during installation of MakerBot MakerWare:
Error Message
Description
The installation failed.
This message appears when installation is
not successful.
The installer encountered an error that
caused the installation to fail. Contact the
software manufacturer for assistance.
Perform the installation steps again. If the
installation fails again, collect as much
information on the failure as you can and
open a Support Ticket by emailing
[email protected].
Your operating system may not recognize
the drivers MakerWare is installing because
they are specific to MakerWare and to your
MakerBot Replicator 2X. Select “OK” to allow
MakerWare and its device drivers to install.
STARTUP
The following error messages could appear when you open MakerWare:
Error Message
Description
Background Service Unavailable.
Conveyor, the background service that
manages print jobs and your computer’s
connection to your Replicator 2X, is
not running. This service is required by
MakerWare.
The background job management service
is not available. Please go to Services ->
Restart Background Service. For more help,
please visit http://www.makerbot.com/
support or email [email protected]
To restart Conveyor:
1. Go the Services menu.
2. Select Restart Background Service.
16
MAKERBOT MAKERWARE ERROR MESSAGES CONTINUED
MAKERWARE WINDOW
The following error messages could appear in the main MakerWare window during operation:
Error Message
Description
Print failed.
This error message appears when:
See MakerWare log for more information.
• A print is cancelled before completion.
• The MakerBot Replicator 2X is
disconnected from the computer where
MakerWare is running during a print via
USB. Check the USB connection between
the MakerBot Replicator 2X and the
computer.
• Conveyor, the background service, is
unavailable. To restart Conveyor, go to
the Service menu and select “Restart
Background Service.”
Service Error.
This error message appears when:
No connection to the background service.
• You try to print an object while the
background is unavailable.
• You try to export a file while the
background service is unavailable.
To restart Conveyor, the background service:
1. Go the Services menu.
2. Select Restart Background Service.
There are unfinished exports in progress.
Closing MakerWare will prevent these files
from being placed in the correct directory.
• Select Cancel to keep MakerWare open
and running until the export completes.
You can then quit MakerWare again.
• Select Close MakerWare to close
MakerWare without finishing the export.
Error Saving [file name and location].
This message appears when you try to save
a file to a location that is read-only.
Unable to open file for writing.
Try saving to another location.
TROUBLESHOOTING
17
MAKERBOT MAKERWARE ERROR MESSAGES CONTINUED
OPENING A FILE
The following messages could appear when you add an object to the plate:
Error Message
Description
The file could not be loaded. It may be an
unsupported file format.
This message appears when you load a file
of a format other than OBJ, STL or Thing, or
a badly formatted STL, OBJ or Thing file.
Error opening file
Couldn’t open [file name]
MakerWare is unable to open the file. This
could appear if you don’t have permissions
to open the file, or if the file is corrupted.
The object is off the platform.
Do you want to put it on the platform?
Select No to leave the object in its
current position.
Select Yes to place the object
on the platform.
This object seems very small. It may have
been designed in inches.
Select No to leave the object at its
current size.
Would you like to scale it to mm?
Select Yes to convert the units of your object
from inches to millimeters. This will resize
the object.
MAKE DIALOG
The following error messages could appear when you try to make something on your
MakerBot Replicator 2X:
Error Message
Description
Background Service Unavailable.
This error message appears when you try to
Make an object while Conveyor, MakerWare’s
background service, is unavailable.
To restart Conveyor:
1. Go the Services menu.
2. Select Restart Background Service.
18
MAKERWARE ERROR MESSAGES CONTINUED
Printer is busy.
This message appears when you try to print
something while another print is still in progress.
Print failed.
This error message appears when:
See MakerWare log for more information.
• A print is cancelled before completion.
• The MakerBot Replicator 2X is
disconnected from the computer where
MakerWare is running during a print via USB.
Check the USB connection between the
MakerBot Replicator 2X and the computer.
• Conveyor, the background service, is
unavailable. To restart Conveyor, go to
the Service menu and select “Restart
Background Service.
ONBOARD PREFERENCES
The following error messages could appear when you select the MakerBots > Onboard
Preferences menu entry:
Error Message
Description
Error displaying onboard preferences.
This message appears when you attempt
to view your Replicator 2X Onboard menu
while your bot is printing.
TROUBLESHOOTING
19
MAKERWARE ERROR MESSAGES CONTINUED
UPLOADING FIRMWARE
The following error messages could appear when you try to update the firmware on your
MakerBot Replicator 2X:
Error Message
Description
Firmware upload requires an internet
connection.
This message appears when a user selects
the menu entry MakerBots > Upload
Firmware and the computer running
MakerWare is not connected to the internet.
Upload Failure.
This message appears when a user
attempts to upload firmware while the
MakerBot Replicator 2X is printing.
MAKERBOT SUPPORT
HOW TO USE MAKERBOT SUPPORT
At MakerBot, we take pride in offering expert,
responsive, friendly customer support to all
of our customers around the world. When
you email or call us, there are a few things
you can do ahead of time to help us help you.
Have your serial number ready.
We use your serial number to look up your
order and get more complete information
on your MakerBot Replicator 2X. The serial
number is located on the underside of the
MakerBot Replicator 2X.
If you are contacting us via email, be as
thorough as possible.
To get the most helpful support response,
provide as much information as possible
about your issue in your initial email. The more
information we have, the more accurately we
can identify your issue. Additional emails will
reach us, but might push your support request
down in the queue.
Send a photo.
Many issues are easier to diagnose with
photographs. These kinds of issues include:
• Situations where something is physically
damaged or out of place.
• Print quality issues.
• Situations where you believe you
understand the issue, but don’t know the
names of the components involved.
20
DOS AND DON’TS
MakerBot encourages you to tinker with
your Replicator 2X Experimental 3D Printer,
but there are some things we know are bad
ideas, and you should know about them, too.
• Don’t put any liquids into your extruder.
Whether it’s boiling water or acetone or
anything in between, it’s not going to help
and it could do a lot of harm.
• Don’t overheat your extruder. We set
temperature limits in our software for your
safety and for the extruder’s safety, so
don’t use anything other than the installed
heaters to heat your extruder – don’t use
blowtorches, and don’t detach parts of the
extruder and put them in the oven.
• Don’t use sharp tools to remove objects
from the build plate – using a knife or
a razor blade to remove prints is just as
likely to hurt you as it is to help.
• Don’t turn your MakerBot Replicator 2X
off immediately after finishing a print.
Give the extruder fans time to cool the
extruder first.
• Don’t drill out your extruder nozzle or drive
any kind of metal tool through the nozzle.
If you change the shape or size of your
nozzle, the slicer will not be able to create
accurate toolpaths.
• Don’t try to replace your extruder nozzles.
The nozzles are very securely attached
to the extruder, and trying to remove
them might result in the threaded portion
of the nozzle shearing off and remaining
inside the thermal core.
• Do make sure small and medium-sized
prints work well before leaving your
MakerBot Replicator 2X unattended
for long prints.
• Do use only MakerBot Filament with
your MakerBot Replicator 2X.
• Do be careful with the ceramic insulation
on your extruders’ thermal cores. Hitting
them with tools or gripping them
with pliers might break off parts of
the ceramic insulation.
TROUBLESHOOTING
21
USEFUL TOOLS
Your MakerBot Replicator 2X package
includes everything you need to start printing,
but here are a few other things that might
come in handy as you begin to experiment.
A craft spatula. A thin metal craft spatula
is a great tool for removing stubborn prints
form the build plate. Carefully work the
edge of the spatula under the edge of your
print, making sure to keep the spatula at a
low angle. If the spatula is pointing down
too steeply, it’s more likely to damage your
Kapton tape. When you’ve used the spatula
to detach as much of the edges from the
build surface as possible, twist the handle
slightly. The print should pop right off.
22
Sandpaper and files. Files are good for
removing small imperfections in a print, or
removing traces of support structures, and
sandpaper is great at smoothing out layer lines.
Use progressively finer grades of sandpaper for
a smoother and smoother finish.
A small brush or canned air. You can use
either of these tools to clean out the drive
gears on your extruders. The drive gears are
accessible through the outside sides of each
extruder’s drive block.
DIAGNOSING PRINT QUALITY ISSUES
Sometimes little things can go wrong with a
print – things that are easy to fix, but only if
you know what’s causing the problem. This
guide can help: just find the picture of the
problem you’re experiencing and read the
tips on how to fix it.
File Name: Frank’s Head
Design by: michaelmelcone
Thingiverse: 142860
Fig. 1.5
Warping or Cracking
Are your prints curling off the build plate?
This can happen during printing when the
air around your print is too cool. Thermal
expansion means that warmer layers closer
to the extruder are shrinking, causing strain on
the cooler layers below. The shrinking layers
pull at the stable layers, warping the object. If
the bond between two layers isn’t strong, the
strain of the warping layers can actually cause
cracks in the sides of your objects. [Fig. 1.5]
Warping occurs more often with ABS than
with PLA because ABS expands more
when it’s heated. For either type of plastic,
warping can be reduced by warming up the
area around your object. When your print is
surrounded by warm air, newly-printed layers
will cool at a slower rate and adjacent layers
will be closer in temperature. This is why the
MakerBot Replicator 2X is fully enclosed. The
enclosure keeps the heat from the extruders
within the build area and keeps prints at a
more constant temperature.
TROUBLESHOOTING
23
DIAGNOSING PRINT QUALITY ISSUES CONTINUED
Filament Variation
Does it seem like there’s too much or too little
plastic being used in your prints? This can
happen when your filament doesn’t look or
behave exactly how the slicing engine expects
it to. Sometimes 1.75 mm plastic filament is
actually closer to 1.65 mm or 1.85 mm. Your
extruder can handle this range of sizes, but the
slicer requires an accurate description of your
filament to create a good toolpath.
setting. You will see two “feedDiameter”
settings, one enclosed in each of the extruder
profiles. Change the first “feedDiameter”
setting if you are printing using the right
extruder on your MakerBot Replicator 2X and
change the second “feedDiameter” setting if
you are using the left extruder.
To compensate for filament variation, you
can create a custom profile. Instructions
on creating custom profiles are available
at makerbot.com/support/makerware/
documentation/slicer.
If you are having trouble with the amount
of plastic being extruded and the value
entered for “feedDiameter” is accurate, look
at the “feedstockMultiplier” setting. This
setting compensates for any difference
between the calculated volume of plastic
going into the extruder and the actual
amount of the plastic coming out of the
extruder. Like the “feedDiameter” setting,
the “feedstockMultiplier” setting appears
twice in the config file – once in each of the
two extruder profiles. When changing the
“feedstockMultiplier” setting, make sure you
choose the setting for the correct extruder.
1. Unspool a couple of feet of filament
and use a caliper to measure it at several
different points. Average out those
measurements and note the averaged value.
2. Create a custom profile and click the Edit
Profile button to open the config file in a text
editor. Then find the correct “feedDiameter”
24
3. Save the config file and use your new
custom profile to print.
DIAGNOSING PRINT QUALITY ISSUES CONTINUED
If you are overextruding [Fig. 1.6], increase the
“feedstockMultiplier” setting by 0.05, save
the config file, and Export your file again. If the
“feedstockMultiplier” setting reaches a value
of 1.0 without the problem being resolved, you
might have a different issue. Please contact
MakerBot Support.
File Name: 3D mouse
Fig. 1.6
Design by: DDStarkey
Thingiverse: 61909
File Name: 3D mouse
If you are underextruding [Fig. 1.7], decrease
the “feedstockMultiplier” setting by 0.05,
save the config file, and Export your file
again. Continue to decrease the value
entered for this setting in increments. If,
after lowering the default setting by a total
of 0.2, your results do not improve, you
might have a different issue. Please contact
MakerBot Support.
Fig. 1.7
Design by: DDStarkey
Thingiverse: 31909
TROUBLESHOOTING
25
DIAGNOSING PRINT QUALITY ISSUES CONTINUED
Rippling
Do you see faint vertical ripples on the
walls of your prints? [Fig. 1.8] This is due to
mechanical feedback and occurs at higher
speeds. Reduce your print speed in the
Advanced Options section of MakerWare’s
Make dialog.
File Name: light house
Fig. 1.8
To print quickly but avoid rippling, reduce
your print speed only on outer shells. To
do this, you must create a custom profile.
Instructions on creating custom profiles
are available at makerbot.com/support/
makerware/documentation/slicer.
Design by: tc_fea
After you have created a custom profile, click
the Edit Profile button to open the config file
in a text editor. Find the “outlines” extrusion
profile near the end of the config file. In this
extrusion profile, find the “feedrate” setting.
Enter a smaller number of millimeters per
second, then save the config file and use your
new custom profile to print.
Thingiverse: 19786
Axis Drift
Does it look like your whole print shifted
sideways? [Fig. 1.9] This is the result of
skipping on the X or Y-axis. This problem
has multiple possible causes.
File Name: Polygon Vase, Cup, and Bracelet Generator
Design by: Eckerput
Thingiverse: 86502
26
Fig. 1.9
Loose belts: If the toothed belts that move
the gantry are loose, the gear that drives them
can start skipping over the teeth in the belt
instead of grabbing onto them. See http://
www.makerbot.com/support/replicator2/
troubleshooting/ for instructions on how to
tighten the gantry belts.
DIAGNOSING PRINT QUALITY ISSUES CONTINUED
Loose drive gear: If the drive gear in the
extruder comes loose on the extruder motor
shaft, the gear cannot grip the filament
and drive it down into the extruder. Use the
Disassembling an Extruder section on page
10 to remove the motor assembly from the
extruder. Then:
1. Use the 2 mm hex wrench from the
accessory box to remove the two bolts
holding the drive block to the extruder
motor. Remove the drive block and set it
aside. Be careful with the drive block – if
any of the pieces are detached, you might
have a difficult time putting it back together.
2. Ensure that the drive gear is in the correct
position on the motor shaft. The top of the
drive gear should be about 2 mm from the
end of the motor shaft. Locate the set screw
that secures the gear to the motor shaft
and make sure it touches the flat side of the
motor shaft.
4. Return the drive block to the motor. Orient
it so that the extruder lever arm points in
the same direction as the white connector
on the motor. Secure the drive block using
the 2 mm hex wrench and the two bolts you
removed earlier.
5. Return the extruder motor assembly to
the extruder carriage.
6. Reconnect the motor wire harness to the
top of the extruder motor.
7. As one piece, return the fan guard, the
fan, the heat sink, and the spacers to the
extruder. [Fig 1.3] Use the 2.5 mm hex
wrench to tighten the two bolts at the lower
corners of the fan guard.
XYZ Motor Cable: There may be a problem
with the section of the motor cable leading
to the X-axis motor. If so, the cable will need
to be replaced. Get in touch with support@
makerbot.com for more information.
3. Use the 1.5 mm hex wrench from the
accessory box to tighten the set screw
against the motor shaft.
TROUBLESHOOTING
27
2
Maintenance
LEVELING THE BUILD PLATE
LEVELING THE BUILD PLATE
One of the best things you can do to keep
your MakerBot Replicator 2X in top shape is
to level your build plate frequently. It never
hurts to re-level, but forgetting to do so can
hurt your success rate.
Fig. 2.1
• If the build platform is too far from the
extruder nozzle, or if one part of the plate is
farther from the nozzle than another part,
your prints might not stick to the build plate.
• If the build platform is too close to the
extruder nozzle, the build plate can block
your filament from extruding from the
nozzle. The nozzle can also scratch the
build plate if it is too close to the plate.
• Leveling your build plate often will help
ensure that your prints always stick well
to the build plate.
To access the MakerBot Replicator 2X builtin leveling script, go to the Utilities menu on
the LCD screen and select Level Build Plate.
To level the plate without using the built-in script:
1. Go to the Utilities menu on the LCD screen
and select Home Axes.
2. Manually move the extruders to different
points above the build plate. At each point,
use a piece of paper, feeler gauge or other
measuring tool to gauge the distance
between the build plate and extruder
nozzles. The distance should be about
75% of your planned layer height.
3. At each point, turn the leveling knobs
beneath the build plate to the left to raise the
build plate and to the right to lower it [Fig. 2.1].
MAINTENANCE
29
LEVELING BUILD PLATE CONTINUED
You should level your build plate regularly,
especially if you notice that your extruder
nozzle is scratching the build plate, or that
the first layer of an object doesn’t adhere to
the plate. Each time you level, you should also
make sure that your build plate is clean: dust,
scratches and oil from your hands can cause
some of the same problems as a plate that’s
too far from the extruder.
Here are a few tips to keep in mind when you
level your build plate:
• Make sure to take your fingers off the
leveling knobs and platform when you
test the friction on your paper or feeler
gauge; pressure from your hands can affect
platform height.
30
• If you’re having trouble leveling your build
plate, make sure your nozzles are clean.
Small amounts of plastic stuck to the nozzles
can make it feel like the nozzle is closer to the
plate than it really is. Wrinkles in the Kapton
tape can also yield confusing results.
• Printing at lower layer heights might
require the plate and nozzle to be a little
closer together. If you are printing at a
lower layer height than you were previously
and the first layer of your print isn’t sticking
well to the plate, try turning each leveling
knob about a quarter turn to the left.
REPLACING KAPTON TAPE
Over time, the Kapton tape on your build plate
will be scratched and torn, and you will need
to replace it with one of the die-cut Kapton
sheets that was included in the package with
your MakerBot Replicator 2X.
To replace the Kapton tape:
1. Peel off the old Kapton tape and discard it.
Fig. 2.2
Fig. 2.3
2. Locate the extra sheets of Kapton tape
that were included with your MakerBot
Replicator 2X. [Fig. 2.2] If you have used all
of the included sheets of Kapton tape, rolls
of Kapton tape are available at
http://store.makerbot.com/.
Find the tape applicator that was included
with your MakerBot Replicator 2X. [Fig. 2.3]
If you can’t find the tape applicator, you can
use a plastic spatula or a credit card.
Fig. 2.4
3. On one of the short sides of the sheet,
peel back the plastic backing approximately
1/4 inch from the edge, so that 1/4 inch
of the sticky side of the Kapton tape is
exposed.
4. Place the exposed strip of Kapton tape
along the edge of one of the short sides of the
build plate. Use your finger to apply pressure
and adhere the Kapton tape to the build plate.
5. Use the tape applicator to simultaneously
roll back the plastic backing bit by bit and
smooth the newly exposed Kapton tape
as you go. Make sure to smooth out any
bubbles. [Fig. 2.4]
6. Continue smoothing the tape down bit by
bit until you have covered the entire plate.
MAINTENANCE
31
REPLACING KAPTON TAPE CONTINUED
7. If there are still bubbles under the Kapton
tape, lift the edge of the tape that is nearest
to the bubbles and use the tape applicator
to smooth the tape from the center out.
8. When the Kapton tape is applied as
smoothly as possible, trim the edges of
the sheet or fold them over the sides of
the build plate.
NOTE: To view a video of this process, go to the
MakerBot Replicator 2X video page at makerbot.
com/support/replicator2x/videos and select the
video Replicator 2X Kapton Tape Application.
LUBRICATING Z-AXIS ROD AND IDLER PULLEY
After approximately 50 hours of build time,
you should lubricate the threaded rod on your
Z-axis and the X-axis idler pulley.
To lubricate the threaded rod and the idler pulley:
1. Find the tube of PTFE-based grease
included in the package with your the
MakerBot Replicator 2X. If you have used up
this tube of grease, PTFE-based grease is
available from many online retailers.
Fig. 2.5
2. Grasp both sides of the build platform
and push it gently to the bottom of the
MakerBot Replicator 2X.
3. Use a clean, lint-free rag [or your finger]
to spread the PTFE-based grease onto as
much of the threaded rod as you can reach.
Make sure you get the grease inside the
threads themselves. [Fig. 2.5]
32
LUBRICATING Z-AXIS ROD AND IDLER PULLEY CONTINUED
4. Grasp both sides of the build platform and
move it to the top of the MakerBot Replicator 2X.
5. Use a clean, lint-free rag [or your finger]
to spread the PTFE-based grease onto
the bottom section of the threaded rod.
Make sure you get the grease inside the
threads themselves.
X-axis
idler pulley
Fig. 2.6
6. Locate the X-axis idler pulley. Facing the
front of the MakerBot Replicator 2X, the idler
pulley is at the top left side. [Fig. 2.6] The
idler pulley is one of the pulleys that allow the
rubber belt to move the extruder from left to
right, or along the X-axis. The pulley at the
other side of the gantry is called the timing
pulley and does not require lubrication.
7. Squeeze a small amount of the PTFEbased grease directly onto the exposed area
of the metal rod inside the idler pulley and
manually move the pulley back and forth to
spread the grease.[Fig. 2.7]
NOTE: To view a video of this process, go to the
MakerBot Replicator 2X video page at
makerbot.com/support/replicator2x/videos and
Fig. 2.7
select the video Replicator 2X Maintenance.
MAINTENANCE
33
REALIGNING THE GANTRY
The gantry is the system of rods and belts
that moves the extruder. If one side is too far
out of alignment with the other, the outlines
of printed objects might appear slanted on
the build plate. You should make sure you
gantry is aligned after moving or jolting your
MakerBot Replicator 2X.
Fig. 2.8
To determine whether your gantry is aligned
correctly, push the extruders all the way to
the front of the MakerBot Replicator 2X. Hold
the right side of the gantry against the front of
the MakerBot Replicator 2X. Then try pushing
the left side forwards. It should not move. If it
does move, perform the following steps.
1. Turn off the MakerBot Replicator 2X.
2. Unscrew the bolts on each of the
makerBot Replicator 2X side panels. Set the
bolts and panels aside.
Fig. 2.9
3. Locate the four pulleys holding the Y-axis
belts. There is one pulley in each corner of
the MakerBot Replicator 2X upper frame.
You will see two pulleys in the back right
corner of the MakerBot Replicator 2X. You
will be adjusting the pulley closer to the
center of the MakerBot Replicator 2X.
4. For each pulley, manually move the
extruders backwards or forwards to rotate the
pulley until you have a clear view of the set
screw holding the pulley to the front or back
gantry rod. Use the 1.5 mm hex wrench from
the Accessory Box to loosen each set screw.
[Figs 2.8 and 2.9]
5. Manually move the extruders to the
front of the MakerBot Replicator 2X, as far
forward as they will go. Make sure that the
plastic pieces on both sides of the gantry
are flush against the plastic brackets that
hold the two front pulleys.
34
REALIGNING THE GANTRY CONTINUED
6. Use the 1.5 mm hex wrench to tighten the
set screw in each of the two back pulleys.
Make sure these set screws are very tight.
Make sure these set screws are very tight.
NOTE: If you cannot see one of the set screws, hold
both sides of the gantry and very gently push it
NOTE: If you cannot see one of the set screws, hold
away from the back of the MakerBot Replicator 2X.
both sides of the gantry and gently push it away from
Make sure to exert an equal amount of pressure on
the front of the MakerBot Replicator 2X. Make sure
both sides of the gantry. Push only until you can see
to exert an equal amount of pressure on both sides
the hidden set screw.
of the gantry. Push only until you can see the hidden
When you have completed these steps, your
gantry will be correctly aligned again.
set screw.
7. Manually move the extruders toward the
back of the MakerBot Replicator 2X. Make
sure the gantry is as far back as it can go.
8. Use the 1.5 mm hex wrench to tighten the
set screw in each of the two front pulleys.
NOTE: To view a video of this process, go to http://
www.youtube.com/watch?v=NP47vjSZQtA
TIGHTENING THE X-AXIS PULLEY AND THE Y-AXIS PULLEY
Loose X and Y-axis pulleys in your MakerBot Replicator 2X can result in belts slipping during printing.
If you notice shifts on the X or Y-axis during a print, it might be time to tighten your pulleys. To do this:
1. Locate the X-axis pulley. It is attached to
the motor mounted on the right side of the
gantry. Slide the extruders to the left until
you have access to the set screw holding
the pulley to the motor shaft. Use the
1.5mm hex wrench from the Accessory Box
to tighten the set screw. [Fig 2.11]
X-axis
pulley
Fig. 2.11
2. Locate the Y-axis pulley. It is attached to the
motor mounted in the back right corner of the
Replicator 2X. Slide the extruders to the front
of the Replicator 2X until you have access to
the set screw holding the pulley to the motor
shaft. Use the 1.5mm hex wrench from the
Accessory Box to tighten the set screw.
NOTE: To view a video of this process, go to http://
www.youtube.com/watch?v=76XaGlyG0Z0
MAINTENANCE
35
FILAMENT CARE
Your MakerBot Replicator 2X Experimental
3D Printer is optimized to print with 1.75
mm MakerBot ABS plastic filament. For
maximum performance, you must keep
your ABS filament cool and dry. Heat and
humidity can cause the ABS plastic to
absorb moisture and swell. To reduce the
absorption of moisture, keep the filament in
a sealed plastic bag when not in use.
Keep your filament tightly wound on the
spool. Loose filament will become tangled,
and can break or jam during a print.
For more details on ABS plastic filament,
see the chapter on filament in the MakerBot
Replicator 2X User Manual.
ADJUSTING EXTRUDER SPRING TENSION
Each extruder in the MakerBot Replicator 2X
includes a spring that puts tension on the
extruder bearing. The extruder bearing then
pushes the filament against the drive gear,
which drives the filament into the hot end of
the extruder. If the spring puts too much or
too little tension on this bearing, the MakerBot
Replicator 2X cannot extrude filament.
screw is located in the threaded brass insert
next to the filament hole in each extruder’s
drive block.
3. Set the extruder lever arm to the closed
position. The lever arm should point towards
the opposite extruder. Use the 2 mm hex
wrench from the Accessory Box to tighten
the set screw completely.
To adjust the tension on the extruder bearing:
4. Turn the set screw ½ turn counter-clockwise.
1. Unload any filament.
2. Locate the extruder spring set screw on
the extruder that needs adjustment. The set
36
5. Test the tension on the spring. You should
be able to move the extruder lever arm to the
open position with some difficulty.
CONTACT US
SUPPORT
makerbot.com/support
Our website has extensive documentation and troubleshooting
information about your MakerBot Replicator 2X Experimental 3D
Printer. It’s a great resource when you want to try to solve issues
quickly on your own.
[email protected]
If you ever need help resolving an issue with your MakerBot
Replicator 2X, send an email to the address above to open a ticket
with the MakerBot Support Team. To help us understand your
problem from the start, it is very helpful to include pictures or a
video as attachments on your email.
SALES
[email protected]
To learn about other MakerBot products, including MakerBot
Filament, please email the address above, or call our Sales Team
at 1-347-334-6800.
FEEDBACK
[email protected]
For general questions, or to tell us what’s on your mind, send an
email to the address above. We love to hear from you, and using
this email address helps keep our Sales and Support lines free for
customers in need.
CONTACT US
37
WARRANTY, RETURNS, AND REPLACEMENT POLICY
MakerBot products do not carry a long-term warranty. Returns are possible only on unaffected
items, within 14 days of receipt. After such time, all sales are considered final. “Unaffected”
means a device has never been assembled, powered up, programmed, or otherwise changed.
MakerBot cannot accept returns on purchased items that have had electrical power applied
to them, or been otherwise programmed, changed, or affected. However, we will provide parts
or service on items that prove to be defective from the time of manufacture, and we’ll always
work with you to get your bot running again.
TERMS OF SERVICE
Please be advised of the following terms (the “Terms”) regarding this User Manual (the “Manual”):
All information in this Manual is subject to change at any time without notice and is provided
for convenience purposes only. MakerBot reserves the right to modify or revise the Manual
in its sole discretion and at any time. You agree to be bound by any modifications and/or
revisions. Contact the MakerBot Support Team for up-to-date information.
The design of this Manual and all text, graphics, information, content, and other material are
protected by copyright and other laws. The contents are Copyright (c) 2009, 2010, 2011, 2012,
2013 MakerBot Industries LLC, or our respective affiliates and suppliers. All rights reserved.
Certain trademarks, trade names, service marks and logos (the “Marks”) used are registered
and unregistered trademarks, trade names and service marks of MakerBot and its affiliates.
Nothing contained in this Manual grants or should be construed as granting, by implication,
estoppel, or otherwise, any license or right to use any Marks without the written permission of
MakerBot. Any unauthorized use of any information, materials or Marks may violate copyright
laws, trademark laws, laws of privacy and publicity, and/or other laws and regulations.
38
NOTES
TERMS OF SERVICE
39
MakerBot
One MetroTech Center, 21st Floor, Brooklyn, NY
[email protected]
makerbot.com