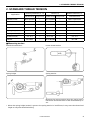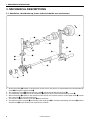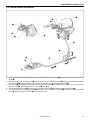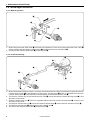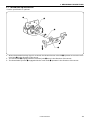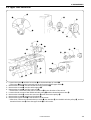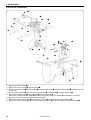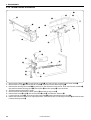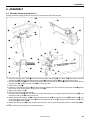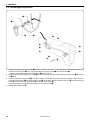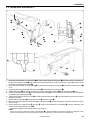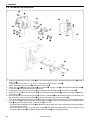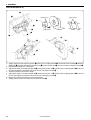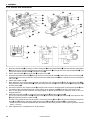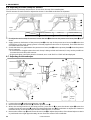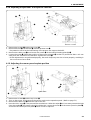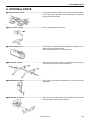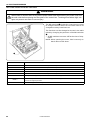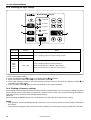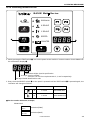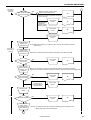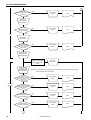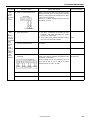
1
LK3-B430E
SERVICE MANUAL
Please read this manual before making any adjustments.
ELECTRONIC LOCKSTITCH BAR TACKER
This service manual is intended for B430E Mark II; be sure to read the B430E Mark II instruction manual before this manual.
Carefully read the "SAFETY INSTRUCTIONS" below and the whole of this manual to understand this product before you start
maintenance.
As a result of research and improvements regarding this product, some details of this manual may not be the same as those for
the product you purchased.
If you have any questions regarding this product, please contact a Brother dealer.
SAFETY INSTRUCTIONS
1. Safety indications and their meanings
This service manual and the indications and symbols that are used on the machine itself are provided in order to ensure safe
operation of this machine and to prevent accidents and injury to yourself or other people.
The meanings of these indications and symbols are given below.
Indications
DANGER
The instructions which follow this term indicate situations where failure to follow the instructions
will almost certainly result in death or severe injury.
CAUTION
The instructions which follow this term indicate situations where failure to follow the instructions could cause injury when using the machine or physical damage to equipment and surroundings.
Symbols
................ This symbol (
) indicates something that you should be careful of. The picture inside the triangle indicates the nature of the caution that must be taken.
(For example, the symbol at left means “beware of injury”.)
................ This symbol (
) indicates something that you must not do.
................ This symbol (
) indicates something that you must do. The picture inside the circle indicates the nature
of the thing that must be done.
(For example, the symbol at left means “you must make the ground connection”.)
i
LK3-B430E Mark II
2. Notes on safety
DANGER
Wait at least 5 minutes after turning off the power switch and disconnecting the power cord from the wall outlet before
opening the face plate of the control box. Touching areas where high voltages are present can result in severe injury.
CAUTION
Environmental requirements
Use the sewing machine in an area which is free from
sources of strong electrical noise such as highfrequency welders.
Sources of strong electrical noise may cause problems with correct operation.
Any fluctuations in the power supply voltage should
be within ±10% of the rated voltage for the machine.
Voltage fluctuations which are greater than this may
cause problems with correct operation.
The power supply capacity should be greater than the
requirements for the sewing machine's electrical
consumption.
Insufficient power supply capacity may cause problems with correct operation.
The ambient temperature should be within the range
of 5°C to 35°C during use.
Temperatures which are lower or higher than this may
cause problems with correct operation.
The relative humidity should be within the range of 45%
to 85% during use, and no dew formation should occur
in any devices.
Excessively dry or humid environments and dew formation may cause problems with correct operation.
Avoid exposure to direct sunlight during use.
Exposure to direct sunlight may cause problems with
correct operation.
In the event of an electrical storm, turn off the power
and disconnect the power cord from the wall outlet.
Lightning may cause problems with correct operation.
Installation
Machine installation should only be carried out by a
qualified technician.
Contact your Brother dealer or a qualified electrician
for any electrical work that may need to be done.
All cords should be secured at least 25 mm away from
any moving parts. Furthermore, do not excessively
bend the cords or secure them too firmly with staples,
otherwise there is the danger that fire or electric shocks
could occur.
The sewing machine weighs more than 47 kg. The
installation should be carried out by two or more people.
Install the belt covers to the machine head and motor.
Do not connect the power cord until installation is
complete, otherwise the machine may operate if the
foot switch is pressed by mistake, which could result
in injury.
If using a work table which has casters, the casters
should be secured in such a way so that they cannot
move.
Hold the machine head with both hands when tilting it
back or returning it to its original position.
Furthermore, after tilting back the machine head, do
not push the face plate side or the pulley side from
above, as this could cause the machine head to topple
over, which may result in personal injury or damage to
the machine.
Be sure to connect the ground. If the ground connection is not secure, you run a high risk of receiving a
serious electric shock, and problems with correct
operation may also occur.
LK3-B430E Mark II
Be sure to wear protective goggles and gloves when
handling the lubricating oil and grease, so that they do
not get into your eyes or onto your skin, otherwise inflammation can result.
Furthermore, do not drink the oil or eat the grease under any circumstances, as they can cause vomiting
and diarrhoea.
Keep the oil out of the reach of children.
ii
CAUTION
Sewing
This sewing machine should only be used by operators who have received the necessary training in safe
use beforehand.
If using a work table which has casters, the casters
should be secured in such a way so that they cannot
move.
The sewing machine should not be used for any
applications other than sewing.
Attach all safety devices before using the sewing
machine. If the machine is used without these devices
attached, injury may result.
Be sure to wear protective goggles when using the
machine.
If goggles are not worn, there is the danger that if a
needle breaks, parts of the broken needle may enter
your eyes and injury may result.
Wait until the needle stops in the needle up position
before turning off the power.
If this is not done, the wiper may strike the needle,
which might cause the needle to break.
Turn off the power switch at the following times,
otherwise the machine may operate if the foot switch
is pressed by mistake, which could result in injury.
• When threading the needle
• When replacing the needle and bobbin
• When not using the machine and when leaving the
machine unattended
Do not touch any of the moving parts or press any
objects against the machine while sewing, as this may
result in personal injury or damage to the machine.
If an error occurs in machine, or if abnormal noises or
smells are noticed, immediately turn off the power
switch. Then contact your nearest Brother dealer or a
qualified technician.
If the machine develops a problem, contact your
nearest Brother dealer or a qualified technician.
Cleaning
Wait until the needle stops in the needle up position
before turning off the power.
If this is not done, the wiper may strike the needle,
which might cause the needle to break.
Turn off the power switch before carrying out cleaning,
otherwise the machine may operate if the foot switch
is pressed by mistake, which could result in injury.
Be sure to wear protective goggles and gloves when
handling the lubricating oil and grease, so that they do
not get into your eyes or onto your skin, otherwise inflammation can result.
Furthermore, do not drink the oil or eat the grease under any circumstances, as they can cause vomiting
and diarrhoea.
Keep the oil out of the reach of children.
Maintenance and inspection
Maintenance and inspection of the sewing machine
should only be carried out by a qualified technician.
Ask your Brother dealer or a qualified electrician to carry
out any maintenance and inspection of the electrical
system.
Wait until the needle stops in the needle up position
before turning off the power.
If this is not done, the wiper may strike the needle,
which might cause the needle to break.
Turn off the power switch and disconnect the power
cord from the wall outlet at the following times, otherwise
the machine may operate if the foot switch is pressed
by mistake, which could result in injury.
• When carrying out inspection, adjustment and maintenance
• When replacing consumable parts such as the rotary hook
If the power switch needs to be left on when carrying
out some adjustment, be extremely careful to observe
all safety precautions.
iii
LK3-B430E Mark II
Hold the machine head with both hands when tilting it
back or returning it to its original position.
Furthermore, after tilting back the machine head, do
not push the face plate side or the pulley side from
above, as this could cause the machine head to topple
over, which may result in personal injury or damage to
the machine.
Use only the proper replacement parts as specified by
Brother.
If any safety devices have been removed, be absolutely sure to re-install them to their original positions
and check that they operate correctly before using the
machine.
Any problems in machine operation which result from
unauthorized modifications to the machine will not be
covered by the warranty.
3. Warning labels
The following warning labels appear on the sewing machine.
Please follow the instructions on the labels at all times when using the machine. If the labels have been removed or are
difficult to read, please contact your nearest Brother dealer.
1
Hazardous voltage
will cause injury.
Hochspannung
verletzungsgefahr!
Turn off main
switch and wait 5
minutes before
opening this cover.
Bitte schalten sie den Eteindrel'interrupteur et
hauptschalter aus und attendre 5 minutes
warten sie 5 minuten, avantd' ouvrir le capot
bevor sie diese
abdeckung öffnen.
2
Moving parts
may cause injury.
Operate with safety devices.
Turn off main switch before
threading, changing bobbin
and needle, cleaning etc.
3
Un voltage non adapté
provoque des blessures.
Un voltaje inadecuado
puede provocar las
heridas.
Apagar el interruptor
principal y esperar 5
minutos antes de abrir
esta cubierta.
Safety devices
Eye guard
Finger guard
Thread take-up cover
Thread take-up solenoid cover
Belt cover
Motor cover, etc.
Be sure to connect the ground. If the ground connection is not secure, you run a high risk of receiving a
serious electric shock, and problems with correct operation may also occur.
Eye guard
Thread take-up cover
2
Belt
cover
Thread take-up
solenoid cover
Finger guard
3
1
Motor cover
LK3-B430E Mark II
iv
Contents
1. PROGRAM LIST ............................................ 1
5-7. Upper shaft mechanism ................................ 33
5-8. Needle bar mechanism ................................. 34
2. STANDARD THREAD TENSION .............. 4
3. MECHANICAL DESCRIPTIONS ............... 5
3-1. Needle bar, thread take-up, lower shaft and
shuttle race mechanisms ................................ 5
5-9. Lower shaft mechanism ................................ 35
5-10. Thread trimmer mechanism (2)................... 36
5-11. Thread wiper mechanism (2) ...................... 37
5-12. Shuttle race mechanism ............................. 38
3-2. Work clamp lifter mechanism .......................... 6
5-13. Presser arm mechanism ............................. 39
3-3. Work clamp lifter and thread wiper
mechanisms .................................................... 6
5-14. Covers ........................................................ 40
3-4. Feed mechanism ............................................ 7
6. ADJUSTMENT .............................................. 41
3-5. Thread trimmer mechanism ............................ 8
6-1. Adjusting the needle bar height .................... 41
3-6. Thread nipper mechanism .............................. 9
6-2. Adjusting the needle bar lift stroke ................ 41
3-6-1. Manual operation ......................................... 9
6-3. Adjusting the driver needle guard ................. 42
3-6-2. In thread trimming ........................................ 9
6-4. Adjusting the needle clearance ..................... 42
3-7. Thread take-up mechanism .......................... 10
6-5. Adjusting the shuttle race thread guide ........ 42
6-6. Adjusting the work clamp lift amount ............ 43
4. DISASSEMBLY ............................................ 11
6-7. Adjusting the thread wiper ............................ 43
4-1. Covers .......................................................... 11
6-8. Adjusting the thread take-up amount ............ 44
4-2. Presser arm mechanism ............................... 12
6-9. Adjusting the movable knife .......................... 44
4-3. Shuttle hook mechanism .............................. 12
6-9-1. Replacing the movable and fixed knives ... 45
4-4. Needle bar mechanism ................................. 13
4-5. Upper shaft mechanism ................................ 14
6-9-2. Adjusting the engagement of the movable
knife and fixed knife .................................. 45
4-6. Lower shaft mechanism ................................ 15
6-10. Adjusting the driving lever stopper position .... 46
4-7. Feed mechanism .......................................... 16
6-11. Adjusting the thread trimmer driving lever
position ........................................................ 46
4-8. Presser mechanism ...................................... 19
4-9. Thread wiper mechanism ............................. 20
6-12. Adjusting the thread trimming solenoid
position ........................................................ 47
4-10. Thread nipper mechanism .......................... 21
6-13. Adjusting the backlash ................................ 47
4-11. Thread take-up mechanism ........................ 22
6-14. Adjusting the positions of the presser solenoid .. 48
4-12. Thread trimmer mechanism ........................ 23
6-15. Adjusting the sensor perceive plate position .. 48
5. ASSEMBLY ................................................... 24
5-1. Thread trimmer mechanism (1) .................... 24
5-2. Thread nipper mechanism ............................ 25
5-3. Thread wiper mechanism (1) ........................ 26
5-4. Thread take-up mechanism .......................... 27
5-5. Presser mechanism ...................................... 28
5-6. Feed mechanism .......................................... 30
6-16. Adjusting the home position ........................ 49
6-17. Adjusting the needle up stop position ......... 49
6-18. Adjusting the V belt tension ........................ 50
7. GAUGE PARTS LIST ACCORDING
TO SUBCLASSES ....................................... 51
8. OPTIONAL PARTS ..................................... 56
LK3-B430E Mark II
9. TROUBLESHOOTING ............................... 57
10. ELECTRIC MECHANISM ........................ 61
10-1. Precautions at the time of adjustment ........ 61
10-2. Components inside the control box and
the operation panel ..................................... 61
10-3. Fuse explanation ........................................ 62
10-4. Connectors ................................................. 63
10-5. Explanation of the DIP switches ................. 68
10-5-1. Panel DIP switch functions ...................... 68
10-5-2. Setting the presser mode ........................ 68
10-5-3. DIP switches inside the control box ......... 69
10-6. Explanation of the memory switches .......... 70
10-7. Checking the input sensor and DIP
switch input ................................................. 72
10-8. Checking the input voltage ......................... 73
10-9. Clearing all memory settings ...................... 73
10-10. Confirming software version ..................... 74
10-11. Table of error codes .................................. 75
10-12. Troubleshooting flowchart ......................... 77
10-12-1. Troubleshooting flowchart ..................... 77
10-12-2. Problem solution and measures ............ 80
10-13. Control circuit block diagram .................... 91
LK3-B430E Mark II
1. PROGRAM LIST
1. PROGRAM LIST
For each specification, sewing patterns are limited as shown in the table below. (Any program is available as
long as the sewing pattern is within the work clamp and feed plate in size.)
Specification
Use
Program No.
Sewing pattern
No. of
Standard bar
stitches tacking length
Standard bar
tacking width
1
42
16mm
2mm
4
30
16mm
2mm
5
29
10mm
2mm
8
21
7mm
2mm
13
35
10mm
2mm
15
42
10mm
2mm
20
28
7mm
2mm
21
35
7mm
2mm
2
42
20mm
3mm
3
35
20mm
3mm
6
30
16mm
3mm
14
35
16mm
3mm
16
43
16mm
3mm
17
42
24mm
3mm
18
56
24mm
3mm
19
64
24mm
3mm
-1
For ordinary
materials
-5
-2
1
For denim
LK3-B430E Mark II
1. PROGRAM LIST
Specification
-7
Use
For knitted
materials
Program No.
Sewing pattern
No. of
Standard bar
stitches tacking length
Standard bar
tacking width
7
28
8mm
2mm
9
21
7mm
2mm
22
14
7mm
2mm
* To prevent thread breakage due to heat, set the sewing speed to a maximum of 2,500 rpm for sewing
knitted materials.
* The difference between -1 and -5 specifications for ordinary material is that the standard presser foot and
feed plate are different.
* Length when the sewing size is 100%.
<Straight bar tacking>
Program No.
Sewing pattern
No. of Standard bar Standard bar
stitches tacking length tacking width
10
21
10mm
0.3mm
11
28
10mm
0.3mm
12
28
20mm
0.3mm
23
35
25mm
0.3mm
24
42
25mm
0.3mm
25
45
25mm
0.3mm
* Use the presser foot and feed plate for straight bar tacking when using the
above programs.
LK3-B430E Mark II
2
1. PROGRAM LIST
<Vertical bar tacking &
vertical straight bar
tacking>
Program No. Sewing pattern
No. of Standard bar Standard bar
stitches tacking length tacking width
26
28
3mm
10mm
27
35
3mm
10mm
28
19
0.3mm
10mm
29
21
0.3mm
10mm
30
28
0.3mm
10mm
Vertical bar
tacking
vertical
straight bar
tacking
* Use the presser foot and feed plate for straight bar tacking when using the above
programs.
3
LK3-B430E Mark II
2. STANDARD THREAD TENSION
2. STANDARD THREAD TENSION
Ordinary materials (-1, -5)
Denim (-2)
Knitted materials (-7)
Application
Standard hook
Large hook
Standard hook
Large hook
Standard hook
Needle thread
#50 or equivalent
,
#30 or equivalent
,
#60 or equivalent
Lower thread
#60 or equivalent
,
#50 or equivalent
,
#80 or equivalent
Needle thread tension (N)
0.6 - 0.9
1.0 - 1.3
1.2 - 1.6
1.4 - 1.8
0.8 - 1.0
Lower thread tension (N)
0.2 - 0.3
,
0.2 - 0.3
,
0.2 - 0.3
6-8
,
6-8
,
6-8
0.15 - 0.35
,
0.4 - 0.6
,
0.2 - 0.4
Pretension (N)
0.1 - 0.3
,
0.3 - 0.5
,
0.1 - 0.3
Needle
DP×5#14
,
DP×17NY#19
,
DP×5#9
Spring height (mm)
Spring tension (N)
■ Measuring tension
Needle thread tension
Lower thread tension
Spring height
Spring tension
Measure the spring tension when the spring end is
lowered to the thread hook of the thread take-up lever.
* When the spring height (stroke) is great or the spring tension is insufficient, it may cause the thread end
length to vary after thread trimming.
LK3-B430E Mark II
4
3. MECHANICAL DESCRIPTIONS
3. MECHANICAL DESCRIPTIONS
3-1. Needle bar, thread take-up, lower shaft and shuttle race mechanisms
q
e
w
i
r
!0
o
t
y
u
!1
!3
!2
1. When the pulley q rotates in the direction of the arrow, the motion is transmitted to the thread take-up
crank e through the upper shaft w.
2. The needle bar crank r attached to the crank e moves the thread take-up lever t.
3. The needle bar crank y moves the needle bar u up and down via the thread take-up lever t.
4. When the pulley q rotates in the direction of the arrow, the eccentric portion of the upper shaft w causes
the crank rod i to move up and down.
5. The crank rod i moves the rock gear o back and forth.
6. The motion of the rock gear o causes the lower shaft gear !0 to oscillate. Resultantly, the driver !2 and the
shuttle hook !3 in the shuttle hook mechanism oscillate.
5
LK3-B430E Mark II
3. MECHANICAL DESCRIPTIONS
3-2. Work clamp lifter mechanism
e
r
q
w
t
y
u
1. When the presser signal is on, the presser solenoid q operates.
2. The plunger w moves in the direction of the arrow, and consequently link (C) assy e, link shaft B r, and
link B t move.
3. Link B t presses the presser plate u down via link shaft C y.
3-3. Work clamp lifter and thread wiper mechanisms
i
y
u
o
!0
q
!1
!2
w
1. When the presser plate q lowers, the presser arm
lever plate w is pressed down, presser arm levers
R and L r pivot on the presser arm lever shaft e,
and work clamps R and L t rise.
2. When the presser plate q lowers, the motion is
transmitted to the thread wiper driving lever u,
the thread wiper rod assembly i, and the thread
wiper link o via link shaft B y, and the thread wiper
arm !1 and the thread wiper !2 operate via the
thread wiper arm support !0.
3. When the presser solenoid is turned off, the presser
plate q rises, and work clamps R and L t lower.
Simultaneously, the thread wiper !2 operates in
the opposite direction.
r
t
e
LK3-B430E Mark II
6
3. MECHANICAL DESCRIPTIONS
3-4. Feed mechanism
!4
u
!1
i
!2
r
e
w
!5
q
!3
o
t
y
!0
(Y direction)
1. When the Y-pulse motor q operates, coupling hub 6.35 w, the coupling spacer e, and coupling hub 8 r
transmit the motion to feed cam Y t.
2. Feed cam Y t is connected to the Y-feed lever !0 pivoting on the tack width lever shaft y, which is
connected to the feed bracket i with the tack width lever u, via the feed cam roller o.
3. The motion of the Y feed lever !0 is transmitted to the feed bracket i via the tack width lever shaft y.
(X direction)
1. The motion of the X-pulse motor !1 is transmitted to feed cam X !2 with the same couplings as for Y
direction.
2. One end of the X feed lever !3 is positioned on feed cam X !2 along with the feed cam roller !4, and the
other is attached to the feed bracket i along with the slide block !5. When feed cam X !2 moves, the feed
bracket i oscillates, pivoting on the tack width lever shaft u.
Sewing patterns are created through combinations of X and Y movements shown above.
7
LK3-B430E Mark II
3. MECHANICAL DESCRIPTIONS
3-5. Thread trimmer mechanism
q
w
e
r
t
u
y
i
o
!1
!0
!2
!3
1. When the thread trimming signal is on, the thread trimming solenoid q pushes the pushing lever driving
lever w.
2. The pushing lever driving lever w which pivots on the shoulder screw e, pushes the thread trimmer
driving lever r in the direction of the arrow, and slides on the driving lever shaft t.
3. The roller y attached to the thread trimmer driving lever r is inserted into the groove of the thread
trimmer cam u, and the thread trimmer rod i operates.
4. The thread trimmer rod i moves the connecting rod lever !0 via the thread trimmer lever o.
5. The thread trimmer connecting rod !1 attached to the connecting rod lever !0 operates, and the movable
knife !2 slides on the fixed knife !3 to trim the thread.
LK3-B430E Mark II
8
3. MECHANICAL DESCRIPTIONS
3-6. Thread nipper mechanism
3-6-1. Manual operation
e
w
t
q
r
1. When the presser bar lifter lever q is turned in the direction of the arrow, the presser bar lifter crank w
makes contact with the tension release lever e, pushing the tension release bar r.
2. The end of the tension release bar r pushes the pin t.
3-6-2. In thread trimming
q
r
t
e
y
w
i
u
1. When the thread trimming signal is received, the thread trimmer solenoid operates to push the tension
release driving lever q in the direction of the arrow, and the roller w which is attached to the tension
release driving lever q is positioned on the periphery of the thread trimmer cam e.
2. The tension release cam of the thread trimmer cam e moves the tension release driving lever q in the
direction of the arrow.
3. Tension release lever (U) r, which is engaged with the tension release driving lever q, moves in the
direction of the arrow.
4. The tension release lever (U) r moves the tension release lever y via the tension release rod assy t.
5. The tension release lever y pushes the tension release bar u.
6. The end of the tension release bar u pushes the pin i.
9
LK3-B430E Mark II
3. MECHANICAL DESCRIPTIONS
3-7. Thread take-up mechanism
* Denim specification is optional.
q
w
e
r
1. When the thread trimming signal is received, the thread trimmer solenoid q operates to move the solenoid joint w in the direction of the arrow.
2. The crank shaft e engaged with the solenoid joint w turns in the direction of the arrow.
3. The thread take-up lever r engaged with the crank shaft e operates in the direction of the arrow.
LK3-B430E Mark II
10
4. DISASSEMBLY
4. DISASSEMBLY
CAUTION
Turn off the power switch before disassembly, otherwise the machine may operate if the
foot switch is depressed by mistake, which
could result in injury.
Disassembly should only be carried out by a
qualified technician.
Be sure to wear protective goggles and gloves
when handling the lubricating oil and grease,
so that they do not get into your eyes or onto
your skin, otherwise inflammation may result.
Furthermore, do not drink the oil or eat the
grease under any circumstances, as they may
cause vomiting and diarrhea.
Keep the oil out of the reach of children
Use only the proper replacement parts as
specified by Brother.
If any safety devices have been removed,
be absolutely sure to re-install them to their
original positions and check that they operate correctly before using the machine.
Any problems in machine operation which
result from unauthorized modifications to
the machine will not be covered by the
warranty.
4-1. Covers
q
r
!0 !1 !2
y
w
t
!3
e
o
1.
2.
3.
4.
5.
11
u
i
Remove the screws and the top cover q.
Remove the screws, the belt cover w, and bed covers (R) e and (L) r.
Remove the screws, the eye guard t and the face plate y.
Remove the stud screw u and the washer i on each side, and the shuttle race cover o.
Remove the bolt !0, spring washer !1, the washer !2, and tension pulley !3.
LK3-B430E Mark II
4. DISASSEMBLY
4-2. Presser arm mechanism
y
i
u
r
t
q
e
w
!4
o
!0
!2 !3
1. Remove the set screw q, the needle w and the
needle bar thread guide e.
2. Remove the bolt r and the washer t on each side,
and the presser arm y.
* Pay attention not to let the ball bearing i of the
presser arm support shaft u fall.
3. Remove the flat screw o, the screw !0 and the
feed plate !1.
4. Remove the two flat screws !2, the two screws !3,
and the needle plate !4.
!1
!5
!7
!8
!9
@0
5. Remove the rubber cap !5, the set screw !6, and
the tack width feed shaft !7.
6. Remove the eight screws !8, and the feed bar guide
plate @0 along with the feed bracket !9.
* Pay attention not to let the ball bearing @1 fall.
7. Remove the slide block @2 from the pin.
@1
!6
@2
4-3. Shuttle hook mechanism
1. Remove the bobbin case q by pulling its release
lever.
2. Open the setting claw w on each side, and remove
the shuttle race e along with the shuttle hook r.
w
r
q
e
LK3-B430E Mark II
12
4. DISASSEMBLY
4-4. Needle bar mechanism
q
r
e
w
t
w
y
o
i
u
!2
!1
!0
!3
r
!2
!5
t
!4
Set screw
Set screw
1. Remove the rubber cap q.
2. Loosen the screw of the needle bar clamp w, and remove the needle bar e through the machine top.
3. Remove the needle bar clamp w from the thread take-up lever r.
* Remove the needle bar guide slide block y from the needle bar guide t.
4. Remove the rubber cap u, loosen the set screw i, and remove the wick o and the thread take-up support
stud !0.
5. Remove the oil cap !1, loosen the two set screws of the thread take-up crank !2, and remove the thread
take-up lever r.
* The thread take-up assembly !3 will come off.
6. Remove the rubber cap !4, the screw !5, and the needle bar guide t.
* Do not remove them if possible to prevent the machine from overheating due to needle bar rubbing.
13
LK3-B430E Mark II
4. DISASSEMBLY
4-5. Upper shaft mechanism
w
!7
e
!5
q
!6
!4
!3
t
y
u
o
!8
i
!0
!2
q
!1
r
!2
r
!8
!0
!1
1. Loosen the screw w and the set screw e of the thread take-up crank q.
* The screw w should be loosened until its end comes off the upper shaft r.
2. Remove the screw t, and the thread trimming solenoid y.
3. Remove the screw u, and the wick support i.
4. Remove the screw o, and the crank rod !0.
* At this time, lower the lower part of crank rod !0 in the direction of the arrow.
5. Loosen the set screws of the bobbin winder pulley !1 and the thread trimmer cam !2.
6. Remove the V-belt !3, loosen the set screw !4, and remove the pulley !5.
7. Remove the screw !6 and the synchronizer !7.
8. Remove the upper shaft r in the direction of the arrow.
* After that, remove the thread take-up crank q, the washer !8 , the bobbin winder pulley !1, and the
thread trimmer cam !2 from the upper shaft r, in this order.
LK3-B430E Mark II
14
4. DISASSEMBLY
4-6. Lower shaft mechanism
y
t
r
e
w
q
!2
!0
!1
o
i
u
u
1.
2.
3.
4.
Tilt the machine head until it stops.
Remove the felt support q.
Loosen the screw w and remove the driver e and the retaining ring r.
Loosen the set screw of the set screw collar t, and remove the lower shaft assembly y from the rear of
the machine.
* The set screw collar t will come off.
5. Loosen the two set screws u.
6. Untie the wick i, loosen the set screw of the set screw collar o, and remove the rock gear shaft !0 from
the rear of the machine.
7. Remove the set screw collar o, the rock gear !1, and the crank rod !2.
15
LK3-B430E Mark II
4. DISASSEMBLY
4-7. Feed mechanism (1)
i
e
!2
q
!3
u
r
y
t
!3
w
!2
!1
!0
o
1. With the machine head tilted, loosen the set screw of the set screw collar q, and remove the latter.
2. Return the machine to its original position.
3. Loosen the set screw w, and remove the tack width lever shaft t and the washer r from above.
* When the tack width lever shaft t is not removed, remove the retaining ring e and the washer r.
4. Remove the Y feed lever i by lifting it in the direction of the arrow.
* Remember to remove the washer r under the Y feed lever i.
5. Remove the screw y, and home position sensor Y u.
6. Remove the X feed lever o by lifting it in the direction of the arrow.
7. Remove the screw !0 and home position sensor X !1.
8. Remove the screw !2, the cord support !3, and home position sensors Y u and X !1.
LK3-B430E Mark II
16
4. DISASSEMBLY
Feed mechanism (2)
e
u
y
w
t
q
!2
!0
r
!1
i
o
1. Remove the four screws q, the X-pulse motor assembly w, coupling hub 6.35 e, and the coupling spacer
r.
2. Tilt the machine head until it stops.
3. Remove the screw t, the Y-pulse motor assembly y, coupling hub 6.35 u, and the coupling spacer r.
4. Return the machine head to its original position.
5. For the X direction, remove the screw i, the feed cam bracket o, feed cam X !0, coupling hub 8 !1, and
the feed home position dog !2 by lifting them from above.
6. Repeat step 5 for the Y direction.
17
LK3-B430E Mark II
4. DISASSEMBLY
Feed mechanism (3)
w
q
e
i
o
!0
r
t
!1
u
y
1.
2.
3.
4.
5.
Loosen the set screw q, and remove coupling hub 6.35 e from the shaft of the pulse motor w.
Remove the screw r, and the feed home position dog t from coupling 8 y.
Loosen the set screw u and remove coupling hub 8 y from the cam shaft i.
Loosen the set screw o, and remove the cam shaft i.
Remove the feed cam !0 from the feed cam bracket !1.
LK3-B430E Mark II
18
4. DISASSEMBLY
4-8. Presser mechanism
!9
e
w
o
@1
u
q
!8
!6
@0
u
i
!7
t
!0
i
q
y
!2
r
u
!1
!3
o
!5
!4
1. Remove the two spring q.
2. Remove the two screws w and the guide e.
3. Remove the snap pins t of link shaft D r, and the rubber cap y, and then link shaft D r through the hole
in the arm.
4. Loosen the set screw u, and remove the snap pins i, link shaft A o, and the washers !0.
5. Remove the rubber cap !1, the snap pin !2, and link shaft C !3.
Be sure to hold the presser plate !4 and the presser bar lifter lever rubber !5 so that they do not fall.
6. Remove the presser lifter link-related parts upward.
7. Remove the two rubber caps !6, and the two screws !8 of the solenoid setting plate, B !7.
8. Remove the four screws @0 of the solenoid setting plate, A !9, and the presser foot lifter solenoid @1.
19
LK3-B430E Mark II
4. DISASSEMBLY
4-9. Thread wiper mechanism
r
t
y
!1
!4
!3
!2
!5
e
w
q
!0
!6
!2
u
i
!11
o
Remove the screw q, the washer w, and the thread wiper e.
Loosen the set screw r, and remove the thread wiper shaft t.
Remove the retaining ring y.
Remove the retaining ring u, the washer i, the spring o, and the retaining ring !0. Then remove the
thread wiper rod assembly !1 from the presser bar lifter lever shaft !2.
5. Remove the thread wiper assembly !1 and the thread wiper driving lever !3 by lifting them upward.
6. Loosen the set screw !4, and remove the thread wiper link !5 and the thread wiper arm !6 by pulling them
downward.
1.
2.
3.
4.
LK3-B430E Mark II
20
4. DISASSEMBLY
4-10. Thread nipper mechanism
y
r
e
w
q
!8
!7
!0
!1
!6
i
!5
y
o
!4
u
t
!3
!2
1. Loosen the set screw q, and remove the thread tension assembly w, the pin e, and the tension release
bar r.
2. Remove the rubber cap t, the stud screw u of the thread tension release lever y, the stud screw !0
securing both tension release lever (U) i and the pushing lever o, and then remove the tension release
rod !1 and the pushing lever o in the direction of the arrow.
3. Loosen the set screw !2, and remove the presser bar lifter lever shaft !3 , collar 13 !4 and tension release
lever y.
4. Remove the screw !5, the washer !6, and the presser bar lifter lever !7.
5. Remove the presser bar lifter crank !8 in the direction of the arrow.
21
LK3-B430E Mark II
4. DISASSEMBLY
4-11. Thread take-up mechanism
q
w
!1
r
e
u
t
r
i
o
!0
!3
y
!4
!6
!5
!2
1. Remove the two screws q, and the solenoid setting plate w from the machine head.
2. Remove the spring e from the spring hook r.
3. Loosen the set screw y of the solenoid joint t, and remove the solenoid joint t from the thread take-up
solenoid u.
4. Remove the screw i, the spring washer o, the washer !0 and the nut, 3.57 !1 from the solenoid setting
plate w.
5. Remove the two stud screws !2, and the thread take-up lever !3.
6. Remove the retaining ring !4, the crankshaft !5 and the washer !6.
LK3-B430E Mark II
22
4. DISASSEMBLY
4-12. Thread trimmer mechanism
u
!1
@2
r
y
e
t
o
!0
q
i
w
@3
!6
!7
!9
!2
@1
!3
!8
@0
!5
!4
1. Remove the rubber cap q, loosen the set screw w, and remove the connecting rod lever shaft e.
2. Remove the oil cap r, loosen the set screw t, and remove the retaining ring y.
3. Remove the driving lever shaft u by pulling it in the direction of the arrow. Then remove the cushion i,
the tension release driving lever o, the washer !0 and the spring !1 from the shaft.
4. Tilt the machine head until it stops.
5. Remove the thread trimmer return spring !2 and the spring hook !3.
6. Remove the nuts !4 and !5, the stud screws !6 and !7, and the two washers !8.
7. Loosen the set screw !9, and remove the lever shaft @0 and the thread trimmer lever @1.
8. Return the machine head to its original position, and remove the connecting rod lever @2 and the thread
trimmer driving lever @3.
23
LK3-B430E Mark II
5. ASSEMBLY
5. ASSEMBLY
5-1. Thread trimmer mechanism (1)
During assembly, apply grease to the portions indicated by the white arrows.
q
w
!0
o
u
!1
!3
i
r
e
y
!2
t
@1
!7
!8
!7
!6
y
e
!4
@4
!0
i
t
u
r
@3
@0
!5
!9
@2
1. Insert the driving lever shaft q into the machine. Place the spring w, the washer e, the tension release
driving lever r, the thread trimmer driving lever t, and the cushion y on the shaft in this order.
2. Put the retaining ring u on the shaft. Press the thread trimmer driving lever t against the tension release
driving lever r. Tighten the set screw i on the screw flat.
3. Attach the oil cap o.
4. Insert the connecting rod lever !0 into the machine, lightly press the connecting rod lever shaft !1 against
the former, then secure them using the set screw !2.
5. Attach the rubber cap !3.
6. Tilt the machine head until it stops.
7. Pass the lever shaft !5 with the washer and the retaining ring, through the thread trimmer lever !4, and
tighten the set screw !6 on the screw flat.
8. Attach the thread trimmer rod !7 to the thread trimmer lever !4 using the stud screw !8 and the nut !9, and
also attach the connecting rod lever !0 to the thread trimmer lever !4 using the two washers 4.76 @0, the
stud screw @1 and the nut @3.
9. Attach the spring hook @3 to the inside of the machine, and connect the thread trimmer return spring @4 to
it.
10. Return the machine head to its original position.
LK3-B430E Mark II
24
5. ASSEMBLY
5-2. Thread nipper mechanism
q
w
r
e
!0
i
!1
y
!2
!3
u
o
!4
t
1. Insert the presser bar lifter crank q into the machine as shown, in the direction of the arrow, attach the
presser bar lifter lever w to it, and secure them using the screw e and the washer r.
* Make sure that the presser bar lifter lever w moves easily.
2. Insert the presser bar lifter lever shaft t into the machine, and place the tension release lever y and collar
13 u on it.
3. Insert the tension release rod i into the machine in the direction of the arrow as shown, attach it to the
tension release lever y using the stud screw o, and attach tension release lever (U) !1 and the pushing
lever !2 to the driving lever stopper !3 using the stud screw !0.
*Apply grease to the engagement portion of the stud screw !0.
4. Attach the rubber cap !4.
25
LK3-B430E Mark II
5. ASSEMBLY
5-3. Thread wiper mechanism (1)
r
e
!3
y
q
!4
w
t
u
t
u
!2
!5
!6
!7
!0
o
i
q
!1
21 mm
!2
!8
!9
@0
!1
@1
1. Insert the thread wiper rod assembly q and the thread wiper driving lever w into the machine from above.
Fit the thread wiper shaft e with retaining rings and washers on the former two, and lightly press them
and secure using the set screw r.
2. Place the thread wiper rod assembly q on the presser bar lifter lever shaft t, and fit the retaining ring y
on it.
3. Lightly press the presser bar lifter lever shaft t, and tighten the set screw u.
4. Attach the spring i as shown in the figure above. Attach the washer o and the stop ring !0 to it.
5. Insert the thread wiper arm !1 and the thread wiper link !2 into the machine in the direction of the arrow,
and attach the retaining ring !3.
6. Temporarily tighten the set screw !4 so that the thread wiper arm !1 is positioned 21 mm below from the
bottm of the arm.
7. Attach the thread wiper !5 using the washer !6 and the screw !7.
8. Move the forked portion of the thread wiper driving lever w, and check that all of the thread wiper mechanism moves.
9. Insert the tension release bar !8, the pin !9, and the thread tension assembly @0 into the machine, and
secure them using the set screw @1.
* Adjust the height of the spring referring to page 4.
NOTE:
If there is no thrust in the thread wiper rod assembly w or the thread wiper mechanism operation is sluggish, it may
be due to the operation of the presser plate (shown on page 28), and error E-60 may be displayed.
LK3-B430E Mark II
26
5. ASSEMBLY
5-4. Thread take-up mechanism
!6
y
!0
!2
!4
!5
!1
!2
!4
u
i
y
!3
o
0.5mm
e
!3
w
A
B
r
C
q
t
1. Insert the thread take-up lever crank q into the machine and secure it using the thrust washer w and the
stop ring e.
* Apply grease to portions A, B, and C of the thread take-up lever crank q.
2. Attach the thread take-up lever r using the stud screw t.
3. Attach the screw u, the spring washer i, the washer o, and nut 3.57 !0 to the solenoid setting plate y.
* The screw u should be temporarily tightened.
4. Temporarily attach the solenoid joint !2 to the thread take-up solenoid !1 using the set screw !3.
5. Attach the spring !5 to the spring hook !4 of the solenoid setting plate y and the spring hook !4 of the
solenoid joint !2.
6. Place the thread trimming solenoid joint !2 onto the crankshaft q so that the flat surfaces are aligned, and
then install the solenoid setting plate y to the machine head with the two screws !6.
7. Turn the thread trimming solenoid joint !2 forward you in the direction of the arrow while tightening the
two set screws !3 of the thread trimming solenoid joint !2 so that the gap between the solenoid setting
plate y and the thread trimming solenoid joint !2 is 0.5 mm.
* Check that the thread take-up lever r operates smoothly at this time. If the movement is stiff, damage to
the solenoid may result.
If the movement is stiff, loosen the two screws !6 and make fine adjustments to the position of the
solenoid setting plate y so that the thread take-up lever r can operate smoothly.
27
LK3-B430E Mark II
5. ASSEMBLY
5-5. Presser mechanism
During assembly, apply grease to the necessary portions while referring to the next page.
!9
!8
e r
@5
@0
i
u
@7
@5
@2
y
r
t
!7
@6
@6
w
q
@1
@3
!1
@4
!7
@2
@5
o
110.0 ± 0.2 mm
!0
!2
@2
@0
!6
!3 !4
@8 !5
1. Attach the presser plate q to the presser bar lifter lever rubber w, and insert them from the bottom of the
arm.
2. Insert the presser lifter link-related parts e from the top into the arm, fit link shaft B r into the forked
portion of the thread wiper driving lever t, and pass link shaft C y through link B u and the presser plate
q.
3. Fit the snap pins i on both ends of link shaft C y.
4. Attach the presser solenoid o to the top of the arm.
5. Tighten the screws !0 and !1 in this order when the presser bar lifter solenoid o is 11.0 ± 0.2 mm away
from the end of the arm, and insert the rubber cap !2 into the hole on the side of the arm.
6. Pass link shaft D !3 through the hole in the arm. Insert it into the holes in the plunger !4 and link C !5, and
attach the snap pins !6.
7. Insert link shaft A !7 into the machine, and pass it through the washers !8 and link A !9.
8. Attach the snap pins @0 to the outside of the washers !8 that are on both ends of link shaft A !7.
9. Secure link shaft A !7 using the set screw @2 so that link B u is centered in the bush @1.
10. Attach the guide @3 using the screw @4.
11. Attach the two springs @5 to link shaft B r and the two pins @6.
* Press the presser lifter link-related parts e by hand to make sure that they can move easily.
12. Attach the rubber caps @7 and @8.
LK3-B430E Mark II
28
5. ASSEMBLY
If the presser mechanism is sluggish, it may not move well vertically, resulting in occurrence of error E-60.
Make sure that it moves easily, and apply grease to sliding portions of parts before assembly.
1. Sliding portions of link shaft C q and link B w
2. Sliding portions of link shaft B e, link B w, link A
r, and link (C) assy t
3. Forked portion of the wiper driving lever y
4. Sliding portions of link shaft A u and link A r
5. Sliding portions of link shaft D i, link (C) assy t
6. Forked portion of the plunger o where link C assy
t is fitted
7. Outer and inner surfaces of spherical bush !0 to
be attached to link C assy t
t
!0
r
u
t
e
i
o
y
w
q
1. Sliding portion of the work clamp q (Apply small
amount of grease.)
2. Sliding portions of the presser arm lever w and
presser arm levers R and L e
3. Round portion of the presser arm lever plate r
4. Bearing ball of the presser arm support shaft t
t
r
e
q
29
w
LK3-B430E Mark II
5. ASSEMBLY
5-6. Feed mechanism (1)
Assembly steps of the feed mechanism are the same for X and Y directions.
Feed cams X and Y are similar. Be sure to check their respective markings.
e
r
u
q
o
i
Set screw
Screw flat
y
w
y
y
t
!0
!0
!1
!2
!1
!2
2.5 mm
1. Insert the feed cam q into the feed cam bracket w, and pass the cam shaft r with the retaining ring e
attached, through them.
2. Fit coupling hub 8 t on the cam shaft r so that there is no end play, adjust the set screw y on the screw
flat, and tighten it.
3. Adjust the set screw u of the feed cam q on the screw flat, and tighten it so that the feed cam q rotates
easily.
4. Fit the feed home position dog i on coupling hub 8 t, and tighten the screw o in the center of the slot.
5. Fit coupling hub 6.35 !1 on the shaft of the pulse motor !0, and tighten the set screw !2 until the shaft is
protruding 2.5 mm.
LK3-B430E Mark II
30
5. ASSEMBLY
Feed mechanism (2)
r
e
Apply grease.
Aplly grease.
q
q
w
Apply grease.
u
y
t
!2
!1
o
!3
i
!0
1. Apply grease to the coupling spacer q, and fit it in coupling hub 8 w, fit the feed cam bracket t with the
feed cam e and the feed home position dog r on the locator pin y, and secure them using the screw u.
2. Repeat above steps for Y direction.
3. Adjust the angle of coupling hub 6.35 o of the pulse motor, X i to that of the coupling spacer q. Pass the
former through the machine wall, and secure it using the screw !0.
4. Tilt the machine head until it stops.
5. Adjust the angle of coupling hub 6.35 !2 of the pulse motor, Y !1 to that of the coupling spacer q. Pass the
former through the machine wall, and secure it using the screw !3.
6. Return the machine head to its original position.
7. Apply grease to the circumference of the feed cam e.
31
LK3-B430E Mark II
5. ASSEMBLY
Feed mechanism (3)
@2
o
@5
!0
@0
!9
!5
y @7
e
r
!6
@4
@6
!8
@3
!4
@1
i
w
q
u
y
!1
t
!7
o
!3
!2
q
0.1 - 0.5 mm
1. Pass the shaft of the X feed lever q through the bush w, and fit the feed cam roller e into the groove of
feed cam X.
2. Place the washer y on the bearing surface which is inside the machine and passes the tack width lever
shaft t through it. Place the Y feed lever o on the washer y, and fit the feed cam roller u into the groove
of the Y feed cam i. Then, pass the tack width lever shaft t with the retaining ring !0 and the washer y
on it, through the holes of the Y feed lever o and the hole in the machine.
3. Press the tack width lever shaft t downward, and adjust it so as to tighten the set screw !1 on the screw
flat.
* Pay attention to the weight of the Y feed lever.
4. Put the driver into the end of the Y feed lever o, and press the X feed lever q downward.
5. Tilt the machine head until it stops.
6. Place the set screw collar !2 on the shaft of the X feed lever q, press it in the direction of the arrow, and
tighten the set screw !3.
7. Return the machine head to its original position.
8. Attach the X home position sensor !4 and the Y home position sensor !5 using the screws !6 and !7 so that
the clearance between each home position sensor and the home position dog !8 is 0.1 - 0.5 mm.
9. Fix the cord of the Y home position sensor !5 using the cord support !9 and the screw @0.
10. Tuck the cord of the Y home position sensor !5 into the recess @1 of the machine, and fix it along with the
cord of the X home position sensor !4 using the cord support @2 and the screw @3.
11. Insert the wicks @4 and @5 of the X feed lever q and the Y feed lever o into the hole @6 for lubrication.
* Do not allow the wicks to make contact with the connecting rod lever @7.
LK3-B430E Mark II
32
5. ASSEMBLY
5-7. Upper shaft mechanism
During assembly, apply grease to the portions indicated by the white arrows.
e
r
q
w
y
q
e
r
u
t
i
y
!0
u
!2
t
!1
!3
0.5 mm
Rotation direction
Rotation direction
!2
!3
o
q
w
Pulley
!2
Thread trimmer cam
!0
1. Insert the upper shaft q from the rear of the machine, and place the thread trimmer cam w, the bobbin
winder pulley e and the washer r on the shaft.
* Apply adhesive (equivalent of Three Bond 1401) around the area which the bearing in the machine goes
into. Also, apply grease to grooves on the thread trimmer cam w.
2. Pass the thread take-up crank t from the face plate side over the upper shaft q, and tighten the screw y
and the set screw u.
3. Bring the thread take-up crank t, the washer r and the bobbin winder pulley e close to the upper shaft
bush so that there is no end play in the upper shaft q. Secure the bobbin winder pulley e by adjusting the
set screw to its screw flat and tightening it.
4. Press the thread trimmer cam w against the crank of the upper shaft q. Adjust the set screw o that comes
first when rotating to the screw flat, and tighten it.
5. Attach the synchronizer !0 to the machine using the screw !1.
6. Attach the pulley !2 leaving a 0.5 mm clearance from the protrusion of the synchronizer !0, tighten the set
screw !3 that comes later when rotating to the screw flat.
33
LK3-B430E Mark II
5. ASSEMBLY
5-8. Needle bar mechanism
During assembly, apply grease to the portions indicated by the white arrows.
@0
t
!7
!8
@1
u
!6
!2
e
!3
!5
r
!2
y
!9
w
q
q
!1
!0
!1
!4
!3
u
i
Set screw
o
a
(DP × 5)
A
DP × 17
!3
!4
Set screw
Cut section
1. Temporarily tighten the screw w of the needle bar guide q.
2. Pass the thread take-up support stud e through the thread take-up assembly r, lightly press the former,
and secure them using the set screw t.
3. Pass the needle bar crank y through the thread take-up assembly r and the counter crank u, adjust the
set screw i to the screw flat, and tighten the set screws i and o.
4. Fit the chamfering side of the needle bar guide slide block !0 into the groove on the needle bar guide q,
and insert the shafts of the needle bar clamp !1 dinto the thread take-up lever !2 and the needle bar guide
slide block !0, as shown in the figure.
* Be sure to apply grease to the sliding block !0 and the groove of the needle bar guide q.
5. Insert the needle bar !3 from the top of the machine into the needle bar clamp !1.
6. Turn the pulley to set the needle bar !3 at its lowest position. Move the needle bar vertically so as to align
the second lowest reference line A (for using needle DP × 17) or the highest reference line a (for using
needle DP × 5) on the needle bar !3 with the lower end of needle bar bush (D) !4. Tighten the screw !5 with
the cut section of the needle bar facing the front.
7. Find the position of the needle bar guide q so that the pulley rotates easily, and tighten the screw w.
8. Attach the oil cap !6 and the rubber caps !7, !8, and !9.
9. Insert the wick @0 extending from the thread take-up support stud e into the lubrication hole @1.
LK3-B430E Mark II
34
5. ASSEMBLY
5-9. Lower shaft mechanism
!2
q
w
e
t
r
Lower
u shaft gear
Screw flat
o
!0
i
y
!1
w
!4
Matching
marks
!2
!7
q
!6
!5
0.05 - 0.12 mm
!3
!2
!0
1. Tilt the machine head until it stops.
2. Insert the rock gear shaft q from the rear of the machine, pass the rock gear w, the set screw collar e over
the shaft, bring them close together without any clearance, and tighten the set screw r.
3. Insert the lower shaft t from the rear of the machine, pass the set screw collar y over it, and engage the
lower shaft gear with the rock gear w.
NOTE:
When inserting the lower shaft t from the rear into the machine, lower the needle bar to its lowest position, and
position the screw flat of the lower shaft so that it faces down. Also, apply grease to the shuttle race base and the
lower shaft bush u at this time.
4. Sandwich the lower shaft bush u between the lower shaft gear and the set screw collar y without any
clearance, and tighten the set screw i.
*Apply grease to the portion between the lower shaft bush u and the set screw collar y.
5. Fit the retaining ring o on the lower shaft t, press the driver !0 against the retaining ring o, and tighten
the screw !1.
6. Return the machine head to its original position.
7. Fit the crank rod !2 over the crank of the upper shaft !3, align the matching mark of the crank rod !2 with
that of the upper shaft !3, and tighten the screw !4.
* Apply grease to the engagement portion between the upper shaft crank and the crank rod.
8. Tilt the machine head until it stops.
9. Turn the pulley !5 to move the rock gear w right and left until the pulley rotates easily. Turn the rock gear
shaft q to allow 0.05 - 0.12 mm play of the driver !0.
10. Pass the wick !7 through the rock gear shaft q, and knot it on the end.
11. Return the machine head to its original position.
35
LK3-B430E Mark II
5. ASSEMBLY
5-10. Thread trimmer mechanism (2)
t
r
Rotation direction
o
y
e
i
u
q
Pulley
w
0.5 mm
e
!2
!3
B
A
!1
o
i
!0
!4
!5
1. Fit the hole of the thread trimmer connecting rod q over the pin of the connecting lever w. Secure the
needle plate e using the screws r and t so that the hole on the needle plate is centered at the needle
position.
2. Turn the pulley y until the mark u has slightly passed over the horizontal line.
* Adjust the position of the pulley to the position where the cam grooves on the thread trimmer cam do
not fluctuate.
3. Attach the thread trimming solenoid i using the screw o. At this time, the plunger !0 of the thread
trimming solenoid i must be fully pressed (the same status as when the thread trimming solenoid i is
turned on), and a 0.5 mm clearance must be provided between the thread trimmer driving lever !1 and the
driving lever stopper !2.
4. Make sure that the thread trimmer driving lever !1 moves smoothly when the plunger !0 is pressed and
released.
5. Tilt the machine head until it stops.
6. Loosen the nut !4 and move the connecting rod lever !5 to the left or right to adjust so that the V section A
is aligned with the index mark B on the needle plate when the sewing machine in the stopped position
and the movable knife !3 is moved toward the index mark.
7. Return the machine head to its original position.
LK3-B430E Mark II
36
5. ASSEMBLY
5-11. Thread wiper mechanism (2)
q
r
u
y
t
w
w
w
e
2 ± 0.5mm
Approx. 30 mm
(Approx. 20 mm)
1. When the sewing machine in the stop position, press link C q to check that the clearnce between the top
of the thread wiper and the needle point e is 2 ± 0.5 mm when the thread wiper w has passed under the
needle.
If it is not, loosen the set screw r, and adjust the thread wiper arm t by moving it vertically.
2. Make sure that the thread wiper w is positioned 30 mm to the left from the center of the needle bar when
link C q is fully pressed.
If it is not, remove the rubber cap y, loosen the set screw u, and adjust the thread wiper position.
37
LK3-B430E Mark II
5. ASSEMBLY
5-12. Shuttle race mechanism
Needle center C
e
u
Rotary
hook
point D
i
w
q
w
B
b
DP × 17
(DP × 5)
r
e
y
0.01 - 0.08 mm
e
e
i
!1
!2
y
!0
!8
!3
i
!4
@0
!6
o
y
t
!5
!9
y
t
!8
!7
!7
!8
1. Attach the needle bar thread guide q to the needle bar w, and attach the needle e (DP × 5 for knitwear, DP
× 17 for denim) with its long groove facing the front, using the set screw r.
2. Fit the inner rotary hook y in the shuttle race base t. Turn the pulley to raise the needle bar w from its
lowest position until the lowest reference line B (for DP × 17 needle; use the second lowest reference line
b for DP × 5 needle ) is aligned with the bottom of needle bar bush D u. Loosen the screw o, and move
the driver i to align the center of the needle C with the inner rotary hook point D.
3. Make sure that the needle e just makes contact with the needle guard of the driver i when the center C
of the needle is aligned with the point of the inner rotary hook. If it does not, loosen the set screw !0, and
turn the eccentric shaft !1. Retighten the set screw !0 afterwards.
4. Make sure that there is a 0.01 - 0.08 mm clearance between the needle e and the point D of the inner
rotary hook when they are aligned. If there is not, loosen the set screw !2, and turn the eccentric shaft !3.
Retighten the set screw !2 afterwards.
5. Attach the large shuttle hook !4 to the shuttle race base t, insert the bobbin !5 into the bobbin case !6,
and fit them in the inner rotary hook y.
6. Attach the felt support !7 to the shuttle race base t.
* Place it as shown in the illustration so as not to clamp the felt !8, and then gently press the felt !8 and the
wick !9 until they are at the same height as the rotary hook race.
* Return the support @0 to its original position.
LK3-B430E Mark II
38
5. ASSEMBLY
5-13. Presser arm mechanism
!2
!4
o
!7
!3
!5
!6
t
e
r
u
!9
!1
i
y
!0
q
w
!9
y
@3
@2
0.1 0.5 mm
0.1 - 0.5 mm
@1
@0
!8
X direction
Y direction
1. Place the slide block q on the pin of the X feed lever w, fit the feed bracket e into the feed bar guide plate
r with care not to drop the ball bearing, pass the slide block q through the slot in the feed bracket e, and
secure the fed bar guide plate r using the screw t.
2. Attach the feed plate y using the flat u and the screw i.
3. Pass the tack width feed shaft o through the hole in the feed bracket e and the hole of the Y feed lever !0,
adjust the former to the screw flat, and press the tack width feed shaft o from above to secure it using the
set screw !1.
4. Attach the rubber cap !2.
5. With attention not to let the bearing balls in the presser arm support shaft !4 fall, fit the presser arm !3 to
the protrusion of the feed bracket e, and secure the presser arm !3 to the feed bracket e using the bolt !5
and the washer !6.
6. Secure the presser arm support shaft !4 using the set screws so that the back of the support plate !7 can
just make contact with ball bearings in the presser arm support shaft !4 when the work clamp rises.
7. Turn on the power of the machine, set the program to No.00, press the foot switch to reset X and Y to
original position.
8. Make sure that the slot !8 is centered in the work clamp !9 and the feed plate y.
If it is not, loosen the flat screw u and the screw i of the feed plate y and the bolt !5 of the presser arm
!3, and adjust the position of the slot !8.
If it still is not centered turn off the power, loosen the screws @0 and @1, and turn the feed home position
dogs @2 and @3 little by little.Then tighten the screws @0 and @1, and perform u for positioning.
* At this time, the clearance between the feed home position dog and the sensor sensing surface should
be 0.1 - 0.5 mm.
9. After adjustment is completed, turn off the power.
39
LK3-B430E Mark II
5. ASSEMBLY
5-14. Covers
A
o
!6 !5 !4
!7
!9
!3
!8
b
c
!1
!2
Approx. 1 mm
u
Approx. 9 - 10 mm
r
10 N
y
!0
t
i
r
e
w
Attach the V belt q.
Attach the the shuttle race cover r using the shoulder screw w and the washer e.
Attach the eye guard t and the face plate y using the screws u.
Attach bed covers (R) i and (L) o using the screws !0.
Temporarily attach the top cover !1 using the screw !2.
Provisionally install the tension pulley !3 with the flat washer !4, spring washer !5 and bolt !6.
* Adjust the belt tension by moving the tension pulley to the right and left so that there is 9 - 10 mm of
deflection in the V-belt q when it is gently pushed in the middle with a force of approximately 10 N.
* After adjusting, tighten the bolt b to secure the left pulley assembly. Move the right tension pulley so
that there is a gap of about 1 mm between it and the V-belt q, and then tighten the bolt c to secure the
right pulley assembly.
7. Attach the belt cover !7 while inserting part A into the top cover !1, and tighten the screws !8 and !9.
8. While lightly pressing the top of the belt cover !7 in the direction of the arrow, tighten the screw !2.
1.
2.
3.
4.
5.
6.
LK3-B430E Mark II
40
6. ADJUSTMENT
6. ADJUSTMENT
CAUTION
Use only the proper replacement parts
specified by Brother.
Maintenance and inspection of the sewing
machine should only be carried out by a qualified technician.
If any safety devices have been removed,
be absolutely sure to re-install them to their
original positions and check that they operate correctly before using the machine.
Turn off the power switch and disconnect the
power cord from the wall socket at the following times, otherwise the machine may operate if the foot switch is depressed by mistake,
possibly resulting in injury.
• When carrying out inspection, adjustment,
and maintenance
• When replacing consumable parts such as
the rotary hook and knife
Any problems in machine operation which
result from unauthorized modifications to
the machine will not be covered by the
warranty.
If the power switch needs to be left on when
carrying out some adjustment, be extremely
careful to observe all safety precautions.
6-1. Adjusting the needle bar height
q
w
e
A
a
(DP × 5)
DP × 17
Turn the pulley to lower the needle bar at its lowest position. Remove the rubber cap w, and loosen the screw
e. Move the needle bar up or down to adjust the needle bar height so that the second lowest line A of the
needle bar is aligned with the bottom of the needle bar bush q when the needle bar is lowered to its lowest
position.
* For needle DP × 5, align the highest line a on it with the bottom of the needle bar bush.
6-2. Adjusting the needle bar lift stroke
t
q
w
r
b
(DP × 5)
t
e
y
B
DP × 17
t
e
Turn the machine pulley to raise the needle bar from the lowest position until the lowest reference line on the
needle (reference line B) is aligned with the lower edge of the needle bar bush q.
* If using a DP × 5 needle, use the second reference line from the top of the needle (reference line b).
1. Open the support w in the direction of the arrow, and remove the felt support e.
2. Loosen the screw r, and move the driver to adjust so that the tip of the rotary hook is aligned with the
needle center line.
* When returning the felt support e, place it as shown in the illustration so as not to clamp the felt t, and
then gently press the felt t and the wick y until they are at the same height as the rotary hook race.
* Return the support w to its original position.
41
LK3-B430E Mark II
6. ADJUSTMENT
6-3. Adjusting the driver needle guard
Center of the needle
Shuttle hook point
q
e
w
Turn the pulley to align the shuttle hook point with the center of the needle. Loosen the set screw w, and turn
the eccentric shaft e to adjust the position of the driver needle guard q so that it makes contact with the
needle.
If the needle contact pressure is too great, skipped stitches may result. On the other hand, if the driver needle
guard q is not touching the needle, the inner rotary hook point will obstruct the needle, resulting in an excessively high amount of friction.
6-4. Adjusting the needle clearance
0.01 - 0.08 mm
q
w
Turn the pulley to align the shuttle hook point with the center of the needle. Loosen the set screw q, and turn
the eccentric shaft w to adjust the clearance between the needle and the shuttle hook point to 0.01 - 0.08 mm.
6-5. Adjusting the shuttle race thread guide
e
q
w
yu
!0
r
t
o
i
1. Loosen the bolt q and the washer w, and remove the presser arm e. Then loosen the two flat screws r
and y, and the screws t and u, and remove the feed plate i and the needle plate o.
* Pay attention not to let the ball bearing of the presser arm support shaft fall.
2. While pushing the shuttle race thread guide !0 in the direction of the arrow, adjust the position of the
shuttle race thread guide !0 so that the needle is central in the needle groove of the shuttle race thread
guide !0.
LK3-B430E Mark II
42
6. ADJUSTMENT
6-6. Adjusting the work clamp lift amount
The maximum work clamp lift amount is 17 mm from the top of the needle plate.
The lift amount for each model is adjusted as shown in the table at the time of shipment.
e
w
q
17mm
Use Ordinary materials (-1, -5)
Denim (-2)
+1
0
Life amount
Knitted materials (-7)
+1
0
10 mm
9+10 mm
14 mm
1. To adjust the work clamp lift amount, loosen the bolt q and move the presser arm lever plate w up or
down.
2. Apply grease to the bottom of the presser plate e to the top of the presser arm lever plate w and to the
sliding part of the work clamp (grease is already applied at the time of shipment), and check that the
movement becomes easier.
3. Check that there is a gap between the presser arm lever plate w and the presser plate e when the presser
foot is lowered.
* If movement is sluggish when the work clamp is being raised and lowered, it may not be possible to
increase the work clamp life amount.
* If the work clamp cannot be raised or lowered, error code "E-61" or "E-63" will be displayed.
6-7. Adjusting the thread wiper
q
w
t
y
u
2 ± 0.5 mm
Needle
point
e
r
!1
u
i
!2
o
(Approx.
30 mm)
u
Approx.
20 mm
1. Loosen the screw q, and remove the top cover w.
2. Remove the bolt e, the washer r, and the presser arm t.
3. When the sewing machine in the stop position, press link C y to pass the thread wiper u under the
needle. Loosen the set screw i, and move the thread wiper arm o up and down to adjuste the clearance
between the top of the thread wiper and the needle point is 2 ± 0.5 mm.
4. Remove the rubber cap !1, and loosen the set screw !2 to adjust the position of the thread wiper so that it
is positioned to the right approximately 20 mm from the center of the needle bar.
43
LK3-B430E Mark II
6. ADJUSTMENT
6-8. Adjusting the thread take-up amount
q
Thread take-up amount (stroke)
e
Shorter
Longer
w
q
r
At the time of shipment from the factory, the thread take-up amount (stroke) of the thread take-up lever q is
set to the standard setting of 5 mm for ordinary material (-1/-5) ordinary material specifications, and 0 mm for
knitted material specifications. You may need to adjust this setting depending on the sewing conditions to
prevent the thread from pulling out at the sewing start.
[Adjustment method]
Loosen the screw w and move the stopper (3.57 nut) e to adjust the operating angle of the thread take-up
solenoid r.
* The stroke of the thread take-up lever becomes longer when the stopper is moved downward, and it becomes shorter when the stopper is moved upward.
NOTE:
Do not increase the stroke of the thread take-up lever any more than is necessary.
If the sub-thread tension is too high, the needle thread length may become too short and the thread may come out of
the needle. Furthermore, if the sub-thread tension is too weak, the needle thread length may become too long and the
underside of the article being sewn may become untidy.
6-9. Adjusting the movable knife
q
B
A
e
w
Loosen the nut w and move the connecting rod lever e to the left or right to adjust so that the V section A is
aligned with the index mark B on the needle plate when the sewing machine in the stopped position and the
movable knife q is moved toward the index mark.
LK3-B430E Mark II
44
6. ADJUSTMENT
6-9-1. Replacing the movable and fixed knives
y
w
q
e
y
t
r
u
i
1. Open the shuttle race cover, and remove the flat screw q, the screw w and the feed plate e.
2. Remove the two screws r and the two flat screws t, and needle plate y.
3. Remove the thread trimmer connecting rod u from the pin of the connecting rod lever i.
o
!2
!3
!1
!0
0.5 mm
!0
4. Remove the movable knife o, and replace it with a new one. At this time, make sure that the movable knife
o and the fixed knife !0 cut the thread cleanly. If necessary, replace the washer !11 to obtain a clean cut.
*Apply grease to the outside of the collar !2 at this time.
5. Remove the fixed knife !0, and replace it with a new one. Place it 0.5 mm from the needle hole plate !3.
6. Insert the thread trimmer connecting rod u to the pin of the connecting rod lever i, and attach the needle
plate y.
6-9-2. Adjusting the engagement of the movable knife and fixed knife
Fig.1
A
B
C
Movable knife
D
Fix knife
Cutting
edge
Cutting
edge
Cutting
edge
Cutting
edge
A. After the movable knife and fixed knife are properly engaged, tighten the screw as shown in Fig.1.
B. Turn the movable knife (in the direction of the arrow) while the screw is still tightened.
C. Loosen the screw.
D. Turn the movable knife (in the direction of the arrow) while the screw is still loosened.
Repeat above steps A, B, C and D four or five times to maintain the cutting performance of the knife.
45
LK3-B430E Mark II
6. ADJUSTMENT
6-10. Adjusting the driving lever stopper position
q
6 mm
w
e
6 mm
0.15mm or less
t
e
r
r
1. Remove the screw q and the top cover w.
2. If thread trimming is not performed, loosen the screw t so that the difference between the thread trimmer
driving lever e and the driving lever stopper r is 6 mm.
* Make sure that the clearnce between the thread trimmer driving lever e and the driving lever stopper r
is at the most 0.15 mm.
The driving lever stopper r has an imprinted number mark: 2, 3, or 4. If the clearance is larger than 0.15
mm, replace the driving lever stopper r with that with a different number. For example, when the
number 3 stopper is used, replace it with number 4 stopper. When the number 4 stopper is used, replace
it with number 2 stopper.
6-11. Adjusting the thread trimmer driving lever position
q
w
y
t
r
e
1. Remove the screws q and the top cover w.
2. Turn the pulley to place the thread trimmer cam e with its non-operating portion facing upward.
3. Loosen the nut t. Move the screw y so that the roller r of the thread trimmer driving lever will return
smoothly when it is put into the groove of the thread trimmer cam e.
LK3-B430E Mark II
46
6. ADJUSTMENT
6-12. Adjusting the thread trimming solenoid position
q
w
0.5 mm
y
t
u
e
r
1. Remove the screws q and the top cover w.
2. Fully press the plunger r of the thread trimming solenoid e, adjust the clearance between the thread
trimmer driving lever t and the driving lever stopper y to 0.5 mm, and tighten the screw u.
6-13. Adjusting the backlash
0.05 - 0.12 mm
r
w
q
e
1. Loosen the set screw q, and turn the rock gear shaft w to adjust the play at the end of the driver e to 0.05
- 0.12 mm
2. After adjustment, move the rock gear shaft w to the left and right so that the pulley can rotate easily, and
tighten the set screw q.
47
LK3-B430E Mark II
6. ADJUSTMENT
6-14. Adjusting the positions of the presser solenoid
o
w
q
!0
i
t
y
u
e
r
110.0 mm ± 0.2 mm
1. Remove the screws q and the top cover w.
2. Remove the bolt e, the washer r, and the presser arm t.
* Pay attention not to let the ball bearing of the presser arm support shaft fall.
3. Remove the rubber cap y, and loosen the screws i of the solenoid setting plate (B) u.
4. Loosen the screw o, adjust the position of the presser solenoid !0 so that it is positioned 110.0 ± 0.2 mm
away from the shoulder of the machine. Tighten the screw o.
* If this adjustment is not performed properly, the work clamp may not rise or lower properly, resulting in
the occurrence of error E-60.
6-15. Adjusting the sensor perceive plate position
q
w
r
t
y
y
1.
2.
3.
4.
u
i
e
Approx. 5 mm
t
Remove the screws q and the top cover w.
Turn on the power, and change to the sensor mode on the operation panel. (Refer to page 72.)
Remove the rubber cap e from the side of the arm.
Press the link C assy r in the presser lifter mechanism. When the wiper t is 5 mm away toward the right
from the needle y, the presser signal should be ON. Loosen the screw i of the sensor perceive plate u,
and move the sensor perceive plate u back or forth to adjust it.
LK3-B430E Mark II
48
6. ADJUSTMENT
6-16. Adjusting the home position
y
!4
!2
o
!3
!5
w
!0
u
!1
e
e
r
q
i
t
X direction
Y direction
1. Following the instruction manual, turn on the power, set the program number to 00, and press the foot
switch to set the home position of X and Y axes.
2. Turn off the power. Loosen the screw r and the bolt t, and move the feed plate e and the presser arm y
so that the needle plate q comes to the center of the feed plate e and the presser arm y.
* After that, turn on the power again to check the alignment.
3. If this adjustment does not make the alignment correct, loosen the screw u after turning off the power,
and remove bed covers R i and L o.
Loosen the screws !0 and !1, rotate the feed home position dogs !2 and !3 gradually, tighten screws again,
and repeat step 1.
4. Turn off the power.
* If oil or grease is adhered to the home position sensors !4 and !5, or a wire is broken, error E-A0 may
occur.
6-17. Adjusting the needle up stop position
Feed mechanism operates.
e
Material
r
q
w
t
y
u
Feed mechanism stops.
1. Loosen the screw t (at the U side on the pulley q), and turn the pulley q so that the mark w on the pulley
is inside the mark r of the belt cover e.
The pulley q stops later if it is turned clockwise; it stops earlier if it is turned counterclockwise.
The standard needle up stop position is 6 mm below the needle bar dead point.
Timing between the needle and the feed mechanism is adjusted so that the feed mechanism starts operating after the needle comes out of the material sewn, and stops before the needle penetrates the material.
* The screw y at the “D” mark is an adjusting screw for the needle down detection function and is adjusted to match the feed timing, so it should not be loosened.
* The screw u is a screw for detecting the machine stop position, and should not be loosened.
49
LK3-B430E Mark II
6. ADJUSTMENT
6-18. Adjusting the V-belt tension
e
w
r
q
Approx. 1 mm
Approx. 9 - 10 mm
r
10 N
1. Remove the screw q, loosen the screw w, then remove the belt cover e.
2. Press the center of the V-belt with a load of 10 N, and adjust the tension pulley r so that the V belt
deflection is approximately 9 - 10 mm.
3. Adjust the right tension pulley so that there is a gap of about 1 mm between it and the V-belt.
* When the belt tension is weak, the following problems will occur;
• Noise & vibration become large.
• Needle up stop position becomes unstable.
• Error code [E-50] is displayed.
LK3-B430E Mark II
50
7. GAUGE PARTS LIST ACCORDING TO SUBCLASSES
7. GAUGE PARTS LIST ACCORDING TO SUBCLASSES
The following are standard gauge parts according to each specification.
(In the following table, parts marked with ★ are common with the LK3-B430E; parts with ✩ are common with
the BAS-311E.)
-2
Subclass
Use
Part name
-1
For denim
Needle hole plate
152690-301 B
S15902-401 LA
Tension spring
-7
For ordinary materials
For knitted materials
(φ2.2)
S49980-001 FM
(φ1.6)
S10211-001 A
✩
(φ2.6)
S10212-101 E
Bobbin case assy
-5
154340-001 B
S16074-101 LA
★
✩
★
✩
Screw
✩
159610-201 A
★
S15902-401 LA
✩
154339-001 A
★
S16074-101 LA
✩
★
159610-201 A
★
154339-001 A
154341-001
★
S16074-101 LA
✩
★
154341-001
Spring,
anti-spin
✩
159612-001 A
★
S15667-001 LA
✩
S15667-001 LA
★
159612-001 A
Bobbin
159613-051
★
S15665-001 LA
✩
★
159613-051
Shuttle hook book
assy
152687-902 B ★
152685-903 A
★
S15663-991 LB ✩
S15662-992 LA
✩
152685-903 A
Large shuttle hook
★
★
152686-101 B
Spring tension
152682-101 A
★
★
107606-001
Spring
104525-001
★
★
144588-001 B
51
★
145519-001
LK3-B430E Mark II
7. GAUGE PARTS LIST ACCORDING TO SUBCLASSES
-2
Subclass
Use
For denim
Part name
-5
-7
For ordinary materials
★
Thread guide,
needle bar
A
Needle assy
-1
For knitted materials
★
152890-001 A
S41222-001 B
★
152890-001 A
B
★
★
S37928-419
107415-414
107415-409
DP × 5 #14
107415-014
DP × 5 #9
107415-009
★
Needle
★
DP × 17 NY #19
S37928-019
Work clamp arm
assy
S49591-001
Work clamp,
U
S49594-001
★
5.6 × 23
(for 3mm use)
R. 153608-101
L. 154527-001
Feed plate
S49697-001
S49596-001
★
4 × 18
(for 2mm use)
R. 152777-001
L. 152778-001
4 × 12
(for 2mm use)
R. 152779-001
L. 152780-001
12 × 24
12 × 31
(Submerged-type, L) (Submerged-type, S)
S49700-001
S49698-001
★
5 × 13
(for 2mm use)
S49699-001
Standard sizes for work clamps and feed plates are as follows:
(The actual sewing area has a 1.5 mm margin on every side; inside the lines which the dimensions indicate.)
-1
152777-001
152778-001
4
Work
clamp, U
-5
152779-001
152780-001
12
18
5.6
23
S49697-001
-7
152779-001
152780-001
S49698-001
4
-2
153608-101
154527-001
4
Spec.
R
L
12
S49700-001
S49699-001
LK3-B430E Mark II
24
5
13
16
31
12
Feed
plate
21.2
4
30.2
52
7. GAUGE PARTS LIST ACCORDING TO SUBCLASSES
<Gauge parts>
The following are provided as optional gauge parts.
Each work clamp pair is used in combination with the feed plate directly below them.
• Work clamps R, L (★) and feed plate
4
S00906-001 (1 Inch)
S00907-001 (1 Inch)
5.6
3
153203-001 (PS)
153204-001 (PS)
23
22
5
5
Work
clamp, U
2
153201-001 (PL)
153202-001 (PL)
5.6
R
L
1
152781-001 (For denim)
152782-001 (For denim)
12
28.4
S49942-001 (For denim)
S49943-001 (PL)
S49944-001 (PS)
23
23
13
S49946-001 (1 Inch)
21.2
6
6
5
S33747-001 (30mm)
S33748-001 (30mm)
6
153201-001 (For denim)
153202-001 (For denim)
7
152777-001 (PM)
152778-001 (PM)
8
S49695-001 (F)
S49694-001 (F)
18
12
S49948-001 (30mm)
S49949-001(For denim)
S49943-001 (PL)
S49696-001 (F)
33
27
60
112.5
LK3-B430E Mark II
6
16
23
S49945-001(MS)
53
5.4
22
9
Feed
plate
4
33
5.6
Feed
plate
5
Work
clamp, U
4
5.6
R
L
6
32.9
Feed
plate
13.4
7. GAUGE PARTS LIST ACCORDING TO SUBCLASSES
11
12
13
R
S46771-001
(For straight bar
tacking)
S46771-001
(For straight bar
tacking/submerged)
S46774-001
(For vertical bar
tacking)
S46774-001
(For vertical bar
tacking/submerged)
L
S46770-001
(For straight bar
tacking)
S46770-001
(For straight bar
tacking/submerged)
S46773-001
(For vertical bar
tacking)
S46773-001
(For vertical bar
tacking/submerged)
32.4
13
13
32.4
4.4
S49970-001
(For straight bar
tacking)
S49971-001
(For vertical bar
tacking)
S49975-001
(For vertical bar
tacking/submerged)
33
13
16.5
3
Feed
plate
S49974-001
(For straight bar
tacking/submerged)
4.4
23
Work
clamp, U
5.6
5.6
10
42
5
15
156006-001 017680-512 156006-001 017680-512 156006-001 017680-512 156006-001 017680-512
Work
clamp, U
Bolt
14
15
R
S46777-001
(For circular stitching)
S46780-001
(For crescent bar
tacking)
L
S46776-001
(For circular stitching)
S46779-001
(For crescent bar
tacking)
10
Work
clamp, U
φ13
S49972-001
(For circular stitching)
14.6
S49973-001
(For crescent bar
tacking)
10
Feed
plate
φ13
14.6
156006-001 017680-512 156006-001 017680-512
Work
clamp, U
Bolt
* Separate programs must be created if using 14 or 15.
LK3-B430E Mark II
54
7. GAUGE PARTS LIST ACCORDING TO SUBCLASSES
Work clamp, U blank
155994-000
Feed plate blank
S49977-000
S49976-000
20.4
S49978-000
34
38
42
with lozenge
Without lozenge
• Needle hole plate (✩)
A
S10211-001 AF S51449-001 BZ S41013-001
D
S29997-001
E
S10212-101 ED S30925-001
φ1.6
φ1.6
φ2.2
3
F
S10213-001
3
55
3
3
-2 (For denim)
FD S30926-001 FM S49980-001
φ2.2
φ10
φ2.2
φ2.2
φ10
φ3.4
2.8
3
-7 (For knitted
materials)
φ4
φ2.6
φ2.6
H
S30450-001
-1,-5 (For ordinary
materials)
LK3-B430E Mark II
S25127-001
φ4.7
φ2.6
φ3.3
3
3
L
4.8
2.8
3
φ2.6
M
S34348-001
φ6.5
φ4
2.8
8. OPTIONAL PARTS
8. OPTIONAL PARTS
■ Two-pedal foot switch ........................................... The presser switch and the start switch have been separated, giving the operator more flexibility to select the
best method of working.
■ Two-step foot switch ............................................. This is a pedal-type foot switch.
■ Liquid cooling tank ................................................. This helps to prevent thread breakages caused by friction
when using synthetic threads.
Fill the tank with silicone oil (100 mm2/S).
■ Work clamp set QC ................................................ The work clamp can be easily replaced by loosening the
bolt and moving work clamp arm levers.
■ Solenoid thread wiper ........................................... This wipes the thread independently of the work clamp
operation.
■ Thread take-up device ........................................... This ensures a longer upper thread trailing. (This thread
take-up device is for denim material.)
LK3-B430E Mark II
56
9. TROUBLESHOOTING
9. TROUBLESHOOTING
Problem
Cause
Work clamp does not
rise.
Check
Solution
Page
Link operation is sluggish.
Solenoid position
Adjust solenoid position.
48
Work clamp operation
is sluggish.
Grease on work clamp
Apply grease to the
sliding part of the work
clamp.
29
Too high work clamp
lift stroke
Distance between work
clamp and needle plate
top
Adjust the height of
the work clamp to 17
mm or less.
43
Improper sliding of
presser
plate
and
presser arm lever plate
Grease on presser
plate and presser arm
lever plate
Apply grease to the
presser plate and the
presser arm lever plate.
29
Work clamp
contact with
wiper.
makes
thread
Thread wiper stand-by
position
Adjust the position of
the thread wiper.
43
Improper position of
sensor perceive plate
Sensor perceive plate
position
Adjust the position of
the sensor perceive
plate.
48
Electrical trouble
See #7 work clamp
does not rise" in the
table in 10-12-2.
←
86
Spring
Hook
the
properly.
spring
Solenoid position
Adjust the
position
solenoid
Link does not return.
Work clamp does not
lower.
48
Electrical trouble
See #8 Work clamp
does not lower" in the
table in 10-12-2.
←
86
Improper position of
presser arm lever plate
Distance between work
clamp and needle plate
top
Adjust the work clamp
lift stroke.
43
Thread wiper obstructs
needle
Clearance
between
thread wiper and needle tip
Adjust the height of
the thread wiper
43
Improper position of
thread wiper
Thread wiper position
Adjust the operating
distance of the thread
wiper.
43
Lower thread is wound
to one side
Improper height of tension stud
Height of the tension
stud
Adjust the height of
the tension stud.
Insufficient
thread wound
Improper position of
bobbin presser
Wound lower thread
amount.
Adjust the height of
the bobbin presser.
Insufficient work clamp
lift stroke.
Improper thread wiper
operation
57
lower
LK3-B430E Mark II
9. TROUBLESHOOTING
Problem
Cause
Check
Solution
at
See "Skipped stitches
occur."
←
Unstable thread length
after thread trimming
Upper thread length
after thread trimming
Adjust the sub tension.
4
Thread take-up lever
stroke is too great.
Thread take-up lever
stroke
Adjust the thread takeup lever stroke.
44
Turn the thread tension
nut in the bobbin case to
adjust the tension.
Turn the thread tension
nut in the bobbin case to
adjust the tension.
←
89
Upper thread tension
is too great
Upper thread tension
Adjust
the
thread tension.
Improper
orientation
Needle orientation
Reinstall the needle
with its long groove
facing the front.
Stitches skipped
start of sewing
Upper
unthreaded
thread
Upper thread breaks.
Lower thread breaks.
Skipped stitches occur.
needle
upper
4
Thread is too thick for
needle.
Upper
needle
and
Use the correct thread
for the needle.
Improper tension and
height of the thread
take-up spring
Thread take-up spring
tension and height
Adjust the tension and
height of the thread
take-up spring.
Damaged or burred
rotary hook, needle
hole plate or needle
Scratches or burrs
File or replace
affected part.
Thread
melting
(synthetic thread)
Thread end
Use the thread cooling
device.
Lower thread tension
is too great.
Lower thread tension
Adjust the tension of
the lower thread.
Damaged corners of
needle hole plate or
bobbin case
Damage
File or replace
affected part.
Excessive clearance
between needle and
rotary hook tip
Clearance
between
needle and rotary hook
point
Adjust the needle clearance
between the needle and the
rotary hook point.
42
Improper
timing
between needle and
rotary hook
Needle bar lift stroke
Adjust the needle bar
lift stroke.
41
Driver is contacting
needle more than is
necessary.
Clearance
between
driver and needle
Adjust
the
needle guard.
42
Needle bent
Needle curve
Replace the needle
with a new one.
Needle
installed
Needle orientation
Reinstall the needle
with its long groove
facing the front.
improperly
thread
Page
LK3-B430E Mark II
4
the
4
the
driver
58
9. TROUBLESHOOTING
Problem
Cause
Check
Solution
Page
Clearance
between
needle and rotary hook
point
Adjust the clearance
between the needle
and rotary hook point.
42
Needle bar lift stroke
Adjust the needle bar
lift stroke.
41
Needle curve
Replace the needle
with a new one.
Needle and feed timing
Adjust the needle down
detection position.
Needle is too thin.
Needle and thread
Use the correct needle
for the material.
Electrical trouble
See #15 "The machine cannot produce correct stitches" in the table in 10-12-2.
Fixed knife is blunt.
Fixed knife blade
Sharpen or replace the
fixed knife.
Rotary
guide
Adjust the position of
rotary hook thread
guide.
42
Needle bar lift stroke
Adjust the needle bar
lift stroke.
41
Movable knife does not pick up
the thread because of skipped
stitches at the end of sewing.
Skipped stitches at the
end of sewing
See "Skipped stitches
occur."
Improper position of
movable knife
Movable knife position
Adjust the position of
the movable knife.
Sub
tension
insufficient.
Sub tension
Turn the tension nut to
adjust the tension.
Needle is interfering
with rotary hook.
Needle is bent
Needle breaks.
Sideways
movement
needle
Movable knife does not
pick up the thread.
Upper or lower thread
is not trimmed.
Thread jamming
59
is
hook
thread
←
49
89
44
Electrical trouble
See #16 "The thread
trimmer does not operate"
in the table in 10-12-2.
Lower thread tension
is insufficient
Lower thread tension
Turn the thead tension
nut in the bobbin case
to adjust the tension.
Inadequate
tension
and height of thread
take-up spring
Tension and height of
thread take-up spring
Adjust the tension and
height of the thread
take-up spring.
4
Improper needle and
rotary hook timing
Needle bar lift stroke
Adjust the needle bar
lift stroke.
41
Rotary hook thread
guide does not separate
upper and lower threads.
Rotary hook
guide position
Adjust the position of
the rotary hook thread
guide.
42
Upper thread tension
is insufficient
Main tension
LK3-B430E Mark II
thread
←
Turn the tension nut to
adjust the tension.
89
9. TROUBLESHOOTING
Problem
Cause
Poor
stitching
on
reverse side of material
Poor stitching
Unstable upper thread
length
Unstable needle
stop position
up
Check
Solution
Page
Adjust the position of
the rotary hook thread
guide.
42
4
Rotary hook thread guide
does not separate upper
and lower threads properly.
Rotary hook
guide position
Improper upper thread
tension
Upper thread tension
Adjust
the
thread tension.
Unstable upper thread
length after thread
trimming
Upper thread length
after thread trimming
See "unstable upper
thread length."
Thread take-up lever
stroke is too great.
Thread take-up lever
stroke
Adjust the thread takeup lever stroke.
44
Upper thread tension
is insufficient.
Upper thread tension
Adjust
the
thread tension.
upper
4
Lower thread tension
is insufficient.
Lower thread tension
Adjust
the
thread tension
lower
Improper tension and
height of thread takeup spring
Thread take-up spring
tension and height
Adjust the tension and
height of the thread
take-up spring.
4
Improper tension and
height of thread takeup spring
Thread take-up spring
tension and height
Adjust the tension and
height of the thread
take-up spring.
4
Improper adjustment
of sub tension
Sub tension
Adjust the sub tension.
Needle
up
stop
position fluctuates.
See "Unstable needle
up stop position."
Fixed knife is blunt.
Fixed knife blade
Sharpen or replace the
fixed knife.
Thread take-up lever
stroke is too great.
Thread take-up lever
stroke
Adjust the thread takeup lever stroke.
44
Inadequate adjustment
of V-belt tension
Tension pulley position
Adjust the tension of
the V belt using the
tension pulley.
50
←
90
Electrical trouble
thread
See #18 "The machine
does not stop with the
needle at the upper
position after thread
trimming" in the table in
10-12-2.
LK3-B430E Mark II
upper
4
←
60
10. ELECTRIC MECHANISM
10. ELECTRIC MECHANISM
10-1. Precautions at the time of adjustment
Pay attention to the following when opening the control box for maintenance.
■ Electric shock
Some large capacitors may have a high voltage remaining in them for up to 5 minutes after the power is
turned off. To prevent electric shock, wait at least 5 minutes after the power is turned off before doing the
following:
¡ Opening and closing the control box
¡ Replacing fuses
¡ Separating and joining connectors
¡ Measuring resistance
¡ Doing anything with a possibility of touching something inside the control box
Some adjustments require measuring the voltage while the power is turned on with the control box kept
open.
In such a case, be careful not to touch any place other than that for the measurement. In addition, always
keep in mind that a high voltage remains for 5 minutes after the power is turned off.
■ Injury
While the power is turned on, the cooling fan of the control box operates; be careful not to get caught in it.
When separating or rejoining connectors, and measuring something, be careful not to cut your fingers on
metal parts such as heatsinks and covers.
10-2. Components inside the control box and the operation panel
The following are brief explanations of components inside the control box. See control circuit block diagram
at the end of this manual for the details of the connections.
◆ Main circuit board
The main circuit board is fixed to the rear panel of the control box. This PCB serves to control machine
operation.
◆ Power supply circuit board
The power supply circuit board is fixed at the bottom of the control box. Four fuses are mounted on this
PCB.
◆ Panel PCB
The panel PCB is fixed to the front panel of the operation panel. This PCB controls indications of the machine status and the input operation.
◆ DC fan motor
The DC fan motor serves as a fan to cool the inside of the control box. Clean the inlet filter monthly.
◆ Conversion transformer (depending on power supply voltage specification)
The conversion transformer controls the power supply voltage to provide 220 V.
Panel PCB
DC fan motor
Air inlet
Power supply
circuit board
Main circuit board
Operation panel
61
Control box
LK3-B430E Mark II
10. ELECTRIC MECHANISM
10-3. Fuse explanation
When replacing a fuse, follow the instructions indicated in “10-12. Troubleshooting flowchart.”
If a component on a PCB is damaged, a fuse may blow again immediately even when it has been replaced.
When replacing a fuse, be sure to use the specified ones listed below.
No.
Part name
Part code
When a fuse has blown
1
G fuse (5AFB)
(quick melting type, 5A-250V)
S08030-000
The feed mechanism and work clamp do not operate.
Error E-A0 is displayed.
2
G fuse (7AFB)
(quick melting type, 7A-250V)
S48580-000
The machine motor does not turn.
Error E-20 is displayed.
3
Fuse 6A
(glass tube fuse, 6A-250V)
153242-000
The power lamp is not lit, and nothing operates.
4
Fuse 6A
(glass tube fuse, 6A-250V)
153242-000
The power lamp is not lit, and nothing operates.
Fuse
No.1
Fuse
No.2
Fuse
No.3
Fuse
No.4
Main circuit board mounting side
LK3-B430E Mark II
Front panel
62
10. ELECTRIC MECHANISM
10-4. Connectors
Most of the machine trouble is due to connector problems including improper connection or insufficient
contact. Therefore, be sure to check if each connector is correctly inserted and that there is no contact failure
between pins and wires before starting troubleshooting procedures.
■ Connector positions
Outside of the control box
For foot switch
Main circuit board
P15
EXIN
P20
RSPORT
P16
PER
P117
FOOT
P8
PANEL
P18
HEAD
P1A
ORG1
P14
AIR
P1B
ORG2
P19
FAN2
P2
SYNCHRO
P3
SELECT
P13
DC18
P9
POWER
P10
FAN1
P12
DC300
63
P11
UVW
P7
XPM
LK3-B430E Mark II
P6
YPM
P5
SOL
P4
SOL2
10. ELECTRIC MECHANISM
Power supply circuit board
P5
DC300
P1
POWER
P4
ACIN
P3
DC18
P2
PER
Panel PCB
P1
LK3-B430E Mark II
64
10. ELECTRIC MECHANISM
■ Contact failure
The connectors functions are divided into four categories. Some connectors may belong to more than one
group. Be sure to investigate another category if a problem is not found in one category.
For the details of connections, refer to the control circuit block diagram at the end of this manual.
1. Feed mechanism
Problem
Connector No. and position
• Home position is not properly detected.
• Error E-A0 is displayed.
• The work clamp does not operate.
• Error E-60 is displayed.
Main circuit board
• Forward feed does not operate correctly.
• Error E-A0 is displayed.
Sewing
clamp
sensor
Y home
position
sensor
X home
position
sensor
Main circuit board
Y pulse
motor
• Sideways feed does not operate correctly.
• Error E-A0 is displayed.
Main circuit board
X pulse
motor
2. Work clamp lifter and thread trimmer mechanisms
Problem
Connector No. and position
• The work clamp does not operate.
• The machine does not operate.
Main circuit board
Control
box
Foot
switch
• The work clamp does not operate.
• Thread trimming is not performed.
• Error E-61 is displayed.
Main circuit board
Sewing
clamp
solenoid
Thread
trimming
solenoid
• Thread take-up lever does not operate.
Main circuit board
Thread takeup solenoid
65
LK3-B430E Mark II
10. ELECTRIC MECHANISM
3. Sewing operation
Connector No. and position
Problem
• The power lamp is not lit, and nothing operates.
• Machine operation is unstable.
Power supply circuit board
Conversion transformer
Power supply switch
• The power lamp is not lit, and nothing operates.
• Machine operation is unstable.
• The feed mechanism does not operate.
• The work clamp lifter mechanism does not operate.
• Error E-61 is displayed.
• Error E-A0 is displayed.
Power supply circuit board
Main circuit board
• The machine motor does not run.
• Motor operation is unstable.
• Needle up stop position is not correct.
• Error E-20 is displayed.
• Error E-50 is displayed.
Power supply circuit board
Main circuit board
• The machine motor does not run.
• Motor operation is unstable.
• Needle up stop position is not correct.
• Error E-20 is displayed.
• Error E-50 is displayed.
Power supply circuit board
Main circuit board
• The machine motor does not run.
• Motor operation is unstable.
• Needle up stop position is not correct.
• Error E-20 is displayed.
• Error E-50 is displayed.
Main circuit board
Synchronizer
• The machine motor does not run.
• Motor operation is unstable.
• Needle up stop position is not correct.
• Error E-20 is displayed.
• Error E-50 is displayed.
Main circuit board
Machine
motor
LK3-B430E Mark II
66
10. ELECTRIC MECHANISM
4. Others
Problem
Connector No. and position
• The DC fan motor does not run.
• Error E-70 is displayed.
Main circuit board
DC fan
motor
• Error E-F1 is displayed.
Power supply circuit board
Main circuit board
• Indication is strange.
• Any switch does not have any effect.
• The power lamp is not lit.
Main circuit board
Panel PCB
67
LK3-B430E Mark II
10. ELECTRIC MECHANISM
10-5. Explanation of the DIP switches
10-5-1. Operation panel DIP switches
The operation panel DIP switches q are used to
change functions which might need to be changed
depending on the sewing conditions.
NOTE:Always turn off the power before setting the
DIP switches.
The functions shown in the table below can be
changed by means of these DIP switches.
* All DIP switches are set to OFF at the time of shipment.
q
Motion when set to ON
Switch
DIPA-1
Presser does not automatically lift after sewing is
completed.
See "10-5-2. Setting the presser
mode"
DIPA-2
Two-pedal mode is available.
DIPA-3
User program mode is available.
DIPA-4
—
DIPA-5
The presser does not rise automatically when a split is found.
DIPA-6
Displays the enlargement/reduction ratio in millimeter units instead of as a percentage.
(After changing this setting, be sure to carry out the auto-clear operation by referring to
page 73.)
DIPA-7
Enlargement of pattern size is not available.
DIPA-8
Program number is fixed.
10-5-2. Setting the presser mode
Through the combination of DIP switches A-1 and A-2 on the operation panel, presser motions can be set as
follows:
DIPA-1
DIPA-2
Pedal specifications
—
—
Single pedal
Presser is raised automatically.
ON
—
Single pedal
Presser is raised by pressing the pedal.
ON
Two pedals
Presser is raised auddtomatically, then it is lowered by
pressing the pedal.
ON
Two pedals
Presser is kept lifted while the pedal is pressed.
—
ON
Raising the presser at the sewing end
LK3-B430E Mark II
68
10. ELECTRIC MECHANISM
10-5-3. DIP switches inside the control box
DANGER
Wait at least 5 minutes after turning off the power switch and disconnecting the power cord from
the wall outlet before opening the face plate of the control box. Touching areas where high voltages are present can result in severe injury.
The DIP switches q dinside the control box are used
to change functions which do not often need to be
changed once they have been set.
The functions can be changed as shown in the table
below by changing the positions of the DIP switches
q.
* All DIP switches are set to OFF at the time of shipment.
NOTE: When opening the cover, hold it securely so
that it does not fall down.
q
Motion when set to ON
Switch
69
DIPB-1
First two stitches are sewn at a low speed of 260 rpm.
DIPB-2
Last two stitches are sewn at a low speed of 260 rpm.
DIPB-3
—
DIPB-4
Last two stitches are sewn at a low speed of 700 rpm.
DIPB-5
First two stitches are sewn at a low speed of 400 rpm.
DIPB-6
Low speed sewing is not performed at the start of sewing.
DIPB-7
The motor operates in reverse when the upper shaft stops, to return the needle bar to
close to its highest position.
DIPB-8
Area checking of the sewing data is not carried out.
LK3-B430E Mark II
10. ELECTRIC MECHANISM
10-6. Explanation of the memory switches
The functions of the switches on the operation panel q can be changed to carry out special functions.
NOTE: After changing the memory switch settings, press the power switch to turn the power off and then back on
again.
The memory switches “00-2F” are set to OFF at the time of shipment.
1. Turn on the power switch.
2. While pressing the TEST switch w, press the BOBB430E Mark Series
BIN. WIND switch e.
q
* “00--” will appear in the display window r.
P PROGRAM NO.
P1
P2
3. Press the DISPLAY SET switches t to set the two digPOWER
its at the left of the display window r to the correX-SCALE
sponding number (00 to 4F) of the function shown in
y
P3
P4
RESET
Y-SCALE
the table below that you would like to select.
4. When the BOBBIN. WIND switch e ispressed, the
SPEED
two spaces at the right in the display window will
r
w
TEST
COUNTER
change from “--” to “ON”.
* If you press the RESET switch y at this time,
memory switches from 00 to 2F will all be set to OFF
SELECT
e BOBBIN.WIND
(“--”), and memory switches from 30 to 4F will be
returned to their initial settings.
5. Press the TEST switch w.
* The display window will return to normal.
t
■ Memory switches 00 – 0F
Switch
Motion when set to ON
memo-00
At the end of sewing, the feed plate will be returned to the sewing start point via mechanical
home position.
memo-01
Work clamp will move to the sewing start point, and then will be lifted.
(The work clamp rises at the final stitch to enable the quick taking out of the workpieces.)
memo-02
Feed will move automatically to the next starting point at the same time as a user program is
switched. (Normally it moves to the starting point after sewing starts.)
memo-03
When sewing using programs, the programs which have been set will be sewn in numerical
order.
(Cycle sewing mode is set.)
memo-04
The sewing speed will be fixed at the minimum speed for the maximum pitch of the sewing
data. (Set this to ON if you are concerned that variations in pitch may cause changes in the
sewing speed.)
memo-05
Increases the presser solenoid lifting force (Set to ON when using the optional spring for
extra-heavy material)
memo-06
Enlargement and reduction ratio settings for X and Y become the same.
memo-07
—
memo-08
Test feeding is carried out stitch by stitch when the foot switch is depressed.
memo-09
The sewing start point becomes the reference point for enlargements and reductions. (The
reference point for enlargements and reductions is normally the center of the sewing frame.)
memo-0A
—
memo-0b
—
memo-0c
Needle stops in up position during emergency stop.
(EMERGENCY STOP switch is available as an option.)
memo-0d
The bar tacking stitches (with a pitch of less than 1 mm) are also enlarged and reduced.
(Normally stitches with a pitch of less than 1 mm are not enlarged or reduced.)
memo-0E
Test feeding will be performed at the same speed as that for actual sewing.
(This is used for checking feeding operation.)
memo-0F
After sewing is finished, the work clamp automatically opens and closes once (practice
operation).
LK3-B430E Mark II
70
10. ELECTRIC MECHANISM
■ Memory switches 10 – 1F
Motion when set to ON
Switch
memo-10
The optional emergency stop switch can be used.
memo-11 - memo-13
—
memo-14
Solenoid wiper can be used (available as an option).
memo-15
—
memo-16
Needle cooler output is enabled. (Needle cooler is available by special order.)
memo-17
Thread take-up device is not operated at the sewing end.
memo-18
Thread take-up device operates one stitch before the sewing end.
memo-19
Presser position errors are not detected.
memo-1A
Needle up stop position errors are not detected.
memo-1b
Presser can be moved up and down before the home position is detected.
(Normally the presser cannot be moved up and down until after the home position has
been detected.)
memo-1c
—
memo-1d
—
memo-1E
Errors can be reset using the EMERGENCY STOP switch. (EMERGENCY STOP switch is
available as an option.)
memo-1F
Thread is not trimmed when an emergency stop occurs during sewing. (EMERGENCY
STOP switch is available as an option.)
■ Memory switches 20 – 2F
Switch
Motion when set to ON
memo-20
Machine head from previous B430E series is used. (Only the operation panel and box are
Mark II.)
memo-21
Rotating-type thread breakage detector operates. (Device is available by special order.)
memo-22
During thread breakage detection, sensitivity is decreased from 8 to 14 stitches at the
sewing start. (Sensitivity during sewing is three stitches.)
memo-23
When DIP switch A-8 is simultaneously ON, setting values changed using the operation
panel are ignored.
memo-24 - memo-2F
—
■ Memory switches 30 – 4F
30 to 4F are set by entering two-digit values.
These values are incremented using the P2 switch, and decremented using the P4 switch.
71
Switch
Possible setting range
Units
Initial value
memo-30
0 - 30
mm
30
Limits the maximum area in the horizontal direction (X)
memo-31
0 - 30
mm
10
Limits the maximum area in the vertical direction (Y)
memo-32
12 - 27
× 100rpm
27
Changes the maximum sewing speed.
memo-33
1 - 10
× 7.5°
5
Changes the feed timing
1 (Fast) ←5 (Standard) →10 (Slow)
memo-34
0-5
Needle
0
The sewing speed at the sewing start is 400 rpm for the
specified number of stiches.
memo-35
3-9
× 100rpm
4
Changes the sewing start speed specified by memo-34.
memo-36
—
—
—
—
memo-37
1 - 20
× 7.5°
10
Changes the feed timing one stitch before the sewing end.
1 (Fast) ←10 (Standard)→20 (Slow)
memo-38
1 - 20
× 7.5°
10
Changes the feed timing two stitches before the sewing
end. memo-39
1 - 20
× 7.5°
10
Changes the feed timing for the third stitch at the sewing start.
1 (Fast) ←10 (Standard) →20 (Slow)
memo-3A
1 - 20
× 7.5°
10
Changes the feed timing for the second stitch at the sewing start.
memo-3b
1 - 20
× 7.5°
10
Changes the feed timing for the first stitch at the sewing start.
Explanation
memo-3c
—
—
—
—
memo-3d
—
—
—
—
memo-3E
—
—
—
—
memo-3F
—
—
—
—
memo-40
–
memo-4F
—
—
—
—
LK3-B430E Mark II
10. ELECTRIC MECHANISM
10-7. Checking the input sensor and DIP switch input
B430E Mark
POWER
q
P
Series
PROGRAM NO.
P1
P2
P3
P4
X-SCALE
e
RESET
Y-SCALE
SPEED
w
TEST
r
COUNTER
SELECT
BOBBIN.WIND
t
1. When the X-SCALE indicator q is illuminated and the RESET switch e is pressed while the TEST switch w
is being pressed, the state of the X home position signal will appear on the display window r.
• When sensor is ON
• When sensor is OFF
2. Each time the SELECT switch t is pressed, a different indicator will illuminate and the operating condition
for the corresponding item will appear on the display window r.
• When X-SCALE indicator is illuminated............ X home position sensor (ON when home position detected)
• When Y-SCALE indicator is illuminated ............ Y home position sensor (ON when home position detected)
• When SPEED indicator is illuminated ............... Synchronizer (*1)
• When COUNTER indicator is illuminated ......... Presser sensor (ON when presser is lowered)
* 1)
The synchronizer display simultaneously displays the needle up signal (3rd digit), the 24-section signal
(2nd digit) and the needle down signal (1st digit).
[ H L L]
“H” when the sensor is on, and “L” when the sensor is off
Needle down signal
24-section signal
Needle up signal
If the DIP switches at the side of the operation panel are changed at this time, the number of the DIP switch
which was changed will be displayed in the 4th digit position of the disply window r for about one second.
NOTE:
The DIP switch can be changed at this time without turning off the power so that you can check the DIP
switch input. However, you should normally always turn off the power when changing DIP switch settings.
3. Press the TEST switch w again to return the display to the normal condition.
LK3-B430E Mark II
72
10. ELECTRIC MECHANISM
10-8. Checking the input voltage
B430E Mark
P
Series
PROGRAM NO.
POWER
P1
P2
P3
P4
X-SCALE
w
r
RESET
Y-SCALE
SPEED
e
TEST
t
COUNTER
SELECT
BOBBIN.WIND
q
Specifications
Display
200V
[090 - 110]
220V
[100 - 120]
230V
[105 - 125]
100V
380V
400V
415V
[100 - 120]
Notes
"100" is displayed when the input voltage is 200V.
"110" is displayed when the input voltage is
100V (for 100-V specs.), 380V (for 380-V specs.)
400V (for 400-V specs.) or 415V (for 415-V specs.).
1.
2.
3.
4.
Turn on the power switch.
Press the SELECT switch q until the Y-SCALE indicator w illuminates.
While pressing the TEST switch e, press the RESET switch r.
If the input voltage is normal, the input voltage conditions will be shown in the display window t as
indicated in the table above.
5. Press the TEST switch e again to return the display to the normal condition.
10-9. Clearing all memory settings
If the sewing machine stops operating normally, the cause may be that an incorrect memory setting may have
been made by means of the memory switch, for instance. In such cases, carry out the following procedure to
clear the memory, and also check the DIP switch settings.
[Method]
While pressing the RESET switch, turn on the power. This will clear all of the memory setting.
NOTE:
• This operation causes all settings stored in memory such as memory switch and user program settings to
be cleared.
• If the optional emergency stop switch has been installed, you should reset memory switch No. 10 to ON.
73
LK3-B430E Mark II
10. ELECTRIC MECHANISM
10-10. Confirming software version
B430E Mark
P
Series
PROGRAM NO.
POWER
P1
P2
P3
P4
X-SCALE
RESET
Y-SCALE
SPEED
q
TEST
w
COUNTER
SELECT
BOBBIN.WIND
e
1. While pressing the TEST switch q, turn on the power to the machine. Version number of each PROM can
be confirmed in display w.
3rd and 4th digits: Special specification
2nd digit: Version number
Versions A, B and C are replaced with 1, 2, and 3 respectively.
1st digit: PROM identification code
2. Every time the SELECT switch e on the panel is pressed until the TEST switch q is pressed again, the
indication will change as follows:
Indication
LED of Menu switch
PROM
(A)
X-SCALE
Main PROM
(MN)
(b)
Y-SCALE
Motor PROM
(MT)
■ Version number indication (example)
PROM label
B430EMK2
MN-C
Indication[A300]
B430EMK2
MT-D03
Indication[b403]
LK3-B430E Mark II
74
10. ELECTRIC MECHANISM
10-11. Table of error codes
DANGER
Wait at least 5 minutes after turning off the power switch and disconnecting the power cord from
the wall outlet before opening the face plate of the control box. Touching areas where high voltages are present can result in severe injury.
If a malfunction should occur with the sewing machine, a buzzer will sound and an error code will appear in
the display window.
Follow the remedy procedure to eliminate the cause of the problem.
Code
E-13
E-20
E-21
E-30
E-31
E-32
75
Remedy
Cause
Machine specification select connector is not Turn off the power and check if connectors P3 is
connected properly.
disconnected.
Turn off the power, and then turn the machine pulley to
Problem with machine motor stopping, or check if the machine has locked up. Check the
synchronizer connection. Check if connectors P11, P12
synchronizer connection error.
and P13 are disconnected.
Turn off the power and check the ground wire connection.
Machine motor operation error.
Data is outside possible sewing area due to Press the RESET switch, and then set the enlargement
enlargement ratio setting.
ratio again.
Stitch pattern data overlaps the sewing area Press the RESET switch, and then reset the memory
switches "30" and "31" or enlargement ratio.
when area limiting is active.
After
changing the setting of DIP switch A-6, clear all
The data format of the user program (% or mm)
memory settings.(Refer to "10-9. Clearing all memory
dose not match the setting of DIP switch A-6.
settings.")
E-40
Length of a stitch exceeds 10 mm.
Press the RESET switch, and then set the enlargement
ratio again.
E-41
Abnormality in the sewing data.
If programming a new sewing data, repeat the procedure
from the beginning.
E-42
Invalid program number specified.
Press the RESET switch and specify a correct number.
E-50
Turn the pulley to align the index mark with the needle
Needle bar does not stop when the needle is up stop position. (Refer to "6-17. Adjusting the needle up
raised.
stop position".)
Check the V-belt tension. (Refer to "6-18. Installing the V-belt".)
E-60
Presser has not been lowered.
E-61
Presser cannot be raised.
E-62
Presser is not raised.
E-63
Presser cannot be lowered.
E-70
Cooling fan does not operate.
Turn off the power, and then check if the cooling fan is
blocked with scraps of thread.
E-80
Motor PROM is not correctly inserted.
Turn off the power and check.
E-81
Foot switch was depressed when the power
Turn off the power and check
was turned on.
E-82
An operation panel switch was depressed when Turn off the power and check the operation panel.
Check that all panel cords are normal.
the power was turned on.
E-90
Abnormal drop in power supply voltage, or
power was turned on again immediately after it
was turned off.
Turn off the power and check the input voltage. After
turning off the power, wait 3 seconds or more before
turning it on again. (Refer to "10-8. Checking the input
voltage".)
E-91
Abnormal rise in power supply voltage.
Turn off the power and check the input voltage. (Refer to
"10-12. Checking the input voltage".)
Refer to "9. TROUBLESHOOTING".
Turn off the power and check the connection of presser
sensor connector P1.
LK3-B430E Mark II
10. ELECTRIC MECHANISM
Code
Cause
Remedy
E-A0
Home position cannot be detected (malfunction Turn off the power and check the connection of home
of home position sensor), or malfunction of
position sensor connector P1.
power supply circuit board.
E-b0
Press the RESET switch.
You tried to change the program number when
Set DIP switch A-8 to OFF before trying to change the
DIP switch A-8 was set to ON.
program number.
E-d0
Heat sink of control circuit board is abnormally Turn off the power and clean the air intake port of the
box.
hot.
E-E0
Malfunction of EEPROM (malfunction of main Turn off the power, and turn it back on. If the error
continually occurs, contact a qualified service technician.
circuit board).
E-E1
Corrupted EEPROM data, or main PROM Press the RESET switch to reset the error. However, the
data (memory switches, display and user programs) will
version has been upgraded.
be reset to the backup data or initialized.
E-E2
Corrupted EEPROM control information data
E-F0
Solenoid short-circuit (malfunction of main Turn off the power and contact a qualified service
circuit board), or power relay is not operating
technician.
(malfunction of power supply circuit board).
E-F1
Bad connection in cable between power supply Turn off the power and check if connectors P16 is
disconnected.
circuit board and main circuit board.
E-F2
Abnormal current detected in power supply Turn off the power and contact a qualified service
circuit board.
technician.
Press the RESET switch to reset the error. However, the
data (memory switches, display and user programs) will
be initialized.
■ Errors generated when optional equipment is connected
Code
Cause
Remedy
Turn the EMERGENCY STOP switch clockwise to release the
lock, and then press the RESET switch to reset the error.
E-10
Emergency stop switch was pressed.
E-11
Turn the EMERGENCY STOP switch clockwise to release
Emergency stop switch was pressed during the lock, and then press the RESET switch to reset the
sewing.
error. You can then press the STEP BACK switch to repeat
the sewing.
E-12
Emergency stop switch is being continually
Turn off the power and check.
pressed, or emergency switch connection error.
E-14
Turn the EMERGENCY STOP switch clockwise to release
the lock, and then press the RESET switch to reset the
error. You can then press the STEP BACK switch to repeat
the sewing.
Thread breakage detected.
REFERENCE
segment LED alphabet
Panel display
Text dispalay
A
b
c
d
LK3-B430E Mark II
E
F
6
H
L
O 76
10. ELECTRIC MECHANISM
10-12. Troubleshooting flowchart
10-12-1. Troubleshooting flowchart
Symbols and their meanings
Indicates switch operation.
Indicates set-up
present condition.
Requires selection of the course
of action to follow, using a yesor-no decision-making process.
Indicates that the procedure to
follow continues on the next page.
Indicates the error status number
in the first column of the
"problem solution and measures"
table, and consequently the
procedure to follow.
Start
operation
(Special)
indicates special specification.
Note:
indicates an item to be noted.
Note: Be sure to set DIP switch A-1 on the front panel to off before starting the troubleshooting
flowchart.
Turn on the
power.
When the
power is
turned on.
Is the power lamp lit?
NO
Turn off the
power.
#1
YES
Turn off the
power.
#2
NO
Turn off the
power.
#3
YES
Does error code appear
on the display?
NO
Press the Menu
switch 2 or 3
times.
Does
the lit lamp position
vary each time the switch
is pressed?
YES
Turn on the
power.
Set the
program
number
to 00.
Moving to
the home
position
77
or
Press the foot
switch to the
second position,
and release it.
(Special): For machines with two pedal foot switches, press the start
pedal.
Note: If error code [E-50] appears on the display window, turn the pulley
to raise the needle to its highest position.
LK3-B430E Mark II
10. ELECTRIC MECHANISM
Moving to
the home
position
Does the
work clamp return to
the home position?
NO
When the home position varies
without any strange sound
#4
When the position of presser foot does
not move at all.
When the error
code [E-A0]
appears on the
display window.
Turn off the
power.
#5
Turn off the
power.
#6
Turn on the
power.
Set the program
number you
ordinarily use.
Moving to
the start of
sewing
Press the foot
switch to the
second position,
and release it.
Does the work
clamp rise?
Note: When the program you ordinarily use is not set, the needle may hit the
presser foot.
(Special): For machine with two pedal foot switches, press the start pedal.
NO
Turn off the
power.
#7
YES
Press the foot
switch to the first
position, and
release it.
Does the
work clamp lower
after it has rised?
Note: If you press the foot switch to the second position, the machine will start.
(Special): For machines with two pedal foot switches, press the presser foot lifting pedal.
NO
Turn off the
power.
#8
YES
Confirm that the
program is set
to the number or dinarily used.
Turn on the
power.
Press the test
switch.
Test
NO
Is the test lamp lit?
Turn off the
power.
#9
YES
Press the foot
switch to the
second position,
and release it.
(Special): For machines with two pedal foot switches, press the presser foot
lifting pedal first, then the start pedal.
LK3-B430E Mark II
78
10. ELECTRIC MECHANISM
Does the
needle slowly move stitch
by stitch?
NO
Turn off the
power.
#10
Turn off the
power.
#11
Turn off the
power.
#12
YES
Press the
pedal to the
first position.
Does the
feed mechanism
move quickly?
NO
YES
Test
Release the
foot switch.
Does
the machine operate
correctly for the set program,
and return to the sewing
start position?
NO
YES
Press the test
switch to turn
off its indicator.
Confirm that the
program is set to the
number ordinarily
used.
Press the foot
switch to the
second position,
and release it.
Does not
the machine start to move,
and error code [E-20] appear
on the display
window?
Turn on
the power.
(Special): For machines with two pedal foot switches, press the presser foot lifting
pedal first, then the start pedal.
NO
Turn off the
power.
#13
Turn off the
power.
#14
Turn off the
power.
#15
Turn off the
power.
#16
TES
Sewing
operation
Does
error code appear on the
display window after the
machine start to
move?
NO
YES
Does the
work clamp move so as
to form stitches?
NO
YES
Is the thread
trimmer activated?
NO
YES
79
LK3-B430E Mark II
10. ELECTRIC MECHANISM
Does the
machine stop with the
needle at the top?
Sewing
operation
NO
Turn off the
power.
#17
Turn off the
power.
#18
YES
Does
the machine
operate correctly for the set
program and return to the
start position?
NO
YES
Normal
10-12-2. Problem solution and measures
Precautions
1. Pay attention to the following when opening the control box for maintenance.
■ Electrical shock
Some large capacitors may have a high voltage remaining in them for up to 5 minutes after the power is
turned off. To prevent electrical shock, wait at least 5 minutes after the power is turned off before doing the
following:
• Opening and closing the control box
• Replacing fuses
• Separating and rejoining connectors
• Measuring resistance
• Doing anything with a possibility of touching something inside the control box
Some adjustments require measuring the voltage while the power is turned on with the control box kept
open.
In such a case, be careful not to touch any place other than that for the measurement. In addition, always
keep in mind that a high voltage remains for 5 minutes after the power is turned off.
■ Injury
While the power is turned on, the DC fan motor of the control box operates; be careful not to get caught in
it.
When separating or rejoining connectors, and measuring something, be careful not to cut your fingers on
metal parts such as the heatsinks and covers.
2. When replacing a fuse, be sure to use a new one of the same quality and capacity as the old one.
3. Refer to the circuit block diagram at the end of this manual regarding the connector numbers and their
matches.
Before adjustment
1. While the power is turned off, check each connector is securely plugged in by referring to page 63, “List of
connector numbers and matches.”
2. Find the error status number in the troubleshooting flowchart.
3. From the applicable part of the flowchart, take the reference number to find the correspondingly numbered
details of the problem in the following table.
LK3-B430E Mark II
80
10. ELECTRIC MECHANISM
Error status
Probable causes
#1
1. Conversion transformer
improperly wired
The power
lamp does
not light
when the
power is
turned on.
(for 100V specification)
Parts to be replaced
Check/repair/adjust
Note: Before adjustment, be sure to check
that the power is turned off to prevent
electric shock.
If the power is turned on, turn off the
power, and wait at least 5 minutes.
a.
Conversion in the control box
Check the transformer is correctly and
securely wired to the terminals.
(For 200 V, 220 V, and 230
specifications, this is not necessary.)
V
(For 380 V, 400V, and 415 V specifications)
(For 200 V, 220 V, and 230 V
specifications)
No conversion transformer is installed.
2. Conversion transformer
defective
Separate P4 (ACIN) connectors on the power
supply circuit board, and check there is
continuity between pins 1 and 2 in the
connector on the cable.
If there is no continuity, replace the
conversion transformer.
(For 200 V, 220 V, and 230 V specifications,
this is not necessary.)
Conversion
transformer
3. Power supply cable defective
Separate P4 (ACIN) connectors on the power
supply circuit board, turn on the power, and
measure the voltage across pins 1 and 2 in
the connector on the cable.
If the voltage is as shown in the table below,
the power supply cable is not defective.
Power supply
cable
ACV
For 200 V, 220 V, and
230 V specifications
The same as the
power supply voltage
of wall socket
For 100 V, 110 V, 240
V, 380 V, 400 V, and
415 V specifications
About 220 V
After checking, turn off the power, and rejoin
P4 connectors.
81
LK3-B430E Mark II
10. ELECTRIC MECHANISM
Error status
#1
Check/repair/adjust
Probable causes
4. Fuse has blown
a.
The
power
lamp
does not
light
when the
power is
turned on.
Remove fuses No.3 and No.4, and check
them for continuity.
Parts to be replaced
Fuse 6A-250V
If there is no continuity, replace the fuses
with new ones, and perform the check/
repair/adjust items of #1-5.
5. Power supply circuit board
defective
a.
b.
c.
6. Main circuit board defective
P9
7. Panel circuit board defective
Separate P4 (ACIN) connectors on the
power supply circuit board, and then
measure the resistance between the
following pairs of pins, pins 1 and 4 and
pins 2 and 4, in the connector on the
cable.
If the resistance is ∞Ω in both cases, the
power supply circuit board is not
defective.
Measure the resistance between pins 1
and 2.
If there is no short, the power supply
circuit board is not defective.
Rejoin P4 (ACIN) connectors on the
power supply circuit board.
Separate P9 (POWER) connectors on the
main circuit board, turn on the power,
and measure the voltage across pins 1
and 3 in the connector on the cable.
If it is + 5V, the power circuit board is not
defective.
After measurement, turn off the power,
wait at least 5 minutes, and then rejoin
P9 connectors.
Power supply
circuit board
With P9 (POWER) connectors plugged in on
the main circuit board, turn on the power, and
measure the voltage across pins 1 and 3 in
the connector on the cable.
If it is + 5V, the power circuit board is not
defective.
After measurement, turn off the power.
Main circuit board
Check that P8 (PANEL) connectors of the main
circuit board and P1 (PANEL) connectors of
the panel circuit board are plugged in.
Panel circuit board
panel cord
LK3-B430E Mark II
82
10. ELECTRIC MECHANISM
a.
#2
Error code
appears
on the
display
window
when the
power is
turned on.
Check/repair/adjust
Pdrobable causes
Error status
1. Cooling fan defective when
the error code E-70 appears
on the display window.
b.
a.
2.
3.
4.
5.
6.
b.
Foot switch remains pressed
when error code E-81 appears
on the display window.
See #5-1 and #5-2.
Foot switch
Foot switch cord
assy
A switch on operation panel
remains pressed when error
code E-82 appears on the
display window.
See #1-7.
Panel PCB
Panel cord
Power supply voltage drops
abnormally when error code
E-90 appears on the display
window.
Power supply voltage rises
abnormally when error code E-91
appears on the display window.
Control box has overheated
when the error code E-d0
appears on the display
window.
8. Main circuit board defective
9.
Cord defective when the error
code E-F1 appears on the
display window.
10. Short circuit in a solenoid
(main circuit board defective)
occurs or relay on the power
supply circuit board does not
function when error code E-F0
appears on the display
window.
11. Abnormal electricity supply is
detected when error code
E-F2 appears on the display
window.
83
Check the PROM chip is securely
attached to the main circuit board
without its lead bent.
Check the PROM chip is attached to the
main circuit board with letters MN and
MT on the PROM chip and those on the
main circuit board matching.
DC fan motor assy
PROM chip defective or main
circuit board defective when
the error code E-80 appears
on the display window.
a.
b.
PROM chip
Main circuit board
Make sure that the power supply voltage
of the wall socket is within ± 10% of the
voltage specification.
See # 1-2 and #1-3.
See #2-5.
a.
7.
Check threads are not tangled in the
cooling fan.
Check P10 (FAN) connectors are securely
plugged in on the main circuit board.
Parts to be replaced
b.
Clean the ventilation outlet of the control
box.
Keep the control box open for a while to
allow the inside to cool down, and then
turn on the power again.
If the same code still appears on the
display, the main circuit board is
defective.
Main circuit board
Turn on the power again.
If the same code still appears on the display,
the main circuit board is defective.
Main circuit board
Check P2 (PER) connectors are attached to the
power supply circuit board and P16 (PER)
connectors are attached to the main circuit
board. Check the cord connecting P2 and P16
is not damaged.
PER cord
a. See #7-2.
b. See #16-2.
c. Power supply circuit board is defective if
the error still appears after replacement
of the main circuit board.
Sewing clamp
solenoid and Main
circuit board
Thread trimming
solenoid and main
circuit board
Main circuit board
and power supply
circuit board
Power supply circuit board defective if the
error still appears after replacement of the
main circuit board.
Main circuit board
and power supply
circuit board
LK3-B430E Mark II
10. ELECTRIC MECHANISM
Error status
Check/repair/adjust
Probable causes
Parts to be replaced
1. Panel PCB detective
See #1-7.
#4
Home
position
is not
correct.
1. Home position sensor not
adjusted properly
Look the status of home position signals
referring to page 49.
When both X- and Y-home position signal
lamps are lit, adjust the home position while
referring to page 49.
When either signal lamp is not lit, perform the
check/repair/adjust items of #6.
#5
Work
clamp
does not
return to
the home
position
even after
the foot
switch is
pressed.
1. Foot switch and its cord are
defective
(Make sure that the power is turned off. If you
proceed from #4, be sure to turn off the
power.)
Remove the foot switch connector from the
outside of the control box, and check it for
continuity between the following pairs of
pins, pins 1 and 2 and pins 7 and 8, in the
connector on the cable:
If it is normally ∞Ω, 0 Ω between pins 1 and 2
when pressing the foot switch to the first
position, or 0 Ω between pins 1 and 2 and
pins 7 and 8 when pressing the foot switch to
the second position, the foot switch and its
cord are not defective.
Foot switch
2. Cord in the control box is
defective
Rejoin the connector checked in #5-1.
Open the control box, and check P17 (FOOT)
connectors for continuity between the
following pairs of pins, pins 1 and 2 and pins
3 and 4, in the connector on the main circuit
board.
(Do not separate P17 connectors. Make sure
the tester probes touch the leads.)
If it is normally ∞Ω, 0 Ω between pins 3 and 4
when pressing the foot switch to the first
position, or 0 Ω between pins 1 and 2 and
pins 3 and 4 when pressing the foot switch to
the second position, the cord is not defective.
Foot switch cord
assy
1. Fuse has blown when the feed
mechanism does not move
and error code E-A0 appears
on the display window.
Remove fuse No.1 and check it for continuity.
If there is no continuity, the fuse is defective.
Proceed to #6-2.
Fuse 5A-250V
#3
No
switches
on the
operation
panel are
activated.
#6
Error
code
appears
on the
display
window
when the
foot
switch is
(First
position)
presser
Connector on the
cable
(second
position)
starting
LK3-B430E Mark II
Panel PCB
Panel cord
84
10. ELECTRIC MECHANISM
Error status
Check/repair/adjust
Pdrobable causes
#6
2. Power supply circuit board is
defective when the feed
Error code
mechanism does not move
appears
on the
and error code E-A0 appears
display
on the display window.
when the
foot
switch is
pressed.
3. Home position sensor is defective when the work clamp
moves in an unexpected direction and error code E-A0
appears on the display window.
Measure the resistance between the fuse
No.1 terminal which is close to the center
of the power supply circuit board and pin
2 of P5 (DC300) connector.
If the resistance is ∞Ω, the power supply
circuit board is not defective.
b.
Separate P9 (POWER) connectors on the
main circuit board, turn on the power,
and measure the voltage across the
following pairs of pins, pins 4 and 6 and
pins 5 and 7, in the connector on the
cable.
If the voltage is +55V in each case, the
power supply circuit board is not
defective.
After measurement, turn off the power,
wait at least 5 minutes, and rejoin P9
connectors.
a.
Turn the power switch off and then on
again, and move the work clamp to near
the home position by hand.
If the home position sensor LED is lit, the
home position sensor is not defective.
Check that P1 (ORG) connector on the
main circuit board and the home position
sensor are plugged in.
See 10-7. "Checking the input sensor and
DIP switch input" to make sure that the
home position sensor is connected.
If item a causes no problem and item b
results in defective sensor input, either
the cord connection is poor or the main
circuit board is defective.
Home position
sensor
Separate P6 (YPM) and P7 (XPM)
connectors on the main circuit board.
Measure the resistance between the
following pairs of pins, pins 4 and 6 and
pins 5 and 7, in the connector on the
cable.
If the resistance is 2 - 3 Ω, it is not
defective.
After measurement, rejoin P6 and P7
connectors.
If item b causes no problem, the main
circuit board is defective.
X- or Y-pulse
motor assy
b.
a.
b.
85
Power supply
circuit board
a.
c.
4. Pulse motor and cord are
defective when the work clamp
operates abnormally and error
code E-A0 appears on the
display window.
Parts to be replaced
LK3-B430E Mark II
Main circuit board
Main circuit board
10. ELECTRIC MECHANISM
Error status
Probable causes
#7
1. Work clamp is not lowered
when error code E-60 appears
on the display window.
Work
clamp
does not
rise.
Check/repair/adjust
a.
b.
c.
d.
2. Work clamp is not raised
although attempted, when no
error code appears or error
code E-61 appears on the
display window.
• Presser bar lifter solenoid
defective
a.
b.
c.
#8
Work
clamp
does not
lower.
If it is not lowered due to the mechanical
lock, see 6-14 "Adjusting the positions of
the presser solenoid" for adjustment.
Open the top cover, turn on the power
switch, and press the tip of the plunger
of the presser solenoid. If the work
clamp sensor LED is turned on and off, it
is OK.
Make sure P1 (ORG) connector on the
main circuit board and work clamp
sensor are plugged in.
See 10-7. "Checking the input sensor and
DIP switch input" to make sure that the
work clamp sensor is connected.
If item b causes no problem and item c
results in defective sensor input, either
the cord connection is poor or the main
circuit board is defective.
If it does not rise because of mechanical
problem, see 6-14 "Adjusting the
positions of the presser solenoid."
Separate P5 (SOL) connectors on the
main circuit board, and measure the
resistance between pins 3 and 4 in the
connector on the cable.
If the resistance is 2 - 3 ohms, there is no
problem. After measurement, rejoin P5
connectors.
If the resistance is 0 ohms (it means a
short circuit), replace the main circuit
board with a new one because it may be
defective.
If the presser bar lifter solenoid does not
operate at all, the main circuit board is
defective.
1. Work clamp is not raised when
error code E-62 appears on the
display window.
Same as #7-2.
2. Work clamp is not lowered
although attempted when error
code E-63 appears on the
display window.
Same as #7-1.
LK3-B430E Mark II
Parts to be replaced
Sewing clamp
sensor
Main circuit board
Sewing clamp
solenoid
Main circuit board
Main circuit board
86
10. ELECTRIC MECHANISM
Error status
Check/repair/adjust
Parts to be replaced
Separate P14 (PANEL) connectors on the
main circuit board, and measure the
resistance between pins 2 and 20 in the
connector on the cable with the polarity
shown in the left figure.
(Use of a digital meter is prohibited.)
If the resistance is normally ∞Ω, or the needle
oscillates at its maximum limits when the test
switch is pressed, the test lamp and its cord
are not defective.
Panel PCB or panel
cable assy
Measure the resistance between pins 1 and 12
with the same method as for #9-1.
If the needle oscillates at its maximum limits,
the test lamp and its cord are not defective.
Panel PCB or panel
cable assy
Probable causes
1. Test switch and its cord are
#9
defective
The test
lamp does
not light
when the
test
switch is
pressed.
Black
Red
2. Test lamp and its cord are
defective
Black
Red
Main circuit board
3. Main circuit board defective
#10
The feed
mechanism does
not move
during
test.
a. See #5.
b. See #6.
#11
Quick
feeding
cannot be
performed
during
test.
See #5.
#12
The
machine
does not
operate
correctly
for the set
program
during
test sewing.
See #5.
See #6.
87
LK3-B430E Mark II
10. ELECTRIC MECHANISM
Error status
Probable causes
Check/repair/adjust
Parts to be replaced
#13
1. Cable related to machine motor
is defective
a. Make sure P3 (DC18) connector on the
power supply circuit board and P13 (DC18)
on the main circuit board are plugged in.
b. Make sure P5 (DC300) connector on the
power supply circuit board and P12
(DC300) connector on the main circuit
board are plugged in.
c. Check the connection between P11 (UVW)
connector on the main circuit board and
the terminal block of the machine motor.
Gate power supply
cable
2. Main circuit board is defective
when fuse F1 on the main
circuit board has blown.
Replace the main circuit board with a new
one when fuse F1 has blown.
Main circuit board
3. Main circuit board defective
Separate P12 (DC300) connectors on the main
circuit board, and measure the resistance
between pins 1 and 2 in the connector on the
main circuit board with the same polarity as
shown in the left figure.
(Use of a digital meter is prohibited.)
If the pointer indicates 10KΩ - 30k Ω on the x
1k Ω range, the main circuit board is not
defective.
After measurement, rejoin P12 connectors.
(If the pointer does not, fuses No.2, 3, and 4
may be blown. Examine them.)
Main circuit board
1. Synchronizer is defective or
machine is not adjusted
properly when error code E-20
appears on the display window
after the machine is started.
a. Make sure that P2 (SYNCHRO) connector
on the main circuit board and the
synchronizer are plugged in.
b. See 10-7. "Checking the input sensor and
DIP switch input" to make sure that the
synchronizer is connected.
If signal is switched on and off, there is no
problem.
c. Turn the pulley by hand to check it can
easily rotate.
d. If error code E-20 appears when the
machine is stopped, see 6-12. "Adjusting
the thread trimming solenoid position" for
adjustment.
Synchronizer assy
2. A malfunction occurs due to
noise or main PROM is
defective when error code E-21
appears after the machine is
started.
a. Make sure that the ground wire is surely
grounded and there is no equipment that
generates strong electrical noise in the
vicinity.
b. If the machine has been remodeled, return
the machine to its original condition before
checking.
c. If the error still occurs after replacement of
PROM, put the original PROM back before
checking.
The
machine
does not
operate
during
sewing,
and the
error code
E-20
appears
on the
display
window.
Red
Black
#14
Error code
appears
on the
display
window
after the
machine
operates.
3. Power supply voltage
abnormally lowers when error
code E-90 appears after the
machine is started.
Motor power
supply cable
Motor cable
PROM chip
See #2-5.
If 550VA /machine is not allocated at the
power source, the voltage will drop as soon
as the machine is started, resulting in this
error.
LK3-B430E Mark II
88
10. ELECTRIC MECHANISM
Error status
#15
The
machine
cannot
produce
correct
stitches.
Check/repair/adjust
Probable causes
1. Synchronizer defective
See #14-1.
2. Pulse motor is defective or
mechanical adjustment is not
appropriate when stitching
deviates from what it should
be.
a. See #6-4.
b. If stitching deviates because of insufficient
pressure of the work clamp, see 6-6.
"Adjusting the work clamp lift amount" for
adjustment.
c. Make adjustments if the feed mechanism
has any unnecessary looseness.
1. Home position sensor not
#16
The thread
adjusted properly
trimmer
does not
operate.
Adjust the thread trimmer mechanism (page
24 and 36).
(When it is obvious that the thread trimmer
does not operate, perform the check/repair
/adjust items of #16-2 and #16-3.
2. Thread trimmer solenoid
defective
Separate P5 (SOL) connectors on the main
circuit board, and then measure the
resistance between pins 1 and 2 in the
connector on the cable.
If the resistance is 7 - 8 Ω, the solenoid is not
defective.
Thread trimmer
solenoid
3. Main circuit board defective
With P5 (SOL) connectors plugged in on the
main circuit board, turn on the power,
perform sewing, and measure the voltage
across pins 1 and 2 in the connector on the
cable.
If there is a sudden voltage output at the end
of sewing, it is OK.
Main circuit board
Thread trimmer
#17
Thread
take-up
lever does
not
operate.
89
Parts to be replaced
1. Home position sensor not
adjusted properly
Adjust the thread take-up mechanism (page
27).
(If the solenoid does not work even after it is
separated from the mechanical parts, perform
the following items #17-2 and #17-3.)
2. Thread take-up solenoid
defective
Separate P4 (SOL2) connectors on the main
circuit board, and then measure the
resistance between pins 1 and 2 in the
connector on the cable.
If the resistance is 12 - 14 Ω, the solenoid is
not defective.
LK3-B430E Mark II
10. ELECTRIC MECHANISM
Error status
#17
Check/repair/adjust
Probable causes
3. Main circuit board defective
Thread
take-up
lever does
not
operate.
Parts to be replaced
With connector P4 (SOL2) on the main circuit
board removed, turn on the power, perform
sewing, and measure the voltage across pins
1 and 2 of connector P4.
If there is a sudden voltage output at the end
of sewing, it is OK.
Thread trimmer
#18
1. Poor adjustment
The
machine
does not
stop with
the needle
at the
upper
2. Synchronizer defective
position
after
thread
trimming 3. Cable defective
(Error
code E-50
appears
on the
4. Power supply circuit board
display
defective
window).
Main circuit board
a. See 6-17. "Adjusting the needle up stop
position," and 6-18. "Adjusting the V-belt
tension" for adjustment.
b. If the pulley turns after the machine stops,
this is not an electrical problem.
V-belt
See #14-1.
See #13-1.
With P13 (DC18) connectors plugged in on the
main circuit board, measure the voltage in the
connector on the cable.
If the voltage across the following pairs of
pins, pins 1 and 2, pins 4 and 5, and pins
10and 11 is DC 15 - 18 V, it is OK.
Power supply
circuit board
+15 ー18V for each
5. Main circuit board defective
Main circuit board
6. Motor defective
Motor
LK3-B430E Mark II
90
10. ELECTRIC MECHANISM
10-13. Control circuit block diagram
EMNC
±0V
EMNO
+5V
THREAD
GKTH
P14
YPM
LEDD2
LEDD1
LEDD0
KEY2
KEY1
KEY3
KEY0
KEY4
KEY5
S0V
KEY7
LED
KEY6
±0V(START)
START
3191-04R1
X pulse motor
Y pulse motor
B7P-VH
Green/Yellow
EARTH
PH2
EARTH
P3
DC18
1
2
3
4
5
RLYIN
+VS
RLYOFF
SWDOFF
S0V
Green/
Yellow
Green/
Yellow
Conversion
transformer
+12V-N
±0V-N
Gray
Red
Gray
Gray
Black
LB-04TV
PH1
±0V
+300V
+12V-C
±0V-C
1
2
+12V-B
±0V-B
Gray
Red
Gray
Gray
Black
EARTH
DC300
B5B-PH-K-S
+12V-N
±0V-N
Red
Black
Red
Black
Control box
Red
Black
B11B-PH-K-S
Red
Black
+12V-C
±0V-C
+12V-B
±0V-B
+12V-A
±0V-A
RLYIN
+VS
RLYOFF
SWDOFF
S0V
White
Red (Black)
AC200V
AC200V
P5
B11B-PH-K-S
Red
Black
Red
White
Black
1
2
3
4
5
1
2
3
4
A18V
A0V
Black
Red
P4
ACIN
1
2
3
4
5
6
7
8
9
10
11
Black
Red
POWER
1 +5V
2 +24V
3 S0V
4 +55V
5 +55V
6 P0V
7 P0V
P2
PER
PER
Red
Black
B3B-PH
-K-S
MOLEX
3191−03R1
±0V(CLAMP1)
CLAMP1
CLAMP2
±0V(CLAMP2)
EARTH
1
2
3
4
5
6
7
8
9
±0V
+300V
Red
Orange
Black
Violet
Violet
Gray
Gray
P16
Red
Black
5219-03A
Red
White
Black
Foot switch
DC18
FAN1
+24V
OUTPUT
S0V
Gray
Gray
1
2
1
2
3
4
5
6
7
8
9
10
11
Red
Gray
Gray
P13
P10
1
2
3
Start
Red
Green
START
±0V (START)
±0V (CLAMP1)
CLAMP1
CLAMP2
±0V (CLAMP2)
Red
Orange
Black
Violet
Violet
Gray
Gray
P12
DC300
Red
Black
Green
1
2
3
4
5
6
UVW
1
2
3
Green/
Yellow
P17
FOOT
Machine head
POWER PCB
S49939-001
P1
P9
POWER
1 +5V
2 +24V
3 S0V
4 +55V
5 +55V
6 P0V
7 P0V
5219
-02A
B3B-PH
-K-S
Orange
Blue
Red
Yellow
3191-02R1
KEY0
KEY1
KEY2
KEY3
U
V
W
Green/
Yellow
Gray
Gray
Gray
Gray
B6B-PH-K-S
White
172161-1
Black
172169-1
Clamp
Gray
Gray
Gray
Gray
Solenoid
White
Black
White
Black
MOLEX
FAN2
XA
XA
XB
XB
3191-02R1
SELECT
P11
Black
White
Sewing clamp sensor
Thread trimming
Orange
Blue
Red
Yellow
XPM
1
2
3
4
P19
5
6
7
8
Y home position sensor
P7
P3 1COM
2COM
3COM
4COM
YA
YA
YB
YB
1
2
3
4
1
2
3
1
2
3
4
14
15
16
17
18
19
20
21
22
23
24
25
26
5219-04A
P6
B4P−VH(Blue)
PANEL
1 COM0
2 COM1
3 COM2
4 COM3
5 COM4
6 COM5
7 +5V
8 BUZ
9 LEDD7
10 LEDD6
11 LEDD5
12 LEDD4
13 LEDD3
+55V
THCUT
CLAMP
CLAMP
MOLEX
MAIN PCB
S49479–001
+24V
OUTPUT
S0V
3M 7926-B500FL
3429-6002SCFL
5566-08A
LEDD2
LEDD1
LEDD0
KEY2
KEY1
KEY3
KEY0
KEY4
KEY5
S0V
KEY7
LED
KEY6
MOLEX
5557-08R
14
15
16
17
18
19
20
21
22
23
24
25
26
3429-6002SCFL
COM0
COM1
COM2
COM3
COM4
COM5
+5V
BUZ
LEDD7
LEDD6
LEDD5
LEDD4
LEDD3
3M 7926-B500FL
1
2
3
4
5
6
7
8
9
10
11
12
13
SOL
1
2
3
4
P8 P1 PANEL
X home position sensor
P5
B4P-VH
PANEL PCB
S49497–001
Synchronizer
Green/Yellow
Sewing clamp
B7P-VH
Operation panel
RCLAMP
LCLANP
FOOT
FLIP
OPTION1
OPTION2
OPTION3
NEEDLE
±0V
+24V
+24V
AIRSW
Brown
Black
Blue
Brown
Black
Blue
Brown
Black
Blue
S0V
P1B ORG2
1 +24V
2 XORG B
3 S0V
4 +24V
5 YORG B
6 S0V
7 +24V
8 OSAE B
9 S0V
10 +24V
11 OPTION
12 S0V
MOLEX
B12P−SHF−1AA
AIR
1
2
3
4
5
6
7
8
9
10
11
12
Red
White
Black
Green
Yellow
5219
-02A
B6B-XHA
1
2
3
4
5
6
+5V
XORG A
GKX
+5V
YORG A
GKY
+5V
OSAE A
GKOS
B5B-XHA
1
2
3
4
5
6
7
8
9
HEAD
Red
Black
White
Red
Black
White
P1A ORG1
P15 EXIN
P20 RSPORT
+5V
ENC
NLUP
NLDW
B5B-PH-K
Emergency stop switch
1
2
3
4
5
B12B-XHA
P18 P2 SYNCHRO
B9B-XHA
±0V
±0V
TXD
DTR
RXD
DSR
+11V
−11V
+5V
+5V
+55V
THREL
+55V
OPTION
1
2
3
4
5
6
7
8
9
10
B5P-VH
Thread trimming
1
2
3
4
5
B16B−PHDSS
B10B-XH-A
SOL2
±0V
EXIN1
+24V
±0V
EXIN2
+24V
±0V
EXIN3
+24V
±0V
EXIN4
+24V
±0V
EXIN5
+24V
P4
White
Black
1
2
3
4
5
6
7
8
9
10
11
12
13
14
15
16
Machine head
Option parts
Green/
Yellow
PE
Green/Yellow
Green/Yellow
Power switch
U
V
W
E
Red
White
Black
Red
White
Red
White
Green/Yellow
Black
DCfan
Yellow/
Green
Yellow/
Green
Machine motor
Power supply plug
LK3-B430E Mark II
91
SERVICE MANUAL
BROTHER INDUSTRIES,LTD. NAGOYA,JAPAN
Printed in Japan
118-V30
I9100769B
1999.11. (1)