1
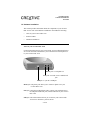
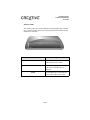
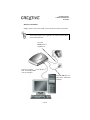
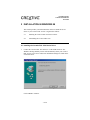
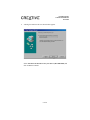
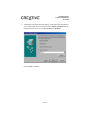
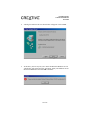
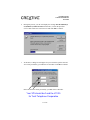
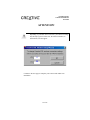
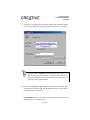
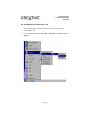
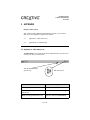
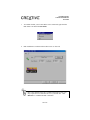
Installation Guide
Creative DSL USB 7410
RFC 2364
Table of Contents
1 INTRODUCTION ......................................................................................... 1
1.1 Minimum System Requirements............................................................ 1
1.2 Hardware Installation ............................................................................. 2
Jacks on your Creative DSL 7410 ............................................................... 2
Indicator LEDs ............................................................................................ 3
Hardware Installation ................................................................................. 4
1.3 Installation CD......................................................................................... 5
1.4 Before Installation ................................................................................... 5
2 INSTALLATION IN WINDOWS 98 .......................................................... 7
2.1 Installing the Creative DSL 7410 Device Driver .................................. 7
2.2 Uninstalling the Creative DSL 7410 .................................................... 16
3 APPENDIX .................................................................................................. 19
3.1 Appendix A - DSL Status Icon ............................................................. 19
3.2 Appendix B - Troubleshooting ............................................................. 21
4 FCC REGISTRATION INFORMATION FOR USERS......................... 23
5 CONTACT INFORMATION .................................................................... 25
6 WARRANTY INFORMATION ................................................................ 27
7 REGISTRATION CARD ........................................................................... 29
Installation Guide
Creative DSL USB 7410
RFC 2364
1 INTRODUCTION
Creative DSL USB 7410 is developed to bring modem users into the digital
era by providing high-speed Internet connections using their current phone
lines. An interface via USB connection and extremely simple hardware
installation allows Creative DSL 7410 users to quickly setup and configure
their DSL network.
This user’s guide provides information on how to setup and configure the
Creative DSL 7410 in Windows 98. Before starting the device driver
installation, it is essential that you carefully review the following sections:
1.1
Minimum System Requirements
1.2
Hardware Installation
1.3
Installation CD
1.4
Before Installation
1.1 Minimum System Requirements
The Creative DSL 7410 requires the following system:
•
Pentium II 233 or higher IBM compatible PC
•
Windows 98 Operating System
•
32MB of RAM
•
20MB of free hard disk space
•
One available USB port
•
CD-ROM drive for Creative DSL 7410 driver installation
•
Subscribed service with a DSL Service Provider
•
One RJ-11 telephone cable - connects your Creative DSL 7410 to a DSL
service-ready phone line (supplied with package)
•
Optional: User may also need access to the Windows 98 installation
CD
1 of 32
Installation Guide
Creative DSL USB 7410
RFC 2364
1.2 Hardware Installation
This section provides information about the components of your Creative
DSL 7410 as well as the hardware installlation. It includes the following:
•
Jacks on your Creative DSL 7410
•
Indicator LEDs
•
Hardware Installation
Jacks on your Creative DSL 7410
Located at the back panel of your Creative DSL 7410 (see illustration below)
are several connectors which allows you to attach the PC and telephone set
to your Creative DSL 7410.
Phone jack: to a telephone set
Line jack: to a DSL service enabled wall
jack
USB jack: to your PC’s USB port
Phone jack: The phone jack allows you to connect a phone set to your
Creative DSL 7410.
Line jack: Using the provided phone cable, connect your telephone line to
the wall jack and the line jack, located at the back of your Creative
DSL 7410.
USB jack: The USB connector allows you to connect your Creative DSL
7410 to a PC while the system is still on.
2 of 32
Installation Guide
Creative DSL USB 7410
RFC 2364
Indicator LEDs
Your Creative DSL 7410 features Indicator LEDs which provides your DSL
line’s connection status. Refer to the following illustration and table for the
definition of each LED.
LED
Descriptions
POWER
On when your Creative DSL 7410 is
connected to a power source
HS
Flashing when trying to establish a
connection to the DSL Service
Provider
LINK
On once DSL line is connected and
your Creative DSL 7410 is ready
3 of 32
Installation Guide
Creative DSL USB 7410
RFC 2364
Hardware Installation
Simply connect your Creative DSL 7410 (to the devices shown) as follows:
Your Creative DSL 7410 is required to be connected with a DSL
service subscribed line.
From the
Phone jack to a
telephone set
From your Creative
DSL 7410 USB jack to
your PC USB port
From the Line jack to a
DSL service subscribed
wall jack
4 of 32
Installation Guide
Creative DSL USB 7410
RFC 2364
1.3 Installation CD
Your Creative DSL 7410 comes with an installation CD. Make sure you
have this CD with you when you are ready to install the driver. The device
driver for your Creative DSL 7410 can be found under the folder named
Driver.
1.4 Before Installation
Before starting the DSL device driver installation, it is very important to
ensure that all the followings are in place:
•
Subscription to a DSL Service Provider.
•
Obtain all necessary Network Setting values, such as VPI and VCI
values, from your DSL Service Provider.
•
Obtain the User Name and Password from your DSL Service Provider.
•
Connect your Creative DSL 7410 to a DSL service-ready phone line.
5 of 32
Installation Guide
Creative DSL USB 7410
RFC 2364
6 of 32
Installation Guide
Creative DSL USB 7410
RFC 2364
2 INSTALLATION IN WINDOWS 98
This section provides you with instructions on how to install the device
driver of your Creative DSL 7410. It is organized as follows:
2.1
Installing the Creative DSL 7410 Device Driver
2.2
Uninstalling the Creative DSL 7410
2.1 Installing the Creative DSL 7410 Device Driver
1.
Connect the Creative DSL 7410 to the PC via the USB connector. The
Windows 98 Plug-and-Play feature will automatically detect your Creative
DSL 7410 as a new device and start an installation dialog box similar to the
one shown below.
Click on Next to continue.
7 of 32
Installation Guide
Creative DSL USB 7410
RFC 2364
2.
A dialog box similar to the one shown below appears.
Select Search for the best driver for your device. (Recommended) and
click on Next to continue.
8 of 32
Installation Guide
Creative DSL USB 7410
RFC 2364
3.
A dialog box such as the one below appears. At this time, insert the provided
Creative DSL USB 7410 Installation CD. Select Specify a location and type
in the path for the drivers, for example E:\Driver or D:\Driver.
Click on Next to continue.
9 of 32
Installation Guide
Creative DSL USB 7410
RFC 2364
4.
A dialog box similar to the one shown below will appear. Click on Next.
5.
At this time, your PC may ask you to insert the Microsoft Windows 98 CD.
A dialog box such as the one below will appear. Insert your Windows 98 CD
into the CD-ROM drive and click OK to continue.
10 of 32
Installation Guide
Creative DSL USB 7410
RFC 2364
6.
During this process, your PC will display the message The file adslusb.sys
on (Unknown) cannot be found. At this time, re-insert the provided
Creative DSL USB 7410 Installation CD and click OK to continue.
7.
At this time, a dialog box will appear for you to enter the specific VPI and
VCI values provided by your DSL Service Provider. Click OK to continue.
Enter VPI and VCI values provided by your DSL Service Provider.
Your VPI should be 0 and the VCI 35
for Terril Telephone Cooperative
11 of 32
Installation Guide
Creative DSL USB 7410
RFC 2364
ATTENTION!
Depending on your DSL Service Provider, your VPI/VCI settings
may already by preset. In this case, the VPI/VCI window, as
shown below, will not appear.
0
35
Continue to the next page to complete your Creative DSL USB 7410
installation.
12 of 32
Installation Guide
Creative DSL USB 7410
RFC 2364
8.
A dialog box similar to the one below appears confirming your successful
installation of the Creative DSL USB 7410 device driver. Click Finish to
complete the installation.
9.
To complete your setup, Windows 98 will now prompt you to restart the
computer. Click Yes to proceed.
13 of 32
Installation Guide
Creative DSL USB 7410
RFC 2364
10. Once your computer has restarted in Windows 98, you will notice a DSL
dial-up icon on your desktop.
14 of 32
Installation Guide
Creative DSL USB 7410
RFC 2364
11. To connect to your DSL Service Provider, double-click on the DSL dial-up
icon. A dial-up dialog box similar to the picture shown below will appear.
yourusername@local
******Password***
The phone number 1234567 is the default number since your Creative
DSL 7410 does not require dial-up. Any number that you specify in
this field would work. However, due to Microsoft’s requirements, you
will need to enter a phone number.
12. Enter your User name and Password to log on the subscribed DSL service.
To disconnect, just simply right-click the DSL dial-up icon on the bottom
right-hand corner of your screen.
Congratulations! You are now ready to surf the Internet with your Creative
DSL USB 7410 at very high speeds!
15 of 32
Installation Guide
Creative DSL USB 7410
RFC 2364
2.2 Uninstalling the Creative DSL 7410
This section provides you with instructions on how to uninstall your
Creative DSL 7410.
1.
From the Windows desktop, click Start -> Programs -> Creative -> Dsl ->
Remove.
16 of 32
Installation Guide
Creative DSL USB 7410
RFC 2364
2.
A dialog box similar to the one below will appear confirming the
uninstallation of the Creative DSL 7410 driver and utilities. Click Yes to
finalize the uninstallation.
17 of 32
Installation Guide
Creative DSL USB 7410
RFC 2364
18 of 32
Installation Guide
Creative DSL USB 7410
RFC 2364
3 APPENDIX
Purpose of this section
This section provides additional information in regards to your Creative
DSL 7410. The Appendix is organized as follows:
3.1
Appendix A - DSL Status Icon
3.2
Appendix B - Troubleshooting
3.1 Appendix A - DSL Status Icon
The DSL Status icon is located at the lower right hand corner of your screen
in the Systen Tray, as shown below.
Your Desktop Windows
System Tray
DSL Status Icon
Status
Description
Black top icon & Green bottom icon
Indicates modem is connected
Flashing Yellow top icon & Black
bottom icon
Indicates modem is handshaking
Red cross through DSL Status icon
Indicates modem is unconnected
19 of 32
Installation Guide
Creative DSL USB 7410
RFC 2364
1.
To confirm whether your Creative DSL 7410 is connected, right-click the
DSL Status icon and click CPE Status.
2.
DSL installation is confirmed when ‘Show Time’ is observed.
Due to the variation of the line’s condition from time to time, you
may experience low connection rates over your DSL line. Click
Retrain to re-establish the DSL connection.
20 of 32
Installation Guide
Creative DSL USB 7410
RFC 2364
3.2 Appendix B - Troubleshooting
This section provides you with troubleshooting information for solving
problems that you may encounter during installation or normal use.
The Creative DSL 7410 POWER light is off Your Creative DSL 7410 is not properly powered by an external power
source, check both ends of your Creative DSL 7410 USB cable connection
to see if the USB cable is firmly plugged into both the PC and your Creative
DSL 7410.
If the USB cable is plugged properly at both ends, try switching the USB
cable to another USB port on your PC.
If switching the USB port does not resolve your POWER light issue, please
contact Technical Support at (408)719-5179 for further assistance.
The POWER light is on but nothing else is happening Make sure that the RJ-11 phone cable is connected to the LINE jack of your
Creative DSL 7410 and the other side of the phone cable is plugged into a
wall phone jack with DSL service subscribed.
Verify the Network Settings as specified by your DSL Service Provider.
Check to see if your Creative DSL 7410 drivers have been properly installed.
This can be verified by going through the following steps:
1.
Click Start -> Settings -> Control Panel -> System -> Device Manager ->
Network Adapters. Double-click Network Adapters and you should see
Creative DSL USB 7410 is listed.
2.
If the Creative DSL 7410 has a
sign in front of the device, this means
that the drivers were not properly installed. To reinstall the drivers, first you
must uninstall the driver. To do this, click Start -> Programs -> Creative > DSL -> Remove. A screen will pop up saying “Are you sure you want to
uninstall the Creative DSL 7410 DS7410 driver and utilities?” Click Yes. At
this time, your PC will reboot. Once your PC has rebooted, the driver will
now have to be reinstalled. Refer back to Section 2.1 for further assistance.
21 of 32
Installation Guide
Creative DSL USB 7410
RFC 2364
3.
If you continue to see the
sign beside the Creative DSL USB 7410
device, contact Technical Support for further assistance.
The HS Light is off or keeps blinking When the HS light is flashing, the modem is attempting to connect to your
local Central Offic (CO) to establish a DSL connection. Upon a successful
connection, the HS light should turn off and the green LINK light should be
illuminated. However, if your modem HS light keeps on flashing for minutes
long, it is possible indicating the followings:
1.
HS light is off - Central Office equipment might have not turned on properly.
Contact your DSL Service Provider for further assistance.
2.
HS light keeps on blinking a. Too much noise in your phone line renders the DSL connection unable to
establish. Try the following two methods External interference might have caused noise to your DSL line. Try
your DSL connection a few minutes later.
Attach microfilters to all the phone jacks connected to analog devices,
which share the same line as your DSL connection.
b. If the problem persists, contact Technical Support.
22 of 32
Installation Guide
Creative DSL USB 7410
RFC 2364
4 FCC REGISTRATION INFORMATION FOR
USERS
This product is compliant and registered with the CFR47-Part 68 of the
Federal Communications Commision (FCC). The FCC requires us to
provide you with the following information:
•
Connection to the nationwide telephone network should be made by
using standard modular telephone jacks, type RJ-11.
•
This equipment may not be used with Party Line Services or with Coin
Telephone Lines.
•
You should provide the FCC registration number and Ringer Equivalent
Number (REN) of this product to your telephone company. The REN is
useful to determine the number of devices you may connect to your
telephone line and still have all of these ring when your telephone
number is called.
•
If your telephone equipment causes harm to the telephone network, the
telephone company may discontinue your service temporarily. If
possible, they will notify you in advance. If advance notice is not
practical, you will be notified as soon as possible. You will have an
opportunity to correct the problem, and you will be informed of your
right to file a complaint with the FCC. Your telephone company may
make changes in its facilities, equipment, operations or procedures that
could affect the proper functioning of your product. If such changes are
planned, you will be notified in advance.
•
If it is determined that the equipment still fails to operate properly, the
FCC requires that the unit be disconnected from the telephone line until
the problem has been corrected. Repair to this equipment can only be
made by the manufacturer, its authorized agents, or others who are
authorized by the FCC.
23 of 32
Installation Guide
Creative DSL USB 7410
RFC 2364
24 of 32
Installation Guide
Creative DSL USB 7410
RFC 2364
5 CONTACT INFORMATION
Reach us by Phone:
Telephone support is available Monday through Friday, 8:30am - 5:30pm,
Pacific Standard Time. To reach our DSL support by phone, please call:
Broadxent Technical Support Hotline: (408) 719-5179
Reach us by E-Mail:
You may also send your questions and comments to the following e-mail
address:
E-Mail: [email protected]
or [email protected]
Reach us by Mail:
Broadxent, Inc. - A Creative Company
188 Topaz Street
Milpitas, CA 95035
General Line: (408) 719-5100
General Fax: (408)262-1390
25 of 32
Installation Guide
Creative DSL USB 7410
RFC 2364
26 of 32
Installation Guide
Creative DSL USB 7410
RFC 2364
6 WARRANTY INFORMATION
Broadxent, Inc. warrants that equipment furnished will be free from defects
in material and workmanship for a period of three (3) years from the
confirmed date of purchase of the product new from retail location. Upon
written notice of any such defect, the manufacturer will, at its option, repair
or replace the defective item under the terms of this warranty, subject to the
provisions and specific exclusions listed herein.
This warranty shall not apply to equipment that has been previously repaired
or altered outside our plant in any way. Nor will it apply if the equipment has
been used in a manner exceeding its specifications or if the serial number has
been removed.
We do not assume any liability for consequential damages as a result from
our product use, and in any event our liability shall not exceed the original
selling price of the equipment.
The equipment warranty of Broadxent, Inc. shall constitute the sole and
exclusive remedy of any Buyer of the manufacturer’s equipment and the sole
and excessive liability of the manufacturer, its successors or assigns, in
connection with equipment purchase and in lieu of all other warranties
expressed implied or statutory, including, but not limited to, any implied
warranty of merchantability or fitness and all other obligations or liabilities
of manufacturer, its successors or assigns.
**Please fill out the next page and mail or fax to Broadxent, Inc. for product
registration.
27 of 32
Installation Guide
Creative DSL USB 7410
RFC 2364
28 of 32
Installation Guide
Creative DSL USB 7410
RFC 2364
7 REGISTRATION CARD
Creative DSL USB 7410 Product Registration
Name:
Company:
Address:
City/State/Zip:
Phone:
E-Mail:
Serial Number:
Purchased From:
Date of Purchase:
Please cut our the above Product Registration Card and send in with a selfaddressed stamped enbelope to:
BROADXENT, INC.
188 TOPAZ STREET
MILPITAS, CA 95035
ATTN: Customer Service
29 of 32
Installation Guide
Creative DSL USB 7410
RFC 2364
DISCLAIMER:
© 2000 Broadxent, Inc. All Rights Reserved
Broadxent logo is a registered trademark of Broadxent, Inc. in the United States and/or other countries. Creative logo and brand
name are trademarks or registered trademarks of Creative Technology Ltd. in the United States and/or other countries. Pentium
is a registered trademark of Intel Corporation. IBM is a registered trademark of IBM Corporation. All other logos and brand
names are trademarks or registered trademarks of their respective holders.
Manual contents and specifications are subject to change without prior notice from Broadxent, Inc.
Creative DSL USB 7410 User’s manual, pmc rfc 2364 v3.0, pn 235-00956.
30 of 32
Installation Guide
Creative DSL USB 7410
RFC 2364
31 of 32
Installation Guide
Creative DSL USB 7410
RFC 2364
32 of 32