Download Getting Started with Flash

Transcript
Getting Started with Flash
Trademarks
Add Life to the Web, Afterburner, Aftershock, Andromedia, Allaire, Animation PowerPack, Aria, Attain, Authorware,
Authorware Star, Backstage, Bright Tiger, Clustercats, ColdFusion, Contribute, Design In Motion, Director, Dream Templates,
Dreamweaver, Drumbeat 2000, EDJE, EJIPT, Extreme 3D, Fireworks, Flash, Fontographer, FreeHand, Generator, HomeSite,
JFusion, JRun, Kawa, Know Your Site, Knowledge Objects, Knowledge Stream, Knowledge Track, LikeMinds, Lingo, Live
Effects, MacRecorder Logo and Design, Macromedia, Macromedia Action!, Macromedia Flash, Macromedia M Logo and
Design, Macromedia Spectra, Macromedia xRes Logo and Design, MacroModel, Made with Macromedia, Made with
Macromedia Logo and Design, MAGIC Logo and Design, Mediamaker, Movie Critic, Open Sesame!, Roundtrip, Roundtrip
HTML, Shockwave, Sitespring, SoundEdit, Titlemaker, UltraDev, Web Design 101, what the web can be, and Xtra are either
registered trademarks or trademarks of Macromedia, Inc. and may be registered in the United States or in other jurisdictions
including internationally. Other product names, logos, designs, titles, words, or phrases mentioned within this publication may
be trademarks, service marks, or trade names of Macromedia, Inc. or other entities and may be registered in certain jurisdictions
including internationally.
Third-Party Information
This guide contains links to third-party websites that are not under the control of Macromedia, and Macromedia is not
responsible for the content on any linked site. If you access a third-party website mentioned in this guide, then you do so at your
own risk. Macromedia provides these links only as a convenience, and the inclusion of the link does not imply that Macromedia
endorses or accepts any responsibility for the content on those third-party sites.
Speech compression and decompression technology licensed from Nellymoser, Inc. (www.nellymoser.com).
Sorenson™ Spark™ video compression and decompression technology licensed from
Sorenson Media, Inc.
Opera ® browser Copyright © 1995-2002 Opera Software ASA and its suppliers. All rights reserved.
Apple Disclaimer
APPLE COMPUTER, INC. MAKES NO WARRANTIES, EITHER EXPRESS OR IMPLIED, REGARDING THE
ENCLOSED COMPUTER SOFTWARE PACKAGE, ITS MERCHANTABILITY OR ITS FITNESS FOR ANY
PARTICULAR PURPOSE. THE EXCLUSION OF IMPLIED WARRANTIES IS NOT PERMITTED BY SOME STATES.
THE ABOVE EXCLUSION MAY NOT APPLY TO YOU. THIS WARRANTY PROVIDES YOU WITH SPECIFIC
LEGAL RIGHTS. THERE MAY BE OTHER RIGHTS THAT YOU MAY HAVE WHICH VARY FROM STATE TO
STATE.
Copyright © 2003 Macromedia, Inc. All rights reserved. This manual may not be copied, photocopied, reproduced,
translated, or converted to any electronic or machine-readable form in whole or in part without prior written approval of
Macromedia, Inc. Part Number ZFL70M100
Acknowledgments
Director: Erick Vera
Project Management: Stephanie Gowin, Barbara Nelson
Writing: Jody Bleyle, Mary Burger, Kim Diezel, Stephanie Gowin, Dan Harris, Barbara Herbert, Barbara Nelson, Shirley Ong,
Tim Statler
Managing Editor: Rosana Francescato
Editing: Mary Ferguson, Mary Kraemer, Noreen Maher, Antonio Padial, Lisa Stanziano, Anne Szabla
Production Management: Patrice O’Neill
Media Design and Production: Adam Barnett, Christopher Basmajian, Aaron Begley, John Francis, Jeff Harmon
First Edition: September 2003
Macromedia, Inc.
600 Townsend St.
San Francisco, CA 94103
CONTENTS
CHAPTER 1: Getting Started .
......................................... 5
About Flash. . . . . . . . . . . . . . . . . . . . . . . . . . . . . . . . . . . . . . . . . . . . . . . . . . . . . . . 5
About the Flash Player. . . . . . . . . . . . . . . . . . . . . . . . . . . . . . . . . . . . . . . . . . . . . . . 5
What’s new in Flash. . . . . . . . . . . . . . . . . . . . . . . . . . . . . . . . . . . . . . . . . . . . . . . . . 6
Guide to instructional media. . . . . . . . . . . . . . . . . . . . . . . . . . . . . . . . . . . . . . . . . . 9
Using the Start page . . . . . . . . . . . . . . . . . . . . . . . . . . . . . . . . . . . . . . . . . . . . . . . 11
CHAPTER 2: Installing Flash .
. . . . . . . . . . . . . . . . . . . . . . . . . . . . . . . . . . . . . . . . 13
System requirements . . . . . . . . . . . . . . . . . . . . . . . . . . . . . . . . . . . . . . . . . . . . . . . 13
Installing and activating Flash . . . . . . . . . . . . . . . . . . . . . . . . . . . . . . . . . . . . . . . . 14
Changing or removing Flash Player . . . . . . . . . . . . . . . . . . . . . . . . . . . . . . . . . . . . 15
Configuring a server for the Flash Player . . . . . . . . . . . . . . . . . . . . . . . . . . . . . . . . 16
CHAPTER 3: Getting to Know the Workspace . .
. . . . . . . . . . . . . . . . . . . . . . . . . 19
Using the Stage . . . . . . . . . . . . . . . . . . . . . . . . . . . . . . . . . . . . . . . . . . . . . . . . . . . 20
Using the Timeline . . . . . . . . . . . . . . . . . . . . . . . . . . . . . . . . . . . . . . . . . . . . . . . . 21
Using frames and keyframes . . . . . . . . . . . . . . . . . . . . . . . . . . . . . . . . . . . . . . . . . 24
Using layers . . . . . . . . . . . . . . . . . . . . . . . . . . . . . . . . . . . . . . . . . . . . . . . . . . . . . . 26
About the main toolbar and edit bar . . . . . . . . . . . . . . . . . . . . . . . . . . . . . . . . . . . 30
Using the toolbar. . . . . . . . . . . . . . . . . . . . . . . . . . . . . . . . . . . . . . . . . . . . . . . . . . 30
Using the grid, guides, and rulers . . . . . . . . . . . . . . . . . . . . . . . . . . . . . . . . . . . . . 32
Using panels and the Property inspector . . . . . . . . . . . . . . . . . . . . . . . . . . . . . . . . 34
Setting preferences in Flash . . . . . . . . . . . . . . . . . . . . . . . . . . . . . . . . . . . . . . . . . . 36
Customizing keyboard shortcuts . . . . . . . . . . . . . . . . . . . . . . . . . . . . . . . . . . . . . . 39
Using context menus . . . . . . . . . . . . . . . . . . . . . . . . . . . . . . . . . . . . . . . . . . . . . . . 40
Accessibility in the Flash authoring environment. . . . . . . . . . . . . . . . . . . . . . . . . . 40
CHAPTER 4: Building Your First Application
. . . . . . . . . . . . . . . . . . . . . . . . . . . . 45
Workflow for building an application . . . . . . . . . . . . . . . . . . . . . . . . . . . . . . . . . .
Examine a completed application . . . . . . . . . . . . . . . . . . . . . . . . . . . . . . . . . . . . .
Open the authoring document . . . . . . . . . . . . . . . . . . . . . . . . . . . . . . . . . . . . . . .
Create a new document. . . . . . . . . . . . . . . . . . . . . . . . . . . . . . . . . . . . . . . . . . . . .
Add media content . . . . . . . . . . . . . . . . . . . . . . . . . . . . . . . . . . . . . . . . . . . . . . . .
Add navigation controls. . . . . . . . . . . . . . . . . . . . . . . . . . . . . . . . . . . . . . . . . . . . .
Add motion and basic interactivity . . . . . . . . . . . . . . . . . . . . . . . . . . . . . . . . . . . .
45
46
47
48
49
53
55
3
Test the application . . . . . . . . . . . . . . . . . . . . . . . . . . . . . . . . . . . . . . . . . . . . . . . . 56
Publish and view the application . . . . . . . . . . . . . . . . . . . . . . . . . . . . . . . . . . . . . . 56
The next steps . . . . . . . . . . . . . . . . . . . . . . . . . . . . . . . . . . . . . . . . . . . . . . . . . . . . 57
Resources . . . . . . . . . . . . . . . . . . . . . . . . . . . . . . . . . . . . . . . . . . . . . . . . . . . . . . . 57
INDEX
4
. . . . . . . . . . . . . . . . . . . . . . . . . . . . . . . . . . . . . . . . . . . . . . . . . . . . . . . . . . . 61
Contents
CHAPTER 1
Getting Started
Welcome to Macromedia Flash MX 2004 and Macromedia Flash MX Professional 2004. Flash
provides everything you need to create and deliver rich web content and powerful applications.
Whether you’re designing motion graphics or building data-driven applications, Flash has the
tools necessary to produce great results and deliver the best user experience across multiple
platforms and devices.
This guide is designed to introduce you to Flash. The tutorial in this guide leads you through the
process of creating a simple Flash application.
About Flash
Flash is an authoring tool that allows you to create anything from a simple animation to a
complex interactive web application, such as an online store. You can make your Flash
applications media rich by adding pictures, sound, and video. Flash includes many features that
make it powerful but easy to use, such as drag-and-drop user interface components, built-in
behaviors that add ActionScript to your document, and special effects that you can add to objects.
When you author in Flash you work in a Flash document, a file that, when saved, has the file
extension .fla. When you are ready to deploy your Flash content, you publish it, creating a file
with the extension .swf. The Flash Player, described in the next section, runs the SWF file.
About the Flash Player
Macromedia Flash Player 7, which runs the applications that you create, installs by default along
with Flash. The Flash Player ensures that all SWF content is viewable and available consistently
and across the broadest range of platforms, browsers, and devices.
The Macromedia Flash Player is distributed with products from every major partner, including
Microsoft, Apple, Netscape, AOL, and Opera, to bring rich content and applications
immediately to over 516 million people worldwide. The Flash Player is distributed freely
to anyone who wants to use it. You can get the latest version of the Flash Player at
www.macromedia.com/go/getflashplayer.
5
What’s new in Flash
There are now two editions of Flash: Flash MX 2004 and Flash MX Professional 2004. To verify
which edition you have installed, select Help > About Flash in the application.
Flash MX 2004
Flash MX 2004 is the perfect tool for the web designer, interactive media
professional, or subject matter expert developing multimedia content. Emphasis is on creation,
import, and manipulation of many types of media (audio, video, bitmaps, vectors, text, and data).
Flash MX Professional 2004
Flash MX Professional 2004 is designed for advanced web
designers and application builders. Flash MX Professional 2004 includes all the features of Flash
MX 2004, along with several powerful new tools. It provides project-management tools for
optimizing the workflow between the members of a web team made up of designers and
developers. External scripting and capabilities for handling dynamic data from databases are some
of the features that make Flash particularly suitable for large-scale, complex projects deployed
using the Flash Player along with a hybrid of HTML content.
New features available in both Flash MX 2004 and Flash MX
Professional 2004
The new features in Flash MX 2004 and Flash MX Professional 2004 provide greater
productivity, enhanced rich media support, and streamlined publishing.
Productivity
Flash MX 2004 and Flash MX Professional 2004 include many features designed specifically for
streamlining previously complex tasks, thereby improving productivity:
Timeline effects
You can apply Timeline effects to any object on the Stage to quickly add
transitions and animations such as fade-ins, fly-ins, blurs, and spins. For more information, see
“Using Timeline effects” in Using Flash Help.
Behaviors With behaviors, you can add interactivity to Flash content without writing a line of
code. For example, you can use behaviors to include functionality that links to a website, loads
sounds and graphics, controls playback of embedded videos, plays movie clips, and triggers data
sources. For more information see “Controlling instances with behaviors” in Using Flash Help.
Accessibility support in the authoring environment
Accessibility support in the Flash
authoring environment provides keyboard shortcuts for navigating and for using interface
controls, letting you work with these interface elements without using the mouse. For more
information, see “Accessibility in the Flash authoring environment” in Using Flash Help.
Updated templates
Flash includes updated templates for creating presentations, e-learning
applications, advertisements, mobile device applications, and other commonly used types of Flash
documents. For more information, see “Using templates” in Using Flash Help.
Integrated Help system
The new Help panel provides in-context reference, ActionScript
reference, and lessons in the Flash authoring environment. For more information, see “Using the
Help panel” in Using Flash Help.
Spell checker
The spell checker searches your text for spelling errors.
Document tabs
Tabs for each open document are displayed at the top of the workspace so that
you can quickly locate and switch between open documents. For more information, see “Using
document tabs for multiple documents (Windows only)” in Using Flash Help.
6
Chapter 1: Getting Started
Start page The Start page puts commonly used tasks at your fingertips, in a central page. For
more information, see “Using the Start page” on page 11.
Find and Replace
The Find and Replace feature locates and replaces a text string, a font, a
color, a symbol, a sound file, a video file, or an imported bitmap file. For more information, see
“Using Find and Replace” in Using Flash Help.
Rich media support
New rich media support features enhance the quality of rich media presentations.
High-fidelity import
High-fidelity import lets you import Adobe PDF and Adobe Illustrator 10
files and preserve accurate vector representation of your source files. For more information, see
“Importing Adobe Illustrator, EPS, or PDF files in Using Flash Help.
Video Import wizard The Video Import wizard simplifies video encoding and offers encoding
presets and clip editing. For more information, see “About the Video Import wizard” in Using
Flash Help.
Small font size rendering Small font sizes are now rendered more crisply. For more
information, see “Creating text” in Using Flash Help.
Publishing
New publishing features make it easy to detect Flash Player versions, improve accessibility, and
simplify localization.
Flash Player detection
You can now publish SWF files with associated files that detect if a user
has a specified Flash Player version. You can configure your published files to direct users to
alternate files if they don’t have the specified Flash Player. For more information, see “Configuring
publish settings for Flash Player detection” in Using Flash Help.
Publish profiles You can create profiles to save your publish settings, then export the profiles
and use them across projects to publish consistently under different conditions. For more
information, see “Creating a publish profile” in Using Flash Help.
Accessibility and components
New accessibility features and a new generation of components
offer tab ordering, tab focus management, and improved support for third-party screen readers
and closed-caption programs.
Globalization and Unicode Enhanced globalization and Unicode support allows multilanguage
authoring using any character set. For more information, see “Creating Multilanguage Text” in
Using Flash Help. You may need to update your Help system to see this information.
Strings panel The new Strings panel makes it easier to publish Flash content in multiple
languages. With the click of a few buttons, Flash creates external XML files for each specified
language. For more information, see “Creating Multilanguage Text” in Using Flash Help. You
may need to update your Help system to see this information.
Security
The Flash Player 7 enforces a stricter security model than previous versions of the
Flash Player. Exact domain matching requires that the domain of the data to be accessed match
the data provider’s domain exactly in order for the domains to communicate. HTTPS/HTTP
restriction specifies that a SWF file using nonsecure (non-HTTPS) protocols cannot access
content loaded using a secure (HTTPS) protocol, even when both are in exactly the same
domain. For more information, see “Flash Player security features” in ActionScript Reference
Guide Help.
What’s new in Flash
7
Other improvements
Flash Player performance has been greatly improved, and ActionScript has been enhanced to
comply with ECMA script language specifications. Also, Flash now tracks interactions so that
they can be converted to reusable commands.
Flash Player runtime performance Player runtime performance has been improved by a factor
of two to five times for video, scripting, and general display rendering.
ActionScript 2.0 ActionScript 2.0 is an object-oriented language that follows the ECMA script
language specification and supports inheritance, strong typing, and the event model. For more
information, see “ECMA-262 Edition 4 compliance in ActionScript Reference Guide Help. You
may need to update your Help system to see this information.
History panel The History panel tracks your actions so that they can be converted to reusable
commands. For more information, see “Using the History panel” in Using Flash Help.
New features available in Flash MX Professional 2004 only
Flash MX Professional 2004 offers all the features available in Flash MX 2004, plus a variety of
new features to enhance application development and design. Features include the screen-based
visual development environment, and tools for managing data interactively and for fostering team
productivity.
Screen-based visual development environment
A visual programming environment Flash MX Professional 2004 introduces a forms-based
visual programming environment, which is ideal for developing applications. For more
information, see “Slide screens and form screens (Flash Professional only)” in Using Flash Help.
Slides-based authoring Slide screens provide functionality designed for sequential
presentations. For more information, see “Slide screens and form screens (Flash Professional
only)” in Using Flash Help.
A new generation of components
Advanced components support
New components now support focus management to control
tab navigation. Although the components have a new sophisticated design, you can easily reskin
them to modify their appearance. For more information, see “Benefits of v2 components” in
Using Components Help.
Data interactivity
Data binding
Data binding allows you to connect any component to various data sources to
manipulate, display, and update data through components or ActionScript. For more
information, see “Data Binding” in Using Flash Help. You may need to update your Help system
to see this information.
Prebuilt data connectors for Web Services and XML New components allow you to connect
to web services and XML data sources easily. For more information, see “Macromedia Flash MX
2004 and Macromedia Flash MX Professional 2004 Components” in Using Components Help.
Performance improvements Performance improvements on large record sets allow your
application to work efficiently with large amounts of data.
8
Chapter 1: Getting Started
Team productivity
Project management The Project panel enables centralized project file management, version
control, and workflow optimization for teams of Flash users working together. For more
information, see “Working with Projects (Flash Professional Only)” in Using Flash Help.
Source code control
Flash Professional provides source code control integration with plug-ins
to industry-leading source control systems such as Microsoft Visual Source Safe. For more
information, see “Using version control with projects (Flash Professional only)” in Using
Flash Help.
Guide to instructional media
Flash contains a variety of media to help you learn the program quickly and become proficient in
creating your own Flash applications.
About the electronic manuals and lessons
The following electronic manuals are available through the Help panel (Help > Help):
• Getting Started provides a hands-on introduction to Flash.
• Using Flash contains complete information on working in the Flash authoring tool, including
all commands, features, and user interface elements.
• Using Components contains information on adding and configuring components in a Flash
document, as well as information on creating components.
• The ActionScript Reference Guide provides a conceptual introduction to the ActionScript
language and documents all actions, methods, and properties in the ActionScript API.
If you are a new user, you’ll find the following information useful:
• Getting Started provides basic information about the Flash workspace and guides you in
creating a simple document.
• A series of lessons on the How Do I tab offer an introduction to using Flash. Refer to the
Quick Tasks, Basic Flash, and Basic ActionScript lessons (Help > How Do I).
Using the Help panel
The updatable Help panel provides access to information on how to use Flash. For more
information about the Help panel, see the following sections.
Accessing help
The tabs in the Help panel—Help and How Do I—contain the full set of user assistance
information provided with the Flash application.
• You can select the Help tab to display general help information.
• You can select the How Do I tab to display a list of 10–20 minute lessons that guide you
through many of the features in Flash.
Guide to instructional media
9
To access help and the table of contents:
1 Select Help > Help to open the Help panel.
2 If the table of contents is not visible, click the Table of Contents button to display the table
of contents.
A list of help books is displayed. The Help tab is selected by default.
3 Click a book to open it and display its topics.
4 Click a topic to select it.
The How Do I tab contains brief lessons that introduce you to the main features of Flash, letting
you practice on isolated examples. If you are new to Flash, or if you have used only a limited set of
features, start with the How Do I tab.
To start the lessons:
1 Select Help > How Do I to display the How Do I tab of the Help panel.
In the Table of Contents, you’ll find a list of lessons.
2 Click a lesson topic to open it.
To search for a word or phrase in the Help panel:
1 Click the Search icon in the Help panel toolbar.
2 Type a word or phrase in the text box, then click Search.
A list of topics that contain the word or phrase is displayed.
To close the help table of contents:
• To close the table of contents, click the X above the table of contents.
Note: You can access the table of contents again by clicking the Table of Contents button.
To print a help page:
1 Click the Print button in the Help panel toolbar.
2 In the Print dialog box, select the printer and other printing options, then click Print.
Updating the Help panel
The Update feature allows you to update your help system with new and revised documentation,
including procedures and lessons. You can click the Update button to see if new information is
available. Additionally, if you see a topic in help with the text “For the latest information about
this topic, click the Update button at the top of the Help tab,” you can click this button to update
Flash Help.
To update Flash Help:
1 Verify that you’re connected to the Internet.
2 Click the Update button in the Help panel toolbar and follow instructions to download the
help system.
10
Chapter 1: Getting Started
Using the Start page
The Start page provides easy access to your most frequently used actions, either at the start of a
session or whenever no open documents are in the application window.
The Start page contains the following areas:
Open a Recent Item
0pen
lets you view your most recent documents.
displays the Open File dialog box.
Create New offers a list of file types from which to choose, such as ActionScript or document, for
a quick way to open a new file.
Create from Template
lists the templates most commonly used to create new documents and
allows you to select from the list.
Extend
links to the Macromedia Flash Exchange website, where you can download additional
applications and information.
The start page also offers quick access to resources that assist you in learning Flash. You can take a
tour of Flash, take a lesson, and update your help system with the latest documentation.
The Start page can also display trial conversion information, upgrade notices, and additional
messages of interest.
You can choose whether to display the Start page.
To hide the Start page:
• On the Start page, select Don’t Show Again.
To specify that the Start page appear again, do one of the following:
• (Windows) Select Edit > Preferences and click Show Start Page on the General tab.
• (Macintosh) Select Flash > Preferences and click Show Start Page on the General tab.
Using the Start page
11
12
Chapter 1: Getting Started
CHAPTER 2
Installing Flash
This chapter explains the following:
• The system requirements for running Flash (see “System requirements” on page 13)
• How to install Flash (see “Installing and activating Flash” on page 14).
• How to customize Flash for a network (see “About Flash Player security configurations on
corporate networks” on page 17)
• How to configure a server for the Flash Player (see “Configuring a server for the Flash Player”
on page 16).
System requirements
The following hardware and software are required to run Macromedia Flash MX 2004 and
Macromedia Flash MX Professional 2004.
Authoring
The following hardware and software are required to install the Flash authoring tool.
Windows
Macintosh
600 MHz Intel Pentium III processor or equivalent 500 MHz PowerPC G3 processor
Windows 98 SE, Windows 2000, or
Mac OS X 10.2.6
Windows XP
128 MB RAM (256 MB recommended)
190 MB available disk space
130 MB available disk space
Complete product system requirements and recommendations are available at
www.macromedia.com/go/sysreqs.
To install Flash MX 2004 and Flash MX Professional 2004, you must have administrative
privileges. You must also have administrative privileges to remove any edition of Flash.
Flash MX 2004 and Flash MX Professional 2004 do not support Macintosh hard disks formatted
with UFS. Apple has documented several UFS formatting issues for Carbon and Classic. Unless
you are using native applications (Cocoa), UFS is not recommended or supported by Apple.
13
Flash Player 7
The following table lists system and browser requirements for Flash Player 7.
Platform
Browser
Windows 98
Microsoft Internet Explorer 5.x, Netscape 4.7, Netscape 7.x,
Mozilla 1.x, AOL 8, and Opera 7.11
Windows Me
Microsoft Internet Explorer 5.5, Netscape 4.7, Netscape 7.x,
Mozilla 1.x, AOL 8, and Opera 7.11
Windows 2000
Microsoft Internet Explorer 5.x, Netscape 4.7, Netscape 7.x,
Mozilla 1.x, CompuServe 7, AOL 8, and Opera 7.11
Windows XP
Microsoft Internet Explorer 6.0, Netscape 7.x, Mozilla 1.x,
CompuServe 7, AOL 8, and Opera 7.11
Mac OS 9.x
Microsoft Internet Explorer 5.1, Netscape 4.8, Netscape 7.x,
Mozilla 1.x, and Opera 6
Mac OS X 10.1.x, or Mac OS X 10.2.x Microsoft Internet Explorer 5.2, Netscape 7.x, Mozilla 1.x,
AOL 7, Opera 6, and Safari 1.0 (Mac OS X 10.2.x only)
Complete product system requirements and recommendations are available at
www.macromedia.com/go/sysreqs.
Installing and activating Flash
Installing Flash is an automated process. After installation, you can choose to run the 30-day
trial mode of Flash, or you can choose to activate either Flash MX 2004 or Flash MX 2004
Professional. Both editions of Flash must be activated over the Internet or phone prior to use,
and you need your serial number to activate either edition of Flash unless you wish to select
trial mode. Windows 98 SE users must have Microsoft Internet Explorer 5.1 or later in order to
activate over the Internet.
Note: Installing Macromedia Flash MX 2004 and Macromedia Flash MX Professional 2004 does
not overwrite earlier Flash versions, such as Macromedia Flash MX, that you might have installed.
To install Flash:
1 Close any running versions of Flash before installing.
2 Do one of the following to start the installation process:
■
(Windows) If you have a CD, insert it in your CD drive. A Flash movie plays that guides
you through installation choices.
Note: You can also run Install Flash MX 2004.exe to start the Flash movie, if necessary.
(Macintosh) If you have a CD, insert it in your CD drive and double-click the
Installer icon.
■ If you have downloaded Flash from the Internet, double-click FlashMX2004Installer.exe
(Windows), or double-click the Installer icon (Macintosh) and follow the onscreen
instructions.
3 When installation is complete, follow the instructions to select the 30-day trial period, or enter
your serial number and activate Flash.
■
14
Chapter 2: Installing Flash
Upgrading from Macromedia Flash MX 2004 to Macromedia Flash MX
Professional 2004
If you’ve purchased Macromedia Flash MX 2004, you can upgrade to Macromedia Flash MX
Professional 2004.
To upgrade to Macromedia Flash MX Professional 2004:
1 Select Help > Upgrade to Flash MX Professional 2004.
2 In the dialog box that appears, do one of the following:
■
■
Select Buy to open a browser for the Macromedia store.
Select Try and follow the instructions to obtain a serial number for a trial upgrade.
At the end of the trial period, if you do not purchase the upgrade, your application reverts to
Macromedia Flash MX 2004.
Switching between trial mode editions
If you’re running the trial mode of one edition of Flash, you can change to another edition during
the same trial period.
To switch between trial modes:
• From Flash, select Help > Switch to Flash MX Professional 2004 or Switch to Flash MX 2004,
depending on which trial mode you’re already using, and which you wish to try.
A dialog box appears indicating that you must restart your computer for the change to
take effect.
Purchasing a Flash edition from trial mode
If you’re running Flash in trial mode, you can initiate your purchase directly from the application.
To purchase Flash from trial mode:
1 Select Help > Activate Macromedia Flash MX.
2 In the dialog box that appears, select Buy One Online to purchase a serial number.
A browser window takes you to the Macromedia store.
Changing or removing Flash Player
You can change or reinstall the current version of Flash Player.
To change or reinstall the ActiveX control for Windows (Internet Explorer or AOL):
1 Close your browser.
2 Remove any currently installed versions of the ActiveX control. For instructions, see Technote
14157 on the Macromedia Support Center at www.macromedia.com/support/flash/ts/
documents/remove_player.htm.
3 Run the Install Flash Player 7 AX.exe file in your Players folder to begin installation.
4 Open the browser. The new version of the ActiveX control should be installed.
Changing or removing Flash Player
15
To change or reinstall the plug-in for Windows (Netscape, Mozilla, CompuServe, or Opera):
1 Close your browser before installing a new version of the plug-in.
2 Remove any currently installed versions of the plug-in. For instructions, see Technote 14157
on the Macromedia Support Center at www.macromedia.com/support/flash/ts/documents/
remove_player.htm.
3 Run the Install Flash Player 7.exe file in your Players folder to begin installation.
4 Open the browser. The new version of the plug-in should be installed. To verify installation in
Netscape, select Help > About Plug-ins from the browser menu.
To change or reinstall the plug-in for Macintosh (Netscape, Internet Explorer for Macintosh,
Safari, AOL, Opera, or CompuServe):
1 Close your browser before installing a new version of the plug-in.
2 Remove currently installed versions of the plug-in. See Technote 14157 on the Macromedia
Support Center at http://www.macromedia.com/support/flash/ts/documents/
remove_player.htm for instructions.
3 Run Install Flash Player 7 (Mac OS 9.x) or Install Flash Player 7 OS X (Mac OS X.x) in your
Players folder to begin installation.
4 Open the browser. The new version of the plug-in should be installed. To verify on Netscape,
select Help > About Plug-ins from the browser menu.
Configuring a server for the Flash Player
For users to view your Flash content on the web, the web server must be properly configured to
recognize SWF files.
Your server may already be configured properly. To test server configuration, see TechNote 4151
on the Macromedia Flash Support Center at www.macromedia.com/support/flash/ts/documents/
tn4151.html. If your server is not properly configured, follow the procedure below to
configure it.
Configuring a server establishes the appropriate Multipart Internet Mail Extension (MIME) types
so that the server can identify files with the .swf extension as Shockwave Flash files.
A browser that receives the correct MIME type can load the appropriate plug-in, control, or
helper application to process and properly display the incoming data. If the MIME type is
missing or not properly delivered by the server, the browser might display an error message or a
blank window with a puzzle piece icon.
To configure a server for the Flash Player, do one of the following:
• If your site is established through an Internet service provider (ISP), ask the ISP to add this
MIME type to the server: application/x-shockwave-flash with the SWF suffix.
• If you are administering your own server, see your web server documentation for instructions
on adding or configuring MIME types.
16
Chapter 2: Installing Flash
About Flash Player security configurations on corporate networks
Corporate and enterprise system administrators can configure Flash to restrict access by the Flash
Player to resources in the local file system. You can create a security configuration file that limits
Flash Player functionality on the local system.
The security configuration file is a text file placed in the same folder as the Flash Player installer.
The Flash Player installer reads the configuration file during installation and follows its
security directives. The Flash Player exposes the configuration file to ActionScript using the
System object.
With the configuration file, you can disable access by the Flash Player to the camera or
microphone, limit the amount of local storage the Flash Player can use, control the auto-update
feature, and block the Player from reading anything from the user’s local hard disk.
For more information about security, see “System class” in ActionScript Reference Guide Help.
Configuring a server for the Flash Player
17
18
Chapter 2: Installing Flash
CHAPTER 3
Getting to Know the Workspace
The Macromedia Flash MX 2004 and Macromedia Flash MX Professional 2004 workspace
consists of a Stage on which you place media content, a main toolbar with menus and commands
for controlling application functionality, panels and a Property inspector for organizing and
modifying media assets, and a toolbar with tools for creating and modifying vector graphic
content. For more information on the workspace, see the following sections:
•
•
•
•
•
•
•
•
“Moving the view of the Stage” on page 21
“Using the Timeline” on page 21
“Using frames and keyframes” on page 24
“Using layers” on page 26
“About the main toolbar and edit bar” on page 30
“Using the toolbar” on page 30
“Using the grid, guides, and rulers” on page 32
“Using panels and the Property inspector” on page 34
You can select preferences to modify the default Flash workspace. Context menus and keyboard
shortcuts provide ways for you to easily navigate the Flash authoring environment. Special
workspace accessibility features provide additional keyboard shortcuts that let you navigate panels
and dialog boxes without using the mouse. See the following sections:
•
•
•
•
“Setting preferences in Flash” on page 36
“Customizing keyboard shortcuts” on page 39
“Using context menus” on page 40
“Accessibility in the Flash authoring environment” on page 40
19
Using the Stage
The Stage is the rectangular area where you place graphic content, including vector art, text boxes,
buttons, imported bitmap graphics or video clips, and so on. The Stage in the Flash authoring
environment represents the rectangular space in the Macromedia Flash Player where your Flash
document is displayed during playback. You can zoom in and out to change the view of the Stage
as you work.
The grid, guides, and rulers help you position content precisely on the Stage. See “Using the grid,
guides, and rulers” on page 32.
Zooming
To view the entire Stage on the screen, or to view just a particular area of your drawing at high
magnification, you can change the magnification level. The maximum magnification depends on
the resolution of your monitor and the document size. The minimum value for zooming out on
the Stage is 8%. The maximum value for zooming in on the Stage is 2000%.
To magnify or reduce your view of the Stage, do one of the following:
• To zoom in on a certain element, select the Zoom tool in the toolbar and click the element. To
switch the Zoom tool between zooming in or out, use the Enlarge or Reduce modifiers (in the
options area of the toolbar when the Zoom tool is selected) or Alt-click (Windows) or Optionclick (Macintosh).
• To zoom in on a specific area of your drawing, drag a rectangular selection marquee with the
•
•
•
20
Zoom tool. Flash sets the magnification level so that the specified rectangle fills the window.
To zoom in on or out of the entire Stage, select View > Zoom In or View > Zoom Out.
To zoom in or out by a specified percentage, select View > Magnification and select a
percentage from the submenu, or select a percentage from the Zoom control at the lower left
corner of the application window.
To scale the Stage to fit completely in the given window space, select View > Magnification >
Fit in Window.
Chapter 3: Getting to Know the Workspace
• To display the contents of the current frame, select View > Magnification > Show All, or select
•
•
Show All from the Zoom control at the upper right of the application window. If the scene is
empty, the entire Stage is displayed.
To display the entire Stage, select View > Magnification > Show Frame or select Show Frame
from the Zoom control at the lower left corner of the application window.
To display the work area surrounding the Stage, select View > Work Area. The work area is
shown in light gray. Use the Work Area command to view elements in a scene that are partly or
completely outside of the Stage. For example, to have a bird fly into a frame, you would
initially position the bird outside of the Stage in the work area.
Moving the view of the Stage
When the Stage is magnified, you may not be able to see all of it. The Hand tool lets you move
the Stage to change the view without having to change the magnification.
To move the Stage view:
1 In the toolbar, select the Hand tool. To temporarily switch between another tool and the Hand
tool, hold down the Spacebar and click the tool in the toolbar.
2 Drag the Stage.
Using the Timeline
The Timeline organizes and controls a document’s content over time in layers and frames. Like
films, Flash documents divide lengths of time into frames. Layers are like multiple film strips
stacked on top of one another, each containing a different image that appears on the Stage. The
major components of the Timeline are layers, frames, and the playhead.
Layers in a document are listed in a column on the left side of the Timeline. Frames contained
in each layer appear in a row to the right of the layer name. The Timeline header at the top of
the Timeline indicates frame numbers. The playhead indicates the current frame displayed on
the Stage.
The Timeline status display at the bottom of the Timeline indicates the selected frame number,
the current frame rate, and the elapsed time to the current frame.
Note: When an animation is played, the actual frame rate is displayed; this may differ from the
document frame rate if the computer can’t display the animation quickly enough.
Empty keyframe
Playhead
Timeline header
Frame View pop-up menu
Frame-by-frame animation
Tweened animation
Guide layer icon
Center Frame button
Onion-skinning buttons
Elapsed Time indicator
Frame Rate indicator
Current Frame indicator
Using the Timeline
21
You can change the way frames are displayed in the Timeline, as well as display thumbnails of
frame content in the Timeline. The Timeline shows where there is animation in a document,
including frame-by-frame animation, tweened animation, and motion paths. For more
information, see “Creating motion” in Using Flash Help.
Controls in the layers section of the Timeline let you hide, show, lock, or unlock layers, as well as
display layer contents as outlines. See “Editing layers and layer folders” on page 28.
You can insert, delete, select, and move frames in the Timeline. You can also drag frames to a new
location on the same layer or to a different layer. See “Working with frames in the Timeline”
on page 24.
Changing the appearance of the Timeline
By default, the Timeline appears at the top of the main application window, above the Stage. To
change its position, you can dock the Timeline to the bottom or either side of the main
application window, or display the Timeline as its own window. You can also hide the Timeline.
You can resize the Timeline to change the number of layers and frames that are visible. When
there are more layers than can be displayed in the Timeline, you can view additional layers by
using the scroll bars on the right side of the Timeline.
To move the Timeline:
• Drag from the area above the Timeline header.
Drag the Timeline to the edge of the application window to dock it. Control-drag to prevent
the Timeline from docking.
To lengthen or shorten layer name fields:
• Drag the bar separating the layer names and the frames portions of the Timeline.
To resize the Timeline, do one of the following:
• If the Timeline is docked to the main application window, drag the bar separating the Timeline
•
from the application window.
If the Timeline is not docked to the main application window, drag the lower right corner
(Windows) or the size box in the lower right corner (Macintosh).
Moving the playhead
The playhead moves through the Timeline to indicate the current frame displayed on the Stage.
The Timeline header shows the frame numbers of the animation. To display a frame on the Stage,
you move the playhead to the frame in the Timeline.
When you’re working with a large number of frames that can’t all appear in the Timeline at once,
you can move the playhead along the Timeline to easily locate the current frame.
22
Chapter 3: Getting to Know the Workspace
To go to a frame:
• Click the frame’s location in the Timeline header, or drag the playhead to the desired position.
To center the Timeline on the current frame:
• Click the Center Frame button at the bottom of the Timeline.
Changing the display of frames in the Timeline
You can change the size of frames in the Timeline, and display sequences of frames with tinted
cells. You can also include thumbnail previews of frame content in the Timeline. These
thumbnails are useful as an overview of the animation, but they require extra screen space.
Frame View button
Frame View pop-up menu
Short and Normal frame view options
Using the Timeline
23
To change the display of frames in the Timeline:
1 Click the Frame View button in the upper right corner of the Timeline to display the Frame
View pop-up menu.
2 Select from the following options:
■
■
■
■
■
To change the width of frame cells, select Tiny, Small, Normal, Medium, or Large. (The
Large frame-width setting is useful for viewing the details of sound waveforms.)
To decrease the height of frame cell rows, select Short.
To turn tinting of frame sequences on or off, select Tinted Frames.
To display thumbnails of the content of each frame scaled to fit the Timeline frames, select
Preview. This can cause the apparent content size to vary.
To display thumbnails of each full frame (including empty space), select Preview in Context.
This is useful for viewing the way elements move within their frames over the course of the
animation, but previews are generally smaller than with the Preview option.
Using frames and keyframes
A keyframe is a frame in which you define a change in an animation or include frame actions to
modify a document. Flash can tween, or fill in, the frames between keyframes to produce fluid
animations. Because keyframes let you produce animation without drawing each frame, they
make creating animation easier. You can change the length of a tweened animation by dragging a
keyframe in the Timeline.
The order in which frames and keyframes appear in the Timeline determines the order in which
they are displayed in a Flash application. You can arrange keyframes in the Timeline to edit the
sequence of events in an animation.
Working with frames in the Timeline
In the Timeline, you work with frames and keyframes, placing them in the order you want the
objects in the frames to appear. You can change the length of a tweened animation by dragging a
keyframe in the Timeline.
You can perform the following modifications on frames or keyframes:
•
•
•
•
•
Insert, select, delete, and move frames or keyframes
Drag frames and keyframes to a new location on the same layer or on a different layer
Copy and paste frames and keyframes
Convert keyframes to frames
Drag an item from the Library panel onto the Stage to add the item to the current keyframe
The Timeline provides a view of tweened frames in an animation. For information on editing
tweened frames, see “Editing animation” in Using Flash Help.
Flash offers two different methods for selecting frames in the Timeline. In frame-based selection
(the default) you select individual frames in the Timeline. In span-based selection, the entire
frame sequence, from one keyframe to the next, is selected when you click any frame in the
sequence. You can specify span-based selection in Flash preferences. See “Setting preferences in
Flash” on page 36.
24
Chapter 3: Getting to Know the Workspace
To insert frames in the Timeline, do one of the following:
• To insert a new frame, select Insert > Timeline > Frame.
• To create a new keyframe, select Insert > Timeline > Keyframe, or right-click (Windows) or
•
Control-click (Macintosh) the frame where you want to place a keyframe, and select Insert
Keyframe from the context menu.
To create a new blank keyframe, select Insert > Timeline > Blank Keyframe, or right-click
(Windows) or Control-click (Macintosh) the frame where you want to place the keyframe, and
select Insert Blank Keyframe from the context menu.
To select one or more frames in the Timeline:
• To select one frame, click on the frame. If you have Span Based Selection turned on in
•
•
Preferences, clicking one frame selects the entire frame sequence between two keyframes. See
“Setting preferences in Flash” on page 36.
To select multiple contiguous frames, Shift-click additional frames.
To select multiple discontiguous frames, Control-click (Windows) or Command-click
(Macintosh) additional frames.
To select all frames in the Timeline:
• Select Edit > Timeline > Select All Frames.
To delete or modify a frame or keyframe, do one of the following:
• To delete a frame, keyframe, or frame sequence, select the frame, keyframe, or sequence and
•
•
•
•
•
•
•
select Edit > Timeline > Remove Frame, or right-click (Windows) or Control-click
(Macintosh) the frame, keyframe, or sequence and select Remove Frame from the context
menu. Surrounding frames remain unchanged.
To move a keyframe or frame sequence and its contents, drag the keyframe or sequence to the
desired location.
To extend the duration of a keyframe, Alt-drag (Windows) or Option-drag (Macintosh) the
keyframe to the final frame of the new sequence duration.
To copy a keyframe or frame sequence by dragging, Alt-click (Windows) or Option-click
(Macintosh) and drag the keyframe to the new location.
To copy and paste a frame or frame sequence, select the frame or sequence and select
Edit > Timeline > Copy Frames. Select a frame or sequence that you want to replace, and
select Edit > Timeline > Paste Frames.
To convert a keyframe to a frame, select the keyframe and select Edit > Timeline > Clear
Keyframe, or right-click (Windows) or Control-click (Macintosh) the keyframe and
select Clear Keyframe from the context menu. The cleared keyframe and all frames up
to the subsequent keyframe are replaced with the contents of the frame preceding the
cleared keyframe.
To change the length of a tweened sequence, drag the beginning or ending keyframe left or
right. To change the length of a frame-by-frame sequence, see “About frame-by-frame
animation” in Using Flash Help.
To add an item from the library to the current keyframe, drag the item from the Library panel
onto the Stage.
Using frames and keyframes
25
Using layers
Layers are like transparent sheets of acetate stacked on top of each other. Layers help you organize
the artwork in your document. You can draw and edit objects on one layer without affecting
objects on another layer. Where there is nothing on a layer, you can see through it to the layers
below.
To draw, paint, or otherwise modify a layer or folder, you select the layer to make it active.
A pencil icon next to a layer or folder name indicates that the layer or folder is active. Only one
layer can be active at a time (although more than one layer can be selected at a time).
When you create a new Flash document, it contains one layer. You can add more layers to
organize the artwork, animation, and other elements in your document. The number of layers
you can create is limited only by your computer’s memory, and layers do not increase the file size
of your published SWF file. You can hide, lock, or rearrange layers.
You can also organize and manage layers by creating layer folders and placing layers in them. You
can expand or collapse layers in the Timeline without affecting what you see on the Stage. It’s a
good idea to use separate layers or folders for sound files, actions, frame labels, and frame
comments. This helps you find these items quickly when you need to edit them.
In addition, you can use special guide layers to make drawing and editing easier, and mask layers
to help you create sophisticated effects.
For an interactive introduction to working with layers in Flash, select Help > How Do I > Basic
Flash > Work with Layers.
Creating layers and layer folders
When you create a new layer or folder, it appears above the selected layer. A newly added layer
becomes the active layer.
To create a layer, do one of the following:
• Click the Insert Layer button at the bottom of the Timeline.
• Select Insert > Timeline > Layer.
• Right-click (Windows) or Control-click (Macintosh) a layer name in the Timeline and select
Insert Layer from the context menu.
To create a layer folder, do one of the following:
• Select a layer or folder in the Timeline, then select Insert > Timeline > Layer Folder.
• Right-click (Windows) or Control-click (Macintosh) a layer name in the Timeline, then select
Insert Folder from the context menu.
The new folder appears above the layer or folder you selected.
Viewing layers and layer folders
As you work, you may want to show or hide layers or folders. A red X next to the name of a layer
or folder indicates that it is hidden. When you publish a Flash SWF file, any layers that were
hidden in the FLA document are preserved and visible in the SWF file.
To help you distinguish which layer an object belongs to, you can display all objects on a layer as
colored outlines. You can change the outline color used by each layer.
26
Chapter 3: Getting to Know the Workspace
You can change the height of layers in the Timeline in order to display more information (such
as sound waveforms) in the Timeline. You can also change the number of layers displayed in
the Timeline.
To show or hide a layer or folder, do one of the following:
• Click in the Eye column to the right of the layer or folder name in the Timeline to hide that
layer or folder. Click in it again to show the layer or folder.
• Click the eye icon to hide all the layers and folders. Click it again to show all layers and folders.
• Drag through the Eye column to show or hide multiple layers or folders.
• Alt-click (Windows) or Option-click (Macintosh) in the Eye column to the right of a layer or
folder name to hide all other layers and folders. Alt-click or Option-click it again to show all
layers and folders.
To view the contents of a layer as outlines, do one of the following:
• Click in the Outline column to the right of the layer’s name to display all objects on that layer
as outlines. Click in it again to turn off outline display.
• Click the outline icon to display objects on all layers as outlines. Click it again to turn off
outline display on all layers.
• Alt-click (Windows) or Option-click (Macintosh) in the Outline column to the right of a
layer’s name to display objects on all other layers as outlines. Alt-click or Option-click in it
again to turn off outline display for all layers.
To change a layer’s outline color:
1 Do one of the following:
Double-click the layer’s icon (the icon to the left of the layer name) in the Timeline.
Right-click (Windows) or Control-click (Macintosh) the layer name and select Properties
from the context menu.
■ Select the layer in the Timeline and select Modify > Layer.
2 In the Layer Properties dialog box, click the Outline Color box and select a new color, enter the
hexadecimal value for a color, or click the Color Picker button and select a color.
3 Click OK.
■
■
To change layer height in the Timeline:
1 Do one of the following:
Double-click the layer’s icon (the icon to the left of the layer name) in the Timeline.
■ Right-click (Windows) or Control-click (Macintosh) the layer name and select Properties
from the context menu.
■ Select the layer in the Timeline and select Modify > Timeline > Layer Properties.
2 In the Layer Properties dialog box, select an option for Layer Height and click OK.
■
To change the number of layers displayed in the Timeline:
• Drag the bar that separates the Timeline from the Stage.
Using layers
27
Editing layers and layer folders
You can rename, copy, and delete layers and folders. You can also lock layers and folders to
prevent them from being edited.
By default, new layers are named by the order in which they are created: Layer 1, Layer 2, and so
on. You can rename layers to better reflect their contents.
To select a layer or folder, do one of the following:
•
•
•
•
•
•
Click the name of a layer or folder in the Timeline.
Click a frame in the Timeline of the layer you want to select.
Select an object on the Stage that is located on the layer you want to select.
To select two or more layers or folders, do one of the following:
To select contiguous layers or folders, Shift-click their names in the Timeline.
To select discontiguous layers or folders, Control-click (Windows) or Command-click
(Macintosh) their names in the Timeline.
To rename a layer or folder, do one of the following:
• Double-click the name of a layer or folder and enter a new name.
• Right-click (Windows) or Control-click (Macintosh) the name of a layer or folder and select
Properties from the context menu. Enter the new name in the Name text box and click OK.
• Select the layer or folder in the Timeline and select Modify > Timeline > Layer Properties. In
the Layer Properties dialog box, enter the new name in the Name text box and click OK.
To lock or unlock one or more layers or folders, do one of the following:
• Click in the Lock column to the right of the name of a layer or folder to lock it. Click in the
•
•
•
Lock column again to unlock the layer or folder.
Click the padlock icon to lock all layers and folders. Click it again to unlock all layers
and folders.
Drag through the Lock column to lock or unlock multiple layers or folders.
Alt-click (Windows) or Option-click (Macintosh) in the Lock column to the right of a layer or
folder name to lock all other layers or folders. Alt-click or Option-click in the Lock column
again to unlock all layers or folders.
To copy a layer:
1 Click the layer name to select the entire layer.
2 Select Edit > Timeline > Copy Frames.
3 Click the Insert Layer button to create a new layer.
4 Click the new layer and select Edit > Timeline > Paste Frames.
To copy the contents of a layer folder:
1 Click the triangle to the left of the folder name to collapse it, if necessary.
2 Click the folder name to select the entire folder.
3 Select Edit > Timeline > Copy Frames.
4 Select Insert > Timeline > Layer Folder to create a new folder.
5 Click the new folder and select Edit > Timeline > Paste Frames.
28
Chapter 3: Getting to Know the Workspace
To delete a layer or folder:
1 Select the layer or folder.
2 Do one of the following:
■
■
■
Click the Delete Layer button in the Timeline.
Drag the layer or folder to the Delete Layer button.
Right-click (Windows) or Control-click (Macintosh) the layer or folder name and select
Delete Layer from the context menu.
Note: When you delete a layer folder, all the enclosed layers and all their contents are also deleted.
Organizing layers and layer folders
You can rearrange layers and folders in the Timeline to organize your document.
Layer folders help organize your workflow by letting you place layers in a tree structure. You can
expand or collapse a folder to see the layers it contains without affecting which layers are visible
on the Stage. Folders can contain both layers and other folders, allowing you to organize layers in
much the same way you organize files on your computer.
The layer controls in the Timeline affect all layers within a folder. For example, locking a layer
folder locks all layers within that folder.
To move a layer or layer folder into a layer folder:
• Drag the layer or layer folder name to the destination layer folder name.
The layer or layer folder appears inside the destination layer folder in the Timeline.
To change the order of layers or folders:
• Drag one or more layers or folders in the Timeline to the desired position.
To expand or collapse a folder:
• Click the triangle to the left of the folder name.
To expand or collapse all folders:
• Right-click (Windows) or Control-click (Macintosh) and select Expand All Folders or Collapse
All Folders from the context menu.
Using guide layers
For help in aligning objects when drawing, you can create guide layers. You can then align objects
on other layers to the objects you create on the guide layers. Guide layers do not appear in a
published SWF file. You can make any layer a guide layer. Guide layers are indicated by a guide
icon to the left of the layer name.
You can also create a motion guide layer to control the movement of objects in a motion tweened
animation. See “Tweening motion along a path” in Using Flash Help.
Note: Dragging a normal layer onto a guide layer converts the guide layer to a motion guide layer. To
prevent accidentally converting a guide layer, place all guide layers at the bottom of the layer order.
To designate a layer as a guide layer:
• Select the layer and right-click (Windows) or Control-click (Macintosh) and select Guide from
the context menu. Select Guide again to change the layer back to a normal layer.
Using layers
29
About the main toolbar and edit bar
The main toolbar at the top of the workspace displays menus with commands for controlling
Flash functionality. The menus include File, Edit, View, Insert, Modify, Text, Commands,
Control, Window, and Help.
The edit bar, directly below the main toolbar, contains controls and information for editing
scenes and symbols, and for changing the magnification level of the Stage.
For information on changing the Stage magnification level, see “Zooming” on page 20.
For information on editing symbols, see Chapter 3, “Using Symbols, Instances, and Library
Assets,” on page 59.For information on working with scenes, see “Working with scenes” in Using
Flash Help.
Using the toolbar
The tools in the toolbar let you draw, paint, select, and modify artwork, as well as change the view
of the Stage. The toolbar is divided into four sections:
•
•
•
•
The tools area contains drawing, painting, and selection tools.
The view area contains tools for zooming and panning in the application window.
The colors area contains modifiers for stroke and fill colors.
The options area displays modifiers for the selected tool, which affect the tool’s painting or
editing operations.
Using the Customize Toolbar dialog box, you can specify which tools to display in the Flash
authoring environment. See “Customizing the toolbar” on page 30.
For information on using the drawing and painting tools, see “Flash drawing and painting tools”
in Using Flash Help. For information on using the selection tools, see “Selecting objects” in Using
Flash Help.For information on using the view modification tools, see “Moving the view of the
Stage” on page 21.
To show or hide the toolbar:
• Select Window > Tools.
Selecting tools
You can select tools by clicking in the toolbar, or by using a keyboard shortcut.
To select a tool, do one of the following:
• Click the tool you want to use. Depending on the tool you select, a set of modifiers may be
•
•
displayed in the options area at the bottom of the toolbar.
Press the tool’s keyboard shortcut.
To select a tool located in the pop-up menu behind a visible tool, press the icon of the visible
tool and select another tool from the pop-up menu.
Customizing the toolbar
You can customize the toolbar to specify which tools appear in the authoring environment. You
use the Customize Toolbar dialog box to add or remove tools from the toolbar.
30
Chapter 3: Getting to Know the Workspace
You can display more than one tool in one location. When more than one tool is displayed in a
location, the top tool in the group (the most recently used) is displayed with an arrow in the lower
right corner of its icon. When you press and hold the mouse button on the icon, the other tools
in the group appear in a pop-up menu. You can drag to select a tool from the menu.
To customize the toolbar:
1 To display the Customize Toolbar dialog box, do one of the following:
■
■
In Windows, select Edit > Customize Toolbar.
On the Macintosh, select Flash > Customize Toolbar.
The Available Tools menu indicates the tools that are currently available in the Flash. The
Current Selection menu indicates the tool (or tools) currently assigned to the selected
location in the toolbar.
Note: If more than one tool is assigned to one location in the toolbar, the additional tools appear
in a pop-up menu located behind the top tool in the group. A small arrow in the lower right
corner of the top tool indicates that additional tools are present. The same keyboard shortcut
functions for all tools in the group.
2 Click a tool in the toolbar graphic or use the arrows to cycle through the tools, to specify the
location to which you want to assign another tool.
3 To add a tool to the selected location, select the tool in the Available Tools list and click the
Add button. It is possible to assign a tool to more than one location.
4 To remove a tool from the selected location, select the tool in the Current Selection scroll list
and click the Remove button.
5 Click OK to apply your changes and close the Customize Toolbar dialog box.
To restore the default toolbar layout:
• Click Restore Default in the Customize Toolbar dialog box.
Using the toolbar
31
Using the grid, guides, and rulers
Flash comes with rulers and guides that help you draw and lay out objects precisely. You can place
guides in a document and snap objects to those guides, or turn on the grid and snap objects to it.
Note: You can also snap objects to other objects or to pixels, or align objects using specified snap
tolerance boundaries. See “Snapping” in Using Flash Help.
Using the grid
When the grid is displayed in a document, it appears as a set of lines behind the artwork in
all scenes. You can snap objects to the grid, and you can modify the grid size and grid line color.
To display or hide the drawing grid:
• Select View > Grid > Show Grid.
To turn snapping to grid lines on or off:
• Select View > Snapping > Snap to Grid.
To set grid preferences:
1 Select View > Grid > Edit Grid.
2 For Color, click the triangle in the color box and select a grid line color from the palette.
3
4
5
6
7
The default grid line color is gray.
Select or deselect Show Grid to display or hide the grid.
Select or deselect Snap to Grid to turn snapping to grid lines on or off.
For grid spacing, enter values in the text boxes to the right of the horizontal and vertical arrows.
For Snap Accuracy, select an option from the pop-up menu.
If you want to save the current settings as the default, click Save Default.
Using guides
You can drag horizontal and vertical guides from the rulers onto the Stage when the rulers are
displayed. You can move guides, lock guides, hide guides, and remove guides. You can also snap
objects to guides, and change guide color and snap tolerance (how close objects must be to snap
to a guide). Draggable guides appear only in the Timeline in which they were created.
You can clear all the guides in the current editing mode—document-editing mode or symbolediting mode. If you clear guides in document-editing mode, all the guides in the document are
cleared. If you clear guides in symbol-editing mode, all the guides in all symbols are cleared.
To create custom guides or irregular guides, you use guide layers. See “Using guide layers”
on page 29.
To display or hide the drawing guides:
• Select View > Guides > Show Guides.
Note: If the grid is visible and Snap to Grid is turned on when you create guides, guides will snap to
the grid.
32
Chapter 3: Getting to Know the Workspace
To turn snapping to guides on or off:
• Select View > Snapping > Snap to Guides.
Note: Snapping to guides takes precedence over snapping to the grid in places where guides fall
between grid lines.
To move a guide:
• Use the Arrow tool to drag the guide.
To remove a guide:
• With guides unlocked, use the Arrow tool to drag the guide to the horizontal or vertical ruler.
For information on locking and unlocking guides, see the following procedure.
To lock guides:
• Select View > Guides > Lock Guides.
Note: You can also use the Lock Guides option in the Guides preferences dialog box. See the
following procedure.
To set guide preferences:
1 Select View > Guides > Edit Guides and do any of the following:
For Color, click the triangle in the color box and select a guide line color from the palette.
The default guide color is green.
■ Select or deselect Show Guides to display or hide guides.
■ Select or deselect Snap to Guides to turn snapping to guides on or off.
■ Select or deselect Lock Guides to lock or unlock guides.
■ For Snap Accuracy, select an option from the pop-up menu.
■ If you want to remove all guides, click Clear All.
■ Clear All removes all guides from the current scene.
■ If you want to save the current settings as the default, click Save Default.
2 Click OK.
■
To clear guides:
• Select View > Guides > Clear Guides.
If you are in edit document mode, all guides in the document are cleared. If you are in edit
symbols mode, only guides used in symbols are cleared.
Using rulers
When rulers are displayed, they appear along the top and left sides of the document. You can
change the unit of measure used in the rulers from the default of pixels. When you move an
element on the Stage with the rulers displayed, lines indicating the element’s dimensions appear
on the rulers.
To display or hide rulers:
• Select View > Rulers.
Using the grid, guides, and rulers
33
To specify the rulers’ unit of measure for a document:
• Select Modify > Document, and then select an option from the pop-up menu at the
upper right.
Using panels and the Property inspector
Flash offers many ways to customize the workspace to your needs. Using panels and the Property
inspector, you can view, organize, and change assets and their attributes. You can show, hide, and
resize panels. You can also group panels and save custom panel sets to make managing your
workspace easier. The Property inspector changes to reflect the tool or asset you are working with,
giving you quick access to frequently used features.
About the Property inspector
The Property inspector simplifies document creation by making it easy to access the most
commonly used attributes of the current selection, either on the Stage or in the Timeline. You can
make changes to the object or document attributes in the Property inspector without accessing
the menus or panels that contain these features.
Depending on what is currently selected, the Property inspector displays information and settings
for the current document, text, symbol, shape, bitmap, video, group, frame, or tool. When two or
more different types of objects are selected, the Property inspector displays the total number of
objects selected.
About the Library panel
The Library panel is where you store and organize symbols created in Flash, as well as imported
files, including bitmap graphics, sound files, and video clips. The Library panel lets you organize
library items in folders, see how often an item is used in a document, and sort items by type. See
“Using the library to manage media assets” in Using Flash Help.
About the Actions panel
The Actions panel lets you create and edit actions for an object or frame. Selecting a frame,
button, or movie clip instance makes the Actions panel active. The Actions panel title changes to
Button Actions, Movie Clip Actions, or Frame Actions, depending on what is selected.
For information on using the Actions panel, including switching between editing modes, see
“Using the Actions panel and Script window” in ActionScript Reference Guide Help.
Using panels
Panels in Flash help you view, organize, and change elements in a document. The options
available in panels control the characteristics of symbols, instances, colors, type, frames, and other
elements. You can use panels to customize the Flash interface, by displaying the panels you need
for a specific task and hiding other panels.
Panels let you work with objects, colors, text, instances, frames, scenes, and entire documents. For
example, you use the Color Mixer to create colors, and the Align panel to align objects to each
other or the Stage. To view the complete list of panels available in Flash, see the Window menu.
34
Chapter 3: Getting to Know the Workspace
Most panels include a pop-up menu with additional options. The options menu is indicated by a
control in the panel’s title bar. (If no options menu control appears, there is no options menu for
that panel.)
To open a panel:
• Select the desired panel from the Window menu.
To close a panel, do one of the following:
• Select the desired panel from the Window menu.
• Right-click (Windows) or Control-click (Macintosh) the panel’s title bar and select Close Panel
from the context menu.
To use a panel’s options menu:
1 Click the control at the far right in the panel’s title bar to view the options menu.
2 Click an item in the menu.
To resize a panel:
• Drag the panel’s border (Windows) or drag the size box at the panel’s lower right
corner (Macintosh).
To expand or collapse a panel to its title bar:
• Click the collapse arrow in the title bar. Click the collapse arrow again to expand the panel to
its previous size.
To close all panels:
• Select Window > Hide Panels.
Arranging panels
You can rearrange the order in which panels appear within panel groups. You can also create new
panel groups and dock panels to existing panel groups.
To move a panel:
• Drag the panel by its title bar.
To add a panel to an existing panel group:
• Drag the panel by its title bar onto another panel.
To create a new panel group:
• Drag the panel by its title bar, away from other panel groups.
Using panel sets
You can create panel sets in custom arrangements, and you can save these custom panel layouts.
You can reset panel display to the default layout (displaying the Color Swatches, Actions, and
Components panels and the Color Mixer to the right of the application window) or to a custom
layout that you have saved previously.
Using panels and the Property inspector
35
To save a custom panel set:
1 Select Window > Save Panel Layout.
2 Enter a name for the layout and click OK.
To select a panel layout:
1 Select Window > Panel Sets.
2 From the submenu, select Default Layout to reset panels to the default layout, or select a custom
layout that you have saved previously.
To delete custom layouts:
• Open the folder for the Panel Sets documents in the location for your operating system (listed
below) and delete the text file for the custom panel set.
For Windows operating systems:
■ Windows 2000 or XP: <boot drive>\Documents and Settings\<username>\Local
Settings\Application Data\Macromedia\Flash MX 2004\<language>\Configuration\Panel
Sets
■ Windows 98: C:\Windows\Application Data\Macromedia\Flash MX
2004\<language>\Configuration\Panel Sets
For Macintosh operating systems:
■ Macintosh OS X: Macintosh HD/Applications/Macromedia Flash MX 2004/First Run/
Panel Sets
Setting preferences in Flash
Flash lets you set preferences for general application operations, editing operations, and
Clipboard operations. See also “Specifying drawing settings” in Using Flash.
To set preferences:
1 Select Edit > Preferences (Windows) or Flash > Preferences (Macintosh).
2 Click the General, Editing, Clipboard, Warning, or ActionScript Editor tab, and select from
the respective options as described in the procedures that follow. For more information on
ActionScript Editor preferences, see “Using the ActionScript editor” in ActionScript Reference
Guide Help.
To set general preferences, select from the following options:
• For Undo Levels, enter a value from 2 to 9999 to set the number of undo/redo levels. Undo
•
•
36
levels require memory; the more undo levels you use, the more system memory is taken up.
The default is 100.
For Printing Options (Windows only), select Disable PostScript if you want to disable
PostScript output when printing to a PostScript printer. By default, this option is deselected.
Select this option if you have problems printing to a PostScript printer, but keep in mind that
this will slow down printing.
For Selection Options, select or deselect Shift Select to control how Flash handles selection of
multiple elements. When Shift Select is off, clicking additional elements adds them to the
current selection. When Shift Select is on, clicking additional elements deselects other
elements unless you hold down the Shift key.
Chapter 3: Getting to Know the Workspace
• Select Show Tooltips to display tooltips when the pointer pauses over a control. Deselect this
option if you don’t want to see the tooltips.
• For Timeline Options, select Disable Timeline Docking to keep the Timeline from attaching
•
•
•
•
•
itself to the application window once it has been separated into its own window. For more
information, see “Using the Timeline” on page 21.
Select Span Based Selection to use span-based selection in the Timeline, rather than the default
frame-based selection. For more information on span-based and frame-based selection, see
“Working with frames in the Timeline” on page 24.
Select Named Anchor on Scenes to have Flash make the first frame of each scene in a
document a named anchor. Named anchors let you use the Forward and Back buttons in a
browser to jump from scene to scene in a Flash application.
For Highlight Color, select Use This Color and select a color from the palette, or select Use
Layer Color (the default option) to use the current layer’s outline color.
For Font Mapping Default, select a font to use when substituting missing fonts in documents
you open in Flash. See “Substituting missing fonts” in Using Flash Help.
For On Launch options, select an option to specify which document Flash opens when you
start the application. Select Show Start Page to display the Start Page. Select New Document
to open a new, blank document. Select Last Documents Open to open the documents that
were open when you last quit Flash. Select No Document to start Flash without opening
a document.
To set editing preferences, do any of the following:
• For Pen Tool options, see “Setting Pen tool preferences” in Using Flash Help.
• For Vertical Text options, select Default Text Orientation to make the default orientation
•
•
•
of text vertical, which is useful for some Asian language fonts. By default, this option
is deselected.
Select Right to Left Text Flow to reverse the default text display direction. This option is
deselected by default.
Select No Kerning to turn off kerning for vertical text. This option is deselected by default but
is useful to improve spacing for some fonts that use kerning tables.
For Drawing Settings, see “Specifying drawing settings” in Using Flash Help.
Note: If you are using Macromedia Flash MX Professional 2004, you can select Project
preferences on the Editing tab, for closing and saving project files. See “Creating and managing
projects (Flash Professional only)” in Using Flash Help.
To set Clipboard preferences, select from the following options:
• For Bitmaps (Windows only), select options for Color Depth and Resolution to specify these
•
parameters for bitmaps copied to the Clipboard. Select Smooth to apply anti-aliasing. Enter a
value in the Size Limit text box to specify the amount of RAM that is used when placing a
bitmap image on the Clipboard. Increase this value when working with large or highresolution bitmap images. If your computer has limited memory, select None.
For Gradients (Windows only), select an option to specify the quality of gradient fills placed in
the Windows Metafile. Choosing a higher quality increases the time required to copy artwork.
Use this setting to specify gradient quality when pasting items to a location outside of Flash.
When you are pasting within Flash, the full gradient quality of the copied data is preserved
regardless of the Gradients on Clipboard setting.
Setting preferences in Flash
37
• For PICT Settings (Macintosh only), for Type, select Objects to preserve data copied to the
•
Clipboard as vector artwork, or select one of the bitmap formats to convert the copied artwork
to a bitmap. Enter a value for Resolution. Select Include PostScript to include PostScript data.
For Gradients, select an option to specify gradient quality in the PICT. Choosing a higher
quality increases the time required to copy artwork. Use the Gradients setting to specify
gradient quality when pasting items to a location outside of Flash. When you are pasting
within Flash, the full gradient quality of the copied data is preserved regardless of the
Gradient setting.
For FreeHand Text, select Maintain Text as Blocks to keep text editable in a pasted
FreeHand file.
To set warning preferences, select one of the following options:
• Select Warn on Save for Macromedia Flash MX Compatibility to have Flash warn you when
•
•
•
•
•
•
•
•
•
•
38
you try to save documents with content specific to the Flash MX 2004 or Flash MX
Professional 2004 authoring tool as a Flash MX file. This option is selected by default.
Select Warn on Missing Fonts to have Flash warn you when you open a Flash document that
uses fonts that are not installed on your computer. This option is selected by default.
Select Warn on URL Changes in Launch and Edit to have Flash warn you if the URL for a
document has changed since the last time you opened and edited it.
Select Warn on Reading Generator Content to have Flash display a red X over any Generator
objects, as a reminder that Generator objects are not supported in Flash MX 2004.
Select Warn on Inserting Frames when Importing Content to have Flash alert you when it
inserts frames in your document to accommodate audio or video files that you import.
Select Warn on Encoding Conflicts When Exporting .as Files to have Flash alert you when
selecting Default Encoding could potentially lead to data loss or character corruption. (For
example, if you create a file with English, Japanese, and Korean characters and select Default
Encoding on an English system, the Japanese and Korean characters will be corrupted.)
Select Warn on Conversion of Effect Graphic Objects to have Flash warn you when you
attempt to edit a symbol that has Timeline effects applied to it.
Select Warn on Exporting to Flash Player 6 r65 to have Flash warn you when you export a
document to this earlier version of the Flash Player.
Select Warn on Sites with Overlapped Root Folder to have Flash warn you when you create a
site in which the local root folder overlaps with another site.
Select Warn on Behavior Symbol Conversion to have Flash warn you when you convert a
symbol with a behavior attached to a symbol of a different type—for example, when you
convert a movie clip to a button.
Select Warn on Symbol Conversion to have Flash warn you when you convert a symbol to a
symbol of a different type.
Chapter 3: Getting to Know the Workspace
Customizing keyboard shortcuts
You can select keyboard shortcuts in Flash to match the shortcuts you use in other applications, or
to streamline your Flash workflow. By default, Flash uses built-in keyboard shortcuts designed for
the Flash application. You can also select a built-in keyboard shortcut set from one of several
popular graphics applications, including Fireworks, Adobe Illustrator, and Adobe Photoshop.
To create a custom keyboard shortcut set, you duplicate an existing set, and then add or remove
shortcuts from the new set. You can delete custom shortcut sets.
To select a keyboard shortcut set:
1 Select Edit > Keyboard Shortcuts (Windows) or Flash > Keyboard Shortcuts (Macintosh).
2 In the Keyboard Shortcuts dialog box, select a shortcut set from the Current Set pop-up menu.
To create a new keyboard shortcut set:
1 Select a keyboard shortcut set as described in the previous procedure.
2 Click the Duplicate Set button.
3 Enter a name for the new shortcut set and click OK.
To rename a custom keyboard shortcut set:
1 In the Keyboard Shortcuts dialog box, select a shortcut set from the Current Set pop-up menu.
2 Click the Rename Set button.
3 In the Rename dialog box, enter a new name and click OK.
To add or remove a keyboard shortcut:
1 Select Edit > Keyboard Shortcuts (Windows) or Flash > Keyboard Shortcuts (Macintosh) and
select the set that you want to modify.
2 From the Commands pop-up menu, select Drawing Menu Commands, Drawing Tools, Test
Movie Menu Commands, or Workplace Accessibility Commands to view shortcuts for the
selected category.
3 In the Commands list, select the command for which you want to add or remove a shortcut.
An explanation of the selected command appears in the Description area in the dialog box.
4 Do one of the following:
■ To add a shortcut, click the Add Shortcut (+) button.
■ To remove a shortcut, click the Remove Shortcut (-) button and proceed to step 6.
5 If you are adding a shortcut, enter the new shortcut key combination in the Press Key text box.
Note: To enter the key combination, simply press the keys on the keyboard. You do not need to
spell out key names, such as Control, Option, and so on.
6 Click Change.
7 Repeat this procedure to add or remove additional shortcuts.
8 Click OK.
To delete a keyboard shortcut set:
1 Select Edit > Keyboard Shortcuts (Windows) or Flash > Keyboard Shortcuts (Macintosh). In
the Keyboard Shortcuts dialog box, click the Delete Set button.
2 In the Delete Set dialog box, select a shortcut set and click Delete.
Note: You cannot delete the built-in keyboard shortcut sets that ship with Flash.
Customizing keyboard shortcuts
39
Using context menus
Context menus contain commands relevant to the current selection. For example, when you
select a frame in the Timeline window, the context menu contains commands for creating,
deleting, and modifying frames and keyframes. Context menus exist for many items and controls
in many locations, including on the Stage, in the Timeline, in the Library panel, and in the
Actions panel.
To open a context menu:
• Right-click (Windows) or Control-click (Macintosh) an item.
Accessibility in the Flash authoring environment
Accessibility support in the Flash authoring environment provides keyboard shortcuts for
navigating and using interface controls, including panels, the Property inspector, dialog boxes, the
Stage, and objects on the Stage, so that you can work with these interface elements without using
the mouse.
Note: Certain keyboard controls are available only in Windows. See “About Flash authoring
accessibility on the Macintosh” on page 40.
You can customize the keyboard shortcuts for accessibility in the authoring environment using
the Workspace Accessibility Commands section of the Keyboard Shortcuts dialog box. See
“Customizing keyboard shortcuts” on page 39.
Some authoring environment accessibility features are unavailable on the Macintosh. See the
following section.
About Flash authoring accessibility on the Macintosh
Accessibility for the Flash authoring environment on the Macintosh has the following limitations:
• The Panel Focus keyboard shortcut (Command+Alt+Tab) is not supported for the
•
Property inspector.
The Panel Control Focus keyboard shortcut (Tab) is supported only for the Timeline, not for
other panels or the Property inspector.
Selecting panels or the Property inspector with keyboard shortcuts
You can select a panel or the Property inspector (also referred to as applying focus to the panel
or Property inspector) by using the keyboard shortcut Control+Alt+Tab (Windows) or
Command+Option+Tab (Macintosh).
You can apply focus to a panel or the Property inspector only when the panel or Property
inspector is open. It can be expanded or collapsed.
When you use the keyboard shortcut to select panels, focus is applied to panels using the
following criteria:
• Docked panels are given focus first.
• If the Timeline is displayed and docked, the Timeline is given focus the first time you press
Control+Alt+Tab (Windows) or Command+Option+Tab (Macintosh).
40
Chapter 3: Getting to Know the Workspace
• If the Timeline is not displayed and docked, or if you press the keyboard shortcut again, focus
•
moves to the rightmost and highest docked panel. Pressing the keyboard shortcut repeatedly
then moves the focus through the other docked panels, from right to left and from top to
bottom of the workspace.
If you move the focus through all the docked panels, or if there are no docked panels displayed,
focus then moves to the rightmost and highest floating panel. Pressing the keyboard shortcut
repeatedly then moves the focus through the other floating panels, from right to left and from
top to bottom of the workspace.
To use keyboard shortcuts to select or deselect, expand, or collapse panels or the
Property inspector:
• To move the focus through the panels currently displayed in the workspace, press
Control+Alt+Tab (Windows) or Command+Option+Tab (Macintosh).
• To move the focus to the previously selected panel, press Control+Shift+Alt+Tab (Windows) or
Command+Shift+Option+Tab (Macintosh).
• To deselect a panel, press Escape, or move, dock, or undock the panel.
• To move the focus to the panel above or below the current panel in a panel group, press the Up
Arrow or Down Arrow key.
To use keyboard shortcuts to expand or collapse panels or the Property inspector:
• Press the Spacebar to expand or collapse the currently selected panel.
To hide all panels and the Property inspector:
• Press F4. Press F4 again to display all panels and the Property inspector.
Selecting controls in a panel or the Property inspector using
keyboard shortcuts
When a panel or the Property inspector has the current focus, you can use the Tab key to move
the focus through the panel controls. You can use the Spacebar to activate the control that has the
current focus (that is, pressing Spacebar is equivalent to clicking a control in the panel).
When you use the keyboard shortcut for panel controls, focus is applied to a control and the
control is activated using the following criteria:
• The panel with the current focus must be expanded in order for you to select a control in the
•
•
•
•
panel with the Tab key. If the panel is collapsed, pressing the Tab has no effect.
When panel with the current focus is expanded, pressing the Tab key the first time moves the
focus to the panel options menu.
You can use the Right Arrow and Left Arrow keys to move the focus between the options menu
and the panel title bar.
If the focus is on the options menu, pressing the Tab key again moves the focus through the
other controls in the panel. Pressing the Tab key again will not return the focus to the panel
options menu.
When the options menu has the focus, you can press Enter (Windows only) to display the
options menu items.
Accessibility in the Flash authoring environment
41
• In panels that are grouped, you can use the Up Arrow and Down Arrow keys to move the focus
between the options menus of the panels in the group.
• You can move the focus to a panel control only if the control is active. If a control is dimmed
(inactive), you cannot apply focus to the control.
To move the focus from a panel title bar to a panel options menu, do one of the following:
• Press the Tab key.
• Press the Right Arrow key. Press the Left Arrow key or Shift+Tab to return the focus to the
panel title bar.
• If the panel is in a group, press the Up Arrow key to move the focus to the options menu of
the panel immediately above the panel with the current focus. Press the Down Arrow key to
move the focus to the options menu of the panel immediately below the panel with the
current focus.
To move the focus through the items in a panel options menu:
1 With the focus currently applied to the panel options menu, press the Spacebar to display the
options menu items.
2 Press the Down Arrow key to move through the items in the options menu.
3 Press Enter (Windows) or Return (Macintosh) to activate the currently selected options
menu item.
To move the focus through the controls in a panel:
1 Press the Tab key when the focus is currently applied to the panel options menu. Press the Tab
key repeatedly to move the focus through the controls in the panel.
2 Press Enter (Windows only) to activate the currently selected panel control.
Navigating dialog box controls using keyboard shortcuts (Windows only)
In Windows operating systems, you can use keyboard shortcuts to navigate controls in dialog
boxes. You can move from one control to another, apply controls, or cancel and exit the
dialog box.
To navigate dialog box controls using keyboard shortcuts, do any of the following:
• Press Tab to move through the controls in the dialog box.
• To move through the controls within one section of a dialog box, press the Up Arrow and
•
•
•
•
42
Down Arrow keys. For example, in the Spelling Setup dialog box, press the Up Arrow and
Down Arrow keys to move through the controls within the Document Options section.
When the focus is applied to a dialog box control button—such as the OK, Cancel, or Apply
button—press Enter to activate the button (equivalent to clicking the button).
When the focus is not applied to any dialog box control button—such as the OK, Cancel, or
Apply button—press Enter to apply the current settings and close the dialog box (equivalent to
clicking OK).
Press Escape to close the dialog box without applying the changes (equivalent to
clicking Cancel).
When the focus is applied to the Help button, press Enter or Spacebar to view the Help
content for the dialog box (equivalent to clicking Help).
Chapter 3: Getting to Know the Workspace
Selecting the Stage or objects on the Stage using keyboard shortcuts
You can select the Stage or an object on the Stage using keyboard shortcuts. Selecting the Stage
with a keyboard shortcut is equivalent to clicking on the Stage. Any other element currently
selected becomes deselected when the Stage is selected.
Once the Stage is selected, you can use the Tab key to navigate through all objects on all layers,
one at a time. You can select instances (including graphic symbols, buttons, movie clips, bitmaps,
videos, or sounds), groups, or text fields. You cannot select shapes (such as rectangles) unless those
shapes are instances of symbols. You cannot select more than one object at a time using keyboard
shortcuts. Objects are selected on the Stage using the following criteria:
• If an object is currently selected, pressing Shift+Tab selects the previous object.
• Pressing Tab the first time selects the first object that was created on the active frame in the
•
•
active layer. When the last object on the top layer is selected, pressing Tab moves to the next
layer beneath it and selects the first object there, and so on.
When the last object on the last layer is selected, pressing Tab moves to the next frame and
selects the first object on the top layer there.
Objects on layers that are hidden or locked cannot be selected with the Tab key.
Note: If you are currently typing text into a text box, you cannot select an object using the keyboard
focus. You must first change the focus to the Stage and then select an object.
To select the Stage:
• Press Control+Alt+Home (Windows) or Command+Option+Home (Macintosh).
To select an object on the Stage:
• With the Stage selected, press Tab.
Navigating tree controls using keyboard shortcuts
You can navigate tree controls, the hierarchical displays of file structures in certain Flash panels,
using keyboard shortcuts. You can expand and collapse folders in the tree control and move up
and down between parent and child folders.
To navigate tree controls with keyboard shortcuts, do any of the following:
•
•
•
•
To expand a collapsed folder, select the folder and press the Right Arrow key.
To collapse an expanded folder, select the folder and press the Left Arrow key.
To move to the parent folder of an expanded folder, press the Left Arrow key.
To move to the child folder of an expanded folder, press the Right Arrow key.
Accessibility in the Flash authoring environment
43
Working with library items using keyboard shortcuts
You can cut, copy, and paste library items using keyboard shortcuts. You can cut or copy an item
from the Library panel and paste it onto the Stage or into another library, or paste a folder into
another library. If you paste a folder, each item in the folder is included.
You can use keyboard shortcuts to select a library item. See “Navigating tree controls using
keyboard shortcuts” on page 43
Items are cut, copied, and pasted using the following criteria:
• You can cut or copy one item or multiple items.
• You cannot paste a shape from the Stage into the library.
• You cannot paste a library item into a common library, because common libraries cannot be
•
•
•
•
modified. However, you can create a new common library. See “Working with common
libraries” in Using Flash Help.
When you paste a library item onto the Stage, the item is centered.
To paste a library item into a folder in the destination library, you can click on the folder
before pasting.
You can paste a library item into a different location in the same library where it originated.
If you attempt to paste a library item into a location containing another item by the same
name, you can select whether to replace the existing item.
To cut, copy, and paste library items using keyboard shortcuts:
• To copy or paste a selected library item, press Control+X (Windows) or Command+X
•
44
(Macintosh) to cut the item, or press Control+C (Windows) or Command+C (Macintosh) to
copy the item.
To paste a cut or copied item, click on the Stage or in another library to set the insertion point,
and press Control+V (Windows) or Command+V (Macintosh) to paste in the center of the
Stage, or press Control+Shift+C (Windows) or Command+Shift+C (Macintosh) to paste in
place (in the same location as the original).
Chapter 3: Getting to Know the Workspace
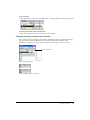
CHAPTER 4
Building Your First Application
This chapter provides a tutorial that guides you through the process of creating a simple
application using some of the authoring features in Macromedia Flash MX 2004 and
Macromedia Flash MX Professional 2004. A Flash application, broadly defined, can be as simple
as content that offers interactivity, or as elaborate as a robust application that interacts with a
variety of data sources.
In this tutorial, after examining an existing Flash document, you’ll begin by creating a new Flash
document and end by publishing the application for web playback. The tutorial should take
approximately 20 minutes to complete.
If you have not already done so, we recommend that before you take this tutorial you read
Chapter 3, “Getting to Know the Workspace,” on page 19.
Workflow for building an application
The tutorial in this chapter follows the order of one possible workflow for creating a
Flash application.
• “Examine a completed application” on page 46 shows you how to work with an application.
•
•
•
•
•
•
In the process, you become familiar with the Flash workspace.
“Create a new document” on page 48 is the starting point for creating your own
new application.
“Add media content” on page 49 shows you how to quickly add vector artwork, text, bitmap
images, video, sound, buttons, and movie clips to your application.
“Add navigation controls” on page 53 introduces you to the built-in components and
behaviors provided with Flash that let you drag navigation buttons and other user interface
elements to your application.
“Add motion and basic interactivity” on page 55 shows you how to add built-in effects and
behaviors to your application.
“Test the application” on page 56 shows you how to preview your application in the Flash
Player to verify it is working correctly before you publish it.
“Publish and view the application” on page 56 shows you how to get your application ready for
deployment on the web or wherever else you want to publish it.
45
Examine a completed application
As you examine the finished version of an application you’ll create, you will also take look at the
Flash workspace.
In this section, you’ll learn how to complete the following tasks:
•
•
•
•
“Run the completed application” on page 46
“Open the authoring document” on page 47
“Examine the completed application” on page 47
“Close the application” on page 48
In subsequent sections you’ll go through the steps to create the application yourself.
Run the completed application
To better understand the type of application you’ll create as you take this tutorial, you can analyze
a completed version of the application. You can play the SWF file in the Flash Player. Published
Flash applications have the SWF file extension. Documents saved in the authoring environment
have the FLA file extension.
1 In Flash select File > Open.
2 Browse to the completed file using one of the following paths:
■
If you’re using Windows 2000 or XP, browse to <boot drive>\Documents and
Settings\<username>\Local Settings\Application Data\Macromedia\Flash MX
2004\<language>\Configuration\HelpPanel\Help\GettingStarted\finished_files and
double-click myad_finished.swf.
Note: If the Application Data folder is hidden, you’ll need to change your Windows Explorer
settings to see the folder.
If you’re using a Windows 98 operating system, browse to
<boot drive>\Windows\Application Data\Macromedia\Flash MX 2004\<language>\
Configuration\HelpPanel\Help\GettingStarted\finished_files and double-click
myad_finished.swf.
■ If you’re using a Macintosh operating system, browse to <Macintosh HD>/Users
<username>/Library/Application Support/Macromedia/Flash MX 2004/<language>/
Configuration/HelpPanel/Help/GettingStarted/finished_files and double-click
myad_finished.swf.
The completed application runs in the Flash Player. The car fades out after a while.
3 Click the Information button to see where it links, then close the browser that opened and
return to the SWF file.
4 After viewing the application, click its close box.
■
46
Chapter 4: Building Your First Application
Open the authoring document
It’s helpful to analyze the completed authoring document, which is a FLA file, to see how the
author designed the application.
1 In Flash, select File > Open.
2 Browse to the authoring document using one of the following paths:
■
If you’re using Windows 2000 or XP, browse to <boot drive>\Documents and
Settings\<username>\Local Settings\Application Data\Macromedia\Flash MX
2004\<language>\Configuration\HelpPanel\Help\GettingStarted\finished_files and
double-click myad_finished.fla.
Note: If the Application Data folder is hidden, you’ll need to change your Windows Explorer
settings to see the folder.
If you’re using a Windows 98 operating system, browse to
<boot drive>\Windows\Application Data\Macromedia\Flash MX 2004\<language>\
Configuration\HelpPanel\Help\GettingStarted\finished_files and double-click
myad_finished.fla.
■ If you’re using a Macintosh operating system, browse to <Macintosh HD>/Users/
<username>/Library/Application Support/Macromedia/Flash MX 2004/<language>/
Configuration/HelpPanel/Help/GettingStarted/finished_files and double-click
myad_finished.fla
You now see the completed tutorial application in the authoring environment.
■
Examine the completed application
You’ll become more familiar with the Flash workspace as you examine the authoring file. For
comprehensive information about the workspace, see Chapter 3, “Getting to Know the
Workspace,” on page 19.
In this section, you’ll take a look at some of the most frequently used workspace features:
The Stage is the area that represents how your published content will appear. The
myad_finished.fla file has a car, logo, button, text, and shapes assembled on the Stage.
For more information about the Stage, see “Using the Stage” on page 20.
The Timeline,
above the Stage, displays a layer for the art and a layer for the effects in the
document. For more information about the Timeline, see “Using the Timeline” on page 21.
Panels in Flash assist you in working with and assigning attributes to the document or to objects
on the Stage. For more information about panels, including how to dock and move them, see
“Using panels and the Property inspector” on page 34.
The Property inspector allows you to view and change attributes of a selected object. The
Property inspector changes to display information about the tool or asset you are working with,
offering quick access to frequently used features. For more information about the Property
inspector, see “Using panels and the Property inspector” on page 34.
The Library panel stores reusable items such as graphics, sound, and video clips. When you want
to use a library item, you simply drag it from the Library panel to the Stage. You’ll learn more
about the Library panel next.
Open the authoring document
47
View the library for your document
You can view library items for your document in the Library panel.
1 If the Library panel isn’t open, select Window > Library.
2 View or scroll through the assets in the Library panel.
3 When you finish viewing the library assets, collapse the panel.
Close the application
• To close the document, select File > Close.
If you’ve made changes to the file, do not save them.
Create a new document
Now that you have had a tour of the application you will create and of the Flash workspace, it is
time to create your own Flash document. To learn how to create a application in Flash, you’ll start
with the very first step in the process: creating a new file.
In this section, you’ll learn how to complete the following tasks:
• “Open a new document” on page 48
• “Define document properties” on page 49
Open a new document
Now you’re ready to create your own version of the ad.
1 Select File > New.
2 Select Flash Document and read the description of the file type that appears, and then click OK.
3 Select File > Save.
4 Name the file myad.fla and save the file on your desktop or in any convenient location.
The file is given the extension .fla.
Note: As you complete the tutorial, remember to save your work frequently.
48
Chapter 4: Building Your First Application
Define document properties
Configuring document properties is a common first step in authoring. You can use the Property
inspector to specify settings that affect the entire application, such as the frames per second (fps)
playback rate, and the Stage size and background color.
1 If the Property inspector isn’t open, select Window > Properties.
The Property inspector lets you view and change the specifications for selected objects. The
specifications depend on the type of object selected. If you select a text object, for example, the
Property inspector displays settings for viewing and modifying text attributes. Because you
have just opened a new document, the Property inspector shows the document settings.
Note: If the Property inspector is not fully expanded, click the white triangle in the lower
right corner.
2 In the Property inspector, verify that 12 is the number in the Frame Rate text box.
The application will play at 12 frames per second, an optimal frame rate for playing
animations on the web.
3 The Background color box indicates the color of the Stage. Click the down arrow on the
Background Color box, then move the Eyedropper tool over the color swatches to view their
hexadecimal values in the Hexadecimal text box.
4 Find and click the gray color swatch with the hexadecimal value of #CCCCCC.
Hexadecimal
text box
Select this
shade of gray
For more information about setting document properties, see “Creating or opening a document
and setting properties” in Using Flash Help.
Add media content
Media content includes artwork, either created in Flash or imported from another program, and
text. Media is added to the Stage in the appropriate frame and layer.
In this section, you’ll learn how to complete the following tasks:
•
•
•
•
“Add vector art” on page 50
“Import images into the library” on page 51
“Add art from the library” on page 52
“Add text” on page 53
Add media content
49
Add vector art
When you draw in Flash, you create vector art, which is a mathematical representation of lines,
curves, color, and position. Vector art is resolution-independent; you can rescale the art to any size
or display it at any resolution without losing clarity. Additionally, vector art downloads faster than
comparable bitmap images.
You will begin by drawing a rectangle to highlight the area where the car will be.
1 Double-click the Layer 1 name in the Timeline.
2 Type over the name Layer 1, replacing it with the name Art.
Art is now the active layer. Anything you place on the Stage will be in this layer.
3 Select the Rectangle tool from the toolbar.
4 On the Stage, draw a rectangle, similar to the one below, toward bottom of your screen.
(The colors are not important right now; you’ll change the colors soon.)
The drawing tools work much as they do in other graphics programs, with one major
exception. When you draw a shape, it has two parts: the outer line, called the stroke, which
outlines the shape, and the fill, which colors the inside of the shape.
5 Click the Selection tool in the toolbar.
6 Holding down the mouse button, draw a rectangle around the rectangle you just drew. This
selects the entire rectangle.
Now the Property inspector displays settings for a shape. You can use the Property inspector to
change the line thickness, fill and stroke colors, and other attributes of the selected rectangle.
7 In the Property inspector, change the color of the fill to dark gray (hexadecimal #333333).
8 Change the color of the stroke to the same dark gray.
50
Chapter 4: Building Your First Application
Import images into the library
To use media files, such as graphics, sound, and video files, you need to put them into your file or
use the library of another file that already has those media elements.
When you import a file into Flash, you can import it directly into the library or you can import it
onto the Stage. In this case, you will import images into the library of your file. You can then use
these images to finish your slide show.
For more information about importing files, see “Placing artwork into Flash” in Using
Flash Help.
1 If the Library panel is not open, select Window > Library.
At this time there is nothing in the library.
2 Select File > Import > Import to Library.
3 Browse to one of the following paths:
■
If you’re using Windows 2000 or XP, browse to <boot drive>\Documents and Settings\
<username>\Local Settings\Application Data\Macromedia\Flash MX 2004\<language>\
Configuration\HelpPanel\Help\GettingStarted\start_files\Assets. Select logo.ai and car.png
to import.
Note: If the Application Data folder is hidden, you’ll need to change your Windows Explorer
settings to see the folder.
If you’re using a Windows 98 operating system, browse to
<boot drive>\Windows\Application Data\Macromedia\Flash MX 2004\<language>\
Configuration\HelpPanel\Help\GettingStarted\start_files\Assets. Select logo.ai and car.png
to import.
■ If you’re using a Macintosh operating system, browse to <Macintosh HD>/Users/
<username>/Library/Application Support/Macromedia/Flash MX 2004/<language>/
Configuration/HelpPanel/Help/GettingStarted/start_files/Assets. Select logo.ai and car.png
to import.
4 In the Illustrator Import dialog box, verify that Layers and Include Invisible are selected, and
click OK.
The two images are now in the library.
■
Add media content
51
Add art from the library
Now that the files are in the library, you can add them to your document.
1 Using the Selection tool, drag logo.ai from the Library panel onto the Stage and place it as
shown in the following illustration:
2 Next, drag car.png from the Library panel onto the Stage and place it in the middle of the
rectangle you drew, as in the following illustration:
52
Chapter 4: Building Your First Application
Add text
The next step is to add text on the Stage.
1 Select the Text tool from the toolbar and click on the Stage, under the car.
A text field appears, with a round control that indicates that the field will expand as you type.
2 You can specify all the settings for the Text tool before you start typing. In the Property
inspector, do the following:
■ In the Font text box, select Arial
■ In the Point Size text box, type 14.
■ In the Text (fill) color box, select blue (hexadecimal 3366CC).
■ Verify that additional settings appear as in the following screen shot:
3 Type Don’t let your dream car fade away! Click here for more information.
4 If necessary, click the Selection tool in the toolbar and move the text so that it’s more centered
under the car on the Stage.
Add navigation controls
You can easily add navigation controls to your application so that users can click a button to go to
a website. You can do this quickly by adding a PushButton component to the Stage, then adding
behaviors to the button to make it go to a URL.
In this section, you’ll learn how to complete the following tasks:
• “Add and configure components” on page 54
• “Add a behavior” on page 54
Add navigation controls
53
Add and configure components
Components are drag-and-drop elements that you use to create a user interface almost instantly.
You will use the Button component to create the Information button.
For more information about components, see Using Components Help.
The Flash built-in components are displayed in the Components panel (Window > Development
Panels > Components).
You will add a Button component to create the Information button.
1 Click the Selection tool in the toolbar.
2 From the Components panel, drag the Button component onto the Stage, as shown below.
3 On the Stage, select the button that you just added and configure it using the Parameters tab of
the Property inspector:
■ In the Instance name text box, type info.
■ In the Label text box, type Information. As you type, the name of the button on the Stage
changes from Button to Information.
Add a behavior
Next, you’ll add a behavior to the button that will make it open a website. Behaviors enable you
to add the power, control, and flexibility of ActionScript coding to your document without
having to create the ActionScript code yourself. You can use behaviors to control movie clips,
video, and sound files.
You’ll use the Go to Web Page behavior to add navigation to a button that opens a website.
1 On the Stage, click the Button component that you added.
2 If the Behaviors panel is not already open, select Window > Development Panels > Behaviors
3
4
5
6
54
to open it.
Click the Add (+) button at the top of the panel to display a list of behaviors.
Select Web > Go to Web Page.
The Go to URL dialog box appears.
In the URL text box, type any complete URL, such as http://www.macromedia.com. Then
click OK.
When the user clicks the button, a browser will open for the specified URL.
Save your file.
Chapter 4: Building Your First Application
Add motion and basic interactivity
The ad is almost complete. The next step before testing and publishing it is to add the motion
that makes the car fade away. With just a few keystrokes, you can add motion to an object using
the built-in Timeline effects provided with Flash.
In this section, you’ll learn how to complete the following tasks:
• “Add a Timeline effect” on page 55
• “Extend a layer in the Timeline” on page 55
Add a Timeline effect
Timeline effects are powerful tools that you can use to create an instant animation. In this
example, you’ll add a fade-out effect.
For more information about effects, see “Using Timeline effects” in Using Flash Help.
1 With the Selection tool, click the car on the Stage.
2
3
4
5
6
7
The box around the car indicates that it is selected.
Do one of the following:
■ Select Insert > Timeline Effects > Transition.
■ Right-Click (Windows) or Control-Click (Macintosh) and select Timeline Effects >
Transition from the context menu.
The Transition dialog box appears, displaying a preview of the effect, with default settings.
Because you only want the car to fade, and you do not want a wipe transition, deselect Wipe.
For the Direction, select Out for the car to fade out.
Click Update Preview to view the effect with the new settings, then click OK.
A new layer named Transition 1 appears in the Timeline.
In the Timeline, click the Transition 1 layer title and drag it up it so that it is the top layer and
the Art layer is the bottom layer. Otherwise, the content on the Art layer appears over the
content on the Transition 1 layer and hides the car.
Choose Control > Test Movie to test the document in the Flash Player.
The car fades out as expected; however, the text and the rest of the artwork disappear from the
Stage very quickly, before the fade-out ends. The application continues to loop and play again.
Extend a layer in the Timeline
The reason the fade-out effect lasts longer than the rest of the application is apparent when you
look at the Timeline. The Fade Out 1 layer extends to Frame 30, whereas the Art layer is only on
Frame 1. As each frame is played in sequence, the Art layer (Frame 1) disappears until the
application loops back to the beginning. To solve this problem, you will simply extend the Art
layer so that it is longer than the Fade Out layer.
1 In the Timeline, right-click Frame 1 in the Art layer, which has the filled black keyframe. From
the context menu, select Copy Frames.
2 Right-click Frame 30 in the Art layer. From the context menu, select Paste frames.
Frames with content in the Art layer now extend to Frame 30.
Add motion and basic interactivity
55
Test the application
At any point during authoring, you can test how your application plays as a SWF file.
1 Select File > Save to save your application.
2 Save your application and Select Control > Test Movie.
3 Click the Information button to go to the website you specified in the behavior.
4 View the animation to verify that it plays as expected.
5 When you finish viewing the application, close the SWF file by clicking its close box.
Publish and view the application
To complete your document, you use the Publish command to create a web-compatible
application as a SWF file.
If you use the Publish command with the default settings, Flash prepares your file for the web.
Flash publishes the SWF file and creates an HTML file with the tags necessary to display the
SWF file.
After you define the necessary publish settings, you can repeatedly export to all selected formats at
once by simply choosing File > Publish. Because Flash stores your publish settings with the
document, each application can have its own settings.
In this section, you’ll learn how to complete the following tasks:
• “View publish settings” on page 56 in one step
• “View your published application in a browser” on page 57
Publish the application
You can publish your Flash document for web playback in one step, by selecting File > Publish.
Before you publish, however, you’ll check your publish settings.
View publish settings
Using the Publish Settings dialog box, you can easily change the way your file is published.
1 To view your publish settings, choose File > Publish Settings.
Flash is configured, by default, to create a supporting HTML file that displays the
Flash application.
When you select a format that requires additional settings, a new tab appears.
2 On the Formats tab, verify that Flash (.swf) and HTML (.html) are selected. Click the Flash tab.
By default, the application publishes for the Flash Player.
3 Click the HTML tab.
By default, the publishing process creates an HTML document that inserts your SWF file in a
browser window. Settings on the HTML tab of the Publish Settings dialog box determine how
the application appears in the browser.
4 If Detect Flash Version is selected, deselect that option so that Flash will not create files to detect
your user’s Flash Player version.
56
Chapter 4: Building Your First Application
Change publish settings
By default, Flash gives the SWF file the same name as the FLA file. You will now change the
default name.
1 Click the Formats tab of the Publish Settings dialog box. In the HTML (.html) text box, select
the existing text and type newAd.html.
2 Click Publish. When the Publishing status window closes, click OK in the Publish Settings
dialog box.
3 Save your document. Publish settings save with the document, so the next time you want to
publish using the same settings, you can select File > Publish.
Note: You can also create publish profiles. See “Creating a publish profile” in Using Flash Help.
View your published application in a browser
In your browser, you can view the HTML file and SWF application that you just published.
1 Open your browser, then open the HTML file that you created, named newAd.html.
By default, the HTML file is in the same folder as your FLA file.
When you open the HTML file, the SWF application plays within your browser.
2 In your browser, use a command such as View > Page Source or View > Source to view
the HTML.
The object and embed tags ensure that the SWF application is displayed within the browser.
The next steps
By completing this tutorial, you’ve learned much about creating Flash applications, including
how to accomplish the following tasks:
•
•
•
•
•
•
Create a new document
Add media content
Add navigation controls
Add a behavior
Add motion and basic interactivity
Test the application
There are many valuable resources you can use to help you as you continue working with Flash.
For more information, see the next section.
Resources
Macromedia has excellent resources to help you discover more about Flash, get support, and send
feedback to the company.
Registration
Register to receive up-to-the-minute notices about upgrades and new products, technical support,
and more. You can register online by selecting Help > Online Registration. You can also print the
registration form from the Help menu.
Resources
57
Release Notes
Check the Flash Support Center, at www.macromedia.com/support/flash/releasenotes.html, for
Release Notes, which contain late-breaking information and known issues about Flash.
Flash support
Get the answers you need, day or night, with high-quality Flash support from knowledgeable
product support engineers. Learn more at www.macromedia.com/go/fl2004_help_support.
Flash training and certification
Boost your Flash skills with hands-on tasks and real-world scenarios - allowing you to roll up
your sleeves and get right to work. Choose between instructor-led and online training, or
combine them to create a learning path that is most effective for you. Learn more at
www.macromedia.com/go/flash_training.
Macromedia Flash Development Center
Stay up to date with the latest Macromedia Flash development trends and techniques. Tutorials,
articles, and sample applications give you the information you need to stay competitive,
innovative, and efficient. Learn more at www.macromedia.com/devnet/mx/flash.
On Demand seminars
Evaluating a new product can be difficult, and each version introduces new features to navigate.
Enter Macromedia On Demand seminars, the fastest way to get up to speed quickly. Our
seminars feature multimedia presentations and demos designed to help you maximize your
evaluation experience with our products.To learn more, go to www.macromedia.com/
macromedia/events/online/ondemand/index.html.
Sample applications
Flash includes sample files that you can dissect to learn various design and development concepts.
To view SWF versions of the sample files, along with a description, select Help > Samples. Some
of the samples are complete applications, while others are simple and intended to introduce a
basic concept. Click the link of the desired sample to open the sample in an HTML browser
window. To view the authoring version (FLA file) for a given sample, open the file from within
Flash. You’ll find the sample files in the Samples folder, which is in your Flash application
directory. The Samples page (Help > Samples) also includes a link the Macromedia website,
where you’ll find additional samples.
Books and Training section of the Macromedia Worldwide Store
Using Flash, ActionScript Reference Guide, and Using Components are provided in electronic
format (online help and PDF). To purchase a printed copy of these books, please visit
www.macromedia.com/go/books_and_training/.
58
Chapter 4: Building Your First Application
Additional resources
The following Macromedia web pages include reference materials and links to third-party
Flash resources:
• Websites devoted to Macromedia Flash and Flash developers at www.macromedia.com/
support/flash/ts/documents/flash_websites.htm
• Macromedia Press at www.macromedia.com/support/mmpress/
Resources
59
60
Chapter 4: Building Your First Application
INDEX
A
accessibility, in the Flash authoring environment 40
Actions panel 34
activating Flash 14
applications
publishing and viewing 56
sample 58
testing 56
viewing published in a browser 57
art, adding from the library 52
authoring environment accessibility 40
D
Default Layout command, for panels 36
deleting
frames or keyframes 25
layers and layer folders 29
document, creating new 48
document-editing mode 32
B
behavior, adding 54
bitmap images, anti-aliasing 37
Bitmaps on Clipboard preference (Windows only) 37
Blank Keyframe command 25
building an application, tutorial 45
F
Flash
about 5
activating 14
getting started 5
system requirements 13
Flash MX 2004 system requirements 13
Flash MX Professional 2004 system requirements 13
Flash Player
about 5
changing or uninstalling 15
security 17
system requirements 14
Flash Player 7 system requirements 14
Font Mapping Default preference 37
Frame command 25
Frame View button 24
Frame View menu 24
frames
centering the playhead in 23
changing the view 23
converting keyframes into 25
copying and pasting 25
copying by dragging 25
displayed in Timeline 21
C
Center Frame button 23
certification and training 58
Clear Keyframe command 25
Clipboard preferences 37
components, adding and configuring 54
configuring a server for Flash Player 16
context menus, about 40
Copy Frames command 25
copying
layer folder contents 28
layers 28
Customize Shortcuts dialog box 39
Customize Toolbar command 31
E
edit bar 30
editing layers and layer folders 28
61
displaying 22
displaying contents 21
dragging in Timeline 25
editing in Timeline 24
inserting 25
removing 25
showing thumbnails 24
thumbnail display 23
using 24
FreeHand Text on Clipboard preference 38
G
Gradients on Clipboard preference (Windows only) 37
grids
editing 32
showing 32
snapping to 32
using 32
guide layers 29
guides
clearing 33
locking 33
moving 33
removing 33
setting preferences 33
showing 32
snapping to 33
using 32
H
Hand tool 21
help
accessing 9
closing table of contents 10
online 9
printing a page 10
Help panel
searching in 10
updating 10
using 9
Highlight Color preference 37
I
images, importing into library 51
Insert Blank Keyframe command 25
Insert Keyframe command 25
Insert Layer command 26
installing Flash 13, 14
instructional media 9
interactivity, adding basic 55
62
Index
K
keyboard shortcuts
adding and removing 39
customizing 39
deleting 39
for dialog box controls 42
for library items 44
for panel controls 41
for panels 40
for Property inspector 40
for Property inspector controls 41
for the Stage 43
for tree controls 43
Keyframe command 25
keyframes
converting into frames 25
creating blank 25
dragging in tweened frame sequences 25
inserting 25
removing 25
using 24
L
Layer command 26
layer folders
changing order of 29
copying contents of 28
creating 26
deleting 29
editing 28
locking 28
organizing 29
renaming 28
layers
Add Layer button 26
adding layer folder 26
changing layer height 27
changing number of layers displayed 27
changing order of 29
changing outline color 27
copying 28
creating 26
deleting 29
editing 28
guide layers 29
hiding and showing 26, 27
locking 28
organizing 29
renaming 28
selecting 28
using 26
viewing as outlines 27
lessons, Flash 9, 10
library
adding art from 52
importing images into 51
keyboard shortcuts for items 44
Library panel
about 34, 47
viewing items 48
locking layers and layer folders 28
M
Macromedia Flash Development Center 58
Macromedia Flash support 58
main toolbar 30
media content, adding 49
MIME types, configuring for 16
motion, adding 55
N
Named Anchor on Scenes preference 37
navigation controls, adding 53
new features 6, 8
O
On Launch preferences 37
outlines
changing color on layers 27
viewing layer contents as 27
P
Panel Sets command 36
panels
about 47
Actions 34
arranging 35
closing 35
collapsing 35
creating new group 35
default layout 36
deleting custom layout 36
docking 35
dragging 35
expanding 35
grouping 35
keyboard shortcuts 40
keyboard shortcuts for tree controls 43
Library 34
opening 34
resetting layout of 36
resizing 35
saving custom set 36
selecting layout 36
sets 35
ungrouping 35
using 34
using options menu 35
viewing list of 34
Paste Frames command 25
PICT Settings for Clipboard preference (Macintosh
only) 38
playhead, moving 22
preferences
Bitmaps on Clipboard (Windows only) 37
Clipboard 37
editing 37
Font Mapping Default 37
FreeHand Text on Clipboard 38
general 36
Gradients on Clipboard (Windows only) 37
Highlight Color 37
Named Anchor on Scenes 37
On Launch options 37
PICT Settings for Clipboard (Macintosh only) 38
Printing Options (Windows only) 36
setting 36
Shift Select 36
Show Tooltips 37
Span Based Selection 37
Timeline Options 37
Undo Levels 36
warning 38
Preferences command 36
previewing frame thumbnails 23
Printing Options preference (Windows only) 36
Property inspector
about 34, 47
keyboard shortcuts 40
using panels and 34
publish settings
changing 57
viewing 56
published application, viewing in a browser 57
publishing the application 56
Index
63
R
registration 57
release notes 58
Remove Frame command 25
renaming layers and layer folders 28
resources 57, 59
rulers
changing units of 34
showing and hiding 33
using 33
S
security, Flash Player 17
selecting layers 28
seminars 58
Shift Select preference 36
Show All command 21
Show Frame command 21
Show Grid command 32
Show Guides command 32
Show Tooltips preference 37
Snap to Grid command 32
Snap to Guides command 33
snapping
to grid 32
to guides 33
Span Based Selection preference 37
Stage
about 47
displaying entire 21
keyboard shortcuts for selecting 43
zooming 20
Start page 11
SWF files, configuring for server MIME type 16
symbol-editing mode 32
system requirements
Flash MX 2004 13
Flash MX Professional 2004 13
Flash Player 7 14
T
testing the application 56
text, adding 53
third-party resources 58, 59
Timeline
about 47
appearance of, changing 22
Center Frame button 23
centering the playhead in 23
64
Index
converting keyframes into frames 25
copying and pasting frames 25
deleting frames or keyframes 25
docking to the application window 22
dragging 22
dragging frames 25
editing frames 24
extending a layer in 55
frame display, changing 23
frames 24
hiding layers in 26
inserting frames 25
keyframes 24
layer folder order, changing 29
layer height, changing 27
layer name fields in 22
layer order, changing 29
locking layer folders in 28
locking layers in 28
number of layers displayed, changing 27
playhead 22
Preview in Context option 23
Preview option 24
resizing 22
showing frame thumbnails 23, 24
using 21
viewing layers as outlines 27
working with frames 21
Timeline effect, adding 55
Timeline Options preference 37
toolbar
customizing 30
showing and hiding 30
using 30
tools
customizing the toolbar 30
Hand 21
selecting 30
viewing 30
Zoom 20
training and certification 58
tree controls, keyboard shortcuts for 43
trial mode
purchasing Flash 15
switching between editions 15
tutorials
building an application 45
guide to 9
tweened frames, dragging keyframes in 25
U
Undo Levels preference 36
upgrading from Macromedia Flash MX 2004 15
V
vector art, adding 50
viewing the application 56
W
warning preferences 38
work area, showing and hiding 21
Z
Zoom tool 20
zooming 20
Index
65
66
Index