1
Using the Macromedia Breeze Plug-in for
Microsoft PowerPoint
Trademarks
Add Life to the Web, Afterburner, Aftershock, Andromedia, Allaire, Animation PowerPack, Aria, Attain, Authorware,
Authorware Star, Backstage, Bright Tiger, Clustercats, ColdFusion, Contribute, Design In Motion, Director, Dream Templates,
Dreamweaver, Drumbeat 2000, EDJE, EJIPT, Extreme 3D, Fireworks, Flash, Flash Lite, Flex, Fontographer, FreeHand,
Generator, HomeSite, JFusion, JRun, Kawa, Know Your Site, Knowledge Objects, Knowledge Stream, Knowledge Track,
LikeMinds, Lingo, Live Effects, MacRecorder Logo and Design, Macromedia, Macromedia Action!, Macromedia Breeze,
Macromedia Flash, Macromedia M Logo and Design, Macromedia Spectra, Macromedia xRes Logo and Design, MacroModel,
Made with Macromedia, Made with Macromedia Logo and Design, MAGIC Logo and Design, Mediamaker, Movie Critic,
Open Sesame!, Roundtrip, Roundtrip HTML, Shockwave, Sitespring, SoundEdit, Titlemaker, UltraDev, Web Design 101,
what the web can be, and Xtra are either registered trademarks or trademarks of Macromedia, Inc. and may be registered in the
United States or in other jurisdictions including internationally. Other product names, logos, designs, titles, words, or phrases
mentioned within this publication may be trademarks, service marks, or trade names of Macromedia, Inc. or other entities and
may be registered in certain jurisdictions including internationally.
Third-Party Information
This guide contains links to third-party websites that are not under the control of Macromedia, and Macromedia is not
responsible for the content on any linked site. If you access a third-party website mentioned in this guide, then you do so at your
own risk. Macromedia provides these links only as a convenience, and the inclusion of the link does not imply that Macromedia
endorses or accepts any responsibility for the content on those third-party sites.
Apple Disclaimer
APPLE COMPUTER, INC. MAKES NO WARRANTIES, EITHER EXPRESS OR IMPLIED, REGARDING THE
ENCLOSED COMPUTER SOFTWARE PACKAGE, ITS MERCHANTABILITY OR ITS FITNESS FOR ANY
PARTICULAR PURPOSE. THE EXCLUSION OF IMPLIED WARRANTIES IS NOT PERMITTED BY SOME STATES.
THE ABOVE EXCLUSION MAY NOT APPLY TO YOU. THIS WARRANTY PROVIDES YOU WITH SPECIFIC
LEGAL RIGHTS. THERE MAY BE OTHER RIGHTS THAT YOU MAY HAVE WHICH VARY FROM STATE TO
STATE.
Copyright © 1997-2004 Macromedia, Inc. All rights reserved. This manual may not be copied, photocopied, reproduced,
translated, or converted to any electronic or machine-readable form in whole or in part without prior written approval of
Macromedia, Inc.
Second Edition: March 2004
Macromedia, Inc.
600 Townsend St.
San Francisco, CA 94103
CONTENTS
CHAPTER 2: Introduction
............................................ 5
Macromedia Breeze features . . . . . . . . . . . . . . . . . . . . . . . . . . . . . . . . . . . . . . . . . .
Design tips . . . . . . . . . . . . . . . . . . . . . . . . . . . . . . . . . . . . . . . . . . . . . . . . . . . . . . .
System requirements . . . . . . . . . . . . . . . . . . . . . . . . . . . . . . . . . . . . . . . . . . . . . . . .
Guide to documentation and additional resources. . . . . . . . . . . . . . . . . . . . . . . . . .
CHAPTER 3: Using the Macromedia Breeze Plug-In for PowerPoint
. . . . . . . . . 11
Using the Create Wizard . . . . . . . . . . . . . . . . . . . . . . . . . . . . . . . . . . . . . . . . . . .
Previewing your presentation. . . . . . . . . . . . . . . . . . . . . . . . . . . . . . . . . . . . . . . . .
Logging in and publishing a presentation . . . . . . . . . . . . . . . . . . . . . . . . . . . . . . .
Preparing audio for importing . . . . . . . . . . . . . . . . . . . . . . . . . . . . . . . . . . . . . . .
Importing audio . . . . . . . . . . . . . . . . . . . . . . . . . . . . . . . . . . . . . . . . . . . . . . . . . .
Editing audio and animations . . . . . . . . . . . . . . . . . . . . . . . . . . . . . . . . . . . . . . . .
Playing back, recording, and editing audio . . . . . . . . . . . . . . . . . . . . . . . . . . . . . .
Managing your account. . . . . . . . . . . . . . . . . . . . . . . . . . . . . . . . . . . . . . . . . . . . .
Inserting Macromedia Flash content . . . . . . . . . . . . . . . . . . . . . . . . . . . . . . . . . . .
CHAPTER 4: Setting Options
5
7
7
8
11
15
16
18
19
21
23
28
29
. . . . . . . . . . . . . . . . . . . . . . . . . . . . . . . . . . . . . . . . 31
Selecting the audio input source . . . . . . . . . . . . . . . . . . . . . . . . . . . . . . . . . . . . . . 31
Account settings . . . . . . . . . . . . . . . . . . . . . . . . . . . . . . . . . . . . . . . . . . . . . . . . . . 31
CHAPTER 5: The Macromedia Breeze Quiz Feature .
. . . . . . . . . . . . . . . . . . . . . 33
Creating a quiz or survey . . . . . . . . . . . . . . . . . . . . . . . . . . . . . . . . . . . . . . . . . . . . 33
Deleting a quiz or survey . . . . . . . . . . . . . . . . . . . . . . . . . . . . . . . . . . . . . . . . . . . . 34
Modifying a quiz or survey . . . . . . . . . . . . . . . . . . . . . . . . . . . . . . . . . . . . . . . . . . 34
About the quiz conversion. . . . . . . . . . . . . . . . . . . . . . . . . . . . . . . . . . . . . . . . . . . 34
Viewing quiz or survey results . . . . . . . . . . . . . . . . . . . . . . . . . . . . . . . . . . . . . . . . 35
Changing quiz or survey design . . . . . . . . . . . . . . . . . . . . . . . . . . . . . . . . . . . . . . . 35
Viewing a list of quizzes and surveys . . . . . . . . . . . . . . . . . . . . . . . . . . . . . . . . . . . 35
About quiz and survey properties . . . . . . . . . . . . . . . . . . . . . . . . . . . . . . . . . . . . . 35
Adding a question . . . . . . . . . . . . . . . . . . . . . . . . . . . . . . . . . . . . . . . . . . . . . . . . . 38
Displaying a quiz results page . . . . . . . . . . . . . . . . . . . . . . . . . . . . . . . . . . . . . . . . 42
Customizing question feedback text boxes. . . . . . . . . . . . . . . . . . . . . . . . . . . . . . . 43
Aviation Industry CBT Committee (AICC) integration . . . . . . . . . . . . . . . . . . . . 44
3
CHAPTER 6: Troubleshooting and FAQs
. . . . . . . . . . . . . . . . . . . . . . . . . . . . . . . 45
Troubleshooting audio problems . . . . . . . . . . . . . . . . . . . . . . . . . . . . . . . . . . . . . . 45
Troubleshooting microphone issues . . . . . . . . . . . . . . . . . . . . . . . . . . . . . . . . . . . . 47
Troubleshooting presentation problems . . . . . . . . . . . . . . . . . . . . . . . . . . . . . . . . . 48
Troubleshooting animations . . . . . . . . . . . . . . . . . . . . . . . . . . . . . . . . . . . . . . . . . 50
Troubleshooting problems with online presentations . . . . . . . . . . . . . . . . . . . . . . . 52
Frequently asked questions . . . . . . . . . . . . . . . . . . . . . . . . . . . . . . . . . . . . . . . . . . 53
INDEX
4
. . . . . . . . . . . . . . . . . . . . . . . . . . . . . . . . . . . . . . . . . . . . . . . . . . . . . . . . . . . 55
Contents
CHAPTER 2
Introduction
Macromedia Breeze Plug-In for Microsoft PowerPoint lets you create an animated presentation
with audio from a Microsoft PowerPoint file, and then publish the presentation to a server. Using
Breeze Plug-In for PowerPoint with PowerPoint versions XP, 2000, or 97, you can create dynamic
web presentations for delivery anytime and anyplace—to your employees, partners, investors,
and customers.
Breeze Plug-In for PowerPoint provides a simple interface for adding audio narration to your
presentation. You can easily synchronize your PowerPoint animations with your audio narration.
You can use Breeze Plug-In for PowerPoint to integrate audio from live events or to integrate
specially produced audio narration. Breeze Plug-In for PowerPoint includes advanced features for
importing audio and for graphically editing your presentation audio and animation timing.
A quiz feature, also included in Breeze Plug-In for PowerPoint, gives you a quick and easy way to
add quizzes and surveys to your presentations.
Macromedia Breeze features
Macromedia Breeze is a complete solution for creating, managing, and delivering your online
presentations. Using Macromedia Breeze, you can quickly and easily convert your presentations
into valuable assets that employees, customers, partners, investors, and suppliers can access
through most Internet browsers. With Breeze Plug-in for PowerPoint and Macromedia Breeze
Training or Macromedia Breeze Presentation, you have a complete solution for your online
multimedia presentation and training needs.
You can use Breeze Plug-in for PowerPoint to create online
presentations quickly and easily from your desktop:
Creating presentations
• Add audio narration to your presentation, including synchronized animations.
• Upload your presentation to the Macromedia Breeze Training or Macromedia Breeze
Presentation.
Your presentation is automatically converted into an online version supporting animations
and audio.
Managing presentations You can use the Macromedia Breeze presentation library
management system to do the following tasks:
5
•
•
•
•
Organize your entire presentation library.
Give users the ability to search for and find information quickly.
Control access and permissions to your presentations.
Add and delete users to your account.
Delivering presentations
Effectively deliver presentations over the Internet.
• Present full multimedia presentations to Netscape Navigator (version 4 and later) and Internet
Explorer (version 4 and later) browsers.
• Give customers, partners, employees and vendors access to your presentation information
anytime, anywhere.
Macromedia Breeze is available as an enterprise solution or as a hosted application service. To
learn more about Breeze, please visit www.macromedia.com/products/breeze and sign up.
Getting started
Breeze Plug-In for PowerPoint offers a simple approach to using the features:
You can add audio and synchronized animations to your PowerPoint
presentation, creating a complete multimedia version for delivery over intranets and the Internet.
For more information, see “Recording audio” on page 12.
Record audio
You can view your animated multimedia presentation before
uploading to Macromedia Breeze, ensuring you have recorded the right messages for your
presentation.
Preview a presentation
Publish a presentation You can upload your presentation from your desktop PC to
Macromedia Breeze Training or Macromedia Breeze Manager, where your presentation is
converted to the appropriate online formats, including Macromedia Flash and streaming audio.
For more information, see “Logging in and publishing a presentation” on page 16.
You can manage your complete presentation library, including adding
users and setting presentation viewing permissions. For more information, see “Managing your
account” on page 28.
Manage your account
Breeze Plug-In for PowerPoint also offers a set of commands for editing and importing your audio
and animations, including the following tools:
Import files You can import external audio files using the Breeze plug-in. For more
information, see “Importing audio” on page 19.
You can redo your animation timing without re-recording your audio. For more
information, see “Editing animation timings” on page 20.
Edit timings
This powerful new tool allows you to graphically edit your
audio and animation timing. Instead of using an external audio program, you can now perform
basic editing using the Breeze plug-in.
Edit audio and animation timing
Breeze Plug-In for PowerPoint also includes a powerful feature that allows you to quickly add
quizzes and surveys to your PowerPoint presentations.
6
Chapter 2: Introduction
To create your online presentation, select Breeze > Run Wizard. The wizard guides you through
all the steps necessary to create an online presentation. For more information, see “Using the
Create Wizard” on page 11.
Design tips
To create effective online presentations, follow these design guidelines:
• Design your online presentation to optimize the bandwidth capabilities of your audience. If
your audience has fast broadband connections to view your online presentation, you can create
a graphic-intensive presentation that includes many animations. However, if your audience has
slower connection speeds (less than 56 Kbps), you should use graphic images judiciously to
ensure that your audience has a good viewing experience.
• Create a written script of your audio presentation. Your online presentation is designed so that
you can present once but let your audience view many times. Speaking into a microphone can
often be more difficult than giving the presentation to a live audience. To ensure a smooth
delivery in which you cover all of your important points, consider completely scripting your
presentation before recording.
• Add animation to your presentation. Breeze Plug-In for PowerPoint supports PowerPoint
animation. Animation often adds interest to your message and improves the overall viewing
experience of your audience.
• View the presentation online before releasing it to your audience. During the conversion
process to an online presentation, your original PowerPoint presentation may undergo some
slight changes. You should view the online version to ensure that it meets your requirements
before presenting to your online audience.
• Create slide titles that appear in the PowerPoint outline. Breeze Plug-In for PowerPoint uses
the PowerPoint outline to provide your viewers with fast access to any slide. You should make
sure that slide titles are displayed in the PowerPoint outline for all slides, including graphic
only slides, before uploading your presentation.
System requirements
The following hardware and software is required to run Breeze Plug-In for PowerPoint.
Windows
•
•
•
•
•
Windows 98, Windows Millennium, Windows NT 4, Windows 2000
200 MHz Pentium processor or better
32 MB of RAM
5 MB of free disk space
Approximately 0.5 MB of disk space for every minute of presentation audio
PowerPoint 97, PowerPoint 2000, or PowerPoint XP
Breeze Plug-In for PowerPoint is designed for use with PowerPoint 97, PowerPoint 2000, and
PowerPoint XP. It is not designed for use with any other version of PowerPoint.
System requirements
7
Microphone and sound card
To add audio to your presentation, you need a microphone and a sound card. A good quality
microphone and sound card can greatly enhance the final online audio quality. For more
information, see “Selecting the right microphone” on page 47.
Note: Built-in laptop microphones generally produce recordings of poor quality. Macromedia
recommends using an external microphone.
Internet connection
To publish your online presentation to the Macromedia Breeze online service, you need an
Internet connection.
Because presentations with audio can be very large files, Macromedia recommends a fast Internet
connection, of at least 100 Kbps, for uploading presentations.
For up-to-date system requirements, visit www.macromedia.com/go/breeze_sysreqs.
Guide to documentation and additional resources
You can use a variety of resources to learn how to use the components of Macromedia
Breeze quickly.
About the electronic manuals and online help
In addition to this guide, the following electronic manuals and online help systems are available:
Note: The relevance of these guides to users depends on the modules installed on the Breeze
Presentation platform, the type of user (such as meeting content manager, information technology
engineer, or course presenter), and the user’s Breeze account permissions.
• Using the Breeze Manager describes how to use the administration, presentation, and training
components of Breeze. You can access this documentation from the Breeze Manager Home
page, and from the Help link in the Breeze Manager.
• Using the Breeze Publish Wizard includes procedures for publishing Breeze presentations
created in PowerPoint to your Breeze server. You can access this documentation from the
Breeze Manager Home page when you run the Publish Wizard.
• Breeze Live User Guide for Meeting Presenters includes information about using the Breeze web
application to host online real-time meetings. The documentation includes procedures that
show how simple it is to add slides, Flash SWF files, images, live audio, and video to your
presentation.You can access this documentation from the Breeze Manager Home page, and
from the Help menu within a Breeze Live meeting room (when you enter as a presenter) by
selecting Meeting > Help.
8
Chapter 2: Introduction
• Breeze Live User Guide for Meeting Participants includes information relevant to users
participating in an online real-time meeting. Breeze Live offers meeting participants a variety
of options to make their experience truly participatory. For instance, participants can send
messages and questions to presenters and to each other, and they can participate through live
video and audio. You can access this documentation from the Breeze Manager Home page, and
from the Help menu within a Breeze Live meeting room (when you enter as a participant) by
selecting Meeting > Help.
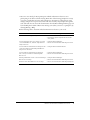
Use the following table to determine what documentation is relevant to your needs.
Breeze user
Recommended reading
Information technology (IT) engineer
• Breeze Installation Guide.
• Review the system requirements in all other
user guides.
Content managers who are in charge of overall
content within Breeze, and who may add users
and permissions
• Using the Breeze Manager
• Breeze Live User Guide for Meeting Presenters
Content authors and instructional designers who • Using the Breeze Publish Wizard
create presentations and training with Breeze
Plug-In for PowerPoint
Content authors and instructional designers
who create presentations and training with
Breeze Live
• Using the Breeze Manager
• Breeze Live User Guide for Meeting Presenters
Meeting administrators who create and manager • Using the Breeze Manager
Breeze Live meetings
• Breeze Live User Guide for Meeting Presenters
End users who attend Breeze Live meetings
• Breeze Live User Guide for Meeting Participants
Guide to documentation and additional resources
9
10
Chapter 2: Introduction
CHAPTER 3
Using the Macromedia Breeze Plug-In
for PowerPoint
This chapter describes how to use Macromedia Breeze Plug-In for Microsoft PowerPoint to
work with audio, animations, and video, and to use a wizard to create an interactive multimedia
presentation.
Using the Create Wizard
The easiest way to create a complete online presentation is to use the Create Wizard. The wizard
walks you through each step required to create your presentation.
To start the wizard for creating your multimedia presentation:
1. From within PowerPoint, select Breeze > Run Wizard.
The Create Wizard dialog box appears.
2. Set the microphone recording level. This step helps ensure that good quality audio is generated
for your online presentation. You need to connect your microphone before starting this process.
3. Record narration for your presentation slides, including adding animations. From this window
you can also play back your multimedia presentation.
After completing these steps, you have the option of publishing the presentation or returning to
PowerPoint. To publish your presentation, you need a valid user name and password to upload
presentations to your Macromedia Breeze account. For more information, see “Logging in and
publishing a presentation” on page 16.
Setting the microphone recording level
The Breeze Plug-In for PowerPoint recording feature uses your PC sound system and microphone
to record audio for your presentation. You must have a working microphone and sound card to
record your presentation. The Breeze plug-in includes a tool that automatically sets your
microphone to the optimal level for recording your presentation. The Set Microphone Recording
Level dialog box appears automatically the first time you record audio for each PowerPoint
presentation.
To set the microphone recording level for your presentation:
1. To open the Set Microphone Recording Level dialog box, do one of the following:
11
■
Select Breeze > Run Wizard
■
Select Breeze > Record
2. After the Set Microphone Recording Level dialog box appears, begin speaking the designated
phrase into the microphone. The message “Checking Input Level” is displayed in the red box.
When calibration is complete, the box turns green and you see the message “Input Level OK.”
3. When the Input Level OK message appears, press the OK button.
Note: It is important to use the same tone of voice when you set the microphone recording level that
you will use while recording the presentation. Some speakers have the tendency to use a louder
“speaker’s voice” during the recording process.
Recording audio
Breeze Plug-In for PowerPoint allows you to add narration to your slides. After you begin using
the Breeze plug-in, the program creates an external file in which to store your audio recording
information. This external audio file has the same name as the PowerPoint file, but uses the .ppc
file extension. For more information, see “About the PPC file” on page 13.
To record audio:
1. Open the appropriate PowerPoint presentation.
2. From the Breeze menu, select Record. The Record Narration dialog box appears.
3. Press the Record button and begin speaking into the microphone.
4. Use the Action button (identified by the “mouse” graphic and accompanying text) to control
your activities during recording. This button allows you to perform different functions
depending on the state of the presentation. This button has three possible states, as reflected by
the text on the button:
Next Animation
By pressing this button during recording, you trigger the start of the next
animation.
Stop Recording This function is enabled when you are on the last slide in the presentation.
You can also press the Stop button to end recording at any time. (To record each slide
individually, select the Record/Play This Slide Only check box.)
Warning: If you use the Stop button to stop recording, you return to the beginning of the slide. If
you then continue recording, you will erase any previously recorded audio and animations for that
slide. If you want to record from where you left off, use the Pause button.
This function is enabled when there are no animations remaining and you have
not selected Record This Slide Only.
Next Slide
5. To pause recording, press the Pause button. When you’re ready to continue, press the
Record button.
6. After recording any slide, you can press the Play button to play back the recorded slide. See
“Playing back the recorded slide” on page 13.
12
Chapter 3: Using the Macromedia Breeze Plug-In for PowerPoint
Recording animation
You can add text or objects to a presentation slide. For example, you can have text bullet points
“fly” from the right of the slide, or you can have a picture appear in the middle of your slide.
Animations can start automatically at a specific time or manually through
mouseclicks.PowerPoint supports two basic types of animations to enhance your presentation:
Automatic animations These animations are automatically enabled during a presentation
based on predefined timed settings. Breeze Plug-In for PowerPoint automatically plays these
animations during your presentation.
Mouse-click animations These animations are enabled by mouse clicks during a presentation.
Mouse-click animations allow the presenter to synchronize the animations to the audio narration.
The Breeze plug-in records these animations as the presenter generates them during the recording
process.
To add mouse-click animations to a presentation:
• While recording audio in the Record Narration dialog box (select Breeze > Record), press the
Next Animation button. If you do not see the text “Next Animation” (on the Action button),
then there is no mouse-click animation ready to be played.
After starting a mouse-click animation, you should see it appear in the presentation screen. If
you make any changes or additions to your animations after recording a slide, you should
review that slide again to make sure that playback is correct.
Note: Macromedia Breeze does not support all types of PowerPoint animations. Some animations
are converted to create a similar effect during the online conversion process.
Playing back the recorded slide
After recording audio and slide animations for a specific slide, you can immediately review the
audio and animations for that slide from within the Record Narration dialog box.
To play back a recorded slide:
1. Move to the slide you want to play back using the Next or Previous buttons.
2. Press the Play button. The current slide, including audio and animations, plays until stopped.
3. To play back only the current slide, select the Record/Play This Slide Only check box.
You can also use the View Show menu item to play back the entire presentation.
About the PPC file
Breeze Plug-In for PowerPoint creates a file with the extension .ppc to store the audio information
for your presentation (the file has the same name as the presentation, but uses the .ppc extension
rather than .ppt extension used by PowerPoint. If you move or copy the PowerPoint presentation,
you must also move or copy the corresponding PPC file to the same location, or your
presentation will not include your audio information.
Using the Create Wizard
13
If you move or copy the PowerPoint presentation and do not move or copy the PPC file, the
Breeze plug-in displays a dialog box allowing you to associate the correct PPC file with the
PowerPoint presentation. This dialog box automatically copies the PPC file. You can also select
the option to not associate a file, which eliminates all audio from that presentation.
Record and playback modes
Breeze plug-in supports two different recording and playback modes:
Continuously This is the default mode. Recording or playback continues without interruption
until you reach the end of the presentation or you press Stop. You use the Action button in the
Next Slide mode to move to the next slide. This option allows you to record continuously as
though you were giving a live presentation.
Record/Play This Slide Only When you are in this mode and reach the end of the current
slide, recording stops. To move to the next slide, you must use the Next button.
To select Record/Play This Slide Only mode:
1. Select Breeze > Record.
The Record Narration dialog box appears (the Set Microphone Recording Level dialog box
may appear if you have not set the microphone level during this PowerPoint session.)
2. Select Record/Play This Slide Only.
Adding script text
The Breeze Plug-In for PowerPoint lets you assign a text script to each slide; you can read the
script as you record. You can enter your script in the Record Narration dialog box.
To add script text to slides:
1. Select Breeze > Record.
2. In the Record Narration dialog box, select View Script.
3. Click the text window and enter your script text.
4. To enter a script for a different slide, use the Next or Previous buttons.
Importing and exporting scripts
Breeze Plug-In for PowerPoint allows you to import and export text between the Breeze plug-in
script area and your PowerPoint notes area You can transfer text between these two areas without
retyping or tedious copying.
The Import/Export function within Breeze Plug-In for PowerPoint supports three slide-range
options:
Current Slide
All Slides
Slides
Selects the text only from the current slide.
Selects the text from all presentation slides.
Lets you select the specific slides to import or export.
The Breeze plug-in also supports two import/export options:
14
Chapter 3: Using the Macromedia Breeze Plug-In for PowerPoint
Append Imported Notes to Current Scripts
This feature allows you to import the new text
into the existing text.
Replace current scripts with Imported Notes
This feature overrides the existing script and
replaces it with the new script.
To import PowerPoint slide notes into Breeze plug-in slide scripts:
1. Select Record from the Breeze menu.
The Record Narration dialog box appears.
2. Select the View Script text box. A text window opens. If the slide already contains a script, the
text box automatically displays the script.
3. Click the Import button. The Import Notes dialog box appears.
4. Select the slide range and the import method, and then click OK.
Note: If you select Replace Current Scripts With Imported Notes, all text currently in the script
window is overwritten.
To export a Breeze plug-in script into PowerPoint notes:
1. Select Breeze > Record.
The Record Narration dialog box appears.
2. Select View Script. A text window opens. If the slide already contains a script, the text box
displays the script.
3. Click Export and select the slide range and the export option method, and then click OK.
Note: If you select Replace Current Scripts With Imported Notes, all current text is overwritten.
Previewing your presentation
Breeze Plug-In for PowerPoint lets you view your presentation and its associated audio and
animations prior to converting your presentation for online viewing. The View Show feature does
not provide an exact preview of the online presentation—some slight changes may occur during
the online conversion process. However, the View Show feature allows you to view your
presentation slides with the synchronized audio and animations.
To view your multimedia presentation:
1. Open the PowerPoint presentation you want to preview.
Note: You must record audio and/or animations using the Breeze plug-in prior to viewing a
presentation.
2. Select Breeze > View Show.
The View Show dialog box appears.
3. Click Play to start the presentation.
You can play the entire presentation or select Stop any time during the presentation.
Note: Command markers (Wait and Goto) do not appear while you view the show within PowerPoint.
These markers affect only the converted presentation.
Previewing your presentation
15
Logging in and publishing a presentation
After recording and previewing your multimedia presentation, you can upload the presentation to
a Breeze server for online conversion and viewing using Macromedia Breeze Presentation
platform. To upload a presentation to a Breeze server, you must be connected to the Internet,
preferably through a high bandwidth connection. You can upload a presentation using the Run
Wizard command or the Publish command in the Breeze menu.
To log in and publish a presentation:
1. Select Breeze > Publish.
The Publish Presentation screen appears, which initially displays the Publish Wizard, where
you can log in to Macromedia Breeze.
2. Log in to Macromedia Breeze using the user name (your e-mail address) and the password
provided to you by your administrator.
Note: All password information is case sensitive.
Your account administrator for Macromedia Breeze must give you the appropriate permissions
to create or update a presentation.
3. After you log in successfully, the Set Presentation Location screen appears. Select the folder in
which to store your presentation. You can also add a folder.
4. After you select the desired location, select the appropriate presentation or action:
■
To add a new presentation, click Publish.
■
To update an existing presentation, click the title of the presentation you want to update.
5. The Enter Presentation Information screen appears. Add or modify the presentation
information. After entering your information, click the Next button.
6. The Select Presentation Features screen appears. Select your options and press the Next button.
Continue with the wizard until you have selected all the settings for your presentation. For
more information, see the next section.
7. After completing the wizard, click the Finish button, and your presentation will begin
uploading for conversion.
Note: Uploading a presentation may take a long time depending on the size of your presentation/
audio files and your Internet connection speed. For example, over a 56 Kbps connection, the
estimated time for uploading a 1 MB file is about 2 minutes.
Specify the presentation location
During the publishing process, you must select a location in your Macromedia Breeze account
library for your presentation. Macromedia Breeze allows you to create folders and subfolders to
organize your presentations. The Set Presentation Location screen appears after you have
successfully logged in to Macromedia Breeze.
16
Chapter 3: Using the Macromedia Breeze Plug-In for PowerPoint
To select a presentation location:
1. After you log in to Breeze during the publishing process, the Set Presentation window appears,
and you see a list of the contents of your presentation library. Select a folder that represents the
correct directory location for your presentation. If you need to add a folder, select the correct
location and click Create Folder. Enter the name of the new folder.
2. To create a new presentation, click Publish.
3. To update an existing presentation, click its title. You need to know both the directory location
and the name of the presentation you want to update.
Note: To create or update a presentation, you must have the appropriate security permissions.
Permissions are assigned using the Manage Account command in the Breeze menu.
Entering presentation information
During the publishing process, you are prompted to provide additional information about your
presentation. For example, you can provide a summary description of the presentation and
speaker information. This information is accessible to the viewer of your presentation.
To add presentation information using the Publish command:
1. Select Breeze > Publish (or select the Publish option after using the Create Wizard).
2. Follow each step until you reach the Enter Additional Presentation Information screen. This
screen appears after the Set Presentation Location screen.
3. Enter the information in the text boxes provided.
Updating an existing presentation
If you want to change a previously uploaded presentation, you can do so by updating the
existing multimedia presentation. The new version of the presentation overwrites the existing
presentation.
To update an existing presentation:
1. Select Breeze > Publish.
The Publish Presentation screen appears, which initially displays the Publish Wizard, where
you can log in to Macromedia Breeze.
2. Log in to Macromedia Breeze using the user name (your e-mail address) and password provided
to you by your administrator.
3. After successfully logging in, you see the Set Presentation Location screen.
4. Find the presentation you want to update by navigating through the library. To navigate to a
folder, click the folder name. After you find the appropriate presentation, select its name to
update it.
5. In the Enter Presentation Information dialog box. modify the presentation information, if
necessary. After making modifications, select Next.
The Submit Presentation screen appears.
Logging in and publishing a presentation
17
6. If all the information is correct, select Upload. As the new presentation is uploaded, a status bar
shows the upload progress.
Note: Only uploaded changes are updated.
Preparing audio for importing
Breeze Plug-In for PowerPoint allows you to import external audio for use with your presentation.
The Breeze plug-in has several features that simplify the process of importing, particularly for
users of the audio-editing program Sound Forge. There are two basic methods of preparing audio
for import:
• Using individual audio files for specific presentation slides. To use this method you create
individual audio files for each slide in your presentation. During the import process, you
match the audio file to its corresponding presentation slide. If you choose this method, you can
take advantage of these two helpful features:
If you number your audio files in a logical, numeric manner (for example, a1,
a2, a3, and so on), the Breeze plug-in speeds the import process by allowing you to select
multiple audio files and automatically assign them to the correct slide.
File naming
Animation markers You can add Sound Forge markers to your audio file to represent
animation timings within the slide. During the import process, Macromedia Breeze Plug-in
automatically matches the Sound Forge markers with mouse-click animations on the
corresponding slide. If you do not use animation markers, you can set the animation timings
using Edit Timings within the Advanced feature of the Breeze menu.
• Using one long audio file for the presentation with Sound Forge markers. If you want to
import one long audio file for your presentation, you should use the following Sound Forge
marker in your audio file to identify slide transitions and animation timings within the audio
file:
= 4) BSPSPopupOnMouseOver(event);;"
href="javascript:BSSCPopup('Sound_Forge.htm');"
With these markers in the audio file, the Breeze plug-in automatically synchronizes the slides
and animations to the audio file during the import process. There are two methods of naming
Sound Forge markers:
No marker names The Breeze plug-in automatically handles Sound Forge markers that use
the default naming (for example, time). The Breeze plug-in reads these markers in, and assigns
them sequentially to slide transitions and mouse-click animations as they occur in the
presentation file.
Named markers The recommended method of using Sound Forge markers is to change the
name of the Sound Forge markers depending on the type of event you are trying to identify.
For slide transitions, use an “s” prefix (for example, s1, s2, s3). For mouse-click animations, use
an “a” prefix within each slide (for example, a1, a2).
When you give use these prefixes, the slide transitions always take precedence. Thus, if you
have an incorrect number of “a” markers, they are discarded or left incomplete—the slide
boundaries are always used.
18
Chapter 3: Using the Macromedia Breeze Plug-In for PowerPoint
Note: To ignore all markers within an audio file, select the Ignore Markers check box in the Import
dialog box.
Importing audio
Breeze Plug-In for PowerPoint allows you to import external audio files into your PowerPoint
presentation to use as slide narration. You can use externally recorded audio, for example,
recordings from a live event or professionally produced audio, with your online presentation.
During import, you can match specific audio files to specific slides in a presentation. In addition,
the Breeze Plug-in supports timing markers from the audio-editing program Sound Forge to help
you synchronize your audio and animations to your presentation. There are three basic methods
of importing audio with Breeze Plug-In for PowerPoint:
• Create and import one audio file for each slide. During import, you assign each audio file to a
specific slide in your presentation.
• Import multiple individual audio files. If you have created individual audio files, you can
import them all at once if you have named them appropriately, as indicated in the procedure
that follows.
• Create one long audio file with Sound Forge markers. During import you will select the initial
slide corresponding to the audio file—the Breeze plug-in automatically assigns the audio and
animations to the slides using the Sound Forge markers in the audio file.
To import individual audio files for each slide:
Prior to following this procedure, give each audio filename a numeric extension (for example,
slide1, slide2, slide3).
1. Select Breeze > Import Audio.
2. In the Choose Slides and Files for Import dialog box, select the slide for import by clicking the
slide name.
3. Click the Browse button to find the audio file associated with the selected slide, and then click
Open. Breeze Plug-In for PowerPoint collects information about animations, length of the
audio file, and the name of the associated File.
Note: If your audio file is read incorrectly, for example, if the audio is spread over multiple slides,
you may have timing markers in your file. To ignore all markers, click Ignore Markers below the
Browse button.
4. Continue assigning audio files to slides by repeating steps 2 and 3 above.
5. After you have assigned all the audio files, click Start Import to import the selected audio files.
To import a single audio file containing Sound Forge markers:
1. Select Breeze > Import Audio.
2. In the Choose Slides and Files for Import dialog box, select the initial slide for import by
clicking its name.
Importing audio
19
3. Click the Browse button to find your audio file. Select the audio file and click Open. The file
is read into Breeze Plug-In for PowerPoint using the Sound Forge markers to synchronize the
slides and the presentation. Information about animations, length of the audio file, and the
name of the associated file should appear next to each slide name.
Note: Review the information that appears during step 3 to ensure that the audio is matched to the
correct animations, number of slides, and so on.
4. Click Start Import to import the selected audio files.
Importing an embedded PowerPoint audio narration file
The Breeze plug-in allows you to import an existing audio narration file for use with your
Macromedia Breeze presentation. You create narration files by using the PowerPoint narration
feature or by inserting an audio file that plays automatically when the presentation is viewed in
slide show mode.
Note: Only one embedded narration audio file can be imported per slide.
An embedded audio file must be linked as a narration file that starts when the slide is first viewed;
otherwise, it cannot be imported.
To Import an embedded audio narration file:
1. Select Breeze > Import Audio.
2. Select the slide where the embedded audio file is located.
3. Click Import from Presentation.
Warning: The embedded audio overwrites all existing audio on the slide. Be sure you want to
replace all the audio for the selected slide.
4. When the Breeze plug-in has completed capturing your embedded audio file, click the
OK button.
Editing animation timings
Breeze Plug-In for PowerPoint allows you to set and change the timing of animations in a slide.
This feature does not change the audio recording associated with the slide, but allows you to
change the synchronization of the animations to the audio narration.
To change the timing of animations on a slide:
1. Select Breeze > Set Timings.
2. In the Edit Animation Timings dialog box, use the Next and Previous buttons to move to the
slide whose animation timings you want to change.
3. Click Edit Timings (identified by the stopwatch icon) to start editing your animation timings.
Playback of the recorded audio begins. The large Next Animation button should become
highlighted.
4. At the appropriate time, click Next Animation to trigger the next animation. Continue until
you synchronize all animations for that slide.
20
Chapter 3: Using the Macromedia Breeze Plug-In for PowerPoint
To play back audio on a slide in the Edit Animation Timings dialog box:
1. Select Breeze > Set Timings. In the Edit Animation Timings window, use Next and Previous to
move to the slide you want to play back.
2. Click Play. The audio and animations start to play. Use Pause and Stop to control playback.
When you are ready to edit the animation timings, you can click Pause and then click the Edit
Timings button to change animations from that time location.
Note: The Edit Timings feature does not affect your previously recorded audio narration.
Editing audio and animations
Breeze Plug-In for PowerPoint includes an editing tool for quickly editing your audio and
animation timing without having to rely on an external audio program. With the Edit Audio
command, you can accomplish the following tasks:
• Graphically view your entire presentation audio, including slide markers and animation
markers. See “Editing audio files” on page 22
• Play back, record, delete, and edit your audio, including adding silence. See “Playing back,
recording, and editing audio” on page 23 and “Inserting silence” on page 26.
• Graphically change your slide and animation timing (markers). See “Moving slide markers”
on page 25 and “Moving animation markers” on page 24
• Set special player commands for playback, such as “Stop after slide playback.”
• Use basic audio-processing features, including normalization and dynamics. See “Volume and
audio controls” on page 26
You should use the Edit command after you add audio (using the Record or Import commands)
and set animation timing for your presentation.
Editing audio and animations
21
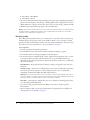
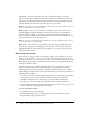
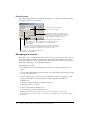
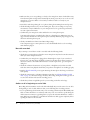
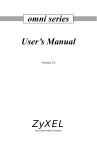
Edit Audio dialog box
Here is an overview of the Edit Audio dialog box.
Record and
Playback Controls:
Allows you to bring
up the record
narration windows
or play back audio.
Zoom In - Zoom
Out: Allows you
to zoom in and
out of the audio
file.
Current Time:
Displays the
currently
selected time
location in
the audio file.
Total Length:
Gives the total
length of the
audio file.
Slide Navigation: Allows you to automatically
move to the audio of a specific slide.
Slide Marker: Designates a slide transition.
Automatic Animation Marker: Designates the location of an
automatic animation.
Stop Command Marker: Shows the location of a Stop command.
Mouse-click Animation Marker: Shows the location of a mouse-click animation.
Editing audio files
The Edit Audio dialog box provides a graphical interface for viewing and editing your
presentation audio file. When you open the Edit dialog box you will see a graphical representation
of your audio. To move within the Edit Audio dialog box, use the following options:
Move Backward and Forward Within the Audio File allows you to scroll through the audio file.
As you drag the scroll bar at the bottom of the dialog box, you move forward or backward in the
audio file.
Zoom In allows you to increase the time scale of the audio file. You see more detail, allowing you
to edit the audio more precisely.
allows you to decrease the time scale of the audio file. This allows you to see more
audio in the window.
Zoom Out
lets you use the standard Windows resizing commands to increase or decrease
your view of the audio file.
Window Resizing
To use the Edit Audio command
1. Open the PowerPoint presentation.
2. Select Breeze > Edit Audio.
22
Chapter 3: Using the Macromedia Breeze Plug-In for PowerPoint
The Edit Audio dialog box appears, displaying animation markers and slide markers.
Markers within the Edit Audio dialog box
The Edit Audio dialog box contains a graphical representation of your audio waveform. In
addition, the Breeze plug-in automatically places vertical lines signifying different markers within
the file. These markers control the timing of slide transitions, animations, and commands during
the playback of your presentation. You can use the Edit Audio dialog box to adjust the timing
location of these markers. There are four types of markers:
‘
Type
Name
Marker color
Description
Slide
Slide (#)
Gray header with The slide marker designates slide transitions. Each
solid red line
slide marker is numbered.
Mouse-click Click (#)
animation
Blue
The mouse-click animation markers designate when
a mouse-click animation will be triggered. These
markers are numbered within each slide boundary.
Automatic
animation
Auto
Faded gray
These animations are automatically generated based
on the settings in your PowerPoint presentation using
the Automatic setting.
Command
Stop or
Goto
Green
These are special markers that allow you to control
playback. There are two basic types:
• Stop—When this location is reached, playback
automatically stops. The viewer needs to press Play
to continue the presentation.
• Goto—When this location is reached, playback
automatically jumps to the designated slide.
Note: Markers at the same location appear stacked.
Playing back, recording, and editing audio
The Edit Audio dialog box in the Breeze plug-in allows you to play back, insert, replace, and
delete audio in your presentation. When you open the Edit Audio dialog box, you see a waveform
of your audio file. To edit your audio, move to the appropriate location in the waveform. You can
perform the following functions:
You can select a location at which to start playing audio
by clicking the audio waveform. You should see a blinking vertical cursor at that location. Click
the Play button (at the lower left corner) to begin playback. You can also press the Spacebar on
the keyboard to begin playback. To stop playback, click the Pause or Stop buttons, or press the
Spacebar.
Play audio from a specific location
Select an audio section by clicking and holding the mouse
button at the starting position and dragging to the end location – the selected area should be
highlighted in black. Press the Play icon (at the lower left corner) to begin playback. You can also
press the Spacebar on the keyboard to begin playback. Playback continues until the end of the
section is reached. To stop playback, click Pause or Stop, or press the Spacebar.
Play audio for a selected section
Playing back, recording, and editing audio
23
Select the location where you want to add audio by clicking on the audio
waveform. You should see a blinking vertical cursor at that location. Click Record (at the lower
left corner) to open the Record Narration dialog box. When you are ready to begin recording,
click Record in the Record Narration dialog box. When you have finished, click the Stop icon,
and then click OK. The new audio is inserted at the location you selected.
Insert audio
Note: Macromedia Breeze recommends using the Calibrate button in the Record Narration window
prior to recording to improve your audio quality.
Replace audio Select the section of audio you would like to replace. The selected section
should be highlighted in black. Click Record (at the lower left corner) to open the Record
Narration dialog box. When you are ready to begin recording, click Record in the Record
Narration dialog box. When you have finished, click the Stop icon and then click OK. The new
audio replaces the audio in the selected section.
Note: Macromedia recommends using the Calibrate button n the Record Narration dialog box prior
to recording to improve your audio quality.
Select the section you would like to delete by clicking and holding the mouse
button at the starting position and dragging to the end location—the selected area should be
highlighted in black. To delete the selected audio, click Cut or press Delete on your keyboard.
The selected audio is erased.
Delete audio
Moving animation markers
After you have recorded your audio and set animation timings, you may still need to do minor
editing to get the animation to occur at the correct time. There are several ways to change the
timing of an animation—you can re-record your audio, use the Set Timings command, or use the
Breeze plug-in graphical editor. The Edit Audio dialog box allows you to graphically change the
timing of an animation marker.
The Edit Audio dialog box graphically displays all the audio for your presentation. If you are
using mouse-click animations, they automatically appear in the audio file. Your animation
markers appear with a blue header and have a dashed vertical blue line with the text “Click #,”
where # designates the click number in that specific slide. Please note the following restrictions on
handling animation markers:
• You cannot add or delete animation markers manually: they are automatically generated from
the presentation. To add or delete animation markers, you must use the appropriate
PowerPoint commands. For more information, see your PowerPoint documentation.
• You cannot move animation markers beyond slide boundaries or adjacent animations.
• Several animation markers can appear (be stacked) in the same location. Look at the top of the
marker—it will look overlapped if markers are stacked.
To move an animation marker:
1. From the Breeze menu, select Edit Audio.
2. In the Edit Audio dialog box, go to the slide and animation you would like to change.
3. Drag the marker to the appropriate location.
24
Chapter 3: Using the Macromedia Breeze Plug-In for PowerPoint
When you release the mouse button, the marker should appear in its new location.
Moving slide markers
After you have recorded your audio and set the timing for your slides, you may still want to make
minor adjustments to the timing of the slide transitions. To change the timing of a slide marker,
you can use the Breeze plug-in graphical editor. You accomplish this task in the Edit Audio
dialog box.
The Edit Audio dialog box contains a graphical representation of the entire audio for your
presentation. Your slide markers automatically appear in your audio file. Slide markers have with
a gray header and a vertical red line with the text “Slide #,” where # designates the number of that
slide. The following restrictions apply to the handling of slide markers:
• You cannot add or delete slide markers manually; they are automatically generated from the
presentation. To add or delete slides markers, you must delete the slide from the presentation.
(You will lose any audio associated with that slide.)
• You cannot move slide markers beyond adjacent slide markers or adjacent animation markers.
• Animation markers can be stacked on top of Slide markers. Look at the top of the marker—it
will look overlapped if markers are stacked.
• You will not see a marker for slide 1. The slide automatically starts from the beginning of the
audio file.
To move a slide marker:
1. Select Breeze > Edit Audio.
2. In the Edit Audio dialog box, go to the slide marker you want to change.
3. Drag the slide marker to the appropriate location and release the mouse button.
The slide marker should appear in its new location.
Note: To hear the audio for a specific section of the presentation, select the region you want to play
(it will appear in black) and click the Play button (or the Spacebar on your keyboard.)
Playback options
The Breeze plug-in Edit Audio dialog box allows you to add special command markers that are
used during playback of the presentation. Breeze Plug-In for PowerPoint currently supports two
types of special player options, which are identified in green.
This marker designates a “wait” location during playback. When this marker is
reached, playback stops (waits) until the user moves to a different slide. When the user moves to a
different slide, playback resumes automatically.
Wait for User
Go to Slide This marker designates a destination location. When this marker is reached, the
user automatically moves to the selected slide.
To add a Wait for User marker:
1. In the Edit Audio dialog box (Breeze > Edit Audio), click the audio location where you’ll add a
Wait for User marker.
Playing back, recording, and editing audio
25
2. Select Insert > Command.
3. In the Player Command dialog box, select Wait for User and click OK.
A wait marker appears in the dialog box.
To add a Go to Slide marker:
1. In the Edit Audio dialog box (Breeze > Edit Audio), click the audio location where you’ll add a
Go to Slide marker.
2. Select Insert > Command.
3. In the Player Command dialog box, select Go to Slide and click OK.
A marker appears in the dialog box.
Note: The Wait for User and Go to Slide options work only on the converted presentation. If you view
the presentation within PowerPoint (Breeze > View Show), these commands do not affect playback.
Inserting silence
The Edit Audio dialog box allows you to quickly add silence to your presentation audio. You can
specify the number of seconds of silence you would like to add.
To insert silence in your presentation:
1. In the Edit Audio dialog box (Breeze > Edit Audio), click the audio location or slide where you
would like to insert silence.
2. Select Insert > Silence.
3. In the Insert Silence dialog box, select the number of seconds of silence to add.
4. Select one of the following options specifying where to insert silence:
Cursor Position
adds silence to the current cursor location
Start of Slide adds
End of Slide adds
silence to the beginning of the selected slide.
silence to the end of the selected slide.
5. Click OK.
Volume and audio controls
The Volume dialog box provides advanced features for processing your audio file. In addition to
allowing you to change the Recording Volume setting, you can apply Normalization and
Dynamics, as described in the procedure that follows.
Note: In most cases, you will not need to use these commands if you directly record using a
microphone and the Breeze plug-in. However, if you import audio you may need to use these
commands to improve your overall audio quality.
To Adjust the Volume Control or Process Audio:
1. Select Breeze > Edit Audio.
2. In the Edit Audio dialog box, select Tools > Volume.
3. In the Adjust Volume dialog box, you can select from the following options:
26
Chapter 3: Using the Macromedia Breeze Plug-In for PowerPoint
Normalization Selecting this option helps even out the audio volume. This is helpful when
the audio volume is low and you want to increase the volume of the entire recording. You can
normalize the entire audio file (if no audio is selected) or a specific selected section. By default,
the current selection is normalized to 100%. If no audio is selected, the current selection is
becomes the entire presentation. When Normalize is selected, the best volume is chosen based
on the peak volume of the selection. The setting of 100% is relative to the best volume for
the selection.
When Normalization is not selected, 100% is relative to the original volume of the selection.
Dynamics When this option is selected, quiet sections are amplified to compensate for
variations in the volume of the recording. This selection is helpful if there are frequent and
noticeable variations in the loudness of the speaker’s voice. The default settings for Dynamics
should improve most presentations. The Advanced Dynamics Controls button allows you to
tune the dynamics adjustment. This can further improve presentations that have significant
background noise or frequent, very quiet, sections.
The Selecting Ratio option controls the maximum
amplification that will be used in the Dynamics option. The default, 2.0, means that the
quietest sections will be amplified by a factor of 2. Higher settings are useful in presentations
that have larger differences between quiet and loud sections. However, background noise can
also be amplified with higher settings.
Advanced Dynamic Controls
The Noise Threshold option helps control the amplification of background noise. Anything
quieter than the noise threshold will not be amplified. If background noise is being amplified
too much, turning this slider up may help. However, the Dynamics option does not work well
with high noise levels.
Whenever you change these settings, the view in the Edit Audio dialog box is updated, so you
can see the results of your changes before clicking OK.
Additional editing controls
The Breeze plug-in Edit Audio dialog box also supports additional controls to speed up editing.
This displays a context menu with
Right-click in the header bar above the audio window
commands for the following actions:
•
•
•
•
Move a marker
Insert a command marker
Delete a command marker
Change the properties of a command marker
This automatically moves the next marker to
the current location. The next marker is the first marker to the right of the current location
Press M or Control+M within the Audio window
Click in the Audio window and use the mouse wheel
If you have a mouse wheel, you can use
it to quickly change the view by zooming in or out.
Select a location in the audio file and press the Spacebar
The Spacebar acts as a toggle
between Play and Pause during playback of the audio file.
Playing back, recording, and editing audio
27
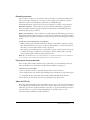
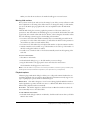
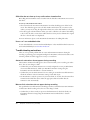
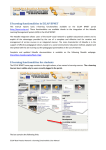
Recording audio
If you click the Record button in the Edit Audio dialog box, you will open the following dialog
box, which you can use to record audio.
Input Source: Used to select the
input source for your audio.
Audio Monitor: Shows the strength of your
audio input. The stronger the audio signal, the
higher the level. If the signal is too strong, the
monitor turns yellow and red at the top.
Recording
Status: Displays
either “Stopped”
or “Recording.”
Calibration: Used to run automatic audio calibration.
Macromedia Breeze recommends using this
command prior to recording any audio.
Volume control in Record Narration dialog box: Used to manually set
the volume control for recording. Macromedia recommends using the
Calibrate command to automatically set your volume control.
Record button - Record Narration dialog box:
Used to start recording audio.
Managing your account
If you want to access your Macromedia Breeze account to manage your presentations, you need to
directly access Macromedia Breeze Administration. Macromedia Breeze Administration allows
you to make changes to your account information (for example, user information, presentation
information), depending on your individual permissions.
To manage your account:
1. From the Breeze menu, select Manage Account. The Login to Macromedia Breeze screen
appears.
2. Log in to Macromedia Breeze using the user name (your e-mail address) and password provided
to you by your administrator.
3. After a successful login, you can access various administrative functions, depending on your
permission level. Here are some functions performed through Macromedia Breeze
Administration:
■
Modify or update additional presentation information
■
Delete presentations or folders
■
Add or delete Macromedia Breeze users
■
Set permissions for Macromedia Breeze users
Note: You must have the appropriate permissions to log in and make changes to your
Macromedia Breeze account. Please contact your account administrator to get the appropriate
permissions.
28
Chapter 3: Using the Macromedia Breeze Plug-In for PowerPoint
Inserting Macromedia Flash content
Macromedia Breeze allows you to embed Flash SWF files (files authored using Macromedia Flash
that are published with the .swf file extension) into presentations. These files are converted and
played back in the published presentation.
To insert Flash content:
1. Navigate to the slide where you want to insert the Flash content and select Breeze > Insert
Flash Movie.
A dialog box appears that asks you to select the location of the Flash content that you want
to insert.
2. Navigate to the location of your SWF file. Select the file and click Open.
The Flash content is added to the current slide.
3. Drag the Flash content to the x,y position where you want it to appear on the slide
4. For Flash content requiring user interaction, or if you are unsure of the precise duration, you
need to select Breeze > Edit Audio and insert a Wait for User command at the beginning of the
slide to ensure that any narration you record does not play over audio contained in your Flash
content. For more information, see “Playback options” on page 25.
Inserting Macromedia Flash content
29
30
Chapter 3: Using the Macromedia Breeze Plug-In for PowerPoint
CHAPTER 4
Setting Options
You use the Options dialog box to set recording and account parameters in Macromedia Breeze
Plug-In for Microsoft PowerPoint. You can access the Options dialog box by selecting Breeze >
Options. From the Options dialog box, you can select recording and account options listed in the
following section.
Selecting the audio input source
You can manually select the audio input source from the Macromedia Breeze Plug-in
Options menu.
On most computers, you can select from two choices for the input source:
Microphone
connects directly to your microphone.
Line In applies
if you are using the line-in connector of the sound card and your audio is a
line-level input.
Additionally, you can select this option:
Always Prompt to Set Microphone Level Before Recording
automatically opens the window
each time before you record.
Keep this option selected to achieve the best quality audio. Minor changes in microphone
position, microphone type, and voice strength can degrade the audio unless you set the recording
level each time.
You can also specify whether you want to be prompted to set the microphone level before each
recording. Macromedia recommends you always set the microphone level for better audio quality.
Account settings
If you have multiple Macromedia Breeze accounts, for instance, an account hosted by
Macromedia Breeze and an account on your own internal Macromedia Breeze server, you can set
up and select which account to use when you publish and manage your account.
31
Selecting the service for publishing and managing accounts
To add a new account destination:
1. In PowerPoint, select Breeze > Options.
2. Click the Account tab, and then click New.
3. Enter an identifier in the Name text box. (for example, Enterprise Service)
4. Enter the URL where the Macromedia Breeze service is hosted (for example,
admin.breezecentral.com)
To select a different account destination:
1. In PowerPoint, select Breeze > Options and click the Publishing tab.
2. Click the service you want to use so that it is highlighted in blue.
32
Chapter 4: Setting Options
CHAPTER 5
The Macromedia Breeze Quiz Feature
Macromedia Breeze Plug-in for Microsoft PowerPoint gives you the ability to add quizzes and
surveys to your PowerPoint presentations. You can upload your presentation to Macromedia
Breeze for conversion into a complete online presentation and quiz. You can track quiz results
using Macromedia Breeze or an AICC-compliant learning management system. You can use these
key features:
• You can add quizzes and surveys directly to your PowerPoint presentation. You can even add
multiple quizzes and/or surveys to a single presentation.
• You can include scored test questions and unscored survey questions.
• You can create three types of questions: multiple choice, true/false, and multiple answer.
• You can customize the look of your quiz using standard PowerPoint features. After you create
your quiz questions, you can use PowerPoint to change fonts, add graphics, and change the
look of your buttons.
• You can add animations and audio as you normally would any other presentation.
The quiz feature allows you to set many different options for your quiz, from navigation through
results handling. It is a flexible yet easy-to-use solution for your assessment needs.
Creating a quiz or survey
With the Macromedia Breeze quiz feature, you can quickly add one or more quizzes and surveys
to a PowerPoint presentation.
To create or add a quiz:
1. Open the PowerPoint presentation in which you’ll add the quiz or survey and select the slide
that should precede the quiz. The quiz will appear on the following slide.
2. Select Breeze > Quiz and Surveys.
If this is the first quiz or survey in the presentation, the Macromedia Breeze Quiz wizard
appears. This wizard guides you through all the steps necessary to create your quiz or survey.
Skip to step 5.
If you have already created a quiz or survey, the Quiz Properties dialog box appears. Go to
step 3.
33
3. In the Quiz Properties dialog box, select Add/Remove Quizzes from the Current Quiz
pop-up menu.
4. In the Quiz Manager dialog box, Select Add.
5. The Quiz wizard appears.
6. When you finish using the Quiz wizard, select Finish.
For detailed information about a specific quiz property, see “About quiz and survey properties”
on page 35
Deleting a quiz or survey
You can easily delete a quiz or survey from your presentation.
To delete a quiz or survey in your presentation:
1. In PowerPoint, select Breeze > Quizzes and Surveys.
2. In the Quiz Properties dialog box, select Add/Remove Quizzes from the Current Quiz
pop-up menu.
The Quiz Manager window lists the quizzes and surveys in the current presentation.
3. In the Quiz Manager dialog box, select the quiz to delete and click Remove, then respond to
the prompt asking you to confirm the deletion.
Note: To delete a quiz you can also delete all the slides corresponding to the quiz or survey
(questions, result page) from within PowerPoint.
Modifying a quiz or survey
After creating a quiz or survey, you can modify its properties.
To modify a quiz or survey:
1. Select Breeze > Quizzes and Surveys.
2. In the Quiz Properties dialog box, select the quiz that you want to modify from the Current
Quiz pop-up menu.
3. Select the appropriate tab and make your modifications.
For detailed information on a specific quiz property, see “About quiz and survey properties”
on page 35
About the quiz conversion
After you finish adding quizzes and questions to you PowerPoint presentation, you need to
convert the presentation using the normal presentation Publishing process. After the presentation
is converted, your users can take the quiz online.
Note: Users cannot take the quiz using the View Show feature within PowerPoint.
To take the quiz, users view the online presentation as they would any other Macromedia Breeze
presentation. To respond to a quiz question, they select an answer.
34
Chapter 5: The Macromedia Breeze Quiz Feature
To collect quiz results, you use the Macromedia Breeze server or a compatible learning
management system (LMS). For more information, see the next section, Viewing quiz or
survey results.
Viewing quiz or survey results
The quiz feature is designed to collect test results for viewing by test administrators in the
Breeze Manager.
To view quiz or survey results:
• Select Breeze > Manage Account to log in to Breeze Manager.
In Breeze Manager, you can view a detailed set of test results by quiz or survey, by question,
and by user.
You can download data (CVS format) for use in a spreadsheet or reporting package. You can
also integrate quizzes with a compatible LMS and view reports through that system.
Changing quiz or survey design
You use PowerPoint features to make the following types of changes to your quiz or survey design:
•
•
•
•
•
Change the font of questions, including type, color, and size.
Change the font of answers, including type, color, and size.
Add graphics.
Add audio and animations.
Change the look of the Submit and Clear buttons. You can alter the color, font, and size of
these buttons.
• Change the order of questions.
Viewing a list of quizzes and surveys
The Quiz Manager dialog box lists the quizzes and surveys in your presentation.
To view and manage quizzes and surveys:
1. Select Breeze > Quizzes and Surveys.
2. In the Quiz Properties dialog box, select Add/Remove quizzes from the Current Quiz
pop-up menu.
In the Quiz Manager window, you will see a list of the quizzes and surveys in the current
presentation.
About quiz and survey properties
The quiz feature offers a variety of ways to customize your quiz functionality. Using quiz
properties, you can accomplish the following:
• Select a unique name for your quiz. For more information, see “Naming a quiz or survey”
on page 36.
About quiz and survey properties
35
• Display a progress indicator for users as they take the quiz. For more information, see
“Modifying Progress Display options” on page 36.
• Control how the user navigates through the quiz. For more information, see “Modifying User
Movement options” on page 37.
• Control when the user can move to the next question. For more information, see “Modifying
Advancement options” on page 37.
• Set the default feedback behavior after an answer.
■
After each correct answer
■
After each incorrect answer
For more information, see “Modifying After Each Answer options” on page 38.
• Determine the type of results displayed after the user completes the quiz or survey. For more
information, see “Displaying a quiz results page” on page 42.
• Control what the user can review after completion. For more information, see “Modifying
Post-Quiz options” on page 42.
Naming a quiz or survey
You can include multiple quizzes and surveys in your presentation, but you must create a unique
name for each quiz. You can name a quiz or survey in two ways:
• Through the Macromedia Breeze Quiz wizard. In step 1, the Quiz wizard ask you to enter the
name of the quiz.
• Through the Quiz Properties dialog box, where you can modify the Quiz Name property.
To change the name of a quiz:
1. Select Breeze > Quizzes and Surveys.
2. In the Properties dialog box, select the name of a quiz in the Current Quiz pop-up menu.
3. In the Properties dialog box, select the General tab.
4. Change the name of the quiz in the Name text box.
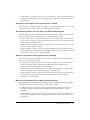
Modifying Progress Display options
Progress Display options let you specify how to give your users status on their progress as they
take the quiz or survey
Relative (Question 3 of 10) Shows the user the current question number along with the total
number of questions in the quiz or survey.
Numeric (Question 3) Shows the user the current question number, but not the total number
of questions in the quiz or survey.
Do not show progress
Shows no numeric progress information to the user.
To modify the Progress Display property:
1. Open the PowerPoint presentation containing the quiz you want to modify.
2. Select Breeze > Quizzes and Surveys.
36
Chapter 5: The Macromedia Breeze Quiz Feature
3. Select the name of the quiz or survey from the Current Quiz pop-up menu.
4. In the Properties dialog box, click the General tab.
5. Next to the Progress Display property, click the ellipsis (…) button.
6. In the Progress Display dialog box, select a progress display option for this quiz.
Modifying User Movement options
You can specify whether users must move linearly through your questions or whether they can
revisit questions they have already seen. You use these two options:
Users can only move forward through the quiz or survey. After users
move beyond a question, they cannot return to it. Quiz question titles do not appear in the
outline if this option is selected.
Forward movement only
Users can move forward and backward throughout the
presentation. If this option is selected, you can show question titles in the outline.
Forward and backward movement
To modify the Movement options:
1. Select Breeze > Quizzes and Surveys.
2. In the Properties dialog box, select the name of the quiz or survey from the Current Quiz pop-
up menu.
3. In the Properties dialog box, click the General tab.
4. Next to the Movement property, click the ellipsis (…).
5. In the Movement dialog box, select the desired movement option.
Modifying Advancement options
Advancement options control how a user navigates during a quiz or survey:
Must answer the question
To move to the next question, the user must answer the question.
No skipping is allowed.
Must answer the question correctly
The user must select the correct answer before moving to
the next question.
No restrictions
The user can move to the next question with no restrictions, including skipping
questions.
To modify Advancement options:
1. Select Breeze > Quizzes and Surveys.
2. In the Properties dialog box, select the name of the quiz or survey from the Quiz Properties
pop-up menu.
3. On the General tab, next to the Advancement property, click the ellipsis (…) button.
4. In the User Advancement dialog box, select the desired advancement option.
About quiz and survey properties
37
Modifying After Each Answer options
After Each Answer options control the default action performed after the user answers a question.
After each correct answer
The default behavior after the user gives a correct answer. There are
two possibilities:
• Provide no feedback after correct answers. After submitting the answer, the user automatically
moves to the next question with no feedback message.
• Display a default message. You can specify the default message to display.
After each incorrect answer
The default behavior after the user gives an incorrect answer.
There are two possibilities:
• Provide no feedback after incorrect answers. After submitting the answer, the user
automatically goes to the next question, with no feedback message.
• Display a default message. You can specify the default message to display.
Note: You can also select custom messages for each question and answer. You can set custom
feedback messages when you add/modify a specific question.
To modify After Each Answer properties:
1. Select Breeze > Quizzes and Surveys.
2. In the Properties dialog box, use the Current Quiz pop-up menu to select the name of the quiz
or survey you want to modify.
3. In the Properties dialog box, click the General tab.
4. The After Each Answer area displays two properties: After Each Correct Answer and After Each
Incorrect Answer.
5. Click the ellipsis (…) button next to the appropriate property. The corresponding property
window opens.
6. Select your option and enter the desired message if needed.
Adding a question
After you create a quiz or survey, you can add the questions.
To add a question to your quiz:
1. Select Breeze > Quizzes and Surveys.
2. In the Properties dialog box, select the name of the quiz or survey from the Current Quiz
pop-up menu.
3. In the Properties dialog box, click the Questions tab.
The Questions tab allows you manage all of the questions for this quiz.
4. Click New and add your question.
Note: After you complete the Macromedia Breeze Quiz wizard and have created a new quiz, you
automatically go to the Questions tab.
38
Chapter 5: The Macromedia Breeze Quiz Feature
Modifying a Question
If you want to modify a question and its answers, you have two options:
• Use the Quiz Properties window and the Questions tab to modify any question, including its
properties.
• Use PowerPoint to change text and formatting. You can make those changes directly on the
PowerPoint slide.
Note: To change the properties of a question, you will need to use the correct Quiz Properties
window.
To modify a question using the Properties dialog box:
1. Select Breeze > Quizzes and Surveys.
2. In the Properties dialog box, select the name of the quiz in the Current Quiz pop-up menu.
3. In the Properties dialog box, slick the Questions tab, which allows you manage all of the
questions for this quiz.
4. Select the question you want to modify by clicking its name.
5. Click Modify to open the selected question.
6. In the Question Properties dialog box, make the appropriate changes to the question and
click OK.
Deleting a Question
To remove a question and its answers, you have two options:
• Use the Properties dialog box and the Questions tab to modify any question, including its
properties.
• Use PowerPoint to delete the question slide from the quiz.
To Remove a question using the Properties dialog box:
1. Select Breeze > Quizzes and Surveys.
2. In the Properties dialog box, select the name of the quiz or survey from the Current Quiz
pop-up menu.
3. In the Properties dialog box, click the Questions tab. Then click the name of the question you
want to modify and click Remove to delete the selected question.
Setting the question format
For each question, you select the question format. The Breeze plug-in supports three types
of formats:
Multiple Choice
This type of question has only one correct answer. You can have up to eight
possible answers.
Multiple Answer
This type of question has multiple correct answers. You can have up to eight
possible answers.
Adding a question
39
True/False
This type of question supports two answers (True/False, Yes/No).
To modify the question format:
1. Select Breeze > Quizzes and Surveys.
2. In the Properties dialog box, select the name of the quiz or survey from the Current quiz
pop-up menu.
3. In the Properties dialog box, click the Questions tab and click the name of the question you
want to modify.
4. Next to the Format option, click the ellipses (…)button.
5. In the Question Format dialog box, select the question format and click OK.
Setting the question as a quiz or survey question
For each question, you must select the question type. The Breeze plug-in supports two types
of questions:
Test
This type of question has a correct answer and a corresponding score.
This type of question does not have a correct answer. It is not used in any calculations
of score or results.
Survey
To modify the question type:
1. Select Breeze > Quizzes and Surveys.
2. In the Properties dialog box, select the name of the quiz or survey you want to modify.
3. In the Properties dialog box, click the Questions tab and select the question you want to modify.
4. Next to the Question Type option, click the ellipsis (…) button.
5. In the Question Type dialog box, select the question type and click OK.
Setting the question score
If your question is of the Test type, you must also set the score value for the question. You set a
numerical value for the question; each individual question can have its own score value.
Note: A question must be entirely correct to get a score value. Partial credit is not given for multipleanswer questions.
The score values of all questions in a quiz are used to determine whether a user passes or fails the
quiz. You can set the pass/fail score for the quiz on the Questions tab.
To modify the question score:
1. Select Breeze > Quizzes and Surveys.
2. In the Properties dialog box, select the name of the quiz in the Current Quiz pop-up menu.
3. In the Properties dialog box, click the Questions tab and click the question you want to modify.
4. In the Question Properties dialog box, enter the score for the question.
40
Chapter 5: The Macromedia Breeze Quiz Feature
Adding answers
For each question, you can enter answers and Answer properties. Answer properties include:
Number of Answers
Correct
Select the number of answers for this question, from two to eight.
Select the correct answer. For multiple-answer questions, select the correct answers.
Answer Text
Enter the exact text for the answers.
Setting Feedback
Set feedback handling for this question after the user has answered.
If you want to modify answers, you have two options:
• Use the Properties dialog box and the Questions tab to modify any question, including
its properties.
• Use PowerPoint to change text and formatting directly on the slide.
To modify answers:
1. Select Breeze > Quizzes and Surveys.
2. In the Properties dialog box, select the name of the quiz from the Current Quiz pop-up menu.
3. Click the Questions tab and select the question you want to modify.
4. In the Question Properties dialog box, make the appropriate changes to the Answer section.
Setting feedback responses
For each question you can customize the handling of feedback to users after they answer the
question. There are three options for handling user feedback:
Default Use the default behavior for correct and incorrect answers, as specified on the General
tab of the Properties dialog box for the quiz.
Display no feedback for this question
Select this if you don’t want the user to receive feedback
after answering the question.
Use custom feedback as follows Enter customized feedback for each answer. You can
customize feedback depending on the answer selected by a user.
To set Feedback options for a specific question:
1. Select Breeze > Quizzes and Surveys.
2. In the Properties dialog box, select the name of the quiz from the Current quiz pop-up menu.
3. Click the Questions tab and click name of the question you want to modify.
4. In the Question Properties dialog box, click the ellipses (…) button next to the Feedback
option.
5. In the Custom Feedback dialog box, select how you want to handle feedback. If you select
custom feedback you can enter the feedback text in the field below each answer.
Adding a question
41
Specifying the passing score for a quiz
Breeze Plug-In for PowerPoint allows you to set a passing score that determines whether a test
taker passes the quiz. After a user completes the quiz, Breeze calculates the score by adding up the
scores from each correct answer and compares the total to the passing quiz score.
To modify the passing score:
1. Select Breeze > Quizzes and Surveys.
2. In the Properties dialog box, select the name of the quiz from the Current quiz pop-up menu.
3. Click the Questions tab. In the Passing Quiz Score text box, enter the total numerical score
required to pass the quiz.
Displaying a quiz results page
You can specify whether to show users quiz results after they have completed a quiz. The Quiz
Results property has two options:
Do not show user results of the quiz
The user does not see a results page after completing
the quiz.
The user sees a results pages after completing the quiz. You
can select to show some or all of the following information:
Show user the results of the quiz
•
•
•
•
Display score (for example, 70 out of 100)
Display percent score (for example, 70%)
Tally correct (for example, 7 of 10 correct)
Display pass/fail If you select this option, you can enter custom messages depending on
whether the user passes or fails the quiz.
Note: Using PowerPoint, you can customize the look and feel of the results page. After you add the
results page to your quiz, it appears in your PowerPoint presentation. You can then format the slide by
changing fonts, or colors, adding images, and so on.
To modify quiz results properties:
1. Select Breeze > Quizzes and Surveys.
2. In the Properties dialog box, select the name of the quiz from the Current Quiz pop-up menu.
3. Click the Post-Quiz tab and select the desired option.
• If you select Yes, Show User the Results of the Quiz, you can select the information to show on
the Results page. Click the boxes corresponding to the desired information.
• If you select Display Pass/Fail, click Pass/Fail Messages to enter a custom message.
Modifying Post-Quiz options
Use these option to specify whether users can review questions after they complete the quiz:
No, do not allow the user to review questions
after completing the quiz.
42
Chapter 5: The Macromedia Breeze Quiz Feature
The user can’t go back to review the questions
Yes, allow the user to go back and review questions
The user can review the quiz questions
after completing the quiz.
To modify Post-Quiz options:
1. Select Breeze > Quizzes and Surveys.
2. In the Properties dialog box, select the name of the quiz y from the Current quiz pop-up menu.
3. Click the Post-Quiz tab.
4. In the Post-Quiz Review area, select your desired option.
Customizing question feedback text boxes
When you create a quiz, the Quiz wizard allows you to provide your users with feedback after
they answer a question. You can customize the look of the text boxes that contain the feedback
using normal PowerPoint formatting.
Note: You must create your quiz using the Quiz wizard before you can customize the question
feedback text boxes.
To customize the feedback text boxes, you must select the feature that displays the question
feedback text boxes on each PowerPoint slide.
To show feedback text boxes:
1. Select Breeze > Quizzes and Surveys.
2. In the Properties dialog box, select the Advanced tab and select Show Feedback Message Boxes
inside PowerPoint.
3. Click OK and return to PowerPoint. The feedback boxes now appear on the corresponding
PowerPoint quiz slides. You can then proceed to edit the Feedback text boxes.
Editing question feedback text boxes
Answer Feedback dialog boxes appear on the relevant quiz slide. Initially feedback text boxes are
positioned on top of each other, with only the top text box visible. To edit the text boxes, drag
them apart. You can reposition the text boxes after you finish editing them. You can reformat and
edit the text boxes, but do not delete them.
Using the standard PowerPoint commands to format autoshapes you can:
•
•
•
•
•
Change the shape of the dialog box
Change the color
Change the border
Modify the font
Add one or more images to the dialog box (You must group the images to the relevant dialog to
ensure the image is displayed with the feedback.)
Customizing question feedback text boxes
43
Hiding question feedback text boxes in PowerPoint
Hiding answer feedback does not discard changes you make to feedback text boxes or delete the
text boxes.
To hide question feedback text boxes:
1. Select Breeze > Quizzes and Surveys.
2. In the Properties dialog box, select the Advanced tab
3. Deselect Show answer and click OK.
Aviation Industry CBT Committee (AICC) integration
Macromedia Breeze supports various standards that allow integration of its converted content
into other systems, such a learning management system (LMS). The typical integration for
Macromedia Breeze content (presentations and quizzes) uses AICC/HACP. For more information
on AICC, please see www.aicc.org.
Note: To use the Macromedia Breeze AICC/HACP integration, you must have the LMS integration
option enabled for your account or system. For more information, please contact Macromedia Breeze
Sales.
Macromedia Breeze supports both AICC/HACP and Shareable Content Object Reference Model
(SCORM) communication with an LMS. Macromedia Breeze HACP implementation relies on
an intermediate proxy servlet—the Flash presentation communicates to this proxy servlet using a
proprietary Macromedia Breeze protocol. The proxy then communicates with the LMS using
HACP (versions from 2.2 through 3.5 of the AICC specification are supported). The proxy
servlet is included with both the ASP and enterprise versions of the product; ASP customers
with firewalls may have issues with the HACP communication when the proxy is blocked by
the firewall.
Macromedia Breeze SCORM implementation includes both SCORM metadata and runtime
support. Macromedia Breeze supports SCORM version 1.2.
For more information on AICC integration, please go to Macromedia Breeze Support at
www.macromedia.com/support/breeze.
44
Chapter 5: The Macromedia Breeze Quiz Feature
CHAPTER 6
Troubleshooting and FAQs
This chapter describes some common problems encountered after installing the Macromedia
Breeze Plug-In for PowerPoint, and describes ways to fix them. Also included are frequently asked
questions (FAQs) about using the Breeze plug-in.
Troubleshooting audio problems
One common audio problem is with recording sound. There are a number of reasons why you
might have problems with audio in your presentation, and an error message can help you
determine the source of the problem. You might get an Audio Input Error message. This error
message means that Breeze Plug-In for PowerPoint was not able to correctly set your microphone
level. Troubleshooting audio problems can be difficult, but there are four primary causes for this
problem:
• You have selected the wrong audio input source. There are two options: Line in or
Microphone. For more information about setting these options, see Chapter 4, “Setting
Options,” on page 31.
• Audio input is too low (possibly no audio input).
• There is too much noise (background noise or electrical noise).
• Audio input is too high.
To troubleshoot audio recording error problems:
1. Confirm that your microphone is plugged into the correct input and that the microphone is
plugged into the correct microphone input on your sound card.
Most sound cards have two inputs: microphone and line in. Make sure the microphone is
plugged into the microphone input.
2. If you are using an external pre-amplifier with your microphone, confirm that it is plugged into
the correct input. This type of configuration is typically plugged into the line-in connector.
3. Confirm that your microphone and sound card are working properly.
You can check this by using a standard Windows program, like Sound Recorder, to test your
audio system. If you cannot record and play back audio using Sound Recorder, have your
system administrator check your sound card and microphone.
45
4. Make sure that you are not speaking too closely to the microphone. Move a little farther away
from the microphone and repeat the Set Microphone Level process. If you are too close to the
microphone, your voice will be too loud and you will not be able to correctly set your
microphone level.
5. Pause before and after speaking the “test” phrase (during the Set Microphone Level process).
6. Check the background noise of your surrounding area. If you are recording in a very noisy
environment, it may be difficult to set your microphone level. To get the best performance,
record in a quiet environment.
7. Confirm that your microphone works with the line-in or microphone inputs.
Some microphone drivers, particularly those that use a digital input or USB input, may not
support the standard line-in or microphone inputs. Currently the Breeze plug-in supports only
the line-in and microphone inputs.
8. Check your Windows Volume Control Recording settings.
Some computers support a microphone boost. You should disable this boost for recordings
with the Breeze plug-in.
No audio recorded
If you attempt to record but no audio is recorded, make the following checks:
• Check that your microphone is plugged in. Your microphone may have become disconnected
when you set the microphone level.
• Confirm that your microphone is plugged into the Microphone input of your sound card.
In most cases, your microphone should be connected to the microphone input connector, not
the line-in connector. For additional information on audio input source. go to the Options
dialog box.
• Check the volume and connections of your speakers or headphones. If you have recorded
audio but cannot hear playback, check that your speakers or headphones are working properly.
• Run the About the PPC file process again. Resetting the microphone level may provide better
audio quality.
• Check the status message on the Record Narration window (see “Playing back the recorded
slide” on page 13). The status message should say “Recording” during the recording process. If
not, close the window and restart the recording process.
• Check that you have enough disk space for your recording; audio files can be large.
Audio cut off at beginning or end of slide
Breeze Plug-In for PowerPoint records each slide individually. If your audio seems to be cut off at
the beginning or end of a slide, make sure that you are following these recording practices:
• Do not speak during a slide transition. If you are recording continuously (the Record/Play One
Slide at a Time check box is not selected), make sure you do not continue to speak during the
slide transition. You must stop speaking before you press the Start Next Animation or Move to
Next Slide button. In addition, you should wait until the new slide appears completely before
speaking the audio for the next slide.
46
Chapter 6: Troubleshooting and FAQs
• Make sure that you finish speaking before clicking the Stop button.
• Pause slightly after pressing the Record button, to ensure that recording has started. After
pressing the Record button, you can pause for about 1/2 second prior to speaking your audio.
Problems with embedded audio
If you publish your presentation and receive a message indicating that Breeze Plug-In for
PowerPoint does not support embedded audio, use the following procedure to insert your audio
file into the appropriate slide in your presentation:
Warning: The embedded audio will overwrite the existing audio on the slide. Be sure you want to
replace all the audio for the selected slide.
To Import an embedded audio file:
1. From the PowerPoint menu, select Insert, then select Movies and Sounds.
Note: The Breeze plug-in only supports embedded audio linked to a specific slide.
2. The Select Sound dialog box displays this message: “Do you want your sound to play
automatically in the slide show?” Select Yes.
3. Select Breeze > Import Audio.
4. Select the slide where the embedded audio file is located and click the Import from Presentation
button.
Note: The embedded audio will overwrite all existing audio on the slide. Be sure you want to
replace all the audio for the selected slide.
5. When the Breeze plug-in has finished importing your embedded audio file, click OK.
Command markers don't work in PowerPoint
Command markers (Goto and Wait) affect only the converted presentation. If you add these
command markers and then play back your presentation using the View Show command from
the Breeze menu in PowerPoint, the markers will have no effect. You must convert the
presentation and view it online to see the effect of these markers.
Troubleshooting microphone issues
The following sections may help you with microphone problems.
Selecting the right microphone
You can use several different microphones to record your audio. Here are the most common types
of recording devices:
Standard PC microphone These are usually inexpensive microphones that provide fair quality
recordings. When you use these microphones, it is important to use the Set Microphone
Recording Level function and follow the tips for proper microphone use.
Troubleshooting microphone issues
47
High quality audio microphone These microphones are designed for audio recordings and
provide good quality audio recordings. However, in some cases they may not work well with your
PC sound card. In those cases you may need to use these microphones with a mixer as described
below.
This combination provides good quality audio recordings.
First you connect the microphone to your mixer. You then connect the analog output of the mixer
and to the line-in connector of your sound card.
Microphone/Mixer combination
USB Microphone The USB microphones provide good quality recordings. However, it often
takes some setup time to ensure you have the right drivers. In addition, not all USB microphones
work with all operating systems. Look at the requirements carefully before selecting a USB
microphone.
Note: Overall audio quality is a function of the microphone and sound card. Using an expensive
microphone doesn’t ensure high quality audio, and an inexpensive sound card can greatly degrade
your quality.
Connecting your microphone
Before recording your audio, make sure that you connect your microphone. In most cases, there
are two primary sound input connectors on your sound card:
Microphone
This input is used to connect to most microphones.
You should select this option if you are using the line-in connector of the sound card
and your audio input is a line-level input. Line-in input is often used when an external device
(such as an audio mixer or DAT recorder) is connected to the sound card—the microphone is
connected to this external device.
Line In
If you have a USB microphone, you need to connect it to the USB connector on your computer.
This type of microphone does not connect through the sound card.
Note: Some high-quality audio recording microphones may not work well with the microphone input
to your sound card. You may need to use an audio mixer and the line-in input to the sound card.
Troubleshooting presentation problems
The following sections offer solutions for presentation and publishing problems.
Unable to log in
To publish a presentation to Macromedia Breeze, you must have a valid Macromedia Breeze
account and be able to log in. If you have trouble logging in, you should check the following:
• Confirm that you have a valid Macromedia Breeze account. To log in, you must have already
established an account with the Macromedia Breeze service. If you do not have an account, you
can go to www.macromedia.com/products/breeze and sign up for an account.
• Confirm your user name. Macromedia Breeze uses your e-mail address as your user name.
• Check your password. Breeze passwords are case sensitive. If you forgot your password, click
the Forgot your Password link on the login page.
48
Chapter 6: Troubleshooting and FAQs
• Confirm that your administrator has set up the correct permissions necessary for uploading a
file. To publish a presentation, you must have at least Publisher permission for the folder you
are uploading to. Your Breeze administrator can set up the correct permissions for you.
Unable to find the Breeze file
When the Breeze plug-in cannot find the Breeze file associated with your PowerPoint
presentation, it opens a dialog box with the message: “Macromedia Breeze Plug-in cannot load
the recordings for slides.” You can look for the associated Breeze file.
To find a Breeze file associated with your presentation:
1. In the error dialog box that appears, select the option Load the Recordings from Another File.
2. Click the Browse button to find the Breeze file (.ppc extension) or type the path name for the
file in the text box provided, and then click OK.
The Breeze plug-in creates a new file for your presentation using the information from the
selected Breeze file.
To eliminate all previous recordings using the Breeze plug-in error dialog box:
• In the error dialog box that appears, select the second option, Continue Without the
Recordings for These Slides, and then click OK.
Can't select upload location
After successfully logging in to Macromedia Breeze, you must select an upload location. If you are
having trouble selecting a location, you can try the following:
• Check your Internet connection to make sure that it is working properly.
• Close the Publish dialog box and begin again.
Unable to publish presentation
To publish your presentation, you must log in to your Breeze account, specify the account
location, and add your presentation information. After these steps you should publish the
presentation. If the process fails at this point, you can try these troubleshooting steps:
• Check your Internet connection. You must be connected to the Internet to publish your
presentation to the Macromedia Breeze hosted application service.
• Look for an error message. If the publishing process has failed, you should have received an
error message from Macromedia Breeze that should help determine the error. If the
Macromedia Breeze server is having problems, you should wait and retry again later.
• Verify the upload location. If you have published your presentation, but can’t find the
published version, confirm that you are looking in the right upload location.
• Confirm your PowerPoint presentation is not read-only. Read-only presentations cannot
be published.
Troubleshooting presentation problems
49
Slide titles do not show up in my outline when viewed online
Breeze Plug-In for PowerPoint creates an outline from the slide titles in PowerPoint. You can view
this online.
To view your PowerPoint slide outline:
1. Select Normal in the View menu in PowerPoint. An outline should appear at the left of the
screen. The slide titles appear next to the slide number and slide icon. If you cannot see the
outline, you may need to drag the right window frame (next to the slide numbers) to the right.
2. If no titles appear in the PowerPoint outline, you need to add titles to the outline. After adding
a title, look at the slide to ensure that it still looks fine. You may need to eliminate the original
title box so that the title is not duplicated.
For more information, please see the PowerPoint documentation for adding slide titles.
Users can’t see embedded video
To view embedded videos, viewers must have Flash Player 6 or later installed in their browser. You
can download Flash Players at www.macromedia.com.
Troubleshooting animations
There are a few potential problems that can occur with PowerPoint animations during the
recording or previewing process using Breeze Plug-In for PowerPoint. This section describes some
common problems and offers suggestions on ways to correct them.
Automatic animations do not appear during recording
The automatic animations should appear at the correct time while you are recording your audio.
If not, here are some things to check:
• Confirm that your automatic animations are correctly configured to start at predefined times
(not mouse-click animations). Check your PowerPoint animation settings using the
PowerPoint menu item Slide Show > Custom Animation.
• Confirm that your automatic animations are not waiting for an initial mouse-click animation.
Check the animation order and animation settings of each slide object.
• Use PowerPoint to verify the operation of your mouse clicks. To do that, select the View Show
command in the Slide Show menu. Select the appropriate slide and confirm that the
animations occur automatically.
Mouse-click animations do not appear during recording
Your predefined mouse-click animations should appear when you click the Start Next Animation
or Slide button while recording. If not, here are some things to check:
• Confirm that you have correctly set up mouse-click animations for that slide. Check your
PowerPoint animation settings using the PowerPoint menu item Slide Show > Custom
Animation.
50
Chapter 6: Troubleshooting and FAQs
• Use PowerPoint to verify the operation of your mouse clicks. To do that, select the View Show
command in the Slide Show menu. Select the appropriate slide and use mouse clicks to view
the animations.
Animations do not appear when presentation is viewed
If your animations appeared during the recording process they should appear when you view the
presentation. If not, you may need to re-record the slide and animations.
All animation markers are not visible in the Edit Audio dialog box
The Edit Audio dialog box automatically shows all animation markers in the presentation. If you
do not see all your animation (Click) markers, you should check the following:
• Check for markers that are overlapped because they are in the same location. To move markers
to new locations, drag the top of the marker. Remember that you can’t move markers beyond
slide boundaries or adjacent markers.
• Check for automatic animations that are not displayed. If an automatic animation is set to 0
seconds, it is not displayed in the file.
• Check PowerPoint to make sure you have added the animations. Because the Breeze plug-in
automatically gathers the animations from PowerPoint, check that you are on the correct slide
and that the animations do exist within PowerPoint.
Automatic animations do not appear during recording
The automatic animations should appear at the correct time while you are recording your audio.
If not, here are some things to check:
• Confirm that your automatic animations are correctly configured to start at predefined times
(not mouse-click animations). Check your PowerPoint animation settings using the
PowerPoint menu item Slide Show > Custom Animation.
• Confirm that your automatic animations are not waiting for an initial mouse-click animation.
Check the animation order and animation settings of each slide object.
• Use PowerPoint to verify the operation of your mouse clicks. To do that, select the View Show
command in the Slide Show menu. Select the appropriate slide and confirm that the
animations occur automatically.
Mouse-click animations do not appear during recording
Your predefined mouse-click animations should appear when you click the Start Next Animation
or Slide button while recording. If not, here are some things to check:
• Confirm that you have correctly set up mouse-click animations for that slide. Check your
PowerPoint animation settings using the PowerPoint menu item Slide Show > Custom
Animation.
• Use PowerPoint to verify the operation of your mouse clicks. To do that, select the View Show
command in the Slide Show menu. Select the appropriate slide and use mouse clicks to view
the animations.
Troubleshooting animations
51
Animations don't convert correctly
During the conversion process from a PowerPoint presentation into an online presentation,
Breeze converts the PowerPoint animations for online playback. During the conversion process,
the converted animations might not appear exactly as they do in PowerPoint. Some of the changes
that might occur include the following:
• Animations might appear slightly different than they do in PowerPoint. For example, the
Dissolve animation in PowerPoint might appear as more of a Fade animation in the converted
presentation.
• Different animations may be substituted for a specified animation. For example, the
Checkerboard animation may appear as a Wipe animation in the converted presentation.
• In some rare instances, Breeze might not support the specified animation. For example, slide
transition animations might not be supported at all—the slide might just transition to the next
slide without any animation.
• Advanced animations, such as those included in PowerPoint XP, might not be supported.
Using unsupported animations might result in unexpected operation results in the converted
online presentation.
For more information about the animations currently supported by Breeze, please contact
Macromedia Breeze support at www.macromedia.com/go/breeze_support.
Troubleshooting problems with online presentations
The following sections give tips on resolving problems with viewing online presentations.
Animation problems during online viewing
PowerPoint animations are converted to web animations for online viewing. You may experience
problems with the final output of the animation effects, including the following:
• Animations do not seem to be correctly synchronized with the audio when viewed online.
Animation timings are affected by a variety of factors, including the computer configuration
you use to record your presentation, the computer and browser you use to view the
presentation, and the type of animation. Here are some potential fixes:
52
■
Increase the timing between animation effects. Usually problems occur because some
computers take longer than others to play an animation effect. By increasing the timing
between effects, you increase the likelihood that a computer will be able to complete the
animation on time.
■
Change the animation type. Some animations appear more quickly than others. Changing
to a faster animation makes it easier to synchronize with the audio recording after
conversion to the online format.
■
Re-record the slide. If you make any changes or additions to animation objects in
PowerPoint after recording, you need to re-record that slide. Otherwise, the animations do
not show up correctly during online viewing.
Chapter 6: Troubleshooting and FAQs
• The animation effects are different when viewed online. Not all animations are currently
supported for viewing with Netscape browsers. If you use an unsupported animation effect,
Breeze Plug-In for PowerPoint substitutes a similar animation effect during the online
conversion process.
Frequently asked questions
This section gives answers to frequently asked questions.
Can I use PowerPoint to record audio?
No. You must use Breeze Plug-In for PowerPoint to record audio. The Breeze plug-in uses custom
tools to optimize audio quality and synchronize animations for online delivery. These tools are
not compatible with the PowerPoint recorder and player.
How do I record and play back audio on Windows?
Sound Recorder is the standard audio recording program in Windows. To access this program on
a computer running Windows 98, select Start > Programs > Accessories > Entertainment and then
select Sound Recorder. This program allows you to record and play back audio.
How do I control volume on Windows?
The standard audio mixer program on your computer is called Volume Control. This mixer
allows you to control input and output volume of your various sound devices. You can access this
program on a Windows 98 system by selecting Start > Programs > Accessories > Entertainment >
Volume Control.
Can I add links to my online presentation?
Yes, Macromedia Breeze supports hypertext links in your online presentation. To add links to
your presentation, select Insert > Hyperlink within PowerPoint. The PowerPoint links are
automatically transferred to your online presentation. Your viewers can then click a link while
viewing the presentation online.
Can I change the look of the quiz buttons?
You can customize the appearance of the Submit and Clear buttons. To change these buttons,
you use the normal PowerPoint features for editing. You can edit the following characteristics of
these buttons:
• The button color
• The text on the button (for example, from Submit to Done)
• Text font
To change the format of the buttons:
1. Within PowerPoint, right-click the button you want to change and select Format Autoshape
from the context menu.
2. Make the appropriate changes to the button using the normal PowerPoint commands.
Frequently asked questions
53
Can I use PowerPoint to modify the question order?
Yes. You can use PowerPoint to reorder questions. Using the PowerPoint outline or slide sorter,
move the questions to the right location.
Note: Keep all questions in a specific quiz together. You cannot include non-quiz PowerPoint slides
between quiz questions. If you do, Macromedia Breeze treats them as separate quizzes.
Can I copy questions from one presentation to another?
Yes, you can copy questions from one quiz to another within PowerPoint. However, please
remember to update any feedback handling and scoring.
How can I quickly move markers?
To move many markers quickly, you can use the Edit Audio command within Breeze Plug-In for
PowerPoint.
To readjust markers:
1. Select Breeze > Edit Audio.
2. In the Edit Audio dialog box, specify where to move the next marker (either Slide or Click).
3. Press M or Control+M and the next marker (to the right) automatically moves to the selected
location.
4. You can repeat this process to quickly readjust all your markers.
54
Chapter 6: Troubleshooting and FAQs
INDEX
A
account settings 31
add a question to a quiz or survey 38
After Each Answer options
modify 38
AICC integration 44
animation
automatic 13
conversion problems 52
editing 21
timings 20
mouse click 13
recording 13
animation markers
moving 24
answers
adding to a quiz 41
audio
add silence 26
controls 26
editing 21
importing 19
insert 23
play from a specific location 23
recording 12, 28
audio import
file naming conventions 18
preparation 18
audio input source 31
B
Breeze documentation 8
C
changing quiz or survey design 35
controlling
nimation 23
timing 23
Create Wizard dialog box
creating a multimedia presentation 11
creating a quiz or survey 33
customizing feedback text boxes 43
D
deleting a question in a quiz or survey 39
deleting a quiz or survey 34
design tips 7
E
Edit Audio dialog box
illustration 22
markers 23
editing
animation 20, 21
audio 21
feedback text boxes 43
editing controls 27
embedded PowerPoint audio narration file
importing 20
F
FAQs 53
features 5
feedback responses
specifying for a quiz 41
feedback text boxes
customizing 43
editing 43
hiding 44
Flash content
inserting in a presentation 29
formatting
questions 39
frequently asked questions 53
55
G
getting started 6
I
importing
audio 19
embedded PowerPoint audio narration file 20
importing and exporting
scripts 14
inserting silence into a presentation 25
L
learning interactions
setting 39
learning resources 8
logging in to Breeze 16
M
Macromedia Flash content
inserting in a presentation 29
markers
controlling timing and animation 23
microphone
connecting 48
setting recording level 11
Modify a presentation 17
modify a question for a quiz or survey 39
modifying a quiz or survey 34
multiple answer questions 39
multiple choice questions 39
N
naming
a quiz 36
a survey 36
naming audio files for import 18
narration
adding script text 14
importing 20
recording 12
O
online help 8
Options dialog box
account settings 31
publishing and managing accounts 32
selecting the audio input source 31
56
Index
P
playback options 25
playing back the recorded slide 13
post-quiz review
modifying options 42
PPC file 13
preparing audio for import
Sound Forge markers 18
presentation
updating 16
presentation location
setting 16
previewing 15
publishing 16
a quiz 34
specifying the presentation location 16
publishing and managing accounts 32
Q
question
multiple answer 39
multiple choice 39
setting as a quiz or survey 40
setting the score value 40
true/false 39
quiz
add a question 38
adding and modifying answers 41
change design 35
creating 33
deleting 34
deleting a question 39
formatting questions 39
modify a question 39
modifying 34
naming 36
properties 35
publishing 34
selectiong question type 40
setting feedback responses 41
setting the passing score 42
view all 35
viewing results 35
quiz results page
displaying to users 42
R
record and playback modes 14
Record dialog box
recording audio 28
Record Narration dialog box
adding script text 14
recording animation 13
recording audio 12
recording
animation 13
audio 12, 28
narration 12
audio problems 45
microphone 47
presentation problems 48
problems with online presentations 52
slides not in outline 50
true/false questions 39
S
score value
setting in a quiz 40
scoring
setting options for a quiz 42
script text
adding to your file 14
scripts
importing and exporting 14
replacing with notes 14
setting the microphone level 11
silence
insert in audio 26
inserting 25
slide markers
moving 25
Sound Forge markers
adding to an audio file 18
survey
add a question 38
change design 35
creating 33
deleting 34
deleting a question 39
formatting questions 39
modify a question 39
modifying 34
naming 36
properties 35
selecting quiestion type 40
view all 35
viewing results 35
system requirements
Windows 7
V
viewing
all quizzes and surveys in a presentation 35
quiz or survey results 35
volume controls 26
U
Updating a presentation 16
T
troubleshooting
animation 50
animations don’t convert correctly 52
Index
57
58
Index