1
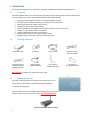
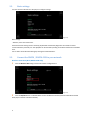
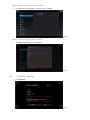
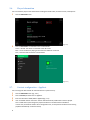
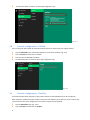
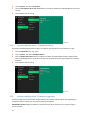
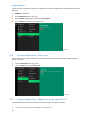
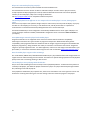
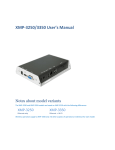
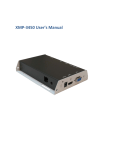
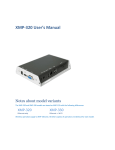
DNP50 DRAKE ANDROID® NETWORK PLAYER Stand-alone Network Media Player for Digital Signage Applications I N S T R U C T I O N M A N U A L Contents Included: • • • • • DNP50 Drake Android Network Player Instruction Manual DC Power Supply HDMI Cable A/V Cable (RCA to 3.5mm jack) is a registered trademark of R.L. Drake Holdings, LLC. © Copyright 2014 R. L. Drake Holdings, LLC P/N: 651234400 A Printed in U.S.A. Rev: V002 20140106 1002595 DNP50 Contents Drake DNP50 Instruction Manual 0 1. 1 Introduction 1.1. Features 1 1.2. Package contents 1 1.3. Mounting options 1 1.4. Physical view 2 2. Configuring the DNP50 / DNP50 AVW Media Player 3 2.1. System connections 3 2.2. Basic settings 4 2.3. Connect the DNP50 / DNP50 AVW to your network 4 2.4. Time zone settings 6 2.5. Content settings 7 2.6. Player Information 8 2.7. Content configuration ‐ AppStart 8 2.8. Content configuration ‐ FailSafe 9 2.9. Content configuration ‐ EasyPlay 9 2.10. Display settings 12 2.11. Sound settings 14 2.12. System configuration ‐ Time Server 15 2.13. System configuration ‐ Scheduled reboot 16 2.14. System configuration ‐ Firmware upgrades 16 2.15. System configuration ‐ Factory reset 17 2.16. System configuration ‐ Power save 18 2.17. System configuration ‐ Expand Storage by using SD card 18 3. Content Management 19 4. Authoring in HTML5 19 5. Working with SMIL 19 5.1. Introduction 19 5.2. www.a‐smil.org for developers 20 6. Technical Data 6.1. 7. Specifications Appendix: FAQ i 20 20 21 1. Introduction This document describes the basic operation of the DNP50 / DNP50 AVW and frequently asked questions. 1.1. Features The DNP50 / DNP50 AVW is an HD 720p resolution high definition digital signage player featuring industrial grade mechanical design and versatile open‐standard HTML5 and SMIL programmability. 1.2. Support for HTML5 widgets for dynamic content (W3C Widgets standard) HD 720p hardware decoding of MPEG1/2/4, H.264, and VC‐1 media formats 4GB on‐board flash local storage with SD card slot Integrated audio and video output via HDMI Supports full POPAI Screen Media Formats Standards profiles S1 to S12, and E1 to E8 Multiple 3rd party software solution compatibility Industry leading W3C SMIL support for developers (DNP50 AVW only) Built‐in Wi‐Fi (wireless) b/g/n network (DNP50 AVW only) Composite AV input and Component input Packagecontents Media Player Unit AC Adapter Ethernet cable Standard 3.5mm to RCA‐to‐AV adapter Standard 3.5mm to component adapter (DNP50 AVW only) RS‐232 adapter (DNP50 AVW only) Wi‐Fi Antenna (DNP50 AVW only) SD card cover (pre‐installed on unit) NOT INCLUDED: A USB mouse is required for system setup 1.3. Mountingoptions The player can be attached to mounting posts on the backs of screens or inside cabinetry with the built in VESA MIS‐D100 (100mmx100mm) compatible mounting flange. ATTACH the Wi‐Fi antenna to the DNP50 AVW’s Wireless antenna post, and then screw the Wi‐Fi antenna clockwise onto the post until antenna is secure. DO NOT OVER‐TIGHTEN. (DNP50 AVW with Wi‐Fi Antenna Installed) 1 1.4. Physicalview (DNP50 AVW only) DNP50 (without WiFi Antenna) / DNP50 AVW Physicalfeatures(lefttorightinaboveillustration) HDMI 1.3a connector for digital video and audio combined output ADB , Android debug console port 12V DC for power adapter Power and Status LED indicator 3.5mm composite AV output Ethernet port for network content update SD card slot with SD card cover USB ports for USB content update and configuration S/W Reset button to perform factory reset Wireless antenna post (DNP50 AVW only) RS‐232 port (not used as telephone connector, DNP50 AVW only) Composite AV input (DNP50 AVW only) Component input (DNP50 AVW only) VGA port for analog video output (DNP50 AVW only) 2 DNP50 AVW only 2. Configuring the DNP50 / DNP50 AVW Media Player 2.1. Systemconnections 1 Attach an HDMI cable to your monitor When using an HDMI connection, audio is sent along with video over the HDMI cable, so no additional cables are required. 2 Attach the AC power adapter to power on the unit. After approximately 40 seconds booting animation will be displayed on screen as shown below : 3 Player boot process takes approximately 75 seconds to complete. TroubleshootingTips 1 The operation indicators light up, but no video is displayed on screen Ensure that your video cable (HDMI) is securely connected. When using an HDMI connection, choose high quality, certified HDMI cables or try using shorter length cables Check if your monitor is turned on and the correct video input source is selected 2 No sound is heard Check volume (mute) settings on monitor If using VGA connection, you also need to connect RCA audio cables (DNP50 AVW only) After boot up complete, player will stay in basic settings menu if no content service has been configured (i.e. first boot up for brand new unit or after a factory reset). Plug in a USB mouse to start configuring the player. If you have already set content into the player, contents will play back automatically after 15 seconds after boot up. To enter the menu system at any time during playback, plug in a USB mouse and hold the left mouse key in the corner area as shown below for 10 seconds. *Player will ask for password if password has been configured. 3 2.2. Basicsettings You must attach a USB mouse to the player to configure settings. (Fig. 2.2.1) Basic settings: – Network, Time zone and Content. Each time the Basic settings menu is entered, playback will automatically begin after 15 seconds if content services have been previously set. Auto playback can be canceled by clicking on the button before the countdown ends. User is able to enter Advanced Settings by clicking the Advanced button. 2.3. ConnecttheDNP50/DNP50AVWtoyournetwork Wirelessconnection(Wi‐Fi,DNP50AVWonly) 1 Click the Wireless LAN setting to launch the wireless configuration UI. 2 (Fig. 2.3.1) Click the ON/OFF button as indicated below to turn ON Wireless interface (Ethernet will be disconnected when player connects to wireless network). 4 3 (Fig. 2.3.2) The player will scan for wireless signals nearby and available access points will be listed. (Fig. 2.3.3) 4 Click on the network ID to connect. If the network requires authentication, you will be asked to provide a password. (Fig. 2.3.4) Wiredconnection To use the wired Ethernet connection, connect an Ethernet cable and disable Wireless LAN first 1 2 5 Click the Wireless LAN setting to enter the wireless configuration UI. (Fig. 2.3.1) Click the ON/OFF button as indicated below to turn OFF Wi‐Fi. (Fig. 2.3.2) DHCP–automaticallyassignnetworkIPaddress 3 Turn on Ethernet. If using DHCP, no further action is required. (Fig. 2.3.5) StaticIP–manuallyassignnetworkIPaddress 4 Click Ethernet to configure static IP address. (Fig. 2.3.6) 2.4. 1 Timezonesettings Click Time zone. 6 (Fig. 2.4.1) 2 Choose the correct time zone from the available options. (Fig. 2.4.2) 2.5. 1 Contentsettings Click the Set content button. (Fig. 2.5.1) 2 Input the content source URL and click Connect. The player will start playback immediately. 7 (Fig. 2.5.2) 2.6. PlayerInformation User can check the player’s basic information including the Health status, Firmware version, and Player ID. 1 Click the Advanced button. (Fig. 2.6.1) 2 Click on Information. The definitions of the Health Status: Green – Normal. The device is connected to the URL server. Blue – Local. The device is playing content from the USB drive or SD card. Gray – Disconnected. The device is disconnected. (Fig. 2.6.2) 2.7. Contentconfiguration–AppStart User can assign the URL and APP for execution after the system start up. 1 2 3 4 8 Click the Advanced button. (Fig. 2.6.1) Click on Content, and then click on AppStart. Enter the valid URL of HTML/SMIL in AppStart(Fig. 2.7.1). User can disable Autorun from here. Autorun will automatically enable when content is played. This is useful when system integrators prepare the device in the office before installation. In most case, the network needs to be re‐configured on site, so this prevents the device from starting playback automatically on the first startup. 5 The Advanced option is used for 3rd‐party App configuration only. (Fig. 2.7.1) 2.8. Contentconfiguration–FailSafe User can assign the URL and APP for execution while the system has failed to play the assigned content. 1 2 3 4 Click the Advanced button, advanced configuration menu will be launched. (Fig. 2.6.1) Click on Content, and then click on FailSafe. Enter the URL of HTML/SMIL in FailSafe. The Advanced option is used for 3rd‐party App configuration only. (Fig. 2.8.1) 2.9. Contentconfiguration–EasyPlay The feature EasyPlay allows the player to play media content from the USB flash drive (or SD card) directly. When EasyPlay is enabled, the player will play content from the USB drive (or SD card) only. If user wants to play content from the URL server configured via ‘Set content’, EasyPlay must be disabled. 1 2 9 Click the Advanced button. (Fig. 2.6.1) Click on Content, and then click on EasyPlay. 3 Click Disabled/Enabled button to enable EasyPlay, and choose from Photo Mode or Movie Mode. (Fig. 2.9.1) ConfigurePhotoMode 4 Click on Photo for choosing photos and music. Click on the button as marked in red below, and select the directories for photos and music from the USB drive. 5 Click Set button after selecting the directories. (Fig. 2.9.2) ConfigureMovieMode 6 Click on Movie. Click on the button as marked in red below, and select the directory for movies from the USB drive. 7 8 Click Set button after the folder is selected. 10 The files in the selected folders will be played after clicking the Play button in the Basic or Advanced settings menu. (Fig. 2.9.3) EasyPlayScheduleconfiguration 1 2 3 Click the Advanced button. (Fig. 2.6.1) Click on Content, and then click on Schedule. Click on the buttons marked in red below to enable/disable the EasyPlay schedule for each time slots. Type the scheduled time in the dialogue boxes marked in blue below by using the pop‐up keyboard or the USB keyboard. 4 11 (Fig. 2.9.4) The "On" times assigned in the time slots A‐E are inclusive. For example, a schedule assigned as the example below: (Fig. 2.9.5) The exact playback time will be the time slots marked in blue as shown in figure 2.9.6. The dark blue parts are the overlap time of C/D and D/E. (Fig. 2.9.6) 2.10. Displaysettings OutputMode For best quality, set the output resolution to match your display’s native resolution to avoid image scaling and blur. If you are connecting an LCD computer monitor, projector, or plasma display, refer to the device specifications for optimal settings. If you are connecting to composite input only monitor, such as CRT TV, the output resolution must be set to 12 Composite: NTSC or Composite: PAL. 1 2 Click the Advanced button. (Fig. 2.6.1) Click the Display/sound button, and then click on Display. The Display Settings page will be launched. 3 (Fig. 2.10.1) Click on Output mode. Select Output mode from the popup menu. Screenorientation Screen orientation is to set the display to rotate 90/180/270 degrees. 13 (Fig. 2.10.2) (Fig. 2.10.3) 1 2 Click the Advanced button, advanced configuration menu will be launched. (Fig. 2.6.1) 3 Click on the Screen orientation marked in red below. Click the Display/sound button, and then click on Display. The Display Settings page will be launched. (Fig. 2.10.1) (Fig. 2.10.4) 4 Click on the preferred angle from the menu. The option “Auto‐rotate” allows the display to rotate along with the signboard automatically. (Fig. 2.10.5) 2.11. Soundsettings To control the output sound volumes and touch sounds: 1 2 14 Click the Advanced button. (Fig. 2.6.1) Click the Display/sound button, and then click on Sound. The Sound Settings page will be launched. (Fig. 2.11.1) 3 Click on Volumes. Drag the blue sliders to adjust the volumes for the selected options, and then click on OK to save the new settings. (Fig. 2.11.3) 4 Click on the icon on the right as marked in red to enable/disable the Touch sounds. (Fig. 2.11.2) (Fig. 2.11.2) (Fig. 2.11.3) 2.12. Systemconfiguration–TimeServer The feature allows user to choose the player’s synchronization source. When it’s enabled, the player synchronizes with the time of AppStart URL. Otherwise, the player synchronizes with Android default time server. 1 15 Click the Advanced button, advanced configuration menu will be launched. (Fig. 2.6.1) 2 3 Click on System, and click on Time Server. 4 Click on Set to save the setting. Click the Use AppStart URL as time server button as marked in red below to enable/disable the time server function. (Fig. 2.12.1) 2.13. Systemconfiguration–Scheduledreboot The feature Scheduled Reboot allows the player to reboot on the assigned time automatically every day. 1 2 3 Click the Advanced button. (Fig. 2.6.1) 4 Click on Set to save the setting. Click on System, and click on Scheduled Reboot. Click the Enable daily reboot button as marked in red below to enable/disable the daily reboot function. Click on the dialogue box to set the time. The value can be inputted with the pop‐up keyboard or the USB keyboard. 2.14. (Fig. 2.13.1) Systemconfiguration‐Firmwareupgrades Firmware updates can be performed by using a USB flash drive. Please read the release notes regarding the changes that will be made to your player before applying the upgrade. IMPORTANT: DO NOT unplug the USB drive or power down the player while the system is performing the firmware update. 16 1 Download the latest firmware and copy it to the root directory of a USB drive from http://support.iadea.com 2 3 4 5 6 Plug in the power cord into the device. Plug in a USB mouse to the device to enter Basic settings menu. Click the Advanced button. (Fig. 2.6.1) Click on System, and choose Firmware. Click on OK to begin the firmware update. (Fig. 2.14.1) 7 Plug in the USB drive while the screen shows “Scanning USB drives for firmware package”. (Fig. 2.14.2) 2.15. Systemconfiguration‐Factoryreset If you forget the system password, you must reset the system to access to the player. Usingtheresetbutton 1 2 3 4 17 PRESS and HOLD the reset button with a pin. RE‐CONNECT the power cord. WAIT about 10 seconds or until the status LED flashes. RELEASE reset button and wait for system to initialize. Reset button UsingaUSBmouse System reset will re‐initialize the system, clear passwords, and return settings to their default values. Perform the following: 1 2 3 4 CONNECT a USB mouse. Click the Advanced button. (Fig. 2.6.1) Click on System configuration, and choose Factory default. Click on OK button to perform the system reset. (Fig. 2.15.1) 2.16. Systemconfiguration–Powersave The Power save feature allows the player to power off automatically while idle in the Basic settings page while idle for 10 minutes. 1 2 Click the Advanced button. (Fig. 2.6.1) Click on System, and click on Power save. (Fig. 2.16.1) 2.17. Systemconfiguration–ExpandStoragebyusingSDcard An external SD card may be used to replace the current SD card if more space is needed. 1 18 Take an IAdea‐approved SD card, format it as FAT16/32 clean 2 3 4 In the root directory of the card, create a file named "EXPANSIONCARD" (not case‐sensitive, Fig.2.17.1) Insert SD card into player, lock it with the provided SD card lock clip, then power cycle the player. The device now has expanded storage. (Fig. 2.17.1) 3. Content Management The DNP50 / DNP50 AVW is designed to work with 3rd party management solutions. Please refer to the printed guide for related set up instructions. 4. Authoring in HTML5 A major advancement in the DNP50 / DNP50 AVW media player is its ability to playback HTML5 content which can contain dynamic information. To find out more about using HTML5 for digital signage, visit http://widget.iadea.com. 5. Working with SMIL The DNP50 / DNP50 AVW uses open communications protocols for content presentation and playback control. SMIL‐compliance means predictable results across multiple devices, and SMIL’s non‐proprietary nature means that your investments are never obsolete. 5.1. Introduction Using SMIL (pronounced “smile”), the language created by W3C for multimedia communications, the media player understands the language “spoken” by professional tools from companies such as Adobe, Apple, Microsoft, and Real Networks. What this means is quicker, easier, and better integration of your players into your digital signage networks, opening up avenues of software controls and realizing the full potential of your player hardware down the road. 19 5.2. www.a‐smil.orgfordevelopers The media player operating system utilizes W3C SMIL as the underlying scripting language, which lends well to customization to your project management needs. For resources, downloads, and community support, please visit www.a‐smil.org. 6. Technical Data 6.1. 20 Specifications DNP50 DNP50 AVW Video format support POPAI Screen Media Standards S6 (MPEG‐1 SIF, 3Mbps CBR) S7 (MPEG‐1 480p, 10Mbps CBR) S8 (MPEG‐1 720p, 15Mbps CBR) S9 (MPEG‐2 480p, 6Mbps CBR) S10 (MPEG‐2 720p, 12Mbps CBR) S11 (MPEG‐4 AVC, 480p, 6Mbps CBR) S12 (MPEG‐4 AVC, 720p, 10Mbps CBR) E4 (VC‐1/WMV9, MP@ML, 720p) E7 (MPEG‐4 ASP, 480p, 10Mbps CBR) E8 (MPEG‐4 AVC, 1080p, 10Mbps CBR) Image format support POPAI Screen Media Standards S1 (JPEG 480p baseline) S2 (JPEG 720p baseline) S3 (JPEG 1080p baseline) E1 (PNG 24bpp+alpha, 480p) E2 (PNG 24bpp+alpha, 720p) E3 (PNG 24bpp+alpha, 1080p) Audio codec support POPAI Screen Media Standards S4 (MPEG L2 audio) S5 (MP3 audio, 320Kbps) Dynamic content W3C HTML5 (HTML, CSS, JavaScript) W3C SMIL 3.0 instructions (sub‐set) Physical I/O connectors HDMI 1.3a 3.5mm AV out RJ45 Ethernet USB 2.0 As DNP50 AVW: Wi‐Fi antenna port RS‐232 port 3.5mm composite in 3.5mm component in Local storage 4GB on‐board flash memory (up to 1.8 hrs of 5 Mbps high def. video) SD card expansion slot Accessories 3.5mm‐RCA AV cable Ethernet cable Power requirement 12V 1.5A DC As DNP50 AVW: Wi‐Fi antenna RS‐232 adapter 3.5mm‐RCA AV cable 3.5mm‐Component cable Power consumption* 9.6 watts max Environmental Operating temperature: 0 – 40° C / 32 – 104° F Humidity: 5 – 85% @ 40° C / 32 – 104° F non‐condensing Dimensions 183 x 115 x 29mm (7.3 X 4.5 X 1.1 inches) Weight 0.70kg 1.54lbs Safety UL‐approved AC adapters Certifications CE/FCC Warranty One‐year limited parts & labor 7. Appendix: FAQ WhatvideoformatcanIplay? Video files encoded in MPEG‐4 AVC up to 1920x1080 resolutions and bitrates should play perfectly. If a certain video is not played as scheduled, or if it plays poorly, please search the support site for “transcode” instructions. ThesignboardisplacednearmyWi‐Fiaccesspoint,yettheconnectionisunreliable. Wi‐Fi appliances in general should be placed 10 feet (3 meters) from the Wi‐Fi access point for reliable operation. Try relocating the access point further away from the signboards to improve connection. WhatcanIdoaboutthegapbetweenvideoandvideo? Video gaps (blank screen) occur before and after each video are played. To minimize the gap, avoid back to back video programming by scheduling an image between each video. IfbothEthernet&WiFiareconnected,whichonewilltakeprecedence? If both connections are available, WiFi will be used. Whatisthemaximumfilesizeforasinglevideofile? The maximum video file size for the DNP50 / DNP50 AVW is 2GB. We recommend reserving a safety margin to avoid exceeding the limit (i.e. limiting files to 1850MB). WhatshouldIdoifIforgotmypassword? Please perform a factory reset. Use the S/W RESET button located at the back of the media player to restore factory settings. This will also clear the player’s password. HowdoImanagetheplaybackofcontents? The media appliance is designed to be interoperable with leading 3rd party management software solutions or via SMIL open standard commands. CouldtheplayerdisplayFlashorMicrosoftPowerPointpresentations? The player features limited PowerPoint support, but not Flash support. While PCs can play many formats with varying degrees of success, RISC‐based media players are designed to reliably play specific video formats (see spec for details). While Microsoft PowerPoint native files cannot play directly on a RISC‐based player, the file can be converted (i.e. Adfotain Manager Express) into an image format to be played as an image slideshow. 21 Whywon’tsomemediafilesplayproperly? The video data bit‐rate used may have exceeded the recommended bit rate. The video data bit‐rate is the amount of video or audio data used per second to store or play the contents, usually expressed in Mbps (mega‐bits per second). Video encoded with excessive bit‐rates will not playback smoothly in the media player, likely due to storage I/O bottleneck. Visit http://support.iadea.com for compatible media format presets. ThemediaplaybacklooksdifferentonaPCcomparedtothemediaplayer’sscreen.(Wrongaspect ratio) There are 2 major aspect ratios (width‐to‐height ratios) for video content, but many kinds of displays. If you play 4:3 video on a 16:9 display (or vice versa), a circle becomes oval, and the picture takes on a squeezed or stretched look. To avoid this distorted look, adding black bars are a common technique. The Network Media Player can be configured to automatically add black bars for certain types of displays. You can set the output resolution in DNP50 / DNP50 AVW’s configuration menu to match the native resolution of your display. SomeJPEGimagescannotbeplayedinthemediaplayer. Progressive JPEG files are not supported. Please convert to baseline JPEG for maximum compatibility. JPEG images can be either of 2 types: baseline or progressive compression. Baseline JPEG offers greatest compatibility, while progressive JPEGs are suitable for web site images. Progressive images are downloaded and displayed “progressively,” being rendered more clearly as more data is received over the internet. Progressive images are primarily supported on PCs. For media appliances, make sure to save images as baseline JPEG in your photo editor, or resave them as baseline JPEGs using free tools such as IrfanView (http://www.irfanview.com/ ). Doesthemediaplayersupportvideostreaming? No. Drake DNP50 / DNP50 AVW / DNP100 Network Media Players play media files from local storage and do not support real‐time video streaming over the network. This delivers an optimal viewing experience free of playback quality issues such as stuttering, blocking, or blue‐screens. Themediaplayerisnotplaying.WhatshouldIdo? Play list errors and scheduling issues are two major causes of playback problems. To determine if the problem is caused by a bad playlist, just delete the playlist and restart the player. The player should loop through all media files, indicating a fault with the play list. If the playback is scheduled to play at specific time, check to see if the device is set to the right time zone on the world clock. If nothing seems wrong, the time zone setting is often the reason the program is not played. 22 DRAKE ONE YEAR LIMITED WARRANTY Seller will at its sole option, either repair or replace (with a new or factory reconditioned product, as Seller may determine) any product manufactured or sold (or in the case of software, licensed) by Seller which is defective in materials or workmanship or fails to meet the applicable specifications that are in effect on the date of shipment or such other specifications as may have been expressly agreed upon in writing: (i) for a period of three (3) years from the date of original purchase for all stock hardware products (other than those specifically referenced herein below having a shorter warranty period); (ii) for a period of one (1) year from the date of original purchase, with respect to all MegaPort™, IPTV products, test equipment and fiber optics receivers, transmitters, couplers and integrated receiver/distribution amplifiers; (iii) for a period of one (1) year from the date of original purchase (or such shorter period of time as may be set forth in the license agreement specific to the particular software being licensed from Seller) with respect to all software products licensed from Seller (other than Core Product Software) that is (a) developed for a specific function or application, (b) complimentary to and does not function without the Core Product Software, and (c) listed with a specific model number and stock number in Seller’s Price List (“Non‐Core Software”); (iv) for a period of ninety (90) days from the date of original purchase, with respect to non‐serialized products and accessories, such as parts, sub‐assemblies, splitters and all other products sold by Seller (other than Core Product Software and Refurbished/Closeout Products) not otherwise referred to in clauses (i) through (iii) above. The warranty period for computer programs in machine‐readable form included in a hardware product, which are essential for the functionality thereof as specifically stated in the published product specifications (“Core Product Software”) will be coincident with the warranty period of the applicable hardware product within which such Core Product Software is installed. Software patches, bug fixes, updates or workarounds do not extend the original warranty period of any Core Product Software or Non‐Core Software. Notwithstanding anything herein to the contrary, (i) Seller’s sole obligation for software that when properly installed and used does not substantially conform to the published specifications in effect when the software is first shipped by Seller, is to use commercially reasonable efforts to correct any reproducible material non‐conformity (as determined by Seller in its sole discretion) by providing the customer with: (a) telephone or e‐mail access to report non‐conformance so that Seller can verify reproducibility, (b) a software patch or bug fix, if available or a workaround to bypass the issue if available, and (c) where applicable, replacement or damaged or defective external media, such as CD‐ROM disk, on which the software was originally delivered; (ii) Seller does not warrant that the use of any software will be uninterrupted, error‐free, free of security vulnerabilities or that the software will meet the customer’s particular requirements; and the customer’s sole and exclusive remedy for breach of this warranty is, at Seller’s option, to receive (a) suitably modified software, or part thereof, or (b) comparable replacement software or part thereof; (iii) Seller retains all right, title and interest in and to and ownership of all software (including all Core Product Software and Non‐Core Software) including any and all enhancements, modifications and updates to the same; and (iv) in some cases, the warranty on certain proprietary sub‐assembly modules manufactured by third‐party vendors and contained in Seller’s products, third party software installed in certain of Seller’s products, and on certain private–label products manufactured by third‐parties for resale by Seller, will be of shorter duration or otherwise more limited than the standard Seller limited warranty. In such cases, Seller’s warranty with respect to such third‐party proprietary sub‐assembly modules, third‐party software and private‐label products will be limited to the duration and other terms of such third‐party vendor’s warranty, if any. In addition, certain products, that are not manufactured by Seller, but are resold by Seller, may carry the original OEM warranty for such products, if any. The limited warranty set forth above does not apply to any product sold by Seller, which at the time of sale constituted a Refurbished/Closeout Product, the limited warranty for which is provided in the following paragraph. Seller will at its sole option, either repair or replace (with a new or factory‐reconditioned product, as Seller may determine) any product sold by Seller which at the time of sale constituted a refurbished or closeout item (“Refurbished/Closeout Product”), which is defective in materials or workmanship or fails to meet the applicable specifications that are in effect on the date of shipment of that product or fails to meet such other specifications as may have been expressly agreed upon in writing between the parties, for a period of ninety (90) days from the date of original purchase. Notwithstanding the foregoing, in some cases the warranty on certain proprietary sub‐assembly modules manufactured by third‐party vendors and contained in Seller products, third party software installed in certain of Seller’s products, and on certain private–label products manufactured by third‐parties for resale by Seller will be of shorter duration or otherwise more limited than Seller limited warranty for Refurbished/Closeout Products. In such cases, Seller’s warranty for Refurbished/Closeout Products constituting such third party proprietary sub‐assembly modules, third party software, and private‐label products will be limited to the duration and other terms of such third‐party vendor’s warranty, if any. In addition, notwithstanding the foregoing, (i) certain Refurbished/Closeout Products that are not manufactured (but are resold) by Seller, may carry the original OEM warranty for such products, if any, which may be longer or shorter than Seller’s limited warranty for Refurbished/Closeout Products. All sales of Refurbished/Closeout Products are final. To obtain service under this warranty, the defective product, together with a copy of the sales receipt, serial number if applicable, or other satisfactory proof of purchase and a brief description of the defect, must be shipped freight prepaid to Seller at the following address: One Jake Brown Road, Old Bridge, New Jersey 08857. This warranty does not cover failure of performance or damage resulting from (i) use or installation other than in strict accordance with manufacturer’s written instructions, (ii) disassembly or repair by someone other than the manufacturer or a manufacturer‐authorized repair center, (iii) misuse, misapplication or abuse, (iv) alteration, (v) exposure to unusual physical or electrical stress, abuse or accident or forces or exposure beyond normal use within specified operational or environmental parameters set forth in applicable product specifications, (vi) lack of reasonable care or (vii) wind, ice, snow, rain, lightning, or any other weather conditions or acts of God. OTHER THAN THE WARRANTIES SET FORTH ABOVE, SELLER MAKES NO OTHER WARRANTIES OR REPRESENTATIONS OF ANY KIND, EXPRESS OR IMPLIED, AS TO THE CONDITION, DESCRIPTION, FITNESS FOR A PARTICULAR PURPOSE, MERCHANTABILITY, OR AS TO ANY OTHER MATTER, AND SUCH WARRANTIES SET FORTH ABOVE SUPERSEDE ANY ORAL OR WRITTEN WARRANTIES OR REPRESENTATIONS MADE OR IMPLIED BY SELLER OR BY ANY OF SELLER’S EMPLOYEES OR REPRESENTATIVES, OR IN ANY OF SELLER’S BROCHURES MANUALS, CATALOGS, LITERATURE OR OTHER MATERIALS. IN ALL CASES, BUYER’S SOLE AND EXCLUSIVE REMEDY AND SELLER’S SOLE OBLIGATION FOR ANY BREACH OF THE WARRANTIES CONTAINED HEREIN SHALL BE LIMITED TO THE REPAIR OR REPLACEMENT OF THE DEFECTIVE PRODUCT F.O.B. SHIPPING POINT, AS SELLER IN ITS SOLE DISCRETION SHALL DETERMINE. SELLER SHALL IN NO EVENT AND UNDER NO CIRCUMSTANCES BE LIABLE OR RESPONSIBLE FOR ANY CONSEQUENTIAL, INDIRECT, INCIDENTAL, PUNITIVE, DIRECT OR SPECIAL DAMAGES BASED UPON BREACH OF WARRANTY, BREACH OF CONTRACT, NEGLIGENCE, STRICT TORT LIABILITY OR OTHERWISE OR ANY OTHER LEGAL THEORY, ARISING DIRECTLY OR INDIRECTLY FROM THE SALE, USE, INSTALLATION OR FAILURE OF ANY PRODUCT ACQUIRED BY BUYER FROM SELLER. All claims for shortages, defects, and non‐conforming goods must be made by the customer in writing within five (5) days of receipt of merchandise, which writing shall state with particularity all material facts concerning the claim then known to the customer. Upon any such claim, the customer shall hold the goods complained of intact and duly protected, for a period of up to sixty (60) days. Upon the request of Seller, the customer shall ship such allegedly non‐conforming or defective goods, freight prepaid to Seller for examination by Seller’s inspection department and verification of the defect. Seller, at its option, will either repair, replace or issue a credit for products determined to be defective. Seller’s liability and responsibility for defective products is specifically limited to the defective item or to credit towards the original billing. All such replacements by Seller shall be made free of charge f.o.b. the delivery point called for in the original order. Products for which replacement has been made under the provisions of this clause shall become the property of Seller. Under no circumstances are products to be returned to Seller without Seller’s prior written authorization. Seller reserves the right to scrap any unauthorized returns on a no‐credit basis. Any actions for breach of a contract of sale between Seller and a customer must be commenced by the customer within thirteen (13) months after the cause of action has accrued. A copy of Seller’s standard terms and conditions of sale, including the limited warranty, is available from Seller upon request. Copies of the limited warranties covering third‐party proprietary sub‐assembly modules and private‐label products manufactured by third‐parties may also be available from Seller on request. (Rev 0713) 23 SERVICE INFORMATION A Return Material Authorization (RMA) Number is required on ALL PRODUCT RETURNS (regardless of whether the product is being returned for repair or for credit). Product that is received at the factory without an RMA Number will be returned to the Sender, unopened. RMA Numbers must be used when returning product for credit or repair. Use of RMA Numbers will ensure efficient processing. When needing to return your product to R.L. Drake Holdings, LLC., please follow these simple steps listed below (in the order that they appear). SERVICE REPAIRS ONLY CREDIT RETURNS ONLY 1. Contact R.L. Drake Holdings, LLC.’s Service Department 1. Contact R.L. Drake Holdings, LLC.’s Service Department in one of three ways: in one of three ways: A. Phone: 937‐746‐6990 A. Phone: 937‐746‐6990 B. Email: [email protected] B. Email: [email protected] C. Fax: 937‐806‐1510 C. Fax: 937‐806-1510 2. Request from Drake Service a copy of the Product Return 2. Request from Drake Service a copy of the Product Return Authorization Form. Authorization Form. 3. Complete the Product Return Authorization Form fully. 3. Complete the Product Return Authorization Form fully. 4. Return the completed Product Return Authorization Form 4. Return the completed Product Return Authorization Form to the Drake Service Department using one of the contact to the Drake Service Department using one of the contact methods listed in Step 1. methods listed in Step 1. 5. After completing Steps 1 through 4, an RMA Number will 5. After completing Steps 1 through 4, an RMA Number will be assigned to you. be assigned to you. 6. Securely pack the product and mark the box with your RMA 6. Securely pack the product in its original undamaged box Number. If shipping multiple boxes, all boxes must be mark‐ (returning the product without its original packaging in good, ed with the RMA Number. Place the RMA Number near the new condition may cause the incursion of additional fees). return address in large, bold print (approx. 2” in height). Pack this box within another shipping container or box. Mark the shipping box or container with your RMA Number. Place the RMA Number near the return address in large, bold print (approx. 2” in height). 7. Ship your “SERVICE REPAIR ONLY” return to: 7. Ship your “CREDIT RETURNS ONLY” return to: R.L. Drake Holdings, LLC. R.L. Drake Holdings, LLC. Attn: Product Service Returns Attn: Product Credit Returns 9900 Springboro Pike One Jake Brown Road Miamisburg, OH 45342 Old Bridge, NJ 08857 *NOTE: All Credit Returns are subject to a 15% Restock Fee *NOTE: All shipments are to be PRE‐PAID by the sender. NO COD’s will be accepted. IF YOU NEED TECHNICAL HELP Call our Customer Service/Technical Support line at +1 (937) 746‐6990 between 8:00 A.M. and 4:00 P.M. Eastern Standard Time, weekdays. Please have the unit’s serial number available. We will also need to know the specifics of any other equipment connected to the unit. When calling, please have the unit up and running, near the phone if possible. Our technician(s) will likely ask certain questions to aid in diagnosis of the problem. Also, have a voltmeter handy, if at all possible. DRAKE also provides technical assistance by Email: [email protected] Fax: (937) 806‐1510. Many of the products that are sent to us for repair are in perfect working order when we receive them. For these units, there is a standard checkout fee that will be charged. Please perform whatever steps are applicable from the product’s Instruction Manual before calling or writing ‐ this could save unnecessary phone charges. Please do not return the product without calling Drake Service and following the steps above first; it is preferred to help troubleshoot the problem over the phone (or by Email) first, saving you both time and money. 24 R.L. DRAKE HOLDINGS, LLC 9900 SPRINGBORO PIKE MIAMISBURG, OH 45342 USA SALES: FAX: 937.746.4556 800.777.8876 937.806.1510 [email protected] SERVICE: FAX: 937.746.6990 937.806.1510 [email protected] http://rldrake.com 25