1
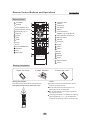
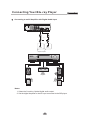
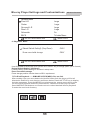
CMMBX130 Operating Manual
This manual contains important information for the setup and
operation of your new Curtis Mathes Blu-ray Disc player. Keep
this manual handy during setup and troubleshooting to help you
connect your Blu-ray player to your TV and other AV equipment
and to help you answer any operating questions you may have.
A message from Curtis Mathes
Congratulations on purchasing your new Curtis
Mathes CMMBX130 Blu-ray player. This disc player
lets you enjoy HD films and experience a new
level of picture detail and color. Advanced Blu-ray
playback technology gives you crisp clear images,
while added picture quality adjustments allow
you to customize your viewing and listening
experience. Please enjoy your new Curtis Mathes
Blu-ray player to its optimum performance by
purchasing discs formattedwith blu-ray
technology.
For your convenience...Please contact your
authorized Curtis Mathes service partner.
Contact Curtis Mathes Support for this product at
the Worldwide Web:
http://www.curtismathes.com/support
or call us toll-free at 1-887-444-8998.
Table of Contents
Introduction
Important Safety Precautions
2
Important Safety Instructions
3
Other Operating Precautions
4
Features
4
Front and Rear Panel Components
5
Remote Control Buttons and Operations
6
Connecting Your Blu-ray Player
Connecting to Your Television Set
7
Connecting to Your Digital Audio System
8
Advanced Features
Remote Control Button Definitions
9
Blu-ray Player Settings and Customizations
12
Troubleshooting and Specifications
Troubleshooting
19
Specifications
20
1
Important Safety Precautions
Please read the manual carefully before using this DVD player, and keep it safe for future reference.
WARNING
TO REDUCE THE RISK OF ELECTRIC SHOCK, DO NOT REMOVE THE COVER (OR BACK).
NO USER - SERVICEABLE PARTS ARE INSIDE. REFER SERVICING TO QUALIFIED SERVICE PERSONNEL.
CAUTION
RISK OF ELECTRIC SHOCK
DO NOT OPEN
The lightening fl ash and
To reduce the risk of electric shock, do The exclamation point within
Arrowhead within triangle is
not remove the cover (or back) no
a warning sign alerting you of
user - serviceable parts are inside. refer alerting you of important
dangerous voltage inside the
servicing to qualified service
instructions accompanying the
product.
personnel.
product.
the triangle is a warning sign
Warning
In order to prevent the risk of fire or electric shock, do not expose the machine to rain or any moisture. Do not
open the case of the unit because of the risk of electric shock. Repair work must be undertaken by qualified
personnel.
Caution
If the unit is moved from a cold to warm environment condensation may develop on the lens of the laser. To
ensure correct operation switch the unit off and leave it for one hour before using.
Caution
This DVD player has a laser system.
Please note that hazardous radiation leakage may be caused if the player is misused in anyway. Do not defeat
the safety interlocks.
Do not open the case of the player. The laser light will become visible when the case is opened.
Warning
・ This machine may malfunction if it is modified or repaired by unauthorized persons.
・ The apparatus shall not be exposed to dripping or splashing and no objects filled with liquids, such as vases,
shall be placed on the product.
・ Must be shown how can operate the product via the MODE and Vol+ and Vol- button for the unit complete the
function.
CLASS 1 LASER PRODUCT
CLASS 1
LASER PRODUCT
Use of controls, adjustments or performance of procedures other than those specified herein may result in
hazardous radiation exposure.
2
11.
Please follow it strictly.
12.
4.
13.
5.
6.
14.
7.
15.
16.
8.
17.
9.
10.
18.
3
Important Operating Precautions
Please use the original box and packing materials for safe transportation of this
product.
It is normal for the cover and rear panel to become warm after the player has been
operation for an extended period of time.
Do not move this product during playback. Doing so may cause damage to the
pickup and the disc.
Press OPEN/CLOSE on the front panel or remote to open or close the disc tray.
Do not push or touch the tray while it is opening or closing.
Features
Introduction
Disc formats supported by this player:
BD-ROM
32
Subtitle choices
Dolby Digital
8
Audio choices
16:9 LB
DVD video
9
TV Aspect Ratio modes
R RESTRICTED Parental Lock
Multi-angle
This product incorporates copyright protection technology that is protected by method claims of
certain U.S.patents and other intellectual property rights owned by Macrovision Corporation and other
rights owners.Use of this copyright protection technology must be authorized by Macrovision
Corporation, and is intendedfor home and other limited viewing uses only unless otherwise authorized
by Macrovision Corporation.Reverse engineering or disassembly is prohibited.
Manufactured under license from Dolby Laboratories."Dolby" and the double-D symbol are trademarks of
Dolby Laboratories. Confidential Unpublished Works. c 1992-1997 Dolby Laboratories, Inc. All rights reserved.
This device complies with Part 15 of the FCC Rules. Operation is subject to the following two conditions:(1)
this device may not cause harmful interference, and(2) this device must accept any interference received,
including interference that may cause undesired operation.
4
Front and Rear Panel Components
Front panel
1
2
3
4
5 6
9
1 POWER
5 SENSOR
2 CABIN DOOR
6
3 BD LIGHT
7 PLAY/PAUSE BUTTON
4 VFD SCREEN
8 STOP BUTTON
OPEN/CLOSE BUTTON
7
2
3 4 5
6
10 NEXT BUTTON
7
1
2 CH Audio output(L,R)
2 COMPOSITE VIDEO output
3
Component Video output (Y, Pb, Pr)
4 Digital Audio COAXIAL output
5
Digital Audio OPTICAL output
6 HDMI output
7 SERVICE
Rear panel(7.1CH Audio output)
DIGITAL AUDIO OUT
1
HDMI OUT(1080P)
SERVICE
6
7
2 3 4 5
1
7.1 CH Audio output
(SR,SL,RR,RL,SW,CEN,FR,FL)
2 COMPOSITE VIDEO output
3
Component Video output (Y, Pb, Pr)
4 Digital Audio COAXIAL output
5
Digital Audio OPTICAL output
7 SERVICE
6 HDMI output
5
9 10
PREV BUTTON
Rear panel(2CH Audio output)
1
8
Remote Control Buttons and Operations
Remote Control
STANDBY
STANDBY
OPEN/CLOSE
20
1
ANGLE
SUBTITLE
AUDIO
2
21
ANGLE
POP MENU/TITLE MENU
RANDOM
22
4
5
POP MENU/TITLE
SECONDARY AUDIO
MOVE(
6
BONUS
VIEW
SECONDARY
AUDIO
SECONDARY
SUBTITLE
7
23
8
)
24
SETUP
3
ENTER
9
COLOUR (RED,
GREEN, YELLOW, BLUE)
SECONDARY SUBTITLE
STEP
SETUP
25
REV
DISPLAY
STEP
SLOW
FWD
PREV
10
11
26
REV
FWD
NEXT
27
12
28
VOL+
29
VOL-
14
+
VOL
0-9 NUMBER KEY
REPEAT
33
A-B
34
RETURN
BONUS VIEW
ENTER
13
MUTE
15
STOP
30
32
OPEN/CLOSE
AUDIO
SUBTITLE
RANDOM
MENU
DISPLAY
SLOW
16
17
1
2
3
4
5
6
7
8
9
0
GOTO
RESOLUTION
REPEAT
A-B
RETURN
31
NEXT
PREV
32
PLAY
18
19
MUTE
33
PAUSE
34
STOP
RESOLUTION
GOTO
Battery installation
1.Open the cover
2.Install batteries
3.Close the cover
O
O
PE
PE
N
N
Using the remote
Notes:
Point the remote control directly at the
player's remote sensor.
Do not leave the remote control in an
extremely hot or humid place.
Do not spill water or put anything wet on
the remote control.
Inserting the 2AAA 1.5V batteries making
sure the polarity (+ or -) of the batteries
matches the polarity marks inside the unit.
Point the remote control at the remote sensor.
(The picture below is for reference only.)
STANDBY
ANGLE
OPEN/CLOSE
SUBTITLE
AUDIO
POP MENU/TITLE MENU
RANDOM
BONUS
VIEW
SECONDARY
AUDIO
SECONDARY
SUBTITLE
ENTER
SETUP
REV
DISPLAY
STEP
SLOW
FWD
PREV
NEXT
MUTE
+
VOL
1
4
STOP
2
5
3
6
7
8
9
0
GOTO
RESOLUTION
REPEAT
A-B
RETURN
6
Connecting Your Blu-ray Player
HDMI
Y
U
V
R
L
VIDEO
AUDIO IN
VIDEO IN
YPbPr IN
HDMI IN
CONNECT BD PLAYER TO TV SET BY AV CABLE
Connect the BD player s L and R jack to the audio input jack on the TV.
Connect the BD player s video out jack to the video input jack of TV.
CONNECT THE BD PLAYER TO TV SET USING THE Y/Pb/Pr JACKS
Use the COMPONENT Cable(not supplied) to connect BD player to your TV.
Set the [Primary output] to [Component].
Connect the BD player s L and R jack to the audio input jack on the TV.
Notes: The BD player component output supports 1080i, 720P, 576P and 576i.
You can press RESOLUTION key on the remote controller to set the BD player
component output. If your TV does not accept your resolution setting, an
abnormal picture appears on the screen. Please read TV s owner s manual then
set the resolution that your TV can accept.
CONNECT THE BD PLAYER TO TV SET USING THE HDMI OUTPUT
Use an HDMI cable to connect BD player to your TV (please check outer packaging
to see if an HDMI Cable is included with this product, if not please visit your local
retailer to purchase an HDMI cable for optimal Blu-ray playback performance).
Notes: The player supports video resolution up to 1080p 60Hz on HDMI output. If
the player is set to a resolution the TV cannot support, picture will become abnormal.
Press the RESOLUTION button under STOP status to change the output resolution.
The player can also perform auto detection of supported TV resolution via EDID in
order to avoid the setting of unsupported resolution.
7
Connecting Your Blu-ray Player
Connecting to an AV Amplifier with Digital Audio Input
Coaxial
Optical cable
Coaxial cable
or
Optical
Digital Amplifier
Notes:
1. Select the Coaxial or Optical digital audio output.
2. Set the digital Amplifier to the AV input connected to the BD player.
8
Remote Control Button Definitions
Advanced Features
,
Function Buttons
OPEN/CLOSE
To open the disc tray, press OPEN/CLOSE; To close the disc tray, press OPEN/CLOSE
again.
AUDIO
During BD, DVD playback, press AUDIO can select different audio language.
During VCD playback, press AUDIO button to switch between LEFT/RIGHT/STEREO
channels.
SUBTITLE
Press the button to choose different captions(Requires support from disc).
RANDOM
During CD playback, press RANDOM button for random sequence playing.
MENU
During BD, DVD playback, press MENU to display the disc menu of the current title.
Note: This function is subject to the disc.
During VCD playback, press MENU to control PBC ON/OFF.
COLOUR( RED/GREEN/YELLOW/BLUE)
Use the buttons as indicated by the video display during BD-ROM disc playback.
DISPLAY
Press the button to show the information of the current playing disc.
A-B
During playback, press A-B to select point A, press it again to select point B. The player will
repeat the section from A to B automatically. Press A-B a third time to cancel A-B repeat and
clear points A and B.
Note: During CD/VCD playback, points A and B must be within the same track. During BD,
DVD playback, points A and B can be selected from different chapters.
ENTER
Press the button to confirm your choice on screen.
RETURN
When VCD disk playing, press RETURN button to return to Main menu (PBC ON only).
During BD/DVD playback, it acts like RESUME
SLOW
During BD, DVD, VCD or SVCD playback, press SLOW for slow motion playback. One you
press SLOW, the disc will play at different speed. Press PLAY to resume normal playback.
9
Remote Control Button Definitions
Advanced Features
NEXT
During BD, DVD,CD or VCD playback, press NEXT to play the next chapter, title or track.
PREV
During BD, DVD, CD or VCD playback, press PREV to play the previous chapter, title or
track.
Play
In pause state or stop state, press the button, the player will be in playing state.
MUTE
Press MUTE to turn off the audio, press MUTE again to resume normal sound.
Pause
In play state, press the button for the first time and the player will be in pause state.
STOP
Press the button once and the player will be in memory stop state. Continuously press
this button twice and the player will be in complete stop state.
RESOLUTION
In the STOP/OPEN TRAY/NO DISC state, Press RESOLUTION key, you can select
different output resolution for HDMI and component.
GOTO
During BD/DVD playback, press GOTO button to choose the desired title or chapter, and
search the desired title time or chapter time.
During VCD playback, press GOTO button to search the desired disk time or track time,
and choose the desired track.(only valid on PBC off)
During CD playback, press GOTO button to search desired track
STANDBY
Press the button to switch the power between normal work mode and standby mode.
ANGLE
Press ANGLE button to view the scene from different angles, this function is disc
dependent.
Bonus View
Press Bonus View button to play the secondary video.
(Picture in picture mode, this function is disc dependent).
Secondary Subtitle
Press Secondary Subtitle button to choose subtitle language of the secondary video (this
function is disc dependent).
Secondary Audio
Press Secondary Audio button to choose audio language for the secondary audio (this
function is disc dependent).
10
Remote Control Button Definitions
Advanced Features
POP MENU/TITLE
Press the button to enter the appointed title.(Requires disc support)
During BD playback, press the button to display the disc s popup menu.
REPEAT
Each press of the REPEAT button will change the repeat mode.
During VCD, CD playback, there are three modes: repeat Single, repeat ALL and Off.
During BD, DVD playback, there are three modes: Repeat Chapter, Repeat Title and OFF.
Note: During VCD playback, the PBC mode must be set to Off.
Direction key(UP/DOWN/RIGHT/LEFT)
Press the keys to move the highlighted bar or cursor on any menu to your selection.
SETUP
Press the button to enter the system setting menu. Press the button again to exit the menu.
STEP
Press STEP to step a single frame/ picture forward during playback. Press STEP several
times to step several frames/ pictures forward. Press play to resume playback.
REV:
During BD, DVD, CD or VCD playback, press REV to scan in reverse. The player will review
the disc at different times speed. Press PLAY/PAUSE to resume normal playback.
FW D
During BD, DVD, CD, or VCD playback, press FW D to scan forward. The player will cue the
disc at different speed. Press PLAY/PAUSE to resume normal playback.
VOLUME+/Press VOL+ to increase volume and press VOL- to decrease volume.
0-9 keys
These keys are used to input the time, as well as title, chapter and track numbers. When a
numeric item is displayed on the screen, press the 0-9 keys to select the desired entry, and
press ENTER to confirm. When a VCD is playing(with PBC off), press the 0-9 keys to select
a track directly.
11
Blu-ray Player Settings and Customizations
Advanced Features
BD Player Setup Menu
Press SETUP button on remote controller under STOP or TRAY OPEN status to enter Main
menu. In Main menu, press UP/DOWN button to select desired sub-menus and press
ENTER button to switch to other sub-menus. In sub-menus, LEFT/RIGHT button are used
to change options for desired item which was highlighted.
A. Main setup menu for 2 channel player
Language Menu
Display Menu
Audio Menu
Parental Password Menu
Diagnostic Menu
EXIT
ENTER: switch menu item
: make choice
B. Main setup menu for multi-channel player
Language Menu
Display Menu
Audio Menu
Parental Password Menu
Speaker Menu
Diagnostic Menu
EXIT
ENTER: switch menu item
: make choice
1. LANGUAGE SETUP
Select Language in the setup menu, and display the Language submenu:
Language Menu
Audio Language
Subtitle Language
Menu Language
OSD Language
BACK
Auto
None
Auto
English
To Index Menu
ENTER: switch menu item
: make choice
1.1 Audio Language : Select default audio language for BD/DVD
1.2 Subtitle Language: Select default subtitle for BD/DVD.
12
Blu-ray Player Settings and Customizations
Advanced Features
1.3 Menu Language: Select default menu language for BD/DVD.
1.4 OSD Language: Select your language for player OSD.
1.5 BACK: Return to main setup menu.
2. DISPLAY SETUP
Select Video in the setup menu, and display the Video submenu:
Display
TV Type
TV Aspect
Resolution
Color Space
Film Mode
BACK
Menu
NTSC
16:9
1080i
xvYCC
off
To Index Menu
ENTER: switch menu item
: make choice
2.1 TV Type: Select TV type.
2.2 TV Aspect:: Select display configuration for disc.
16:9: Content presented in 16:9 geometry for widescreen TVs.
4:3: Content presented in 4:3 geometry with horizontal black bars on top and bottom for
conventional TVs.
4:3 Pan and Scan: Content cropped to fit within 4:3 geometry for conventional Tvs.
Note: Under HD(720P / 1080i / 1080P) mode, just 16:9 is available.
2.3 Resolution: Select desired resolution.
2.4 Color Space
User can select the best color space the TV supported for best color effect
xvYCC: player implements a fallback algorithm in which the flow is xvYCC->YCC->RGB
base on EDID information via HDMI
YCC: player implements a fallback algorithm in which the flow is YCC->RGB base on EDID
information via HDMI
RGB: player will output video using RGB color space
Note: Color space setting only affects HDMI video output. Choose correct option here if you
know the color space feature of TV, choose xvYCC option to let player decide for you. For
some special case, e.g. the TV has wrong EDID information, please change color space to
RGB.
2.5 Film Mode
On: player will output disk content recorded at 24 frames per second directly
Off: player will convert 24frams/sec content to 1080p 60Hz output
Note: This item is only affect HDMI output, if no HDMI connect to player or TV do not support
1080p24Hz, it will be locked to ・Off・ option.
2.6 BACK: Return to main setup menu.
13
Blu-ray Player Settings and Customizations
Advanced Features
3. Audio setup menu
A. For 2 channel player
Audio Menu
Digital Output
PCM Downsampling
Dynamic Range Control
BACK
PCM
Off
Off
To Index Menu
ENTER: switch menu item
: make choice
B. For multi-channel player
Audio Menu
Digital Output
PCM Downsampling
Dynamic Range Control
Bass Crossover Freq
BACK
PCM
Off
Off
Off
To Index Menu
ENTER: switch menu item
: make choice
3.1Digital Output
Choose preferred option for digital output base on receiver connected to player
PCM: Output PCM audio data for receiver not support Dolby「 and DTS「 decoding (mixed
primary audio, secondary audio and effect audio if available in disk)
Bitstream: Output raw data for receiver support Dolby and DTS decoding (primary audio
only).
Re-encoded DTS: Output DTS data format for receiver if it support DTS decoding (mixed p
rimary audio, secondary audio and effect audio if available in disk)
Note: Not setting this item properly may result in noise.
「 Dolby Digital, Dolby Digital Plus, Dolby Digital True HD
「 DTS and DTS HD
14
Blu-ray Player Settings and Customizations
Advanced Features
3.2 PCM Downsampling: Sets maximum sampling rate for the SPDIF digital audio output (as
some SPDIF receivers do not support 192 kHz or even 96 kHz).
48 kHz: Downsample audio with sample rates over 48 kHz.
96 kHz: Downsample audio with sample rates over 96 kHz.
Off : No downsampling on SPDIF output.
3.3 Dynamic Range Control: Reduces loudness difference between soft and loud parts of
the audio track.
On: Enables dynamic range control for all codecs.
Follow: Enables dynamic range control for all codecs. MLP streams use the
DRC level embedded in the audio stream itself.
Off: Turns off dynamic range control.
3.4 Bass Crossover Freq(only for multi-channel player)
Use this item to indicate BD player your Subwoofer's frequency response (off / 80Hz /
100Hz / 120Hz)
3.5 BACK: Return to main setup menu.
4. Parental control menu:
Please Input 4-Digit parental password
ENTER: switch menu item
: make choice
Enter right password to enter parental control menu.
Parental Menu
Parental Country
Parental Control
Parental Level
Parental Password
BACK
USA
Off
1. Kid Safe
Default
To Index Menu
ENTER: switch menu item
Note: Factory default password is 6666.
15
: make choice
Blu-ray Player Settings and Customizations
Advanced Features
4.1 Parental Country: Select the movie intended for your residential area.
USA: Parental country set to USA.
International: Parental country set to others
4.2 Parental Control: Activate parental control.
Off: Turn off parental control.
On: Turn on parental control.
4.3 Parental Level Select parental control level, disc cannot be played if preset level on
disc exceeds the level user set.
1.Kid Safe
2.G
3.PG
4.PG-13
5.PG-R
6.R
7.NC-17
8.Adult
4.4 Parental Password: Set parental password.
Default: Reset to default password
User Define: Setup user define password
User defined password setting for parental control.
Please set 4-Digit Parental password: ----
ENTER: switch menu item
: make choice
4.5 BACK
Select this item, then press ENTER to return to main setup menu.
5.Speaker Menu(only for multi-channel player)
Set this menu properly for analog audio output.
If there are only 2 speakers, just keep Front L-R as ・large・, set others to ・Off・
If there are more speakers connected through amplifier, Front L-R set to ・Large・,
others you can set to ・Large・ or ・Small・, and turn Subwoofer to ・On・. Only when the
source content with 5.1CH or 7.1CH audio stream, player can output 5.1CH or 7.1
CH analog audio
16
Blu-ray Player Settings and Customizations
Speaker Menu
Front L-R
Center
Surround L-R
Rear L-R
Subwoofer
BACK
Advanced Features
Large
Large
Large
Large
On
To Index Menu
ENTER: switch menu item
: make choice
6. Diagnostic Menu
Reload Default Setting? (Okay/Canel)
OKAY
Erase nonvolatile storage
OKAY
ENTER: switch menu item
: make choice
Use UP/DOWN to select item, then use the LEFT/RIGHT key to change option (OK or Cancel).
Reload Default Setting? (Ok/Canel)
Loading factory default setting for all items in setup menu
Erase nonvolatile storage
Erase storage partition function base on BD-J requirement
7.File Disk Playback ----- WMA/MP3/JPEG(WMJ) files on disk
After reading from your recorded music/picture/video disk, the player will list all
directories and files in root directory as shown below. Press the TITLE key to display
the help messages, Press the MENU key to bring up the pop up menu which guide
you through the special features, press the LEFT button to exit the pop up menu,
press NAVIGATION buttons on remote control to select desired item for playback
or enter the next level directory.
17
Blu-ray Player Settings and Customizations
Advanced Features
For music files, in the pop up menu, user can add the current file into playlist as
a favorite songs, and set current file as the background music for your JPEG slide show.
Play
Add Play List
Set As BGM
For the playlist operation, in the pop up menu, user can set the play mode, audio mode,
and remove songs which have been added into playlist.
Play
Set Play Mode
Set Audio Mode
Play list
For JPEG files, in the pop up menu, the user can choose to play the current JPEG or
slide show JPEG files
Play
Start Slide Show
Properties
For a single JPEG file playback, a user can change to slide show mode with different
transition effects, rotate the current picture or choose ・Properties・ to see detailed
file information.
Start Slide Show
Rotate
Properties
For JPEG slide show operations, the user can set the time interval or transition effects for
the JPEG slide show and enable background music playback during a JPEG slide show.
Start Slide Show
Blend
Slide Show Duration
Film
Slide Show BGM
Shutter
Fade
Curtain
None
18
Troubleshooting
& Specifications
Troubleshooting
Make sure the Main unit s POWER button is on.
Ensure you have entered the correct AV input for your TV.
Ensure you have entered the correct AV input for your TV.
19
Troubleshooting
& Specifications
Specifications
Power requirements: AC 100-240 Volt, 50/60Hz
Power consumption: 35W
Discs COMPATIBILITY:
BD,DVD,DVD+/-R/RW,VCD,CD-DA,CD-R/RW.
Video out
Video out: 1.0V(p-p)/75 , sync, negative polarity, RCA pin jack x 1
Audio out
2 channel out: RCA pin jackx2
7.1 channel out: RCA pin jackX8 (optional)
Coaxial out: 0.5V(p-p)75 , RCA pin Jack x l
Frequency response: 20Hz to 20kHz
S/N ratio:>90dB
Total harmonic distortion: <-65dB
[Accessories]
Video/ Audio cable x 1 (or HDMI cable, please refer to the outer packaging)
Remote Control x 1
User s Manual x 1
Battery x 2
Specifications are subject to change without notice.
Weight and dimensions are approximate.
20