1
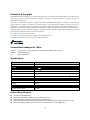
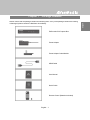
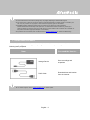
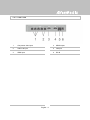
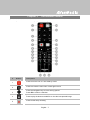
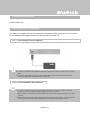
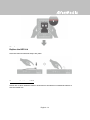
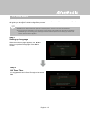
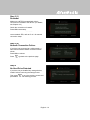
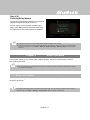
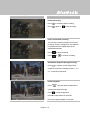
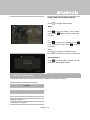
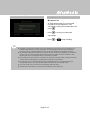
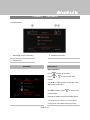
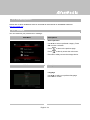
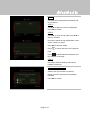
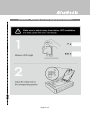
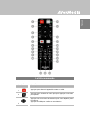
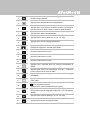
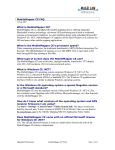
Italiano EzRecorder 530 CR530 English Français Deutsch Italiano Español Português User Manual European Community Compliance Statement Class B This product is herewith confirmed to comply with the requirements set out in the Council Directives on the approximation of the laws of the Member States relating to Electromagnetic Compatibility Directive (EMC) 2004/ 108/ EC, Low Voltage Directive (LVD) 2006/95/EC and Energy-related Products Directive (ErP) 2009/ 125/ EC. Responsible manufacturer: AVerMedia Technologies, Inc. No. 135, Jian 1st Rd.,Zhonghe Dist., New Taipei City 23585, Taiwan TEL: +886-2-2226-3630 European Community contact: AVerMedia Technologies Europe B.V. Kwartsweg 50, 2665 NN, Bleiswijk, The Netherlands Technical Support: http://www.avermedia.com/avertv/Support/ FCC NOTICE (Class B) This device complies with Part 15 of the FCC Rules. Operation is subject to the following two conditions: (1) this device may not cause harmful interference, and (2) this device must accept any interference received, including interference that may cause undesired operation. Federal Communications Commission Statement NOTE- This equipment has been tested and found to comply with the limits for a Class B digital device, pursuant to Part 15 of the FCC Rules. These limits are designed to provide reasonable protection against harmful interference in a residential installation. This equipment generates, uses and can radiate radio frequency energy and, if not installed and used in accordance with the instructions, may cause harmful interference to radio communications. However, there is no guarantee that interference will not occur in a particular installation. If this equipment does cause harmful interference to radio or television reception, which can be determined by tuning the equipment off and on, the user is encouraged to try to correct the interference by one or more of the following measures: ‧ ‧ ‧ ‧ Reorient or relocate the receiving antenna. Increase the separation between the equipment and receiver. Connect the equipment into an outlet on a circuit different from that to which the receiver is connected. Consult the dealer or an experienced radio/television technician for help. CAUTION ON MODIFICATIONS To comply with the limits for the Class B digital device, pursuant to Part 15 of the FCC Rules, this device must be installed in computer equipment certified to comply with the Class B limits. All cables used to connect the computer and peripherals must be shielded and grounded. Operation with non-certified computers or non-shielded cables may result in interference to radio or television reception. Changes and modifications not expressly approved by the manufacturer or registrant of the equipment can void your authority to operate the equipment under Federal Communications Commission rules. Responsible manufacturer: AVerMedia Technologies, Inc. No. 135, Jian 1st Rd.,Zhonghe Dist., New Taipei City 23585, Taiwan TEL: +886-2-2226-3630 USA Office contact: AVerMedia Technologies U.S.A. 47358 Fremont Blvd., Fremont, CA 94538 Technical Support: http://www.avermedia.com/avertv/Support/ i CAN ICES-3 (B)/NMB-3(B) 1. 2. 3. 4. 5. 6. Dispositif de sécurité - Ne pas modifier Utilisez uniquement les cordons et les boîtiers d’alimentation fournis par le fabricant du produit. N’enroulez jamais un cordon d’alimentation autour du boîtier d’alimentation ou de tout autre objet. Connectez toujours les cordons d’alimentation et les câbles d’interface dans le bon ordre et assurez-vous que tous leurs connecteurs sont bien enfoncés et fixés dans les prises. N’utilisez pas de boîtiers d’alimentation présentant des signes de corrosion sur les broches d’entrée secteur ou des signes de surchauffe. Evitez d’exposer le cordon et les boîtiers d’alimentation à des liquides. JAPAN- VCCI Class B Mark VCCI Class B Statement BSMI Declaration of Conformity D33183 重要安全說明 •仔細閱讀這些說明。 •妥善保存這些說明。 •遵守所有的指示。 •注意所有的警告。 •請勿將本產品安裝於不平穩的表面。 •請勿在潮濕或靠近水的地方使用本產品。 •清潔前請拔除電源。僅使用乾布清潔。 •請於通風的環境使用本產品。請勿堵住通風口。 •請於規格溫度範圍內使用本產品。 •請使用額訂電壓範圍內的電源。 •請勿放置重物於本產品上。 •請勿安裝於熱源附近如暖器或火爐旁。 •請勿破壞極性或接地插頭的安全防護設計。 •請保護電源線,物使其被踩踏或碾壓,特別是與插頭或變壓器的連接處。 •僅使用製造商指定的配件及零件。 •打雷或長時間不使用時請拔除電源。 •請勿以任何方式改造或拆解本產品。 •如需維修請洽合格維修人員。 •請勿當作家庭垃圾任意丟棄。請遵從當地環境法規妥善處理。 ii WASTE ELECTRICAL AND ELECTRONIC EQUIPMENT (WEEE) The mark of Crossed-out wheeled bin indicates that this product must not be disposed of with your other household waste. Instead, you need to dispose of the waste equipment by handing it over to a designated collection point for the recycling of waste electrical and electronic equipment. For more information about where to drop off your waste equipment for recycling, please contact your household waste disposal service or the shop where you purchased the product. Important Safety Instructions 1.) Read these instructions. 2.) Keep these instructions. 3.) Pay attention to all warnings. 4.) Follow all instructions. 5.) Do not use this apparatus near water. 6.) Clean only with dry cloth. 7.) Do not block any ventilation openings. Install in accordance with the manufacturer's instructions. 8.) Do not install near any heat sources such as radiators, heat registers, stoves, or other apparatus (including amplifiers) that produce heat. 9.) Do not defeat the safety purpose of the polarized or grounding-type plug. A polarized plug has two blades with one wider than the other. A grounding type plug has two blades and a third rounding prong. The wide blade or the third prong is provided for your safety. If the provided plug does not fit into your outlet, consult an electrician for replacement of the obsolete outlet. 10.) Protect the power cord from being walked on or pinched particularly at plugs, convenience receptacles, and the point where they exit from the apparatus. 11.) Only use the attachments/accessories specified by the manufacturer. 12.) Unplug this apparatus during lightning storms or when unused for long periods of time. 13.) Refer all servicing to qualified service personnel. Servicing is required when the apparatus has been damaged in any way, such as power-supply cord or plug is damaged, liquid has been spilled or objects have fallen into the apparatus, the apparatus has been exposed to rain or moisture, does not operate normally, or has been dropped. WARNING To prevent fire or shock hazard do not expose the unit to rain or moisture. Dangerously high voltages are present inside the unit. Do not open the unit. Refer servicing to qualified personnel only. Battery Safety Information Use of carbon-zinc battery for remote control is strongly recommended. Use of other types of batteries, such as alkaline or rechargeable (nickel-cadmium), may cause battery current overload or battery leakage and corrosion which can damage the remote control. Store the batteries in a cool dry place. Do not dispose of used batteries in domestic waste. Dispose of batteries at special collection points or return to point of sale if applies. Remove the batteries during long periods of non-use. Always remove exhausted batteries from the remote control. Battery leakage and corrosion can damage this remote control, dispose of batteries safely. Do not mix old and new batteries. Do not mix different types of batteries: alkaline, standard (carbon-zinc) or rechargeable (nickel-cadmium). Do not dispose of batteries in a fire. The batteries may explode or leak. Never short circuit the battery terminals. iii Disclaimer & Copyright © 2014 by AVerMedia Technologies, Inc. All rights reserved. No part of this document may be reproduced or transmitted in any form, or by any means (Electronic, mechanical, photocopy, recording, or otherwise) without prior written permission of AVerMedia Technologies, Inc. Information in this document is subject to change without notice. AVerMedia Technologies, Inc. reserves the right to modify, change, improve or enhance its products and to make changes in the content without obligation to notify any person or organization of such changes. Please visit avermedia.com to get the updates of the operation and use of AVerMedia products. "AVerMedia" is trademark and logo of AVerMedia Technologies, Inc. Apple, the Apple logo, iPod, iPhone, iPad and Apple TV are trademarks and/or registered trademark of Apple Inc., registered in the U.S. and other countries. Other trademarks used herein for description purpose only belong to each of their companies. Picture shown may vary from actual product. Fonts by Arphic, Copyright © Arphic Technology Co., LTD All Rights Reserved. This software uses libraries from the Libav project under the LGPLv2.1. International Headquarter Office Address: No.135, Jian 1st Rd., Zhonghe Dist., New Taipei City 23585, Taiwan (R.O.C.) Website: www.avermedia.com/ Tel: +886-2-2226-3630 Specifications Product Name Capture Box Model No. CR530 Power Input Rating 12 V Power Consumption < 7 W (power consumption of hard drive not included) Standby Power Consumption < 0.5 W Adapter Rating Input: 100–240 V~, 50–60 Hz 0.5 A, Max. Output: 12 V 1.5 A 1.5 A Dimension Size 190 mm (W) x 33.5 mm (H) x 152.5 mm (D) Weight 421 g Environmental Condition Operating Temperature 0–40℃ System Requirements TV/monitor with HDMI input TV/monitor with 720p or 1080p (recommended) resolution Video device with component video (YPrPb) or HDMI output NTFS-formatted hard drive with capacity greater than 500 GB (maximum supported capacity: 2 TB) Hard drive is highly preferred over flash drive to minimize the risk of recording failure iv Package Contents Please confirm that the package contains the following items. If any of the package contents are missing or damaged, please contact the distributor immediately. EzRecorder 530 Capture Box Power Adapter Power Adapter Outlet Module HDMI Cable User Manual Quick Guide Remote Control (Batteries Included) English – 1 English Chapter 1 The accessories that come with the package may vary slightly depending on different sales regions. The capture box is made for record and capture media materials that are legally owned or licensed by the user only. Any violation of copyrights or other intellectual property rights is not allowed. AVerMedia regularly releases the latest version of firmware for the capture box. Having the latest firmware enhances the functionality of the capture box. To download the latest firmware file, please go to /www.avermedia.com and then enter the model name in Product Search field. Firmware file is available on the product information page (See Chapter 6.2 for details). If problems are encountered, refer to FAQ section at www.avermedia.com for further troubleshooting. 1.1 Other Items You Need In order to fully enjoy the recording and capturing functions of the capture box, you will need to have the following items prepared: You need the item to… Item Storage Device Save recordings and snapshots RJ45 Cable Download time and location from the Internet For further support, refer to www.avermedia.com for latest update. English – 2 Chapter 2 The Unit Parts 2.1 Front Panel The button panel found on the front of the unit provides quick access to commonly used functions. # Buttons Descriptions Record 1 Press to start / stop recording. Power Press to turn the unit on. 2 Hold down the button for 4 seconds to forcibly shut down the capture box. 2.2 Infrared Sensor When using the remote control, aim it at the infrared (IR) sensor located at the front panel of the unit. The remote control must be held at an angle within 30 degrees perpendicular to the IR sensor to function correctly. The distance between the remote control and the sensor should not exceed 6 meters (20 feet). English – 3 2.3 LED Indicator The LED indicators on the front of the unit show the device’s status. 1 HDMI source LED indicator 2 YPbPr source LED indicator 3 Record status LED indicator 4 Power status LED indicator Condition Source Record Powered on Ready to record/snapshot Power Solid green Solid green Solid green Recording Solid green Flashes red slowly Solid green Take a snapshot Flashes red once Flashes red once Flashes green once Unable to record/snapshot Flashes green continuously Solid green Flashes green continuously No source Source is available Solid green Power off in progress Solid green A/V pass through on when powered off Flashes green continuously Solid orange Pause recording Solid green Solid red Solid green Record finish in progress Solid green Flashes red continuously Solid green English – 4 Condition Source Record Power Storage space is low Solid green Flashes red rapidly Solid green Device is not ready Flashes green continuously Problems like no storage / no signal / protected content Flashes green continuously Accepting a remote control command Flashes green once Press [F1] to obtain LED light indicator status. 2.4 Connection Ports 2.4.1 Front View 1 USB slot 2 MIC input 3 Headphone output USB slot is for external HDD storage device connection as well as for firmware upgrade via storage device. USB hub is not supported. There will be no function or reply when connecting the capture box to the computer via USB. English – 5 2.4.2 Rear View 1 Component video input 4 HDMI output 2 Audio L/R input 5 LAN port 3 HDMI input 6 DC-IN English – 6 Chapter 3 The Remote Control The descriptions below show the deployment of the keys on the remote control. # 1 2 3 4 5 Buttons Descriptions Press to turn the unit on / into stand-by mode. Press to access the main menu. Press again to exit. Press the navigation keys to move among options. Press OK to confirm a selection. Press to play the latest recorded file or view the last captured image. Press to start/ stop recording. English – 7 6 7 8 9 Press to start playing the selected file. Press to play the file at normal (1x) speed when slow motion, rewind, or fast-forward is active. Press to stop the playback/ recording. Press to rewind (2x, 4x, 8x, 16x, 32x). Press to return to the previous page. 10 Press to display the video/ snapshot quality adjustment screen. Press again to exit. 11 Press to safely remove external hard disk in Menu. (Follow the on-screen instruction) 12 13 14 15 16 17 (Follow the on-screen instruction) (Follow the on-screen instruction) Press to switch between Component and HDMI sources. Press to display onscreen information, including mode, source and audio sources. Press to exit the current page and return to the previous page. Press to take a snapshot during video playback or recording. 18 Press to pause the playback. Press OK or Press to pause the recording. 19 Press to play the video in slow motion (1/2x). Press again to enter frame- byframe mode (See p.27 for details). 20 21 22 23 to resume playback. Press to fast-forward (2x, 4x, 8x, 16x, 32x). Press to go to the next page. Press to delete the selected files. Press to display the disk information. Press again to hide it. English – 8 Chapter 4 Installation & First Time Setup 4.1 Supported Resolutions The capture box supports Component (YPbPr) and HDMI input resolution as follows: HDMI / Component (YPbPr) 480i/576i 480p/576p 720p (50 & 60 Hz) 1080i (50 & 60 Hz) 1080p (24, 25, 30, 50 & 60 Hz) * * Component only supports 1080p (50 & 60 Hz) The capture box records in the same resolution as the display resolution under most circumstances. Exceptions can only be found when the source resolution is set to 1080p. The discrepancy is due to the TV not supporting 1080p (30 fps) playback, which results in an automatic drop in display resolution to 1080i (60 fps). However, such change will not affect the resolution of your recorded file – 1080p (30 fps). Source Resolution Display Resolution Recorded Resolution 1080p (60 fps) 1080i (60 fps) 1080p (30 fps) 1080p (50 fps) 1080i (50 fps) 1080p (25 fps) 1080p (30 fps) 1080i (60 fps) 1080p (30 fps) 1080p (25 fps) 1080i (50 fps) 1080p (25 fps) 1080p (24 fps) 1080p (24 fps) * 1080p (24 fps) * Requires a monitor or TV that supports 1080p 24 fps English – 9 Estimated recording duration for different video quality settings: HD 1080p Video Quality Optimal (20 Mbps) Good (18 Mbps) Maximum Recording Length (15 Mbps) 1 TB 100 hrs 110 hrs 125 hrs 2 TB 200 hrs 220 hrs 250 hrs Optimal (20 Mbps) Good (15 Mbps) Maximum Recording Length (10 Mbps) 1 TB 100 hrs 125hrs 200 hrs 2 TB 200 hrs 250 hrs 400 hrs Optimal (15 Mbps) Good (12 Mbps) Maximum Recording Length (10 Mbps) 1 TB 125 hrs 150 hrs 200 hrs 2 TB 250 hrs 300 hrs 400 hrs Optimal (7.5 Mbps) Good (5 Mbps) Maximum Recording Length (3 Mbps) 1 TB 250 hrs 400 hrs 650 hrs 2 TB 500 hrs 800 hrs 1300 hrs Storage Capacity HD 720P Video Quality Storage Capacity HD 1080i Video Quality Storage Capacity SD 480i(576i)/480P(576P) Video Quality Storage Capacity Recording with higher video quality takes up more disk space. English – 10 4.2 Hardware Installation Please refer to Quick Installation Guide or download full User Manual on AVerMedia website at www.avermedia.com. 4.3 Storage Device Installation The capture box supports 2.5 inch internal hard drive and external USB storage device. You can save the recorded files and snapshots either to the internal HDD or external one. 4.3.1 USB Storage Device Insertion Connect your portable USB hard drive to the USB port on the front of the capture box It is highly recommended to use a NTFS format hard drive instead of a flash drive to minimize the risk of recording failure. To avoid any possible data loss, go to main menu and press [F1] of your remote control to safely remove the external storage disk before unplugging it from the capture box. 4.3.2 HDD Installation and Removal It is highly recommended to use a new unformatted hard drive or a hard drive formatted as NTFS file system. The maximum supported storage capacity of the hard drive is 2 TB. Before installing or removing the internal HDD, please disconnect the power supply from the capture box to avoid data loss. Removing internal HDD immediately after powering-off may cause personal injury due to heat. Please wait until the HDD cools down completely (it takes approximately 10 minutes) before any attempt to remove it. English – 11 To install the internal HDD: Step 1 Remove the HDD Lid Open the HDD lid on the bottom of the capture box. Step 2 Before Installing Internal HDD Use the measuring card to measure the height of your HDD (7 mm or 9.5 mm). Please refer to the Appendix B for the measuring card. English – 12 Adjust the rotary knob attached to the inner side of the lid to fit the height of your HDD. The default position of the rotary knob fits HDD with 9.5 mm height. If you use HDD with 7 mm / 9.5 mm height, rotate the rotary knob to the other direction. Using a 9.5 mm HDD: Using a 7 mm HDD: Step 3 Inserting the HDD Place the HDD on the slot with the sticker-side facing up and the HDD connector end facing to the left. Align and insert the HDD connectors all the way into the SATA connector. Push in firmly to secure them. English – 13 Step 4 Replace the HDD Lid Place the HDD lid back and snap it into place. To remove the internal HDD: Please refer to Quick Intallation Guide or download full User Manual on AVerMedia website at www.avermedia.com. English – 14 4.4 Setup Wizard When the first time you power on the capture box unit, the setup wizard appears. The following steps will guide you through the initial configuration process. Make sure to install a hard drive (internal or external) and to connect to the internet beforehand. For the first-time initialization, a short duration of black screen (approximately 20 seconds) is followed by AVerMedia logo. The blinking green status light indicates that the capture box is starting up. Please wait until the welcome screen appears. Step 1 Setting up Language When the welcome page appears, use ▲/▼ to select your preferred language. Press OK to confirm. Step 2 A/V Pass Thru. It is suggested that A/V Pass Through to be turned ON. English – 15 Step 3 (1) Reminder Make sure a NTFS-formatted hard drive is connected or installed to the device. (For details, see Chapter 4.3) Check the connection of network. Press OK to start setup. A router which supports DHCP IP network is recommended. Also, refer to Ch. 6.3 for manual connection setup. Step 3 (2) Network Connection Failure If you have not connected to a valid network, a short result of failed network connection will be shown. Press OK to continue. Press to go back to the previous page. Step 4 No Hard Drive Detected If you have not yet installed any storage device, install it before continuing the setup process. Then press to go to the previous screen and press OK to run disk checking process. English – 16 Step 4 (2) Finishing Setup Wizard Once a NTFS-formatted hard drive is connected, a Settings Complete notice will be shown. You can start to record and take snapshot right away. Press OK to exit the wizard and start using the capture box. The video screen then appears. Unplug the capture box from the power supply before installing an internal HDD. Sometimes the connection test in Wizard will appear to be failed even though you have connected the RJ45 cable to the capture box. Go to Menu > Network > Network Settings > Manually Setup to set the network manually. Chapter 5 Basic Operation This chapter guides you to record video, capture images, add voice commentary to videos, and instantly play files. All the recorded files or snapshots will be saved to the default hard drive destination automatically. Please see Chapter 6 for details. 5.1 Record and Capture The capture box lets you record, capture and adds voice commentary to the videos. Instructions are given as follows. The capture box displays video in real-time and standard mode. You can change the default real-time mode to standard mode. Go to Menu > Settings > Display Mode. (Refer to Chapter 6.2 for details.) English – 17 OSD Menu Descriptions Instant Recording - Press to activate instant recording. - Press again or to stop recording. Pause and resume recording You can skip unwanted footages and resume recording. Only the footages you recorded will be saved and those skipped clips will be deleted automatically. - Press to pause recording. - Press or to continue recording. Quick/Burst Snapshot During Recording - Press to capture current image. Burst snapshot can be set in Settings to take 1, 3, 5, or 7 consecutive snapshots. Instant Playback - Press to play the latest recorded file or view the last captured image. - Press to stop the playback. - Press ►to skip forward 30 seconds. - Press ◄ to skip backward 10 seconds. English – 18 Image Capture During Video Playback Way 1: - Press to capture current image. Way 2: Step 1: - Press to play the video in slow motion (1/2x). Press again to view the video frame by frame. or - Press to pause the playback. Press to go to previous frame; press to go to next frame. Step 2: - Press to capture your desired image. Disk Information Press then press OK to display the disk information. Press again to hide it. 5.2 Adding Commentary This section shows you how voice commentary is added to your video recording. Requirements for headset/microphone: Headset Connector: 3.5 mm jack Microphone Frequency Response : 20–16 kHz Impedance: 2.0 KΩ Working Voltage: 3 V Connector: 3.5 mm jack English – 19 OSD Menu Descriptions Microphone On An OSD will be shown if you connected microphone to the capture box. Your commentary will only be recorded when you press . - Press to record your video with commentary. - Press or to stop recording. If headset or microphone is plugged in during the Wizard Setup, the sound can only be heard from your headphone and instructions on voice commentary will not be displayed. Therefore, plug in headset or microphone after you complete Wizard setup so as to follow the headphone/ microphone instructions. All commentary added will be mixed with the video sound. Also, a s long as the headphone is connected to the device, all your commentary and background sound will be recorded. Therefore, remember to stop recording and remove the headphone when no commentary is needed. If the microphone is disconnected or connected to the capture box during recording, the sound will also be recorded. Please avoid plugging or unplugging the microphone during recording. The volume you hear in the commentary test may be slightly different from the actual recording. It is recommended that you run a mock test beforehand to be familiar with the recorded volume. It is normal to hear your own voice when recording with HDMI input source. No OSD will be shown when you connect only the headphone to the capture box. English – 20 Chapter 6 OSD Menu Under the menu, you can check and manage both your recorded files and snapshots, and customize your preferences. 1 Remaining Time for Recording 3 Current Time OSD Menu 2 Network Connection Descriptions Basic Operation - Press to bring up the menu. - Press or to return to the video screen. - Use ▲/▼ to make selection on the menu and OK to enter a submenu. - In the submenu, use ▲/▼ to make selection and OK to confirm. Press to return to the previous page. Press F1 to safely remove the storage device.. - *The upper left corner shows your current default storage device and available remaining recording English – 21 6.1 Media Studio You can check both recordings and snapshots captured by the capture box in “Media Studio”. Capture Format: Video AVI (Codec: H.264 format with MP3 audio) Image JPEG It is recommended that you view only videos and snapshots that are recorded by the capture box. Attempt to open files taken by other equipment (such as a camera) on the capture box is very likely to fail. OSD Menu Descriptions Navigating - Use the navigation keys ◄/►/▲/▼ to select among items. - Press F1 to sort the files by name, size, format, or modified date. - Press F2 to switch between list mode and thumbnail mode. - Press F3 to rename, edit, share the highlighted file. - Press to go to the next page. - Press return to the previous page. - Press to directly access the main menu. Video Playback - Press or OK to start playing the selected video. - Press or OK to pause the playback. Press or OK to resume playback. - Press to play the video in slow motion (1/2x). - Press to rewind at 2x, 4x, 8x, 16x, 32x speed. - Press to fast forward at 2x, 4x, 8x, 16x, English – 22 32x speed. - Press to play the file at normal (1x) speed when slow motion, rewind, or fast-forward is active. - Press to stop the playback. - Press to display the playback information, including storage disk, recording resolution, duration, elapsed and remaining time, and file name. * Only video files captured by the capture box are supported. Snapshots Viewing - Press Press or OK to view the selected image. or to return. * Only image files captured by the capture box are supported. English – 23 6.2 File Management Please refer to Quick Installation Guide or download full User Manual on AVerMedia website at www.avermedia.com. 6.3 Settings You can customize your preferences in “Settings”. OSD Menu Descriptions Basic Operation - Use ▲/▼ to select a preferred category. Press OK to make a selection. - Press Press to return to the previous page. to directly access the main menu. - Press F1 to safely remove the storage device. OSD Menu Descriptions Language Use ▲/▼ to select your preferred language. Press OK to confirm. English – 24 OSD Menu Descriptions Display Mode The default mode is set as real-time mode. - Use ▲/▼ to switch between real-time and standard mode. Real-Time Mode Real-time mode lets you play videos with zero delay. No recording or snapshot status will be shown on screen. All capture work will run in the background. However, if any problem occurs during the capturing process, OSD will automatically jumps out. - Press to check OSD and track capture status. Standard Mode In standard mode, on-going recordings will be shown in the upper right corner of the screen. As there will be a slight delay in video, standard mode is recommended for set-top box. Black screen may occur when calling for Menu in real-time mode. And the pause varies by TV type. English – 25 OSD Menu Descriptions Network Settings Use ▲/▼ to move among options. Press OK to confirm. Before setup, please make sure the Ethernet cable is well connected. Auto Setup (Recommended) : It is recommended to use Auto Setup to automatically obtain IP and DNS addresses. Manual Setup : Use Manual Setup to manually configure IP and DNS addresses. STEP 1: Use ▲/▼ to select an item for configuration. Press OK to confirm. STEP 2: Use ◄/► to move among options and ▲/▼ to select a number. Press OK to confirm. Press OK to save the setting. - Press to cancel and return to the previous page. STEP 3: Press F1 to save the settings and test the network connectivity. English – 26 PPPoE : Use username and password provided by ISP for connection. STEP 1: Use ▲/▼ to select an item for configuration. Press OK to confirm. STEP 2: Use ◄/► to move among options and ▲/▼ to select a character. Press F1 to switch among capital letters, lower cases, numbers, or signs. Press OK to save the setting. - Press to cancel and return to the previous page. Press to delete selected characters and the character to the right. STEP 3: Press F1 to save the settings and test the network connectivity. Network Connectivity Test Select to test your network connectivity. Please check the result and fix the problem indicated. Press OK to confirm. English – 27 Network Connectivity Test Once network setting is completed, a list of connection details will be displayed. Press OK to confirm. Current Network Information This page displays the current status of your network connection. If network is temporarily inaccessible, manually set up the time zone settings so that the videos and snapshots is named correctly. OSD Menu Descriptions Date and Time Use ▲/▼ to select an item for configuration. Press OK to confirm. English – 28 Date Format : Use ▲/▼ to select a preferred date format. Press OK to confirm. Auto Update : Use ▲/▼ to enable/disable automatic date and time update. Press OK to confirm. *To use this function, a network connection is required. Time Zone : STEP 1: Use ▲/▼ to move among options and select your area. Press OK to confirm. STEP 2: Use ▲/▼ to move among options and select your time zone. Press OK to confirm. Time Setup : Use ◄/► to move among options and ▲/▼ to adjust date and time. Press OK to confirm. English – 29 Daylight Saving Time : Use ▲/▼ to enable/disable Daylight Saving Time. Press OK to confirm. *To use this function, a network connection is required. OSD Menu Descriptions Disk Management Storage Destination Step 1: Select and press OK to change your current desired default storage device for both recorded files and snapshots. * indicates normal write speed of selected partition; indicates low write speed of selected partition. To make sure recording functions properly, be sure to select partition with normal write speed. Step 2: Use ▲/▼ to select the preferred default storage device. Step 3: Use ▲/▼ to select a folder and press OK to confirm. Step 4: Press F1 to save the setting. English – 30 OSD Menu Descriptions A/V Management Use ▲/▼ to move among options. Press OK to confirm. Press to switch from component and HDMI input sources. Video Input: Use ▲/▼ to toggle between various video input source options (Component / HDMI). / Press OK to confirm. Audio Input: Use ▲/▼ to toggle between various audio input source options (Stereo Audio / HDMI). Press OK to confirm. English – 31 OSD Menu Descriptions A/V Pass Through: Use ▲/▼ to enable/disable A/V Pass Through. Press OK to confirm. *The default setting is set Off to yield to the power-saving regulation. If this function is enabled, The capture box still output signal when turned off. If this function is disabled, The capture box does not output signal when turned off. Color Range Setup Use ▲/▼ to toggle between off, limited, and full. Press OK to confirm. OSD Menu Descriptions Watermark Add your selected watermark to your videos. You can customize the display of the watermark by setting up the type, position and also scale. - Press to go back to last level. Press OK to enter the next level. Press F1 to preview the display. English – 32 Watermark Type: Use to ▲/▼ select from the listed watermark types. Press OK to save the change. - Press to go back to last level. Position: Use ▲/▼ to select from the listed watermark positions. Press OK to save the change. - Press to go back to last level. Display Scale: Use ▲/▼ to select the display scale. Press OK to save the change. - Press English – 33 to go back to last level. OSD Menu Descriptions Auto Save Use ▲/▼ to switch from enable or disable the Auto Save function. Recording/ Snapshot Video Quality: Use ▲/▼ to toggle among various video quality options (Optimal/ Good/ Maximum recording length). Press OK to confirm. Snapshot Quality: Use ▲/▼ to toggle among various snapshot quality options (Best /Better/Good). Press OK to confirm. Live Commentary A short demonstration will be played in this section. Press OK to continue. English – 34 Volume: Use ▲/▼ to move among options and ◄/► to adjust the volume. Press OK to save the setting. Press F1 to restore to the default setting. Sound Mode: Use ▲/▼ to select a preferred mode for mic recording. Press OK to confirm. One Speaker will automatically switch video sound output to your headphone. To ensure the optimal quality, please use both microphone and headphone for voice commentary recording. Many Speakers will record both video sound and voice commentary or voice chat from microphone during video. It is recommended to use an omni-directional or high-sensitive microphone. ODS Menu Descriptions Firmware Upgrade Follow the steps below to upgrade the firmware via USB storage device: Step 1: To download the latest firmware binary package, please go to www.avermedia.com, and then enter the model name in Product Search field. Firmware file is available on the product information page. English – 35 Step 2: Extract the files by unzipping the package. Copy the firmware files to the root directory of your USB storage device, and then connect it to the capture box. Step 3: Press F1 to start the firmware upgrade process. Press to abort the operation and return to the previous page. Step 4: The capture box automatically detects whether a different version of firmware is available for upgrade or rollback. Once the firmware upgrade process has completed, press OK to restart the capture box. The firmware upgrade process takes up approximately 10–14 minutes. Firmware upgrade requires at least 256 MB free space of the external storage device (USB/HDD). If problems encountered during firmware upgrade, please clear all the data stored on your USB storage device and repeat the process above. NEVER power off the device or unplug the power supply or remove the USB storage device during the firmware upgrade process. If the firmware upgrade is interrupted for any reason, the device may crash . Restore to Factory Settings Press F1 to restore to original factory settings. Press to abort the operation and return to the previous page. English – 36 Product Information This page provides information about this product, including product name, model no., and firmware version. Press F1 to edit the display name. OSD Descriptions Name your own capture box. Press navigation keys select characters. Up and Down to Press navigation keys Left and Right to shift to the former or later character. Press to switch to the next input menu. Press to delete the character. Press OK to save the name. To change product name, go to Menu > Product Name. * The display name will show up when you enable watermark. (When a specific type of watermark is selected.) English – 37 Appendix A Troubleshooting To download the latest firmware for the capture box: Go to www.avermedia.com. Enter the model no. (CR530) in Product Search field. The latest firmware file is available on the “AP & Driver” section on the product information page. Hard Drive Problem Actions Make sure that the storage destination is properly set up. Go to Menu Settings Disk Management Storage Destination to set storage destination. Make sure the hard drive is connected / installed and restart the capture box. Make sure the capture box has stable power supply while recording or the recording mail fail. Failure of recording may stop the capture box from detecting hard disk. Format current drive to NTFS file system. It is likely that the hard drive is not set to NTFS format. You can check the hard drive and reformat it by downloading HP USB Disk Storage Format Tool. The capture box will automatically generate files that help boost the operation. Files that have file name extension like ‘.avm_chk_tmp’, ‘.avm_speed_test’, ‘.hd_keepalive’aim at preserving hard disk speed as well as other crucial record. Please don’t remove them. Hard drive not detected Unknown files are found on my hard disk after connecting to the capture box Video Display Problems “No input signal” message appears on screen Actions Make sure that all the cables are firmly connected. Power off the capture box and then make sure that the device is connected with the English – 38 proper cables (See 3.1 Hardware Installation in user manual for details). Green screen color with buzzing noise: Screen color appears abnormal using component input Unsuccessful recording of HDMI-input-videos Black screen using HDMI input Mono screen color: Make sure that the red and blue connectors do not come loose. The capture box supports all HDMI input except those in HDCP (protected video) form. If screen is black when using HDMI input, please try: 1. Reconnect the HDMI cable from the input source device and also the capture box. Also, connect to HDMI port 1 of your TV at all times. 2. Change HDMI cable and try again. The recording is fast-forwarded or stopped when recording complex video frames in HD resolution (720p or above) Make sure that the red and blue connectors do not come loose. When recording video in HD resolution (720p or above), fast-forward may occur due to the complex video content. Follow the tips below to ensure good recording quality: 1. Install a format tool. It is recommended that you format hard disk into NTFS format using HP USB Disk Storage Format Tool. Please find the link: http://download.cnet.com/HP-USB-Storage- Tool/3000-2094_4-1 Be sure to backup your data before start formatting. All data will be erased once the formatting process begins. 2. Lower video output resolution. Details can be found in CR530 user manual. Please refer to video output settings. 3. Lower CR530 video quality at Menu > Settings > Edit/Share 4. Use another high- performance storage disk (For example, another NTFS hard disk). English – 39 Playback Problems Actions Poor quality of captured video Check video output settings of your source device. Set 1080p, 1080i and 720p as video output resolutions. If you only select 1080i, the screen resolution automatically goes to 480i when you play a video in 720p. Enable the “De-interlace” function of your media player before playback. Some media players cannot process the interlaced video (1080i/576i/480i) well. This problem does not persist after video uploaded to YouTube. Try recording video again using another NTFS-formatted hard drive. When this problem occurs, it is recommended to play the videos on PC. Alternatively, you can record at a lower bit rate to solve this problem. This problem does not persist after video uploaded to YouTube. Turn on Microphone volume via Menu. Turn down input volume of your video source device. Adjust volume via in-video settings. Gain Microphone amplifier. Make sure that your TV supports 1080p. Turn on A/V Pass through via Settings. Jittery/Jerky video playback on PC Stuttering local video playback Microphone volume not loud enough No A/V Pass Through with video source device and TV ON File Management Problems Actions All files are named after the date and time they are recorded. In the file management, you can sort files out by its name, the time recorded, and the file size. Make sure the time zone is set correctly or manually setup to obtain correct file name. For example, a video which recorded at 9:30 a.m., 15 of April, 2013 will be named as: 130415-0930 Difficulty in locating files English – 40 A recorded videos with commentary will be called: 130415-0930 (Mic) An edited recorded video will be named as : 130415-0930 (Edit-1) A videos that has been edited for the second time will be named as : 130415-0930 (Edit-2) An edited video with commentary will be named as : 130415-0930 (Mic-Edit-1) The capture box detects all kinds of folder that built in your hard drive; as a result, it is likely that the destination is set to a non-standard folder, for example, a hidden folder. Difficulty in locating the folder on your PC/ laptop If you cannot locate the folder that saves the recordings and snapshots, please check if: 1. You have set the destination of recordings and snapshots to a standard folder, making sure that it is not hidden, locked, etc.. 2. You load the folder with a Microsoft Windows system. A Linux system does not read non-standard folder like a hidden folder. English – 41 Other Problems Actions Solutions are as follows: A. Power off the capture box if an internal storage disk is installed. Remove internal storage disk and power on the capture box. Connect the USB to your capture box to undergo FW upgrade. (*If you are using a SATA storage disk or the temperature of the hard disk appears high; please wait for 10 minutes for the hard disk to cool down.) B. Save the unzipped firmware file to the file root of your USB. C. To enable firmware upgrade, make sure a minimum space of 256 MB on your USB. D. The detection of firmware file may be disrupted by other files on your USB. It is recommended that you wipe the USB or reformat it to NTFS format. Reformat your USB by using HP USB Storage Format Tool: 1. Disconnect your USB from the capture box. Connect it to a computer. 2. Download HP USB Storage Format Tool at the following link: http://download.cnet.com/HP-USB-Disk-Stor age-Format-Tool/3000-2094_4-10974082.ht ml 3. Undergo HP USB Storage Format Tool. Select your USB and format it to NTFS format. Save the firmware file into the NTFS USB and reconnect it to the capture box to Firmware upgrade turns out unsuccessful upgrade firmware. If the problem still persists, refer to FAQ at www.avermedia.com for further troubleshooting. English – 42 Appendix B Measuring Your HDD Height Before Installation English – 43 Français La télécommande Les descriptions ci-dessous présentent les touches de la télécommande. # 1 2 3 Boutons Descriptions Appuyez pour allumer l’appareil/le mettre en veille. Appuyez pour accéder au menu principal. Appuyez à nouveau pour quitter. Appuyez sur les touches de direction pour vous déplacer parmi les options. Appuyez sur OK pour confirmer une sélection. 4 5 Appuyez pour lire le dernier fichier enregistré ou visualiser la dernière image capturée. Appuyez pour démarrer/arrêter l’enregistrement. 6 Appuyez pour démarrer la lecture du fichier sélectionné. Appuyez pour lire le fichier à la vitesse normale (1x) lorsque la fonction lecture au ralenti, retour ou avance rapide est active. 7 Appuyez pour arrêter la lecture. Appuyez pour arrêter l’enregistrement. 8 9 10 11 12 13 Appuyez pour le retour rapide (2x, 4x, 8x, 16x, 32x). Appuyez pour revenir à la page précédente. Appuyez pour afficher l’écran de réglage de la qualité de la vidéo/photo. Appuyez à nouveau pour quitter. (Suivez les instructions à l’écran) (Suivez les instructions à l’écran) (Suivez les instructions à l’écran) 14 Appuyez pour commuter entre les sources Composante et HDMI. 15 Appuyez pour afficher les informations à l’écran, y compris le mode, la source et les sources audio. 16 Appuyez pour quitter la page en cours et revenir à la page précédente. 17 Appuyez pour prendre une photo durant un jeu ou la lecture d’une vidéo. 18 19 20 21 Appuyez pour mettre la lecture en pause. Appuyez sur OK ou pour reprendre la lecture. Appuyez pour mettre l’enregistrement en pause. Appuyez pour lire la vidéo au ralenti (1/2x). Appuyez à nouveau pour passer en mode image par image (voir p. 27 pour plus de détails). Appuyez pour l’avance rapide (2x, 4x, 8x, 16x, 32x). Appuyez pour passer à la page suivante. Appuyez pour supprimer les fichiers sélectionnés. Appuyez pour afficher les informations concernant le disque. Appuyer de nouveau pour les cacher. 23 Fernbedienung Die nachstehenden Beschreibungen zeigen die Funktionen der Fernbedienungstasten. # 1 2 3 4 5 Tasten Beschreibungen Schaltet das Gerät ein bzw. versetzt es in den Bereitschaftsmodus. Ruft das Hauptmenü auf. Zum Verlassen noch einmal drücken. Drücken Sie zum Bewegen zwischen den Optionen die Navigationstasten. Mit OK bestätigen Sie eine Auswahl. Gibt die zuletzt aufgenommene Datei bzw. das zuletzt aufgenommene Bild wieder. Startet/beendet die Aufnahme. 6 Startet die Wiedergabe der ausgewählten Datei. Gibt die Datei bei normaler (1facher) Geschwindigkeit wieder, wenn Zeitlupe, Rücklauf oder Schnellvorlauf aktiv sind. 7 Beendet die Wiedergabe. Beendet die Aufnahme. 8 9 10 11 12 Aktiviert den Rücklauf (2fach, 4fach, 8fach, 16fach, 32fach). Ruft die vorherige Seite auf. Blendet den Bildschirm zur Einstellung der Video/Schnappschuss-Qualität ein. Zum Verlassen noch einmal drücken. (Folgen Sie den Bildschirmhinweisen) (Folgen Sie den Bildschirmhinweisen) Deutsch 22 (Folgen Sie den Bildschirmhinweisen) 13 Schaltet zwischen Component- und HDMI-Quellen um. 14 15 Zeigt Bildschirminformationen, inklusive Modus, Quelle und Audioquelle, an. 16 Verlässt die aktuelle Seite und kehrt zur vorherigen Seite zurück. 17 Nimmt einen Schnappschuss während des Spielens oder der Videowiedergabe auf. 19 Unterbricht die Wiedergabe. Mit OK oder setzen Sie die Wiedergabe fort. Unterbricht die Aufnahme. Gibt das Video in Zeitlupe (1/2fach) wieder. Bei erneuter Betätigung gelangen Sie in den Bild-für-Bild-Modus (siehe Einzelheiten auf S. 27). 20 Aktiviert den Schnellvorlauf (2fach, 4fach, 8fach, 16fach, 32fach). 18 Ruft die nächste Seite auf. 21 Löscht die ausgewählten Dateien. 22 Zeigt Informationen zum Medium an. Zum Ausblenden noch einmal drücken. 23 Telecomando Le descrizioni di seguito mostrano l'utilizzo dei tasti sul telecomando. # 1 2 3 4 Tasti Descrizioni Premere per accendere/mettere in standby l'unità. Premere per accedere al menu principale. Premere di nuovo per uscire. Premere i tasti di navigazione per spostarsi tra le opzioni. Premere OK per confermare una selezione. Premere per riprodurre l'ultimo file registrato o visualizzare l'ultima immagine acquisita. Premere per avviare/arrestare la registrazione. 6 Premere per avviare la riproduzione del file selezionato. Premere per riprodurre il file a velocità normale (1x) quando sono attivi slow motion, riavvolgimento o avanzamento rapido. 7 Premere per arrestare la riproduzione. Premere per arrestare la registrazione. 8 9 10 11 12 13 14 Premere per riavvolgere (2x, 4x, 8x, 16x, 32x). Premere per tornare alla pagina precedente. Premere per visualizzare la schermata di regolazione della qualità video/istantanea. Premere di nuovo per uscire. (Attenersi alle istruzioni sullo schermo) (Attenersi alle istruzioni sullo schermo) (Attenersi alle istruzioni sullo schermo) Premere per passare tra le sorgenti Component e HDMI. 15 Premere per visualizzare le informazioni su schermo, tra cui modalità, sorgente e sorgenti audio. 16 Premere per uscire dalla pagina attuale e tornare alla pagina precedente. 17 Premere per scattare una instantanea durante il gioco o la riproduzione video. 18 19 20 21 22 Premere per interrompere la riproduzione. Premere OK o per riprendere la riproduzione. Premere per interrompere la riproduzione. Premere per riprodurre il video in slow motion (1/2x). Premere di nuovo per accedere alla modalità fotogramma per fotogramma (vedere p. 27 per i dettagli). Premere per avanzare rapidamente (2x, 4x, 8x, 16x, 32x). Premere per andare alla pagina successiva. Premere per eliminare i file selezionati. Italiano 5 Premere per visualizzare le informazioni sul disco. Premere di nuovo per nasconderle. 23 El mando a distancia Las descripciones siguientes muestran el desarrollo de los botones del mando a distancia. Nº Botones Descripciones 1 Presionen este botón para encender la unidad o activar el modo de espera en la misma. 2 Presione este botón para acceder al menú principal. Presiónelo de nuevo para salir. 3 4 5 Presione los botones de navegación para moverse por las opciones. Presione OK (Aceptar) para confirmar una selección. Presione este botón para reproducir el último archivo grabado o ver la última imagen capturada. Presione este botón para iniciar y detener la grabación. 6 Presione este botón para iniciar la reproducción del archivo seleccionado. Presione este botón para reproducir el archivo a velocidad normal (1x) cuando hay movimiento lento, rebobinar o cuando el avance rápido está activo. 7 Presione este botón para detener la reproducción. Presione este botón para detener la grabación. 8 9 10 11 12 Presione este botón para rebobinar (2x, 4x, 8x, 16x y 32x). Presione este botón para volver a la página anterior. Presione este botón para mostrar la pantalla de ajuste de la calidad de vídeo o instantánea. Presiónelo de nuevo para salir. (Siga las instrucciones que aparezcan en pantalla) (Siga las instrucciones que aparezcan en pantalla) (Siga las instrucciones que aparezcan en pantalla) 14 Presione este botón para cambiar entre las fuentes Componente y HDMI. 15 Presión este botón para mostrar la información en pantalla, incluido el modo, la fuente y las fuentes de audio. 16 Presione este botón para salir de la página actual y volver a la página anterior. 17 Presione este botón para tomar una instantánea durante el desarrollo del juego o mientras se reproduce vídeo. 19 Presione este botón para pausar la reproducción. Presione u OK (Aceptar) para reanudar la reproducción. Presione este botón para pausar la grabación. Presione este botón para reproducir el vídeo lentamente (1/2x). Presiónelo de nuevo para entrar en el modo de fotograma a fotograma (consulte la página 27 para obtener detalles). 20 Presione este botón para avanzar rápidamente (2x, 4x, 8x, 16x y 32x). 18 21 22 23 Presione este botón para ir a la página siguiente. Presione este botón para eliminar los archivos seleccionados. Presione este botón para mostrar la información del disco. Presiónelo de nuevo para ocultarla. Español 13 O Controle Remoto As descrições abaixo mostram a distribuição das teclas do controle remoto. # 1 2 3 4 5 Botões Descrições Pressione para ligar a unidade/entrar em modo stand-by. Pressione para acessar o menu principal. Pressione novamente para sair. Pressione as teclas de navegação para se mover entre as opções. Pressione OK para confirmar uma seleção. Pressione para reproduzir o último arquivo gravado ou ver a última imagem capturada. Pressione para iniciar/parar a gravação. 6 Pressione para começar a reproduzir o arquivo selecionado. Pressione para reproduzir o arquivo em velocidade (1x) normal quando movimento lento, retroceder ou avançar rapidamente está ativo. 7 Pressione para parar a reprodução. Pressione para parar a gravação. 8 9 10 11 12 13 14 15 Pressione para retroceder (2x, 4x, 8x, 16x, 32x). Para retornar à página anterior. Pressione para exibir a tela de ajuste de qualidade de vídeo/instantâneo. Pressione novamente para sair. (Siga as instruções na tela) (Siga as instruções na tela) (Siga as instruções na tela) Pressione para alternar entre fontes Componente e HDMI. Pressione para exibir a informação na tela, incluindo o modo, fonte e fontes de áudio. Pressione para sair da página atual e retornar à página anterior. 17 18 19 20 21 22 23 Pressione para tirar uma foto durante o jogo ou reprodução de vídeo. Pressione para pausar a reprodução. Pressione OK ou para retomar a reprodução. Pressione para pausar na gravação. Pressione para reproduzir o vídeo em câmera lenta (1/2x). Pressione novamente para entrar modo quadro a quadro (Ver p.27 para detalhes). Pressione para avançar (2x, 4x, 8x, 16x, 32x). Pressione para ir à próxima página. Pressione para apagar os arquivos selecionados. Pressione para exibir as informações do disco. Pressione novamente para ocultar. Português 16 Open Source Code Notice The following GPL executables and LGPL, MPL libraries used in this product are subject to the BSD/FreeBSD/ GPL/GPLv2/GPLv2+/GPLv3 with GCC/ RLE/jpeg/LGPLv2/LGPLv2.1/LGPLv2.1/ GPLv2/LGPLv2.1+/LGPLv2+/ libpng/MIT/NewBSD/OPENSSL/PD/zlib License Agreements: BSD cppstub/db/libpcre0/JSONKit FreeBSD thttpd GPL makedevs GPLv2 busybox/dbus/dbus-x11/devmem2/dosfstools/fbset/i2c-tools/iproute2/libblkid1/libdbus-1-3/libfreetype6/libpam/ libuuid1/linux-kernel/module-init-tools/module-init-tools-depmod/mtd-utils/netbase/u-boot/update-modules/ usbutils/util-linux-ng GPLv2+ iptables/sysvinit/tinylogin/udev/update-rc.d GPLv3 with GCC RLE libgcc1/libstdc++6 jpeg libjpeg8/libjpeg-tools LGPLv2 Libjson/libts-1.0-0/tslib LGPLv2.1 libav/libmicrohttpd/libusb-1.0-0 LGPLv2.1/GPLv2 alsa LGPLv2.1+ ldd/libc6/libthread-db1 LGPLv2+ libglib-2.0-0 libpng libpng12-0 MIT cocos2d-x/curl/e2fsprogs/fbset-modes/graphmagic/libcom-err2/libcurl4/libe2p2/libexpat1/libext2fs2/libformw/ libmenuw/libpanelw5/libss2/libtic5/libtinfo5/libxml2/ncurses/pointercal New BSD iperf OPENSSL openssl PD modutils-initscripts zlib libz1 AVerMedia Technologies Inc. offers to provide source code to you for a charge covering the cost of performing such distribution, such as the cost of media, shipping and handling upon e-mail request to AVerMedia Technologies Inc. at http://www.avermedia.com For more information, please visit our website: http://www.avermedia.com Model No.C5 P/N 300AC5'' M a d e i n Ta i w a n