1
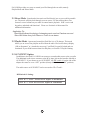
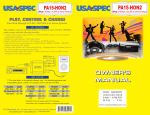
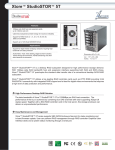
Your iPod throught Volvo Car stereo System!
KEY FEATURES
This interface connects an iPod, iPhone, or iTouch directly to your Volvo
audio system with the following benefits:
Connects iPod’s (includes iTouch and iPhone) audio output directly to car audio system
for optimal playback sound quality.
Offers two ways to access iPod music, namely Direct Mode and Playlist Mode.
Direct Mode: Search and select songs directly on iPod.
Playlist Mode: Select songs and Playlist on iPod with radio’s CD buttons.
Charges iPod while it is playing and charging stops automatically half hour after iPod is
paused.
Connects an additional audio source such as Satellite radio, DVD player, etc. to the car
audio system through the RCA AUX input jack.
APPLICATIONS
PA11-VOL is applicable to the following vehicles:
MODEL
S40
V40
S60/S70/S80
XC70
V70
YEAR
01 - 04(1)
01 - 04(1)
01 - 07
01 - 07
01 - 07
(1): PA11-VOL is compatible with 1st half of 2004 S40 and V40 only.
Note : vehicles with NAV system requires an additional CAS-VOL_NAV radio.
CAS-VOL_NAV cable must be purchased sepeprately from
@ 626 336 3836.
LTI Enterprises, Inc. 167 Mason Way, Unit A2. City of Industry, CA91746
www.usaspec.com or www.usaspec.net
Tel(626)336-3836
[email protected]
20101020
Thank you for purchasing
product. This manual describes the functions
and operation of PA11-HON iPod interface for VOLVO radios. Please read this manual
before installing the product in your vehicle.
!!!!!IMPORTANT!!!!!
It is strongly recommended that the adaptor is installed in an easily accessible location.
You may need to access it for future upgrades, resets, dip switch settings, etc.
Eject ALL CDs from the built-in CD player or CD changer before installation
or before disconnecting the power to the radio!!!
distributes products through authorized dealers so customers will
receive proper services from the dealers.
reserves the right to offer
technical support or warranty services only on products purchased through
authorized
dealers.
SAFETY NOTE: You should always give full attention to driving. Do not operate
the features or functions of PA11-VOL in such a way that may distract you while
driving.
!!!!!CAUTION!!!!!
In general, iPod has not been designed to withstand temperature extremes in
automobiles. Please consult your iPod Owner’s Manual regarding acceptable
operation and storage temperatures.
Do not disassemble or alter the cable and interface box.
Make the connections correctly.
Do not cut away the wire sheath or use the power line for other equipment.
Do not install in locations which might hinder vehicle operation or create hazards
for vehicle occupants.
Have the wiring and installation done by professionals.
Arrange wiring so it is not crimped or pinched.
Do not use this product for purposes other than stated for the vehicle.
SECTION 1. ABOUT YOUR INTERFACE PA11-VOL
This interface connects an iPod, iPhone, and iTouch directly to your VOLVO audio system.
Its on-board software translates commands from your VOLVO CD changer controls into
commands that the iPod understands. This interface enables the iPod to take the place of a
VOLVO CD changer and provides the following benefits:
Directs the iPod’s audio output to VOLVO audio system for optimal playback sound
quality.
Controls the iPod via vehicle’s radio and steering wheel controls.
Charges iPod while it is playing and charging stops automatically half hour after
iPod is paused.
Future iPod and iTune firmware updates may affect the features and functions described
in this owner’s manual and on www.usaspec.com website.
Display of artist and song title information, track search by artist, song title, album or
genre are NOT supported. Only the Playlist number and track number will be displayed
on the radio.
This interface is designed as an alternative replacement to the VOLVO CD changer in
your VOLVO vehicle. Therefore it is not possible to have the VOLVO CD changer and
the PA11-VOL iPod interface simultaneously connected to your VOLVO radio.
Package Contents
PA11-VOL contains one PA11-VOL interface adopter and one each of the following
cables: CAS-VO5i and CB-PA85.
Applications
PA11-VOL is applicable to the following model year vehicles:
MODEL
S40
V40
S60/S70/S80
XC70
V70
YEAR
01 - 04(1)
01 - 04(1)
01 - 07
01 - 07
01 - 07
(1): PA11-VOL is compatible with 1st half of 2004 S40 and V40 only.
Note : vehicles with NAV system requires an additional CAS-VOL_NAV radio.
CAS-VOL_NAV cable must be purchased sepeprately from
@ 626 336 3836.
*
verified the published radio and vehicle application to the best of our ability.
Due to uncontrollable factors,
can not 100% guarantee every published
pubilshed applications. These factors include variables such as, anomalies within a factory
radio, factory radio heretofore unknown to
and partial model year changes.
SECTION 2. DIRECT MODE, PLAYLIST MODE, and AUX
OPTION
PA11-HON provides two ways to control your iPod through the car radio, namely
Playlist Mode and Direct Mode.
2-1 Direct Mode : Search and select music on iPod directly just as you would in portable
use. The music will play back through your car stereo. Use the track up/down, fast
forward/ reverse buttons on your radio to control music playback. iPod’s screen and
keypad are unlocked and functional. Please see Section 4 of this manual for
additional information.
Application Tip
Direct Mode allows the playing of streaming music such as Pandora.com and
Sirius XM Online from your iPhone or iTouch to car stereo.
2-2 Playlist Mode : Operate and control the iPod like it is a CD changer. This mode
allows you to access four playlists on iPod from the radio. iPod screen always display
“OK to disconnect” or “Attached to accessory” and iPod’s keypad is locked and not
functional. If your iPod has more then four Playlists, see Section 5: Playlist Naming.
2-3 AUX INPUT Option
In addition to the iPod, PA11-HON can connect a second audio source to the car radio.
The additional audio source connects to the RCA input jack on the interface labeled as
AUX INPUT. If you choose to use AUX INPUT, the DIP switch #1 on the side of the
adaptor box must be set to “OFF” position (factory default is set to “ON” position).
The audio source at AUX INPUT can be accessed at CD 6 Track 1.
DIP Switch #1 Setting:
DIP #1 = OFF: RCA AUX Input is Enabled
DIP #1 = ON: RCA AUX Input is Disabled
2-4 DIP Switch Setting Summary
DIP Switch #1 = ON
(AUX Input Disabled);
DIP Switch #2 = ON
At...
Radio Plays
DISC 1
Playlist #1
DISC 2
Playlist #2
DISC 3
Playlist #3
DISC 4
Playlist #4
DISC 5
All Songs
DISC 6
Direct Mode
DIP Switch #1 = OFF
(AUX Input Enabled);
DIP Switch #2 = ON
At...
Radio Plays
DISC 1
Playlist #1
DISC 2
Playlist #2
DISC 3
Playlist #3
DISC 4
All Songs
DISC 5
Direct Mode
DISC 6
RCA AUX
SECTION 3. WIRE CONNECTION
Step 1. Set DIP switches according to instructions in Section 2-4.
Step 2. Must remove or eject all CDs from CD player or changer.
Step 3. Remove radio from the dash. DO NOT unplug the power harness that is
connected to the radio. Some radio models require a SAFETY code to resume
operation from battery power loss.
Step 4. Disconnect existing CD changer from the radio if there is one.
Step 5. Connect the black wire on CAS-VO5i cable to radio’s metal chassis.
Step 6. Locate the battery B+ (constant power) wire on the power harness to the radio.
Connect the yellow wire on the CAS-VO5i cable to the battery B+ wire.
Step 7. Plug the 90 degree angled round din plug of the CAS-VO5i cable to the
back of the radio.
Step 8. Plug the other end of the CAS-VO5i cable to the PA11-VOL adaptor interface
where it is labeled radio.
Step 9. Connect the audio output of your auxiliary devices to AUX input jack
on PA11-VOL adaptor box if the additional AUX option is selected by
setting the DIP switch #1 to “OFF” position.
Step 10. Plug the CB-PA85 cable to PA11-VOL adaptor where it is labeled “iPod”.
Step 11. Perform a test run before reinstalling the radio back to the dash.
WARNING!!!
Use only the iPod connection cable that comes with the PA11-VOL interface adaptor.
iPod connection cable from other sources may look similar, but they may damage
your iPod.
2-POSITION DIP SWITCH
ON: when switch is at the bottom position
CONNECT
TO RADIO
FRONT VIEW
TO RADIO
UNPLUG this connector if your
vehicle has NAVIGATION system.
TO iPod
Black wire to
radio chassis or car body
CAS-VO5i
Choke filter
Yellow wire to Battery B+
CAR STEREO
CB-PA85
Player or Satellite Receiver
SECTION 4. CONNECTING & PLAYING iPod
4-1 Selecting iPod Mode
Turn the “SOURCE” knob to go to CD changer mode. Then turn the 1-20/DISC
knob until “CD06 TRK-x” appears on the radio display (x is the track number of the
“Now Playing” song on iPod). This display confirms that iPod mode has been
synchronized and activated. Synchronization time may vary from iPod to iPod.
4-2 When DIP Switch #1 is ON (RCA Disabled)
When iPod is connected to PA11-VOL and the CD changer source is selected from
the radio, iPod will automatically begin playing at DISC #5. iPod screen will show “ OK
to Disconnect” or “Accessory Connected”. iPod will continue to play the tracks
in the folder which was played before the iPod was connected to the interface
adaptor. When the last track of the Folder is played, iPod will go to the first track
of the All Songs folder.
Use the DISC UP ( ∧) and DISC DOWN (∨) buttons on the radio to change DISC
or Playlist.
When returning to DISC #5 from a Playlist (i.e. any DISC among DISC #1 to
DISC #4), DISC #5 will continue to play the track where it left off but will point
to All Songs folder regardless of which Folder or Playlist was played at DISC #5
previously.
When DIRECT control from the iPod is desired, select DISC #6 from the
radio. iPod’s screen and keypad will be unlocked and you will be able to
switch Folders and Playlists as you would in portable use.
When returning to DISC #5 (All Songs) from DISC #6 (iPod Direct), Disc #5 will
continue the track and the folder that was being played at Disc #6. When the last
track of that folder is played, iPod will go to All Songs folder.
If your iPod has more then 4 Playlist, see Section 5: Playlist Naming.
4-2 When DIP Switch #1 is OFF (RCA Enabled)
When iPod is connected to PA11-VOL and the CD changer mode is selected from
the radio iPod will automatically begin playing at DISC #4. iPod screen will show
“OK to Disconnect” or “Accessory Connected”. iPod will continue to play the
tracks in the folder which was played before the iPod was connected to the interface
adaptor. When the last track of the Folder is played, iPod will go to the first track
of the All Songs folder.
Use the DISC UP ( ∧) and DISC DOWN (∨) buttons on the radio to change DISC
or Playlist.
When returning to DISC #4 from a Playlist (i.e. any DISC among DISC #1 to
DISC #3), DISC #4 will continue to play the track where it left off but will point
to All Songs folder regardless of which Folder or Playlist was played at DISC #4
previously.
When DIRECT control from the iPod is desired, select DISC #5 from the
radio. iPod’s screen and keypad will be unlocked and you will be able to
switch Folders and Playlists as you would in portable use.
When returning to DISC #4 (All Songs) from DISC #5 (iPod Direct), Disc #4 will
continue the track and the folder that was being played at Disc #6. When the last
track of that folder is played, iPod will go to All Songs folder.
If your iPod has more then 3 Playlist, see Section 5: Playlist Naming.
DISC #6 is for the additional audio source connected to the RCA Input jack.
SECTION 5. PLAYLIST NAMING
5-1 When iPod is connected to the PA11-VOL, the adapter scans all available Playlist on
your iPod and will automatically assign the first 4 Playlists in alphabetical order to
radio’s DISC #1 to #4. If you want the radio to access Playlists which are not the
first 4 Playlists (by alphabetical order), you need to name your 4 favorite Playlists on
iTune as follow:
Playlist #1 (DISC 1): VOLVO1
Playlist #2 (DISC 2): VOLVO2
Playlist #3 (DISC 3): VOLVO3
Playlist #4 (DISC 4): VOLVO4
The word VOLVO must be in capital letters and there can not be any spaces between
the word VOLVO and the numbers.
You may append any text to the designated VOLVO Playlist names. For example:
VOLVO1-jazz, VOLVO2_pop, VOLVO3 podcast, etc.
5-2 If less then 4 designated VOLVO Playlists are created, PA11-VOL will automatically
fill up the rest of the Playlist numbers with the first available Playlists on iPod (in
alphabetical order). For example: if only 2 designated VOLVO1 and VOLVO3
Playlists are created, the Playlist # assignment will be:
Playlist #1 (DISC 1):
Playlist #2 (DISC 2):
Playlist #3 (DISC 3):
Playlist #4 (DISC 4):
VOLVO1......
(1st available Playlist on iPod )
VOLVO3......
(2nd available Playlist on iPod )
The iPod interface does not recognize Apple generated default Playlists such as
“On-The-Go” or “90’s”. It also does not recognize Paylists that do not contain any
audio tracks regardless of how they are named.
SECTION 6. Playback Function Controls
Track Up/Down
Press the track up button to advance to the next track in the Playlist. Press the track
down button to go to the beginning of the track that’s being played. Press the track down
button twice consecutively to go to the previous track.
If your VOLVO radio currently displays a maximum of two digits for track number,
track number 100 will be displayed as 01, Track 101 as 02, track 102 as 03...
Changing source to AM/FM, CD, Cassette
When a source other then the iPod is selected from the radio, the iPod will pause.
Note: iPod, iPhone, iTouch, and iTune are registered trademarks of Apple Inc.
Sirius XM Online is registered trademark SIRIUS XM Radio, Inc.
VOLVO is a registered trade mark of Volvo Group
Design and specifications of PA11-VOL are subject to change without notice