1
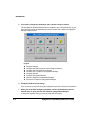
@k/kÂÝk ® ÅÎ@@ÎÌ@bÌ3Åk¿ÅÌ ×bk ¥pææzp¥ææ¥ 1Â@bk@ÂÅ The following are trademarks or registered trademarks of their respective owners. Other product names mentioned in this manual may also be trademarks or registered trademarks of their respective owners. Registered trademarks are registered in the United States Patent and Trademark Office; some trademarks may also be registered in other countries. QMS, Crown, ImageServer, the MINOLTA-QMS logo, and the Crown logo are registered trademarks of MINOLTA-QMS, Inc. Minolta is a trademark of Minolta Co., Ltd. FrameMaker/ Frame Technology Corporation. Helvetica/Linotype-Hell AG andor its subsidiaries. Windows/Microsoft Corporation. ,ÂÂkÎ@ÂàÌ/Î@ÎkkÎ The digitally encoded software included with your ImageServer software is Copyrighted © 2000 by MINOLTAQMS, Inc. All Rights Reserved. This software may not be reproduced, modified, displayed, transferred, or copied in any form or in any manner or on any media, in whole or in part, without the express written permission of MINOLTA-QMS, Inc. àÂÎÌ"ÎXk This manual is Copyrighted © 2000 by MINOLTA-QMS, Inc., One Magnum Pass, Mobile, AL 36618. All Rights Reserved. This manual may not be copied in whole or in par t, nor transferred to any other media or language, without the express written permission of MINOLTA-QMS, Inc. &RQWHQWV ,QWURGXFWLRQ About ImageServer ....................................................................................1-2 About this Manual ......................................................................................1-2 Typographic Conventions 1-3 ,PDJH6HUYHU,QVWDOODWLRQ Introduction ................................................................................................2-2 Print System Requirements ......................................................................2-2 Hard Disk vs. Flash ROM 2-2 System Software and Printer Memory 2-2 Installation to and Deinstallation from Hard Disk ...................................2-3 Installation and Deinstallation Files 2-4 Installation via a Parallel or Serial Port 2-4 Installation via an Ethernet Network Connection 2-5 Deinstallation via a Parallel or Serial Port 2-7 Deinstallation via an Ethernet Network Connection 2-8 Installation to and Deinstallation from Flash ROM ...............................2-10 Installation 2-10 Deinstallation 2-11 Further Assistance ..................................................................................2-11 ,PDJH6HUYHU:LQGRZV8WLOLWLHV ,QVWDOODWLRQ Introduction ................................................................................................3-2 Requirements .............................................................................................3-2 PC Requirements 3-2 Printer Requirements 3-2 Installation ..................................................................................................3-3 Overview of the Files .................................................................................3-5 Further Assistance ....................................................................................3-6 ,PDJH6HUYHU8VHU V*XLGH Introduction ................................................................................................4-2 Target Applications 4-2 Features 4-2 ESP Support 4-3 A Note About Printing 4-4 @k/kÂÝkÂÌÅÎ@@ÎÌ@bÌ3Åk¿ÅÌ×bk TIFF .............................................................................................................4-5 Configuration 4-5 Annotation 4-6 QMS Tag # 4-6 State 4-7 Auto Rotation 4-7 Auto Scaling 4-8 Reverse Image 4-8 Megs for Scratch 4-9 Paper to Image 4-9 Version 4-10 ImageServer 4-10 TIFF 4-10 Multiple TIFF Files as a Single Print Job 4-10 CALS ..........................................................................................................4-11 Configuration 4-11 Auto Rotation 4-12 Auto Scaling 4-12 Version 4-13 CALS 4-13 ImageServer 4-13 Further Assistance ..................................................................................4-13 ! ImageServer Installation and User’s Guide iii ,QWURGXFWLRQ ,Q7KLV&KDSWHU “About ImageServer” on page 1-2 “About this Manual” on page 1-2 N×ÎÌ@k/kÂÝk $ERXW,PDJH6HUYHU The ImageServer Option is an upgrade which will image-enable your Crown printer, allow your Crown printer to print many images near the rated engine speed, and eliminate the need for a PC dedicated to rasterizing images. $ERXWWKLV0DQXDO This manual covers the following topics: Introduction Presents an overview of this manual. ImageServer Installation Provides detailed instructions for installing ImageServer software. ImageServer Windows Utilities Installation Provides detailed instructions for installing the ImageServer Windows Utilities and then provides an overview of the installed files. ImageServer User’s Guide Discusses the printer-resident ImageServer emulations—TIFF, CALS, and CCITT*—along with Crown ESP (Emulation Sensing Processor) technology. In addition, it explains the TIFF and CALS printer configuration menus. *The magicolor 2, magicolor 2+, magicolor 330, and magicolor 6100 support CCITT only and only in monochrome. ¥Õ Ì@k/kÂÝkÂÌÅÎ@@ÎÌ@bÌ3Åk¿ÅÌ×bk N×ÎÌÎÅÌ!@×@ 7\SRJUDSKLF&RQYHQWLRQV The following typographic conventions are used in this manual: » Mixed-Case Courier Text you type, and messages and information displayed on the screen Mixed-Case Italic Courier Variable text you type; replace the italicized word(s) with information specific to your printer or computer UPPERCASE COURIER Information displayed in the printer message window lowercase italic Variable information in text. ↵ Press the Enter key (PC ) ^ Press and hold down the Ctrl key (PC). Note: Notes contain tips, extra information, or important information that deserves emphasis or reiteration. ▲ Caution: Cautions present information that you need to know to avoid equipment damage, process failure, or extreme annoyance. N×ÎÌÎÅÌ!@×@ ¥Ð ,PDJH6HUYHU ,QVWDOODWLRQ ,Q7KLV&KDSWHU “Introduction” on page 2-2 “Print System Requirements” on page 2-2 “Installation to and Deinstallation from Hard Disk” on page 2-3 “Installation to and Deinstallation from Flash ROM” on page 2-10 “Further Assistance” on page 2-11 ÎÂb×XÎ ,QWURGXFWLRQ Installing the ImageServer Option is a two-step procedure: Check print system compatibility Install the printer emulations and, if applicable, system code This chapter explains these procedures. » Note: The ImageServer Option is not supported on MINOLTA-QMS Kanji print systems. 3ULQW6\VWHP5HTXLUHPHQWV +DUG'LVNYV)ODVK520 » Note: Some Crown printers are supplied with hard disks and some are not. Your printer may require the installation of a hard disk before the ImageServer Option can be installed. 1725SLS, 2025, 2060, 2425, 3225, 3260, 3825, 4032, 4060, 4525, magicolor 2, magicolor 2+, magicolor 330, and magicolor 6100—A hard disk (internal or external) must be present on your Crown print system before you can install the ImageServer Option. If more than one hard disk is available, the ImageServer Option automatically installs itself on the disk with the most free storage space. 1060, 1060E, 1660, 1660E, and 1725E—A hard disk is not necessary to install the ImageServer Option since the option is installed in flash ROM. 6\VWHP6RIWZDUHDQG3ULQWHU0HPRU\ Your print system must have the required level of system software and the required amount of memory (RAM) to use the ImageServer Option. To check your system software level and memory, print a status page. ÕÕ Printer System Software Level Minimum RAM 1060/1060E All 16 MB* 1660/1660E All 16 MB* 1725E All 16 MB* @k/kÂÝkÂÌÅÎ@@ÎÌ@bÌ3Åk¿ÅÌ×bk ÅÎ@@ÎÌÎÌ@bÌ kÅÎ@@ÎÌxÂÌ @ÂbÌÅ 1725 SLS Release 2.1.1 2025 Release 8.3.1 and above 16 MB** 13 MB** 2060 BX/EX/FX/GX All 24 MB*** 2425/EX/TURBO All 16 MB*** 3225 Release 8.3.1 and above 16 MB** 3260 BX All 32 MB*** 3260 EX All 32 MB** 3825 Release 8.3.1 and above 32 MB** 4032 All 32 MB** 4060 All 32 MB** 4525 Release 4.4.4 and above 32 MB** magicolor 2 All 32 MB*** magicolor 2+ All 192 MB**** magicolor 330 All 64 MB** magicolor 6100 All 192 MB**** * An upgrade from the base memory size is necessary. In addition, you must ensure that the Administration/Memory/Frame Buffer/600 dpi menu is set to a media size no larger than 11x17. ** Base memory size is adequate. *** An upgrade from base memory size is necessary. **** Base memory on EX model. ,QVWDOODWLRQWRDQG'HLQVWDOODWLRQ IURP+DUG'LVN 1725SLS, 2025, 2060, 2425, 3225, 3260, 3825, 4032, 4060, 4525, magicolor 2, magicolor 2+, magicolor 330, and magicolor 6100 only These procedures are used to install/deinstall the ImageServer Option to printers that store the option on a hard disk. For procedures used to install/deinstall the ImageServer Option to printers that store the option in flash ROM, refer to “Installation to and Deinstallation from Flash ROM” on page 2-10. @k/kÂÝkÂÌÅÎ@@Î ÕÐ ÅÎ@@ÎÌÎÌ@bÌ kÅÎ@@ÎÌxÂÌ @ÂbÌÅ ,QVWDOODWLRQDQG'HLQVWDOODWLRQ)LOHV The following table lists the installation and deinstallation files on the ImageServer Option CD-ROM for all printers that store the option on a hard disk. Printer Name Installation Filename Deinstallation Filename 1725 SLS isxxx.ps is-del.ps 2025 2060 BX/EX/FX/GX 2425/EX/TURBO (where xxx is the current version number) 3225 3260 3825 4032 4060 4525 magicolor 2 magicolor 2+ magicolor 330 magicolor 6100 ,QVWDOODWLRQYLDD3DUDOOHORU6HULDO3RUW This procedure is used to install the ImageServer Option to printers via a parallel or serial port. If you want to install this option over a network, refer to “Installation via an Ethernet Network Connection” on page 2-5. 1 Set the printer’s PostScript level to Level 2. Choose Level 2 in the Administration/Emulations/PostScript/Emulation Level menu. Note: Skip this step if you’re installing the ImageServer Option on the 2060, 2425, 3260, 4032, 4032, 4060, magicolor 2, magicolor 2+, magicolor 330, or magicolor 6100. » 2 Download the ImageServer Option installation file to the printer. a Õ} If your computer is running Windows, change to DOS. @k/kÂÝkÂÌÅÎ@@ÎÌ@bÌ3Åk¿ÅÌ×bk ÅÎ@@ÎÌÎÌ@bÌ kÅÎ@@ÎÌxÂÌ @ÂbÌÅ b Insert the ImageServer Option CD-ROM into your PC’s CD-ROM drive. c Change to that drive (for example, if the CD-ROM is in the D drive, type d:↵ at the DOS prompt). d At the DOS prompt, send the ImageServer Option installation file to the printer: For a parallel connection, type copy /b isxxx.ps lpt#↵ where xxx is the current version number and # is the port number (1 to 3). For a serial connection, type copy /b isxxx.ps com#↵ where xxx is the current version number and # is the port number (1 to 4). 3 When the Disk light stops flashing and the printer’s message window reads Idle for at least 30 seconds, the download is complete. Restart the printer. Restarting the printer is required to complete the installation. The ImageServer Option should be also be listed in the Administration/Emulation printer’s configuration menu and on the advanced status page. Note: If you have a 2060, 2425, 3260, 4032, 4060, magicolor 2, magicolor 2+, magicolor 330, and magicolor 6100 the start-up page also lists the ImageServer version (in the Options section). » 4 If print system software is shipped in your ImageServer Option kit, install it now by following the instructions in your printer documentation. 5 Increase the printer’s K Mem Emulation client (Administration/Memory/K Mem Emulation) by at least 1 MB or, for optimum performance, by 2 MB. See your printer documentation for more information on this memory client and on using your printer’s configuration menu. ,QVWDOODWLRQYLDDQ(WKHUQHW1HWZRUN&RQQHFWLRQ This procedure is used to install the ImageServer Option to printers over an Ethernet network. If you want to install the option via a parallel or serial port, refer to “Installation via a Parallel or Serial Port” on page 2-4. @k/kÂÝkÂÌÅÎ@@Î Õz ÅÎ@@ÎÌÎÌ@bÌ kÅÎ@@ÎÌxÂÌ @ÂbÌÅ » Note: Before you begin this procedure, your printer and your PC (or UNIX workstation) must be connected to an Ethernet network running TCP/IP and have valid IP addresses. 1 If your computer is running Windows, change to DOS. 2 Insert the ImageServer Option CD into your PC’s CD drive. 3 Change to that drive (for example, if the CD-ROM is in the D drive, type d:↵ at the DOS prompt). 4 If you’re downloading the emulation from a UNIX workstation, copy the installation file from your PC to a temporary directory on your workstation. The installation filename is the name containing numbers. See “Installation and Deinstallation Files” on page 2-4 for the filename. 5 Make sure your printer is on line, and that the printer’s message window reads IDLE. 6 Open an ftp session from your PC or workstation by typing one of the following commands: ftp printername↵ ftp ipaddress↵ 7 (for example, ftp pctdev6↵) (for example, ftp 161.33.130.45↵) When prompted for a user name and password, press the Enter key. If your entries are correct, an ftp> prompt displays. 8 At the ftp> prompt, change to binary mode by typing bin↵ 9 At the ftp> prompt, send the emulation file to the printer’s hard disk by typing put isxxx.ps↵ where xxx is the current version number. The printer’s message window reads 1 Active Job, and the Disk light flashes to indicate that the emulation is being downloaded to the hard disk. The ftp> prompt returns when the emulation has finished loading. ÕÊ @k/kÂÝkÂÌÅÎ@@ÎÌ@bÌ3Åk¿ÅÌ×bk ÅÎ@@ÎÌÎÌ@bÌ kÅÎ@@ÎÌxÂÌ @ÂbÌÅ 10 At the ftp> prompt, end the ftp session by typing quit↵ 11 When the Disk light stops flashing and the printer’s message window reads Idle for at least 30 seconds, the download is complete. Restart the printer. Restarting the printer is required to complete the installation. The ImageServer Option should be also be listed in the Administration/Emulation printer’s configuration menu and on the advanced status page. » Note: If you have a 2060, 2425, 3260, 4032, 4060, magicolor 2, magicolor 2+, magicolor 330, or magicolor 6100, the start-up page also lists the ImageServer version (in the Options section). » Note: You may want to erase any installation files left on your PC (and/or workstation), and then remove any temporary directories. 12 If print system software is shipped in your ImageServer Option kit, install it now by following the instructions in your printer documentation. 13 Increase the printer’s K Mem Emulation client (Administration/Memory/K Mem Emulation) by at least 1 MB or, for optimum performance, by 2 MB. See your printer documentation for more information on this memory client and on using your printer’s configuration menu. 'HLQVWDOODWLRQYLDD3DUDOOHORU6HULDO3RUW This procedure is used to deinstall the ImageServer Option from printers via a parallel or serial port. If you want to deinstall this option over a network, refer to “Deinstallation via an Ethernet Network Connection” on page 2-8. » Note: We recommend that no one send print jobs during this procedure. They may be lost when the printer automatically reboots to complete the deinstallation. 1 Set the printer’s PostScript level to Level 2. Choose Level 2 in the Administration/Emulations/PostScript/Emulation Level menu. Note: Skip this step if you’re deinstalling the ImageServer option on the 2060, 2425, 3260, 4032, 4060, magicolor 2, magicolor 2+, magicolor 330, or magicolor 6100. » 2 Download the ImageServer deinstallation software to the printer. @k/kÂÝkÂÌÅÎ@@Î ÕÉ ÅÎ@@ÎÌÎÌ@bÌ kÅÎ@@ÎÌxÂÌ @ÂbÌÅ a Insert the ImageServer Option CD-ROM into your PC’s CD drive. b Change to that drive (for example, if the CD-ROM is in the D drive, type D:↵ at the DOS prompt). c At the DOS prompt, send the deinstallation file to the printer: For a parallel connection, type copy /b is-del.ps lpt#↵ where # is the port number (1 to 3). For a serial connection, type copy /b is-del.ps com#↵ where # is the port number (1 to 4). 3 When the download is complete, the printer automatically reboots. Remove the ImageServer Option CD from your PC’s CD drive, and store it in a safe place. The start-up page lists the printer’s original name (for example, 3260). Note: If you have a 2060, 2425, 3260, 4032, 4060, magicolor 2, magicolor 2+, magicolor 330, or magicolor 6100, the start-up page no longer lists the ImageServer version (in the Options section). » 'HLQVWDOODWLRQYLDDQ(WKHUQHW1HWZRUN&RQQHFWLRQ This procedure is used to deinstall the ImageServer Option from printers over an Ethernet network. If you want to deinstall the option via a parallel or serial port, refer to “Deinstallation via a Parallel or Serial Port” on page 2-7. Õp » Note: Before you begin this procedure, your printer and your PC (or UNIX workstation) must be connected to an Ethernet network running TCP/IP and have valid IP addresses. » Note: We recommend that no one send print jobs during this procedure. They may be lost when the printer automatically reboots to complete the deinstallation. 1 If your computer is running Windows, change to DOS. 2 Insert the ImageServer Option CD-ROM into your PC’s CD drive. @k/kÂÝkÂÌÅÎ@@ÎÌ@bÌ3Åk¿ÅÌ×bk ÅÎ@@ÎÌÎÌ@bÌ kÅÎ@@ÎÌxÂÌ @ÂbÌÅ 3 Change to that drive (for example, if the CD-ROM is in the D drive, type d:↵ at the DOS prompt). 4 If you’re downloading the deinstallation file (is-del.ps) from a UNIX workstation, copy the file from your PC to a temporary directory on your workstation. 5 Make sure your printer is on line, and that the printer’s message window reads IDLE. 6 Open an ftp session from your PC or workstation by typing one of the following commands: ftp printername↵ ftp ipaddress↵ 7 (for example, ftp pctdev6↵) (for example, ftp 161.33.130.45↵) When prompted for a user name and password, press the Enter key. If your entries are correct, an ftp> prompt displays. 8 At the ftp> prompt, change to binary mode by typing bin↵ 9 At the ftp> prompt, send the deinstallation file to the printer’s hard disk by typing put is-del.ps↵ The ftp> prompt returns when the deinstallation file has finished loading. 10 At the ftp> prompt, end the ftp session by typing quit↵ 11 When the Disk light stops flashing and the printer’s message window reads IDLE, the printer automatically reboots. The start-up page lists the printer’s original name (for example, 3260). » Note: If you have a 2060, 2425, 3260, 4032, 4060, magicolor 2, magicolor 2+, magicolor 330, or magicolor 6100, the start-up page no longer lists the ImageServer version (in the Options section). » Note: You may want to erase any deinstallation files left on your PC (and/or workstation), and then remove any temporary directories. @k/kÂÝkÂÌÅÎ@@Î Õ ÅÎ@@ÎÌÎÌ@bÌ kÅÎ@@ÎÌxÂÌ @ÅÌ.$! ,QVWDOODWLRQWRDQG'HLQVWDOODWLRQ IURP)ODVK520 1060, 1060E, 1660, 1660E, and 1725E only These procedures are used to install/deinstall the ImageServer Option to printers that store the option in flash ROM. For procedures used to install/deinstall the ImageServer Option to printers that store the option on a hard disk, refer to “Installation to and Deinstallation from Hard Disk” on page 2-3. » Note: The following installation and deinstallation procedures apply to printers connected via parallel port, serial port, or network connection. ,QVWDOODWLRQ » Note: Installation of the ImageServer Option in printers that store the option in flash ROM requires that the printer’s system software be reloaded with system software that includes the ImageServer Option. This is the software supplied with the ImageServer Option. 1 To remember any custom printer configurations or options that you want to reset after the new software has been loaded, print an advanced status page. This installation procedure will reset all configurations and options presently set in your printer to their factory default values. 2 Install the ImageServer Option by following the instructions in your printer documentation for updating system software. You’ll be using the Administration/Miscellaneous/New Flash Image menu to update the system software (image in flash ROM). After the printer reboots, the start-up page lists its new name (for example, 1660E ImageServer), and the ImageServer Option is listed in the Administration/Emulation configuration menu. 3 » Õ¥æ Increase the printer’s K Mem Emulation client (Administration/Memory/K Mem Emulation) by at least 1 MB or, for optimum performance, by 2 MB. Note: See your printer documentation for more information on memory clients and on using your printer’s configuration menu. @k/kÂÝkÂÌÅÎ@@ÎÌ@bÌ3Åk¿ÅÌ×bk ×ÂÎkÂÌÅÅÅÎ@Xk 4 Using the status page printed before reloading the software, reset any custom configurations and options in your printer. 'HLQVWDOODWLRQ » Note: Deinstallation of the ImageServer Option in printers that store the option in flash ROM requires that the printer’s system software be reloaded with system software that does not include the ImageServer Option. This is the software originally supplied with your printer. 1 To remember any custom printer configurations or options that you want to reset after the new software has been loaded, print an advanced status page. This deinstallation procedure will reset all configurations and options presently set in your printer to their factory default values. 2 Deinstall the ImageServer Option by installing standard print system software. Follow the instructions in your printer documentation for updating system software. You’ll be using the Administration/Miscellaneous/New Flash Image menu to update the system software (image in flash ROM). 3 When finished, reboot the printer. After the printer reboots, the start-up page lists the printer’s original name (for example, 1660E), and the ImageServer Option is no longer listed in the Administration/Emulation configuration menu. 4 Using the status page printed before reloading the software, reset any custom configurations and options in your printer. )XUWKHU$VVLVWDQFH For assistance with installing the ImageServer Option, refer to www.minolta-qms.com @k/kÂÝkÂÌÅÎ@@Î Õ¥¥ ,PDJH6HUYHU:LQGRZV 8WLOLWLHV,QVWDOODWLRQ ,Q7KLV&KDSWHU “Introduction” on page 3-2 “Requirements” on page 3-2 “Installation” on page 3-3 “Overview of the Files” on page 3-5 “Further Assistance” on page 3-6 ÎÂb×XÎ ÎÂb×XÎ The ImageServer Windows Utilities bypass the normal Windows print mechanism to provide enhanced image printing performance while reducing network traffic. These utilities run under both Windows 3.1 and Windows 95/98. .k·×ÂkkÎÅ ,Ì.k·×ÂkkÎÅ If you plan to use the ImageServer Windows Utilities to print directly via TCP/IP, you must have FTP (version 2.3 or above) installed on your PC and approximately 800 KB of free disk space. ,ÂÎkÂÌ.k·×ÂkkÎÅ Your printer must be ImageServer-enabled. ÐÕ @k/kÂÝkÂÌÅÎ@@ÎÌ@bÌ3Åk¿ÅÌ×bk ÅÎ@@Î ÅÎ@@Î » Note: The decompressed files need approximately 800 KB of disk space on your PC’s hard disk. Ensure that this much space is available before beginning this procedure. The setup program (SETUP.EXE) copies all of the ImageServer Windows Utilities files to their proper directories on your PC’s hard disk, creates a program window and program items in Windows, and opens the FastPrint Configuration Manager, so you can configure your printers, server, Document Server Engine (DSE), DSE Daemon, and Logfile Daemon. Use the following steps to run the setup program: 1 Insert the ImageServer Option CD-ROM into your CD-ROM drive. 2 Run the setup program: 3 Windows 3.1—In the Windows Program Manager, from the File menu choose Run... Windows 95/98—From the Start menu choose Run... In the Run dialog box, type x:\utils\dol\setup and choose OK. x is the drive in which you inserted the CD-ROM in step 1. The setup program opens, and a welcome dialog box displays. 4 Choose Continue. The Select Installation Destination dialog box appears. ÅÎ@@Î ÐÐ ÅÎ@@Î 5 If necessary, change the destination path, and then choose Continue. The ImageServer Windows Utilities files are installed in the correct directories on your PC’s hard disk. When the installation process is finished, the FastPrint Configuration Manager Window opens. n o p q r s t u Legend n o p q r s t u 6 Configure Printers Configure the DSE (Document Server Engine) Daemon Configure the Document Server Engine Get Help on the FastPrint Configuration Manager Configure Servers Configure the Logfile Daemon About the FastPrint Configuration Manager Exit from the FastPrint Configuration Manager Configure FastPrint as necessary. If you need help at any time during the configuration process, choose the Help button. 7 When you’ve finished configuring FastPrint, choose the Exit button (the one with the door on it) to exit from the FastPrint Configuration Manager. A dialog box appears, telling you that the setup was successful. Ð} @k/kÂÝkÂÌÅÎ@@ÎÌ@bÌ3Åk¿ÅÌ×bk $ÝkÂÝkÞÌxÌÎkÌkÅ 8 Choose OK. You return to the Windows Program Manager (Windows 3.1) or the Windows desktop (Windows 95/98). Notice the new IS Utilities window. 9 Remove the ImageServer Option CD-ROM from the CD-ROM drive, and store it in a safe place. 10 Fill out and send in your registration card. $ÝkÂÝkÞÌxÌÎkÌkÅ Once you’ve run the setup program, you should have the following files and subdirectories in the C:\WINUTIL directory (or whatever you named it). In addition, the setup program copies other files (.INI and .DLL ) to the appropriate directories on your hard disk. DMON_LOG.EXE—The Logfile Daemon (called Log Daemon in the program window), an application that monitors a directory (specified in the DMON_LOG.INI file) for incoming logfiles and uses those logfiles to create command (.CPI) files for the FastPrint Engine DLL. DMON_LOG.INI—Sample Log Daemon initialization file (used by DMON_LOG.EXE). DMON_PRT.EXE—The Print Daemon, an application that can be used for remote printing on another PC or scheduled printing on the local PC. DOL_MAIN.EXE—The Documents Online print utility, a simple file list manager that invokes the FastPrint driver to create a command (.CPI) file containing the manager’s file names. DOL_MAIN.HLP-The on-line help file for Documents Online (DOL_MAIN.EXE). FAST_CFG.EXE—The FastPrint Configuration Manager, which allows you to configure the FastPrint utility. FAST_CFG.HLP—The FastPrint Configuration Manager help file. FAST_INT.HLP—The FastPrint utility help file. FAST_PRT.INI—The FastPrint utility initialization file. $ÝkÂÝkÞÌxÌÎkÌkÅ Ðz ×ÂÎkÂÌÅÅÅÎ@Xk LOGFILE.OUT—The setup log file, which records your choices in the setup program. SAMPLES folder—Contains sample .TIF, FOLDER.HDR, and PAGE.HDR files. SPOOL folder—Empty. Used for spooling print files. ×ÂÎkÂÌÅÅÅÎ@Xk For assistance installing the ImageServer Windows Utilities, refer to www.minolta-qms.com ÐÊ @k/kÂÝkÂÌÅÎ@@ÎÌ@bÌ3Åk¿ÅÌ×bk ,PDJH6HUYHU8VHÂÁÅ *XLGH ,Q7KLV&KDSWHU “Introduction” on page 4-2 “TIFF” on page 4-5 “CALS” on page 4-11 “Further Assistance” on page 4-13 ÎÂb×XÎ ÎÂb×XÎ This chapter discusses the printer-resident ImageServer emulations—TIFF, CALS, and CCITT*—along with Crown ESP (Emulation Sensing Processor) technology. In addition, it explains the TIFF and CALS printer configuration menus. » Note: In this manual, TIFF, CALS, and CCITT refer to TIFF G3/G4, CALS Raster, and MINOLTA-QMS CCITT, respectively. 1@ÂkÎÌX@ÎÅ The ImageServer printer-resident emulations work in conjunction with document imaging applications that support TIFF and CALS printing. TIFF and CALS are image file formats that comprise a vast array of image and compression types. The ImageServer printer-resident emulations are targeted toward document imaging systems which require only specific subsets of the TIFF, CALS, and CCITT specifications. These subsets (TIFF G3/G4, CALS Raster, and MINOLTA-QMS CCITT) are detailed in this manual. k@Î×ÂkÅ The ImageServer Option provides the following features: TIFF, CALS, and CCITT loadable emulations—These emulations allow you to print TIFF G3/G4, CALS Raster, and MINOLTA-QMS CCITT files directly without any prior filtering. You can print multiple TIFF files as a single Crown print job as well as multiple images in a single TIFF file at or near the rated engine speed. Turbo Level 2 Fax Decode processing capabilities—ImageServer printers contain the industry’s highest performing Level 2 fax decoding capabilities. ESP support—Emulation Sensing Processor (ESP) technology identifies incoming TIFF, CALS, and CCITT files and automatically selects the appropriate emulation. Automatic scaling of images—The image is automatically scaled up or down to fit the currently selected paper size. * The magicolor 2, magicolor 2+, magicolor 330, and magicolor 6100 support CCITT only and only in monochrome. }Õ @k/kÂÝkÂÌÅÎ@@ÎÌ@bÌ3Åk¿ÅÌ×bk ÎÂb×XÎ Automatic rotation—The image is automatically rotated 90 °, 180° or 270° if this would result in a better fit on the currently selected paper size. Automatic tray selection—The TIFF emulation can select the paper size closest to the image size. Annotation on TIFF images—Annotation capabilities allow you to overlay a TIFF image with up to four text annotations without having to decompress the image. Annotations must have the same orientation as the image, and they must be placed within the paper’s imageable area. Note: Only one CCITT font is available for annotation. » Image reversal—Image reversal capability allows you to change all black pixels in an image to white pixels and all white pixels to black pixels. /,Ì/×ÂÎ Emulation Sensing Processor (ESP) technology is a standard feature of Crown architecture. ESP technology, which works with most popular commercially available applications, uses a form of artificial intelligence to analyze incoming file data and select the appropriate printer emulation (for example, TIFF, CALS, CCITT, PostScript, HP-GL, HP PCL, or an optional emulation) from those installed on the printer. The print job is processed without your having to change printer switch settings or send software commands to accommodate different printer emulations. When your printer is in ESP mode, you can easily print TIFF, CALS, and CCITT files as well as files prepared for a PostScript printer, an HP LaserJet, or an HP-GL plotter. Your Crown printer prints almost any file sent in a language ESP technology understands, whether you have one, two, or more hosts, and whether you are communicating through a parallel, serial, AppleTalk, Ethernet, or Token-Ring interface. Most users never have to change from ESP mode to another mode. ÎÂb×XÎ }Ð ÎÂb×XÎ Ì"ÎkÌN×ÎÌ,ÂÎ Typically, document image print jobs are extremely large, often exceeding several megabytes in size, and transporting them over a network often creates congestion and unnecessary bottlenecks. However, the ImageServer Windows driver, included in your shipset, provides a solution to this problem. Using a proprietary CCITT Group 4 compression method, the driver compresses document image files on the host, thus reducing their size significantly, before sending them over the network. For information on installing the ImageServer Windows Utilities, see Chapter 3, “Windows Utilities Installation.” For information on using the driver, see the driver online help. }} @k/kÂÝkÂÌÅÎ@@ÎÌ@bÌ3Åk¿ÅÌ×bk 1 1 TIFF (Tagged Image File Format) is one of the most widely adopted image file format standards in modern computing environments. In this manual, TIFF refers only to a specific portion of the TIFF 6.0 specification, dated June 3, 1992. Sections of the TIFF specification covered by this document are as follows: Baseline TIFF — Notation — TIFF structure — Bilevel images — Baseline field reference guide TIFF Extensions — CCITT bilevel encodings — Tiled images x×Â@Î Use the Administration/Emulations/TIFF menu to configure the TIFF emulation. This menu has the following submenus. Each is explained in detail in this section. (For information on changing configuration menu settings, see your printer documentation.) 1 Annotation—Processes the MINOLTA-QMS private tag for annotation. Auto Rotation—Allows you to specify whether the TIFF image should be automatically rotated 90 °, 180°, or 270° if this would result in a better fit on the currently selected paper size. Auto Scaling—Allows you to specify whether the TIFF image should be scaled (up or down) to fit on the currently selected paper size. Megs for Scratch—Allows you to define the maximum size of the scratch file (in MB) that is created on the printer’s hard disk to contain the image during processing. Paper to Image—Allows you to specify whether the TIFF emulation should automatically select the paper size closest to the image size rather than using the default paper size. Reverse Image—Allows you to change all black pixels in an image to white pixels and all white pixels to black pixels. }z 1 » Version—Identifies the ImageServer and TIFF versions. Note: The Version submenu is not available on the 2060, 2425, 3260, 4032, 4060, magicolor 2, magicolor 2+, magicolor 330 or magicolor 6100. (Instead, the ImageServer version is printed in the Options section of the printer’s start-up page.) A PostScript file on the printer’s hard disk also contains the ImageServer version number. Remote users can retrieve the sys:/bin/emulate/isver.ps file via ftp and then either look at it or print it to get the current ImageServer version. Each submenu, except Version, has a comparable Document Option Command (DOC), which overrides the configuration menu setting. (For more on DOC, see the Crown Document Option Commands manual, on the Software Utilities CD-ROM.) » Note: The ImageServer Option must be installed before it can be configured. If it has not been factory installed, refer to chapter 2, “ImageServer Installation,” for installation instructions. Î@Î This submenu has two options—QMS Tag# and State. » Note: For information on annotating TIFF images, see the FastPrint Printer Driver on-line help. For more information on accessing annotation features within TIFF, see the ImageServer Developer’s Kit User’s Guide. QMS Tag # Purpose Identifies the annotation tag number. Menu Administration Emulations TIFF Annotation QMS Tag# }Ê Choices 0-65000 1000 (Default in Bold) Notes Unless it conflicts with your host software, we recommend that you use the default setting of 1000, the MINOLTA-QMS private tag number. DOC %%IncludeFeature:QMStag(#) @k/kÂÝkÂÌÅÎ@@ÎÌ@bÌ3Åk¿ÅÌ×bk 1 State Purpose Allows you to enable or disable annotation. Menu Administration Emulations TIFF Annotation State DOC Choices Enabled, Disabled (Default in Bold) %%IncludeFeature:annotation (enable) %%IncludeFeature:annotation (disable) ×ÎÌ.Î@Î Purpose Allows you to specify whether the TIFF image should be automatically rotated 90 °, 180°, or 270 ° if this would result in a better fit on the currently selected paper size. Menu Administration Emulations TIFF Auto Rotation 1 Choices Off, 90, 180, 270 (Default in Bold) Notes See your printer documentation for a list of the imageable areas of each paper size. DOC %%IncludeFeature:autorotation (off) %%IncludeFeature:autorotation (90) %%IncludeFeature:autorotation (180) %%IncludeFeature:autorotation (270) }É 1 ×ÎÌ/X@ Purpose Allows you to specify whether the TIFF image should be scaled (up or down) to fit on the currently selected paper size. Menu Administration Emulations TIFF Auto Scaling Choices Off, Down Only, Up Only, Up & Down (Default in Bold) Notes If Auto Scaling is enabled, the tray selection is made first, so scaling can be done based on the selected paper size. DOC %%IncludeFeature:autoscaling (off) %%IncludeFeature:autoscaling (down) %%IncludeFeature:autoscaling (up) %%IncludeFeature:autoscaling (on) no scaling down only up only up and down .kÝkÂÅkÌ@k Purpose Allows you to change all black pixels in an image to white pixels and all white pixels to black pixels. Menu Administration Emulations TIFF Reverse Image DOC }p Choices Off, On (Default in Bold) %%IncludeFeature:reverse (off) %%IncludeFeature:reverse (on) @k/kÂÝkÂÌÅÎ@@ÎÌ@bÌ3Åk¿ÅÌ×bk 1 !kÅÌxÂÌ/XÂ@ÎX Purpose Allows you to define the maximum size of the scratch file (in MB) that is created on the printer’s hard disk to contain the image during processing. Menu Administration Emulations TIFF Megs for Scratch Choices 0 No scratch file is created, and the data is processed from the host input spool buffer as it is received. 1-255 The data is written to the scratch file if there is not enough room in the host input spool buffer to hold it. (Default in Bold) Notes This option is available only on printers with a hard disk. If the requested amount of space is not available on the hard disk, all available disk space will be allocated. Typical TIFF files can be processed from the host input spool buffer with the default size (without a scratch file). DOC %%IncludeFeature:scratchfile (#) ,@kÂÌÎÌ@k Purpose Allows you to specify whether the TIFF emulation should automatically select the paper size closest to the image size rather than using the default paper size. Menu Administration Emulations TIFF Paper to Image Notes Choices Off, On (Default in Bold) If Auto Rotation and/or Auto Scaling are enabled, the tray selection is made first, so the rotation and/or scaling can be done based on the selected paper size. Because this option chooses the closest paper size (larger or smaller), the image may be surrounded by some white space, or it may be clipped. DOC 1 %%IncludeFeature:sheetsel (off) %%IncludeFeature:sheetsel (on) } 1 8kÂÅ This submenu has two options—ImageServer and TIFF. » Note: The Version submenu is not available on the 2060, 2425, 3260, 4032, 4060, magicolor 2, magicolor 2+, magicolor 330, magicolor 6100. A PostScript file on the printer’s hard disk also contains the ImageServer version number. Remote users can retrieve the sys:/bin/emulate/isver.ps file via ftp and then either look at it or print it to get the current ImageServer version. ImageServer Purpose Identifies the version of the currently installed ImageServer software. Menu Not configurable Administration Emulations TIFF Version ImageServer TIFF Purpose Identifies the version of the currently installed TIFF emulation. Menu Not configurable Administration Emulations TIFF Version TIFF !×ÎkÌ1ÌkÅÌ@ÅÌ@Ì/kÌ,ÂÎÌN To print multiple TIFF files as a single Crown print job, use a hex editor or a concatenation utility to concatenate the files, and then print the resulting file as you normally would. You can also concatenate files using the DOS copy command, for example: copy /b *.tif out.tif↵ will concatenate all the TIFF files in the current subdirectory into a file named out.tif. }¥æ @k/kÂÝkÂÌÅÎ@@ÎÌ@bÌ3Åk¿ÅÌ×bk / / CALS (Computer-aided Acquisition and Logistics Support) is a comprehensive specification spelled out in an array of MIL specifications. Some specifications of CALS include Standard Generalized Markup Language (SGML), for text data; Initial Graphics Exchange Specification (IGES), for vector graphics; CCITT Group 4, for raster graphics; and Computer Graphics Metafile (CGM), for vector and raster graphics. This documentation uses the name “CALS” to refer to the CCITT Group 4 MIL-R28002 specification, which defines the requirements for raster graphics representation in binary format. x×Â@Î Use the Administration/Emulations/CALS menu to configure the CALS emulation. This menu has the following submenus. Each is explained in detail in this section. (For information on changing configuration menu settings, see your printer documentation.) » Auto Rotation—Allows the image to be automatically rotated 90 °, 180 °, or 270 °. Auto Scaling—Allows the image to be automatically scaled to fit the selected paper size. Version—Identifies the CALS and ImageServer versions. Note: The Version submenu is not available on the 2060, 2425, 3260, 4032, 4060, magicolor 2, magicolor 2+, magicolor 330, or magicolor 6100. A PostScript file on the printer’s hard disk also contains the ImageServer version number. Remote users can retrieve the sys:/bin/emulate/isver.ps file via ftp and then either look at it or print it to get the current ImageServer version. Each submenu, except Version, has a comparable Document Option Command (DOC), which overrides the configuration menu setting. (For more on DOC, see the Crown Document Option Commands manual, available from your vendor.) » / Note: The ImageServer Option must be installed before it can be configured. If it has not been factory installed, refer to chapter 2, “ImageServer Installation,” for installation instructions. }¥¥ / ×ÎÌ.Î@Î Purpose Allows you to specify whether the CALS image should be automatically rotated 90 °, 180°, or 270° if this would result in a better fit on the currently selected paper size Menu Administration Emulations CALS Auto Rotation DOC Choices Off, 90, 180, 270 (Default in Bold) %%IncludeFeature:autorotation (off) %%IncludeFeature:autorotation (90) %%IncludeFeature:autorotation (180) %%IncludeFeature:autorotation (270) ×ÎÌ/X@ Purpose Allows you to specify whether the CALS image should be automatically scaled (up or down) to fit on the currently selected paper size. Menu Administration Emulations CALS Auto Scaling DOC }¥Õ Choices Off, Down Only, Up Only, Up & Down (Default in Bold) %%IncludeFeature:autoscaling (off) %%IncludeFeature:autoscaling (down) %%IncludeFeature:autoscaling (up) %%IncludeFeature:autoscaling (on) no scaling down only up only up and down @k/kÂÝkÂÌÅÎ@@ÎÌ@bÌ3Åk¿ÅÌ×bk ×ÂÎkÂÌÅÅÅÎ@Xk 8kÂÅ This submenu has two options—CALS and ImageServer. » Note: The Version submenu is not available on the 2060, 2425, 3260, 4032, 4060, magicolor 2, magicolor 2+, magicolor 330, or magicolor 6100. (Instead, the ImageServer version is printed in the Options section of the printer’s start-up page.) A PostScript file on the printer’s hard disk also contains the ImageServer version number. Remote users can retrieve the sys:/bin/emulate/isver.ps file via ftp and then either look at it or print it to get the current ImageServer version. CALS Purpose Identifies the version of the currently installed CALS emulation. Menu Not configurable Administration Emulations CALS Version CALS ImageServer Purpose Identifies the version of the currently installed ImageServer software. Menu Not configurable Administration Emulations CALS Version ImageServer ×ÂÎkÂÌÅÅÅÎ@Xk For assistance with the ImageServer Option, refer to www.minolta-qms.com ×ÂÎkÂÌÅÅÅÎ@Xk }¥Ð