1
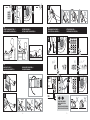
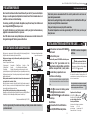
Model MF-46
MARK OF FITNESS FIVE YEAR WARRANTY
-U.S. Customers OnlyCONTENTS
Mark of Fitness, Inc., warrants this product to be free of defects in material and workmanship for a period of five years,
except cuff which has one year warranty.
Should any defects be discovered within five years of purchase, Mark of Fitness, Inc. will repair the defective product or parts
at no charge for labor or materials provided:
1. Said unit is returned postage paid to the factory for servicing, marked Attn: Service Department.
2. Proof of date of purchase is included with the product.
3. A letter accompanies the product and indicates the complaint or defect to be remedied.
4. A check or money order in the amount of $7.95 is included to cover the shipping and handling costs.
In the event the defect may be remedied without returning the unit, contact the firm by phone or mail first, and every effort
will be made to supply the replacement parts quickly and at no charge.
This warranty does not apply to any unit that has been tampered with, abused, accidentally damaged or to damage incurred
through improper packing and mishandling in transit to or from the factory.
This warranty gives you specific legal rights, and you may have other rights which vary from state to state.
Page
Page
BASIC PRODUCT INFORMATION . . . . . . . . . . . 9
WRAPPING THE CUFF . . . . . . . . . . . . . . . . . . 12
PRECAUTIONS FOR USE . . . . . . . . . . . . . . . . 10
MEASUREMENT PROCEDURES . . . . . . . . . . . 13
INSTRUCTIONS
TIPS ON TAKING YOUR BLOOD PRESSURE . . 10
MEMORY FUNCTIONS . . . . . . . . . . . . . . . . . . 13
INSTALLING BATTERIES AND SETTING THE
CLOCK . . . . . . . . . . . . . . . . . . . . . . . . . . . . . . . 11
DELETING STORED DATA . . . . . . . . . . . . . . . . 14
ENGLISH
CORRECT MEASURING POSTURE . . . . . . . . . 12
ERROR DISPLAYS AND TROUBLESHOOTING . . 15
CARE AND MAINTENANCE . . . . . . . . . . . . . . 14
INSTRUCTIONS
ENGLISH
INSTRUCTIONS
ENGLISH
Mark of Fitness, Inc.
621 Shrewsbury Avenue
Shrewsbury, New Jersey 07702
Phone (732) 842-7200 Fax (732) 842-0558
Customer Service (888) 343-1558
MANUAL DE INSTRUÇOES
PORTUGUÊS
e-mail [email protected]
web site www.markoffitness.com
A11XXXX-1A
fig.1
INSTALLING BATTERIES AND SETTING THE CLOCK p.11
1
7
3
11
10
1
4
5
1
-1
2
-2
2
2
1
6
12
3
4
5
6
9
13
8
PARTS NAMES AND PRODUCT COMPONENTS
1 DISPLAY (SYS:systolic/DIA:diastolic/PUL:pulse)
2 ON/OFF BUTTON
5 AIR CONNECTOR
6 AC ADAPTER JACK
7 CUFF HOLDER
10 AIR HOSE
11 TUBE PLUG
12 CARRYING BAG
NOM DES PIÈCES ET COMPOSANTES DU PRODUIT
MEMORY BUTTON M1
CUFF
13 4 X AA BATTERY
3
8
14
MEMORY BUTTON M2
CUFF RING
14 INSTRUCTION MANUAL
MONTH
MOIS
MES
MÊS
YEAR
ANNEE
AÑO
ANO
4
9
7
8
9
DAY
JOUR
DIA
DIA
NOMBRE DE LAS PIEZAS Y COMPONENTES DEL PRODUCTO
11
10
HOUR
HEURE
HORAS
HORA
NOMES DAS PEÇAS E COMPONENTES DO PRODUTO
-2-
-3-
12
13
14
3
MINUTE
MINUTE
MINUTOS
MINUTO
fig.2
CORRECT MEASURING POSTURE p.12
POSTURA CORRECTA DE MEDICIÓN p.X
POSTURE DE MESURE p.X
POSTURA CORRECTA PARA MEDIÇÃO p.X
fig.4
MEASUREMENT PROCEDURES p.13
CÓMO EFECTUAR LA MEDICIÓN p.X
1
MÉTHODE DE MESURE p.X
PROCEDIMENTOS DE MEDIÇÃO p.X
2
11
5
fig.3
WRAPPING THE CUFF p.12
COLOCACIÓN DEL BRAZALETE p.X
ENROULEMENT DU BRASSARD p.X
COLOCAÇÃO DA BANDA p.X
1
3
4
SYS
mmHg
2
DIA
1 inch
-4-
mmHg
PUL
/min
MEMORY BANK NUMBER
NUMÉRO INUTILISÉ DE LA
MÉMOIRE
NÚMERO DE BANCO DE MEMORIA
NÚMERO DO BANCO DE MEMÓRIA
-5-
sfhdfrejrgyk;
dfhfgjtkdfghhg!
.......
fig.5
MEMORY FUNCTIONS p.13
FUNCIONES DE MEMORIA p.X
fig.6
DELETING STORED DATA p.14
FONCTIONNEMENT DE LA MÉMOIRE p.X
FUNÇÕES DA MEMÓRIA p.X
1
Average
SYS
number of total
stored data
1
moyenne
mmHg
DIA
Media
mmHg
médio
PUL
/min
2
2
MEMORY
Y DATA
D A NUMBER
MEMOR
NO DES DONNÉES
DONN ES DE LA MÉMOIRE
MOIRE
NO.
MERO DE REGISTRO DE MEMORIA
NÚMERO
RESUL ADO
NUMERO DO RESULTADO
HEURE
HORA
TEMPO
latest data
Derni es données
donn es
Dernières
medici n más
m s reciente
reciente
medición
ltimos dados
Últimos
1
DATE
FECHA
DATA
3
2
Oldest data
Données les plus anciennes
Dato más antiguo
Dados mais antigos
4
2nd latest data
Avant-dernières données
2º medición más reciente
Penúltimos dados
30
-6-
30
-7-
BASIC PRODUCT INFORMATION
This manual is intended to assist the user in the safe and efficient operation
of the Model MF-46 Digital Blood Pressure Monitor. The product must be
used in accordance with the procedures contained in this manual and
must not be used for purposes other than those described herein. It is
important to read and understand the entire manual. In particular, please
read carefully and become familiar with the section entitled “TIPS ON
TAKING YOUR BLOOD PRESSURE”.
The user is cautioned that the system may fail to yield specified measurement
accuracy if operated or stored in temperature or humidity conditions outside
the limits stated in the specifications section of this manual. Also, an
inaccurate reading may result if this instrument is used on a child's arm.
Consult your physician if you wish to take a child's blood pressure.
Indications for Use
The MF-46 system is intended for the non-invasive measurement of systolic
and diastolic blood pressure and determination of heart rate in adult patients,
i.e., age 15 and above. The product is recommended for use by patients
with labile blood pressure or known hypertension in a home care environment
as an adjunct to medical management. The cuff will accommodate an
upper arm circumference range of approximately 8.7 to 12.6 inches (22
to 32 centimeters). Pressure is measured over a range of 0 to 300 mmHg
and heart rate over a range of 40 to 160 beats/minute.
Method of Measurement
This product employs the oscillometric method for measurement of blood
pressure and heart rate. The cuff is connected to the main unit and wrapped
around the arm. Circuits within the monitor sense the small oscillations in
pressure against the cuff produced by the expansion and contraction of the
arteries in the arm in response to each heart beat. The amplitude of each
pressure wave is measured, converted to millimeters of mercury, and
displayed on the LCD as a digital value. Memory circuit stores the 30
most recent measurement results for comparison.
Accuracy was evaluated during clinical studies in which results with the MF46 system were compared with simultaneous auscultatory measurements
obtained with a standard sphygmomanometer. In these studies, the onset
of the fourth (or fifth) Korotkoff sound was taken as the diastolic pressure
for the purpose of determining overall efficacy. A copy of this study is available
from the manufacturer on request. To insure that accuracy is maintained,
compare readings obtained with the MF-46 system with values measured
by a trained observer using a manual sphygmomanometer at least every
6 months.
Blood pressure measurements determined with this device are equivalent
to those obtained by a trained observer using the cuff stethoscope
auscultation method, within the limits prescribed by the American National
Standard, Electronic or Automated Sphygmomanometers.
The MF-46 system has the ability to function according to its specifications
in the presence of common arrhythmias such as atrial or ventricular
premature beats or atrial fibrillation.
CAUTION!
Do not use cuffs other than the original cuff
included with this product.
SPECIFICATIONS
Model
Operating Principle
Indicator
Pressure indicating Range
Measuring Range
:
:
:
:
:
Accuracy
:
Inflation
Deflation
Exhaust
Power Supply
:
:
:
:
MF-46
Oscillometric method
13 digits LCD display
0 to 300 mmHg (Cuff pressure)
50 to 250 mmHg (systolic)
40 to 180 mmHg (diastolic)
40 to 160 pulse/min. (pulse rate)
±3 mmHg (Cuff pressure)
±5% of reading (pulse rate)
Automatic inflation
Electric control valve
Automatic exhaust valve
4 pcs. 1.5 volt "AA" (R6P/LR6) type batteries
or AC adapter
Power Consumption
Memory
: 4W (max.)
: 30 measurement results x 2, computation
of the average of stored Data
Operating environment : +50˚F to+104˚F, 15 to 90% relative humidity
Storage environment : -4˚F to+122˚F, 15 to 95% relative humidity
Cuff
: Coverage arm circumference ; 8.7 to 12.6 in.
[22 to 32 cm]
Main Unit
: Weight ; Approx. 13.4 oz. [370 g] (without
batteries)
Size ; 6.4 x 7 x 3.2 in [163 x 180 x 83 mm]
(W x D x H) when CUFF HOLDER attached
Specifications are subject to change without notice due to improvements
in performance.
-9-
Refer to "PARTS NAMES AND PRODUCT COMPONENTS" on page 2 for circled numbers:
PRECAUTIONS FOR USE
1
~ 14
TIPS ON TAKING YOUR BLOOD PRESSURE
Do not use this instrument without consultation with your doctor if you are under dialysis
therapy or on anticoagulants, antiplatelets or steroids. Use of this instrument under such
conditions could cause internal bleeding.
To avoid any possibility of accidental strangulation, keep this unit away from children and
do not drape AIR HOSE 10 around your neck.
For specific information on your blood pressure, contact your physician. Never make any
judgment on measurement results on your own.
Take blood pressure measurement with the correct posture and do not move nor
speak during measurement.
Avoid exercise, eating, drinking alcohol, smoking and other activities that affect your
blood pressure right before a measurement.
Take your blood pressure every day at the same time.
The ambient temperature sould be approximately 68˚F (20˚C) when you take your
blood pressure.
Use of this device in areas near portable phones, microwave ovens or other devices with
strong electromagnetic field may cause malfunctions.
INSTALLING BATTERIES AND SETTING THE CLOCK
TIPS ON TAKING YOUR BLOOD PRESSURE
Blood pressure changes shown below.
Upper arm blood pressure date.
Blood pressure (mmHg)
200
Systolic
180
160
140
100
80
60
40
20
12 13 14 15 16 17 18 19 20 21 22 23 24 1 2 3 4 5 6 7 8 9 10 11
Time
io
n
(severe)
ns
180~
rte
160~179 (moderate)
140~159 (mild)
pe
Hy
al
tim
~120
SYS
80 85 90 100 110
80
84 89 99 109
~
~
~
~
~
~
DIA
Rest for approximately five minutes and take your blood pressure while relaxed in a
quiet environment.
- 10 -
3 Install four “AA” type batteries into the
compartment as indicated. Make sure that the
polarities correspond to the (+) and (-) marks.
4 Close the battery compartment cover.
Year flashes on the display.
Clock can be set only after the batteries are reinstalled. Adjust the
clock so that measurement results are stored with correct date and
time.
130~139 High Normal
120~129 Normal
mmHg
Blood pressure classification by WHO (1999)
Never forcefully remove CUFF HOLDER or the battery cover.
Diastolic
120
Op
Blood pressure is a measurement of the force exerted by the heart in pumping the blood
through the arteries and the resistance by the veins in this flow.
Blood pressure changes easily as influenced by mental and physical factors
and is never constant.
Causes for Changes in Blood Pressure
• Body movement
• Conversation
• Mental Tension
• Emotions • Meals
• Drinking Alcohol
• Smoking
• Recent Urination or Bowel Movement
• Temperature
• Changes in the surroundings such as movement or noise, etc.
In general, blood pressure is highest during the working hours and gradually decreases during
the afternoon and evening hours. It is low during sleep and slowly increases at a relatively fast
rate after arising from bed.
Blood pressure measured at home tends to be lower than when measured
in a hospital, clinic or doctor's office.
When blood pressure is measured in a hospital, it could be higher than when measured at
home. This is because you are tense at the hospital and relaxed at home. It is important to
know your stable normal blood pressure at home.
Let a qualified physician interpret your blood pressure readings.
Depending on your age, weight and general condition, blood pressure can be slightly different.
Consult with your doctor on determining what blood pressure is normal for you.
1 Turn the unit over and remove CUFF HOLDER 7
from the unit.
2 Open the battery cover.
5 Use M1 3 to increase the flashing number
and M2 4 to decrease the number.
6 Press ON/OFF BUTTON 2 to confirm and move
to next step.
Month flashes.
7 Adjust month with M1 and M2 buttons.
8 Press ON/OFF BUTTON and day flashes.
- 11 -
see fig.1
page 3
CAUTION! Do not use rechargeable
batteries.
battery replacement indication
Replace all the batteries when the battery replacement
indication appears on the display or nothing is displayed
even if ON/OFF BUTTON 2 is depressed.
Use alkaline batteries to increase battery life. Use of regular CarbonZinc batteries will necessitate more frequent replacement. The
enclosed batteries are for monitoring, and their life may be shorter
than that of commercial batteries.
Since neither the device nor batteries are household
waste, follow your local recycling rules and dispose
of them at appropriate collection sites.
Operation with an AC adapter
AC ADAPTER JACK 6 is located on
the right side of the unit. Do not
use any adapters other than
the one specified below.
Specifications of the AC adapter to be selected are:
Output voltage
: 6 VDC ±5%
Input voltage range : Standard voltage ±15%
Maximum electric load : 600mA or higher
Refer to "PARTS NAMES AND PRODUCT COMPONENTS" on page 2 for circled numbers:
INSTALLING BATTERIES AND SETTING THE CLOCK
9 Adjust day with M1 and M2 buttons.
10 Press ON/OFF BUTTON and hour flashes.
The clock operates in 24-hour mode.
11 Adjust with M1 and M2 buttons.
12 Press ON/OFF BUTTON and minute flashes.
13 Adjust with M1 and M2 buttons.
14 Press ON/OFF BUTTON, the clock is set and
the unit is turned off.
The clock is displayed while the unit is turned off.
CORRECT MEASURING POSTURE
Output plug polarity
Output plug shape
: Center Negative
: External diameter
: Internal diameter
: Length
An approved adapter is the RadioShack PN
adaptaplug "M" PN 273-1716.
5.5ø±0.1 mm
2.1ø±0.1 mm
9.5±0.3 mm
273-1761, with
Remove the batteries when operating the
unit with AC adapter for extended period
of time.
When batteries are removed or AC adapter is
unplugged, the clock returns to the default
value.
see fig.2
page 4
Sit at the table and let the table support your arm as you take the blood pressure measurement.
Make sure that the measurement location on the upper arm is at approximately the same height as the heart,
and that the forearm is extended naturally on the table and does not move.
You may lie on your back and take the measurement. Look at the ceiling, stay calm, and do not move your neck or body during the
measurement. Again, make sure that the measurement location on the arm is at approximately the same height as the heart.
WRAPPING THE CUFF
see fig.3
page 4
1 With the tube of the cuff positioned in the direction of the fingertips, place it on your
left arm.
2 Wrap the cuff around the arm with the edge of the cuff approximately 1 inch (2.5 cm)
above the elbow.
3 Press the surface of the cuff to make sure that it is attached securely.
When wrapping the cuff, wrap it loosely enough around the arm so that two fingers can be placed between
the cuff and the arm. If the cuff is wrapped more tightly or loosely than this, inaccurate blood pressure
readings may result.
If you are wearing a shirt that might restrict circulation in your upper arm or you roll your sleeve up over
the upper arm, the blood flow will be restricted, preventing accurate measurement.
- 12 -
MEASUREMENT PROCEDURES
Take deep breaths and relax.
Do not move, chat or strain your arm or hand
during measurement.
1 Insert TUBE PLUG 11 into AIR CONNECTOR 5 .
2 Press ON/OFF BUTTON 2 .
Beep sounds and the monitor automatically starts inflation.
The inflation stops as beep sounds and the displayed value (pressure)
decreases.
The pulse is indicated by heart mark " " with synchronizing beep.
Long beep sounds as the measurement
completes and maximum and minimum
blood pressures and pulse rate are displayed.
Deflation mark appears and the unit automatically exhausts the air
from the cuff.
3 Press either one of MEMORY BUTTONs,
M1 3 or M2 4 , and the result is stored in
the selected bank.
The selected memory bank number is shown on the display. The
result is stored in the bank which is selected when the unit is turned
off. When a measurement resulted in an error, it will not be stored.
4 Press ON/OFF BUTTON to turn off the power.
If you forget to turn off the unit, it will be automatically turned off
after 3 minutes.
1
~ 14
page 5
see fig.4
Stopping Measurement
Press ON/OFF BUTTON 2 and the
monitor will stop inflation, discharge
air rapidly, and then turn off.
Do not take repeated measurements.
blood can be forced into tissues
beyond the cuff, which would result
in incorrect measurements. Let your
arm rest for at least 5 minutes.
Automatic Repressurization
If the pressure applied is judged insufficient in the early
phase of measurement or if movement of arm or hand
occurs during measurement, the unit will inflate again to a
level about 40 mmHg higher. Automatic Repressurization
is repeated until a measurement is made. However, this
does not indicate a problem.
To manually control pressurization, hold down ON/OFF
BUTTON immediately after the start of inflation and
release it when the pressure reaches the level 50 mmHg
higher than the expected maximum systolic pressure. If
the pressure value has exceeded 180 mmHg, the inflation
will stop when the key is released. Pressure can be
increased to approximately 300 mmHg.
MEMORY FUNCTIONS
see fig.5
page 6
Measured result is stored in either M1 or M2. Each of two memory banks can hold up to 30 results and their average. When the number of
measurements exceeds 30, the oldest data will be deleted to record new data. You may decide which bank to store your measurement
results to avoid data mixture with someone else's, or may use two banks to save data measured in the morning and evening separately.
Recalling measured data
1 Press MEMORY BUTTON M1 3 or M2 4 to see stored data.
- 13 -
Refer to "PARTS NAMES AND PRODUCT COMPONENTS" on page 2 for circled numbers:
1
~ 14
CARE AND MAINTENANCE
MEMORY FUNCTIONS
The avarage of the stored result in the selected bank is displayed.
the batteries out of reach of children.
The latest result stored is displayed when there is only a single result and the clock display remains when there are no results stored.
The indication at the top of the display alternately changes from memory data number to date and to time.
The memory data is displayed for approximately 30 seconds. Approximately 30 seconds after MEMORY BUTTON is released, the
apparatus will turn off.
We suggest that you have your blood pressure monitor checked every 2 years. This operation may only be performed by the manufacturer or by firms
authorized by the manufacturer.
Do not inflate the cuff when it is not wrapped around your arm.
Do not disassemble or modify the unit.
2 Press MEMORY BUTTON to move to next data.
The memory data number 1 is the latest among the stored data in the selected memory bank.
ERROR DISPLAYS AND TROUBLESHOOTING
3 Every depression of the key switches among the memory data.
As MEMORY BUTTON is pressed, the memory data number increases; the bigger the number, the older the result.
4 Press ON/OFF BUTTON 2 and turn off the unit.
DELETING STORED DATA
see fig.6
Deleting a single data
1 Show the data to be deleted following
the steps in MEMORY FUNCTIONS.
2 Press and hold down MEMORY BUTTON
M1 3 or M2 4 whichever the data is
stored.
CAUSE / CHECK POINT
REMEDY
OVER-PRESSURIZATION
The cuff was inflated to the maximum pressure
because of movement of body etc.
Do not move during measurement.
MEASUREMENT ERROR
Measurement could not be made because of
moving or talking during measurement.
Remain still and quiet during measurement.
INFLATION ERROR
TUBE PLUG 11 is not correctly inserted.
Reinsert TUBE PLUG 11 and make sure that it is
securely inserted.
DEFLATION ERROR
Movement or talking was detected during
measurement.
Turn off the power and make another
measurement while being quiet and still.
IMPROPER OPERATION
ON/OFF BUTTON 2 was accidentally pressed
during battery replacement.
Press ON/OFF BUTTON 2 to turn off the power
once and press it again to start a
measurement.
No display when ON/OFF BUTTON
2 is pressed.
Have the batteries polarities been positioned
incorrectly?
Have the batteries run down?
Are the battery terminals clean?
Reinsert the batteries in the correct position.
page 7
Deleting all data in a bank
1 Press MEMORY BUTTON M1 3 or M2 4
and show the average of the bank to be
deleted.
2 Press and hold down selected MEMORY
BUTTON.
The displayed data starts flashing.
The displayed data starts flashing.
Hold down the button until the display
disappears.
Hold down the button until the display
disappears.
CARE AND MAINTENANCE
ERROR SYMOL / SYMPTOM
GASOLINE
PAINT
THINNER
Because the unit includes precision parts, care should be taken to avoid extreme temperature variations, humidity, shock, dust, and direct sunlight. Do not drop
or strike the unit. Make sure not to expose the unit to moisture. This unit is not water resistant.
Use only a soft, dry cloth to clean the unit. Do not use gasoline, paint thinner, or other strong solvents on the unit. Since the cuff may absorb perspiration and
other fluids, inspect it for stain and discoloration after each use. When cleaning the cuff, do not machine wash or scrub it. Use a synthetic detergent and gently
rub the surface. Make sure fluid never gets in AIR HOSE 10 . Air dry throughly.
When storing the unit, do not place heavy objects on it and do not coil AIR HOSE too tightly. When the unit has been stored at a temperature below the freezing
point, keep it for at least 1 hour in a warm place before using it. Remove the batteries if the instrument is to be stored for an extended period of time. Keep
- 14 -
- 15 -
Replace them with new ones.
Clean the battery terminals with a dry cloth.
ERROR DISPLAYS AND TROUBLESHOOTING
ERROR SYMOL / SYMPTOM
CAUSE / CHECK POINT
REMEDY
No display when MEMORY BUTTON
( 3 or 4 )is pressed.
Is there any measured result stored in the
memory?
Are you pressing the right MEMORY BUTTON?
Have the batteries run down?
Nothing is displayed when there is no
measured data stored.
Check the memory bank number.
Replace them with new ones.
Cannot make great number of
measurements.
Are you using alkaline batteries?
Use alkaline batteries to increase battery life.
Cannot complete the measurement.
Have the batteries run down?
Replace all four batteries with new ones.
Blood pressure is different each
time. The reading is extremely low
(or high).
Are you measuring with correct posture?
Blood pressure readings constantly vary with
time of measurement and nervous condition.
Measure with the correct posture.
See TIPS ON TAKING YOUR BLOOD PRESSURE.
Pulse rate is too low (or too high).
Did you move during the measurement?
Did you make measurement right after exercise?
Remain still during the measurement.
Measure again after resting for more than 5
minutes.
The power is automatically turned
off.
Have you left the instrument untouched after
the measurement?
This does not indicate a problem. The instrument
automatically turns off 3 minutes after a
measurement or 30 seconds after memory display.
If you cannot get correct measurement with the methods above, do not tamper with the internal mechanism. Contact your dealer. If the unit malfunctions, please
return it to the dealer or an authorized service representatives for service according to the warranty. Service data are provided to qualified dealers by the manufacturer.
- 16 -
- 17 -