1
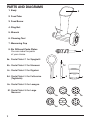
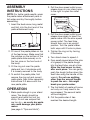
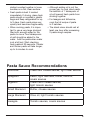
INSTRUCTION & RECIPE BOOKLET
For use with
SM-55 & SM-70
Stand Mixers
Pasta Maker Attachment
SM-PM
For your safety and continued enjoyment of this product, always read the instruction book carefully before using.
IMPORTANT
SAFEGUARDS
When using an electrical appliance,
basic safety precautions should
always be followed, including the
following:
1.READ ALL INSTRUCTIONS
BEFORE USING.
2.Switch off and unplug the
Cuisinart™ Stand Mixer before
fitting or removing the Pasta
Maker Attachment after use
and before cleaning.
3.Close supervision is necessary
when any appliance is used by
or near children. Cuisinart does
not recommend the use of this
appliance by children.
4.NEVER FEED FOOD BY HAND;
ALWAYS USE THE PUSHER.
Avoid contact with moving parts
and fitted attachments. To reduce
the chances of bodily injury and/
or damage to the stand mixer or
pasta maker attachment, keep
hands, clothing, cooking utensils,
etc. away from the moving parts
during operation.
5.The use of attachments not
recommended or sold by
Cuisinart may cause fire, electric
shock or injury.
6.Do not use more than one
attachment at a time.
7.Do not exceed the maximum
capacities listed in these use
and care instructions.
8.Do not use the stand mixer or
attachment if it is damaged
or if the cord is damaged.
Have it checked and serviced
before resuming use.
9.Do not use this attachment for
anything other than its intended
use.
10.Do not use outdoors.
11.To protect against the risk of
electric shock do not put the
power unit in water or other
liquid.
12.Do not let cord hang over edge
of table or counter.
13.Never leave your pasta maker
attachment unattended while
the stand mixer is running.
SAVE THESE
INSTRUCTIONS
FOR HOUSEHOLD
USE ONLY
WARNING: RISK Of FIRE OR ELECTRIC SHOCK
The lightning flash with arrowhead symbol within an equilateral triangle
is intended to alert the user to the presence of uninsulated dangerous
voltage within the product’s enclosure that may be of sufficient
magnitude to constitute a risk of fire or electric shock to persons.
The exclamation point within an equilateral triangle is intended to alert
the user to the presence of important operating and maintenance
(servicing) instructions in the literature accompanying the appliance.
SPECIAL CORD SET
INSTRUCTIONS
Unpacking
Instructions
A short power-supply cord is
provided with the stand mixer to
reduce the risks resulting from
becoming entangled in or tripping
over a longer cord.
Longer extension cords are
available and may be used if
care is exercised in their use.
If a long extension cord is used,
the marked electrical rating of the
extension cord must be at least as
great as the electrical rating of the
appliance, and the longer cord
should be arranged so that it will
not drape over the countertop or
tabletop where it can be pulled
on by children or tripped over.
1. Place the gift box containing your
Cuisinart™ Pasta Maker Stand
Mixer Attachment on a flat sturdy
surface before unpacking.
NOTICE
2. Lift the corrugated insert out of the
gift box. Remove the body,
wrench, measuring cup, pasta
plates and cleaning tool. Use
caution when removing the
cleaning tool as the tip is sharp.
To assemble the pasta maker
attachment, follow Assembly
Instructions on page 4. Replace all
packaging materials inside box and
save the box for repackaging.
Before using for the first time:
Wash all parts according to Cleaning
and Maintenance on page 5.
The stand mixer has a polarized plug
(one blade is wider than the other).
To reduce the risk of electric shock,
this plug will fit in a polarized outlet
only one way. If the plug does not fit
fully in the outlet, reverse the plug. If
it still does not fit, contact a qualified
electrician.
Do not modify the plug in any way.
WARNING
RISK OF FIRE OR ELECTRIC SHOCK
DO NOT OPEN
WARNING: TO REDUCE THE RISK OF FIRE OR ELECTRIC SHOCK,
DO NOT REMOVE COVER (OR BACK)
NO USER-SERVICEABLE PARTS INSIDE
REPAIR SHOULD BE DONE BY AUTHORIZED SERVICE PERSONNEL ONLY
PARTS AND diagrams
1. Body
2
2. Feed Tube
3. Feed Screw
4. Ring Nut
1
4
5. Wrench
6. Cleaning Tool
7. Measuring Cup
8. Six Different Pasta Plates
You can make the pasta
of your choice.
3
8a. Pasta Plate # 1 for Spaghetti
8b. Pasta Plate # 2 for Macaroni
8c. Pasta Plate # 3 for Rigatoni
8d. Pasta Plate # 4 for Fettuccine
(Tagliatelle)
5
6
7
8e. Pasta Plate # 5 for Lasagna
8f. Pasta Plate # 6 for Large
Macaroni
8a
8b
8c
8d
8e
8f
ASSEMBLY
INSTRUCTIONS
NOTE: For better pasta results, warm
the pasta maker attachment parts in
hot water and dry thoroughly before
assembling.
2.Pull the slow speed outlet cover
release lever on your stand mixer
to the right to open the outlet
cover.
1.Insert the feed screw, long metal
end first, into the front end of the
pasta attachment body.
3.Pull the slow speed outlet cover
release lever again to insert the
pasta maker into the slow speed
power outlet. The feed tube
should face you in an upright
position. Turn the pasta maker
both ways until it locks in place.
2.Fit one of the pasta plates on top
of the feed screw. Make sure that
the notches on the bottom of the
pasta plate slide securely on to
the two pins on the front end of
the body.
3.Fit the ring nut over the pasta
plate and turn it clockwise until
it is loosely secured to the body.
4.To switch the pasta plate, first
remove the ring nut and current
pasta plate, then follow assembly
instructions 2-3 above with the
new pasta plate.
OPERATION
1.Make pasta dough in your stand
mixer. The dough should be
smooth and moist but not too
sticky. Do not use recipes that
are too dry – an overly dry pasta
mix could damage your pasta
maker.
(see page 5 “Tips and Hints”)
4.Tighten the ring nut by turning
it clockwise.
5.Turn stand mixer to speed 4.
6.Drop small pieces (about the size
of a grape) of the pasta dough
into the feed tube, one at a time.
Allow the feed screw to clear
after each piece. You can gently
push the dough further down the
feed tube using the handle of the
wrench. Do not use anything
other than the wrench handle
to push the mix – this might
break your pasta maker.
7.The first batch of pasta will come
out curly so it may need to be
reprocessed. The second batch
will be straighter.
8.Cut the pasta when it has
reached the desired length.
CLEANING AND
MAINTENANCE
1.Remove the ring nut manually, or
with the wrench if it is fastened
too tightly.
2.Remove the pasta plate and feed
screw.
3.Allow dough on the pasta plates
to dry before removing it with the
cleaning tool.
4.Wash ring nut in warm soapy
water. Do not put the ring nut in
the dishwasher. All other parts
can be washed in warm soapy
water and are top rack
dishwasher-safe.
Tips and Hints
• It is essential to stir the flour before you measure it. Do not scoop it right out of the bag.
• The key to making fresh pasta is
to have the right feel of the dough.
It is important that the dough is
not too moist or too dry. The
dough should be pliable and
come together in one ball yet
should not be sticky to the touch.
• Pasta dough is too dry if it feels
floury and small granules of flour
mix are evident. If dough is too
dry add warm water 1 teaspoon
at a time until desired texture is
achieved.
• The humidity of the day can greatly affect the pasta dough. If the day
is very humid, watch and feel the dough when you are finished kneading. If it is still sticky, knead in one tablespoon of flour at a time until the stickiness disappears.
• The main differences between
dried pasta and fresh pasta are
the ingredients, cooking time, and
texture. Dried pasta dough is
mainly made of semolina flour,
water, and salt. Dried pasta takes
at least twice as long as fresh to
cook.
• Fresh pasta has a softer, more
delicate texture, making it more
absorbent and more suitable for
lighter sauces such as tomato,
olive oil, cream or butter. Dried
pasta has a firmer, denser texture
that holds up to heartier, meatier,
and heavy sauces.
• 1½ pounds of fresh pasta make
4 ample adult portions.
• It may be necessary to experiment
with the fresh egg pasta recipe
a few times to get the feel of the
dough and the pasta making
process.
• Dough pieces should be no larger
than a grape (no more than ¾ inch
around) when placed into the
pasta maker.
• The pasta maker should not be
stuffed. Add dough pieces one a
time and watch to see them clear
the scroll. Should a piece get
stuck, gently nudge lodged dough
piece with the back of the wrench.
• The dough may come out curly
in the first batch. The dough
should straighten in the second
batch. Any curled pasta can
be reprocessed.
• Separate pasta as soon as it is cut
from the pasta maker. Toss freshly
extruded pasta with cornmeal to
prevent sticking. Pile cornmeal-
dusted noodles together in loose
bundles on a flat, clean surface.
• Fresh pasta is best if cooked
immediately. If storing, place fresh
pasta dough or noodles in plastic
bags and keep refrigerated for up
to 3 days. Fresh pasta dries very
quickly and becomes fragile easily.
• When cooking pasta, it is important to use a very large stockpot
filled with enough water for the
pasta to move. Two tablespoons
of salt should be added to the
water. Add the pasta when water
is at a full boil. Start checking
fresh pasta at 30 seconds. Tubular
and thicker pasta will take longer,
up to 5 minutes to cook.
• Although adding oil is not the
proper way to cook dried pasta,
the addition of 1 tablespoon of
oil will prevent fresh pasta from
sticking together.
• For lasagna and fettuccine,
cook the full recipe of pasta
in 2 batches.
• The stand mixer should rest at
least one hour after processing
2 pasta dough recipes.
Pasta Sauce Recommendations
Fettucine
Cream and cheese sauces, light meat sauces
Spaghetti
Pesto, light marinara, butter, olive oil,
cream sauces
Rigatoni
Cream and cheese sauces,
light tomato sauces
Small Macaroni
Butter, cheese sauces
Large Macaroni
Olive oil, light tomato sauces
Lasagna
Tomato sauces, cream sauces
Recipes
Traditional Pasta
A great recipe for basic,
all-purpose pasta.
Makes 1 pound 4 ounces of dough
3cups unbleached,
all-purpose flour
1
teaspoon salt
4
large eggs
Place the flour and salt in the
Cuisinart™ mixing bowl. Insert the
flat mixing paddle. Mix dry ingredients
together on speed 3. Crack eggs into a
measuring cup with a pour spout. With
stand mixer running on speed 3, pour
the eggs in slowly, one at a time, in a
continuous flow. Mix for about 1 to 2
minutes until the mixture just comes
together. Replace the flat mixing paddle
with the dough hook and knead the
dough on speed 4 for 3 minutes. A
smooth dough ball should form.
Remove dough and wrap in plastic.
Allow to rest for at least 15 minutes.
Attach the pasta maker attachment to
the stand mixer. Turn to speed 4. Run
the dough through the pasta maker in
small, grape-size pieces (no larger than
¾ inch). Should any pieces get stuck in
the feed tube, gently tap with the back
end of the wrench.
Be sure to separate pasta strands
once cut from the pasta maker. Lightly
toss bundles of pasta with cornmeal to
prevent sticking.
Cook immediately.
To cook pasta: Use a very large
stockpot filled with enough water for
the pasta to move. Add 2 tablespoons
of salt to the water. Add the pasta
when water is at a full boil. Start
checking fresh pasta at 30 seconds.
Tubular and thicker pasta will take
longer, up to 5 minutes to cook.
Fresh Spinach Pasta
Makes 1 pound 9 ounces of dough
3½cups unbleached,
all-purpose flour
1
teaspoon salt
3
eggs
½cup spinach purée
(approximately 8 ounces
of fresh spinach steamed
and pureed*)
Place the flour and salt in the Cuisinart™
mixing bowl. Insert the flat mixing
paddle. Mix ingredients together on
speed 3. Crack eggs into a measuring
cup with a pour spout. With stand mixer
running on speed 3, pour the eggs in
slowly, one at a time, in a continuous
flow. Add the spinach. Mix for about
1 to 2 minutes until the mixture just
comes together. Replace the flat mixing
paddle with the dough hook and knead
the dough on speed 4 for 3 minutes. A
smooth dough ball should form.
Remove dough and wrap in plastic.
Allow to rest for at least 15 minutes.
Attach the pasta maker attachment to
the stand mixer. Turn to speed 4. Run
the dough through the pasta maker in
small, grape-size pieces (no larger than
¾ inch). Should any pieces get stuck in
the feed tube, gently tap with the back
end of the wrench.
Be sure to separate pasta strands once
cut from the pasta maker. Lightly toss
bundles of pasta with cornmeal to
prevent sticking.
Cook immediately.
To cook pasta: Use a very large
stockpot filled with enough water for
the pasta to move. Add 2 tablespoons
of salt to the water. Add the pasta
when water is at a full boil. Start
checking fresh pasta at 30 seconds.
Tubular and thicker pasta will take
longer, up to 5 minutes to cook.
*It is very important to remove as much
moisture from the spinach as possible
before adding to the dough. If after
kneading the dough feels slightly sticky,
knead one tablespoon of flour into the
dough at a time until the stickiness
disappears.
Whole Wheat Pasta
Attach the pasta maker attachment to
the stand mixer. Turn to speed 4. Run
the dough through the pasta maker in
small, grape-size pieces (no larger than
¾ inch). Should any pieces get stuck in
the feed tube, gently tap with the back
end of the wrench.
Be sure to separate pasta strands
once cut from the pasta maker. Lightly
toss bundles of pasta with cornmeal to
prevent sticking.
Cook immediately.
To cook pasta: Use a very large
stockpot when cooking pasta filled with
enough water for the pasta to move.
Add 2 tablespoons of salt to the water.
Add the pasta when water is at a full
boil. Start checking fresh pasta at 30
seconds. Tubular and thicker pasta will
take longer, up to 5 minutes to cook.
Makes 1 pound 3 ounces of dough
2
cups whole wheat flour
1cup unbleached,
all-purpose flour
1
teaspoon salt
4
large eggs
Place both flours and salt in the
Cuisinart™ mixing bowl. Insert the flat
mixing paddle. Mix dry ingredients
together on speed 3. Crack eggs into
a measuring cup with a pour spout.
With stand mixer running on speed 3,
pour the eggs in slowly, one at a time,
in a continuous flow. Mix for about 3
minutes until the mixture just comes
together. Replace the flat mixing paddle
with the dough hook and knead the
dough on speed 4 for 3 minutes. A
smooth dough ball should form.
Remove dough and wrap in plastic.
Allow to rest for at least 15 minutes.
Fresh Herb and
Green Onion Pasta
Makes 1 pound 5 ounces of dough
3¼cups plus 1½ tablespoons
unbleached, all purpose
flour
3tablespoons finely chopped
fresh, mixed herbs
(basil, chives, dill, parsley,
tarragon, oregano or mint)
1tablespoon finely chopped
green onion (approximately
1 green onion)
1
teaspoon salt
4
eggs
Place the flour, herbs, onion, and salt
in the Cuisinart™ mixing bowl. Insert
the flat mixing paddle. Mix ingredients
together on speed 3. Crack eggs into
a measuring cup with a pour spout.
With stand mixer running on speed 3,
pour the eggs in slowly, one at a time,
in a continuous flow. Mix for about
1 to 2 minutes until the mixture just
comes together. Replace the flat mixing
paddle with the dough hook and knead
the dough on speed 4 for 3 minutes. A
smooth dough ball should form.
Remove dough and wrap in plastic.
Allow to rest for at least 15 minutes.
Attach the pasta maker attachment to
the stand mixer. Turn to speed 4. Run
the dough through the pasta maker in
small, grape-size pieces (no larger than
¾ inch). Should any pieces get stuck in
the feed tube, gently tap with the back
end of the wrench.
Be sure to separate pasta strands once
cut from the pasta maker. Lightly toss
bundles of pasta with cornmeal to
prevent sticking. Cook immediately.
To cook pasta: Use a very large
stockpot filled with enough water for
the pasta to move. Add 2 tablespoons
of salt to the water. Add the pasta
when water is at a full boil. Start
checking fresh pasta at 30 seconds.
Tubular and thicker pasta will take
longer, up to 5 minutes to cook.
Fresh Black
Pepper Pasta
Makes 1 pound 5 ounces of dough
3cups unbleached,
all-purpose flour
1
teaspoon salt
4
large eggs
2teaspoons crushed black
pepper
Place the flour and salt in the
Cuisinart™ mixing bowl. Insert the flat
mixing paddle. Mix dry ingredients
together on speed 3. Crack eggs into a
measuring cup with a pour spout. With
stand mixer running on speed 3, pour
the eggs in slowly, one at a time, in a
continuous flow. Add the black pepper.
Mix for about 1 to 2 minutes until the
mixture just comes together. Replace
the flat mixing paddle with the dough
hook and knead the dough on speed
4 for 3 minutes.
Remove dough and wrap in plastic.
Allow to rest for at least 15 minutes.
Attach pasta maker attachment to
the stand mixer. Turn to speed 4. Run
the dough through the pasta maker.
Place small, grape-sized pieces (no
larger than ¾ inch) of the pasta dough
through the hopper. Should any pieces
get stuck in the feed tube, gently tap
with the back end of the wrench.
Be sure to separate pasta strands
once cut from the extruder. Lightly toss
bundles of pasta with cornmeal to
prevent sticking.
Cook immediately.
To cook pasta: Use a very large stockpot
filled with enough water for the pasta to
move. Add 2 tablespoons of salt to the
water. Add the pasta when water is at a
full boil. Start checking fresh pasta at 30
seconds. Tubular and thicker pasta will
take longer, up to 5 minutes to cook.
Fresh Tomato and
Basil Pasta
Makes 1 pound 7 ounces of dough
3¼cups unbleached,
all-purpose flour
1
teaspoon salt
4
large eggs
2½ tablespoons tomato paste
½
teaspoon dried basil
Remove dough and wrap in plastic.
Allow to rest for at least 15 minutes.
Attach pasta maker attachment to
the stand mixer. Turn to speed 4. Run
the dough through the pasta maker.
Place small, grape-sized pieces (no
larger than ¾ inch) of the pasta dough
through the hopper. Should any pieces
get stuck in the feed tube, gently tap
with the back end of the wrench.
Be sure to separate pasta strands
once cut from the extruder. Lightly
toss bundles of pasta with cornmeal
to prevent sticking.
Cook immediately.
To cook pasta: Use a very large
stockpot filled with enough water for
the pasta to move. Add 2 tablespoons
of salt to the water. Add the pasta
when water is at a full boil. Start
checking fresh pasta at 30 seconds.
Tubular and thicker pasta will take
longer, up to 5 minutes to cook.
Place the flour and salt in the Cuisinart™
mixing bowl. Insert the flat mixing
paddle. Mix dry ingredients together on
speed 3. Crack eggs into a measuring
cup with a pour spout. With stand
mixer running on speed 3, pour the
eggs in slowly, one at a time, in a
continuous flow. Add the tomato paste
and basil. Mix for about 1 to 2 minutes
until the mixture just comes together.
Replace the flat mixing paddle with the
dough hook and knead the dough on
speed 4 for 3 minutes.
10
WARRANTY
Limited Three-Year
Warranty
This warranty is available to consumers only. You are a consumer if you
own a Cuisinart™ Stand Mixer Pasta
Maker Attachment that was purchased
at retail for personal, family or household use. Except as otherwise required
under applicable law, this warranty is
not available to retailers or other commercial purchasers or owners.
We warrant that your Cuisinart™ Stand
Mixer Pasta Maker Attachment will
be free of defects in materials and
workmanship under normal home use
for 3 years from the date of original
purchase.
We suggest you complete and return
the enclosed product registration card
promptly to facilitate verification of the
date of original purchase. However,
return of the product registration card
does not eliminate the need for the
consumer to maintain the original proof
of purchase in order to obtain the warranty benefits. In the event that you do
not have proof of purchase date, the
purchase date for purposes of this warranty will be the date of manufacture.
If your Cuisinart™ Stand Mixer Pasta
Maker Attachment should prove to be
defective within the warranty period,
we will repair it, or if we think necessary, replace it. To obtain warranty
service, simply call our toll-free number
1-800-726-0190 for additional information from our Customer Service
Representatives, or send the defective product to Customer Service
at Cuisinart, 150 Milford Road, East
Windsor, NJ 08520.
11
To facilitate the speed and accuracy of
your return, please enclose $10.00 for
shipping and handling of the product.
Please pay by check or money order
(California residents need only supply
proof of purchase and should call 1-800726-0190 for shipping instructions).
NOTE: For added protection and
secure handling of any Cuisinart®
product that is being returned, we recommend you use a traceable, insured
delivery service. Cuisinart cannot be
held responsible for in-transit damage
or for packages that are not delivered
to us. Lost and/or damaged products
are not covered under warranty. Please
be sure to include your return address,
daytime phone number, description
of the product defect, product model
number (located on bottom of product), original date of purchase, and
any other information pertinent to the
product’s return.
Your Cuisinart™ Stand Mixer Pasta
Maker Attachment has been manufactured to the strictest specifications and
has been designed for use with the
authorized accessories and replacement parts.
This warranty expressly excludes any
defects or damages caused by accessories, replacement parts, or repair service other than those that have been
authorized by Cuisinart.
This warranty does not cover any damage caused by accident, misuse, shipment or other ordinary household use.
This warranty excludes all incidental or
consequential damages. Some states
do not allow the exclusion or limitation
of these damages, so they may not
apply to you.
CALIFORNIA RESIDENTS ONLY:
California law provides that for InWarranty Service, California residents
have the option of returning a nonconforming product (A) to the store where
it was purchased or (B) to another retail
store which sells Cuisinart products of
the same type.
The retail store shall then, at its discretion, either repair the product, refer the
consumer to an independent repair
facility, replace the product, or refund
the purchase price less the amount
directly attributable to the consumer’s
prior usage of the product. If the
above two options do not result in the
appropriate relief to the consumer, the
consumer may then take the product
to an independent repair facility if
service or repair can be economically
accomplished. Cuisinart and not the
consumer will be responsible for the
reasonable cost of such service, repair,
replacement, or refund for nonconforming products under warranty.
under warranty and direct you to the
nearest service location.
Important: If the nonconforming
product is to be serviced by someone
other than Cuisnart’s Authorized Service
Center, please remind the servicer to
call our Consumer Service Center at
1-800-726-0190 to ensure that the
problem is properly diagnosed, the
product is serviced with the correct
parts, and the product is still under
warranty.
California residents may also, according
to their preference, return nonconforming
products directly to Cuisinart for repair,
or if necessary, replacement, by calling
our Consumer Service Center toll-free
at 1-800-726-0190.
Cuisinart will be responsible for the cost
of the repair, replacement, and shipping
and handling for such products under
warranty.
Before returning your
cuisinart® product
If you are experiencing problems with
your Cuisinart® product, we suggest
that you call our Cuisinart® Service
Center at 1-800-726-0190 before
returning the product serviced. If
servicing is needed, a Representative
can confirm whether the product is
12
Coffeemakers
Food
Processors
Toasters
Rice Cookers
Cookware
Grills
Cuisinart offers an extensive assortment of top quality products to make life in the
kitchen easier than ever. Try some of our other countertop appliances and
cookware, and Savor the Good Life™.
www.cuisinart.com
©2007 Cuisinart
Cuisinart® is a registered
trademark of Cuisinart
150 Milford Road
East Windsor, NJ 08520
Printed in China
07CU26471
Any other trademarks or service marks of third parties referred to
herein are the trademarks or service marks of their respective owners.
IB-6390B