1
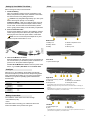
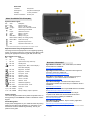
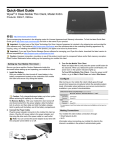
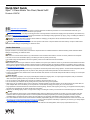
Quick-Start Guide
Wyse® X Class Mobile Thin Client, Model Xx0C
Products: X90CW
http://www.wyse.com/manuals
See accompanying documents in the shipping carton for License Agreement and Warranty information. To find the latest Quick-Start Guide, go to
http://www.wyse.com/manuals and click on the name of your product.
Important: A printed copy of the Wyse Technology End User License Agreement is included in the shipping box and provided for your reference only.
The license at http://www.wyse.com/license as of the purchase date is the controlling licensing agreement. By copying, using, or installing the software or
the product, you agree to be bound by those terms.
Important: If you use Wyse Device Manager Server software for managing your Wyse thin clients, download the latest version to ensure
compatibility at http://www.wyse.com/download.
Caution: Improper connection, mounting, or use of this product could result in component failure and/or flash memory corruption. Read Caution
Statements before setting up and operating your mobile thin client.
Caution Statements
Improper connection or use of this product could result in component failure or undesired interference. Read the following caution statements before
setting up and operating your mobile thin client.
Setup
• Do not force a connector into its socket. If any undue resistance is encountered, ensure that the connector is correctly oriented to the receptacle.
• The main unit is not user serviceable; opening or accessing the case may violate your warranty.
• For wireless usage and requirements, refer to the regulatory notices in the mobile thin client’s documentation.
Venting and Care
• Allow sufficient space around your mobile thin client for ventilation; do not place your mobile thin client in any enclosure that restricts airflow around the
•
•
device, such as a closed briefcase, while the computer is turned on. Restricting airflow can overheat and damage your mobile thin client or cause a fire;
do not place any objects on the device or block the vent outlets. Find environmental operating specifications in the mobile thin client’s datasheet located
at http://www.wyse.com/products.
Do not allow your mobile thin client to rest directly on exposed skin for extended periods of time during operation. The base surface temperature will rise
during normal operation (particularly when AC power is used). Prolonged contact with exposed skin can cause discomfort or a burn.
To clean your mobile thin client, first disconnect it from the electrical outlet, and then use a soft cloth dampened with water for cleaning. Do not use liquid
or aerosol cleaners.
Power Sources
• To ensure regulatory compliance, use only the power adapter included in the shipping carton, or a Wyse-approved equivalent, with your mobile thin
client. Refer to the regulatory notices in your mobile thin client’s documentation.
• You can connect the power adapter at any time with the mobile thin client turned either on or off.
• Do not hard reset your mobile thin client by holding down the power button during normal operation.
• When turning off your mobile thin client, be sure to perform a complete shutdown (via the user interface). Do not disconnect the AC power cable, DC
power adapter cable, remove the battery, or shut off power at a circuit breaker (including power strips), etc., to turn off the device.
• Surge protectors for electrical devices are recommended in areas of lightning. However, when lightning is occurring, your equipment should be properly
shut down and unplugged from AC power until the storm has passed.
• Dispose of your battery properly when it no longer holds a charge or is damaged. Contact your local waste or environmental agency for instructions.
Battery
• The X class mobile thin clients contain a user-replaceable battery pack that is designed to work with your product. Do not use a battery from other
•
•
mobile thin clients or laptop computers. There is a risk of explosion if the battery is replaced by an incorrect type. Replace the battery only with a
compatible battery purchased from Wyse (refer to the Wyse Web site). For disposal of used batteries, follow local ordinance and/or regulation.
The X class mobile thin clients contain an internal button cell battery replaceable by Wyse or one of our Authorized Service Centers. For service, visit
http://www.wyse.com/serviceandsupport/service/service.asp. There is a risk of explosion if the battery is replaced by an incorrect type. Always dispose
of used batteries according to the instructions accompanying the battery.
Perchlorate Materials - Special Handling May Be Required under California Code of Regulations, title 22. (Only required within the U.S.A.)
Setting Up Your Mobile Thin Client
Views
Refer to the figures and proceed as follows:
1. Install the Battery
With your mobile thin client turned off, insert battery in the
battery compartment located on the underside of the mobile
thin client and secure it by sliding the latches.
Caution: Fully charge/discharge battery up to four cycles
before achieving full capacity of a new battery.
To Remove Battery - With your mobile thin client turned off
and disconnected from the power adapter, slide the battery
lock to unlock, and then slide and hold the battery release
latch to gently pull the battery out of the battery compartment.
2. Connect the Power Cable
Plug the power adapter connector to the mobile thin client as
shown. Plug the AC power cable to the power adapter, and
then plug the other end of the power cable to a wall outlet.
Note: You can connect the power adapter at any time
with the computer turned either on or off.
Bottom View
3. Turn On the Mobile Thin Client
Raise and adjust the lid, and press the power on/off button for
two seconds. When you release the power on/off button, the
power icon on the system indicators lights up.
To Turn Off the Mobile Thin Client - Press the power on/off
button, or go to Start | Shut Down and select Shut down.
1 Battery lock
4 Module compartment cover
2 Battery release
5 Speakers
3 Battery
6 Memory cover
Front View
1 System indicator lights
Configure
After turning on, the mobile thin client initially goes through
several boot sequence procedures before the operating system
loads. Information about setting up your server environment is
available in your product’s operating system administrators
documentation.
Right View
1 Four-in-One memory card slot1
2 Audio
Default User Names and Passwords* (case sensitive)
3 Microphone in
WES
Administrator
User Name
Password
User
User Name
Password
out2
4 USB port3
5 Network port, 10/100Base-T
6 Kensington lock slot
1 Accepts
Administrator
Administrator
2
3
User
User
Memory Stick, Memory Stick Pro, SD or MMC memory card.
Warning: Listening to audio at high volume levels for extended durations can damage your
hearing
Not all USB devices are supported; check with Wyse or your Wyse representative to find out if a
particular device is supported on your mobile thin client.
*Zero client not applicable.
Making Connections
Your mobile thin client makes connections through:
• Wired Network (LAN)
• Wi-Fi
Information about connecting your mobile thin client to the
Internet is available in the product users guide.
Left View
1 Power adapter input
3 Video port
2 Vents
4 USB port (2)1
1 Not
all USB devices are supported; check with Wyse or your Wyse representative to find out if a
particular device is supported on your mobile thin client.
2
Inside View
1 Webcam
5 Keyboard
2 Microphone
6 System indicator lights
3 Display
7 Touch pad button
4 Power on/off button
8 Touch pad
About Your Mobile Thin Client (MTC)
System Indicator Lights1
Icon
and
1
Color
Description
Blue
Amber
(no light)
MTC is turned on
MTC is in standby mode
MTC is off or in Hibernation mode
Blue
Purple
Wireless signal is enabled
Wireless is turned on
Amber
Blue
Blinks Blue
Flashes Amber
Battery is charging
Battery in use
Battery running low
Battery not working properly
Flashes Blue
Flash drive activity
Blue
Keyboard caps lock is on
Blue
Keyboard number lock is on
System status indicators light when a particular function of the computer is active.
Keyboard Function Keys for System Control
The usage of function keys depends on the supporting operating
system. To use the function keys, press and hold the Fn key while
pressing the appropriate function key (F2, F10, and the rest).
Wyse X90CW Function Keys
Icon
Key
Description
Fn
Fn
Function key
?
Fn + F1
Opens function keys online help
Fn + F2
standby mode
Fn + F3
Display switch - MTC / external display /
MTC+external display
Fn + F4
Brightness - decrease
Fn + F5
Brightness - increase
Fn + F6
Touch pad - on/off
Fn + F7
Speakers - on/off
Fn + F8
Volume - decrease
Wyse Service and Support - Upgrade software images for
installation on your FTP file server are available at:
Fn + F9
Volume - increase
http://www.wyse.com/support
Fn + F10
Wireless - on/off
Fn + F11
3G Network (optional)1
Fn + F12
Power Save mode - on/off
Wyse Device Manager - Information about Wyse remote
management software that comes with your mobile thin client is
available at:
Fn + NumLk
Scroll lock - on/off
http://www.wyse.com/bundle
Sys Rq
Wyse WSM - Information about Wyse WSM software is available
at: http://www.wyse.com/products/software/wsm
Scr Lk
Sys Rq Fn + Insert
Prt Scr
Fn + Delete
Need more information?
Wyse Reference Guides - User, Administrator, and related
documentation is available at:
http://www.wyse.com/manuals
Wyse-Approved Accessories - Information about approved
accessory options are available at:
http://www.wyse.com/products/accessories
Bitmap of display copies to clipboard
Wyse and the Environment - Information about Wyse
compliance with RoHS and with the Waste Electrical and
Electronic Equipment (WEEE) is available at:
Numeric Keypad
The numeric keypad numbers and symbols are printed in blue on
the keypad keys. Press Num Lk to enable or disable the numeric
keypad.
http://www.wyse.com/green
Wyse Warranty Registration - Wyse’s warranty registration*
process is available at:
Power Management
Proper power management for your mobile thin client will prolong
battery life and reduce heat dissipation. For information on the
Power Save mode and maintaining the battery, refer to your
product’s users guide.
http://www.wyse.com/serviceandsupport/register.asp
* The standard warranty is one year from the date of purchase of the device and six months for
the battery.
3
Wyse Technology Inc.
3471 North First Street
San Jose, CA 95134-1801 U.S.A.
Printed on 50% post-consumer recycled paper
883907-51L Rev. C
December 2009
Printed in U.S.A.
©2009 Wyse Technology Inc. All rights reserved. This product and/or associated software are
protected by copyright international treaties, and various patents, including the following U.S.
patents: 6,836,885 and 5,918,039.