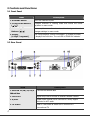
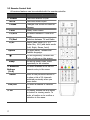
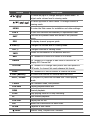
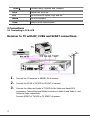
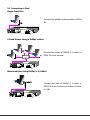
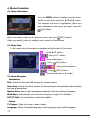
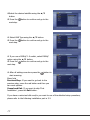
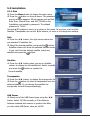
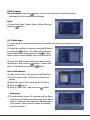
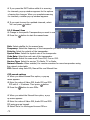
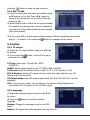
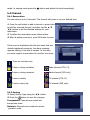
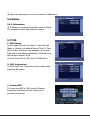
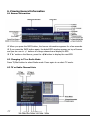
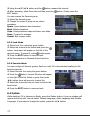
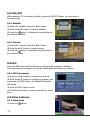
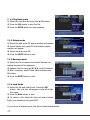
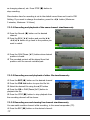
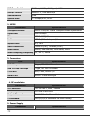
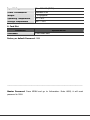
1
Plaza UPM Instruction Manual Notice For your safety, please read this manual carefully and make sure you understand the provided instructions. Warnings, Cautions and Notes Throughout the whole manual, pay special attention to the following marks that indicate hazardous situations. Caution Indicates a condition, if not avoided, could damage the equipment or apparatus. Warning Indicates a hazardous situation, if not avoided, could result in serious injury. Information Indicates additional information to make the user aware of any importance or to help and understand the installation. Safety Information This digital satellite receiver has been manufactured to comply with international safety standards. Please read the following safety precautions carefully. User’s Manual Safety Instructions and Precautions The socket-outlet shall be installed near the equipment and shall be easily accessible. Avoid placing any items and blocking ventilations on the top. Ventilations blocking can cause fire Avoid cleaning the surface with Detergents, Benzene or Volatile gasoline. Color can be damaged. Disconnect the power and the antenna if not used for long period or during thunderstorm. If there is smoke or burning smell, turn off & un-plug the set immediately. Contact your local repair center for advice. Keep the set away from any source of water. Clean off the dust using dry cloth. Dust or Metallic particles entering the set can cause fire and electric shock. Avoid dissembling and assembling. Do not open the set. Do not pull the power cable to unplug. Do not move the set while power cord is plugged in. Place the set in well ventilated area. Avoid direct sunlight and humidity. 2 1 Before You Begin 1.1 Features MPEG-2 & Fully DVB Compliant MPEG-2 Video (MP@ML), MPEG-1 Audio Layer1, Layer 2 PLL RF-Modulator UHF 21~69 with PAL I / G / B / D / K LNB Controlling Logic SCPC/MCPC Receivable from C / Ku-Band Satellites Digital Tuner with Loop-through Wide Symbol Rate 1~45Mbps & Frequency Input 950 ~ 2150MHz USALS & DiSEqC 1.2 Supported 1 SCART for TV User friendly OSD Menu with Full Function 256 Color Graphic User Interface Multi-language menu 4-digit 7-segment LED Display Variable Aspect Ratio (4:3, 16:9) with Pan Vector or Letter Box EPG (Electronic Program Guide) for On-screen Channel Information Small Screen Picture on EPG and PIP (Picture In Picture) Supported Teletext and Subtitle Supported (VBI & OSD) Capacity for Storing 8000 Channels (TV + Radio Total). Favorite Channel and Parental Lock Function Live Screen Pause and Resume Zoom and Multi Picture Supported Blind Scan Supported RS232C Port for receiver to receiver data transfer and Upgrading System Software USB 2.0 connector supporting Jpeg Viewer, external PVR and Upgrading System Software. One channel recording and one channel watching Time Shift Supported Jpeg Viewer Supported 2 Controls and Functions 2.1 Front Panel Item Description 1. STANDBY Button Turns the receiver On/Off. 2. CH Up/Down Buttons Changes channels in viewing mode and moves the cursor (▲ /▼ ) up/down in menu mode. 3. Volume Up/Down Buttons (◀/▶) 4. Display Increases/ decreases the volume levels in viewing mode and changes settings in menu mode. The 4-digit displays channel information. In STAND BY mode, (4-digit 7-segment) it displays the local time. The red LED is STAND BY indicator. 2.2 Rear Panel Item 1. DISH IN 13/18 (14/19) V Description Connect the satellite dish 500mA Max 2. LOOP OUT Signal Loop Out to connect to another satellite receiver 3. S/PDIF Digital Audio Optical Out to connect to a Dolby Digital decoder for AC3 audio 4. TV SCART RGB or CVBS Audio & Video Out to connect to a conventional TV 4 5. RS-232C To connect a Set-top box or a Serial Port of PC 6. TV OUT UHF RF Out to connect to a conventional TV 7. AERIAL IN Connect the TV antenna to the Aerial In. 8. AUDIO, VIDEO CVBS VIDEO and Audio L / R Out to connect to TV. Connect Red and White connector to Audio L/R, and Yellow to Video respectively 9. AC 100-240V ~ 100~240V AC, 50/60Hz Mains Power Inlet. Connect Power 50/60Hz Max 20W Lead to this connector. 10. POWER (Switch) To switch the power to Set-top On or Off. 2.3 Remote Control Unit All receiver features can be controlled with the remote controller. Button 1. POWER Description Turns the receiver On/Off. MUTE Turns the sound on/off. Freeze Changes Live Screen to Pause or Resume. FUNC Zoom, Multi Picture. TV/STB To switch between TV and STB mode. TV/Rad Switches between TV and Radio. A/V+ Select video mode (4:3, 4:3 Letter Box, 16:9) and audio mode (Left, Right, Stereo, Joint) Option To select Audio, Teletext and Subtitle language. To set Brightness, Contrast and Color of picture on the screen. Sleep 2. NUMERIC Buttons (0~9) Recall FAV/SAT 3. OK 6 To set the Sleep Timer. Press repeatedly to set minutes. To select channels or to use for numeric entry in the menu. Move to the previous channel or to show a list of 10 channels watched previously when you press twice. To select a satellite or Favorite List. To display channel list and select a channel in viewing mode. To enter a function or to confirm a selection in the menu. Button Description To move left/right or change settings in menu mode. To ◀/▶ ( / ) adjust audio volume level in viewing mode. ▲/▼ ( / ) To move up/down in menu mode. To change channel in viewing mode MENU To enter the Main menu for installation and other settings. A to Z To sort the channels automatically in alphabetical order. EXIT Exit from the present menu and moves to the previous menu. EPG To display channel program guide. 4 .VOL+/- Changes the volume level in viewing mode. CH+/- Changes channels in viewing mode. INFO Shows the information of the Banner and EPG. RED For Teletext.or to move PIP Screen in PIP mode GREEN For Teletext or to change to edit mode in channel list. To display PIP Channel list YELLOW For Teletext or to change main-picture with sub-picture in PIP mode. In channel list mode changes list format. BLUE For Teletext or to find a channel in channel list mode 5. REC (Record) To record the channel on external hard disc drive. PLAY / PAUSE To playback or pause the recorded files. Pause playing mode. T.Shift Set Timeshift Mode, Auto/Manual PVR Info Display playback status bar REW Rewind playback. STOP Stop playing mode or to stop recording. FF Fast forward playback. PVR LIST Display the file list. PIP Watch two channels at the same time. SLOW Playback in slow mode. ◀ JUMP Rewind Jump, Playback and Timeshift JUMP▶ Forward Jump, Playback and Timeshift JPEG Display the JPEG list. A-B Set the block to repeat, copy and cut. MARK Set the bookmark. JUMP Jump to book marked point. 3 Connections 3.1 Connecting to TV & VCR Receiver to TV with RF, CVBS and SCART connections. 1. Connect the TV antenna to AERIAL IN of receiver. 2. Connect the RF-IN of TV/VCR to RF-OUT of receiver. 3. 8 Connect the Video and Audio of TV/VCR to the Video and Audio RCA connectors. Connect Red and White connector to Audio R and Audio L, and Yellow to Video respectively. Connect SCART of TV/VCR to TV SCART of receiver. 3.2 Connecting to Dish Single fixed Dish Connect the satellite antenna cable to DISH IN. 4 Fixed Dishes Using a DiSEqC switch Connect the output of DiSEqC 1.0 switch to DISH IN of the receiver. Motorized Dish Using DiSEqC 1.2/USALS Connect the input of DiSEqC 1.2 motor to DISH IN of the receiver and output of motor to LNB. 4. Menu Overview 4.1 Menu Instruction Press the MENU button to display the main menu. Select the sub menu using the ▲/▼/◀/▶ button. The selected sub menu is highlighted. When you have selected the sub menu you want, press the (OK) button. When you want to return to the previous menu, press the (EXIT) button. When you want to return to viewing mode, press the Menu button. 4.2 Menu Help In the menu, short information is displayed at the bottom of the screen. : Using ▲/▼ button. : Using P+/P- button. : Using ◀/▶button. : Using (OK) button. : Using colored buttons. : Using (EXIT) button. : Numerical button or ◀ button. 4.3 Menu Structure Installation Dish: Select the dish and LNB settings for channel search. Auto Scan: Search the whole satellite (all transponders) automatically without setting the special parameters. Manual Scan: Search the transponders manually with user setting parameters. Blind Scan: Automatically scan the entire frequency range of the satellite SAT/TP Edit: The red button to select the satellite Option TV Output: Select the video or audio output. Language: Select the display language, audio language, and subtitle language. 10 Time Setting: Setting current time. Parental Control: Change the password and select the censorship classification OSD Display: Setting OSD display time and transparency. Channel Reservation: Reserving channels you want to record at your desired time. Sorting: Choose the channel sort type, such as by Transponder, Network, CAS. Delete: To delete Satellite or channels such as TV/Radio, CAS related, etc. Advanced Reset Factory Default: Restore the receiver to the default values. Channel Upload: Transfer channel data from receiver to receiver or PC. S/W Upload: Transfer the software from receiver to receiver or PC. USB transfer: Download from USB device or upload to USB device Status Information: To check the software and hardware versions of the receiver. Card: To check smart card information or to enter its setup parameters. PVR PVR Setting: Select Timeshift Mode, Size, Record time, Jump time, Record file format. HDD Information: Check the Hard Disc Drive Total size, Free size, Used size Format HDD: To format the Hard Disc Drive. Formatting will erase all previous recordings. 5. Menu Operation 5.1 First Installation If you have a fixed dish you can install the receiver using First Installation for your convenience. It allows you to set your receiver using simple procedures. 1. Select the desired language using the ▲/▼ button. 2. Press the button to confirm and go to the next step. 1.Select the desired satellite using the ▲/▼ button. 2. Press the button to confirm and go to the next step. 1. Select LNB Type using the ▲/▼ button. 2. Press the button to confirm and go to the next step. 1. If you use a DiSEqC 1.0 switch, select DiSEqC option using the ▲/▼ button. 2. Press the button to confirm and go to the next step. 1. After all settings are done press the button to start scanning. Menu help Previous Step: If you want to go back to the previous step, press the red button and then you can reset options. Cancel and Exit: If you want to skip 'First Installation', press the Exit button. If you have a motorized dish and/or you want to use of the detailed setup procedure, please refer to the following installation part in 5.2. 12 5.2 Installation 5.2.1 Dish 1. Press the Menu button to display the main menu. 2. Press the button on the sub menu. The password pop-up window appears. All sub menus such as Dish, Auto Scan, Manual Scan, and SAT/TP Edit on the Installation are locked by password. The default password is "0000". Use the ▲/▼ buttons to move up or down in this menu. In any item, such as Dish, Satellite, Transponder etc use the ◀/▶ buttons, to enter or to change the settings. Dish 1. Press the ◀/▶ button, the right screen shows the pre-selected 32 satellites list. 2. Select the desired satellite, and press the button. Satellite column will show the selected Satellite name. If you can't find the desired satellite, select any satellite and press the button. Satellite 1. Press the ◀/▶ button when you are on Satellite column to display the full satellite list. Select a satellite and press the button to replace the Current satellite. Transponder 1. Press the ◀/▶ button, to display the transponder list. 2. Press the button to select a transponder form the selected satellite. If you change the satellite the transponder list will change accordingly. LNB Power 1. Select one of the LNB Power types using the ◀/▶ button. Select 13/18V normally or if the distance between antenna and receiver is greater than 60m, you can select LNB Power value as 14/19V. LNB Type 1. Select the LNB Type. If you select User Single or User Dual, enter LNB Local Oscillator (LO) frequency using 0 ~ 9 buttons, and press the button. If you select LNB Type as 9750/10600, 9750/10750 or User Dual, 22KHz value is fixed to auto mode. In other cases you can select On or Off. Switch Type (select Switch Type if used) 1. If you use a DiSEqC 1.0 switch, select DiSEqC. Then select one of the DiSEqC inputs on the Option. 2. If you use a DiSEqC 1.1 switch, select SMATV. Then enter a value using 0 ~ 9 buttons (950~2150) on the Option. Motor 1. If you use a DiSEqC 1.2 motor, select Motor. 2. Adjust position of your Motor on the Option. DiSEqC 1.2 Options Move West-East: Press the ◀/▶ button to move the motor. Store Position: Press the button to save the current position. Go to Position: Press the button to move the motor to the stored position. Go to Reference: Press the button to move the motor to the 0 position. Set West Limit: Press the button to enter the West limit. Set East Limit: Press the button to enter the East limit. Enable Limit: Press the button to change to Enable or Disable Limit. USALS 1. If you use a USALS motor, select USALS using the ◀/▶ button. 2. Configure your location Longitude and Latitude and move position of your USALS motor through the Option. 14 USALS Option Go to Position: Press the button to move the motor to the satellite position calculated by the Longitude and Latitude. Go to 1. Select Auto Scan, Manual Scan or Blind Scan and press the Button. 5.2.2 Auto Scan You can search the channels offered by the satellite that has been configured to your antenna. 1. Select the satellite for scanning using ▲/▼button and press the button. The check mark indicates which satellite has been selected. Press button again on the marked satellite and it will de-select it. 2. Press the ◀/▶ button, select scan option using ▲/▼button, and press the button. To start scan, move to StartScan and press the button. Free+CAS options 1. Select Free+CAS or CAS using the ▲/▼buttons. 2. Press the red button, CAS Pop-up window will appear. 3. Select the kind of CAS using the ▲/▼ buttons. 4. Press the button. 5. Move to "Start Scan" and press the button. Searching 1. The left window shows TV channels and the Right window shows Radio channels during scan. White channel names are new channels downloaded to your receiver. Black channel names are already existing channels. 1. If you press the EXIT button whilst it is scanning for channels, pop-up window appears for the options of saving the changes. When you complete scanning for channels, a similar pop-up window appears. 2. If you want to save the updated channels, select 'Yes' and press button. 5.2.3 Manual Scan 1. Change to the specific Transponders you want to scan. 2. Press the button to start the manual scan. Dish: Select satellite for the manual scan. Frequency: Select the frequency of the transponder you want to scan manually. Polarity: Select the polarity of the transponder. Symbol Rate: Select the symbol rate of the transponder. Code Rate: Select the code rate of the transponder. Scan Mode: Select the scan mode Free+CAS, Free or CAS. Service Type: Select the service TV+Radio, TV or Radio. Network Search: When enabled, the receiver searches for more transponders using the network index table. PID: Search using Auto PID, Manual Dec and Manual Hex. PID search options 1. When you select Manual Dec option, a pop-up menu appears. 2. Enter the value of Video PID, Audio PID and PCR PID with 0 ~ 9 buttons. Then press button. 3. Press the button to scan PIDs. 1. When you select the Manual Hex option, a pop up menu appears. 2. Enter the value of Video PID, Audio PID and PCR PID using pop-up keypad. 3. Select ‘Done’ on the keypad to save PIDs or 16 press the button to close the pop-up menu. 5.2.4 SAT/TP Edit 1. Press the red button and select the satellite using ▲/▼buttons on the left. Press ◀/▶ button to move to the transponder on the right. Press red button to eidt. 2. Select Delete, Edit or Add from the popup window. (The satellite and transponder cannot be deleted if the channels of the selected satellite have already been Downloaded) 3. If you select Edit or Add a popup window appears. Edit the parameters as desired using 0 ~ 9 buttons. Then press the button the changes will be saved. 5.3 Option 5.3.1 TV Output 1. Select the TV output options using the ▲/▼/◀/ ▶ buttons. 2. If you press the button, it will exit the menu and save the changes. TV Type: Select your TV type (PAL, NTSC, PAL/NTSC). SCART: Select output signal to your TV (RGB, CVBS, S-VIDEO). TV Screen: Select the screen format of your TV (4:3, 4:3 Letter Box, 16:9) RF CH Number: Set the RF output channel (audio and video signal to your TV). Default is set to channel 64. RF Output Mode: Select RF audio output Mode (PAL B/G, PAL D/K, PAL I for PAL standard) AC3: If you set it to enable, you can listen to the audio in Dolby-Digital when connected to AC-3 decoder via the S/P DIF output. 5.3.2 Language 1. Select the language options using the ▲/▼/◀/ ▶ button 2. Press the button to save the selected language Display: Change the language used for the OSD Menu. Audio 1-2: Change the audio language that you listen to. Subtitle 1-2: Change the subtitle language that you watch. 5.3.3 Time Setting 1. Select the Time Setting option using the ▲/▼ ◀/▶ buttons. 2. After setting press the button, to save the changes and exit. Time Mode: Select TDT (receives the time from broadcaster) or User Mode (set time manually) Offset: Set the time difference between GMT and the local time. Day light saving: Enable will advance time by one hour. Start day: Daylight saving start day. End day: Daylight saving end day. 5.3.4 Parental Control 1. If you want to change the password, press the ◀/▶ button. Enter the new password then enter it again to confirm. 2. Select your desired rating level using the ◀/▶ button. 3. Press the button to save and exit. Rating mode allows you to block channel according to the age level you have set. 5.3.5 OSD Display 1. Select the options using the ▲/▼/◀/▶ button. 2. After setting, press the and exit. button to save changes OSD Display options Banner display time: Select duration time for channel banner display. Screen Saver: Select Screen Saver switch on time to protect your TV in Radio mode. Disable, 5, 10, 20, 30, 60, 120 Minutes OSD Transparency: Select the OSD transparency level (Low, Middle, High). Teletext Transparency: Select the Teletext transparency level (Low, Middle, High). Anti-flicker: Select enable to reduce flicker on picture. Brightness, Contrast and Color: These are best adjusted on a live picture in viewing 18 mode. In viewing mode press the button and adjust the levels accordingly. 5.4 Channel 5.4.1 Reservation You can reserve up to 8 channels. The channel will come on at your desired time. 1. Press the red button to add a channel or green buton to edit the reserved channel. And then use the ▲/▼ ◀/▶ button to set the detailed settings for your reservation. 2. To delete the reservation press yellow button. 3. After all settings are done, press OK button to save. If the event is duplicated with the time zone that was already registered previously, the alarm message appears stating is not able to register. In this case, you must register a reservation for another time zone. Turns on one time only Turns on during weekday Radio channel (FTA, CI) Turns on during weekend Radio channel (PVR only) Turns on weekly TV channel (FTA, CI) Turns on every day TV channel (PVR only) 5.4.2 Sorting 1. Select Sorting Type using the ◀/▶ button. 2. Press the button to save the changes. Transponder: Channels are sorted into transponder order. Network: Channels are sorted into service provider’s order. CAS: Channels are sorted into Scrambled and Free channels order. 5.4.3 Delete To delete you can select Mode such as Channel, Satellite and CAS. Then in Option you can select the detailed items to delete. 1. Select the Mode and Option you want to delete channels using the ▲/▼/◀/▶ button. 2. Press the button to delete and exit. 5.5 Advanced 5.5.1 Reset Factory Default 1. If you want to reset the set to the default values, select yes and press the button. 5.5.2 Software and Channel Upload 1. Connect the receiver with another receiver or PC through RS-232 cable. 2. For the target receiver, turn the AC Power off, then turn on again. 3. The transfer status of is displayed at the bottom. 5.5.4 USB Transfer 1. To download from USB device, select USB Transfer and press the OK button. 2. To upload to USB device, select Upload to USB and press the OK button. 20 3. Select the data type you want to transfer to USB device. 5.6 Status 5.6.1 Information 1. To display the system information such as Model ID, Hardware version and Software version. 5.7 PVR 1. PVR Setting In this menu, you can set Record, Time shift size (Auto or Manual) and default Record Time. If Time Shift is Auto, whenever user changes the channel, time shift is activated automatically. If Manual, time shift function doesn’t work. To force Time Shift in PVR, press T.Shift button. 2. HDD Information To check HDD size, Free size and the recoded size, press the OK button. 3. Format HDD To format the HDD in PVR, press OK button. Formatting will delete all files. Select yes if you wish to proceed. 6. Viewing General Information 6.1 Banner Information 1. When you press the INFO button, the banner information appears for a few seconds. 2. If you press the INFO button again, the detail EPG window appears on top of banner and you can use ch +/- buttons to change channels and display its EPG. 3. If '▶' exists on the Banner, press the ◀/▶button to display the next EPG. 6.2 Changing to TV or Radio Mode Press TV/Rad button to select Radio mode. Press again to re select TV mode. 6.3 TV or Radio Channel Lists 22 6.3.1 Watching Mode Press the button to display the channel list. Several icons are displayed at the bottom of the list each has a special and convenient function for use. If you want to change the mode, press the green button to select a desired function. 1. Press the ▲/▼ button to move the cursor. 2. Press the P+- button when to go to the next or previous channel page. 3. Press A-Z button if you want to sort the channel list alphabetically. Press any numeric button to display alphabetical keypad and select an entry. 4. Press TV/Rad button to change list to Radio. 5. Press the button to select the desired channel. 6. Press the INFO button to display the information for a selected channel. 7. Press the blue button to find a channel by using the displayed keypad. 8. Press EXIT button to close channel list. 6.3.2 Delete Mode 1. Select the Delete Icon using the green button. 2. Select channel you want to delete using the▲/▼ button. Press the button. A X sign will appear on the right of the channel name. 3. Press the EXIT button to save and exit. 6.3.3 Move Mode 1. Select the Move Icon using the green button. 2. Select the channel/s and press the button. A tick will appear on the right of the channel name. 3. Press the ▲/▼ button to move to desired position. Then press blue button to insert. 4. Press the EXIT button to save and exit. 6.3.4 Rename Mode 1. Select Rename Icon using the green button. 2. Select the channel to rename and press the button. An editing name keypad will be displayed. 3. Using the ▲/▼/◀/▶ button and the button rename the channel. 4. After renaming, select Done tab and then press the button. Finally press the EXIT button. You can rename the Favorite group. 1. Select the desired group. 2. Change the name of group as per above procedure. Space: Space between two characters. Back: Delete characters. Caps: Change between caps and lower case letter. Done: To save the changes. Cancel: Exit rename mode. 6.3.5 Lock Mode 1. Select Lock Icon using the green button. 2. Select the channel to be locked and press the button. Lock mark will appear on the left of the channel name. To cancel it, press button again. 3. Press the EXIT button to save and exit. 4. Set the password in Parental Control function. 6.3.6 Favorite Mode You can configure 8 favorite groups. Each can hold 100 channels thus totalling to 800 favorite channels. 1. Select Favorite Icon using the green button. 2. Press the button. Favorite Window will appear on the right of the list. Select a group then press ◀/▶ button focus will move to channel list. 3. Select the channel/s that you want to add to the favorite list. 4. Press the EXIT button to save and exit. 6.4 Option While watching TV or listening to Radio, press the Option button. A pop-up window will appear at the top left. You can select Teletext Language, Audio Language and Subtitle Language. If you want to change the option, press the ◀/▶ button. 24 6.4.1 Audio Language 1. Select the 'Audio' using the ◀/▶ button. 2. Press the ▲/▼ button to select a desired audio language then press the button. 6.4.2 Teletext Language 1. Select the 'Teletext' using the ◀/▶ button. 2. Press the ▲/▼ button to select a language. 3. Press the butto. Teletext in the selected language is displayed if available. 6.4.3 Subtitle Language 1. Select the 'Subtitle' using the ◀/▶ button. 2. Press the ▲/▼ button to select a language. 3. Press the button. 4. If the selected language is different from what is available, subtitles are not displayed. 6.5 A/V+ While watching TV or listening to Radio, press the A/V+ button. A pop-up window will appear at the top left. Select Audio Mode or Video Mode using ◀/▶ button. 6.5.1 Audio Mode 1. Select the 'Audio Mode' using the ◀/▶ button. 2. Press the ▲/▼ button to set the output for speakers (STEREO, LEFT, RIGHT, JOINT). 3. Press the button to save and exit. 6.5.2 Video Mode 1. Select the 'Video Mode' using the ◀/▶button. 2. Press the ▲/▼ button to select screen format of your TV. 3. Press the button to save and exit 6.6 FAV/SAT While watching TV or listening to Radio, press the FAV/SAT button. You can select a Favorite group. 6.6.1 Satellite 1. Select the 'Satellite' using the ◀/▶ button. 2. Press the ▲/▼ button to select a Satellite. 3. Press the button, to display the channel list for the selected Satellite. 6.6.2 Favorite 1. Select the 'Favorite' using the ◀/▶ button. 2. Press the ▲/▼ button to select a group. 3. Press the button, to display the channel list for the selected group. 6.8 EPG Press the EPG button and the electronic channel guide appears if available. Time intervals are arranged in a row and Channel lists are shown in a column. 6.8.1 EPG Information 1. Press the ◀/▶ button to change time interval. 2. Press the ▲/▼ button to change the channel, and then press the INFO button, the detail EPG window will appear. 3. Press the EXIT button to exit. 4. Press the red button to reserve channels for event timer. 6.9 Other Features 6.9.1 Zoom mode 1. Press the button. 26 2. You can move the focus using the ▲/▼ ◀/▶ Up/Down/Left/Right buttons. 3. Press the EXIT button to exit this mode. Zoom mode supports the function of enlarging Screen by X2, x3, x4, x5 and x6. 6.9.2 Multi Picture 1. Select the Multi Picture mode on the function bar. 2. Select the desired channel using the ▲/▼/◀/▶ Up/Down/Left/Right buttons. Press OK button. 3. Press the EXIT button to watch the channel in full size. Multi Picture supports 4, 9, 10, 13 and 16 partition. 6.9.3 Live Screen Pause/Resume 1. Press Freeze button on TV mode to pause the picture. Press it again to resume watching. 7. PVR 7.1 Play List AV file format of recorded channels. Date File size HDD Information 7. 1.1 Playback mode 1. Select the recorded file using the ▲/▼buttons. 2. Press the OK button to play the file. 3. Press the STOP button to stop playback. 7.1.2 Delete mode 1. Select File and press OK popup window will appear. 2. Select Delete and press OK confirmation popup window will appear. 3. Select yes and press OK. 4. Press the EXIT button to exit. 7.1.3 Rename mode 1. Select the file to rename and select Rename an editing keypad will be displayed. 2. Rename the file using ▲/▼/◀/▶ and Ok buttons. 3. After renaming, select 'Done' tab and then press OK button. 4. Press the EXIT button to exit. 7.1.4 Lock Mode 1. Select the file and select Lock. Press the OK button. The lock icon will appear on the left of the file name. 2. Press the Exit button to exit. 3. To unlock a file select the file and select Unlock. Enter your password and press EXIT. If you record a locked cannel, the file is locked automatically. 28 7.2 PVR Banner To access the PVR Banner, press PVR Info button. Current channel name Current position Record time Time gap PVR Control position Progress Bar The description of icons : Time Shift status : Recording status : Time Shift and record status : Playback, Rewind and Forward statuses. : Time Shift Playback, Rewind and Forward statuses. : Recording playback, Rewind and Forward statuses. 7.2.1 Time Shift Time Shift function temporarily records the current program, in case you have missed a scene or like to see a scene again. This function only works automatically if the Time shift is set to Auto in the PVR Setting. 1. If Time shift is set to Auto, to go back to the required scene press rewind. 2. If Time shift is set to Manual in the PVR Setting, Time Shift will work only when you press the T.Shift button. 7.2.2 Record 1. Press the Record (●) button to record the channel you are watching. 2. Record mode can't be canceled by any control such as changing channel, etc. Press STOP (■) button to stop recording. Max duration time for recording is set to the default record time and is set in PVR Setting. If you want to change the duration, press the ◀/▶ button (Minimum: 5 minutes, Maximum: 10 Hours) 7.2.2.1 Recording and playback of the same channel simultaneously 1. Press the Record (●) button on the desired channel 2. Press the REW (◀◀) button and use the ▶▶/ ◀◀/◀/▶ button to go back to the position you want to watch. 1. Press the PLAY/Pause (▶II) button when desired position is found. 2. The recorded content will be played from that position until the current recorded part. 7.2.2.2 Recording one and playback of other file simultaneously 1. Press the REC (●) button on the desired channel 2. Press the PVR List button to open the file list. 3. Select the desired file using the ▲/▼ button 4. Press the OK or PLAY/Pause (▶II) button to playback the file. 5. Press the STOP (■) button to stop playback then the recording channel will be shown. 7.2.2.3 Recording one and viewing live channel simultaneously You can watch another channel while recording, in the same transponder (TP). 1. Press the REC (●) button on the desired channel. 30 2. Press the OK button to view the channel list 3. Select the channel you want to watch using the ▲/▼ button 7.2.3 Playback 1. Press the PVR List button to open the file list. 2. Select the file you want to watch using the ▲/▼ button. 3. Press the OK or PLAY/Pause (▶II) button 1. Press the Exit or PVR List button to exit from the file list 2. Press the ◀/▶ or REW, FF, etc., if you want to check status of playback. 1. Press a numeric button (0-9) in Playback mode 2. Each number represents the value of 10. If you press number 3, the control position will locate at 30% advanced on the progress bar. 7.2.3.1 Jump in playback mode 1. You can locate the control point to the desired position using the ◀/▶ button 2. By releasing the ◀/▶ button, playback continues from that position. 7.2.3.2 Bookmark For your convenience this function enables you to set bookmarks within the media file to continue from or to target a special position in the file. 1. Play the file you want to watch 2. Move the control to the desired position using the ◀/▶ button. Then press the MARK button and a white small bar will be placed at that position. 3. To delete a Bookmark, move the control using the ◀/▶ button to the desired Bookmark and press the MARK button. 4. Press the JUMP button and the control will move to the next Bookmark position and playback starts from this point. The maximum number of the Bookmarks is twenty in a file. 7.2.4 FF/REW/SLOW mode These functions are available in Playback and Time Shift mode. Fast Forward Speed: x 2, x 3, x 4 1. Press the FF (▶▶) button x 2 speed will turn on. 2. Press the FF (▶▶) button again to advance speed. Press repeatedly to change speed. : Fast forward icon in Playback mode : Fast forward icon in Time shift mode Rewind Speed: x 2, x 3, x 4 1. Press the REW (◀◀) button x 2 speed will turn on. 2. Press the REW (◀◀) button again to advance speed. Press repeatedly to change speed. Slow 1. Press the SLOW (I▶) button speed will decrease to ½ 2. Press the SLOW (I▶) button again and the speed will decrease further to ¼. 3. To resume normal playback press Play/Pause button. 7.2.5 Set repeat You can set the block to repeat on the PVR Banner. 1. Play the recorded file. 2. Move the control to the desired starting position using the ◀/▶ button. 32 3. Press the A-B button to set the starting point and then move the control to ending point using the ◀/▶ button. 4. Press the A-B button again on the ending point. 5. Press the A-B button to cancel setting block. 8. Other Functions 8.1 Image Viewer Connect the USB device to the receiver then after it has initialized, press the JPEG button on the remote control. 1. Select JPEG file by using the ▲/▼ buttons and press the OK button. 2. Press the ◀/▶ button to select next JPEG images in current folder. 8.2 Video File Player Connect the USB device to the receiver then after it has initialized, press the JPEG button on the remote control and select MPEG (green button). 1. Select MPEG file by using the ▲/▼ buttons and press the OK button. 8.2 Picture In Picture (PIP) 1. Press the PIP button to display PIP. Press the PIP button repeatedly to change the size of sub-picture or to close the sub-picture. PIP function will only show another channel from the same TP. 2. When in PIP mode, press the Yellow (F3) button to swap main-picture with subpicture. 3. Press the Red button to move the position of sub-picture. 4. To display the service list of main-picture, press the OK button. To display the service list of sub-picture, press the Green button. Additional Information A.1 Troubleshooting Please check the receiver using the procedures described below. If you can’t solve the problem even after following the procedures, please contact your dealer. Do Do not open the receiver cover. It may cause a dangerous situation. 34 No front panel display The power cord is not plugged in. Check power switch on back panel is turned on. No picture or sound Wrong connection of the Audio/Video outputs of the receiver to TV. Ensure TV is tuned or switched to correct input. Wrong connection of the antenna. Check LNB connections are not shorting. No or Bad signal message appears. Check other device connected between Antenna and the receiver, or adjust the antenna position. Audio muting Press the MUTE button No or poor signal. Check antenna cable or connect it to the receiver securely. Incorrect settings of some tuner parameters. Set the values of tuner parameters correctly. Refer to the Installation menu. The UHF Antenna is not optimized. Adjust the antenna. Signal too strong. Connect a signal attenuator to the input. No picture No or bad UHF signal UHF Antenna is too small. Change to a larger antenna. Remote control does not operate Remote control batteries are exhausted or not inserted. Check batteries are inserted correctly. Replace leaky or used batteries. Poor picture quality Cable has signal or power loss. Change the LNB power in Dish menu. Check cable. Less channels in scan A.2 Technical Specifications 1. Tuner & Demodulator Parameter Specifications Input Frequency Range 950 MHz to 2150 MHz RF Input Signal Level -25 to –65 dBm RF Impedance 75 IF Bandwidth 55 MHz/8 MHz (under 5 Msps) LNB Power 13/18 VDC, 14/19 VDC +/- 5%, 0.5A max, 0.8A peak overload protected LNB Tone Switch 22 KHz +/- 2 KHz, 0.6 Vpp +/- 0.2V DiSEqC Control Version 1.2, Tone burst A/B Demodulation QPSK Symbol Rate 1~ 45Msps/SCPC, MCPC 2. MPEG Parameter Specifications Transport Stream MPEG-2 ISO/IEC 13818 Transport Stream Specification Input Rate Max.15Mbit/s Video MPEG-2 MP@ML Audio MPEG-1/2 Audio Layer 1,2 Aspect Ratio 4:3, 16:9 Video Resolution 720x576 (PAL), 720x480 (NTSC) Audio Mode Stereo, Dual channel, Joint stereo, Mono Audio Sampling Frequency 32 / 44.1 / 48KHz 3. Connectors Port Specifications LNB IF input F type, IEC 169-24 Female LNB IF Loop-Through F type, IEC 169-24 Female TV SCART RGB, CVBS, AUDIO L,R Serial Port RS232C D-sub male type 4. RF-modulator Parameter Specifications RF-Connector 75 IEC169-2, Male / Female Frequency 470 MHz to 860 MHz Output Channel Ch 21-69 for the Demodulator TV Standard PAL B/G/I/D/K Selectable via Menu Setting 5. Power Supply Parameter 36 Specifications Input Voltage 90 ~ 260 VAC (SMPS) Power Consumption Maximum 23W Weight 1.5 Kg approx. Operating Temperature 0'C ~ 40'C Storage Temperature -40'C ~ 65'C 6. Card Slot Parameter Embedded Specifications 1 Slot Smart card Factory or default Password: 0000 --------------------------------------------------------------------------------------------------------Master Password: Press MENU and go to Information. Enter 6699, it will reset password to 0000.