1
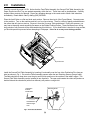
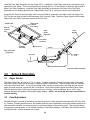
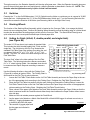
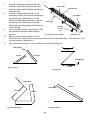
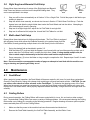
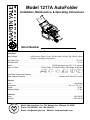
Model 1217A AutoFolder
R
Installation, Maintenance, & Operating Instructions
Serial Number
Specifications
Functional
Paper Weight . . . . . . . . . . . . . . .16 lbs. bond – 90 lbs. Cover, 135 lbs. Index, 150 lbs. Tag, 165 lbs. Offset
(60 gsm – 240 gsm) or equivalent
Max Paper Size . . . . . . . . . . . . . . . . . . . . . . . . . . . . . . . . . . . . . . . . . . . . . . . . . . . . . . . . . . . . . . .12" x 18"
Min Paper Size . . . . . . . . . . . . . . . . . . . . . . . . . . . . . . . . . . . . . . . . . . . . . . . . . . . . . . . . . . . . . . . . . .4" x 4"
Speed . . . . . . . . . . . . . . . . . . . . . . . . . . . . . . . . . . . . . . . . . . . .10,300 sheets per hour (81/2" x 11" sheets)
Types of Folds . . . . . . . . . . . . . . . . . . . . . . . . . .Trifold, Single, Z, Double Parallel, Right Angle, & Baronial
Feed Table Paper Load Capacity . . . . . . . . . . . . . . . . . . . . . . . . . . . . . . . . . . . . . . . . . . . . . . . . . . . . . . .1"
Sheet Capacity (Stapled) . . . . . . . . . . . . . . . . . . . . . . . . . . . . . . . . . . . . .3 sheets 20 lbs. Bond (75.2 gsm)
Physical
Color . . . . . . . . . . . . . . . . . . . . . . . . . . . . . . . . . . . . . . . . . . . . . . . . . . . . . . . . . . . . . . . . . . . . . .Gray/Black
Dimensions . . . . . . . . . . . . . . . . . . . . . . . . . . . . . . . . . . . . . . . . . . . . . . . . . . . . . . . . . . .42" x 17 1/2" x 17"
Weight . . . . . . . . . . . . . . . . . . . . . . . . . . . . . . . . . . . . . . . . . . . . . . . . . . . . . . . . . . . . . . . . . . . . . . . .55 lbs.
Shipping Weight . . . . . . . . . . . . . . . . . . . . . . . . . . . . . . . . . . . . . . . . . . . . . . . . . . . . . . . . . . . . . . . . .67 lbs.
Electrical
Power . . . . . . . . . . . . . . . . . . . . . . . . . . . . . . . . . . . . . . . . . . . . . . . . . . . . . . . . . . . . . . . . . . . .120V 60 HZ
Optional . . . . . . . . . . . . . . . . . . . . . . . . . . . . . . . . . . . . . . . . . . . . . . . . . . . . . . . . . . . . . . . . . . .220V 50 HZ
Martin Yale Industries, Inc., 251 Wedcor Ave. Wabash, IN 46992
Phone: 260.563.0641 Fax: 260.563.4575
Email: [email protected] Website: www.martinyale.com
Table of Contents
1.0 Introduction . . . . . . . . . . . . . . . . . . . . . . . . . . . . . . . . . . . . . . . . . . . . . . .Page 2
2.0 Installation . . . . . . . . . . . . . . . . . . . . . . . . . . . . . . . . . . . . . . . . . . . . . . . .Page 3
3.0 Setup & Operation . . . . . . . . . . . . . . . . . . . . . . . . . . . . . . . . . . . . . . . . . .Page 4
3.1 Paper Guides . . . . . . . . . . . . . . . . . . . . . . . . . . . . . . . . . . . . . . . . .Page 4
3.2 Feed Adjustment . . . . . . . . . . . . . . . . . . . . . . . . . . . . . . . . . . . . . .Page 4
3.3 Switches . . . . . . . . . . . . . . . . . . . . . . . . . . . . . . . . . . . . . . . . . . . .Page 5
3.4 Stacking Wheels . . . . . . . . . . . . . . . . . . . . . . . . . . . . . . . . . . . . . .Page 5
3.5 Setting for Folds . . . . . . . . . . . . . . . . . . . . . . . . . . . . . . . . . . . . . .Page 5
3.6 Right Angle and Baronial Fold Setup . . . . . . . . . . . . . . . . . . . . .Page 7
3.7 Multi-Sheet Fold Setup . . . . . . . . . . . . . . . . . . . . . . . . . . . . . . . . .Page 7
4.0 Maintenance . . . . . . . . . . . . . . . . . . . . . . . . . . . . . . . . . . . . . . . . . . . . . . .Page 7
4.1 Feed Wheel . . . . . . . . . . . . . . . . . . . . . . . . . . . . . . . . . . . . . . . . . .Page 7
4.2 Folding Rollers . . . . . . . . . . . . . . . . . . . . . . . . . . . . . . . . . . . . . . .Page 7
4.3 Retarder Assembly . . . . . . . . . . . . . . . . . . . . . . . . . . . . . . . . . . . .Page 8
4.4 Bearings . . . . . . . . . . . . . . . . . . . . . . . . . . . . . . . . . . . . . . . . . . . . .Page 8
5.0 Troubleshooting . . . . . . . . . . . . . . . . . . . . . . . . . . . . . . . . . . . . . . . . . . . .Page 8
5.1 Folder will not start . . . . . . . . . . . . . . . . . . . . . . . . . . . . . . . . . . . .Page 8
5.2 Paper will not feed . . . . . . . . . . . . . . . . . . . . . . . . . . . . . . . . . . . .Page 9
5.3 Improper Stacking . . . . . . . . . . . . . . . . . . . . . . . . . . . . . . . . . . . . .Page 9
5.4 Crooked Folds . . . . . . . . . . . . . . . . . . . . . . . . . . . . . . . . . . . . . . .Page 10
5.5 Ink smudges on paper . . . . . . . . . . . . . . . . . . . . . . . . . . . . . . . .Page 10
5.6 Paper Jams . . . . . . . . . . . . . . . . . . . . . . . . . . . . . . . . . . . . . . . . .Page 10
5.7 Wrinkled Paper . . . . . . . . . . . . . . . . . . . . . . . . . . . . . . . . . . . . . .Page 11
5.8 Paper exits on top of Fold Table . . . . . . . . . . . . . . . . . . . . . . . .Page 11
5.9 Folds more than a single sheet of paper . . . . . . . . . . . . . . . . .Page 11
Introduction
Thank you for selecting the Martin Yale Model 1217A AutoFolder. The model 1217A
can execute various folds, including the Tri-fold, Z fold, Single fold, Double Parallel fold,
Right Angle fold, Baronial fold, and certain custom folds within its paper size capacity.
We recommend that you familiarize yourself with the AutoFolder by carefully reading this
manual. This will save you time later on by avoiding the most common problems and
eliminating operator associated errors.
WARNING! Never connect power to the machine until you are ready to set up and
operate the model 1217A. This machine contains moving parts. During setup,
operation, and maintenance, keep hands, hair, loose clothing, and jewelry, away
from all moving parts. Serious bodily injury could result. Service or disassembly
of the side covers should only be performed by qualified personnel with the
power disconnected and locked out.
(2)
2.0
Installation
Carefully unpack the model 1217A. Notice that the Feed Table Assembly, the Second Fold Table Assembly, the
Paper Support and Exit Tray, are packed separately within the box. These items will be installed later. Carefully
inspect carton contents for damage. Report any shipping damage to the carrier and to Martin Yale Industries
immediately. Reach Martin Yale by dialing (260) 563-0641.
Place the AutoFolder on a flat and level work surface. Remove the wire tie (See Figure Below). Connect power
to the machine. Turn on the machine and let it run for a few minutes. There is a sheet of paper packed between
the rollers that will eject on start-up. Remove it from the Conveyor Table and discard. During this process, you
may hear a thumping sound caused by flat areas on the Rubber Folding Rollers. These flat areas occur during
long periods of non-use and will be eliminated during this initial run. If your AutoFolder is inactive for long periods,
you should repeat this process before attempting to fold paper. Failure to do so may cause folding problems.
1st Fold Table
Remove Wire Tie
Thumb Screws
Install the Second Fold Table Assembly by inserting it horizontally over the four silver Positioning Pins (two per
side) as shown in Fig. 1. Be sure the Table Assembly passes under the two Retaining Screws (one per side).
The table should then drop down over the pins and lock into position on the notches in the table’s edges. The
Second Fold Table Assembly can be installed in two directions. The open end towards the rollers will produce a
double fold and the closed end (with silver deflector) will produce a single fold.
Insert Open
End For
Double Fold
Retaining Screw
Insert Deflector
End For Single
Fold
Fig.1–Fold Table Installation
Positioning Pins
(3)
Install the Feed Table Assembly onto the model 1217A. Installing the Feed Table requires the red retarder press
against the Feed Wheel. This is normal and will not damage the unit. Do not attempt to adjust the red retarder to
assist Feed Table installation. Install the Feed Table Assembly by placing the front slots of the Feed Table
Assembly onto the locating pins near the Folding Rollers (see Fig. 3), and lower onto the rear locating pins.
Install the Exit Tray onto the back edge of the Conveyor Table by inserting the two tabs on the front edge of the
Exit Tray into the slots provided in the back edge of the Conveyor Table. Install the Paper Support onto the back
edge of the Feed Table in the same manner as the Exit Tray.
Paper Guide,
Left Side
(not visible)
Thumb Knob
Retarder
Pressure
Nut
Paper
Support
Paper
Guide,
Right Side
Feed Table
Assembly
Retarder
Assembly
2
1
Bypass Lever
Fig.2–Feed Table
(Underside)
Locating
Pins
Exit Tray
Fig.3–Feed Table Installation
3.0
3.1
Setup & Operation
Paper Guides
The Paper Guides are pre-set for 81/2” X 11” paper. To adjust, loosen the Thumb Knobs and slide on the shaft.
Adjust the Paper Guides so that the paper is centered with the Feed Wheel. Common paper sizes are indicated
on the top of the Feed Table. To use, set one Paper Guide in place by aligning the outer edge with the desired
paper size mark and lock in place with the Thumb Knob. Lay a sheet of paper against the locked Paper Guide.
Slide the opposite Paper Guide up to the paper and lock it in place. Leave a small gap, about 1/64” (.4mm)
between the paper and guides to allow easier paper feeding. NOTE: too much gap will cause inconsistent or
crooked feeding.
3.2
Feed Adjustment
Retarder pressure is pre-set at the factory and should require no further adjustment throughout the life of the folder. However, if feeding problems occur, the retarder pressure can be adjusted by turning the retarder pressure nut
(with a wrench) clockwise to increase pressure or counterclockwise to decrease pressure. The normal tendency
is to place too much pressure on the retarder resulting in Feed Wheel damage. Call Martin Yale customer service
at (260)-563-0641 if further assistance is needed.
(4)
Through normal use, the Retarder Assembly will develop a flat wear area. When the Retarder Assembly becomes
worn to the point that paper does not feed properly, rotate the Retarder as described in Section 4.3. NOTE: The
Retarder must be tightened securely in place so that it will not rotate!
3.3
Switches
Pressing the “I” on the On/Off/Momentary (I/O/(I)) Switch turns the folder on continuous run to a speed of 10,000
sheets per hour. Holding down the “(I)” on the On/Off/Momentary Switch and “I” on the Reversing Switch at the
same time reverses the direction of the folder (see Reversing Label on the Right Side Cover).
3.4
Stacking Wheels
The function of the Stacking Wheel Assembly, which is located on the Conveyor Table, is to arrange the folded
sheets into an overlapping stack. Position the Stacking Wheel Assembly so that the leading edge of a folded sheet
touches the wheels when the trailing edge just falls onto the Conveyor Table. The Stack Wheel Decal gives a
quick reference to the correct position based upon fold and paper size.
3.5
Setting for Folds (trifold, Z, double parallel, and single folds)
(see Figure #4)
The model 1217A can be set up to make all standard folds.
This includes the trifold, double parallel fold, Z fold, and the
single fold. The fold chart on the Exit Tray illustrates the
standard Fold Table Paper Stop settings for making the various types of folds in 81/2” x 11”, 81/2” x 14”, 11” x 17”, A4,
and A3. The term “1st” refers to the letter setting on the 1st
Fold Table Ruler.
The term “2nd” refers to the letter setting of the 2nd Fold
Table Ruler. The following instructions assume a standard
81/2” x 11” sheet is being folded. Non-standard sizes should
be measured and Paper Stops set according to measurements.
SIMPLIFIED FOLDING CHART
PAPER SIZE
TYPE OF
FOLD
1
st
2
nd
1
st
2
nd
1
st
2
nd
1
st
2
nd
8½x 11
A
S
B
S
C
U
C
8½x 14
H
Y
I
Y
D
Z
D
11 x 17
P
E
F
E
G
W
G
A4
J
K
N
K
R
V
R
A3
Q
X
C
X
T
L
T
REVERSE SECOND FOLD TABLE
1st: UPPER OR FIRST FOLD TABLE SETTING
2nd: LOWER OR SECOND FOLD TABLE SETTING
Use the following directions, along with the Folding Chart
Fig. 4–Folding Chart
(Figure #4) to create all types of folds. The Folding Chart is
also located on the Exit Tray for quick reference.
1.
Loosen the Fold Table Thumb Knobs on the 1st Fold Table Assembly and move the Paper Stop to the center of the appropriate circle according to the Folding Chart. Retighten the Fold Table Thumb Knobs.
2.
Place the 2nd Fold Table into position with the open (folding) end toward the Folding Rollers. Loosen the
Fold Table Thumb Knobs on the 2nd Fold Table and move the Paper Stop to the center of the appropriate
circle according to the Folding Chart. Retighten the Fold Table Thumb Knobs.
3.
Place a sheet of the paper to be folded on the Feed Table Assembly and set the Paper Guides so that the
sheet is centered under the Feed Wheel and slides freely down between the Paper Guides without excessive side play.
4.
Make sure the red retarder presses against the Feed Wheel.
5.
Jog the paper to be folded on a Martin Yale Model 400 or Model 4200 Jogger for at least one minute, or
hand jog. Jogging dissipates statTop Front
ic electricity and fluffs the paper.
6.
Take a stack of jogged paper and
fan the paper as indicated in
Figure #5 .
Fig. 5–Side View of Fanned Paper
(5)
7.
8.
9.
10.
11.
Place the fanned paper onto the Feed Table
Paper Guide
Assembly (see Figure #6) with the top sheet
Fanned Paper
positioned where the Feed Wheel and Retarder
Assembly meet.
Hold the On/Off/Momentary Switch on the
Feed Wheel
momentary position and feed one sheet through
the machine until it falls onto the Exit Tray.
Position the Stack Wheel Assembly so that the
Feed Table
leading edge of a folded sheet touches the
wheels when the trailing edge just falls onto the
Retarder
Conveyor Table.
Pressure
Turn on the folder and run several sheets. Stop
Nut
the folder and inspect the folded sheets for
Retarder Assy
accuracy.
Fig. 6–Fan Paper–Feed Table
Make 1st Fold corrections with the 1st Fold
Table Paper Stop. Make 2nd Fold corrections with the 2nd Fold Table Paper Stop. (See Figures #7-10 for
first and second fold descriptions.)
After corrections are made, turn on the folder and complete the folding job.
Leading Edge
2nd Fold
1st Fold
2nd Fold
Leading Edge
1st Fold
Fig.7–Tri–Fold
Fig.8–Z–Fold
Leading Edge
Leading Edge
2nd Fold
1st Fold
Fig.10–Single Fold
Fig. 9–Double Parallel
(6)
1st Fold
3.6
Right Angle and Baronial Fold Setup
Please follow these instructions for setup of the Right Angle and Baronial
folds.These two folds are not listed on the simplified folding chart. They
can be accomplished in two steps.
1.
Right Angle
Fold
Baronial
Fold
3.
4.
Step one will be done automatically as in Section 3.5 for a Single Fold. Fold all the paper in half before proceeding to step two.
Step two will be done manually, one sheet at a time as in Section 3.7 Multi-Sheet Fold Set-up. Push the
bypass lever and slide the single folded sheet under the Feed Wheel and into the rollers. Attempting to
auto-feed stacks will result in jamming.
Step two for a Right Angle fold, adjust the 1st Fold Table for a single fold.
Step two for a Baronial fold, adjust the 1st and 2nd Fold Tables for a tri-fold.
3.7
Multi-sheet Fold Setup
2.
Please follow these instructions for folding multiple sheets. The Feed Table is equipped
with a Bypass Lever which allows the Retarder Assembly to be pushed away from the
Feed Wheel, thereby permitting multiple sheets to be fed directly into the fold rollers.
Bypass
Lever
1.
2.
Set up the desired fold as described in section 3.5.
With the folder OFF, push and hold the Bypass Lever forward with one hand then pass the multiple set of
paper under the Feed Wheel until it contacts the fold rollers. Note: if using stapled multiple sets, be
sure to attach staples horizontally to the fold rollers and feed the stapled end first.
3.
Press momentary (I) to turn the folder on long enough to complete the fold. Repeat steps 2 and 3 for each
multi-sheet fold.
Note: Do not exceed the recommended number of pages or attempt to hand feed with the machine running as skewing and jamming will likely occur!
4.0
4.1
Maintenance
Feed Wheel
After a period of normal operation, the Feed Wheel will become coated by ink, toner, lint, and other contaminant.
Clean the Feed Wheel by wiping with a damp cloth containing a mild soap and water solution. CAUTION: Do not
use rubber roller cleaner or other solvents on the Feed Wheel. To maximize the gripping power of the Feed
Wheel and to remove any remaining contaminant, go over the Feed Wheel surface with medium grit emery cloth.
Replace the Feed Wheel when, with a properly adjusted Retarder Assembly, a single sheet will no longer feed successfully.
4.2
Folding Rollers
During normal operation, the Folding Rollers will become coated with ink, toner, lint, and various other contaminant. Contaminated Folding Rollers can cause a variety of folding problems. We recommend cleaning the Folding
Rollers after every folding job, according to the following procedure. Regular cleaning will ensure optimum performance and add years of life to the Folding Rollers.
1.
2.
Make sure that the power to the machine has been disconnected and locked out.
Remove the Feed Table Assembly, the 2nd Fold Table Assembly, and the Roller Cover.
(7)
3.
4.
5.
6.
4.3
Liberally spray Martin Yale Rubber Roller Cleaner and Rejuvenator across the rollers. Roller Cleaner and
Rejuvenator has been specifically formulated for use in cleaning the Folding Rollers. Use of any other
cleaner may deteriorate the rollers.
Utilizing a clean cloth, briskly clean each roller until no more contaminant appear on the cloth surface.
Rotate the rollers manually as described in Section 5.6 “Paper Jammed in Rollers” on page 10. Continue
to clean until all roller surfaces are smooth and resilient, not hard or glazed.
If necessary, remove any glaze with a non-abrasive cleaning pad, such as a 3M Scotchbrite ® pad.
After cleaning, turn on the machine and let it run a few minutes to evaporate any cleaner left on the Folding
Rollers. CAUTION: Rollers can stick together if not allowed to fully dry before storing.
Retarder Assembly
If the retarder roller has developed a flat wear area, remove the Feed Table and lay upside down to gain access to
the retarder bracket. Loosen the nut on the retarding locking screw and turn retarder to expose a new surface.
Note: Always turn the retarder in the direction of the paper travel. Re-tighten the nut to lock the retarder in
this position. Note: The retarder roller should always be locked in a stationary position.
4.4
Bearings
After each eight (8) hours of machine operation, thoroughly clean the Folding Rollers and remove any contaminant from the ends of the rollers and bearings.
Lubricate all bearings and shafts with one drop of light
machine oil on each (see Figure #11). NOTE: Do not
allow any oil to come in contact with the Folding
Rollers. If oil is spilled on the Folding Rollers,
remove immediately with Martin Yale Rubber Roller
Cleaner and Rejuvenator.
Oil Here
Roller Rubber
Metal Shaft
Bearing
Fig. 11–Lubricate All Roller Bearings
5.0
Troubleshooting
Following are a list of possible problems, their possible causes, and suggested solutions.
5.1
Folder will not start
Possible Cause
No electrical power to the machine.
Solution
Plug the machine into an active line.
Bearings contaminated or in need of lubrication.
Clean and lubricate bearings according to section 4.4
Bearings.
(8)
Electrical malfunction.
Have the model 1217A checked by a qualified electrician.
Feed Table or Fold Table in wrong position.
Check the position of the Feed Table Assembly and
2nd Fold Table Assembly. Reposition if necessary.
5.2
Paper will not feed
Possible Cause
Feed Table not properly seated.
Solution
Make sure that the Feed Table Assembly is mounted
correctly on the locating pins.
Paper Guides too tight (paper buckles).
Adjust the Paper Guides so that a sheet slides freely
down between the Paper Guides without excessive
side play.
Improper fanning of paper.
Grasp a stack of paper and place it on its long side on
a flat, level surface. Even the paper and grip it tightly
with your left hand. Loosely grip the paper with your
right hand and pull the paper to you until it forms a
semi-circle. Now tightly grip and hold the right side as
you relax your left hand grip. (See Figure 5 for diagram of properly fanned paper.)
Feed Table in wrong position.
Reposition the Feed Table Assembly.
Worn out Feed Wheel.
Replace the Feed Wheel Assembly.
Feed Wheel contaminated.
See instructions in section 4.1, Feed Wheels.
Retarder Assembly set too tight.
Readjust the Retarder Assembly. See Section 3.2.
Flat area on Retarder Assembly.
Reset according to instructions in Section 4.3, Feed
Adjustment.
Jog paper on Martin Yale 400 or 4200 Jogger. Spray
Martin Yale Static Eliminator liberally over paper
edges, Feed Table Assembly, Fold Table Assemblys,
Conveyor Table, and Exit Tray.
Static electricity buildup.
Loose motor belt.
5.3
Adjust or replace 140 3mm HTD Belt.
Improper Stacking
Possible Cause
Stacking Wheels improperly set.
Solution
Reset the Stacking Wheels according to instructions in
Section 3.4, Stacking Wheels.
(9)
Static Buildup
Check the electrical ground. The Conveyor Table is
equipped with an anti-static brush. To work correctly,
the machine must be properly grounded through the
power cord.
5.4 Crooked Folds
Possible Cause
Excessive side play between Paper Guides.
Solution
Readjust the Paper Guides and paper edges.
Fold Table Paper Stops improperly set or not locked.
Readjust the Paper Stops and lock into position.
Paper not square.
Recut paper until square or adjust Fold Table Paper
Stops.
Contaminated Folding Rollers
Clean according to instructions in 4.2, Folding Rollers
5.5
Ink smudges on paper
Possible Cause
Ink not dry.
Solution
Allow additional ink drying time before folding. Some
inks do not dry, they only set (dry to the touch).
Because of the physical nature of friction feeding, you
may notice a mark on the leading edge of the paper.
Excessive toner on photocopied stock.
Check copy machine.
5.6
Paper Jams
Possible Cause
More than a single sheet feeding into the folder.
Solution
Readjust the Retarder Assembly according to the
instructions in Section 3.2. Replace the Feed Wheel
Assembly or rotate Retarder Assembly if necessary.
Folded sheets backing into the folder.
Reset the Stacking Wheels according to instructions in
Section 3.4, Stacking Wheels.
Paper Jammed in Rollers
To remove paper jams manually, make sure the folder
is unplugged. Insert a large (3/8”) flat tipped screwdriver into the slot located in the shaft, just inside the
small access hole on the Right Side Cover. Turn the
screwdriver clockwise to rotate rollers in a forward
direction. It may be necessary to remove the 1st Fold
Table top by removing the two thumbscrews and sliding it off the rubber grommets.
(10)
5.7
Wrinkled Paper
Possible Cause
Feed Table Paper Guides misaligned.
Solution
Align Paper Guides perpendicular to the Folding
Rollers until paper feeds straight into the folder or call
for service.
Feed Table Paper Guides too tight.
Set Paper Guides so that a sheet slides freely down
between the Paper Guides without excessive side
play.
Folding Roller Springs Worn.
Replace with new springs.
Contaminated Folding Rollers.
Clean according to instructions in Section 4.2, Folding
Rollers.
Worn Folding Rollers.
Folding Rollers should be replaced when gaps appear
between the rollers, or call for service.
5.8
Paper exits on top of Fold Table
Possible Cause
Contaminated Folding Rollers.
Solution
Clean according to instructions in Section 4.2, Folding
Rollers.
Static Buildup.
Jog paper on Martin Yale 400 or 4200 Jogger. Spray
Martin Yale Static Eliminator liberally over paper
edges, Feed Table Assembly, Fold Table Assemblys,
Conveyor Table, and Exit Tray.
Laser printed paper.
Reverse direction of feed.
5.9
Folds more than a single sheet of paper
Possible Cause
Improper gap between Retarder Assembly and Feed Wheel.
Solution
Readjust the Retarder Assembly according to instructions in Section 3.2, Feed Adjustment, or rotate as
described in Section 4.3, Retarder Assembly.
Worn Feed Wheel.
Check to see if the Feed Wheel Assembly is worn.
Replace if necessary.
(11)
R
251 Wedcor Avenue
Wabash, Indiana 46992
Phone (260) 563-0641 Fax (260) 563-4575
Email: [email protected]
Website: www.martinyale.com
z
z
z
(12)
M-S027911
Rev. 2 6/22/09