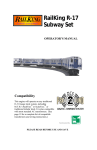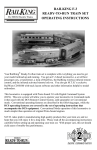
1
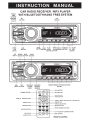
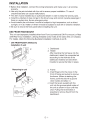
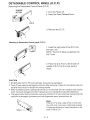
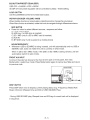
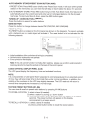
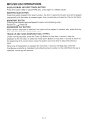
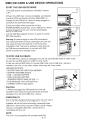
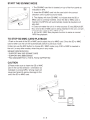
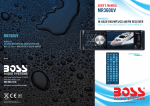
USER'S MANUAL
MR1308UAB
BLUETOOTH®-ENABLED
FULLY MARINIZED
MP3-COMPATIBLE DIGITAL MEDIA RECEIVER
WITH USB AND SD MEMORY CARD PORTS AND FRONT PANEL AUX INPUT
®
INSTRUCTION
TUNING I
SEEK
UP/DOWN
NEXT/BACK
BUTTON
CANCEL/
SRC
BUTTON
MANUAL
CAR RADIO RECEIVER I MP3 PLAYER
WITH BLUETOOTH HAND FREE SYSTEM
EQ
LCD
DISPLAY
BUTTON
INTRO REPEAT RANDOM 10+/- FOLDER
PLAY/
LOUD
BAND
UP I DOWN
SCAN BUTTON BUTTON
BUTTON BUTTON PAUSE
BUTTONS
BUTTON BUTTON
AMS
BUTTON
AUDIO
POWER MUTE
DISP
BUTTON BUTTON BUTTON BUTTON
I:J!IJ#iiUeJI:I
TALK
MENU
BUTTON BUTTON
ENCODER
VOLUME
KNOB
svsTEM
PRESET MEMORY STATION BUTTONS
(M1-M6)
INFRARED
REMOTE
SENSOR
.....------+---- TALK BUTTON
POWER BUTTON ----+--+i
"+--+----MUTE BUTTON
+-+---- BAND BUTTON
CANCEL/SAC BUTTON
...-:~--1----
VOLUME UP I DOWN BUTTONS - - - - -
AUDIO BUTTON
_I
I
~~~~~~-1---- TUNING I SEEK I MP3 TRACK UP I DOWN BUTTON
s-+--+---- AMS BUTTON
r---=--+---- INTRO SCAN BUTTON
~-+---
r
REPEAT BUTTON
- - - - PRESET MEMORY BUTTONS
:---c::::::;;;;:;---t--- 10+/- FOLDER UP I DOWN BUTTONS
EO BUTTON - - - - + - - t -
C-1-----1----DI SP BUTTON
LOUD BUTTON - - - - + - - - - J
REMOTE CONTROL
INSTALLATION
• Before final installation, connect the wiring temporarily and make sure it is all working
properly.
• Use only the parts included with the unit to ensure proper installation. The use of
unauthorized parts can cause malfunctions.
• This item must be installed by an authorized dealer in order to keep the warranty vaild.
• Install the unit where it does not get in the driverls way and cannot injure the passenger if
there is a sudden stop, like an emergency stop.
• Avoid installing the unit where it would be subject to high temperature, such as direct
sunlight, or hot air, heater or where it would be subject to dust dirt or excessive vibration.
• Be sure to remove the front panel before installing the unit.
DIN FRONT/REAR-MOUNT
This unit can be property installed either from Front (conventional DIN Front-mount) or Rear
(DIN Rear-mount installation, utilizing threaded screw holes at the sides of the unit chassis).
For details, refer to the following illustrated installation methods A and B.
- DIN FRONT-MOUNT (Method A)
Installation the unit
1
2
53~
Removing the unit
a
c
1. Dashboard
2. Holder
After inserting the half sleeve into the
dashboard, select the appropriate tab
according to the thickness of the
dashboard material and bend them
inwards to secure the holder in place.
a. Frame
b. Insert fingers into the groove in the
front of frame and pull out to remove
the frame. (When re-attaching the
frame, point the side with a groove
down wards and attach it.)
c. Insert the levers supplied with the
unit into the grooves at both sides of
the unit as shown in figure until they
click. Pulling the levers makes it
possible to remove the unit from the
dashboard.
E- 1
- DIN REAR-MOUNT (METHOD B)
Installation using the screw holes on the sides of the unit.
Fastening the unit to the factory radio mounting bracket.
1. Select a position where the screw
holes of the bracket and the screw
holes of the main unit become
aligned (are fitted) and tighten the
screws at 2 places on each side.
2. Screw
3. Factory radio mounting bracket.
4. Dashboard or Console
5. Hook (Remove this part)
Note: the mounting box, outer trim ring,
and half-sleeve are not used for method
8 installation.
2. DETACHABLE CONTROL PANEL (D.C.P.)
Removing The Detachable Control Panel (D.C.P.).
1. Turn the power off
2. Press the D.C.P. release button
3. Remove the D.C.P.
PANEL RELEASE
BUTTON
Attaching the DCP
1. Attach the panel at the right side first, with
point 8 on the main unit touching point A on
the D.C.P. (As shown on the diagram).
2. Then press the left side of D.C.P. onto the
main unit until a click sound is heard.
CAUTION
• DO NOT insert the D.C.P from the left side. Doing so may damage it.
• The D.C.P can easily be damaged by shocks. After removing it, place it in a protective case
and be careful not to drop it or subject it to strong shocks.
• When the release button is pressed and the D.C.P is unlocked, the earls vibrations may
cause it to fall. To prevent dam~e to the D.C.P, always store it in a protective case after
detaching it.
• The rear connector that connects the main unit and the D.C.P is an extremely important
part. Be careful not to damage it by pressing on it with fingernails, pens, screwdrivers, etc.
Note:
If the D.C.P is dirty, wipe off the dirt with soft, dry cloth
only. And use a cotton swab soaked in isopropyl
alcohol to clean the socket on the back of the D.C.P.
E-2
DETACHABLE CONTROL PANEL (D.C.P.)
Removing The Detachable Control Panel (D.C.P.).
1. Turn the Power off.
2. Press the Panel Release Button.
D.C.P.
3. Remove the D.C.P
Attaching the Detachable Control panel (D.C.P.)
1. Insert the right side of the D.C.P. Into
the main unit.
NOTE: The D.C.P. Must be attached into
the T-Joi nt.
1'
2.
2. Press the D.C.P. On to the left side of
middle of D.C.P. Until a click sound is
heard.
CAUTION
• DO NOT insert the D.C.P from the left side. Doing so may damage it.
• The D.C.P can easily be damaged by shocks. After removing it, place it in a protective case and
be careful not to drop it or subject it to strong shocks.
• When the release button is pressed and the D.C.P is unlocked, the earls vibrations may cause it
to fall. To prevent damage to the D.C.P, always store it in a protective case after detaching it.
• The rear connector that connects the main unit and the D.C.P is an extremely important part. Be
careful not to damage it by pressing on it with fingernails, pens, screwdrivers, etc.
Note:
If the D.C.P is dirty, wipe off the dirt with soft,
dry cloth only. And use a cotton swab soaked
in isopropyl alcohol to clean the socket on the
back of the D.C.P
E-3
ELECTRICAL CONNECTION
a. Make sure your car battery is a 12 volt (6 filler caps) negative ground system (if not, a
converter will be necessary).
b. Before starting wiring connections, disconnect the power supply by removing the fuse
from the fuse box.
c. Connect the power wire to one of the extra terminals of the fuse box.
d. Connect the black ground wire to a metal part of the car. It is important to make good
contact.
e. Make other wiring connections as shown.
f. If your car does not have ISO connector, you can procure it from any car acctssory shop.
Notes: INCORRECT WIRING OR OPERATION WILL AVOID THE WARRANTY OF THIS UNIT.
(CAR UNIT BACK SIDE)
FUSE
Fuse Replacement:
To replace the fuse, pull out the blown fuse
from the socket. Insert a new one with same
rating
GENERAL OPERATION
POWER ON/OFF BUTTON ( <D )
Press POWER button or any other button on the front of the radio to turn the unit on.
Press POWER button again to turn the unit off.
MUTE BUTTON
Press the mute button momentarily to mute the audio volume, and 11 Mute 11 will in the
display. Press the mute button again to restore volume to the previous setting.
AUDIO SELECT BUTTON(ROTARY VOLUME CONTROL KNOB)
Press this button to select desired audio function.
VOLUME (VOL)->BASS (BAS)-> TREBLE (TRE)-> BALANCE (BAL)-> FADER (FAD)
Rotate Volume Control to adjust desired level within 3 seconds.
MENU BUTTON
Press MENU Button to navigate through the menu items, while the desired menu item is
displayed, use Volume control to adjust the selected function:
- LOCI OX MODE
Use this mode to change between Local and Distant (OX) tuning mode. Local mode
improves reception in some areas where the signal is too strong.
- BEEP MODE (BEEP ON I OFF)
BEEP OFF: disable audible beep tone when any function is accessed.
BEEP ON: enable audible beep tone.
E-4
EQ BUTTON (PRESET EQUALIZER)
DSP OFF->CLASSIC->POP->ROCK
At DSP off mode preset equalizer will be controlled by Bass I Treble setting.
LOUD BUTTON
Use this LOUDNESS control to increase bass output.
ROTARY ENCODER VOLUME KNOB
When the Menu function is not activated, rotate this knob to change the volume level.
When Menu function is activated, rotate this knob to navigate through different menu items.
•
SRC BUTTON
Press this button to select different sources , sequence as follow:
A) Tuner mode (Radio)
B) USB (only if a USB drive is inserted)
C) SD I MMC (only if a SD or MMC card is inserted)
D) AUXIN
E) BT MODE (only if unit is paired to a mobile phone)
SOURCES PRIORITY
• Whenever a USB or SDIMMC is being inserted, unit will automatically switch to USB or
SDIMMC mode, does not matter the unit is currently in what mode.
When in USB or SD I MMC mode, if the USB or SD I MMC is being removed, unit will
automatically switch to radio mode.
FRONT AUX INPUT
Connect the external device to the front 3.5mm jack on front panel, then press
Mode button to select Aux mode. Press Mode button again to cancel Aux Mode and return
to previous mode.
DISP BUTTON
Press DISP button once to display current playing status (e.g. Frequency of RadioiAUXI
Music information (Eiasped time and ID3) of USB ISD-MMC Play).
- During USB I SD-MMC play, Elasped time and ID3 tag of current track will be displayed
in sequence.
E-5
AUTO MEMORY STORE/PRESET SCAN BUTTON (AMS)
1.PRESET SCAN: Press AMS button briefly enter Preset Scan mode, it will scan all the preset
stations in the memories, you can hear that will stay on each station for about 10 seconds.
2.AUTO MEMORY STORE: Press AMS button long to enter Auto Store mode, this feature will
automatically scan the current band and enter up to 6 strongest stations into the 6 preset
memories. To stop Auto Store & Scan, press the AMS button again.
TUNING UP I DOWN BUTTON (
~~~
Press this button to search for radio stations.
BAND BUTTON
Press this button to change between bands FM1 ,FM2,FM3, MW1 ,MW2(AM).
1<111111<111111
)
RESET BUTTON
The RESET button is located on the front panel (as shown on the diagram). To press it vertically
with a ballpoint pen or metal object will activate it. The reset button is to be activated for the
following reasons:
'
• Initial installation of the unit when all wiring is completed.
• All the function buttons do not operate.
• Error symbol on the display.
Note: If the unit cannot function normally after reseting, please use a cotton swab soaked in
isopropyl alcohol to clean the socket on the back of the control panel.
LIQUID CRYSTAL DISPLAY PANEL (LCD)
The LCD panel display the frequency, time and activated functions.
NOTE:
It is a characteristic of LCD panel that if subjected to cold temperatures for an extended period
of time, they will take longer time to illuminate than under normal conditions, in addition, the
visibility of the numbers on the LCD may slightly decrease. The LCD read-out will return to
normal when temperatures increase to a normal range.
STATION PRESET BUTTONS (M1-M6)
You can store & recall six preset radio stations by pressing M1-M6 buttons
TO STORE A STATION: 1) select a band (if needed)
2) select a station by tuning up I down button
3) hold a preset button which you want store the station for at least 2
seconds. The preset number will appear on the display
accompanied by a beeps sound.
TO RECALL A STATION: 1) select a band (if needed)
2) press a preset button briefly to recall the stored station.
E-6
MP3/SD/USB OPERATIONS
M1)PLAY/PAUSE AND FIRST TRACK BUTTON
Press this button briefly to pause MP3 play, press again to release pause.
M2)1NTRO SCAN BUTTON
Press this button to select Intra Scan function, the first 10 seconds of each track will be played
sequentially until this button is pressed again, then normal play will resume at the current track.
M3)REPEAT BUTTON
Pressing this button will activate Repeat Function in the following order:
Repeat On ~ Repeat Off
M4)RANDOM PLAY BUTTON
When random play mode is selected, the tracks will be played in random order, press this key
one more time to cancel random play mode.
TRACK UP AND TRACK DOWN BUTTON ( 1...... ..,....,..1)
Under normal play mode, press the Track Up Button for less than 1 second to skip the
playback to the next track, or press the Track Down Button for less than 1 seconds to return to
the beginning of the current track, press this button one more time to skip to the previous
track.
When any of these buttons is pressed for more than 1 second, the Mp3 player will enter
Cue/Review mode, this is indicated by the flashing track number on the LCD. When the key is
released, normal play will resume.
E-7
MMC/SD CARD & USB DEVICE OPERATIONS
START THE USB DEVICE MODE
e
1.The USB socket is accessible as indicated in picture
1.(P.1)
2.Piug in the USB drive I device completely as indicated
in picture 2(P.2) and display will show USB-LOAD to
indicate that the USB drive I device is being plugged in
correctly & the download has begun.
USB SOCKET
/
~
c::::ll:::l
II0 ~-
3.Does not matter which source the unit is in
(TUNER,SD/MMC,AUX,BT,etc), once a USB drive I device
\ is being plugged into the unit, unit will automatically
switch to USB mode.
~
I
4.AII the USB files playback function is same as normal
·. MP3 files playback.
Warning: Excessive weight or size USB drive/device
may cause permanent & serious damage to the unit and
may cause access to the buttons on the front panel
impossible. User must use an extension cable (provide
by USB device manufacturer) to connect with USB
socket to prevent any damage cause.
TO STOP USB PLAYBACK
1.1f the USB drive I device is unplugged, the unit will automatically switch to radio mode.
Or user can use SRC button to switch to other mode.
2.User can use the SRC button to choose USB mode (only if USB drive I device is
inserted in the unit) or any other modes, when they are in any mode.
USB SPECIFICATION
* SUPPORT MAX 32G USB FLASH MEMORY
* SUPPORT MAX 9999 SONGS
* USB 1.1 DEVICE SUPPORT
* USB 2.0 DEVICE SUPPORT
(TRANSFER SPEED SAME AS VER 1.1)
*FILE MANAGER: FAT12/FAT16/FAT32
* CURRENT SUPPLY. MAX 500mA
CAUTION
1.Aiways unplugged the USB gently from the unit,
excessive force used will cause permanent & serious
damage to the unit & the USB drive I device.
COMPATIBILITY
Due to the fast changing technology world, this unit may or
may not be compatible to all the USB drive I device
available with all the future technology, especially those
USB drive I device which require to install a driver. Always
choose a compatible USB drive I device which is
compatible with this unit.
NOTE:
This unit is not compatible with portable Hard-Disc.
E-8
START THE SD/MMC MODE
1 .The SDIM MC card slot is located on top of the front panel as
indicated in (P.4).
2. Insert the SDIMMC card into the card slot in the correct
direction until a CLICK sound is heard.
3. The display will show SD-MMC to indicate that the SO or
MMC card is correctly inserted. Once the SO or MMC card is
inserted, the MP3 file will automatically loaded & playback will
also start.
4. Does not matter the unit is in what sources (Tuner,USB,AUX,BT,
etc), once a SO or MMC card is being inserted in the unit, unit will
automatically switch to SO I MMC mode.
"
5. All the SO I MMC files playback function is same as normal
MP3 files playback.
TO STOP SD/MMC CARD PLAYBACK
1.Push on the end of the SO or MMC card to eject the sd or MMC card. Once the SO or MMC
card is taken out, the unit will automatically switch to previous mode.
2.User can use the SRC button to choose SO I MMC mode (only if SO or MMC is inserted in
the unit) or any other modes, when they are in any mode.
SDIMMC SPECIFICATION
* SUPPORT MAX 32G SDIMMC CARD
* SUPPORT MAX 9999 SONGS
*FILE MANAGER FAT12, FAT16, FAT32 SUPPORTED
CAUTION
2.Piease make sure to insert the SO or MMC
card in the correct direction I orientation as
indicated in picture 6(P.5). Wrong insert will
cause permanent & serious damage to the
unit & the SO or MMC card.
Front side
--u-0
Back side
E-9
MP3 OPERATIONS(MP3/SD/MMC/USB FILES)
Loading MP3 File ( MMC/SD/USB Drive)
During MP3 play, Current Track Number & Time Elapse of current track will be shown on the LCD.
If the disc is ID3 compatible, press DISP button to display elasped time and ID3 tag of
current track, The following categories of ID3 tag will be shown:
1. Track name SONG
2. Title name TITLE
3. Artist name ARTIST
4. Album name ALBUM
5. Folder name DIR
Navigating Through Folders and Tracks
There are Four ways to select your favourite folder/tracks.
1.By Track Up/Down Button (~ IJ+I )
Press track up/down button to skip the current tracks.
2.1 0-Track Up/Down Button
Press Folder up (M6)/F + or Folder down Button (M5)/F- for more than 1seconds skip1 0
tracks.
3.Folder UP/Down
Press Folder up (M6)/F + or Folder down Button (M5)/F- briefly to skip Folder.
4.NAVIGATING THROUGH DIRECTORIES AND TRACKS
Under MP3 play modes, press AMS Menu button once, the display shows TRK-SCH,
then turn the Encoder Volume knob to select desired track number directly,
Then press Volume knob to confrim.
E -10
BLUETOOTH MODE OPERATION
INSTRUCTION FOR HANDSFREE FUNCTION
1. PAIR IT WITH YOUR PHONE (PAIRING)
Before you use your Car HANDSFREE System, you need to pair it with your mobile phone.
1. The Bluetooth set system on the head unit will automatically go into pairing mode when the
POWER turned on .
2. Set your Bluetooth phone to discover the BOSS AUDIO
3. Your phone will find the BOSS AUDIO
Your phone then asks if you want to pair with it. Accept by pressing Yes or OK on the phone
and confirm with the passkey or PIN~=OOOO (4 zeros). Your phone will confirm when pairing is
complete.
In case of unsuccessful pairing, repeat steps 1 to 3 .
2. OPERATION
• Call Accept: Single click TALK button during an incoming call to accept the call.
• Call Reject: Click CANCEL (SRC~) or (STOP) on the remote during an incoming call will
reject the call.
• Call End: Single click SRC~ button when communication or dialling an outgoing call to
hang up.
• Call Disconnect: No BT mode Click TALK button about 1.5 seconds when it is not in
communication mode. And Disconnect and BT OFF will showed on the display.
• Call Re-connect, Click TALK button again at the Disconnect Status. The connection will be
reconnected and CONNECT & BT ON will showed on the display.
• Call Transfer (Private mode): Click TALK button about 1.5 seconds at communicating time, -·
transfer the call to phone, click talk button once again, transfer the call to Bluetooth.
• Auto Answer (Depend on mobile phone feature): Pis refer to your own mobile phone manual
for handsfree auto answer setting.
• Volume Adjust: User can use the volume up/down to adjust the volume level.
3. WHAT DISPLAY CAN SHOW DURING THE INCOMING/OUTGOING CALL MODE
INCOMING CALL
• When there is an incoming call, the display will display the incoming caller telephone
number If the incoming call has no caller number, the LCD will display 00000000 user can
short press the TALK button answer I accept the call and the Talking display will be showed
when the call is answered.
• To end the conversation, press the CANCEL(SRC~ or (STOP) at the Remote control and the
Hang up will showed on display. The unit and the display on the LCD will switch back to the
previous mode automatically.
OUTGOING CALL
User can use his I her Mobile Phone or remote control to dial and make an outgoing call .
Once the user start dialling, the display should show DIALING.
• The audio output of the present mode will ONLY be muted after pressing the TALK button
as a confirmation to dial the outgoing call.
• During talking mode, the LCD Display will display talking time.
• To end the conversation, press the CANCEL (SRC~) button or (STOP) at the Remote
control and the Hang up will showed on display. The unit and the display on the LCD will
switch back to the previous mode automatically. The mute of the previous mode will be
released at the same time.
•
E -11
4. BLUETOOTH NOTICE
• Before you start to use our Bluetooth HEAD UNIT , Please pair the unit with your mobile
phone completely. Please refer to the section of PAIRING To ensure the best reception for
Pairing & Re-connection, please make sure the phone Battery is fully charged when making
the pairing or Re-connection.
• Every time you turn the power on, the unit will automatically re-connect with the mobile
phone.
• By pressing the TALK button the unit will start the Auto-Reconnection . In some conditions,
the user will need to reconnect manually. For example like the following.
• If the mobile phone is out of range. (2 meters away from the head unit) the unit will be
disconnected from the mobile phone.
• If user wants to re-connect, it will have to be done manually.
• The Bluetooth symbol (... ) and the connected symbol ( < I >) on the mobile phone will be
different from one to another. Please refer lo the corresponding specification.
• When you hang up the phone, the main unit will return to previous mode (radio, SO or other
mode).
• Some mobile phone brands like Sony Ericsson may have Power Saving Modell selection
when Blue Tooth mode is switched on. PLEASE DO NOT Switch ON Power saving Mode
when operating with this Head Unit, . As some abnormal communication behavior will
happen Power Saving Mode is switched on.
• To ensure the best conversation quality I performance, please always keep talking within 1
meters of the Head Unit.
• Some Mobile Phones can support IN BAND RING TONE, such as Motorola, Nokia. In such
case, the Incoming Ringing Tone will be same as the original Ring-tone of the Mobile
Phone. But some Mobile Phones like Sony Ericsson do not support this feature. The Ringtone will be using the standard Ring-tone of the Head unit.
• Using voice dialing, please make sure the phone and the head unit within 3 meters of each
other. Also please make sure your mobile phone support voice dialing function. And please
consult with your mobile phone supplier if you want to know the operation further about
voice dialing.
11
• If user wants to disconnect the head unit with the Mobile Phone, please click talk button
long once or switch 0FF Blue Tooth connectivity on the Mobile Phone.
11
11
LISTENING TO MUSIC USING BOSS AUDIO ON THE BT AUDIO MODE
• BOSS AUDIO is capable of streaming music over Bluetooth from a mobile phone
supporting A2DP. Press the SRC ~ button to select Bluetooth BT audio mode, once you
have paired your Car Handsfree with your mobile phone, use your phone to play, pause,
stop, skip forward and backward. When you receive a call, the music will be automatically
paused and you will be able to answer or reject a call through the headset. Once you end a
call, the music will continue. On some phones you may have to press play to start the music
again.
• And you can also make an outgoing call (This function is compatible with some phones
which can make outgoing calls during the A2DP mode.)
E -12
Specifications for Blue tooth
BLUE TOOTH
Power Consumption
Output Power
Frequency Band
Range
Standard
200mA Max.
0 dBm (Class II)
2.4GHz - 2.4835GHz ISM Band
3 meters (free space)
Bluetooth V2.1 specification
• Specifications subject to change without notice.
Remark:
Our Bluetooth Handsfree System adapts to the Bluetooth spec V2.1. It is compatible
with profiles such as Handsfree profile and Head Set profile. However the functionality may be
limited due to some phones dedicated interfacing specifications, even with phones of which the
actual Bluetooth specifications and used profiles apply to our Bluetooth Handsfree System
specifications.
Please check the compatibility list or try it out in practice your phone at the local dealer in case
it is not mentioned in the list.
Note:
Compatibility and connectivity with all Bluetooth mobile phones is not guaranteed.
Warning:
Many jurisdictions have laws regarding the use of a phone in a vehicle.
Obey all local laws. Always keep your hands free to operate the vehicle while driving.
Your first consideration while driving should be road safety.
E -13
SPECIFICATIONS
RADIO SECTION
FM
Frequency Range
Usable Sensitivity
Stereo Separation
S/N Ratio
87.5-107.9 MHz
Better than 15d B at S/N 30 dB
25 dB at 1KHz
50 dB
AM (MW)
Frequency Range
Usable Sensitivity
S/N Ratio
530 -1710KHz
Better than 45d B
40 dB
GENERAL
Power Supply
Polarity
Speaker impedance
Power Output
DC 11 -14V
Negative Ground
4 ohms
50Wx4
REMARK:
Specifications subject to change without notice.
E- 14
752-HS8005BI-01-01
IO~S
AUDIO SYSTEMS
PLACE
POSTAGE
HERE
51\l~S
AUDIO SYSTEMS
THIS PRODUCT IS WARRANTED FORA PERIOD OF ON E YEAR FROM THE DATE OF PURCHASE AGAINSTDEFECTS IN MATERIALS
AND WORKMANSHIP. THE WARRANTY IS FOR REPAIR OR REPLACEMENT AT THE SOLE DISCRETION OF SELLING DEALER. IF WE
CHOOSE TO REPLACE YOUR PRODUCT. WE MAY REPLACE IT WITH A NEW OR RECONDITIONED ONE OF THE SAME OR SIMILAR
DESIGN. CUSTOMER WILL BE RESPONSIBLE FOR FREIGHT CHARGES INCURRED TO RETURN THE PRODUCT AND WILL INCLUDE A
CASHIER'S CHECK OR MONEY ORDER IN THE AMOUNT OF 520.00 FOR CONTINENTAL U.S. OR S3S.OO FOR HAWAII, ALASKA.
CANADA AND PUERTO RICO, PAYABLE TO BOSS AUDIO SYSTEMS TO COVER RETURN SHIPPING AND HANDLING. YOU MUST
SEND A COPY OF THE ORIGINAL INVOICE WITH DATE OF PURCHASE. PLEASE ENCLOSE A LETTER STATING THE PROBLEM YOU ARE
HAVING WITH THE PRODUCT. YOUR DAYTIME PHONE NUMBER, AND YOUR RETURN SHIPPING ADDRESS (NO P.O. BOXES, PLEASE).
PLEASE CONTACT US TO RECEIVE A RETURN AUTH ORIZATION N UM BER (RAI) BEFORE SENDING YOUR DEFECTIVE ITEM.
THIS WARRANTY DOES NOT COVER ANY UNIT SUBJECT TO ABUSE, NFGLECT. INCORRECT WIRING, WATER DAMAGE, OR ANY
REPAIR OR MOD/FICA TION PERFORMED BY SOMEONE OTHER THAN A BOSS AUDIO SYSTEMS REPAIR TECHNICIAN. ANY DAMAGES
RESULTING FROM LEGAL ACTION FOR BREACH OF EXPRESSED OR IMPLIED WARRANTIES SHALL BE LIMITED TO THE COST OF THE
ORIGINAL PURCHASE PRICE OF THE UNIT. AS A CONDITION or TillS WARRANTY, IT l'i AGRffD THAT THF RfMFnY PROVInFn IN
THIS DOCUMENT IS THE SOLE REMEDY UNDER THIS WARRANTY. ALL LIABILITY FOR COINCIDENTAL DAMAGES IS EXCLUDED. THE
PURCHASER AGREES TO RETAIN THE ORIGINAL PROOF-OF-PURCHASE FOR ESTABLISHING THE EFFECTIVE DATE OF THIS
WARRANTY. SHOULD BOSS AUDIO SYSTEMS OR AN AUTHORIZED DEALER REPLACE YOUR PRODUCT UNDER WARRANTY, THIS
REPLACEMENT SHALL BE CONSIDERED A TRANSACTION UNDER THE ORIGINAL WARRANTY. AND DOES NOT EXTEND THE
ORIGINAL WARRANTY PERIOD. THIS WARRANTY IS NON-TRANSFERABLE.
PLEASE FILL IN THE INFORMATION REQUESTED AND MAIL THIS CARD
TO THE ADDRESS ON THE REVERSE SIDE.
NAME
AGE
ADDRESS
CITY
STATE
BOSS AUDIO DEALER NAME
VEHICLE INFORMATION
WHO INSTALLED THE SYSTEM?
TOTAL COST OF AUDIO SYSTEM
DATE OF PURCHASE
SERIAL NUMBER
MODEL NUMBER
ZIP
Boss Audio Systems Free Extended Warranty Program When you purchase directly from BossAudio.com, one of our “Authorized Platinum Online Dealers” or have your product installed at an authorized Boss Audio dealer at the time of purchase, you qualify a free extended warranty on the product you purchased as shown below. Mobile Video & CD and DVD Receivers: 3 Years Total Boss Audio will extend the warranty for an additional two years, 3 years total, directly to the original consumer. Woofers, Speakers, ATV/UTV and Motorcycle Sound Systems: 3 Years Total Boss Audio will extend the warranty for an additional two years, 3 years total, directly to the original consumer. Amplifiers: 6 Years Total Boss Audio will extend the warranty for an additional five years, 6 years total, directly to the original consumer. Other Electronics and Accessories: There is No extended warranty available. Terms and Conditions: Purchases made online from dealers other than Bossaudio.com or an Authorized Platinum Online Dealer listed on this site do not qualify for the free extended warranty program. The online extended warranty program cannot be combined with the Installation Extended Warranty program. The extended warranty is valid only on purchases made and shipped within the US and covers parts and labor to repair only. This program is effective as of 3/1/2015. Any purchase made prior to this date will not qualify for this program. All other conditions of original warranty apply. To see a list of Authorized Platinum online Dealers, please click here. To get service on any product that falls under the Extended Warranty (800)999‐1236 ext. 2239 or email to: http://bossaudio.com/support/, an original or copy of dated purchase receipt is required to validate the warranty and a statement of the problem with the product is needed.