1
DOTH-300
Date
2013-07-15
APPLICATION
MANUAL
Rev
1.04
Page
1-1
Application Manual
for DOT-H300 Windows Mobile computer
D.O.Tel
DOTH-300
Date
2013-07-15
APPLICATION
MANUAL
Rev
1.04
Page
1-2
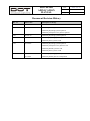
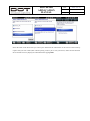
Document Revision History
Doc ver.
Release date
Description of change
1.00
2012/08/06
1st Release of this document
1.01
2012/10/09
H300WM_KIOSK_R0103 Added
H300WM_KeyWedge_R0107 updated
H300WM_SetUpDeviceCtrl_R0103 updated
1.02
2012/11/30
H300WM_KeyWedge_R0203 updated
1.03
2013/02/25
H300WM_KeyWedge_R0303 updated
H300WM_Demo_R0302.CAB
1.04
2013/04/23
H300WM_KeyWedge_R0308 updated
H300WM_SetUpDeviceCtrl_R0106.CAB
H300WM_KIOSK_R0105.CAB
H300WM_Demo_R0307.CAB
1.05
2013/07/31
H300WM_KeyWedge_R0312 updated
2013/08/01
H300WM_DEMO_R0312.CAB updated
DOTH-300
Date
2013-07-15
APPLICATION
MANUAL
Rev
1.04
Page
1-3
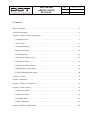
Version Information
Module
Program
Version
Date
Start Up
H300WM_SetUpDeviceCtrl_R0106.CAB
R0106
2012-12-21
KeyWedge
H300WM_KeyWedge_R0312.CAB
R0308
2012-07-26
Demo
H300WM_DEMO_R0312.CAB
R0312
2013-08-01
App Center
H300WM_KIOSK_R0105.CAB
R0105
2013-03-21
DOTH-300
Date
2013-07-15
APPLICATION
MANUAL
Rev
1.04
Page
1-4
Contents
Before You Begin ................................................................................................................................. 6
About This Document ........................................................................................................................... 6
Chapter 1: Guide to StartUp Management ............................................................................................ 7
1.1 SetupDeviceCtrl .......................................................................................................................... 7
1.2 ProcessINI ................................................................................................................................. 11
1.3 OsUpdateManager..................................................................................................................... 14
Chapter 2: KeyWedge ..................................................................................................................... 16
2.1 KeyWedgeTray ......................................................................................................................... 18
2.2: KeyWedge Home Screen ......................................................................................................... 18
2.3 KeyWedge Option ..................................................................................................................... 21
2.4 Scanner KeyWedge Option ....................................................................................................... 25
2.5 HF RFID KeyWedge Option..................................................................................................... 25
2.6 UHF RFID KeyWedge Option.................................................................................................. 30
Chapter 3: Camera............................................................................................................................... 32
Chapter 4: Bluetooth ........................................................................................................................... 35
Chapter 5: Wireless LAN (WLAN) .................................................................................................... 37
Chapter 6: Features Demo ................................................................................................................... 41
6.1 1D Scanner Demo ..................................................................................................................... 41
6.2 2D Scanner Demo ..................................................................................................................... 45
6.3 HF RFID Demo ......................................................................................................................... 49
6.4 UHF RFID Demo ...................................................................................................................... 53
Chapter 7: Windows Mobile Dialer .................................................................................................... 60
DOTH-300
Date
2013-07-15
APPLICATION
MANUAL
Rev
1.04
Page
1-5
7.1 Making a Phone Call ................................................................................................................. 60
7.2 Answering a Call ....................................................................................................................... 63
7.3 Missed Call................................................................................................................................ 64
7.4 Using a Speed Dial .................................................................................................................... 64
Chapter 8: KIOSK Manager ................................................................................................................ 66
DOTH-300
Date
2013-07-15
APPLICATION
MANUAL
Rev
1.04
Page
1-6
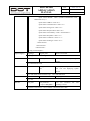
Before You Begin
This document is helpful for the person who is responsible for demonstrating the functions and features of
DOT mobile computer. Before you work with this document, you should be familiar with your network
environment and general networking terms.
About This Document
This document guides you to explore the functions of a DOT mobile computer. You can utilize these
applications to experience functions as follows:
▪ Control Setup-Device, Configure Device Default Value and update OS image
▪ Scanning bar codes (1D/2D)
▪ Reading a HF RFID Cards and Tags
▪ Reading a UHF Tags
▪ Emulate a Key-wedge function
▪ Taking a picture with an integrated camera
▪ Pairing a Bluetooth accessories
▪ Connecting with WLAN AP
▪ Making a phone call with an integrated phone
For more information about which functions are supported by your DOT mobile computer, see each chapter’s
beginning .
DOTH-300
Date
2013-07-15
APPLICATION
MANUAL
Rev
1.04
Page
1-7
Chapter 1: Guide to StartUp Management
This chapter describes SetupDeviceCtrl.exe for initializing the mobile computer, Process.INI for setting initial
default value of the mobile computer and OsUpdateManager.exe for safe OS image updates.
Installing SetupDeviceCtrl folder
H300WM_SetupDeviceCtrl_R01xx.CAB;
My Device > Flash Disk > CAB > H300WM_SetupDeviceCtrl_R01xx.CAB
Tap H300WM_SetupDeviceCtrl_R01xx.CAB to install to SetupDeviceCtrl folder.
Generated folder and files; ~My Device/Flash Disk/SetupDeviceCtrl/~
Supported Model
OS
Type
SetupDeviceCtrl.exe
DOTH-300S(Q)
Windows Embedded Handheld 6.5
Scripts
DOTH-300C(Q)
ProcessINI.exe
1.1 SetupDeviceCtrl
SetupDeviceCtrl (DOS batch file type script) is used for initializing the mobile computer.
▪ SetupDeviceCtrl.exe; located in [Flash Disk/SetupDeviceCtrl/]
▪ Scripts ( OnCleanStart.txt , OnResetStart.txt)
SetupDeviceCtrl runs automatically at Clean Boot or Reset. If you want to have your own, you can
manually execute this script through User Interface window which can be edited and saved.
Auto run of SetupDeviceCtrl
During Clean Boot,
[Flash Disk/SetupDeviceCtrl/OnCleanStart /OnCleanStart.txt] is executed.
If SetupDeviceCtrl.exe exists in [Storage Card/SetupDeviceCtrl/],
[Storage Card/SetupDeviceCtrl/OnCleanStart /OnCleanStart.txt] is executed.
During Reset,
DOTH-300
Date
2013-07-15
APPLICATION
MANUAL
Rev
1.04
Page
1-8
[Flash Disk/SetupDeviceCtrl/OnEveryReset /OnResetStart.txt] is executed.
If SetupDeviceCtrl.exe exists in [Storage Card/SetupDeviceCtrl/],
[Storage Card/SetupDeviceCtrl/OnEveryReset/OnResetStart.txt] is executed.
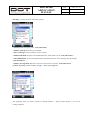
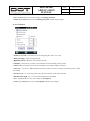
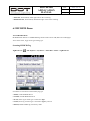
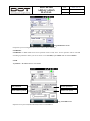
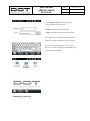
Manual run of SetupDeviceCtrl
You can manipulate scripts through UI edit window.
: Add new line after the current line
: Add new line before the current line.
: Executes all scripts.
: Save all edited scripts.
Besides buttons, you can edit, run and save scripts through Menu. Tap
Menu on the system tray.
▪ Script Mode > Clean Start; Scripts of the OnCleanStart.txt will be
displayed.
▪ Script Mode > Reset Start; Scripts of the OnResetStart.txt will be
displayed.
▪ Add > Add After….; Add new line after the current line.
▪ Add > Add Before….; Add new line before the current line.
▪ Edit Scripts; will enter the edit mode of the current line.
* When you want to edit the current line, tap the line one more time. Then,
it will enter the edit mode of the line that you want to edit.
▪ Run Scripts; will run all scripts.
DOTH-300
Date
2013-07-15
APPLICATION
MANUAL
Rev
1.04
Page
1-9
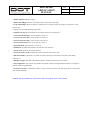
▪ Save; will save what you edited.
Script Format
Following table shows script command, parameter set for reference.
Function
Command
Comment
<;>
Parameter
Remarks
or <//>
Ex> //comment 1
Copy
“src” “dest”
Copy
Ex> copy "\Flash Disk\test.txt" "\Flash Disk\CopyFile.txt"
Move
“src” “dest”
Move
Ex> move "\Flash Disk\test.txt" "\Flash Disk\MoveFileOk.txt"
Delete
“target”
Delete
Ex> delete "\Flash Disk\test.txt"
Make Shortcut
“src” ”shortcut”
Shortcut
Ex> shortcut "\Windows" "\Flash Disk\WindowsShortcutOk.lnk"
Rename
“origin” ”new”
Rename
Ex> rename "\Flash Disk\test.txt" "\Flash Disk\Rename.txt"
Make Folder
“name”
Mkdir
Ex> mkdir "\Flash Disk\TestMkDir"
Make Delay
Delay
[seconds]
Ex> delay 3
Make Delay
Wait
/c<or /q> [seconds]
Seconds : will wait the end of the
previous process during [seconds]
/q : will not execute hereafter script
at timeout
/c : will execute hereafter script even
at timeout
Ex> wait /c 10
Install
“xml file path”
Provxml
Provisioning
XML
Can configure WiFi / Proxy and so
on.
Ex1> PROVXML "\Flash Disk\test.xml"
Ex1>XML 예시
<wap-provisioningdoc>
<characteristic type="Wi-Fi">
<characteristic type="access-point">
<characteristic type="linksys">
DOTH-300
Date
2013-07-15
APPLICATION
MANUAL
Rev
1.04
Page
1-10
<parm name="DestId" value="{436EF144-B4FB-4863-A0418F905A62C572}"/>
<parm name="AdHoc" value="0"/>
<parm name="Authentication" value="7"/>
<parm name="Encryption" value="6"/>
<parm name="KeyProvided" value="0"/>
<parm name="NetworkKey" value="1234567890"/>
<parm name="KeyIndex" value="1"/>
<parm name="Use8021x" value="-1"/>
<parm name="EAPType" value="13"/>
</characteristic>
</characteristic>
</characteristic>
</wap-provisioningdoc>
Import Registry
Regmerge
“reg file path”
DOT’s own format
regmerge "\Flash Disk\test.reg"
IdleTimerReset
IdleTimerReset
[Period]
Will not enter Auto Sleep during this
period
Ex> idletimerreset 1000
Splash Screen
Splash
“bmp path”
Will display Bitmap on screen
Off
Off: will end displaying Splash
Screen
Ex1> SPLASH "\Flash Disk\test.bmp"
Soft Reset
Reset
Ex2> SPLASH OFF
None
Only supported at
“exe parameter”
Can
->“option “file path””
installing Cab file
OnCleanStart.txt
Ex> reset
Run file
“exe path”
run
execution
"\windows\wceload.exe" "/noui /nodelete "\Flash Disk\test.CAB""
file
like
DOTH-300
Date
2013-07-15
APPLICATION
MANUAL
Rev
1.04
Page
1-11
1.2 ProcessINI
ProcessINI is used for setting initial default value of the mobile computer and it is
executed at the beginning
of [Flash Disk/SetupDeviceCtrl/OnCleanStart/OnCleanStart.txt] script run.
▪ ProcessINI.exe; located in [Flash Disk/SetupDeviceCtrl/]
When the user run ProcessINI manually, user-created INI file is applied.
Following table shows INI format for reference.
Section
Key Remapping
Key
Mode
비고
Value
0/1/2
Not Use / Used to Virtual
Key
Used to Program
Execute
For 19 Keys
VKcode
Hexadecimal value
Virtual Key Code
Path
String
Program Path
Ex>
\windows\taskmgr.exe
SUSPEND TIMEOUT
BACKLIGHT
Setting
0/1
Setting Disable / Enable
CheckBatTimeout
0/1
Not Use / Use
OnBatTimeout
1~5
Minute
CheckACTimeout
0/1
Not Use / Use
OnACTimeout
1, 2, 5, 10, 15, 30
Minute
Setting
0/1
Setting Disable / Enable
CheckBatTimeout
0/1
Not Use / Use
OnBatTimeout
10, 30, 60, 120, 180,
Seconds
240, 300
CPU Mode
CheckACTimeout
0/1
Not Use / Use
OnACTimeout
1~10
Minute
AcLevel
0~9
Brightness Level
BatLevel
0~9
Brightness Level
Setting
0/1
Setting Disable / Enable
Mode
0, 1, 2
0 : Turbo Mode
DOTH-300
Date
2013-07-15
APPLICATION
MANUAL
Rev
1.04
Page
1-12
1 : Normal Mode
2 : Save Mode
Screen Off
Setting
0/1
Setting Disable / Enable
Enable
0/1
ScreenOff Mode
Disable / Enable
SuspendEnable
0/1
ScreenOff Suspend Mode
Disable / Enable
IE
SuspendTimeOut
5, 10, 15, 20
Minute
Setting
0/1
Setting Disable / Enable
HomePage
String
Internet Explorer
Default URL
WIRELESS MANAGER
Setting
0/1
Setting Disable / Enable
PhonePower
0/1
Off / On
BTPower
0/1
Off / On
MANUFACTURE
Setting
0/1
Setting Disable / Enable
Name
Name
String
Ex>
DOTEL Co., Ltd
VOLUME
Setting
0/1
Setting Disable / Enable
Mode
0, 1, 2
0 : Normal
1 : Vibrate
2 : Off
SystemVol
0~5
Volume Level
PhoneVol
0~5
Volume Level
INI Sample
[SUSPEND TIMEOUT]
Setting=1
CheckBatTimeout=1
OnBatTimeout=5
CheckACTimeout=1
OnACTimeout=5
DOTH-300
Date
2013-07-15
APPLICATION
MANUAL
Rev
1.04
Page
1-13
[BACKLIGHT]
Setting=1
CheckBatTimeout=1
OnBatTimeout=60
CheckACTimeout=1
OnACTimeout=5
AcLevel=4
BatLevel=4
[CPUMODE]
Setting=1
Mode=0
[SCREENOFF]
Setting=1
Enable=1
SuspendEnable=1
SuspendTimeOut=5
[IE]
Setting=0
HomePage=http://www.naver.com/
[WIRELESS MANAGER]
Setting=1
PhonePower=1
BTPower=1
[VOLUME]
Setting=1
Mode=2
SystemVol=5
PhoneVol=5
[MANUFACTURE]
Setting=0
Name=DOTEL Co., Ltd
[CENTER APP KEY]
Mode=2
VKcode=98
Path=\windows\taskmgr.exe
DOTH-300
Date
2013-07-15
APPLICATION
MANUAL
Rev
1.04
Page
1-14
1.3 OsUpdateManager
Supported Model
OS
Type
DOTH-300S(Q)
Windows Embedded Handheld 6.5
OsUpdateManager.exe
DOTH-300C(Q)
OSUpdateManager will help you update OS safely without losing or changing configuration file in /Flash
Disk.
▪ OsUpdateManager.exe; should be located at same folder, or SD root as which there are OS
image to be updated. This file will be distributed together with new OS image.
▪ OsUpdateManager.ini; Created and exists only when Backup > Restore
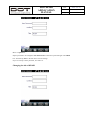
OS Update & Backup
Before doing OS update, make sure that OS image to be updated is in storage card.
It is recommended to update the mobile computer with AC-plugged or fully charged battery to avoid
unwanted situation.
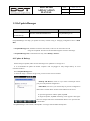
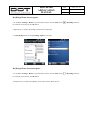
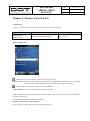
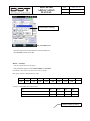
Run OsUpdateManager.exe .
If Total OS image is found in storage card, you will see the screen as follows.
▪ Backup and Restore; Check it if you want to backup & restore
your previously defined configuration.
▪ Flash Disk; Check it if you want backup of previous configuration
data which is in Flash Disk. All files in Flash Disk will be saved.
To quit this application without update, tap Exit.
To begin OS update, tap Start. Following screen appears. This figure
shows an example which user checked Flash Disk to save previous files
in Flash Disk.
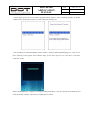
OsUpdateManager creates folder, “Backupdata” in storage card and makes backup files.
DOTH-300
Date
2013-07-15
APPLICATION
MANUAL
Rev
1.04
Page
1-15
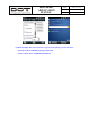
Another figure shows the screen which completed backup operation. After completing backup, the mobile
computer resets automatically within 5 seconds and begins installing OS.
After installing OS, OsUpdateManager checks whether “\Storage Card\OsUpdateManager.ini” exists. If it is
there, following screen appears which indicates being on the restore process. If it is not there, it will show
“Welcome” screen.
When OsUpdateManager completes restoring the backup Flash Disk, it will do Clean Boot automatically and
restart the mobile computer. Then entire OS update process is done.
DOTH-300
Date
2013-07-15
APPLICATION
MANUAL
Rev
1.04
Page
1-16
Chapter 2: KeyWedge
You can enable/disable keyboard wedge for barcode scanner and HF, UHF RFID reader.
Also you can
specify each peripheral’s scan(reading) condition as what you want.
Once Keyboard Wedge Tray is launched, you can set and modify all keyboard wedge settings on Keyboard
Wedge Tray.
About KeyWedgeTray
You can set scanner keyboard wedge and RFID keyboard wedge through KeyWedgeTray.exe and select wedge
conditions through KeyWedgeOpt.exe
Supported Model
OS
DOTH-300S(Q)
Type
KeyWedgeTray.exe
Windows Embedded Handheld 6.5
DOTH-300C(Q)
KeyWedgeOpt.exe
DOTH-300S(Q)
Windows Embedded Handheld 6.5
ScannerOpt.exe
DOTH-300S(Q)
Windows Embedded Handheld 6.5
HFOpt.exe
DOTH-300C(Q)
Windows Embedded Handheld 6.5
UHFOpt.exe
DOTH-300C(Q)
Installing KeyWedge
Copy the latest version of H300wM_KeyWedge_Rxxxx.CAB to the DOT Mobile Computer. Run
H300WM_KeyWedge_Rxxxx.CAB on the DOT mobile computer to install KeyWedge. After the installation
is complete, KeyWedge will run automatically.
DOTH-300
Date
2013-07-15
APPLICATION
MANUAL
Rev
1.04
Page
1-17
Uninstalling KeyWedge
Go to Start > Settings > System to open the System window. Tab the Remove Programs applet.
Select KeyWedge from the list of installed programs and tap the Remove button. Tap the Yes button when the
Remove Program dialog appears to uninstall KeyWedge from the DOT mobile computer.
Tab the Yes button when you delete the user registry information. Otherwise, tab the No button.
¶ NOTE. IF you delete user information, set by default when you reinstall KeyWedge.
KeyWedge Upgrade
DOTH-300
Date
2013-07-15
APPLICATION
MANUAL
Rev
1.04
Page
1-18
▪ Refer to Uninstalling Keywedge, uninstall KeyWedge from the DOT mobile computer.
▪ Refer to Installing Keywedge, on the DOT mobile computer to install KeyWedge.
¶ NOTE. For proper operation, you must remove the previous program, and then install it.
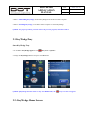
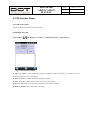
2.1 KeyWedgeTray
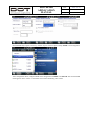
Start KeyWedge Tray
▪ Go to Start > KeyWedge applet or Tab
Tray icon > Options…
▪ Change the KeyWedge ON state and press the OK button.
¶ NOTE. If KeyWedge the OFF status or Tray Icon HIDE status, the
2.2: KeyWedge Home Screen
Tray icon does not appear.
DOTH-300
Date
2013-07-15
APPLICATION
MANUAL
Rev
1.04
Page
1-19
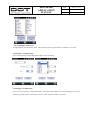
KeyWedge Home Screen register
▪ Go to Start > Settings > Home to open the Home window. Tab the Items. Select (
) KeyWedge from the
list of Home Screen and tag the OK button.
▪ Registration is complete, KeyWedge On/Off status is displayed.
▪ Tab KeyWedge Home Screen, KeyWedge Option is executed.
KeyWedge Home Screen unregister
▪ Go to Start > Settings > Home to open the Home window. Tab the Items. Select (
list of Home Screen and tag the OK button.
▪ Deregistration is complete, KeyWedge will be removed from Home Screen.
) KeyWedge from the
DOTH-300
Date
2013-07-15
APPLICATION
MANUAL
Rev
1.04
Page
1-20
¶ NOTE. KeyWedge Home Screen function is supported in the following versions and above.
- KeyWedge CAB Ver: H300WM_KeyWedge_R0201.CAB
- Windows Mobile OS Ver: WMH300XXXXXXX05AX
DOTH-300
Date
2013-07-15
APPLICATION
MANUAL
Rev
1.04
Page
1-21
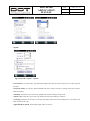
2.3 KeyWedge Option
Go to
>
KeyWedge applet.
If KeyWedgeTray is already activated , tap
icon on the tray.
GeneralSet Tab
▪ KeyWedge: ON or OFF KeyWedge Application.
▪ Tray Icon: SHOW or HIDE the tray icon in “KeyWede ON” mode.
▪ Auto Run: During boot-up, the KeyWedge can run.
▪ Device Enable: Select the device you want to use.
¶ NOTE. If Device (SCANNER, UHF and HF) are not mounted, this menu will be inactive.
DOTH-300
Date
2013-07-15
APPLICATION
MANUAL
Rev
1.04
Page
1-22
▪ About: Show the version information for the KeyWedge.
WedgeSet tab
▪ Select Scan Type; Select “Scanner” for 1D/2D scanner, “HF” for HF RFID reader and “UHF” for UHF
RFID reader.
▪ End of Scan; will define data or command following decoded data.
▪ Key Operation; You can select scan operation mode. According to scan function, 3 modes are supported as
follows.
Mode
Key Down
Key Up
Success
Time out
SYNC
Reading
Stop
Stop
Stop
ASYNC
Reading
No change
Stop
Stop
CONTINOUS
Reading
Stop
Retry
Retry
DOTH-300
Date
2013-07-15
APPLICATION
MANUAL
Rev
1.04
Page
1-23
▪ Timeout; Valid range is between 1sec ~ 15sec. Up to 2-digits can be input.
▪ Interval; Time interval that re-scan after previous scan success in “CONTINOUS” mode. Valid range is
between 100ms ~ 3000ms. Up to 4-digits can be input.
▪ Prefix; character string to be inserted before decoded data. Up to 5-digits can be input.
▪ Suffix; character string to be inserted after decoded data. Up to 5-digits can be input.
Prefix
Data
Suffix
End Of Scan
[Filed of data]
▪ Emul Type;
- Clipboard: Outputs the result to clipboard.
- Keyboard: Outputs the result as keyboard type.
▪ Emul Key Time(ms): Set the Emul key time option to specify the delay to be inserted between each
keystroke character that is sent, in “Keybaord”. (0 msec ~ 1000msec)
¶ NOTE. Emul Key Time(ms) function is supported in the following versions and above.
- KeyWedge CAB Ver: H300WM_KeyWedge_R303.CAB
▪ Notification: Select the Beep or Vibration when scanner read successfully.
If you want to save changes in settings and to exit, tap OK button.
KeyMapping tab
DOTH-300
Date
2013-07-15
APPLICATION
MANUAL
Rev
1.04
Page
1-24
▪ Left / Center / Right / Gun key: you can assign each key to different scan device. (SCANNER, HF, UHF)
▪ Setting: If combo box setting, the configuration window of selected device will appear.
¶ NOTE. The representation of active/inactive and terms Depend on the scanner model
DOTH-300
Date
2013-07-15
APPLICATION
MANUAL
Rev
1.04
Page
1-25
2.4 Scanner KeyWedge Option
About ScannerOpt.exe
You can set barcode symbology for scanner through ScannerOpt.exe
Configuring Scanner
If KeyWedgeTray is already activated, tap
on the tray.
Tap Options… to open KeyWedge setting window.
Move to KeyMapping tab. At least one of the keys (Left, Center, Right, Gun) should be selected as
SCANNER. Tap Setting to open ScannerOpt window.
▪ Check box: Enable or disable each barcode type separately
▪ All Enable: Enable all types of barcodes to be scanned.
▪ All Disable: Disable all types of barcodes to be scanned.
▪Factory Reset: Resets all the settings of the Scanner.
¶ NOTE. Supported barcode symbol may vary depending on the scanner model. If all barcode symbols to
enable, it can take a long time to read.
DOTH-300
Date
2013-07-15
APPLICATION
MANUAL
Rev
1.04
Page
1-26
■ Config…: Set the operation status of the scanner.
• Security Level: Set security level. (Only 1D Scanner)
• Enable Code Type: Barcode type is enabled.
• Select Code Page: Set the code page. (UTF-8, ANSI)
• Enable Flash Mode: If selected “Aimer&Illumination”, Flash mode to work. (Only 2D Scanner)
• Aimer/Illumination: set the Aimer/Illumination combinations that can be used during a decode attempt.
(Only 2D Scanner)
• Enable Centering Mode: Barcode in the center of the Aimer is read only. (Only 2D Scanner)
¶ NOTE. Depending scanner models, “Config...” menu may be different.
Tap symbology name you want to specify its reading condition. > Popup window appears > you can set
reading conditions.
DOTH-300
Date
2013-07-15
APPLICATION
MANUAL
Rev
1.04
Page
1-27
• Enable Aim ID: AIM ID is output.
• Return Check Digit: Transmit the symbol with or without the check digit.
• Verify Check Digit: When this feature is enabled, the scan engine checks the integrity of symbols to verify
that the data
complies with specified check digit algorithm.
• Send Start & Stop: When enabled, the start and stop character transmission.
• Convert EAN8 to EAN13: Convert EAN-8 to EAN-13.
• Convert UPCA to EAN13: Convert UPC-A to EAN-13.
• Convert UPCE to EAN13: Convert UPC-E to EAN-13.
• Convert UPCE to UPCA: Convert UPC-E to UPC-A.
• Extended UPCE: Convert UPC-E to UPC-A.
• Enable FNC1: CODE-128 and GS1-128 barcode to set the FNC1.
• System Code: Transmit the system character.
• System & Country Code: Transmit the system character and country code.
• Full ASCII Mode: Full ASCII is a variant of symbols which pairs characters to encode the full ASCII
character set.
• Min/Max Length: Minimum / Maximum length for valid barcode string for this symbol.
• Only Supplement: The scanner only decodes UPC/EAN symbols with supplemental characters, and ignores
symbols without supplementals.
• Set Space Character: Determines if there is a space character between the data from the bar code and the
data from the addenda.
¶ NOTE. The representation of active/inactive and terms Depend on the scanner model.
DOTH-300
Date
2013-07-15
APPLICATION
MANUAL
Rev
1.04
Page
1-28
2.5 HF RFID KeyWedge Option
Configuring a HF RFID reader
If KeyWedgeTray is already activated, tap
on the tray.
Tap Options… to open KeywedgeOpt window.
Move to KeyMapping tab. At least one of the keys (Left, Center ,Right, Gun) should be selected as HF. Tap
Setting to open HFOpt window.
Supported tag types are listed. Check each tag type that you want to read.
▪ All Enable; enable all tag types and reader will scan all tag types as reading tag.
▪ All Disable; disable all tag types.
▪ Factory Reset; all setting will be reset to default value.
¶ NOTE. Can not support all the tags, depending on DOT mobile computer.
¶ NOTE. If all HF tags to enable, it can take a long time to read.
DOTH-300
Date
2013-07-15
APPLICATION
MANUAL
Rev
1.04
Page
1-29
If tap each tag, pop-up window will be open as figures and you can set data length of each tag.
▪ Data Length: You can set data length of each HF tag
Ex)
MIFARE Classic tag, support for 4-byte UID.
If UID is “12345678”(Hex),
To read all “12345678” : Begin = 1, End = 4
To read only “1234” : Begin = 1, End = 2
To read only “3456” : Begin = 2, End = 3
To read only “5678” : Begin = 3, End = 4
To read only “12” : Begin = 1, End = 1
¶ NOTE. The End value should be equal or greater than Begin value
DOTH-300
Date
2013-07-15
APPLICATION
MANUAL
Rev
1.04
Page
1-30
2.6 UHF RFID KeyWedge Option
Configuring the UHF RFID reader
If KeyWedgeTray.exe is already activated, tap
on the Home screen.
Tap Options… to open KeyWedge setting window.
Move to KeyMapping tab. At least one of the keys(Left, Center, Right, Gun) should be selected as UHF .
Tap Setting to open UHFOPTION window.
▪ Session: Setting is required by the system to multiple tag reading environment. On the same tag, the reading
time interval can be adjusted.
- S00: The same tag can be read consecutively.
- S01: The same tag can be read within about 2 seconds.
- S10: The same tag can be read between 2 and 5 seconds.
- S11: Inventory type until you change it, once reading the tag will not read again.
¶ NOTE. Typically, using the S00 or S01.
¶ NOTE. Duplicate reading time may vary depending on the tag.
▪ Tag Inventory type: Set Inventory type of the tag to read.
- A: Only Inventory type A tag is read.
- B: Only Inventory type B tag is read.
DOTH-300
Date
2013-07-15
APPLICATION
MANUAL
Rev
1.04
Page
1-31
- AB: All Inventory type A and B tag is read.
¶ NOTE. Typically, using the A or AB.
▪ Q: The option to use when reading multiple tags. Its range is between 1~32768.
¶ NOTE. Typically, using the ~32tags.
▪ Select Mask: Used to detect tag you already selected only. Select a tag from the list of previously read tag
and check.
▪ EPC: EPC data output is set.
: EPC data is output only.
: PC and EPC data is output.
¶ NOTE. EPC Mode is supported in the H300XX_KeyWedge_R0310.CAB version and above.
■ Data Format: Set the data output format. (HEX STRING, ASCII)
¶ NOTE. Data Format is supported in the H300XX_KeyWedge_R0312.CAB version and above.
▪ Tx Power control: Used to control the RF output power.
The following table indicates the effects of setting the width of the attenuation.
(unit. dBm)
Max
Att1
Att2
Att3
Att4
Att5
Att6
Att7
Att8
Att9
0
-3
-6
-9
-12
-15
-18
-21
-24
-27
▪ Firmware Ver: UHF firmware version will be displayed.
▪ Factory Reset: Resets all the settings of the UHF RFID.
¶ NOTE. Tx Power adjustment, you can adjust the tag read distance.
¶ NOTE. Tx Power higher, tag read distance is increased. But, Increases the battery consumption.
If you want to save changes in settings and exit, tap OK.
DOTH-300
Date
2013-07-15
APPLICATION
MANUAL
Rev
1.04
Page
1-32
Chapter 3: Camera
About Camera
You can take a picture, save as a file, explore the picture and record motion picture with an integrated camera.
Supported Model
OS
Type
DOTH-300S(Q)
Windows Embedded Handheld 6.5
3M pixel with Auto Focus
DOTH-300C(Q)
Taking a picture
On the Home screen, tap
icon in the system tray and tap Pictures & Videos
Tap Thumbnail icon or Camera in the system tray. Device goes to camera preview mode as follows.
To get the picture which you want to save as file,
press Enter. Camera takes a picture and captured
image appears.
To view the gallery, tap the Thumb… .
DOTH-300
Date
2013-07-15
APPLICATION
MANUAL
Rev
1.04
Page
1-33
Configuring the Camera Settings
You can configure camera settings for various needs and environment.
To configure the setting, tap the Menu in the preview mode. Popup menu for settings appears.
▪ Video : Switches to video mode. In video mode, Still appears and if tap, switches to still mode.
▪ Mode : Normal/Burst/Timer capture mode can be selected.
▪ Brightness : +3 ~ -3 ; Adjust light exposure level as you want.
Also can be adjusted by pressing
,
in the front keypad.
▪ Resolution : QCIF(144*176) ~ SXGA(1024*1280) ; Select capture size as you want.
▪ Zoom : x1~ x4
Also can be adjusted by pressing
,
in the front keypad.
▪ White Balance : Automatic/Sunny/Cloudy/Fluorescent/Incandescent
▪ Flash : On/Off ; Turn on or off flash when you take a picture.
▪ Full Screen : You can see entire screen for preview.
▪ Options…
-
filename prefix as you want. Then camera saves file like img01, img02 and etc.
-
save files to Main memory/Ram disk/Flash disk
-
image compression level as High/Normal/Low quality
DOTH-300
Date
2013-07-15
APPLICATION
MANUAL
Rev
1.04
Page
1-34
▪ Auto Focusing(AF) : Focuses image automatically.
Another way of Auto Focusing : Hold Enter until you can hear the beep sound which notifies of being
auto-focused. Then release the Enter and you will get image captured.
DOTH-300
Date
2013-07-15
APPLICATION
MANUAL
Rev
1.04
Page
1-35
Chapter 4: Bluetooth
About Bluetooth
You can pair with various Bluetooth accessories such as Bluetooth ear-set, Bluetooth Mobile printer and
Bluetooth –equipped PC and communicate with these.
Supported Model
OS
Type
DOTH-300S(Q)
Windows Embedded Handheld 6.5
BT2.1 with EDR
DOTH-300C(Q)
Bluetooth Searching & Pairing
On the Home screen, tap
> Settings > Bluetooth.
Move to Mode tab and turn on Bluetooth. Sometimes may be needed discoverable to other Bluetooth devices.
Now, move to Devices tab and tap Add for searching other Bluetooth accessories. Make sure that the
accessory you want to pair is turned on so that your device can discover it.
DOTH-300
Date
2013-07-15
APPLICATION
MANUAL
Rev
1.04
Page
1-36
Select the name of the device that you want to pair and follow the instructions on the screen. If the accessory
requires that you enter a PIN (often called a pairing code) to pair it with your device, make sure that both the
device and the accessory display the same PIN before tapping Done.
DOTH-300
Date
2013-07-15
APPLICATION
MANUAL
Rev
1.04
Page
1-37
Chapter 5: Wireless LAN (WLAN)
About WLAN
You can connect to an ISP or work network to browse the web and read e-mail.
Supported Model
OS
Type
DOTH-300S(Q)
Windows Embedded Handheld 6.5
802.11 (a)/b/g
DOTH-300C(Q)
Turn On/Off WLAN
indicates WLAN power-off state. Tap this icon to turn on WLAN.
▪ WLAN Insert ; Will turn on WLAN power and connect to assigned SSID automatically if it is configured
previously. If it is not configured yet, it will open WLAN configuration window.
indicates WLAN active state. Tap this icon to turn off WLAN.
▪ WLAN Remove ; Will close WLAN and Turn off WLAN power.
There are different configurations depending on WLAN adapter which is product option. For more information,
consult our salesperson.
You can find WLAN adapter information as follows.
Settings > Connections > Network Cards
You can find one of below WLAN Adapter from the adapter list.
DOTH-300
Date
2013-07-15
APPLICATION
MANUAL
Rev
1.04
Page
1-38
Summit 30AG Series WLAN Adapter
AR6000 WLAN Adapter SD
Case : Summit 30AG Series WLAN
After WLAN Insert, follow icon appears next to
.
: WLAN not connected. Double-tap this icon to edit WLAN configurations
: WLAN is associated with AP and show received signal strength as bar graph and color.
Double-tap this icon to view and configure WLAN adapter.
To Configure WLAN Adapter :
1. Tap Scan in Profile tab to search AP’s name (Service Set Identifier :SSID) available.
2. Select the AP from the scanned SSID list to connect and tap Configure.
Dialog box pops up to make a new profile of SSID and may be prompted to enter credentials or keys.
3. Tap Commit and move to Main tab. Set a newly configured SSID as an active profile.
Once active profile is assigned, it always try to connect to this SSID.
After configured, you can see the related information as follows.
DOTH-300
Date
2013-07-15
APPLICATION
MANUAL
Rev
1.04
Page
1-39
Case : AR6000 WLAN
After WLAN Insert, available SSID list pops up. Select the SSID which you want to connect.
DOTH-300
Date
2013-07-15
APPLICATION
MANUAL
Rev
1.04
Page
1-40
Selected SSID may request to enter keys. Follow steps as shown in figures and tap Finish to end configuration.
After configuration done, configured SSID status changed from Available to Connected and connected SSID
name appears next to “Wi-Fi:” at the Home screen which marked by yellow round.
DOTH-300
Date
2013-07-15
APPLICATION
MANUAL
Rev
1.04
Page
1-41
Chapter 6: Features Demo
About Features Demo
You can experience as following features;
- 1D or 2D scanner features demo
- HF RFID demo
- UHF RFID demo (DOTH-300C only)
Install given CAB file and move to each designated path and invoke application demo that you want.
Installing Features Demo
-Installing CAB file
H300WM_Demo_R01xx.CAB; ~My Device > Flash Disk > CAB > H300WM_Demo_R01xx.CAB
Generated folder and files; ~ My Device/ Flash Disk /Demo/~
Supported Model
OS
Type
DOTH-300S(Q)
Windows Embedded Handheld 6.5
Barcode.exe
Windows Embedded Handheld 6.5
Scanner2D.exe
DOTH-300S(Q)
Windows Embedded Handheld 6.5
TagReader.exe
DOTH-300C(Q)
Windows Embedded Handheld 6.5
rfidhost.exe
DOTH-300C(Q)
DOTH-300S(Q)
DOTH-300C(Q)
6.1 1D Scanner Demo
About 1D Scanner Demo
You can configure 1D scanner and read bar code .
Scanning a bar code
Barcode.exe;
> File Explorer > My Device > Flash Disk > Demo > Barcode.exe
DOTH-300
Date
2013-07-15
APPLICATION
MANUAL
Rev
1.04
Page
1-42
Fig. Barcode.exe Open screen
Tap Open button in the Barcode window to start 1D scanner application.
After a while, “Open Success! “ message will appear on the result window.
Tap Read button to read bard code.
Then, bar code type and its contents(data) will be shown on the screen.
Tap Clear button if you want to delete the results shown on the window.
Tap Stop button to pause reading when you are in continuous reading mode.
Tap Close button to close this application session. To read bar code, tap Open button again.
Configuring Scanner
DOTH-300
Date
2013-07-15
APPLICATION
MANUAL
Rev
1.04
Page
1-43
Tap Options button at Barcode window if you want to configure scanner reading options.
Option window appears.
Following configurable options are supported.
▪ SYMBOLOGIES; All the symbologies will be shown. You can unselect unnecessary symbology for your
application. And several reading options are available.
▪ SCAN OPTION ; You can set several conditions such as timeout, barcode length and so on.
Fig.
Options>SYMBOLOGIES
Fig.
Fig.
SYMBOLOGIES>EAN/UPC Options SYMBOLOGIES>Other Option
▪ EAN/UPC Options ; Data converting between UPC and EAN is available and you are asked whether to
return check digit for UPA and EAN type barcode.
▪ Other Options ; Regardig Code39, Interleave 2 of 5 and Codabar, you can set option for each barcode.
DOTH-300
Date
2013-07-15
APPLICATION
MANUAL
Rev
1.04
Page
1-44
▪ Save; Tap Save button to save your changes in Symblogy Selection.
▪ Cancel; Tap Cancel button to leave Symbology Selection without saving changes.
2) SCAN OPTION;
▪ Scanner is reversed ; Scan direction can be changed right to left or vice versa.
▪ Wide Scan Angle ; Apply for long barcode.
▪ High Filter Mode ; Useful for low resolution barcode
▪ Sound On ; Check this if you want to be notified of successful reading as beep sound.
▪ Vibrator On ; Check this if you want to be notified of successful reading as vibration.
▪ Time Out ; 0 to 99 Sec. Within defined time limit, scanner will retry scanning consecutively until it reads
successfully.
▪ Security Level ; 1 to 5. The larger this value, the more accurate result will be obtained.
▪ Min Barcode Length ; 2 to 15. You can set minimum barcode length.
▪ Save ; Tap Save button to save your changes in Scan Option.
▪ Cancel ; Tap Cancel button to leave Scan Option without saving changes.
DOTH-300
Date
2013-07-15
APPLICATION
MANUAL
Rev
1.04
Page
1-45
6.2 2D Scanner Demo
About 2D Scanner Demo
You can configure 2D scanner and read bar code .
Scanning a bar code
Scanner2D.exe;
> File Explorer > My Device > Flash Disk > Demo > Scanner2D.exe
Fig. Scanner2D demo window
1] Open; Tap Open to load application program. If program loaded successfully, “CONNECT Success”
message will appear in the result window.
2] Close; Tap Close to unload 2D Scanner application program.
3] Clear; Tap Clear to delete data acquired so far in the result window.
4] Stop; Tap Stop to halt scan operation if you want to stop at while reading.
5] Read; Tap Read to start scanning bar code image.
DOTH-300
Date
2013-07-15
APPLICATION
MANUAL
Rev
1.04
Page
1-46
Fig. Read results example
Configuring 2D Scanner
Tap Options at Scanner2D window to configure 2D Scanner option.
Fig. Options menu
▪ Default Symbology; 2D Scanner will scan a bar code according to pre-defined symbology setting.
▪ Disable All Symbology; 2D scanner will ignore all symbologies.
▪ Enable All Symbology; 2D Scanner will scan a bar code using all symbologies.
▪ Symbologies; You can set options such as length setting and symbol data format about each symbolgy.
DOTH-300
Date
2013-07-15
APPLICATION
MANUAL
Rev
1.04
Page
1-47
Fig. Symbologies menu screen
All supported bar code list will be shown. Move slide bar left or right and check or uncheck as you want.
▪ Symbologies > Length Settings
You can set minimum and maximum data length on each symbology.
▪ Symbologies > Symbol Setup
You can set some options on some symbologies. This option can be different on each symbology. If you select
symbology, available option will be shown active. Check options available as you need.
DOTH-300
Date
2013-07-15
APPLICATION
MANUAL
Rev
1.04
Page
1-48
▪ Options
Fig. Scanner2D > Options > Options
▪ Scan Interval; 0 to 9999 mSec. This parameter defines time interval that 2D scanner re-scan after previous
scan done.
▪ Scan Time Limit; 0 to 100 Sec. Within defined time limit, scanner will retry scanning consecutively until it
reads successfully.
▪ Sound On; Check this if you want to be notified of successful reading as beep sound.
▪ Vibrator On; Check this if you want to be notified of successful reading as vibration.
▪ Centering; Check this for scanner to read bar code image when aimer beam (displayed as cross mark at bar
code) centered at bar code.
▪ Light flashed on and off; If unchecked, light will be on always.
DOTH-300
Date
2013-07-15
APPLICATION
MANUAL
Rev
1.04
Page
1-49
▪ Aimer On; If unchecked, Aimer light will be off as scanning.
▪ Illumination On; If unchecked, illumination light will be off as scanning.
6.3 HF RFID Demo
About HF RFID Demo
HF RFID Demo detects 13.56MHz RFID tag based on ISO-14443-A/B, ISO-15693 and TagSys.
And it shows UID , tag protocol type and tag type.
Scanning HF RFID Tag
TagReader.exe;
> File Explorer > My Device > Flash Disk > Demo > TagReader.exe
UI buttons are activated or inactivated by tag type.
▪ OPEN; Loads HF RFID Driver
▪ CLOSE; Unloads HF RFID Driver
▪ SCAN; Scans tag of which type is selected in Type
▪ AUTO; Scans tag of which type is selected in Type by interval
▪ INVEN; Reads ICODE tag at Inventory mode
DOTH-300
Date
2013-07-15
APPLICATION
MANUAL
Rev
1.04
Page
1-50
▪ Write Data box; Data to write to EEPROM of tag
▪ READ; Reads selected EEPROM Block of tag
▪ WRITE; Writes Write Data to selected EEPROM Block of tag
▪ STATUS; Gets Lock status of selected EEPROM Block of ISO-15693 tag
▪ LOCK; Locks selected EEPROM Block of ISO-15693 tag
▪ EAS; Sets EAS information to ICODE tag
▪ Type; Sets tag type to access (ISO-14443A, ISO-14443B, ISO-15693, TagSys, All Type)
▪ Block; Assigns EEPROM Block to access
▪ Key Type; Selects Secret Key Type of MIFARE CLASSIC tag (A or B)
▪ NUM; Sets the number of blocks to read at Multi-read of ISO-15693 tag
▪ Key Data; Assigns Secret Key value of MIFARE CLASSIC tag (HEX, Default to
0xFFFFFFFFFFFF)
▪ Value; Sets value to make EEPROM Block of MIFARE CLASSIC tag as value block (DEC)
▪ +/-; Sets value to increase or decrease Value Block of MIFARE CLASSIC tag
▪ EAS; Sets EAS on ISO-15693 tag (Alarm, Lock, Reset, Set)
▪ LoadKey; Authenticates secret key(Key Type, Key Data) of MIFARE CLASSIC tag
▪ SET; Sets EEPROM Block of MIFARE CLASSIC tag to Value Block as defined in Value.
▪ GET; Gets value from Value Block of MIFARE CLASSIC tag (only when Value Block)
▪ +; Increase value of Value Block of MIFARE CLASSIC tag (only when Value Block)
▪ -; Decrease value of Value Block of MIFARE CLASSIC tag (only when Value Block)
▪ WRITE2; Writes Write Data to 2 blocks which starts from EEPROM Block of Tag-It tag
▪ LOCK2; Locks 2 blocks which starts from EEPROM Block of Tag-It tag
▪ READ mode; Selects option to read ISO-15693 tag (Inform, Multiple, Single)
▪ Write or Lock mode; Selects option to write/lock ISO-15693 tag (AFI, DSFID, EEPROM)
Scanning a tag
1. Set tag Type (ISO-14443A, ISO-14443-B, ISO-15693, TagSys, All Type)
2. Place terminal’s antenna part near at tag.
3. Tap SCAN or AUTO
4. If read successfully, you can find scan data on the result window.
DOTH-300
Date
2013-07-15
APPLICATION
MANUAL
Rev
1.04
Page
1-51
[ MIFARE CLASSIC tag ] To access the tag, it should be authenticated using Key Type, KeyData and
LoadKey after scanning the tag.
Reading a tag
1. Set Block.
2. Tap READ.
[ ISO-15693 tag ] Using NUM and READ (Multiple/Single/Inform), you can read Multi or Single Block and
read Information.
[ ICODE tag ] Through INVEN, you can read tag with Inventory mode.
[ Reading a value from MIFARE CLASSIC tag]
1. Set Value block.
2. Tap GET.
Writing a tag
1. Set Block.
2. Enter data for Write Data.
3.Tap WRITE.
[ Write Data ] MIFARE Ultralight : 4Byte, MIFARE Classic:16Byte, ISO-15693:4Byte
[ Tag-It tag ] You can write 2 consecutive blocks through WRITE2.
[ ISO-15693 tag ] You can select writing area using Write or Lock. ( Block is ignored in case of AFI or
DSFID )
[ Writing a value to MIFARE CLASSIC tag ]
1. Set Block.
2. Enter data for Value.
3. Tap SET
Locking ISO-15693 tag
1. Set Block that you want to lock.
2. Set Write or Lock area
3. Tap LOCK.
Get Lock status of ISO-15693 tag
DOTH-300
Date
2013-07-15
APPLICATION
MANUAL
Rev
1.04
Page
1-52
1. Set Block to get status from.
2. Tap STATUS to view lock status.
[Tag-It tag]
You can lock 2 consecutive block using LOCK2. ( Block is ignored in case of AFI or DSFID )
Set EAS on ICODE tag
1. Select EAS mode (Alarm/Lock/Reset/Set)
2. Tap EAS .
DOTH-300
Date
2013-07-15
APPLICATION
MANUAL
Rev
1.04
Page
1-53
6.4 UHF RFID Demo
About UHF RFID Demo
You can configure UHF reader module and read a UHF tag.
rfidhost.exe; ~ My Device > Flash Disk > Demo > DOTUHF.exe
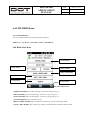
UHF RFID Main Menu
Normal Mode
Single Mode
Custom Mode
Read / Write Mode
Lock / Kill Mode
Config Mode
Exit program
Fig. Main Menu screen
[NORMAL MODE]: Tap to basic read tags. <Session 00, Target AB, Q=5>
[MULTI MODE]: Tap to read multi-tags. <Session 01, Target AB, Q=5>
[SINGLE MODE]: Tap to read single tag. <Session 00, Target AB, Q=0>
[CUSTOM MODE]: Tap to read tags for user.
[READ / WRITE MODE]: Tap to read/write tag memory by block in the memory bank..
[LOCK / KILL MODE]: Tap to make tag’s memory locked/unlocked or killed by memory bank.
DOTH-300
Date
2013-07-15
APPLICATION
MANUAL
Rev
1.04
Page
1-54
[CONFIG]: Tap to confirm and adjust settings.
If tap OK in the system tray, program will be closed and exits.
Through MENU, other functions such as tag read/write can be done.
Reading a RFID tag
Tag count
Start button
Tag ID list
Timeout
CLEAR button
Max power setting
EXIT button
Fig. INVENTORY screen
Normal/Multi/Single/Custom mode is similar to a form.
Tap INVENTORY to read tags. Once inventory activated and in the middle of executing, INVENTORY
button will be changed to STOP. If tap STOP, RFID reader will stop reading operation.
Tag ID list will show PC/EPC value and Co... means accumulated count.
If tap MASK to select the tag inventory and Tap CLEAR to clear the data you scanned.
If Timeout is zero, there is no timeout. Its unit is second.
Max power output is attenuated up to 9 dB.
Att9
Att8
Att7
Att6
Att5
Att4
Att3
Att2
Att1
-9dB
-8dB
-7dB
-6dB
-5dB
-4dB
-3dB
-2dB
-1dB
If tap EXIT in the system tray, program will be changed Main Menu.
Max
DOTH-300
Date
2013-07-15
APPLICATION
MANUAL
Rev
1.04
Page
1-55
READ/WRITE
READ/WRITE let RFID reader start access operation such as read, write. Access operation will be executed
according to parameters which you can set. Prior to run ACCESS, tap Continue and un-check Continue.
READ
Tap MODE > READ/WRITE and the select Read.
If tap ACCESS, program detects tag and then get data from assigned memory.
Continuous/Mask setting
Start button
Select read/write
Detected Tag ID
Tag Memory Bank
Access Password
Tag Memory start offset
Write data word count
Tag Memory word count
EXIT Button
Fig. Read/Write screen
ACCESS -WRITE
Tap MENU > ACCESS and then select Write.
DOTH-300
Date
2013-07-15
APPLICATION
MANUAL
Rev
1.04
Page
1-56
Fig. Read/Write screen
Except that you can set tag data, functions are same as those of READ.
LOCK/KILL
LOCK/KILL let RFID reader start access operation such as read, write. Access operation will be executed
according to parameters which you can set. Prior to run ACCESS, tap Continue and un-check Continue.
LOCK
Tap MENU > ACCESS and then select Lock.
Kill password
Access password
Select Memory Bank
Select Lock option
Fig. Lock/Kill screen
Input the access password(8 hexadecimal) in the access PWD box.
DOTH-300
Date
2013-07-15
APPLICATION
MANUAL
Rev
1.04
Page
1-57
Select the memory bank on the Bank, and then, choose Lock option.
To lock the tag that you want, select memory change option and tap ACCESS.
Lock option
[skip]: relevant memory still remain as lock.
[accessible]: Tag memory bank un-locked.
[secured accessible]: Tag memory bank locked
[perma. accessible]: Tag memory bank permanently un-locked.
[perma. inaccessible]: Tag memory bank permanently locked.
KILL
Tap MENU > LOCK/KILL and then select Kill.
If you enter kill password and run ACCESS, selected tag will be killed. Authorization message is needed for
preventing killing tag by user mistake. If tag is killed, the tag is permanently unrecoverable and you should pay
attention to kill execution.
DOTH-300
Date
2013-07-15
APPLICATION
MANUAL
Rev
1.04
Page
1-58
Authorization message
Fig. Lock/Kill screen
Input the kill password(8 hexadecimal) in the kill PWD box.
Tap ACCESS and then select Yes.
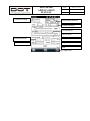
MENU > CONFIG
You can set parameters on tag query.
This parameters applies to both INVENTORY and ACCESS.
If Timeout is zero, there is no timeout. Its unit is second.
Max power output is attenuated up to 9 dB.
Att9
Att8
Att7
Att6
Att5
Att4
Att3
Att2
Att1
-9dB
-8dB
-7dB
-6dB
-5dB
-4dB
-3dB
-2dB
-1dB
Max
Tx duty is controllable from 20% to 80%.
(%)
20
41%
60%
80%
RF transmission time in a channel
40
70
120
160
Pause duration in a channel
160
100
80
40
Session setting to Query
Continuous setting
DOTH-300
Date
2013-07-15
APPLICATION
MANUAL
Rev
1.04
Page
1-59
Target setting to Query
Q setting to Query
Tx duty setting
Device name
Firmware Version
Max power
App. Version
Region
Exit
Fig. Config screen
DOTH-300
Date
2013-07-15
APPLICATION
MANUAL
Rev
1.04
Page
1-60
Chapter 7: Windows Mobile Dialer
About Windows Mobile Dialer
You can make phone calls, set up speed dials, keep track of calls, and send/receive text messages.
Also by integrated phone, you can connect to an ISP or work network to browse the web and read e-mail.
Supported Model
OS
Type
DOTH-300S(Q)
HSUPA (PH8)
Windows Embedded Handheld 6.5
DOTH-300C(Q)
EDGE (MC75i)
7.1 Making a Phone Call
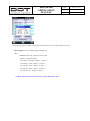
Using the Phone Keypad
1.
Start > Phone or press
2.
Enter the phone number on the dialer or keypad.
3.
Press
4.
Tap
or tap
on the dialer >
or press
.
to stop dialing or end the call.
When you start entering numbers or characters, phone automatically searches and sorts the contact entries in
the SIM card, in the Contacts, and in the phone numbers in call history. You can select the desired number or
contact from the matched list to dial.
To make a call or send a text message using smart dialing :
1.
Start entering the first few numbers or characters.
2.
Select the correct contact from the list and tap
to make a voice call. Or select and tap Call mobile,
Call Home or Call work if it is listed.
3.
To send a text message to the selected contact, tap Send text message.
DOTH-300
Date
2013-07-15
APPLICATION
MANUAL
Rev
1.04
Page
1-61
Using Contacts
To make a call from Contacts :
1.
Tap Contacts.
2.
From the contact list, tap and hold the contact name.
3.
Tap Call Work, Call Home or Call Mobile
Using Call History
To make a call from Call History :
1.
From the keypad, tap Call History.
2.
Tap the phone icon next to the number or tap
3.
Tap End on the dialer or press
to stop dialing or end the call.
Making a Speed Dial Call
1.
Start > Phone or tap Phone on the system tray.
2.
Tap and hold the speed dial location number assigned to a contact.
Or from the keypad, tap Speed Dial and tap speed dial location number in the list.
3.
Press End on the dialer or press
During a call
Muting a call
to stop dialing or end the call.
DOTH-300
Date
2013-07-15
APPLICATION
MANUAL
Rev
1.04
Page
1-62
You can mute the microphone when there is background noise or you are at somewhat noisy environment.
You can hear on the line but the person can not hear you.
Speaker On; While on dialing, tap Speaker On to hear loud sound through built-in speaker. It is convenient
for the situation that you does not need to speak privately or several people need to hear and talk with.
Swapping a Call
To move between two phone calls ;
Press
, enter the first phone number and tap Talk.
When the call connects, Hold icon is activated. Tap Hold to place the first call on hold.
Enter the second phone number to call and tap Talk.
Tap Swap to move from one call to the other call.
Tap End or press
to end the calls.
DOTH-300
Date
2013-07-15
APPLICATION
MANUAL
Rev
1.04
Page
1-63
Conference Call
Conference calling and the number of conference calls allowed may vary by service provider. Please check
with your service provider.
Press
, enter the first phone number and tap Talk.
When the call connects, tap Hold to place the first call on hold.
Enter the second phone number to call and tap Talk.
When the second call answered, tap Conference on the dialer. It will place the calls in conference mode.
Tap Hold the conference on hold.
Enter the other phone number that is added to conference and tap Talk.
When the call is answered, tap Conference . Again, all the calls will be placed in conference mode.
You can repeat above steps until the number of conference call allowed is full.
7.2 Answering a Call
When phone receives an incoming call, a dialog box appears or a ring tone sounds.
To answer an incoming call, tap
To ignore the incoming call, tap
.
.
To end the call, tap End on the dialer or press
.
DOTH-300
Date
2013-07-15
APPLICATION
MANUAL
Rev
1.04
Page
1-64
7.3 Missed Call
To view a missed call list tap the Missed Call on the Phone screen.
Or tap Call History >
>Filter > Missed
7.4 Using a Speed Dial
Adding a Speed Dial Entry
Tap Speed Dial in the Phone screen >
> New
Tap the desired contact name and number in the list.
Tap the up/down arrows to select an available location in the Location field.
DOTH-300
Date
2013-07-15
APPLICATION
MANUAL
Rev
1.04
Page
1-65
Tap OK to add to the speed dial list.
Adding a speed dial entry from Contacts
Tap Contacts and tap a desired contact name.
Tap
> Add to Speed Dial.
Tap the up/down arrows to select an available location in the Location field.
Tap OK to add to the speed dial list.
Editing and deleting a Speed Dial Entry
Tap Speed Dial.
Tap and hold the contact name and then select menu.
You can change the name, phone number, or location number.
To delete speed dial location number, tap Delete. In this case, it does not delete contact information.
Another way to delete speed dial location number ;
Tap Contacts > select the contact name >
> tap Edit Speed Dial >
> tap Yes > OK
DOTH-300
Date
2013-07-15
APPLICATION
MANUAL
Rev
1.04
Page
1-66
Chapter 8: KIOSK Manager
About
This chapter describes the use of the KIOSK of the mobile computer, DOTH-300.
By setting KIOSK, administrator can restrict the use of the mobile computer so that the user access to the
designated program only which is defined by administrator.
Installing the KIOSK
H300WM_KIOSK_Rxxxx.CAB;
My Device > Flash Disk > CAB > H300WM_KIOSK_Rxxxx.CAB
Supported Model
OS
Type
KIOSK.exe
DOTH-300S(Q)
Windows Embedded Handheld 6.5
KIOSK_MANAGER.exe
DOTH-300C(Q)
KIOSK.ini
To install KIOSK, tap H300WM_KIOSK_Rxxxx.CAB, then you are prompted to select path which you want
to locate KIOSK.
Select the path that you want and tap Install in the task bar.
KIOSK’s parent directory can be different as you selected.
DOTH-300
Date
2013-07-15
APPLICATION
MANUAL
Rev
1.04
Page
1-67
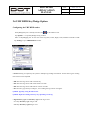
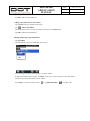
Starting KIOSK manager
To start KIOSK, tap KIOSK.exe in the KIOSK folder.
Option : is used when to change the setting or exit the KIOSK.
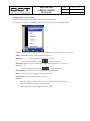
Configuring KIOSK setting
Tap Option and select Manager.
DOTH-300
Date
2013-07-15
APPLICATION
MANUAL
Rev
1.04
Page
1-68
You are prompted to enter password. Input a password and then tap Enter in the task bar.
Initial password is set to “0000”.
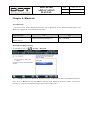
Modify / Add / Delete the contents of KIOSK
Move to Link tab
Modify : Select program to be changed and tap
Modify button.
Add : Tap Add to add a new icon.
Delete : Select program to be deleted and tap
Delete button.
-> Delete 클릭
DOTH-300
Date
2013-07-15
APPLICATION
MANUAL
Rev
1.04
Page
1-69
If tap Modify or Add, you are prompted to
enter program name and its path.
NAME : Program name to be selected
PATH : the path of the program to be changed
For example, enter NAME and PATH as shown in
the figure. And then tap Save to save the changes.
As seen in the following pictures, you can find
that “excel” which is assigned in the KIOSK setting
is generated in the KIOSK.
Changing the password
DOTH-300
Date
2013-07-15
APPLICATION
MANUAL
Rev
1.04
Page
1-70
Move to Option tab.
Input a password to be changed to New Password box and enter a password again to Confirm
box. And then tap Save in the task bar to save the change.
If you are to keep current password, let it left as is.
Changing the title of KIOSK
DOTH-300
Date
2013-07-15
APPLICATION
MANUAL
Rev
1.04
Page
1-71
Move to Option tab.
Input a new title to Title box. Tap Save to change
Adjusting the Transparency of background image
Move to Option tab. Tap and hold slide bar and move left or right as you want. Tap Save to save
the changes.
Exiting the KIOSK
DOTH-300
Date
2013-07-15
APPLICATION
MANUAL
Rev
1.04
Page
1-72
To exit the KIOSK, tap Exit in the Option menu.
Input a password and then tap Enter.
Initial password is “0000”
INI file structure
INI file has a configuration data that is explained in the earlier section and an information about KOSK
background image.
<KIOSK.ini>
[KIOSK TITLE]
< - To change the title.
“KIOSK”
[KIOSK PASSWORD]
0000
< - To change the password
(supported up to 8-digit)
[KIOSK IMAGE]
< - To change the background image of
“\Windows\TestImage.bmp”
KIOSK
DOTH-300
Date
2013-07-15
APPLICATION
MANUAL
Rev
1.04
Page
1-73
[LOCK PROGRAM]
< - To add a background image that
0.NAME:”KIOSK MANAGER”
KIOSK manager can not handle.
0.PATH:”\Windows\KIOSK_MANAGER.exe”
(A digit at head is priority level and
0~9 can be placed)
[UNLOCK PROGRAM]
0.NAME:”MS_WORD”
0.PATH:”\Windows\pword.exe”
1.NAME:”INTERNET EXPLORER”
1.PATH:”\Windows\iexplore.exe”
[END]
< - To add a background image that
KIOSK manager can handle.
(A digit at head is priority level and
0~9 can be placed)