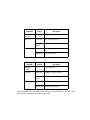
1
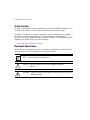
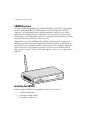
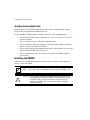
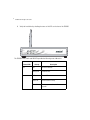
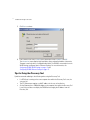
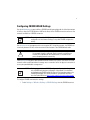
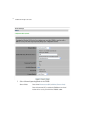
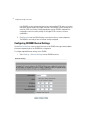
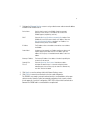
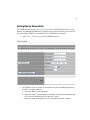
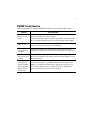
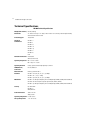
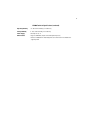
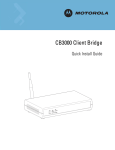
Copyright
Copyright (c) 2006 by Symbol Technologies, Inc. All rights reserved.
No part of this publication can be modified or adapted in any way, for any purposes without permission in writing from
Symbol. The material in this manual is subject to change without notice.
Symbol reserves the right to make changes to any product to improve reliability, function, or design.
No license is granted, either expressly or by implication, estoppel, or otherwise under any Symbol Technologies, Inc.,
intellectual property rights. An implied license only exists for equipment, circuits, and subsystems contained in Symbol
products.
Symbol, the Symbol logo are registered trademarks of Symbol Technologies, Inc.
IBM is a registered trademark of International Business Machine Corporation. Microsoft, Windows, and Windows NT are
registered trademarks of Microsoft Corporation. Novell and LAN Workplace are registered trademarks of Novell Inc. Toshiba
is a trademark of Toshiba Corporation. All other product names referred to in this guide might be trademarks or registered
trademarks of their respective companies and are hereby acknowledged.
Patents
This product is covered by one or more of the patents listed on the Website: www.symbol.com/patents
i
Contents
CB3000 Overview . . . . . . . . . . . . . . . . . . . . . . . . . . . . . . . . . . . . . . . . . . . . . . . . . . . . . 1
Installing the CB3000 . . . . . . . . . . . . . . . . . . . . . . . . . . . . . . . . . . . . . . . . . . . . . . . . . . 1
Prerequisite Requirements . . . . . . . . . . . . . . . . . . . . . . . . . . . . . . . . . . . . . . . . . . 2
Verifying the Package Contents . . . . . . . . . . . . . . . . . . . . . . . . . . . . . . . . . . . . . . 2
Verifying the Installation Site. . . . . . . . . . . . . . . . . . . . . . . . . . . . . . . . . . . . . . . . 3
Installing the CB3000 . . . . . . . . . . . . . . . . . . . . . . . . . . . . . . . . . . . . . . . . . . . . . . . . . . 3
Displaying the CB3000 User Interface . . . . . . . . . . . . . . . . . . . . . . . . . . . . . . . . . . . . . 7
Connecting to the User Interface Using a Web Browser. . . . . . . . . . . . . . . . . . . 7
Connecting to the User Interface Using the Discovery Tool . . . . . . . . . . . . . . . . 9
Tips for Using the Discovery Tool. . . . . . . . . . . . . . . . . . . . . . . . . . . . . . . . . . . . 11
Configuring CB3000 WLAN Settings . . . . . . . . . . . . . . . . . . . . . . . . . . . . . . . . . . . . . 12
Configuring CB3000 Ethernet Settings. . . . . . . . . . . . . . . . . . . . . . . . . . . . . . . . . . . . 15
Configuring CB3000 Security . . . . . . . . . . . . . . . . . . . . . . . . . . . . . . . . . . . . . . . . . . . 17
Configuring CB3000 Basic Encryption . . . . . . . . . . . . . . . . . . . . . . . . . . . . . . . . 17
Testing Device Connectivity . . . . . . . . . . . . . . . . . . . . . . . . . . . . . . . . . . . . . . . . . . . . 20
Where to Go From Here? . . . . . . . . . . . . . . . . . . . . . . . . . . . . . . . . . . . . . . . . . . . . . . 21
CB3000 Troubleshooting . . . . . . . . . . . . . . . . . . . . . . . . . . . . . . . . . . . . . . . . . . . . . . 22
Technical Specifications. . . . . . . . . . . . . . . . . . . . . . . . . . . . . . . . . . . . . . . . . . . . . . . 23
Customer Support. . . . . . . . . . . . . . . . . . . . . . . . . . . . . . . . . . . . . . . . . . . . . . . . . . . . 25
Regulatory Compliance. . . . . . . . . . . . . . . . . . . . . . . . . . . . . . . . . . . . . . . . . . . . . . . . 27
ii
CB3000 Client Bridge Install Guide
To the Installer
This guide is intended for the technician responsible for installing the CB3000 Client Bridge. It is also
assumed that the technician is familiar with Ethernet LAN-based networking concepts.
The purpose of this document is to provide specifications, features and guidelines for use during
default device installation and configuration. For advanced installation and configuration
instructions, refer to the CB3000 Client Bridge User Guide available on the CB3000 Product CDROM
shipped with the CB3000 and from the Symbol Website at:
http://www.symbol.com/services/manuals/
Document Conventions
Before working on any equipment, be aware of the hazards associated with its installation and use.
Also, become familiar with standard practices for preventing accidents.
NOTE
!
Indicate tips or special requirements
CAUTION Indicates conditions that can cause equipment damage or
data loss.
WARNING! Indicates a condition or procedure that could result in personal injury or
equipment damage.
1
CB3000 Client Bridge Install Guide
CB3000 Overview
The Symbol CB3000 Client Bridge (Part No. CB-3000-0010-WWR) is an IEEE 802.11a/b/g compliant
wireless LAN Ethernet adapter. The CB3000 operates in both 2.4GHz (GigaHertz) and 5.2GHz
frequencies. The CB3000 extends wireless networking capabilities to printers, scales, medical
equipment, manufacturing machinery, bar code readers, time clocks, point-of-sale and other data
collection devices. The CB3000 provides a reliable, cost-effective interface between devices utilizing
Ethernet port and wireless LAN switches and access points.
Multiple devices can share one CB3000 using a 10/100Base-T Ethernet hub. This feature saves
equipment costs when several devices require wireless Ethernet connectivity. The CB3000 has an
on-board TCP/IP stack to provide a reliable data transport mechanism. The CB3000 can support up to
16 client connections (or one POS device connection) to your server. Use the CB3000 to network
devices that do not have a PC Card slot or PCI card slot (printers, scanners, etc.) to support wireless
LAN cards.
Installing the CB3000
Before installing the CB3000, review the guidelines in the sections that follow:
•
•
•
Prerequisite Requirements
Verifying the Package Contents
Verifying the Installation Site.
2
Prerequisite Requirements
The following hardware and software resources are required to install and operate a CB3000 and use
the CB3000 Discovery Tool:
•
•
PC to be used during device configuration. The PC must have an RJ-45 Ethernet port and a
CDROM drive. The PC must be running the following:
• Windows 2000 or XP operating system
• A browser interface running Internet Explore 5.0 (or higher) or Netscape 6.0 (or higher)
An access point (for infrastructure mode operation) or a networked client (for Ad-hoc mode
peer-to-peer operation).
Verifying the Package Contents
Before installing the CB3000, verify the package contains the following:
•
•
•
•
•
•
•
!
CB3000 Installation Guide (this guide)
CB3000 Software and Documentation CDROM
CB3000 Client Bridge (Part No. CB-3000-0010-WWR)
Ethernet cable
Power adapter with 4 localized plugs
Detachable omni-directional 802.11a/b/g antenna.
Mounting hardware.
CAUTION Only qualified and approved antennas may be used with the CB3000.
NOTE
Contact the Symbol Support Center to report any missing or improperly
functioning components.
3
CB3000 Client Bridge Install Guide
Verifying the Installation Site
Mounting options for the CB3000 include table top, wall or under a counter mounting using the
keyholes and mounting hardware provided with the unit.
Before installing the CB3000, verify the installation site meets the following requirements:
•
•
•
•
•
The Environmental Specifications as defined in the “Technical Specifications on page -23”
section of this guide.
The site should have access to a properly rated power source.
The site should be dry and within 100 meters of the device(s) (hub, telephone, computers,
point-of-sale) to be connected to the CB3000.
The site should not be near other equipment (transformers, fluorescent lights etc.) that could
interfere with the CB3000’s radio transmissions.
The site should be within 250 ft. of the wireless access point the CB3000 is targeting
for association.
Installing the CB3000
Cable and test the CB3000 before moving it to its table top, wall or under a counter operational
location. To cable the CB3000:
NOTE
!
A cross-over cable is not required to directly connect the CB3000 to a PC.
CAUTION Do not connect a CB3000 (set to Infrastructure mode) directly to the
LAN supporting the WLAN the CB3000 is using (for example, through
a wall port). Such a connection could cause a transmission loop
between the CB3000 and its associated access point, disrupting
network connectivity.
4
1. Screw the antenna clockwise onto the antenna connector on the rear of the CB3000.
NOTE
The back of the CB3000 also contains a Kensington lock mechanism for
attaching the CB3000 to an immovable objects in order to prevent theft.
2. Attach one end of an Ethernet cable to a RJ-45 jack on a computer or hub.
3. Connect the other end of the Ethernet cable to the LAN connector on the rear of
the CB3000.
4. Plug the power adapter into the DC-IN connector on the rear of the CB3000.
!
CAUTION Only use the power adapter supplied by Symbol with the CB3000.
Using an incorrect power adapter could damage the CB3000 and void
the product warranty.
5. Connect the plug end of the power adapter into a power outlet.
The power adapter automatically selects and adjusts the power for the appropriate voltage
for worldwide use.
NOTE
The CB3000 can use either a crossover or straight through cable.
5
CB3000 Client Bridge Install Guide
6. Verify the installation by checking the status of the LEDs on the front of the CB3000.
The CB3000 Power, Radio and LAN LEDs provide the following status indications:.
Power LEDs
Error
Status
Activity
Description
OFF
No errors detected
Orange ON
Hardware error
OFF
Power OFF
Green ON
Power ON/Device ready
Green Blinking
Booting, system self-test or firmware
upgrade
6
Radio LEDs
Activity
Description
802.11a
802.11b/g
OFF
Connectivity disabled
802.11a
Orange ON
802.11a radio connectivity
Orange
Blinking
802.11 a radio traffic
Green ON
802.11b/g radio connectivity
Green Blinking
802.11b/g radio traffic
802.11b/g
LAN LEDs
Activity
Description
100 Mbps
10 Mbps
OFF
No Ethernet activity
100 Mbps
Orange ON
100 Mbps connection over LAN
Orange
Blinking
100 Mbps transmit/receive
Green ON
10 Mbps connection over LAN
Green Blinking
10 Mbps transmit/receive
10 Mbps
When the CB3000’s LED functionality has been verified, launch the CB3000’s user interface to begin
the basic device configuration outlined within this guide.
7
CB3000 Client Bridge Install Guide
Displaying the CB3000 User Interface
Connect to the CB3000 by entering the CB3000’s IP address within a Web browser or use the CB3000
Discovery Tool to locate the CB3000 within the network and launch the user interface.
Connecting to the User Interface Using a Web Browser
The Symbol CB3000 contains a built-in browser interface for system configuration and remote
management using a standard Web browser such as Microsoft Internet Explorer or Netscape
Navigator. The browser interface also allows for system monitoring of the CB3000.
NOTE
Web management of the CB3000 requires either Microsoft Internet
Explorer 5.0 or later or Netscape Navigator 6.0 or later.
To launch the CB3000 Web interface from a browser:
1. If you know the DHCP assigned IP address for the CB3000, enter it in the browser. If no DHCP
services are available, enter the default IP address of https://10.10.1.1. within your browser.
A user name and password screen displays to access the address entered within the
browser.
2. Enter a default user name of admin and a default password of symbol. Click OK.
8
The first time you access the CB3000, the applet recommends changing the password.
The Information screen displays high level device name and network address information.
The page is read-only with no configurable data fields. The CB3000 is now ready to have its
WLAN settings configured, then its Ethernet Settings. For more information, see
9
CB3000 Client Bridge Install Guide
Configuring CB3000 WLAN Settings on page -12 and
Configuring CB3000 Ethernet Settings on page -15.
Connecting to the User Interface Using the Discovery Tool
Use the Symbol Discovery Tool to locate and identify CB3000s. In addition, you can double-click a
located device within the Discovery Tool window to launch the Web interface. After power-up, the
CB3000 sends a request for an IP address or broadcasts a DHCP request. If the CB3000 does not
receive a reply within 20 seconds, it uses a default IP address of 10.10.1.1.
The Discovery Tool is available on the CB3000 product CDROM and the Symbol Support Website.
To launch and use the CB3000 Discovery Tool:
1. Insert the CB3000 Software and Documentation CDROM or download and launch the
CB3000 Software and Documentation image from the Symbol Web Site. Go to
http://www.symbol.com/services/downloads to download the image.
2. Accept the terms Symbol Technologies Inc. End User License Agreement once the CB3000
flash menu displays.
3. Select the CB3000 Discovery Tool menu item.
10
The CB3000 Discovery Tool screen displays and begins a device search for CB3000’s. The
Scan button can also be pressed to initiate a device search, but a valid IP address is
required on your PC’s Ethernet port for the Scan to function properly. If running a VPN client
on the scanning computer, ensure it is disabled or the Scan function may not work.
4. Double-click on one of the CB3000’s listed within the Discovery Tool window.
If the IP address of the CB3000 is not in the same subnet as your PC’s IP address, you must
either change the CB3000’s IP address to be within the PC’s subnet or change your PC to
match the CB3000’s subnet.
A Security Alert screen displays stating issues could exist with the CB3000’s current
security certificate.
11
CB3000 Client Bridge Install Guide
5. Click Yes to continue.
6. Enter a default user name of admin and a default password of symbol. Click OK.
The Information screen displays high level device name and network address information.
The page is read-only with no configurable data fields. The CB3000 is now ready to have its
WLAN settings configured, then its Ethernet Settings. For more information, see
Configuring CB3000 WLAN Settings on page -12 and
Configuring CB3000 Ethernet Settings on page -15.
Tips for Using the Discovery Tool
Symbol recommends adhering to the following when using the Discovery Tool:
•
•
•
If a VPN client is running on the same computer from which the Discovery Tool is run, the
scan may fail.
The PC’s Ethernet port requires a valid IP address for the scan to be effective.
Set the Ethernet port to 100Mb/full duplex on the computer (from which the Discovery Tool
is run) if the scan does not display the CB3000 after changing the IP address from the
Discovery Tool.
12
Configuring CB3000 WLAN Settings
Use the WLAN Settings screen to define a CB3000 network (operating) mode of either Infrastructure
or Ad-hoc, select the ESSID (Wireless LAN Service Area) for the CB3000 connection and assess the
networks available for a CB3000 connection.
NOTE
The configuration of the WLAN Settings should be performed before the
configuration of the Ethernet Settings or any other CB3000 configuration
activity.
Use Infrastructure to interoperate with an access point (AP). Using Infrastructure, the CB3000 can
roam freely between AP cells within the network. Infrastructure is the CB3000 default mode.
!
CAUTION Do not connect a CB3000 set to Infrastructure mode directly to a LAN
(for example, through a wall port). Such a connection could cause a
transmission loop between the CB3000 and its associated access
point, disrupting network connectivity.
Select Ad-hoc to form peer-to-peer CB3000 networks without access points. Use Ad-hoc to create
networks within established network coverage areas or networks free of the physical constraints of
access point provided radio coverage areas.
NOTE
For the scope of the basic CB3000 configuration discussed in this guide,
only a CB3000 Infrastructure configuration is described. For information
on configuring the CB3000 for Ad-hoc (Peer-to-Peer) operation, refer to the
CB3000 Client Bridge User Guide available on your product CDROM or
from the Symbol Web site (http://www.symbol.com/services/downloads).
To configure CB3000 communication settings:
1. Select Settings -> Wireless Settings -> WLAN Settings from the CB3000 menu tree.
13
CB3000 Client Bridge Install Guide
2. Select a Network (operating) Mode for the CB3000.
Network Mode
Select either Infrastructure (AP) or Ad-hoc (Peer-to-Peer).
Select Infrastructure (AP), to enable the CB3000 to transmit and
receive with an access point within the CB3000’s subnet.
14
3. Select an ESSID (network) for CB3000 connection.
ESSID (Wireless LAN The following options are available for CB3000 network
Service Area)
connection:
Select Attach to any ESSID automatically to enable the CB3000
to randomly select a target ESSID for connection.
Select the Specify the ESSID checkbox to manually enter the
name of the target ESSID or use the drop-down menu to select the
ESSID. The list of ESSIDs available to the CB3000 from the
drop-down menu does not automatically refresh as devices come
and go from range of the CB3000.
Frequency Band
Frequency Band options include "a/b/g", "a", or "b/g". Ensure
the frequency band selected is consistent with the WLAN
network. By restricting the Frequency Band on the CB3000
you can reduce the time the CB3000 takes to search for
available APs.
Available Networks
Click View to display the Available Networks screen. Use this
screen to view a list of available ESSIDs (networks) available to the
CB3000 for connection. Select the checkbox to the left of the target
ESSID and click the Connect button to associate with that ESSID
(Infrastructure mode) or networked peer (Ad-hoc mode). Unlike the
networks displayed within the drop-down menu, the networks
within the Available Networks screen can be updated by clicking
the Refresh button. Refer to the Information screen to verify the
connection to the target ESSID.
Scan Mode
Define the Scan Mode as either Active Scan or Passive Scan.
Active Scan mode takes less time when searching for APs by
sending probe requests. Passive Scan takes more time during
a scan, but only listens for AP beacons.
Country Region
Select the appropriate operating region/country.
NOTE
Each country has its own regulatory restrictions concerning
electromagnetic emissions and the maximum RF signal strength that can
be transmitted. Consequently, selecting a country different from the
country you are actually operating the CB3000 in results in the illegal
operation of the CB3000.
4. Click Apply to implement the updated settings.
15
CB3000 Client Bridge Install Guide
If the CB3000’s security settings match the security settings of the ESSID, device association
takes place without having to click Apply. However, if the CB3000’s security settings do not
match the ESSID, the Security Settings page displays and the CB3000 is required to be
configured to match the security settings of the target ESSID to ensure association
compatibility.
5. Click Cancel to revert the WLAN Settings screen back to the last saved configuration.
The CB3000 is now ready to have its Ethernet settings configured.
Configuring CB3000 Ethernet Settings
Use the Ethernet Settings screen to specify the name of the CB3000 and assign network address
information required as part of the CB3000 basic configuration:
To configure required Ethernet settings for the CB3000:
1. Select Settings -> Ethernet Settings from the CB3000 menu tree.
16
2. Configure the Ethernet Settings screen to assign a device name and set network address
information the CB3000 uses to.
Device Name
Specify a device name for the CB3000. Symbol recommends
selecting a name serving as a reminder of the user base the
CB3000 supports (engineering, retail etc.).
DHCP
Select the Obtain an IP address automatically checkbox if the
CB3000 will use a DHCP server to obtain an IP address. Select the
Use the following IP Address checkbox if an IP address is to
entered manually (static) for the CB3000.
IP Address
The IP Address refers to the address other devices use to address
the CB3000.
Subnet Mask
A subnet mask accompanies an IP address and the two values work
together. Applying the subnet mask to an IP address splits the
address into two parts, an "extended network address" and a host
address.
Gateway IP Address
The Gateway IP Address is the address of the device providing the
connection to the network.
Spanning Tree
Protocol
Select the Spanning Tree Protocol checkbox to enable a
technique that detects loops in a network and logically blocks
redundant paths, thus ensuring only one route exists between any
two LANs. Default is disabled.
3. Click Apply to save the settings within the Ethernet Settings screen.
4. Click Cancel to revert the screen back to the last saved configuration.
The CB3000 is now ready to transmit and receive with a connected device in the open
without security. However, Symbol recommends configuring a basic security scheme
(for the purposes of our basic configuration, WEP 128) to ensure initial communication
between the CB3000 and its connected device are protected.
17
CB3000 Client Bridge Install Guide
Configuring CB3000 Security
NOTE
For testing basic connectivity as described in this guide, there is no reason
to enable Secure 802.1x authentication (an advanced authentication
scheme). For details on configuring Secure 802.1x authentication, refer to
the CB3000 User Guide available on the CB3000 product CDROM or go to
the Symbol Web site (http://www.symbol.com/services/downloads) and
download the guide.
Configuring CB3000 Basic Encryption
Encryption applies a specific algorithm to data in order to alter its appearance and prevent
unauthorized decoding. Decryption applies the algorithm in reverse to restore the data to its original
form. Sender and receiver employ the same encryption/decryption method.
Wired Equivalent Privacy (WEP) is a security protocol specified in the IEEE Wireless Fidelity (Wi-Fi)
standard, 802.11b. WEP is designed to provide a WLAN with a level of security and privacy
comparable to that of a wired LAN. WEP could be all that a small-business user needs for the simple
encryption of wireless data.
For the basic configuration and device connection described in this guide, WEP 128 encryption will
be configured for the CB3000. WEP 128 ensures initial communications with the CB3000 are secure.
To configure WEP 128 for the CB3000:
1. Select Settings -> Wireless Settings - > Security from the CB3000 menu tree.
2. Select WEP From the Security Mode drop-down menu.
18
3. Use the Authentication Type drop-down menu to specify whether a shared key is
implemented between the CB3000 and its associated device or no key is used
(Open System).
If a shared key is used, both the CB3000 and its connected device are required to use the
same single key (as selected from 1 to 4) to interoperate. A shared key increases the level
of security within the network as opposed sending information without one (Open System).
19
CB3000 Client Bridge Install Guide
4. Use the Default Transmit Key checkboxes to specify which one key is used to transmit
WEP algorithm information between the CB3000 and its associated device.
NOTE
The CB3000 and its associated device are required to use the same key
and key length to interoperate.
5. Select 128-bits from the WEP Encryption drop down menu.
For WEP 128 (104-bit key), the keys are 26 hexadecimal characters in length.
6. Use the Passphrase algorithm checkboxes to specify whether the optional passphrase is
a Symbol Passkey or a Generic Passphrase. PassKeys and pass phrases provides an easy to
remember way of entering WEP key data without having to manually enter the keys each
time WEP keys are created.
Select Symbol PassKey to use a Symbol proprietary algorithm the CB3000 uses exclusively
with other Symbol clients. The CB3000 decodes the PassKey into a set of 4 WEP keys using
MD5 algorithms. The WEP keys display as alphanumeric text in the key fields until saved or
the user navigates away from the WEP screen.
Select Generic Passphrase if the CB3000 is sharing WEP keys with non-Symbol clients.
The CB3000 decodes the passphrase into a set of 4 WEP keys, with the length depending on
the 64 or 128 bit key length. The WEP keys display as alphanumeric text in the key fields
until saved or the user navigates away from the WEP screen.
7. Specify a 4 to 32 character Passphrase and click the Generate Keys button.
The passphase is helpful for entering WEP keys without having the remember all of the
characters comprising the key. The passphase can be any alphanumeric string. The CB3000,
other proprietary routers and Symbol devices use the algorithm to convert an ASCII string to
the same hexadecimal number. This conversion is not required for a wireless connection.
Wireless devices without Symbol adapters need to use WEP keys manually configured as
hexadecimal numbers.
8. Click Apply to save the settings defined for WEP 128.
9. Click Cancel to revert the screen back to the last saved configuration.
With a basic CB3000 device configuration set and WEP 128 defined for the CB3000 and its
associated network device, the CB3000 is now ready to test for device connectivity.
20
Testing Device Connectivity
The CB3000 Web interface has a Troubleshooting screen with an ICMP Ping Test function. For the
purposes of completing the CB3000 basic configuration and connection verification, this screen will
be used to ping the CB3000’s associated device. To test CB3000 device connectivity:
1. Select Tools -> Troubleshooting from the CB3000 menu tree.
2. The CB3000 can verify its link with an associated access point by sending ping packets to
the device. To conduct a ping test:
a. Enter the IP address of the target device.
b. Specify the length of each data packet transmitted to the target device during the ping
test. This value is defined in bytes (The default is 32 bytes).
c. Specify the number of ping packets to transmit (Symbol recommends 4 packets).
21
CB3000 Client Bridge Install Guide
d. Click the ICMP Ping Test button. Results of the ping test displays on the Status line. If
the Status line displays Success, the CB3000 can interoperate with its associated
access point. If not connected, go to CB3000 Troubleshooting on page -22.
Where to Go From Here?
Once basic connectivity has been verified, the CB3000 can be fully configured to meet the needs of
the network and the users it supports. The sections referenced below are located within the CB3000
Client Bridge User Guide available on your product CDROM or from the Symbol Web site
(http://www.symbol.com/services/downloads).
• Refer to Chapter 4 for information on configuring CB3000 network address information,
and operational mode information.
• Refer to Chapter 5 for information on configuring encryption (WEP, WPA1 and WPA2) and
authentication (Secure 802.1x) security schemes.
• Refer to Chapter 6 for information on accessing statistics helpful in monitoring the
connection between the CB3000 and its connected devices.
22
CB3000 Troubleshooting
Symbol recommends the following troubleshooting tips before contacting the Support Center:
Problem
Corrective Action
PWR LED is Off or
Orange
Verify only the supplied power adapter is used and is plugged into a power supply
appropriately rated for the country of operation.
Unplug the power adapter and re-insert it back into the power outlet. If the problem
persists, a hardware problem likely exists. Contact the Symbol Customer Support.
LAN LED is Off
Verify the cable connection is secure between the CB3000 and the PC’s LAN port.
Ensure the computer network card is functioning properly.
Configuration updates
lost or device hangs
after reboot.
Wait at least 10 seconds after changing and saving the configuration before
rebooting. If the CB3000 is hung, reset the device and implement your changes again.
CB3000 user interface
hangs and cannot be
navigated
Press Reset button on back of CB3000 unit for less than 10 seconds to reset the
device. Press Reset button for 10 seconds or more to restore the CB3000 to its factory
default configuration.
Discovery Tool Scan
function does not
display the CB3000
after changing the IP
address (using the
Discovery Tool).
Ensure the Ethernet port is set to 100Mb/full duplex on the PC/laptop. A valid IP
address is also needed on the Ethernet port in order for the Discovery Tool Scan
function to work properly. Ensure the computer’s VPN client is disabled before
performing a Scan or the Scan will not function properly.
23
CB3000 Client Bridge Install Guide
Technical Specifications
CB3000 Technical Specifications
Weight (with antenna) 0.65 lbs (0.30 kg)
Dimensions
7 in. wide x 4 in. deep x 1.2 in. high (17.78 cm. wide x 10.16 cm. deep x 3.05 cm high) excluding
external antenna and foot stand
Protocol Support
TCP/IP, DHCP
Standards
Conformance
IEEE 802.11
IEEE 802.3
IEEE 802.1d
IEEE 802.11a
IEEE 802.11g
IEEE 802.1x
IEEE 802.3u
HTTP
Network Architectures Infrastructure
Ad-Hoc (Peer-to-Peer)
Operating Frequencies 802.11a: 4.9 – 5.9 GHz
802.11b/g: 2.4 – 2.5 GHz
Operating Channels
Country specific and bound by regulatory restrictions.
LAN (Ethernet)
Connection
Ethernet Frame
One 10/100 Base-T
Data Rate
IEEE 802.11a: 54, 48, 36, 24, 18, 12, 9, 6 Mbps
IEEE 802.11b: 11, 5.5, 2, 1 Mbps
IEEE 802.11g: 54, 48, 36, 24, 18, 12, 9, 6 Mbps
Modulation
IEEE 802.11a: Orthogonal Frequency Division Multiplexing (64QAM, 16QAM, QPSK and BPSK)
IEEE 802.11b: Direct Sequence Spread Spectrum (CCK, DQPSK, DBPSK)
IEEE 802.11g: Orthogonal Frequency Division Multiplexing (64QAM, 16QAM, QPSK and BPSK)
Security
64/128-Bit WEP
IEEE 802.1x
WPA/WPA-PSK
Peak Antenna Gain
3 dBi at 2.4 GHz
4 dBi at 5 GHz
Ethernet_II and IEEE 802.3
Operating Temperature 0 – 50° Celsius
Storage Temperature
- 20 – 70° Celsius
24
CB3000 Technical Specifications (continued)
Operating Humidity
10 – 90% relative humidity, non-condensing
Storage Humidity
5 – 85% relative humidity, non-condensing
Power Supply
Other Features
Switching DC 12V, 1A
• Supports SNMP MIBs (Simple network management protocol)
• Features: Embedded HTTP Web management server that works with a Web browser
supporting HTML
25
CB3000 Client Bridge Install Guide
Customer Support
Symbol Technologies provides its customers with prompt and accurate customer support. Use the
Symbol Support Center as the primary contact for any technical problem, question or support issue
involving Symbol products. If the Symbol Customer Support specialists cannot solve a problem,
access to all technical disciplines within Symbol becomes available for further assistance and
support. Symbol Customer Support responds to calls by email, telephone or fax within the time limits
set forth in individual contractual agreements.
When contacting Symbol Customer Support, please provide the following information:
•
•
•
Serial number of unit
Model number or product name
Software type and version number
North American Contacts
Inside North America, contact Symbol at:
For sales and product information:
For product support and service:
Symbol Technologies, Inc.
One Symbol Plaza
Holtsville, New York 11742-1300
Telephone: 1-631-738-2400/1-800-SCAN 234
Fax: 1-631-738-5990
Symbol Global Support Center:
International Contacts
Outside North America, contact Symbol at:
Symbol Customer Contact Centre
44 800 328 2424 (toll free UK)
042 053 333 6123 (Brno)
+ “in country” local numbers in EMEA
Telephone: 1-800-653-5350
+1-631-738-6213 (Outside North America)
Fax: 1-631-738-5410
Email: [email protected]
26
For other sales offices use the Symbol Services Web site for contact information
http://www.symbol.com/services/howto/howto_contact_us.html
Web Support Sites
Comprehensive On-line support is available at the MySymbolCare Web site. Registration is free and
a variety of services can be linked through this web-portal.
MySymbolCare
http://www.symbol.com/services/msc
Symbol Services Homepage
http://www.symbol.com/services
Symbol Software Updates
http://www.symbol.com/services/downloads
Symbol Developer Program Web site
http://devzone.symbol.com
Additional Information
Obtain additional information by contacting Symbol at:
1-800-722-6234 (Inside North America)
+1-631-738-5200 (Inside/Outside North America)
http://www.symbol.com/
27
CB3000 Client Bridge Install Guide
Regulatory Compliance
All Symbol devices are designed to be compliant with rules and regulations in locations they are sold and will be labelled
as required.
Local language translations are available at the following Website: http://www.symbol.com/services/manuals/.
Any changes or modifications to Symbol Technologies equipment, not expressly approved by Symbol Technologies, could
void the user's authority to operate the equipment.
Symbol’s devices are supplied through controlled distribution channels and are professionally installed.
Use only the supplied or an approved replacement antenna. Unauthorized antennas, modifications, or attachments could
cause damage and may violate regulations.
Country Approvals
Regulatory markings are applied to the device signifying approval for use in the following countries: United States, Canada,
Australia, Japan and Europe 1, 2.
Please refer to the Symbol Declaration of Conformity (DoC) for details of other country markings. This is available at
http://www2.symbol.com/doc/.
Note 1: For 2.4GHz Products: Europe includes, Austria, Belgium, Czech Republic, Cyprus, Denmark, Estonia, Finland, France,
Germany, Greece, Hungary, Iceland, Ireland, Italy, Latvia, Liechtenstein, Lithuania, Luxembourg, Malta, Netherlands,
Norway, Poland, Portugal, Slovak Republic, Slovenia, Spain, Sweden, Switzerland and the United Kingdom.
Note 2: The use of 5GHz RLAN's has varying restrictions of use; please refer to the Symbol Declaration of Conformity (DoC)
for details.
Operation of the device without regulatory approval is illegal.
Safety in Hospitals
Wireless devices transmit radio frequency energy and may affect medical electrical equipment. When installed
adjacent to other equipment, it is advised to verify that the adjacent equipment is not adversely affected.
FCC / EU RF Exposure Guidelines
Safety Information
The device complies with Internationally recognized standards covering Specific Absorption Rate (SAR) related to human
exposure to electromagnetic fields from radio devices.
28
Reducing RF Exposure—Use Properly
It is advisable to use the device only in the normal operating position.
To comply with FCC RF exposure requirements, antennas that are mounted externally at remote locations or operating near
users at stand-alone desktop of similar configurations must operate with a minimum separation distance of 20 cm from all
persons
Power Supply
Use only a Symbol-approved power supply (pt # 0993036903) output rated 12 Vdc and minimum 1 A. The power supply is
certified to EN60950 with SELV outputs. Use of alternative power supply will invalidate any approval given to this device
and may be dangerous.
Wireless Devices
Ad-Hoc Operation
Ad-Hoc operation is limited to Channels 36-48 (5150-5250 MHz). Use of this band is restricted to Indoor Use Only; any other
use will make the operation of this device illegal.
Restrictions - FCC & IC
Use of the 5150-5250 MHz band is restricted to Indoor Use Only; any other use will make the operation of this device illegal.
Symbol declares that FCC ID: H9PCB3000 is limited to Channel 1 - Channel 11 by firmware.
Radio Frequency Interference Requirements—FCC
This equipment has been tested and found to comply with the limits for a Class B digital device,
pursuant to Part 15 of the FCC rules. These limits are designed to provide reasonable protection
against harmful interference in a residential installation. This equipment generates, uses and can
radiate radio frequency energy and, if not installed and used in accordance with the instructions, may
cause harmful interference to radio communications. However there is no guarantee that interference will not occur in a
particular installation. If this equipment does cause harmful interference to radio or television reception, which can be
determined by turning the equipment off and on, the user is encouraged to try to correct the interference by one or more of
the following measures:
•
•
•
•
Reorient or relocate the receiving antenna
Increase the separation between the equipment and receiver
Connect the equipment into an outlet on a circuit different from that to which the receiver is connected
Consult the dealer or an experienced radio/TV technician for help.
29
CB3000 Client Bridge Install Guide
Radio Transmitters (Part 15)
This device complies with Part 15 of the FCC Rules. Operation is subject to the following two conditions: (1) this device may
not cause harmful interference, and (2) this device must accept any interference received, including interference that may
cause undesired operation.
Radio Frequency Interference Requirements – Canada
This Class B digital apparatus complies with Canadian ICES-003.
Cet appareil numérique de la classe B est conforme à la norme NMB-003 du Canada.
Radio Transmitters
This device complies with RSS 210 of Industry & Science Canada. Operation is subject to the following two conditions: (1)
this device may not cause harmful interference and (2) this device must accept any interference received, including
interference that may cause undesired operation.
Label Marking: The Term "IC:" before the radio certification signifies that Industry Canada technical specifications were met.
CE Marking and European Economic Area (EEA)
The use of 2.4GHz RLAN’s, for use through the EEA, have the following restrictions:
• Maximum radiated transmit power of 100 mW EIRP in the frequency range 2.400 -2.4835 GHz.
• France outside usage, the equipment is restricted to 2.400-2.45 GHz frequency range.
• Belgium outside usage, the equipment is restricted to 2.460-2.4835 GHz frequency range.
• Italy requires a user license for outside usage.
The use of 5GHz RLAN’s has varying restrictions for use within the EEA; please refer to the Symbol Declaration of Conformity
(DoC) for details at http://www2.symbol.com/doc/.
Statement of Compliance
Symbol Technologies, Inc., hereby, declares that this device is in compliance with the essential requirements and other
relevant provisions of Directive 1999/5/EC. A Declaration of Conformity may be obtained from
http://www2.symbol.com/doc/.
Other Countries
Mexico - Restrict Frequency Range to: 2.450 - 2.4835 GHz.
Sri Lanka - Restrict Frequency Range to: 2.400 – 2.430 GHz.
Symbol Technologies, Inc.
One Symbol Plaza
Holtsville, New York 11742-1300
http://www.symbol.com
72E-86491-01 Rev A July 2006