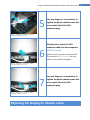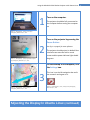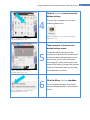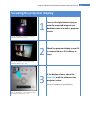
1
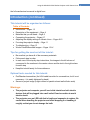
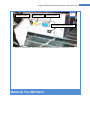
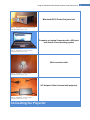
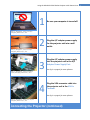
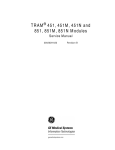
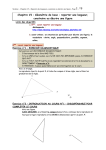
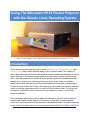
Using The Mitsubishi PK10 Pocket Projector with the Ubuntu Linux Operating System Fillman, S. (Photographer). (2012). Digital LED Projector [Photograph], Retrieved July 1, 2012. Introduction These instructions will teach you how to use a Mitsubishi PK10 Pocket Projector with Ubuntu Linux, using a video graphics array (VGA) connector cable. The majority of Linux users have some technical skills and this tutorial is specifically designed for those users, although it will include enough detail for novice users to get up and running as well. It also assumes that you will be using the pocket projector for presentations that require you to project your computer screen onto a pull-down screen or a white or pastel-colored wall, and that you will be demonstrating technical work or presenting a PowerPoint-style slide show. Finally, the computer or laptop that you use must have the option to hook up a separate monitor to it with a VGA connector cable. To find out this information, consult the owner’s manual for your computer in order to check if this option is available. The instructions will show you how to adjust the settings in Ubuntu Linux so that the projector will display exactly what is on the screen, in real time. For more general instructions and to explore all of the features of the Mitsubishi PK10 Pocket Projector go to http://office.manualsonline.com/manuals/mfg/mitsubishi/pk10.html?idRes=105535 for Using the Mitsubishi PK10 Pocket Projector with Ubuntu Linux the full manufacturer’s manual in digital form. Introduction (continued) This tutorial will be organized as follows: Table of Contents Introduction – Pages 1-3 Description of the equipment – Page 4 Materials that you will need – Page 5 Connecting the projector – Pages 6-7 Adjusting the display settings in Ubuntu Linux – Pages 8-10 Focusing the projector display – Page 11 Troubleshooting – Page 12 Works Cited/Referenced Images – Pages 13-14 Tips for getting the most out of this tutorial: Be sure that you have all of the necessary materials Follow each step in order In each row of the step by step instructions, the images in the left column of correspond to the numbers in the center column and the text in the right column for each step Keep this tutorial handy for future reference Optional tools needed for this tutorial: Flat/Standard screwdriver (the VGA cable has slots for a screwdriver, but it is not necessary – it is easily tightened by hand) Screen to project image (a light-colored or pastel-colored wall will also work) Warnings: The projector and computer you will use in this tutorial are both electric devices that will be plugged into a wall outlet. Exercise caution to avoid electric shock! The projector uses an LED bulb that is fragile and expensive to replace. Be careful when handling the projector and avoid dropping it or handling it roughly so that you do not damage the bulb. 2 Using the Mitsubishi PK10 Pocket Projector with Ubuntu Linux Introduction (continued) Why are these instructions necessary? In order for you to properly connect and use your Mitsubishi pocket projector on Ubuntu Linux, without damaging the projector or mistakenly adjusting the display settings in a way that could cause errors on your operating system, you should use this tutorial instead of risking your hardware or software. These instructions will save you time and they will get you ready for presentations faster and without hassle by taking the guesswork out of using the Mitsubishi PK10 Pocket Projector with Ubuntu Linux. This tutorial is also excellent for professionals who work in a Linux environment. With so many servers now using Linux and more and more Web Developers using Linux, this tutorial will help users to avoid having to track down a computer with Mac OSX or Windows to do demonstrations and presentations to clients and coworkers alike. 3 Using the Mitsubishi PK10 Pocket Projector with Ubuntu Linux Description of the Mitsubishi PK10 Fig. 1 Power Indicator Light Focus Dial Lamp Indicator Light Charge Indicator Light Auto Position Button Computer Button Video Button Down Direction Button Menu Button Power Button Enter Button Fillman, S. (Photographer). (2012). Digital LED Projector Top [Photograph], Retrieved July 1, 2012. 4 Using the Mitsubishi PK10 Pocket Projector with Ubuntu Linux Fig. 2 S-Video Terminal Video Terminal VGA In Terminal A/C Adapter Power Supply Port Fillman, S. (Photographer). (2012). Digital LED Projector Side [Photograph], Retrieved July 1, 2012. Materials You Will Need 5 Using the Mitsubishi PK10 Pocket Projector with Ubuntu Linux Mitsubishi PK10 Pocket Projector Unit Fillman, S. (Photographer). (2012). Digital LED Projector [Photograph], Retrieved July 1, 2012. Computer or Laptop Computer with a VGA port and Ubuntu Linux operating system Fillman, S. (Photographer). (2012). Linux Laptop [Photograph], Retrieved July 1, 2012. VGA connector cable Fillman, S. (Photographer). (2012). VGA Cable [Photograph], Retrieved July 1, 2012. A/C Adaptor Cable (Included with projector) Fillman, S. (Photographer). (2012). A/C Adapter [Photograph], Retrieved July 1, 2012. Connecting the Projector 6 Using the Mitsubishi PK10 Pocket Projector with Ubuntu Linux 1 Be sure your computer is turned off. 2 Plug the A/C adapter power supply for the projector unit into a wall outlet. Fillman, S. (Photographer). (2012). Linux Laptop [Photograph], Retrieved July 1, 2012. Fillman, S. (Photographer). (2012). A/C Adapter [Photograph], Retrieved July 1, 2012. Fillman, S. (Photographer). (2012). A/C Adapter in Projector [Photograph], Retrieved July 1, 2012. 3 4 Plug the A/C adapter power supply into the projector unit in the A/C Adapter Power Supply Port. See Fig. 2 on page 4 for extra reference. Plug the VGA connector cable into the projector unit in the VGA In Terminal. See Fig. 2 on page 4 for extra reference. Fillman, S. (Photographer). (2012). VGA in Projector [Photograph], Retrieved July 1, 2012. Connecting the Projector (continued) 7 Using the Mitsubishi PK10 Pocket Projector with Ubuntu Linux 5 Use your fingers or a screwdriver to tighten the plastic-coated screws that are on each side of the VGA connector plug. Fillman, S. (Photographer). (2012). VGA in Projector [Photograph], Retrieved July 1, 2012. 6 Plug the other end of the VGA connector cable into the computer’s VGA In Terminal. Make sure the computer is still turned off. The location of VGA In Terminal will vary based on the particular computer. Fillman, S. (Photographer). (2012). VGA in Laptop [Photograph], Retrieved July 1, 2012. 7 Use your fingers or a screwdriver to tighten the plastic-coated screws that are on each side of the VGA connector plug. Fillman, S. (Photographer). (2012). VGA in Laptop [Photograph], Retrieved July 1, 2012. Adjusting the Display In Ubuntu Linux 8 Using the Mitsubishi PK10 Pocket Projector with Ubuntu Linux 1 Turn on the computer. The projector should be fully connected to the computer before turning the computer on. Fillman, S. (Photographer). (2012). Linux Laptop [Photograph], Retrieved July 1, 2012. Turn on the projector by pressing the Power Button. 2 Fillman, S. (Photographer). (2012). Digital LED Projector Top [Photograph], Retrieved July 1, 2012. See Fig. 1 on page 4 for extra reference. The projector should project its default bluecolored screen onto the wall or movie screen and the power indicator light should be green. On the desktop of the computer, click the Settings icon. 3 Fillman, S. (Photographer). (2012). Desktop 1 [Photograph], Retrieved July 1, 2012. This icon is on the left navigation bar and it has a wrench and a gear on it. Fillman, S. (Photographer). (2012). Settings Icon [Photograph], Retrieved July 1, 2012. Adjusting the Display In Ubuntu Linux (continued) 9 Using the Mitsubishi PK10 Pocket Projector with Ubuntu Linux Click the Displays icon to access the display settings. 4 This icon has a computer monitor and a measuring device on it. Fillman, S. (Photographer). (2012). Displays Icon [Photograph], Retrieved July 1, 2012. Fillman, S. (Photographer). (2012). Desktop 2 [Photograph], Retrieved July 1, 2012. Take a moment to look over the display settings screen. 5 Fillman, S. (Photographer). (2012). Desktop 3 [Photograph], Retrieved July 1, 2012. Fillman, S. (Photographer). (2012). Mirror Display [Photograph], Retrieved July 1, 2012. 6 The default display settings treat the projector as a second screen and allow you to move windows and applications over to the projector, but for most Information Technology (IT) presentations (and for the scope of this tutorial), we want the projector screen to show exactly what you are doing on the desktop in real-time. Click the Mirror displays checkbox. This will enable the feature that allows a real-time desktop display on your projector screen. 10 Using the Mitsubishi PK10 Pocket Projector with Ubuntu Linux Adjusting the Display In Ubuntu Linux (continued) Click the Apply button to apply the display settings. 7 Now the projector will display a mirror image of the desktop and you can use your Ubuntu Linux laptop for presentations and demonstrations of your work, techniques or for PowerPoint-style slide show presentations. 8 9 Click the small “x” in the upper left corner of the display settings window to exit the display settings. Fillman, S. (Photographer). (2012). Apply Button [Photograph], Retrieved July 1, 2012. Fillman, S. (Photographer). (2012). Exit Button 1 [Photograph], Retrieved July 1, 2012. Fillman, S. (Photographer). (2012). Exit Button 2 [Photograph], Retrieved July 1, 2012. Click the small “x” in the upper left corner of the system settings window to exit the system settings. 11 Using the Mitsubishi PK10 Pocket Projector with Ubuntu Linux Focusing the projector display 1 Turn out the lights before trying to view the projected image of your desktop screen on a wall or projector screen. 2 Check the projector display to see if it is crisp and clear or if it is blurry or fuzzy. Fillman, S. (Photographer). (2012). Laptop Projecting [Photograph], Retrieved July 1, 2012. Fillman, S. (Photographer). (2012). Projected Image [Photograph], Retrieved July 1, 2012. 3 Fillman, S. (Photographer). (2012). Digital LED Projector Top [Photograph], Retrieved July 1, 2012. If the display is fuzzy, adjust the Focus Dial until the picture on the projector is clear. See Fig. 1 on page 4 for extra reference. 12 Using the Mitsubishi PK10 Pocket Projector with Ubuntu Linux Troubleshooting Problems Solutions The Projector is not projecting a display. The Projector is projecting a blue screen and not the desktop of the computer. The projector display is fuzzy and not clear. The projector will not turn on and the indicator lights are not lighting up. Check to make sure that the projector is plugged in Make sure that the VGA cable is connected to the computer and the projector both Make sure that the computer is turned on Make sure the projector is turned on by checking the power indicator light to see if it is green The projector’s LED bulb may be burned out use the original owner’s manual for information about ordering a replacement bulb Make sure that the VGA cable is connected to the computer and the projector both Make sure that the computer is turned on Make sure that Mirror Mode is selected in the display settings for the computer (see pages 7 and 8 for details) The lens of the projector may be dirty, try cleaning it with a soft tissue and warm water Adjust the Focus Dial until the projection is clear Make sure the surface that you are projecting on is a smooth, light colored surface to ensure a clear projection Check to make sure that the projector is plugged in Check the A/C adapter to see if the cord is damaged use the original owner’s manual for information about ordering a replacement cord *For any other problems that are beyond the scope of this tutorial, consult your owner’s manual or the online resources that the manufacturer has made available. 13 Using the Mitsubishi PK10 Pocket Projector with Ubuntu Linux Works Cited – Referenced Images The images used for this tutorial were photographed by Scott Fillman and were retrieved from the hard drive of Mr. Fillman’s computer. The labels and arrows used to label the instructions are used for educational purposes and are from Microsoft Corporation’s Microsoft Office Word 2010. The following is an alphabetical list of the images used for these instructions: Photos: Fillman, S. (Photographer). (2012). A/C Adapter [Photograph], Retrieved July 1, 2012. Fillman, S. (Photographer). (2012). A/C Adapter in Projector [Photograph], Retrieved July 1, 2012. Fillman, S. (Photographer). (2012). Apply Button [Photograph], Retrieved July 1, 2012. Fillman, S. (Photographer). (2012). Desktop 1 [Photograph], Retrieved July 1, 2012. Fillman, S. (Photographer). (2012). Desktop 2 [Photograph], Retrieved July 1, 2012. Fillman, S. (Photographer). (2012). Digital LED Projector [Photograph], Retrieved July 1, 2012. Fillman, S. (Photographer). (2012). Digital LED Projector Top [Photograph], Retrieved July 1, 2012. Fillman, S. (Photographer). (2012). Digital LED Projector Side [Photograph], Retrieved July 1, 2012. Fillman, S. (Photographer). (2012). Displays Icon [Photograph], Retrieved July 1, 2012. Fillman, S. (Photographer). (2012). Exit Button 1 [Photograph], Retrieved July 1, 2012. Fillman, S. (Photographer). (2012). Exit Button 2 [Photograph], Retrieved July 1, 2012. Fillman, S. (Photographer). (2012). Laptop Projecting [Photograph], Retrieved July 1, 2012. Fillman, S. (Photographer). (2012). Linux Laptop [Photograph], Retrieved July 1, 2012. Fillman, S. (Photographer). (2012). Mirror Display [Photograph], Retrieved July 1, 2012. Fillman, S. (Photographer). (2012). Projected Image [Photograph], Retrieved July 1, 2012. Fillman, S. (Photographer). (2012). Settings Icon [Photograph], Retrieved July 1, 2012. Fillman, S. (Photographer). (2012). VGA Cable [Photograph], Retrieved July 1, 2012. Fillman, S. (Photographer). (2012). VGA in Laptop [Photograph], Retrieved July 1, 2012. Fillman, S. (Photographer). (2012). VGA in Projector [Photograph], Retrieved July 1, 2012. *All images and screenshots were captured by and are the sole property of Scott Fillman, Copyright 2012. 14 Using the Mitsubishi PK10 Pocket Projector with Ubuntu Linux Labels - Vector Art: Microsoft Corporation (Creator). (2010). Text Box [Shape/Vector Art], Retrieved July 1, 2012 from Microsoft Office Word 2010. Microsoft Corporation (Creator). (2010). “No” Sign [Shape/Vector Art], Retrieved July 1, 2012 from Microsoft Office Word 2010. Microsoft Corporation (Creator). (2010). Arrow Shape [Shape/Vector Art], Retrieved July 1, 2012 from Microsoft Office Word 2010. *All shapes and vector art were used for educational purposes with permission from Microsoft and are the sole property of Microsoft Corporation: http://www.microsoft.com, Copyright 2012. The shapes were used via Microsoft’s Requirements for Allowed Uses and for educational purposes (http://www.microsoft.com/about/legal/en/us/IntellectualProperty/Permissions/Default.aspx). 15