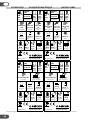
1
NL
F
GB
Gebruiks- en installatiehandleiding
Mode d’emploi et manuel d’installation
User manual and installation guide
HIGH WALL SPLIT AIR CONDITIONER
HWAM9KE HWAM12KE HW9KE HW12KE
NL
FELICITATIES
Wij feliciteren u met de aanschaf van deze airconditioner van superieure kwaliteit
en danken u voor het In ons gestelde vertrouwen. Voordat u het apparaat in werking
stelt, raden wij u aan deze bijgeleverde handleiding aandachtig te lezen. Er wordt
uitgelegd hoe het apparaat te installeren, te gebruiken en de perfect efficiënte
werking te handhaven.
Amcor is al meer dan 50 jaar gespecialiseerd in de fabricage en marketing van
apparatuur voor luchtbehandeling: ontvochtigers, mobiele airconditioners,
koelers, luchtreinigers, ionisatoren en aromatherapie luchtverfrissers. In deze
kwaliteitsproducten worden de laatste technologische ontwikkelingen toegepast.
VEILIGHEIDSASPECTEN
BELANGRIJK:
• Het binnendeel is uitsluitend geschikt voor gebruik binnenshuis.
• Dit apparaat moet op een geaard stopcontact voor 230 V/50 Hz worden
aangesloten en gezekerd met 16A.
• De aansluiting op het elektriciteitsnet dient uitgevoerd te worden in
overeenstemming met de veiligheidsnormen inzake de installatie van elektrische
huishoudelijke apparatuur, die van kracht zijn in het land van gebruik.
Laat bij twijfel de elektrische installatie controleren en zo nodig aanpassen door een
erkend elektricien.
• De airconditioner is een veilig apparaat. Zoals met alle elektrische apparaten met
zorg gebruiken.
• De afstandsbediening buiten bereik van kinderen houden.
• Niet schoonmaken door met water te besproeien, niets in de openingen steken.
• Bij schoonmaken altijd eerst de stekker uit het stopcontact halen.
• Gebruik geen verlengsnoer. Laat een geaard stopcontact aanleggen door een
erkend elektricien als geen geschikt stopcontact voorhanden is.
WAARSCHUWING
• Gebruik dit apparaat nooit met een beschadigd snoer of stekker. Laat het snoer niet
over scherpe kanten lopen.
• Een beschadigd snoer mag uitsluitend door een vakman worden vervangen, om
ieder risico te voorkomen.
• Laat eventuele reparaties – buiten het regelmatig onderhoud – altijd uitvoeren door
een erkend servicemonteur, anders kan dit leiden tot het vervallen van de garantie.
2
NL
Gebruik uw airconditioner niet, als:
het snoer is
beschadigd.
er kans bestaat dat
er een vloeistof
op lekt.
er vreemde
objecten in terecht
kunnen komen.
er een warmtebron
vlak bij staat.
Niet zelf proberen
te repareren.
WERKING
De compressor (6) in het buitendeel drukt
het koelmiddel samen tot een gas met
hoge temperatuur en druk. Als dit gas
langs de koelribben van de condensor (7)
stroomt wordt de warmte afgestaan en
condenseert het gas tot vloeistof, die naar
de verdamper (1) in het binnendeel wordt
geleid. Daar zet de vloeistof uit tot een
gas met lage druk en lage temperatuur
wordt omgezet.
Dit gas neemt de warmte op van de
lucht in het vertrek, de gekoelde lucht
wordt weer in het vertrek geblazen en de
warmte wordt met het gas mee naar de
compressor geleid.
1
a
2
3
4
c
b
6
7
5
d
8
Ventilator (3) zuigt de lucht (a) langs het
filter (2) en blaast de gekoelde lucht (b)
terug in het vertrek.
Ventilator (8) voert lucht (c) over de
condensor en blaast warme lucht (d) weg.
1. verdamper
2. filter
3. ventilator
4. gasleiding
5. vloeistofleiding
6. compressor
7. condensor
8. ventilator
Verwarmen.
Het systeem wordt omgekeerd: de condensor werkt als verdamper, de verdamper
als condensor: er wordt warme lucht het vertrek ingeblazen. Ideaal voor koele dagen
als de hoofdverwarming (nog) niet brandt.
Ontvochtigen.
Als bij koelen, het vocht in de lucht condenseert op de koude verdamper bij
kamertemperatuur.
3
NL
AFSTANDSBEDIENING
LCD display:
auto
koelen
ontvochtigen
ventilator
verwarmen
elektrische verwarming
(niet op deze modellen)
temperatuur
ventilatorsnelheid
richten luchtstroom
2
4
1
5
7
8
10
12
13
klok
tijdklok uit
slaapstand
tijdklok ingesteld
3
6 Toetsen:
1. aan/uit
9
2.
modus
11
(koelen, verwarmen, ontvochtigen)
3. ventilatorsnelheid
14
4. omhoog (temperatuur, tijd)
5. omlaag (temperatuur, tijd)
6. tijdklok instellen
7. tijdklok uitzetten
8. klok
9. lamellen uitblaasrooster regelen
10. elektrische verwarming
(niet op deze modellen)
11. slaapstand
12. turbo
13. reset
14. reserve
Gebruik van de afstandsbediening
Het signaal van de afstandsbediening kan tot 8 m worden ontvangen.
Richt de afstandsbediening op het ontvangpunt van het binnendeel.
Met een bliep wordt de ontvangst van een signaal van de afstandsbediening
bevestigd.
Zie blz. 9 voor het vervangen van de batterijen,
4
NL
BEDIENING
Algemeen
• Zet het apparaat aan met de -toets [1]. De laatst ingestelde werking wordt
actief.
wordt het apparaat uitgezet, de op dat moment
• Met de aan/uit-toets
ingestelde werking wordt in het geheugen opgeslagen.
• De gewenste temperatuur wordt met de omhoog [4] en/of omlaag [5] toets,
binnen de grenzen van de thermostaat 18 °C – 25 °C.
• Stel met de ventilatortoets
de ventilatorsnelheid in, laag:
, matig:
, hoog:
of automatisch (het symbool op de display knippert). In
automatische stand wordt de ventilatorsnelheid bepaald door het verschil tussen
ingestelde temperatuur en de kamertemperatuur.
Tijd instellen
Na eerste installatie en aan het begin van een nieuwe gebruiksperiode moet de tijd
worden ingesteld. Met (nieuwe) batterijen in de afstandsbediening:
Druk op de klok
-toets [8] om de tijd in te stellen. Gebruik de omhoog toets
voor de uren en de omlaag toets voor de minuten.
Koelen
1. Druk op de modus toets
totdat het koelsymbool
verschijnt.
2. Stel de gewenste temperatuur in.
3. Stel met de ventilatortoets
de ventilatorsnelheid in.
Verwarmen
1. Druk op de modus toets
totdat het verwarmensymbool
2. Stel de gewenste temperatuur in.
3. Stel met de ventilatortoets
de ventilatorsnelheid in.
verschijnt.
Ontvochtigen (9KE max. 17 L/24h, 12KE max. 24 L/24h)
1. Druk op de modus toets
totdat het ontvochtigensymbool verschijnt.
2. Stel de gewenste temperatuur in.
3. De ventilatortoets werkt niet in ontvochtigen-modus. De ventilatorsnelheid is in
deze modus altijd laag.
Ventilator modus
totdat het ventilatorsymbool
1. Druk op de modus toets
2. Stel de gewenste temperatuur in.
3. Stel met de ventilatortoets
de ventilatorsnelheid in.
verschijnt.
5
NL
Slaap modus
1. Druk op de modus toets
totdat het verwarmen, koelenof
auto-modus
symbool verschijnt.
2. Stel de gewenste temperatuur in.
3. Druk op de slaap-modus toets
, dit symbool verschijnt in de display.
Annuleren van de slaap modus door weer op deze toets te drukken.
4. In slaap-modus draait de ventilator op lage snelheid.
Auto-modus
totdat het auto-modussymbool
verschijnt.
1. Druk op de modus toets
2. Het verschil tussen ingestelde temperatuur en kamertemperatuur bepaalt de
werking: koelen, verwarmen, ventilatormodus of drogen. De omhoog en omlaag
toetsen werken niet.
3. Stel met de ventilatortoets
de ventilatorsnelheid in.
Tijdklok-uit functie
totdat het symbool verschijnt van de door u
1. Druk op de modus toets
gewenste werking.
2. Stel de gewenste temperatuur in.
3. Stel met de ventilatortoets
de ventilatorsnelheid in.
4. Druk op de tijdklok-uit toets
om de tijd in te stellen. Gebruik de omhoog
toets voor de uren en de omlaag toets voor de minuten. Als de zo ingestelde tijd
is verstreken gaat het apparaat uit. Om de tijdklok-uit functie uit te schakelen
voordat de ingestelde tijd is verstreken nogmaals op de tijdklok-uit toets
drukken.
Tijdklok-aan functie
1. Het apparaat is uitgeschakeld.
2. Druk op de tijdklok-aan toets
om de tijd in te stellen. Gebruik de omhoog
toets voor de uren en de omlaag toets voor de minuten.
Stel de gewenste werking, temperatuur, ventilatorsnelheid enz. in. Als de
ingestelde tijd is verstreken gaat het apparaat aan. Om de tijdklok-aan functie uit
te schakelen voordat de ingestelde tijd is verstreken nogmaals op de tijdklok-aan
toets
drukken.
Turbo
totdat het ventilatorsymbool
verschijnt.
1. Druk op de modus toets
2. Stel de gewenste temperatuur in.
3. Stel met de ventilatortoets
de ventilatorsnelheid in.
4. Druk op de turbo-toets . Gedurende 15 minuten draaien ventilator en
compressor op de hoogste snelheid, daarna weer op eerder ingestelde
snelheden.
6
NL
VAN BELANG
Auto restart
Na stroomuitval start de airconditioner automatisch als de stroomvoorziening is
hersteld. Controleer bij twijfel de instellingen.
Werkgebied binnenthermostaat
De binnenthermostaat kan worden ingesteld op een gewenste temperatuur tussen
18 en 30 °C.
Let op: of de gewenste waarde wordt bereikt hangt af van de condities in de
betreffende ruimte.
Werkgebied warmtepompfunctie
De verwarmingsfunctie kan worden gebruikt bij een buitentemperatuur van ca. 10
°C of hoger.
Let op: bij lagere buitentemperaturen kan de goede werking worden verstoord.
Capaciteit
De benodigde koel- of verwarmingscapaciteit is sterk afhankelijk van de ligging
en/of het gebruik van de ruimte waarin de airconditioner is geïnstalleerd. Sterke
zonnestraling en de aanwezigheid van personen, lampen of apparatuur zorgen voor
een extra warmtebelasting.
Normale woonruimtes vergen voor koeling ca 100 W per m2 vloeroppervlak. Bij
sterke zonbelasting of overige warmtebronnen kan dit oplopen tot 350 W per m2.
Voor de specificaties van uw airconditioner zie blz. 58/59.
Tip: laat op warme dagen de airconditioner gedurende de nacht de ruimte zover
mogelijk afkoelen. Hierdoor werken de koude muren en meubilair mee om de
ruimte tijdens gebruik aangenaam te houden. Voorkom sterke zon instraling.
Noodstart
In geval van problemen kan de airconditioner met de noodknop onder het paneel
van het binnendeel in werking worden gesteld. Open het frontpaneel en druk op de
knop
De airconditioner gaat:
- verwarmen als de kamertemperatuur ≤ 20°C is,
- koelen als de kamertemparatuur ≥ 25 °C is,
en bij tussenliggende waarden: ontvochtigen in een model zonder warmtepomp en
in een model met warmtepomp in ventilator modus.
7
NL
FILTERS
Zet het apparaat uit en haal de stekker uit het stopcontact.
A
A
Openen: trek bij de inkepingen A het
voorstuk naar boven. Het voorstuk
blijft in horizontale stand (draai 90°
omhoog) staan.
B
C
B
Sluiten: duw aan de zijkanten bij B en
in het midden bij C het voorstuk naar
beneden. Zorg ervoor dat het goed is
gesloten (‘klik’).
1. Houd het voorstuk open (of zet het in horizontale stand) en haal de filter(s) er uit.
2. Klop lichtjes op het filter of gebruik de stofzuiger om vuil te verwijderen. Het
stoffilter mag, als het erg vuil is, in lauwwarm water met een heel klein beetje
neutraal schoonmaakmiddel worden gewassen. Dan goed naspoelen en volledig
laten drogen (niet in direct zonlicht of nabij een hittebron).
3. Houd het roosterpaneel open en zet de filter(s) terug. Druk het paneel dicht, een
klik geeft aan dat het goed is gesloten.
4. Stekker in het stopcontact en het apparaat aanzetten.
8
NL
SCHOONMAKEN
Zet het apparaat uit en haal de stekker uit het stopcontact.
Binnendeel
Stof geregeld af met een droge doek of gebruik licht vochtig keukenpapier.
Gebruik nooit chemicaliën of oplosmiddelen, sproei nooit een vloeistof in of over
het apparaat.
Buitendeel
Verwijder vuil en houd de luchttoevoer- en luchtuitblaasopeningen vrij van bladeren
e.d. Schoonmaken met chemicaliën kan beschadigingen veroorzaken.
EINDE GEBRUIKSPERIODE
Als de airconditioner langere tijd niet zal worden gebruikt:
• stel ventilatormodus in op een wat warmere dag, zodat in een aantal uren het
apparaat van binnen goed droog wordt.
• haal de stekker uit het stopcontact en de batterijen uit de afstandsbediening.
• maak ook filter(s) schoon.
BEGIN GEBRUIKSPERIODE
Als de airconditioner na langere tijd weer zal worden gebruikt:
• controleer op blokkering van luchttoevoer- en luchtuitvoeropeningen van het
binnendeel en van het buitendeel. Verwijder alle vuil en obstakels.
• controleer op de aanwezigheid van filter.
• controleer de condenswaterafvoer op goede doorloop.
• zet 2 AAA-batterijen in de afstandsbediening.
• stof het binnendeel af.
• zet het apparaat aan, stel de tijd en stel de gewenste werking in.
Let op: zorg voor vrije afvoer van condens, geen belemmering door algengroei of
dergelijke, anders is er kans op lekkage.
BATTERIJEN VERVANGEN
•
•
•
•
verwijder het deksel.
vervang de AAA-batterijen, + bij + en – bij –.
breng het deksel aan.
druk op de aan/uit-toets , de batterijen zijn leeg of niet
goed geplaatst als geen symbolen op de display verschijnen.
9
NL
INSTALLATIEHANDLEIDING
7PPSXFMLWFSUSFLJTVX"JS$POEJUJPOFSHFTDIJLU
7FFMSBNFO
7FFM[PO
CWTFSSF
(SPPUUFWBO
IFUWFSUSFL
WMPFSPQQFSWMBL
8 N
N
N
8FJOJHSBNFO
.JOEFS[PO
N
8
N N
,PFMDBQBDJUFJU
8
8
8
8
8
%FHSPPUUFWBOIFUWFSUSFLJTBGIBOLFMJKLWBOLPFMDBQBDUFJUMJHHJOHPQEF[POSBBNPQQFSWMBL
XBSNUFCSPOOFOMBNQFOBQQBSBUVVSBBOUBMNFOTFOFO[
)PVEUIJFSSFLFOJOHNFF
7VJTUSFHFMCJKOPSNBMF[POCFMBTUJOHFO[POEFSFYUSBXBSNUFCSPOOFO
8QFSWJFSLBOUFNFUFSEVTCJKLPFMDBQBDJUFJUWBO8FFOWFSUSFLWBON
10
NL
VEILIGHEIDSASPECTEN
Controleer de netspanning.
Overtuig u ervan dat de aanwezige netspanning overeenkomt met de op het
typeplaatje op het apparaat vermelde waarde.
Houd de werkplek opgeruimd.
Slordigheid op de werkplek kan tot ongelukken leiden.
Gebruik het juiste gereedschap.
Gebruik geen apparaten die onvoldoende kracht hebben voor zwaar werk. Gebruik
deugdelijk gereedschap berekend voor het doel waarvoor het is bestemd.
Draag een masker en oog- en oorbescherming.
Draag bij werkzaamheden waarbij splinters of stof ontstaan en bij werk boven
uw hoofd altijd oogbescherming en een passend gezichtsmasker. Draag
oorbeschermers als er geluid wordt geproduceerd.
Verlengsnoer bij werk buitenshuis.
Gebruik uitsluitend goedgekeurde en zodanig gemerkte verlengsnoeren en
contactdozen bij werk buitenshuis.
Controleer elektrisch gereedschap op beschadigingen.
Gebruik nooit gereedschap waarvan de schakelaar niet werkt.
Voorzichtig bij werk op trap, ladder en steiger.
Let extra op bij het werken op een verhoging. Verzeker u ervan dat (keuken)trap,
ladder en steiger op de juiste wijze zijn opgesteld en niet kunnen wegglijden.
Elektrische kabels, gas- en waterleidingen etc.
Belangrijk veiligheidsaspect voor werk met boorgereedschap:
Verzeker u ervan dat u bij het boren geen elektrische kabel, gas- of waterleiding kunt
raken. Controleer de muur met een leiding/kabeldetector voordat u gaat boren.
Is alles duidelijk?
Al u zich op de hoogte bent van de veiligheidsadviezen en uit de
gebruikershandleiding heeft geleerd hoe u het gereedschap moet gebruiken, kunt
u aan de slag gaan. Door u aan de instructies en adviezen van de fabrikanten te
houden zorgt u ervoor zo veilig mogelijk te werken.
Bewaar deze aanwijzingen!
11
NL
VEILIGHEID
Lees het hoofdstuk veiligheidsaspecten en deze instructies voordat u gaat beginnen.
Houd u aan de hier getoonde volgorde en werkwijze.
De fabrikant kan uit technische of commerciële overwegingen wijzigingen
aanbrengen in het apparaat of onderdelen daarvan, zonder algemene kennisgeving.
U kunt uw leverancier hierover raadplegen.
BELANGRIJK:
• Dit apparaat moet op een geaard stopcontact voor 230 V/50 Hz worden
aangesloten, gezekerd op 16A.
• De aansluiting op het elektriciteitsnet dient uitgevoerd te worden in
overeenstemming met de veiligheidsnormen inzake de installatie van elektrische
huishoudelijke apparatuur, die van kracht zijn in het land van gebruik.
Laat bij twijfel de elektrische installatie controleren en zo nodig aanpassen door een
erkend elektricien.
Zorg voor
• goed verlichte en opgeruimde werkplek.
• doordacht en vooropgezet werkplan.
• deugdelijk gereedschap en deugdelijke hulpmiddelen.
• bescherming: veiligheidsbril, oorbescherming, masker, bouwhelm, werkschoenen
en werkhandschoenen.
Het buitendeel dient door twee personen te worden getild en geplaatst.
UW AIRCONDITIONER
De split airconditioner wordt geleverd in twee dozen:
- doos met binnendeel met de benodigde leidingen
- doos met buitendeel en gereedschap.
Haal alles voorzichtig uit de dozen. Het verpakkingsmateriaal moet uit handen van
kinderen worden gehouden.
Meegeleverde onderdelen en gereedschap:
- schroeven en pluggen voor de bevestigingsplaat van het binnendeel
- mof met kraag voor het gat door de muur
- pijpje voor condenswaterafvoer van het buitendeel
- 4 rubberen voetjes voor het buitendeel
- 2 steeksleutels voor de ventielen van het buitendeel
- inbussleutel voor ventielen van het buitendeel
12
NL
AANBEVOLEN GEREEDSCHAP EN HULPMIDDELEN
•
•
•
•
•
•
•
klop- en gatenboor
•
leidingdetector
•
meetlint
•
potlood en krijt
•
waterpomptang
•
eventueel leidinggoot en leidingbeugels
eventueel purschuim of siliconenkit
elektrische schroevendraaier
hamer
waterpas
keukentrap
afdekzeil voor op de grond binnen
WAAR PLAATSEN?
De maximale afstand tussen binnen- en buitendeel is 4 m (de lengte van de
koelleidingen en stroomkabel). Het binnendeel moet tenminste 1 m hoger hangen dan
de bovenkant van het buitendeel.
De plaats voor het binnendeel
• aan een muur waarin een gat van Ø 65 mm (maat van de mof) kan worden gemaakt
voor de verbinding met het buitendeel. Voor een gat in een betonmuur is speciaal
gereedschap nodig; laat dit over aan een gespecialiseerd bedrijf. Controleer de
uitgezochte plaats met een leidingdetector op het ontbreken van leidingen.
• afstand tot plafond tenminste 15 cm, vrije ruimte links en rechts tenminste 50 cm.
• de koele lucht moet gemakkelijk door het gehele vertrek kunnen stromen.
• in het midden, niet bij een raam of deur, is het meest geschikt.
• het moet bereikbaar zijn om het filter te kunnen reinigen.
• tenminste 1 m van TV, video en dergelijke apparaten en van fluorescerende lampen
(TL-buizen).
• er moet op maximaal 1,5 m (de lengte van het snoer aan het binnendeel) een geaard
stopcontact aanwezig zijn. Laat zo nodig een stopcontact aanbrengen door een
erkend installateur, volgens alle geldende voorschriften. Vanuit het binnendeel wordt
het buitendeel van stroom voorzien door de kabel die meegaat met de koelleidingen.
De plaats van het buitendeel
• moet sterk genoeg zijn om het gewicht van het buitendeel te kunnen dragen. Dat
kan zijn op de grond, op een plat dak (mits u daar een passende fundatie kunt
aanbrengen om het buitendeel te bevestigen; voorkom lekkage van uw dak) of op
muursteunen. Verstevig zo nodig de gekozen plaats; is de plaats onvoldoende sterk,
dan kan dat leiden tot overmatig trillen en geluid.
• voldoende vrije luchtstroom, zo min mogelijk blootgesteld aan regen en direct
zonlicht en afvoermogelijkheid van het condenswater.
• waar uitgeblazen lucht en geluid niet tot overlast leiden; niet waar een hoge
luchtvochtigheid aanwezig is, niet in de buurt van vet of oxiderende gassen.
• vrije afstand aan de achterkant tenminst 15 cm, aan de zijkanten en aan de voorkant
tenminste 50 cm. Zorg voor ruimte voor onderhoud.
13
NL
BINNENDEEL
Om kans op lekkage te verkleinen dient het binnendeel beslist waterpas te komen
hangen.
Het lekbakje in het binnendeel met daar aan de condenswaterafvoer moet schoon
en vrij zijn, zodat het condenswater onbelemmerd kan weglopen (anders kans op
lekkage).
Als de plaats voor het binnendeel is bepaald, kan met het bevestigen van
het binnendeel worden begonnen. Let op: de bevestiging is uw eigen
verantwoordelijkheid.
A. Bevestigingsplaat
De bevestigingsplaat waterpas ophangen op een stevige ondergrond, goed uitmeten
en schroefgaten aftekenen.
TIP. Zet de plaat met een schroef niet té stevig vast, breng de plaat in horizontale
postie met behulp van een waterpas, en teken dan de andere schroefgaten af. Draai
de schroef er uit, boor alle gaten, zet er pluggen in en schroef de plaat goed vast.
Boor de 8 gaten van 6,4 mm (2.5”) en 30 mm diep.
Gebruik de meegeleverde pluggen.
Zet de bevestigingsplaat stevig vast met de meegeleverde schroeven.
B. Gat door de muur voor de leiding
Het gat met doorsnede van 65 mm en naar buiten toe iets schuin naar beneden (1015 mm) voor betere condenswaterafvoer, kan binnen de ruitme van de kap worden
aangebracht en blijft dan buiten zicht. Indien noodzakelijk is een doorvoer meer
naar links mogelijk. Voor dat geval zijn afdekgoten in de vakhandel verkrijgbaar.
Ruimte voor het gat.
14
NL
Plaats de meegeleverde mof en gebruik zonodig de afdekkraag aan de binnenzijde.
De mof zonodig op lengte zagen.
C. Elektriciteitssnoer
Bekijk waar het elektriciteitssnoer uit het binnendeel moet komen, links of rechts. Breek
het kleine plaatje voor het snoer weg, haal het snoer naar buiten en zet het tijdelijk met
tape vast, zodat het bij het ophangen van het binnen deel niet in de weg zit.
Vraag assistentie voor het ophangen van het binnendeel en het doorvoeren van de
leiding.
D. Leiding
Rol de bundel leidingen voorzichtig af en zonder knikken en voer het einde door het
gat met mof.
E. Ophangen
Til het binnendeel op en hang het op aan de 4 lippen op de bevestigingsplaat, terwijl de
leidingen worden doorgevoerd. Controleer of het binnendeel op de 4 lippen hangt.
Laat zo nodig iemand aan de andere kant van de muur de doorgevoerde leidingen
begeleiden.
Let goed op de condenswaterafvoerleiding. Zorg dat deze leiding goed meeloopt en
aflopend gelegd wordt. Zorg dat de isolatie niet is verschoven, er mag geen blanke
leiding zichtbaar zijn omdat hier anders condensvorming kan optreden (kans op
lekkage).
Als het binnendeel goed hangt (waterpas en geen links-rechts beweging) kan het
buitendeel worden geplaatst.
bevestigingsplaat
koelmiddelleidingen
waterafvoerleiding
verbindingskabel (stroom)
15
NL
BUITENDEEL
Afvoerpijpje
Bevestig het afvoerpijpje aan de
bodemplaat. Eventueel kan hieraan een
afvoerslang (niet meegeleverd) worden
bevestigd die naar een afvoer wordt
geleid.
Meestal kan op de grond of op het dak
het condenswater vrij weglopen.
Controleer dat niemand hiervan last
kan hebben en dat het geen schade kan
veroorzaken.
A
B
Vastzetten buitendeel
Plaats de rubber voetjes en
schroef het buitendeel vast aan
een geschikte stevige fundatie.
Houd rondom het buitendeel
50 cm ruimte vrij.
Eventueel kan het buitendeel op
speciale fundatie-balkjes worden
geplaatst of op steunen aan de
muur. Vraag uw installateur.
C
D
Aansluiten elektriciteit
Schroef de beschermkap los [A] [B].
De stroom voor het buitendeel komt van het binnendeel door de kabel met een
speciaal stekkertje dat in het contact klikt [C].
Controleer dat deze verbinding goed vastzit [D].
16
NL
E
F
Leidingen
Verwijder de beschermkapjes van de ventielen [E] en de beschermdoppen van de
leiding [F].
G
H
Draai eerst de dunne leiding op bovenste ventiel goed vast [G].
Draai dan de dikke leiding op onderste ventiel goed vast [H].
I
J
Controleer op lekkage.
Draai met de inbussleutel het bovenste ventiel open [I].
Controleer op beide aansluitingen op lekkage, houd er een spons met zeepsop
tegenaan.
Als er lekkage is, direct het ventiel met de inbussleutel sluiten.
Roep de hulp in van een installateur, als u hebt gecontroleerd dat de leidingen goed
vastzitten en er zich toch lekkage voordoet. Houdt de ventielen gesloten!
Is er geen lekkage, draai dan met de inbussleutel het onderste ventiel open [J].
17
NL
K
L
Als de koelleidingen goed vastzitten en geen lekkage vertonen, kunnen de
beschermkapjes weer op de ventielen worden aangebracht [K].
Schroef de beschermkap weer op het buitendeel [L].
Zet de leidingen met in de handel verkrijgbare kabelgoten en
beugelklemmen verticaal vast op de muur.
Breng de waterafvoerleiding naar een geschikt afvoerpunt, let op een vrije doorloop.
Bewaar de beschermkapjes van de koppelingen en ventielen en het meegeleverde
gereedschap zorgvuldig.
18
NL
LOSKOPPELEN
CLEANING
BUITENDEEL
Let op: de snelkoppelingen zijn bedoeld voor eenmalige aansluiting !
Er wordt geen garantie gegeven op meervoudige installatie.
Mocht onverhoopt loskoppelen noodzakelijk zijn, ga dan als volgt te werk:
• vraag assistentie om met de afstandsbediening de airconditioner te bedienen
• zet de gewenste temperatuur op 18 °C
• start de airconditioner, wacht tot u ook de compressor hoort draaien
• draai de kapjes van de ventielen en sluit het bovenste ventiel (dunne leiding) met
de inbussleutel
• wacht maximaal 1 minuut: u hoort het geluid van de compressor veranderen
• sluit met de inbussleutel ook het onderste ventiel (dikke leiding)
• zet onmiddellijk de airconditioner uit door de stekker uit het stopcontact te
nemen
• nadat beide ventielen goed zijn gesloten de beschermkapjes terugplaatsen
• koppel los zoals voor aankoppelen is aangegeven; plaats de beschermkapjes op
de snelkoppelingen
Let op: bij enige twijfel of onzekerheid deze activiteit aan de installateur overlaten.
19
F
FÉLICITATIONS
Nous vous félicitons pour l’achat de ce climatiseur de haute qualité et vous remercions
de la confiance que vous nous avez ainsi témoignée. Avant de mettre l’appareil en
service, nous vous recommandons de lire attentivement le présent manuel. Il vous
explique comment installer et utiliser l’appareil et comment le maintenir en parfait état
de marche.
Conservez ces instructions d’utilisation en lieu sûr et joignez-les à l’appareil si une autre
personne devait l’utiliser.
Amcor est spécialisé depuis plus de 50 ans dans la fabrication et la commercialisation
d’appareils de conditionnement d’air: déshumidificateurs, climatiseurs mobiles,
refroidisseurs, purificateurs d’air, ionisateurs et diffuseurs d’aromathérapie. Ces
produits de qualité intègrent les tous derniers progrès de la technologie.
SÉCURITÉ
IMPORTANT:
• Cet appareil est exclusivement destiné à un usage intérieur.
• Cet appareil doit être connecté à une prise de 220-240 V/50 Hz avec contact de terre.
• Le raccordement au secteur doit être effectué dans le respect des normes de
sécurité en vigueur dans le pays d’utilisation en matière d’installation d’appareils
électroménagers.
En cas de doute, faites contrôler et, au besoin, adapter l’installation électrique par un
électricien agréé.
• Le climatiseur est sans danger. Comme tout appareil électrique, il doit néanmoins
être utilisé avec précautions.
• Tenez-le hors de portée des enfants.
• Vous ne devez jamais l’arroser d’eau ni l’immerger dans l’eau pour le nettoyer.
• N’introduisez aucun objet dans les orifices.
• Avant tout nettoyage, débranchez au préalable la prise électrique.
• N’utilisez jamais de prolongateur pour le raccorder. Faites installer une prise avec
mise à la terre par un électricien agréé si vous n’en disposez pas.
ATTENTION
• N’utilisez jamais cet appareil si le cordon ou la prise est endommagé. Ne faites pas
passer le câble sur des rebords tranchants.
• Si le cordon est endommagé, il ne doit être remplacé que par un professionnel pour
écarter tout risque.
• En dehors de l’entretien normal, ne confiez les réparations éventuellement
nécessaires qu’à un réparateur agréé; à défaut, la garantie pourrait être invalidée.
20
F
N’utilisez pas le climatiseur, si
le câble est
endommagé.
un risque existe
qu’un liquide se
répande sur l’unité.
un risque d’interférence par des objets
étrangers existe.
près d’une source
de chaleur.
Ne pas essayer de
réparer soi-même.
FONCTIONNEMENT
Le compresseur (6) dans l’unité extérieure
comprime le fluide frigorigène en un gaz
ayant une température et une pression
élevées. En s’écoulant le long des ailettes
de refroidissement du condenseur (7),
le gaz cède sa chaleur et se condense
en un liquide qui est conduit vers
l’évaporateur (1) dans l’unité intérieure.
Le liquide se dilate alors pour former
un gaz ayant une pression et une
température basses.
Ce gaz absorbe la chaleur de la pièce, l’air
réfrigéré est soufflé à nouveau dans la
pièce et la chaleur est conduite avec le gaz
vers le compresseur.
1
a
2
3
4
c
b
6
7
5
d
8
Le ventilateur (3) aspire l’air (a) à travers
le filtre (2) et diffuse l’air réfrigéré (b)
dans la pièce.
Le ventilateur (8) entraîne l’air (c) sur le
condenseur et évacue l’air chaud (d).
1. évaporateur 5. conduite de liquide
2. filtre
6. compresseur
3. ventilateur
7. condenseur
4. conduite de gaz
8. ventilateur
Chauffage.
Le système est inversé : le condenseur fonctionne comme évaporateur,
l’évaporateur comme condenseur : l’air chaud est diffusé dans la pièce. Idéal pour
les journées fraîches lorsque le chauffage central ne fonctionne pas (encore).
Déshumidification.
Comme pour le refroidissement, l’humidité de l’air se condense sur l’évaporateur
froid à température ambiante.
21
F
TÉLÉCOMMANDE
Affichage LCD :
auto
refroidissement
déshumidification
ventilateur
chauffage
chauffage électrique
(pas sur ces modèles)
température
vitesse de ventilation
orientation du flux d’air
2
4
1
5
7
8
10
12
13
temps
arrêt temps
fonction nuit
réglage temps
3
6 Touches:
1. marche/arrêt
9
2.
mode (refroidissement,
11
chauffage, déshumidification)
3. vitesse du ventilateur
14
4. augmenter (température, temps)
5. diminuer (température, temps)
6. réglage temps
7. arrêt temps
8. horloge
9. orientation des volets
10. chauffage électrique
(pas sur ces modèles)
11. mode nuit
12. turbo
13. remise à zéro
14. réserve
Utilisation de la télécommande
Le signal de la télécommande est reçu jusqu’à une distance de 8 m. Orienter la
télécommande sur le point de réception de l’unité intérieure.
La réception des signaux de la télécommande est confirmée par un signal sonore.
Voir page 27 pour le rempacement des piles.
22
F
COMMANDE
Généralités
[1]. Le mode de fonctionnement
• Mettre en marche l’appareil avec la touche
choisi en dernier est activé.
• Pour arrêter l’appareil, utiliser la touche marche/arrêt , le dernier mode de
fonctionnement est mémorisé.
• Les touches [4] vers le haut et [5] vers le bas sont utilisées pour augmenter ou
diminuer la température dans la plage de réglage du thermostat 18 °C – 25 °C.
• Régler la vitesse de ventilation avec la touche ventilateur
, bas
, moyen
, haut
ou automatique (le symbole clignote sur l’affichage). En mode
automatique, la vitesse de ventilation est déterminée par la différence entre la
température réglée et la température ambiante.
Réglage de la fonction temps
La fonction temps doit être réglée après la première installation et au début d’une
nouvelle période d’utilisation. Avec la télécommande pourvue de piles (neuves) :
Appuyer sur la touche fonction temps
[8] pour régler le temps. Utiliser la
touche “vers le haut” pour les heures et “vers le bas” pour les minutes.
Refroidissement
1. Appuyer sur la touche Mode
jusqu’à ce que le symbole de refroidissement
s’affiche.
2. Régler la température souhaitée.
avec la touche ventilation.
3. Régler la vitesse de ventilation
Chauffage
1. Appuyer sur la touche
jusqu’à ce que le symbole de chauffage
2. Régler la température souhaitée.
avec la touche ventilation.
3. Régler la vitesse de ventilation
s’affiche.
Déshumidification (9KE max. 17 L/24h, 12KE max. 24 L/24h)
1. Appuyer sur la touche
jusqu’à ce que le symbole de déshumidification
s’affiche.
2. Régler la température souhaitée.
3. La touche ventilation ne fonctionne pas en mode déshumidification. La vitesse
de ventilation est toujours basse dans ce mode.
Mode ventilation
1. Appuyer sur la touche
jusqu’à ce que le symbole de ventilation
2. Régler la température souhaitée.
3. Régler la vitesse de ventilation
avec la touche ventilation.
s’affiche.
23
F
Mode nuit
1. Appuyer sur la touche
jusqu’à ce que le symbole de chauffage
, de
refroidissement
ou automatique
s'affiche.
2. Régler la température souhaitée.
3. Appuyer sur la touche Mode nuit
, ce symbole s’affiche. Annuler le mode nuit
en appuyant encore une fois sur cette touche.
4. En mode nuit, le ventilateur fonctionne à basse vitesse.
Mode Auto
jusqu’à ce que le symbole du mode automatique
1. Appuyer sur la touche
s’affiche.
2. La différence entre la température réglée et la température ambiante détermine le
fonctionnement : refroidissement, chauffage, mode ventilation ou séchage. Les
touches vers le haut et vers le bas ne fonctionnent pas.
3. Régler la vitesse de ventilation
avec la touche ventilation.
Fonction Arrêt temps
1. Appuyer sur la touche
jusqu’à ce que le symbole du mode voulu s’affiche.
2. Régler la température souhaitée.
3. Régler la vitesse de ventilation avec la touche ventilation
.
4. Appuyer sur la touche Arrêt temps
pour régler le temps. Utiliser la touche
“vers le haut” pour les heures et “vers le bas” pour les minutes. Lorsque le laps
de temps réglé s’est écoulé, l’appareil s’arrête. Pour désactiver la fonction arrêt
temps avant que le laps de temps fixé ne se soit écoulé, appuyer encore une fois
sur la touche Arrêt temps
.
Fonction Marche temps
1. L’appareil est débranché.
2. Régler la température souhaitée.
3. Régler la vitesse de ventilation avec la touche ventilation
.
4. Appuyer sur la touche Marche temps
pour régler le temps. Utiliser la touche
“vers le haut” pour les heures et “vers le bas” pour les minutes.
Régler le mode, la température, la vitesse de ventilation, etc. souhaités. Lorsque
le laps de temps fixé s’est écoulé, l’appareil s’allume. Pour désactiver la fonction
Marche temps avant que le laps de temps fixé ne se soit écoulé, appuyer encore
une fois sur la touche Marche temps
.
Turbo
1. Appuyer sur la touche
jusqu’à ce que le symbole de ventilation
s'affiche.
2. Régler la température souhaitée.
avec la touche ventilation.
3. Régler la vitesse de ventilation
4. Appuyer sur la touche Turbo . Le ventilateur et le compresseur fonctionnent
pendant 15 minutes à la vitesse maximum, puis à nouveau aux vitesses fixées
antérieurement.
24
F
IMPORTANT
Remise en marche automatique
Après une panne de courant, le climatiseur démarre automatiquement si
l’alimentation est rétablie. En cas de doute, contrôler les réglages.
Plage de réglage du thermostat intérieur
Le thermostat intérieur peut être réglé sur une température comprise entre 18 et 30
°C.
N.B. : l’obtention de la valeur souhaitée dépend des conditions dans la pièce en
question.
Plage de réglage de la fonction pompe à chaleur
La fonction chauffage peut être utilisée pour une température extérieure d’environ
10 °C ou plus.
N.B. : le fonctionnement de l’appareil peut être perturbé à des températures
extérieures plus basses.
Capacité
La capacité de refroidissement ou de chauffage est fortement dépendante de
la situation et/ou de l’usage de la pièce dans laquelle se trouve le climatiseur.
L’exposition en plein soleil et la présence de personnes, lampes ou appareils
entraînent une charge calorifique supplémentaire.
Le refroidissement des pièces de grandeur habituelle requiert environ 100 W par
m2. En cas de fort ensoleillement ou en présence d’autres sources de chaleur, cette
valeur peut atteindre 350 W par m2.
Pour les spécifications de votre climatiseur, voir pages 58/59.
Conseil : pendant les périodes de grande chaleur, utiliser le climatiseur pour
refroidir autant que possible la nuit. Les murs et le mobilier ainsi rafraîchis
contribuent à conserver une atmosphère agréable au cours de la journée Éviter un
fort ensoleillement.
Mise en marche de secours
En cas de problèmes, le climatiseur peut être mis en marche avec le bouton de
secours sous le panneau de l’unité intérieure. Ouvrir le panneau avant et appuyer
sur le bouton.
Le climatiseur va fonctionner :
- en mode chauffage si la température ambiante est ≤ 20°C,
- en mode refroidissement si la température ambiante est ≥ 25 °C,
et pour les valeurs intermédiaires : déshumidifier sur les modèles sans pompe à
chaleur et fonctionner en mode ventilation sur les modèles équipés d’une pompe.
25
F
FILTRES
Débrancher l’appareil et retirer la fiche de la prise.
A
A
Ouvrir : relever la partie antérieure
en tirant sur les rainures A. La partie
antérieure reste en position horizontale
(déplacement de 90° vers le haut).
B
C
B
Fermer : Rabaisser la partie antérieure
en appuyant sur les côtés latéraux B
et au milieu au point C. S’assurer que
l’appareil est bien fermé (déclic).
1. Ouvrir la partie antérieure (ou la placer en position horizontale) et retirer le(s)
filtre(s).
2. Taper doucement sur le filtre ou utiliser un aspirateur pour enlever la saleté.
Si le filtre anti-poussière est très sale, vous pouvez le laver dans une eau tiède
contenant une très petite quantité de nettoyant neutre. Rincer soigneusement et
bien laisser sécher le filtre (sans le mettre en plein soleil ni près d’une source de
chaleur).
3. Maintenir ouvert le panneau à grille et remettre en place le(s) filtre(s). Bien
refermer le panneau (déclic).
4. Introduire la fiche dans la prise et mettre l’appareil en marche.
26
F
ENTRETIEN
Débrancher l’appareil et retirer la fiche de la prise.
Unité intérieure
Dépoussiérer régulièrement avec un chiffon sec ou utiliser un essuie-tout légèrement
humide. Ne jamais utiliser de produits chimiques ni de solvants et ne jamais vaporiser
de liquide sur ou dans l’appareil.
Unité extérieure
Enlever la saleté et dégager les orifices d’apport et d’évacuation de l’air (feuilles mortes,
etc.). Ne pas utiliser de produits chimiques, ils pourraient endommager l’appareil.
FIN D'UNE PÉRIODE D'UTILISATION
Si le climatiseur n’est plus utilisé pendant une longue période :
• régler le mode ventilateur sur une journée assez chaude pour bien faire sécher
l’intérieur de l’appareil pendant quelques heures.
• enlever la fiche de la prise et retirer les piles de la télécommande.
• nettoyer aussi le(s) filtre(s).
DÉBUT D'UNE NOUVELLE PÉRIODE D'UTILISATION
Si le climatiseur est à nouveau utilisé après une longue période :
• contrôler que les orifices d’apport et d’évacuation de l’air sont libres de tout obstacle
sur les unités intérieure et extérieure. Enlever la saleté et autres obstacles éventuels.
• vérifier la présence du filtre.
• contrôler que l’évacuation des condensats n’est pas entravée.
• placer 2 piles AAA dans la télécommande.
• dépoussiérer l’unité intérieure.
• mettre l’appareil en marche, régler le temps et le mode de fonctionnement souhaités.
N.B. : veiller à ce que l’évacuation des condensats ne soit pas entravée (croissance
d’algues ou autre) pour éviter tout risque de fuite.
REMPLACEMENT DES PILES
• retirer le couvercle.
• remplacer les piles AAA, en respectant les polarités
(+ avec + et – avec –).
• remettre le couvercle.
• appuyer sur la touche marche/arrêt , si aucun symbole
ne s’affiche, cela signifie que les piles sont usées ou
placées de manière incorplacées.
27
F
MANUEL D'INSTALLATION
2VFMMFQJoDFQPVSWPUSF$MJNBUJTFVS
#FBVDPVQEFGFOpUSFT
&OQMFJOTPMFJM
WnSBOEB
%JNFOTJPO
EFMBQJoDF
TVSGBDF
8 N
N
N
.PJOTEFGFOpUSFT
1FVEFTPMFJM
N
8
N N
$BQBDJUnEF
SFGSPJEJTTFNFOU
8
8
8
8
8
-BQJoDFBQQSPQSJnFEnQFOEEFMBDBQBDJUnEFSFGSPJEJTTFNFOUTJUVBUJPOTPMFJMGFOpUSFT
TPVSDFTEFDIBMFVSQSFTFOUMBNQTBQQBSFJMTOPNCSFEFHFOTFUD
5FOJSmBFODPNQUF
1SJODJQFEFCBTFFOTJUVBUJPOTNPZFOTTPMBJSFFUTBOTTPVSDFTEFDIBMFVS
8QBSNoUSFDBSSnBJOTJDBQBDJUnEFSFGSPJEJTTFNFOUEF8EBOTVOFQJoDFEFN
28
F
MESURES DE SÉCURITÉ
Contrôler la tension de secteur.
Vérifier que la tension de secteur est la même que celle indiquée sur la plaque
signalétique de l’appareil.
Maintenir le lieu de travail en ordre.
Une attitude nonchalante sur le lieu de travail peut entraîner des accidents.
Utiliser un outillage adéquat.
Ne pas utiliser d’appareils n’ayant pas une force suffisante pour les gros travaux.
Utiliser des outils en bon état et convenant au but prévu.
Porter un masque et des protections des yeux et des oreilles.
Porter toujours un dispositif de protection des yeux et un masque facial adéquat
pour les travaux produisant des éclats ou de la poussière et pour les travaux réalisés
au-dessus de la tête. Porter le cas échéant des protections auditives.
Rallonge pour les travaux effectués à l’extérieur.
Utiliser uniquement des rallonges et des prises de marque agréée pour les travaux à
l’extérieur.
Contrôler le bon état des appareils électriques.
Ne jamais utiliser un outil dont l’interrupteur est défectueux.
Être prudent pour les travaux effectués sur des escabeaux, des échelles ou des
échafaudages.
Être extrêmement prudent lorsque les travaux sont réalisés sur une partie surélevée.
S’assurer que les escabeaux, échelles ou échafaudages sont installés correctement
et ne peuvent pas glisser.
Câbles électriques, conduites d’eau et de gaz, etc.
Mesures de sécurité importantes pour les travaux de perçage :
S’assurer que vous ne pouvez pas toucher, en perçant, un câble électrique ni une
conduite d’eau ou de gaz. Contrôler le mur avec un détecteur de câble/conduite
avant de forer.
Tout est-il clair ?
Après avoir pris connaissance des instructions de sécurité et du mode d’utilisation
de l’outillage en ayant consulté le mode d’emploi, vous pouvez commencer les
travaux. Le respect des conseils et instructions donnés par les fabricants vous
permet de travailler avec un maximum de sécurité.
Conservez soigneusement ces instructions !
29
F
SÉCURITÉ
Lire attentivement le chapitre sur les mesures de sécurité et ces instructions avant
de commencer les travaux. Respecter l’ordre des travaux et la méthode indiqués ici.
Le fabricant peut modifier sans préavis des appareils ou certaines de leurs pièces
pour des raisons techniques ou commerciales. Consultez votre fournisseur à ce
sujet.
IMPORTANT:
• Cet appareil doit être raccordé à une prise mise à la terre de 230 V/50 Hz et avec
un fusible de 16A.
• Le raccordement au réseau électrique doit être réalisé en conformité avec les
normes de sécurité en matière d’installation des appareils électroménagers en
vigueur dans le pays d’utilisation.
En cas de doute, faire contrôler l’installation électrique et la faire modifier le cas
échéant par un électricien agréé
Effectuer les travaux
• dans un lieu bien éclairé et en ordre.
• selon un plan établi avec soin.
• en utilisant un équipement et des outils de qualité.
• et en utilisant des moyens de protection : lunettes de sécurité, protection
auditive, masque, casque de chantier, chaussures et gants de travail.
L’unité extérieure doit être soulevée et installée par deux personnes.
VOTRE CLIMATISEUR
Le climatiseur split est livré dans deux cartons :
- un carton avec l’unité intérieure et les conduites nécessaires
- un carton avec l’unité extérieure et l’outillage.
Retirer avec précaution les appareils des cartons. Le matériel d’emballage doit être
tenu hors de portée des enfants.
Pièces et outils fournis :
- vis et chevilles pour la plaque de fixation de l’unité intérieure
- manchon à collet pour le trou dans le mur
- tube pour l’évacuation des condensats de l’unité extérieure
- 4 pieds en caoutchouc pour l’unité extérieure
- 2 clés plates pour les valves de l’unité extérieure
- clé alène pour les valves de l’unité extérieure
30
F
ÉQUIPEMENT ET OUTILLAGE RECOMMANDÉS
•
•
•
•
•
•
•
perceuse à percussion
• tournevis électrique
détecteur de conduites
• marteau
mètre à ruban
• niveau à bulle d’air
crayon et craie
• escabeau
pince multiprise
• bâche de protection du sol à l’intérieur
éventuellement coulisse de conduite et brides
éventuellement mousse rigide de polyuréthane (PUR) ou mastic silicone
CHOIX DE L'EMPLACEMENT
La distance maximum entre l’unité extérieure et l’unité intérieure est de 4 m (longueur
des conduites de refroidissement et du câble électrique). L’unité intérieure doit être
placée au moins 1 m plus haut que la partie supérieure de l’unité extérieure.
Emplacement de l’unité intérieure
• contre un mur dans lequel un trou de Ø 65 mm (dimension du manchon) peut être
percé pour la liaison avec l’unité extérieure. Le forage d’un trou dans un mur en
béton nécessite un outillage spécial ; confier ce travail à une entreprise spécialisée.
Contrôler avec un détecteur l’absence de conduites à l’emplacement choisi.
• distance jusqu’au plafond au minimum 15 cm, espace libre à gauche et à droite de
50 cm minimum.
• l’air réfrigéré doit pouvoir diffuser facilement dans toute la pièce.
• l’emplacement le plus adéquat est au milieu, mais pas à proximité d’une fenêtre ou
d’une porte.
• il doit être accessible pour permettre le nettoyage du filtre.
• il doit se trouver à 1 m au moins d’un téléviseur, magnétoscope et autres appareils
ainsi que des lampes fluorescentes (tubes au néon).
• une prise avec raccordement à la terre doit être présente à 1,5 m au maximum
(longueur du cordon de l’unité intérieure). Le cas échéant, faire poser une prise
par un installateur agréé, selon les prescriptions en vigueur. L’unité extérieure est
alimentée en courant depuis l’unité intérieure par le câble installé avec les conduites
de refroidissement.
Emplacement de l’unité extérieure
• doit être suffisamment solide pour soutenir l’unité extérieure. Celle-ci peut être
placée sur le sol, sur un toit plat (à condition de pouvoir réaliser un bâti adéquat
pour y fixer l’unité ; éviter les risques de fuite de la toiture) ou sur des supports
muraux. Renforcer le cas échéant l’emplacement choisi ; si l’emplacement n’est pas
suffisamment solide, il peut en résulter des vibrations et un bruit excessifs.
• flux d’air libre suffisant, exposé le moins possible à la pluie et au soleil, avec
possibilité d’évacuer les condensats.
• à un emplacement où l’air et le bruit émis ne gênent personne ; pas à un endroit
présentant un taux d’humidité élevé ni à proximité de gaz oxydants ou de vapeurs
d’huile.
• espace libre à l’arrière de 15 cm minimum, sur les côtés et à l’avant de 50 cm
minimum. Prévoir un espace suffisant pour l’entretien.
31
F
UNITÉ INTÉRIEURE
Pour réduire les risques de fuite, suspendre l’unité intérieure de manière
parfaitement horizontale.
Le bac collecteur dans l’unité intérieure avec le tube d’évacuation des condensats
doit être propre et libre d’obstacle, de sorte que les condensats puissent librement
s’écouler (sinon risque de fuite).
Après avoir déterminé l’emplacement de l’unité intérieure, la pose de l’unité peut
commencer. N.B. : ce travail relève de votre propre responsabilité.
A. Plaque de fixation
Suspendre la plaque de fixation à l’horizontale sur un support solide, mesurer
soigneusement et marquer l’emplacement des trous de vis.
CONSEIL. Fixer la plaque avec une seule vis sans trop serrer, déterminer la position
horizontale avec un niveau à bulle et marquer l’emplacement des autres trous.
Dévisser la vis, percer tous les trous, placer les chevilles et visser soigneusement la
plaque.
Percer 8 trous de 6,4 mm (2.5”) et 30 mm de profondeur.
Utiliser les chevilles fournies.
Bien fixer la plaque avec les vis fournies.
B. Trou dans le mur pour le passage de la conduite
Le trou de 65 mm de diamètre et légèrement en pente vers l’extérieur (10-15 mm)
pour une meilleure évacuation des condensats, peut être réalisé dans l’espace
du boîtier pour le cacher à la vue. Le cas échéant, un passage plus à gauche est
possible. Des goulottes de recouvrement sont disponibles dans le commerce.
Endroit pour le trou
32
F
Positionner le manchon fourni et utiliser si nécessaire le collet à la partie intérieure.
Le cas échéant, scier le manchon à la longueur désirée.
C. Cordon électrique
Déterminer si le câble de l’unité intérieure doit sortir à gauche ou à droite. Casser la
petite plaque protégeant le câble, sortir le câble et le fixer provisoirement avec du ruban
adhésif, de sorte qu’il ne gêne pas lors de la suspension de l’unité intérieure.
Demander de l’aide pour suspendre l’unité intérieure et faire passer les conduites.
D. Conduites
Dérouler avec précaution les conduites sans les plier et introduire l’extrémité dans
le trou pourvu du manchon.
E. Suspension
Soulever l’unité intérieure et la suspendre aux 4 languettes sur la plaque de fixation
tout en faisant passer les conduites. Contrôler que l’unité est bien suspendue aux 4
languettes.
Le cas échéant, demander à quelqu’un de guider le passage des conduites de l’autre
côté du mur.
Veiller notamment à ce que la conduite d’évacuation des condensats soit placée
correctement et en légère pente et que rien n’entrave l’écoulement. Vérifier que l’isolant
n’a pas glissé et qu’aucune conduite n’est à nu, sinon il pourrait se former de la
condensation (risque de fuite).
Après avoir posé correctement l’unité intérieure (à l’horizontale et sans mouvement
gauche-droite), effectuer la pose de l’unité extérieure.
plaque de fixation
conduites de fluide frigorigène
conduite d’évacuation des condensats
câble de connexion (alimentation)
33
F
UNITÉ EXTÉRIEURE
Fixer l’unité extérieure
Placez les pieds en caoutchouc
et vissez l’unité complètement
sur une base forte.
Gardez 50 centimètres de
l’espace libre autour de l’unité.
Tube d’évacuation
Fixer le tube d’évacuation à la plaque
de fond. Un flexible d’évacuation (non
fourni) peut éventuellement y être
raccordé pour conduire les condensats à
un point d’évacuation.
En général, les condensats s’écoulent
librement sur le sol ou le toit.
Contrôler que ce mode d’évacuation ne
gêne personne et n’occasionne pas de
dommages.
A
B
L’unité extérieure peut être fixée
sur des embases spéciales ou
sur un support mural. Consultez
votre installateur
C
D
Raccordement électrique
Dévisser le boîtier protecteur [A] [B].
L’unité extérieure est alimentée par le câble de l’unité intérieure et une petite prise
spéciale qui se fixe dans le contact [C].
Contrôler que cette connexion est bien fixée [D].
34
F
E
F
Conduites
Enlever les capuchons des valves [E] et les bouchons de la conduite [F].
G
H
Bien serrer en premier la conduite mince sur la valve supérieure [G].
Bien serrer ensuite la conduite plus large sur la valve inférieure [H].
I
J
Contrôler pour fuite.
Ouvrir la valve supérieure avec la clé alène [I].
Vérifier les deux raccordemants pour fuite, en appliquant une éponge avec du savon
aux valves et aux raccordements.
S’il y a une fuite, fermer immédiatement la valve avec le clé alène.
Demander l’assistance de l’installateur si, après que vous ayez vérifié que les
conduites sont bien serrer, il y a néanmoins une fuite. Maintenir les valves fermées !
S’il n’y a aucune fuite, ouvrir la valve inférieure avec la clé alène [J].
35
F
K
L
Si les conduites de refroidissement sont bien serrées et ne présentent pas de fuites,
les capuchons peuvent être remis en place sur les valves [K].
Revisser le boîtier protecteur sur l’unité extérieure [L].
Fixer les conduites verticalement sur le mur avec une coulisse de
conduite et des brides, disponibles dans le commerce.
Veiller à ce que la conduite d’évacuation des condensats puisse s’écouler sans
entrave dans un dispositif de collecte approprié.
Conserver soigneusement les capuchons des raccords et des valves ainsi que les
outils fournis.
36
F
DÉPOSE DE L'UNITÉ EXTÉRIEURE
N.B. : les raccords rapides ne peuvent être utilisés qu’une seule fois !
Aucune garantie n’est donnée en cas de réinstallation de l’unité extérieure.
Si la dépose de l’unité s’avère nécessaire, procéder comme suit :
• demander l’aide d’une personne qui actionnera la télécommande du climatiseur,
• fixer la température souhaitée à 18 °C
• mettre en marche le climatiseur, attendre que le bruit du compresseur soit
audible
• enlever les capuchons des valves et fermer la valve supérieure (conduite mince)
avec la clé alène
• attendre 1 minute au maximum, le bruit du compresseur se modifie
• fermer aussi la valve inférieure (conduite plus large) avec la clé alène
• débrancher immédiatement le climatiseur en enlevant la fiche de la prise
• après avoir soigneusement fermé les valves, remettre en place les capuchons
• désaccoupler comme indiqué pour l’accouplement ; placer les capuchons sur les
raccords rapides.
N.B. : en cas de doute ou d’hésitation, confier cette tâche à l’installateur.
37
GB
THANK YOU
Thank you for choosing this innovative Amcor air conditioner. We suggest that you
keep this manual in a safe place for future reference. It describes the many benefits
and advanced features this unique product has to offer. Before you use your new air
conditioner you should carefully read these instructions to maximise this product’s
performance.
For over 50 years Amcor has specialised in complete indoor environmental control,
manufacturing and marketing; dehumidifiers, portable air conditioners, coolers, air
purifiers, ionisers and aroma therapy scent diffusers. These world class products
incorporate the latest technological developments.
SAFETY INSTRUCTIONS
IMPORTANT!
• The inside unit is designed for indoor operation only.
• Rating: This unit must be connected to a 220-240 V / 50 Hz earthed outlet.
• The installation must be in accordance with regulations of the country where the
unit is used.
If you are in any doubt about the electrical installation, have it checked and if
necessary modified by a qualified electrician.
• The air conditioner is safe. However, as with other electrical appliances, use it
with care.
• Keep the remote control out of the reach of children.
• Do not clean the air conditioner by spraying it or immersing it in water.
• Do not insert any object into the opening of the air conditioner.
• Disconnect it from the mains before cleaning the unit or any of its components.
• Never connect the unit to an electrical outlet using an extension cord. If an outlet
is not available, one should be installed by a licensed electrician.
WARNING
• Never operate this appliance if it has a damaged cord or plug. Do not lead the
cord over sharp edges.
• A damaged supply cord should be replaced by the manufacturer, its service agent
or a qualified person in order to avoid a hazard.
• Any service other than regular cleaning or filter replacement should be performed
by an authorized service representative. Failure to do so could result in a loss of
warranty.
38
GB
Do not use your air conditioner when:
the power cord is
damaged.
there is a change
of liquids falling on
the unit.
ther is a risk of
interference from
foreign objects.
it a close to a heat
source.
This air conditioner
is not made for DIY
repair.
HOW IT WORKS
The compressor (6) in the exterior unit
compresses the refrigerant into a hightemperature, high-pressure gas. When
this gas flows along the cooling fins of
the condenser (7), heat is exuded and
the gas condenses into a liquid, which is
led to the evaporator (1) in the interior
unit. The liquid expands into a gas at
a low temperature and low pressure is
converted.
This gas absorbs the warmth of the air
in the room, the cooled air is blown back
into the room and the heat is led to the
compressor along with the gas.
A fan (3) draws the air (a) over the filter
(2) and blows the cooled air (b) back into
the room.
A fan (8) draws air over the condenser
and blows warm air (d) away.
1
a
2
3
4
c
b
6
7
5
d
8
1. evaporator
2. filter
3. fan
4. gas line
5. liquid line
6. compressor
7. condenser
8. fan
Heating.
The system operates in reverse: the condenser works as an evaporator, the
evaporator as a condenser: warm air is blown into the room. This is ideal for cool
days when the main heating is not on, or not yet on.
Dehumidifying
As with cooling, the moisture in the air condenses on the cold evaporator at room
temperature
39
GB
REMOTE CONTROL
LCD display:
auto
cool
dehumidify
fan
heat
electric heating
(not on these models)
temperature
fan speed
airflow direction
2
4
5
7
8
10
12
13
1
clock
timer off
sleep mode
timer set
3
6 Buttons:
1. ON/OFF
9
2.
mode (cool, heat, dehumidify)
11
3. fan speed
4. increase (temperature, time)
14
5. decrease (temperature, time)
6. timer setting
7. timer cancelling
8. clock
9. swing (adjust the louvers)
10. heater
11. sleep mode
12. turbo
13. reset
14. spare
Using of the remote control
The remote control signal has a range of up to 8 m. Point the remote control at the
receiver in the interior unit.
A beep confirms that the remote control signal has been received.
See page 45 for replacing the batteries.
40
GB
OPERATION
General
button [1]. This activates the most recent
• Turn the appliance on with the
setting.
• The on/off button
turns the appliance off; the type of operation set at that
time is stored in the memory.
• The desired temperature is set with the up [4] and/or down [5] button, within the
limits of the thermostat: 18°C – 25°C.
• Use the fan button
to set the fan speed at low:
, medium:
, high:
or automatic (the symbol on the display will flash). The fan speed in the
automatic setting is determined by the difference between the set temperature
and the room temperature.
Setting the time
The time must be set after initial installation and at the start of a new period of use.
With batteries (new, if necessary) in the remote control:
Press the clock button
[8] to set the time. Use the up button for hours and the
down button for minutes.
Cool
1. Press the mode button
until the cool symbol
2. Set the desired temperature.
3. Use the fan button
to set the fan speed.
Heat
1. Press the mode button
until the heat symbol
2. Set the desired temperature.
3. Use the fan button
to set the fan speed.
appears.
appears.
Dehumidify (9KE max. 17 L/24h, 12KE max. 24 L/24h)
1. Press the mode button
until the dehumidify symbol appears.
2. Set the desired temperature.
3. The fan button does not work in dehumidify mode. The fan speed will always be
low in this mode.
Fan mode
1. Press the mode button
until the fan symbol
2. Set the desired temperature.
3. Use the fan button
to set the fan speed.
appears.
41
GB
Sleep mode
until the heat, coolof auto mode
symbol
1. Press the mode button
appears.
2. Set the desired temperature.
3. Press the sleep mode button
; this symbol will appear on the display. Cancel
the sleep mode by pressing this button again.
4. The fan speed is low in sleep mode.
Auto mode
until the auto mode symbol
appears.
1. Press the mode button
2. The difference between set temperature and room temperature determines how
the appliance operates: cool, heat, fan or dry. The up and down buttons will not
work.
3. Use the fan button
to set the fan speed.
Timer off function
1. Press the mode button
until the symbol appears for the operation you want.
2. Set the desired temperature.
to set the fan speed.
3. Use the fan button
4. Press the timer off button
to set the time. Use the up button for hours and
the down button for minutes. Once the time you have set has elapsed, the
appliance will switch itself off. To cancel the timer off function before the set time
has elapsed, press the timer off button
again.
Timer on function
1. The appliance is switched off.
2. Press the timer on button
to set the time. Use the up button for hours and
the down button for minutes.
Set the desired operation, temperature, fan speed, etc. Once the set time has
elapsed, the appliance will switch itself on. To turn off the timer on function
before the set time has elapsed, press the timer on button
again.
Turbo
1. Press the mode button
until the fan symbol
appears.
2. Set the desired temperature.
to set the fan speed.
3. Use the fan button
4. Press the turbo button . The fan and compressor will run at maximum speed
for 15 minutes, then at previously set speeds.
42
GB
IMPORTANT
Auto restart
The air conditioner will automatic restart when electricity is restored after a power
cut. If in doubt, check the settings.
Range of internal thermostat
The internal thermostat can be set at a desired temperature between 18 and 30 °C.
Note that whether the desired value is achieved depends on conditions in the room.
Range of heat pump function
The heat function can be used when the external temperature is approximately 10 °C
or higher.
Note that it may not operate properly at lower external temperatures.
Capacity
The required cooling or heating capacity depends greatly on the location and/or use
of the room where the air conditioner is installed. Strong sunlight and the presence
of people, lights or equipment create an additional heat load.
Normal living spaces require about 100 W per square metre of floor surface. In
strong sunlight or if other sources of heat are present, this may be as much as
350 W/m2.
For your air conditioner’s specifications, see pages 58/59.
Tip: on warm days, let the air conditioner cool the room as much as possible during
the night. Cold walls and furniture will help to keep the room pleasant during use.
Avoid strong sunlight.
Emergency start
In the event of a problem, the air conditioner can be operated using the emergency
button under the panel in the interior unit. Open the front panel and press the
button.
The air conditioner will:
- heat if the room temperature is 20 °C or less
- cool if the room temperature is 25 °C or more
and for values in between: dehumidify in a model without a heat pump and in a
model with a heat pump in fan mode.
43
GB
FILTERS
Turn the appliance off and remove the plug from the outlet.
A
A
Opening: at the A recesses, pull the
front part up. The front part will stay
horizontal (turn up 90 °).
B
C
B
Closing: press the front part down at
the sides at B and in the middle at C.
Make sure it is properly closed (click).
1. Hold the front part open (or put it in horizontal position) and remove the
filter(s).
2. Tap the filter gently or use a vacuum cleaner to remove dirt. If the dust filter
is very dirty, it may be washed in lukewarm water with a very small amount of
neutral detergent. Rinse well and allow to dry completely (not in direct sunlight or
near a source of heat).
3. Keep the grid panel open and reinstall the filter(s). Press the panel shut; a click
indicates it is closed properly.
4. Plug the appliance back in and turn it on.
44
GB
CLEANING
Turn the appliance off and remove the plug from the outlet.
Interior unit
Dust regularly with a dry cloth or slightly damp paper towel.
Never use chemicals or solvents. Never spray a liquid in or over the appliance.
Exterior unit
Remove dirt and keep the air intake and exhaust openings free of leaves, etc.
Cleaning with chemicals may cause damage.
END OF PERIOD OF USE
If the air conditioner is not going to be used for an extended period:
• set in fan mode on a slightly warm day so that the inside of the appliance dries
out.
• remove the plug from the outlet and the batteries from the remote control.
• clean filters as well.
START OF PERIOD OF USE
If the air conditioner is to be used again after an extended period:
• check that the air intake and exhaust openings of the interior and exterior units
are not blocked. Remove all dirt and obstacles.
• check that there is a filter.
• check that the condensation outlet drains properly.
• install 2 AAA batteries in the remote control.
• dust the interior unit.
• turn the appliance on, set the time and desired setting.
Note: make sure condensation is drained freely and that there is no obstacle such
as algae growth, otherwise leaks may occur.
REPLACING THE BATTERIES
•
•
•
•
remove the cover.
replace the AAA batteries, + to + and - to -.
install the cover.
press the on/off button; if no symbols appear on the
display, the batteries are empty or have been incorrectly
installed.
45
GB
INSTALLATION GUIDE
8IJDISPPNJTCFTUTVJUFEGPSUIF"JS$POEJUJPOFS
.BOZXJOEPXT
.VDITVOTIJOF
DPOTFSWBUPSZ
4J[FPGUIFSPPN
GMPPSBSFB
8 N
N
N
-FTTXJOEPXT
-FTTTVOTIJOF
N
8
N N
$PPMJOHDBQBDJUZ
8
8
8
8
8
"TVJUBCMFSPPNEFQFOETPOUIFDPPMJOHDBQBDJUZTVOMPDBUJPOXJOEPXBSFBQSFTFODFPG
IFBUTPVSDFTMBNQTBQQMJBODFTOVNCFSPGQFPQMFFUD
5BLFUIJTJOUPBDDPVOU
3VMFPGUIVNCJOBWFSBHFTVOTIJOFDPOEJUJPOTBOEOPQSFTFODFPGPUIFSIFBUTPVSDFT
8QFSTRVBSFNFUSFUIVTBDPPMJOHDBQBDJUZPG8JTCFTUQMBDFEJOBNSPPN
46
GB
SAFETY ASPECTS
Check the network voltage.
Make sure that the existing network voltage corresponds to the value specified on
the type tag on the appliance.
Keep the work area tidy.
Carelessness in the work area can lead to accidents.
Use the right tools.
Do not use tools that are not sturdy enough for heavy work. Use reliable tools
suitable for the purpose for which they are intended.
Wear a mask and eye and ear protection.
When doing work which may produce splinters or dust and when working over your
head always wear eye protection and a well-fitting face mask. Wear ear mufflers in
noisy conditions.
Extension cord when working outdoors.
Only use approved and correspondingly marked extension leads and sockets during
work out of doors.
Check electrical equipment for any damage.
Never use equipment with a switch that does not work.
Be careful when working on steps, ladders and scaffolding.
Be extra careful when working on an elevated surface. Make sure that stepladders,
steps, ladders and scaffolding are placed correctly and cannot slip.
Electrical cables, gas and water pipes etc.
Important safety aspect for work with drilling equipment:
Make sure that when drilling you cannot strike electrical cable, gas or water pipes.
Check the wall with a duct/cable detector before you start drilling.
Is everything clear?
Once you have familiarised yourself with the safety recommendations and have
learnt from the user’s manual how to use the tools, you can start working. By
following the instructions and recommendations of the manufacturers you can be
sure that you are working as safely as possible.
Keep these guidelines!
47
GB
SAFETY
Read the section on safety aspects and these instructions before you start.
Stick to the work sequence and working method shown here.
For technical or commercial reasons, the manufacturer may make changes to the
appliance or component parts, without general notification. You can consult your
supplier about this.
IMPORTANT:
• This appliance must be connected to an earthed socket for 230 V/50 Hz, with a
16A fuse.
• The connection to the national grid must be carried out in agreement with the
safety standards as regards the installation of electrical household appliances
applicable in the country of use.
If in doubt have the electrical installation checked and if necessary modified by a
qualified electrician
Ensure you have:
• a well lit and a work area clear of clutter.
• a well thought out and pre-arranged work plan.
• sound tools and reliable implements.
• protection: safety goggles, ear protection, mask, hardhat, work shoes and work
gloves.
The external unit must be lifted and put in place by two people.
YOUR AIR CONDITIONER
The split air conditioner comes in two boxes:
- box with internal unit with the necessary ducts
- box with external unit and tools.
Carefully take everything from the boxes. The packaging material must be kept out
of reach of children
Additionally supplied parts and tools:
- screws and plugs for the attachment plate of the internal unit
- sleeve with collar for the hole through the wall
- pipette for condensation water drainage of the external unit
- 4 rubber footrests for the external unit
- 2 spanners for the valves of the external unit
- socket wrench for valves of the external unit
48
GB
RECOMMENDED TOOLS AND IMPLEMENTS
•
•
•
•
•
•
•
hammer drill and ordinary drill
• electrical screwdriver
duct detector
• hammer
tape measure
• spirit level
pencil and chalk
• stepladder
pipe wrench
• cover to protect room floor
duct trough and pipe brackets (if needed)
PU foam or silicone sealant (if needed)
WHERE TO PUT THE APPLIANCE?
The maximum distance between the internal and external unit is 4 m (the length of the
freezing tubes and electricity cable). The internal unit must hang at least 1 m higher
than the top of the external unit.
The place for the internal unit
• on a wall in which a hole of Ø 65 mm (size of the sleeve) can be made for the
connection with the external unit. For a hole in a concrete wall special equipment is
required; leave this to a specialised company. Check the selected place with a duct
detector to make sure that there are no ducts.
- distance to ceiling at least 15 cm, free space left and right at least 50 cm.
- the cool air must be able to flow easily through the whole room.
- in the middle, not near a window or door is the most suitable place.
- it must be accessible to the filter for cleaning purposes.
- at least 1 m away from TV, video and similar equipment and from fluorescent lamps.
- an earthed socket must be present at a distance of no more than 1.5 m (the length
of the lead to the internal unit). If necessary have a socket fitted by a registered
electrician in accordance with any applicable regulations. The internal unit gets its
electricity from the external unit through the cable going along the freezing tubes.
The place of the external unit
• must be strong enough to support the weight of the external unit. That can be on
the ground, on a flat roof (provided you can fit a suitable base plate there to attach
the external unit to; prevent leakage of your roof) or on wall supports. If necessary
reinforce the place chosen; if the place is not strong enough that can lead to
excessive vibration and noise.
- sufficient free-flowing air current, as little as possible exposed to rain and direct
sunlight and a draining possibility for the condensation water.
- where expelled air and noise do not lead to nuisance; not where there is high
atmospheric humidity, not in the vicinity of grease or oxidising gases.
- free distance to the rear at least 15 cm, to the sides and to the front at least 50 cm.
Allow space for maintenance work.
49
GB
INTERNAL UNIT
To reduce the risk of leakage the internal unit must be hung absolutely level.
The water catcher in the internal unit with the condensation water drainage
connected to it must be clean and free from any obstruction, so that the
condensation water can drain off unhindered (otherwise risk of leakage).
Once the place for the internal unit has been determined, you can start fixing the
internal unit. Note that fixing it is your own responsibility.
A. Attachment plate
Mount the attachment plate level on a firm base, measure well and draw holes for
the screws.
TIP. Fix the plate not too firmly with a screw, put the plate in horizontal position
with the help of a spirit level, and then mark the holes for the other screws. Take the
screw out again, drill all holes, put plugs in and screw the plate tight.
Drill the 8 holes 6.4 mm (2.5”) wide and 30 mm deep.
Use the additionally supplied plugs.
Fix the attachment plate firmly with the additionally supplied screws.
B. Hole through the wall for the duct
The hole with a diameter of 65 mm and slanting a bit towards the outside in a
downward direction (10-15 mm) for better condensation water drainage, can be
made inside the space of the hood and will thus remain out of sight. If necessary
leading it through more to the left is possible. In that case cover troughs are
available in specialist stores.
Area for the hole.
50
GB
Put the additionally supplied sleeve in place and if necessary use the cover collar on
the inside. If necessary saw the sleeve to the right length.
C. Mains lead
Inspect where the mains lead must come out of the internal unit, left or right. Chip off
the small plate for the lead, take the lead out and fix it temporarily with tape, so that it
will not be in the way when mounting the internal unit.
Get someone to help you mount the internal unit and thread the duct through.
D. Duct
Carefully and without bending uncoil the bundle of ducts and thread the end bit
through the hole with the sleeve.
E. Mounting
Lift the internal unit up and hang it on to the 4 lips on the attachment plate, while the
ducts are being threaded through. Check whether the internal unit hangs on the 4 lips.
If necessary have someone on the other side of the wall guide the ducts that are
threaded through.
Pay close attention to the condensation water drainage pipe. Make sure that this duct
runs easily and that it is laid with a downward slant. Make sure that the insulation has
not shifted, no blank duct may be visible, because otherwise condensation may form
here (risk of leakage).
Once the internal unit hangs well (level and not leaning to left or right) the external unit
can be put in place.
attachment plate
coolant pipes
water drainage pipe
connection lead
(electricity)
51
GB
EXTERNAL UNIT
Drainage pipe
Fix the drainage pipe to the base plate. If
necessary a drainage hose (not included)
leading to a drain can be attached to
this.
On the ground or on the roof the
condensation water can usually drain off
freely.
Check that this does not cause nuisance
to anyone and that it can cause no
damage.
A
B
Fixing the external unit
Place the rubber footrests and
screw the unit thoroughly on a
strong base.
Keep 50 cm of free space
around the unit
The external unit can be fitted
on special base plates or on
a wall support.Consult your
installer
C
D
Connecting the electricity
Unscrew the protective cover [A] [B].
The electricity for the external unit comes from the internal unit through the cable
with a special little pin contact which clicks into the contact socket [C].
Check that this connection is properly fixed [D].
52
GB
E
F
Ducts
Remove the protective caps of the valves [E] and the protection caps of the duct [F].
G
H
First tighten the thin duct on the upper valve [G].
Then tighten the thick duct on the lowest valve [H].
I
J
Check for leakage.
Open the upper valve with the socket wrench [I].
Check on both connections for leakage, by applying a sponge with soap-suds to the
valves.
Close the valve immediately with the socket wrench in case of a leakage.
Call for assistance of your installer if, after you have checked that the ducts are well
fitted, there is nevertheless a leakage. Keep the valves closed!
If there is no leakage, open the bottom valve with the socket wrench [J].
53
GB
K
L
Once the freezing tubes are properly fixed and show no leakage, the protective caps
can be put back again on the valves [K].
Screw the protective cover back on the external unit [L].
Fix the piping vertically on the wall with duct through and pipe
brackets, available at DIY-stores.
Lead the water drainage pipe to a suitable drainage point, making sure it can flow
through freely.
Keep the protective caps of the links and valves and the additionally supplied tools
carefully stored.
54
GB
DISCONNECTING THE EXTERNAL UNIT
Notice: the quick-couplers are meant for one-off connection !
The guarantee does not cover multiple installation.
Should it be necessary to disconnect, then go about it as follows:
• ask someone to help you operate the air conditioner via the remote control,
• put the desired temperature at 18 °C
• start the air conditioner, wait until you can also hear the compressor turning
• unscrew the caps from the valves and shut the upper valve (thin duct) with the
socket wrench
• wait up to 1 minute: you will hear the sound of the compressor changing also
shut the lowest valve (thick duct) with the socket wrench
• immediately switch the air conditioner off by taking the plug from the socket
• after both valves have been shut completely put the protective caps back on
• disconnect the same way as indicated for connecting; place the protective caps
on the quick-couplers
Notice: if you are in any doubt or uncertainty leave this work to the installer.
55
EU
EER LABELS
Energie
Airconditioner
Fabrikant
Buitenapparaat
Binnenapparaat
HW-9KE
HW-9KE
Efficiënt
Énergie
Fabricant
Unité extérieure
Unité intérieure
Économe
A
A
B
B
C
B
C
D
D
E
E
F
G
F
G
Inefficiënt
Peu économe
Jaarlijks energieverbruik
kWh in koelstand
450
(Feitelijk verbruik afhankelijk van de wijze van gebruik
van het apparaat en het klimaat)
Koelvermogen
kW
Energie efficiëntieverhouding
volle belasting (hoe hoger, hoe beter)
Type
(La consommation réelle dépend de la manière
dont l'appareil est utilisé et du climat)
2.7
3.1
Puissance frigorifique
kW
Niveau de rendement énergétique à
pleine charge (Doit être le plus élevé possible)
Type
Alleen koeling
Refroidissement seulement
Koeling/verwarming
Refroidissement/chauffage
Luchtgekoeld
Refroidissement par air
Watergekoeld
Refroidissement par eau
Verwarmingsvermogen kW
Energie-efficiëntieklasse
in de verwarmingsstand
A (efficiënt)
2.8
B
dB(A) re 1 pW
Puissance de chauffage
38/52
kW
Performance énergétique
en mode de chauffage
A (économe)
G (inefficiënt)
Geluidsniveau
56
Consommation annuelle d'énergie
kWh en mode refroidissement
G (peu économe)
Bruit
[dB(A) re 1 pW]
Een kaart met nadere gegevens is opgenomen
in de brochures over het apparaat
Une fiche d'information détaillée
figure dans la brochure
Norm EN 14511
Airconditioner
Richtlijn 2002/31/EG (Energie-etikettering)
Norme EN 14511
Climatiseur
Directive relative à l'étiquetage énergétique 2002/31/CE
EU
EER LABELS
Air-conditioner
HW-12KE
HW-12KE
Energy
Climatiseur
Manufacturer
Outside unit
Inside unit
HW-AM9KE
HW-AM9KE
HW-AM12KE
HW-AM12KE
More efficient
A
B
B
C
B
B
450
625
2.7
3.5
3.1
3.1
2.8
B
3.6
D
38/52
38/53
D
E
F
G
Less efficient
625
Annual energy consumption
kWh in cooling mode
(Actual consumption will depend on
how the appliance is used and climate)
3.5
3.1
Cooling output
kW
Energy efficiency ratio (EER)
at full load (The higher the better)
Size
Cooling only
Cooling/heating
Air cooled
Water cooled
3.6
D
Heat output
38/53
Noise
kW
Heating performance
A (more efficient)
dB(A) re 1 pW
G (less efficient)
Further information is contained
in product brochures
Norm EN 14511
Air-conditioner
Energy label Directive 2002/31/EC
57
TYPEPLAATJE
PLAQUE SIGNALÉTIQUE
INDOOR
UNIT
INDOOR
UNIT
See
barcode
HW9KE
Model
Serial number
230 V 50 Hz
1 Ph
2.7 kW 2.8 kW
9000
9500
BTU/h BTU/h
HW12KE
Cooling
capacity
Model
Heating
capacity
4.1/ 4.0 A
max 5.4 A
900 / 880
W
Rated current
Rated power
consumed
R410a
18-30 oC
460 m3/h
Refrigerant
Thermostatic
range
Airflow
Power supply
3.1/ 3.5
~38
W/W
dB(A).r
IP 20
8 kg
Protection
class
Noise level
EER / COP
RATING LABEL
Net weight
See
barcode
3.5 kW 3.6 kW
12000 12300
BTU/h BTU/h
Cooling
capacity
Serial number
230 V 50 Hz
1 Ph
5.7/ 6.0 A
max 7.6 A
Power supply
Rated current
Rated power
consumed
R410a
18-30 oC
500 m3/h
Refrigerant
Thermostatic
range
Airflow
3.1/ 3.0
~38
W/W
dB(A).r
Noise level
EER / COP
NL-1422 AL UITHOORN
IP 20
10 kg
Net weight
www.amcorgroup.com
Made in P.R.C.
See
barcode
Model
NL-1422 AL UITHOORN
OUTDOOR
UNIT
OUTDOOR
UNIT
HW9KE
1245 / 1300
W
Protection
class
www.amcorgroup.com
Made in P.R.C.
Heating
capacity
Serial number
2.7 kW 2.8 kW
9000
9500
BTU/h BTU/h
HW12KE
Cooling
capacity
Model
Heating
capacity
See
barcode
3.5 kW 3.6 kW
12000 12300
BTU/h BTU/h
Cooling
capacity
Serial number
Heating
capacity
230 V 50 Hz 1 Ph
2.4 / 4.0 MPa
230 V 50 Hz 1 Ph
2.4 / 4.0 MPa
Power supply
Pressure range
Suction / Discharge
Power supply
Pressure range
Suction / Discharge
R410a
740 g
10-40 oC
R410a
1050 g
10-40 oC
Refrigerant
Refrigerant load
Operatingrange
Refrigerant
Refrigerant load
Operatingrange
3.1/ 3.5
~52
W/W
dB(A).r
EER / COP
Noise level
IP 24
31 kg
Protection
class
Net weight
3.1/ 3.5
~53
W/W
dB(A).r
EER / COP
Noise level
NL-1422 AL UITHOORN
38 kg
Net weight
www.amcorgroup.com
www.amcorgroup.com
Made in P.R.C.
IP 24
Protection
class
Made in P.R.C.
NL-1422 AL UITHOORN
• De technische gegevens kunnen zonder voorafgaande mededeling worden gewijzigd, er kunnen geen rechten aan worden ontleend.
58
TYPEPLAATJE
PLAQUE SIGNALÉTIQUE
INDOOR
UNIT
INDOOR
UNIT
See
barcode
HWAM9KE
Model
Serial number
2.7 kW 2.8 kW
9000
9500
BTU/h BTU/h
HWAM12KE
Cooling
capacity
Model
Heating
capacity
230 V 50 Hz
1 Ph
4.1/ 4.0 A
max 5.4 A
900 / 880
W
Power supply
Rated current
Rated power
consumed
R410a
18-30 oC
490 m3/h
Refrigerant
Thermostatic
range
Airflow
3.1/ 3.5
~38
W/W
dB(A).r
EER / COP
IP 20
9 kg
Protection
class
Noise level
RATING LABEL
Net weight
See
barcode
3.5 kW 3.6 kW
12000 12300
BTU/h BTU/h
Cooling
capacity
Serial number
230 V 50 Hz
1 Ph
5.7/ 6.0 A
max 7.6 A
Power supply
Rated current
Rated power
consumed
R410a
18-30 oC
490 m3/h
Refrigerant
Thermostatic
range
Airflow
3.1/ 3.0
~38
W/W
dB(A).r
EER / COP
NL-1422 AL UITHOORN
IP 20
Model
9 kg
Net weight
www.amcorgroup.com
Made in P.R.C.
NL-1422 AL UITHOORN
OUTDOOR
UNIT
OUTDOOR
UNIT
See
barcode
HWAM9KE
1245 / 1300
W
Protection
class
Noise level
www.amcorgroup.com
Made in P.R.C.
Heating
capacity
Serial number
2.7 kW 2.8 kW
9000
9500
BTU/h BTU/h
HWAM12KE
Cooling
capacity
Model
Heating
capacity
See
barcode
3.5 kW 3.6 kW
12000 12300
BTU/h BTU/h
Cooling
capacity
Serial number
Heating
capacity
230 V 50 Hz 1 Ph
2.4 / 4.0 MPa
230 V 50 Hz 1 Ph
2.4 / 4.0 MPa
Power supply
Pressure range
Suction / Discharge
Power supply
Pressure range
Suction / Discharge
R410a
770 g
10-40 oC
R410a
1075 g
10-40 oC
Refrigerant
Refrigerant load
Operatingrange
Refrigerant
Refrigerant load
Operatingrange
3.1/ 3.5
~52
W/W
dB(A).r
EER / COP
Noise level
IP 24
31 kg
Protection
class
Net weight
3.1/ 3.5
~53
W/W
dB(A).r
EER / COP
Noise level
NL-1422 AL UITHOORN
38 kg
Net weight
www.amcorgroup.com
www.amcorgroup.com
Made in P.R.C.
IP 24
Protection
class
Made in P.R.C.
NL-1422 AL UITHOORN
• Les données techniques peuvent être modifiées sans préavis. • Data are subject to change without notification, they are not legally binding.
59
Hong Kong
Amcor Ltd
Suite 2007, Tower 6, The Gateway,
Harbour City, 9 Canton Road,
Tsim Sha Tsui, Kowloon,
Hong Kong
Tel: +852 2997 6865
Fax: +852 2997 6091
Email: [email protected]
United Kingdom
Amcor Ltd
9 Ryan Drive, West Cross Centre,
Great West Road, Brentford,
Middlesex, TW8 9ER,
United Kingdom
Tel: +44 20 8560 4141
Fax: +44 20 8232 88141
Email: [email protected]
USA
Amcor Inc.
685A Gotham Parkway, Carlstadt,
New Yersey 07072,
United States of America
Tel: +1 201 460 8100
Fax: +1 201 460 9481
Email: [email protected]
The Netherlands
Amcor B.V.
Anton Philipsweg 9-11,
1422 AL Uithoorn,
The Netherlands
Tel: +31 297 560 079
Fax: +31 297 523 062
Email: [email protected]
Singapore
Amcor Investments (Singapore) Pte Ltd
545 Orchard Road,
#13-02, Far East Shopping Centre,
Singapore 238882
Tel: +65 6297 9881
Fax: +65 6297 8891
Email: [email protected]
China
Shan Xia Industrial Development Zone,
Heng Li Town, Dongguan City,
Guangdong Province, China
Plant One - Amcor (China) Ltd
Tel: +86 769 8372 1090
Fax: +86 769 8372 1790
Email: [email protected]
Plant Two - Amcor Appliances Ltd
Tel: +86 769 8372 1970
Fax: +86 769 8372 1790
Email: [email protected]
HW-series - 913124230
Israel
Amcor International Ltd
3 Sapir Street, Herzelia Pituach,
46733, Israel
Tel: +972 9 951 5351
Fax: +972 9 958 5650
Email: [email protected]