1
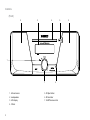
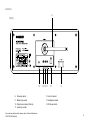
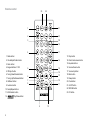
Sound for Generations
ROBERTS
MP-23
CD/AM/FM RDS/DAB digital sound system with
MP3/WMA/SD/USB and remote control
Please read this manual before use
Contents
MP-23 Sound features.........................................................2
FM Stereo/Mono.................................................................22
Controls............................................................................ 3-5
Operating your radio - Search tuning MW..........................23
Remote handset battery replacement..................................6
Manual tuning - FM and MW..............................................24
Mains operation....................................................................6
Presetting stations..............................................................25
Setting the clock...................................................................7
Equalizer function...............................................................26
Using your system for the first time......................................8
Mute function......................................................................26
Selecting the MP-23 modes.................................................9
Sleep function.....................................................................27
Operating your radio - DAB................................................10
Compact discs.............................................................. 28-31
Selecting a station - DAB...................................................11
MP3/WMA CD mode.................................................... 32-35
Secondary services - DAB.................................................11
Using SD cards or USB memory devices..................... 36-40
Display modes - DAB.........................................................12
Alarm............................................................................ 41-44
Finding new stations - DAB................................................13
System reset......................................................................45
Manual tuning - DAB..........................................................14
Clock display......................................................................46
Signal strength display - DAB.............................................14
3D Sound switch................................................................46
Using your radio's Pauseplus feature........................... 15-16
Auxiliary In socket..............................................................47
Station order setup - DAB only...........................................17
Line Out socket..................................................................47
Prune stations - DAB only..................................................18
Headphone and optical output sockets..............................48
Software version - DAB only..............................................18
General...............................................................................49
Dynamic Range Control (DRC) settings - DAB only..........19
Specifications.....................................................................49
Operating your radio - Search tuning FM...........................20
Mains supply......................................................................50
Automatic programme type search - FM............................21
Notes............................................................................ 51-53
Display modes - FM RDS...................................................22
Guarantee..........................................................................54
1
MP-23 Sound System features
The Roberts MP-23 Sound system provides the following features in an
attractive compact unit.
Radio
The MP-23 can receive DAB, FM (with RDS), and AM (Medium Wave)
bands.
CD
Digital output
An optical output is provided for connection to AV receivers, mini- disc
recorders or other devices with a digital input.
Line Out socket
A standard 3.5mm Line Out socket is provided for connecting the audio
signal to an external amplifier.
Surround effect
An optional 3D surround effect provides enhanced stereo sound.
The MP-23 plays audio CDs (can also play CDR, CDRW discs)
CD-MP3/WMA
The MP-23 plays MP3 and WMA files which have been recorded to CDR
or CDRW.
Acoustically tuned cabinet
The quality enclosure includes bass ports and internal bracing to offer
optimal sound reproduction.
SD slot and USB socket
The MP-23 plays MP3 and WMA files from SD cards or USB memory
devices.
Auxiliary input
The MP-23 can be used as an amplifier and loudspeaker system for
external MP3 players, mini disc players and similar devices.
Headphone output
A standard 3.5mm headphone socket is provided for private listening.
If you need any further advice, please call our Technical Helpline on :020 8758 0338 (Mon-Fri)
2
Controls
(Front)
2
4
3
5
1
7
1.Infra red sensor
5.CD Eject button
2.Loudspeakers
6.SD card door
3.LCD display
7.On/Off/Volume control
4.CD slot
3
6
2
Controls
8
(Rear)
14
13 12 11
10
8.Telescopic aerial
12.Line Out socket
9.Mains input socket
13.Headphone socket
10.Optical output socket (Toslink)
14.3D Sound switch
9
11.Auxiliary in socket
If you need any further advice, please call our Technical Helpline on :020 8758 0338 (Mon-Fri)
4
Remote control
23
22
1
21
2
20
3
19
18
4
17
13.Stop button
1.Radio button
16
2.Clock/Adjust/Folder button
4.Keypad buttons 1-10/0
5.CD Eject button
6.Tuning Down/Rewind button
7.Tuning Up/Fastforward button
8.Ok/Select button
9.Autotune button
14.Direct track access button
15.Equalizer button
3.Alarm button
5
15
14
6
13
7
12
8
11
16.Volume Down button
17.Volume Up button
18.Mute button
19.Sleep button
20.Clock button
21.On/Off button
10.Setup/Repeat button
22.SD/USB button
11.Info/Random button
23.CD button
12.
Play/Pause button
9
5
10
Remote handset battery replacement
1. Press in the tab on the left hand side of the battery tray and slide the
tray out.
2. Remove battery holder by pushing holder in direction shown.
3. Remove battery from holder.
4. Replace battery (CR2025 or equivalent) ensuring that the positive
side of the battery faces you with holder positioned as shown.
5. Replace the battery holder.
Mains operation
1. Place your radio on a flat surface.
2. Plug the mains lead into the Socket located on the rear of your radio
ensuring that the plug is pushed fully into the socket.
3. Plug the other end of the mains lead into a wall socket and switch on
the wall socket.
4. The clock digits on the display will flash.
5. To set the clock refer to page 7.
Please note the time must be set before the alarm function can
be used.
If you need any further advice, please call our Technical Helpline on :020 8758 0338 (Mon-Fri)
6
Setting the clock
Leave the unit in Standby while the clock sets. In the event that the
clock does not automatically set follow the procedure below.
You will need to set the clock before the alarm function can be set.The
clock display will be 24hr format.
1
1. Press and hold the Clock/Adjust button, the hour digits on the
display will flash.
2. Press the Tuning Up or Down buttons until the desired hour digit
is set.
3. Press and release the Clock/Adjust button, the minute digits on
the display will flash.
4. Press the Tuning Up or Down buttons until the desired minute
digit is set. If the button is held down the digits will change more
quickly.
2,4
5. Press the Clock/Adjust button to confirm the clock setting.
3,5
7
2,4
Using your system for the first time
1. Fully extend the telescopic aerial.
2. Press the On/Off button to switch on your radio.
3. If this is the first time the sound system is used the display will show
"CD" and will enter CD mode. If the sound system has been used
before the last used mode will be selected.
If you need any further advice, please call our Technical Helpline on :020 8758 0338 (Mon-Fri)
2
2
8
Selecting the MP-23 modes
To select DAB
1. Press and release the Radio button until "DAB" shows on the display
and the unit will enter the DAB mode. See page 10.
To select CD
1. Press and release the CD button until "CD" shows on the display and
the unit will enter the CD mode. See page 29.
To select FM/MW
1. Press and release the Radio button until "FM Tuner" or "AM Tuner"
shows on the display and the unit will enter the FM or the MW mode.
See page 20, 23.
To select SD card/USB
1. Press and release the SD/USB button until "SD Card" or "USB" shows
on the display and the unit will enter either the SD card or USB mode.
See page 36.
To select Auxiliary
1. Press and release the Radio button until "Aux" shows on the display
and the unit will enter Auxiliary mode. See page 47.
9
Operating your radio - DAB
1. Fully extend the telescopic aerial.
2. If your sound system is in standby mode, press the On/Off button to
switch on your radio.
3. Repeatedly press and release the Radio button until "DAB" shows
on the display. The display will show "Welcome to digital radio" for a
few seconds.
2
2
3
4. If this is the first time the radio is used a quick scan of UK Band III DAB
channels will be carried out. The display will show "Searching". If the
radio has been used before the last used station will be selected.
5. During autotune new stations are detected and will be added to the
list.
6. When the Auto tune is complete the first station (in numeric-alpha
order 0...9...A....Z) will be selected.
7. If the station list is still empty after the Autotune your radio will display
"No Stations available".
8. If no signals are found it may be necessary to relocate your radio to
a position giving better reception.
If you need any further advice, please call our Technical Helpline on :020 8758 0338 (Mon-Fri)
10
Selecting a station - DAB
1. The top line of the display shows the name of the station currently
selected.
2
2
2. Press the Up or Down Tuning buttons to scroll through the list of
available stations. Stop pressing the Tuning buttons when you find
the station that you wish to hear.
3. Press and release the Ok/Select button to select the station. The
display may show "Tuning" while your radio finds the new station.
3
4. Adjust the Volume and 3D Sound switch to the required
settings.
Note: If after selecting a station the display continues to show "Station
not available" it may be necessary to relocate your radio to a position
giving better reception.
4
4
4
Secondary services - DAB
1. Certain radio stations have one or more secondary services associated
with them. If a station has a secondary service associated with it the
display will show ">>" next to the station name on the station list. The
secondary service will then appear immediately after the primary
service as you press the Tuning Up button.
2. Press and release the Ok/Select button to select the station.
11
2
4
Display modes - DAB
Your radio has seven display modes:1. Press the Info button to cycle through the various modes.
a. Scrolling text
Displays scrolling text messages such as artist/track name, phone in number, etc.
1
a
b
b. Programme type
Displays type of station being listened to e.g. Pop, Classic, News, etc.
c
c. Multiplex Name Displays name of multiplex to which current station belongs.
d
d. Time and date
Displays current time and date.
e
e. Channel & frequency
Displays channel number and frequency.
f. Bit rate/audio type
Displays the digital bit rate and audio type.
f
g
g. Signal error
Displays signal error for station being listened to.
If you need any further advice, please call our Technical Helpline on :020 8758 0338 (Mon-Fri)
12
Finding new stations - DAB
As time passes new stations may become available. To find new stations
proceed as follows:-
1
1. Press and release the AutoTune button, the display will show "Scanning". Your radio will perform a scan of the UK DAB frequencies. As
new stations are found the station counter on the right-hand side of
the display will increase and stations will be added to the list.
2. To carry out a full scan of the entire DAB Band III frequencies press
and hold down the AutoTune button for more than 2 seconds and
then release. The display will show "Scanning". As new stations are
found the station counter on the right-hand side of the display will
increase and stations will be added to the list.
13
2
Manual Tuning - DAB
Manual tuning allows you to tune directly to the various DAB Band III
channels. UK DAB stations are located in the range 11B to 12D.
1. Press and release the Setup button until the display shows "Station
order".
1
2. Press the Tuning Up or Down buttons until "Manual tune" appears
on the display. Press and release the Ok/Select button.
3. Press the Tuning Up or Down buttons to select the required DAB
channel.
2,3
2,3
4. Press and release the Ok/Select button to select the channel.
5. Any new stations that are found are automatically added to the stored
list of stations.
2,4,6
6. Press and release the Ok/Select button to return to normal tuning
mode.
Signal strength display - DAB
1. Press and release the Ok/Select button the lower line of the display
shows signal strength. Position your radio and angle the telescopic
aerial for best reception using the signal strength display as a guide.
Move your radio around and position so as to give maximum number
of black rectangles on signal strength display.
1,2
2. The clear unfilled rectangle indicates minimum signal level required
for satisfactory reception. Press and release the Ok/Select button
to return to normal tuning mode.
If you need any further advice, please call our Technical Helpline on :020 8758 0338 (Mon-Fri)
14
Using your radio's Pauseplus feature
How many times has your favourite radio station been interrupted by
that phone call from a double glazing firm or someone selling that must
have item? Sound familiar? Now with a single press of the
button you can put your favourite station on hold while you answer that
important call. After the call or other important task is finished simply
press the
button to return to your favourite station exactly
where you left off so that you never miss a single word.
Radio stations can effectively be put on hold between 5 and 15 minutes
depending on the station you are listening to.
Note the
waveband.
1
feature only operates on the DAB
1. To place your radio in
mode simply press the
button, the sound from the loudspeaker will be muted. The display
will show the "Pause symbol" and the time that you are delayed by.
2
2. To return to the radio station that you were listening to simply press
the
button and your radio will continue playing from where
you left off.
3. To return to real time press in and release the Stop button, the display
will return to normal radio display.
15
3
Pauseplus Rewind and fastforward - DAB
1. Press the
button and press and hold the Tuning Up/Fastforward or Tuning Down/rewind buttons to scroll to the item you
wish to listen.
1
2. When using your radio's
feature the top line of display
automatically switches to show the time that you are delayed.
1
If you need any further advice, please call our Technical Helpline on :020 8758 0338 (Mon-Fri)
1
16
Station order setup - DAB only
Your radio has 3 station order settings from which you can choose. The
station order settings are, favourite station, alphanumeric and active
station.
Note: Your radio default station order is alphanumeric.
1
1
1. Press and release the Setup button until "Station order" appears on
the display. Press the Ok/Select button to enter setup.
2. Press the Tuning Up or Down buttons to choose between favourite
station, alphanumeric and active station.
2
2
Favourite stations
When this setting is switched on, after a period of time the most listened
to stations will move to the top of the station list and will be marked with
the heart symbol .
Alphanumeric
Press the Tuning Up and Down buttons until "Alphanumeric" appears
on the display. Your radio will now select stations in alphanumeric order
A....Z 0....9.
Active station
Press the Tuning Up or Down buttons until "Active station" appears on
the display. The display will show only those that a signal can be found.
3. Press and release the Ok/Select button to select the station order
setting required.
17
3
Prune stations - DAB only
Some DAB services may stop broadcasting or you may not be able to
receive a station. Prune stations will delete the DAB stations from your
station list that can no longer be received.
1
1. Press and release the Setup button until "Station order" appears on
the display. Press and release the Ok/Select button.
2. Press the Tuning Up or Down buttons until "Prune stations" appears
on the display.
3. Press and release the Ok/Select button to select.
2
2
1,3
Software version - DAB only
The software display cannot be altered and is for your reference only.
1
1. To view the software version your radio has, press and release the
Setup button until "Station order" appears on display.
2. Press the Tuning Up or Down buttons until "Software version" appears
on the display. The software version will appear on the display.
2
If you need any further advice, please call our Technical Helpline on :020 8758 0338 (Mon-Fri)
2
18
Dynamic Range Control (DRC) settings - DAB only
DRC can make quieter sounds easier to hear when your radio is used in
a noisy environment. This function is only for the DAB waveband.
1
1. Press the On/Off button to switch on your radio.
2. Press and release the Setup button until "Station order" appears on
the display.
3. Press and release the Tuning Up and Down buttons until the display
shows "DRC value".
2,4
4. Press and release the Ok/Select button to enter adjustment mode.
5. Press and release the Tuning Up or Down buttons to select required
DRC setting (default is 0) .
DRC 0 DRC is switched off, Broadcast DRC will be ignored.
DRC 1/2 DRC level is set to 1/2 that sent by broadcaster.
DRC 1 DRC is set as sent by broadcaster.
3,5
3,5
6. Press and release the Ok/Select button to confirm the setting. The
display will return to radio mode.
4,6
19
Operating your radio - Search tuning FM
1. Fully extend the telescopic aerial.
2
2. Press the On/Off button to switch on your radio.
3
2
3. Press and release the Radio button until the FM band is selected.
4. Press and hold the Tuning Up button, your radio will scan in an
upwards direction (low frequency to high frequency) and stop automatically when it finds a station of sufficient strength.
5. After a few seconds the display will update. If the FM band is selected
the display will show the station name if available.
4,6
6. To find other stations press and hold the Tuning Up button as before.
7. To scan the FM band in a downwards direction (high frequency to
low frequency) press and hold down the Tuning Down button for
0.5 seconds and then release.
9
7
9
9
8. When the waveband end is reached your radio will recommence tuning
from the opposite waveband end.
9. Adjust the Volume and 3D Sound switch to the required
settings.
10. To switch off your radio press the On/Off button.
If you need any further advice, please call our Technical Helpline on :020 8758 0338 (Mon-Fri)
10
20
Automatic programme type search - FM
Your radio can automatically search for a programme type such as news,
sport etc and will tune in to a station transmitting this information.
2
1. Fully extend the telescopic aerial.
3
2
2. Press the On/Off button to switch on your radio.
3. Press and release the Radio button to select the FM band.
4. Press and release the Auto tune button, the radio will enter the
programme type mode the first programme type available will show
on display.
4,5
5. Press and release the Autotune button until the required programme
type shows on the display.
6. To begin the programme type search press and hold down either the
Tuning Up or Down buttons for 0.5 seconds. The radio will scan the
FM band until it finds a station transmitting your required programme
type.
6
6
7. If a programme of the specified type is not found the radio will tune
to the previously selected station and will show "NO MATCH".
8. To switch off your radio press the On/Off button.
8
21
Display modes - FM RDS
Your system has five display modes in FM. The Radio Data System (RDS)
is a system in which inaudible digital information in addition to the normal
FM radio programme is transmitted.
a
On FM the bottom line of the display can be set to any of the following
modes.
1. Press the Info button to cycle through the various modes.
a. Station Name
Displays the station name currently being transmitted
b. Programme Type
Displays type of station being listened to e.g. Pop, Classic, News, etc.
c. Radio Text
Displays radio text messages such as news items etc.
d. Time and date
Displays current time and date.
e. Frequency
Displays frequency of the station being listened to.
b
1
c
d
e
Note: When tuned to the FM band, information display is only available
when the radio is able to receive RDS information from the broadcaster.
FM Stereo/Mono
1. If a station being received is weak some hiss may be audible. To reduce the hiss press and hold in the Ok/Select button until the display
shows "Mono". Your radio will switch to mono mode.
2. To return to stereo mode press and hold in the Ok/Select
button until the display shows "Stereo". Your radio will switch to
stereo mode.
1,2
Note: FM stereo is only available when listening via earphone/headphones
If you need any further advice, please call our Technical Helpline on :020 8758 0338 (Mon-Fri)
22
Operating your radio - Search tuning MW
1. For MW there is a built in ferrite aerial. Rotate your radio for best
reception.
3
2
2. Press the On/Off button to switch on your radio.
2
3. Press and release the Radio button to select MW band. The display
will show the AM Tuner.
4. Press and immediately release the Tuning Up button, your radio will
scan in an upwards direction (low frequency to high frequency) and
stop automatically when it finds a station of sufficient strength.
4,6
5. After a few seconds the display will update.
6. To find other stations press and release the Tuning Up button as
before.
7. To scan the MW band in a downwards direction (high frequency to
low frequency) press and hold down the Tuning Down button for 0.5
seconds and then release.
9
7
9
8. When the waveband end is reached your radio will recommence tuning
from the opposite waveband end.
9. Adjust the Volume and 3D Sound switch to the required
settings.
10. To switch off your radio press the On/Off button.
23
10
9
Manual tuning - FM and MW
1. Press the On/Off button to switch on your radio.
3. Press the Tuning Up and Down buttons to tune to a station. The
frequency will change in steps of 50kHz on FM. On MW the frequency
will change in steps of 9 kHz.
2
1
2. Press and release the Radio button to select the FM or MW band.
Fully extend the Telescopic aerial for FM reception. For MW reception there is a built in ferrite aerial. Rotate your radio to the position
giving best reception.
3
3
4. When the waveband end is reached the radio will recommence tuning
from the opposite waveband end.
5. Set the Volume and 3D Sound switch to the desired settings.
5
6. To switch off your radio press the On/Off button.
5
5
5
6
If you need any further advice, please call our Technical Helpline on :020 8758 0338 (Mon-Fri)
24
Presetting stations
There are 10 memory presets on each of the DAB, MW and FM
wavebands.
1
1. Press the On/Off button to switch on your radio.
2. Tune to the required station as previously described.
3. Press and hold down the required Preset button (1 to 10) until the
display shows e.g. "Preset 1 stored". The station will be stored under
the chosen preset button. Repeat this procedure for the remaining
presets.
3
4. Stations stored in preset memories may be overwritten by following
Recalling a preset station
1. Press the On/Off button to switch on your radio.
3
2. Select the required waveband by pressing the Radio button.
3. Momentarily press the required Preset button (1-10), your radio will
tune to the station stored in preset memory.
25
Note: If you have not previously stored a preset station and the preset
button is pressed "Empty preset" will be displayed.
1
2
Equalizer function
The tone on your sound system can be adjusted to suit the particular
broadcast listened to. Your radio has six equalizer modes:-
1
1. Press the Equalizer button to cycle through the various modes.
a. Flat
b. Jazz
c. Rock
d. Classic
e. Pop
f. News
.
Mute function
Pressing the Mute button will mute the output from the loudspeakers.
1. Press the Mute button to mute sound output.
1
2. Press Mute again to return to normal play mode.
If you need any further advice, please call our Technical Helpline on :020 8758 0338 (Mon-Fri)
26
Sleep function
Your clock radio can be set to turn off after a preset time has elapsed. The
sleep setting can be adjusted between 10 and 90 minutes in 10 minute
increments.
1
1. To set the desired sleep time, press the Sleep button to enter the
sleep setup. "Sleep" will appear on the display.
2. Repeatedly press and release the Sleep button to select the desired
sleep time 90>80>70>60>50>40>30>20>10 minutes or to OFF to
premanently cancel the sleep function.
2
3. Your radio will switch off after the preset sleep time has elapsed.
4. To cancel the sleep function before the preset time has elapsed, press
the On/Off button.
4
27
Compact discs
Use only Digital Audio CDs which have the
symbol.
Never write on a CD or attach any sticker to the CD. Always hold the CD
at the edge and store it in its box after use with the label facing up.
To remove dust and dirt, breathe on the CD and wipe it with a soft, lint free
cloth in a straight line from the centre towards the edge.
Cleaning agents may damage the CD.
Do not expose the CD to rain, moisture, sand or to excessive heat. (e.g
from heating equipment or in motor cars parked in the sun).
CD-R/CD-RW discs
Your MP-23 can playback CD-DA format audio CD-R/CD-RW discs that
have been finalised* upon completion of recording.
Your MP-23 may fail to playback some CD-R/CD-RW discs due to poor
recording and wide variation in quality of the CD-R/CD-RW disc.
*Finalising enables a CD-R/CD-RW disc to playback on audio players
such as your MP-23.
If you need any further advice, please call our Technical Helpline on :020 8758 0338 (Mon-Fri)
28
Inserting a CD
When your Sound System is in the standby mode inserting a CD will switch the
unit on.
Ensure the cd tray is empty before inserting a CD. If you cannot insert a
CD, press the Cd/Eject button to ensure the unit is empty.
1
1. To select the CD mode press the CD button.
2. To eject or load a CD press and release the CD Eject button.
2
3. To insert an audio CD, place printed side facing up into the cd compartment. The CD will be automatically loaded. The unit will check the CD
type and load its track list. The display will show "loading" and then
"reading" as the information is read.
4. If you load a CD with MP3 tracks your sound system will enter the
MP3 mode see page 32.
Playing a CD
1,3
1. Press the Play/Pause button to start playback. The display will show
the first track number.
2. Adjust the Volume and 3D Sound switch to the required settings.
3. To pause playback press the Play/Pause button. To resume playback
press the Play/Pause button again.
29
2
2
2
4. To stop play, press the Stop button. The total number of CD tracks
will be displayed.
5
4
5. To take out the CD, press and release the CD Eject button. The
display will show "No Disc".
Selecting a track
1. Whilst the CD is playing, press either the Fastforward or Rewind
buttons to change to the desired track, the track number appears in
the display.
2. You can also skip tracks when the player is in stop mode. Skip to the
desired track using the Fastforward or Rewind buttons. Press and
hold the button to make the track numbers cycle, release the button
when the desired track is displayed.
1,2
1,2
3
3. Press the Play/Pause button to play the selected track.
Select a desired track
1,2
1. For track numbers 1-9 simply press the corresponding digit button.
2. For track numbers ten and above press the direct track access button then press the required digits.
3. If the track number entered exceeds the number of tracks on the CD,
then no track will be played.
If you need any further advice, please call our Technical Helpline on :020 8758 0338 (Mon-Fri)
2
30
Search function
1. Whilst the CD is playing, press and hold the Fastforward or Rewind
buttons.
1
2. Release the button when the desired part of the track is reached.
Repeat a single file
1. Whilst the CD is playing, press the Setup button until the single track
symbol appears in the display. The current track will be repeated.
1
Repeat all tracks
1. Whilst the CD is playing, press the Setup button until the repeat all
tracks symbol appears in the display. All the tracks will be repeated.
1
Play files in random order
1. Whilst the CD is playing, press the Info button until the random symbol
appears in the display. The tracks will be played in random order.
1
To stop playing files in random order
1. Whilst the CD is playing, repeatedly press the Info button until the
random symbol disappears from the display. The CD will return to
normal play.
31
1
1
Intro play feature
The button marked Intro will cause the first 10 seconds of each CD track to
be played. Press and release this button to allow a specific track to be found
without manually selecting tracks. When the desired track is reached, press
and release the Intro button again to continue playing the CD normally.
CD time display
The button marked Remain allows different time information to be displayed for
the CD or track currently being played. For each press and release of the Remain
button will cycle through the following displays, time into current CD track, total time
into CD, time remaining on current CD track and total time remaining on CD.
MP3/WMA CD Mode
1. To select the CD mode press the CD button.
The MP-23 is able to play CD-R and CD-RW discs containing MP3 and
WMA files.
In MP3/WMA mode the terms "album" and "file" are very important. "Album" corresponds to a folder on a PC, "File " to a PC or a CD -DA track.
The device reads MP3 files with a maximum of 255 files per album. An
MP3 CD may not contain more than 512 files or albums in total. MP3 and
WMA files must be created with an audio sample rate of 44.1kHz (this is
normal for files created from CD audio content).
1
When burning CD-R and CD-RWs with audio files, various problems may
arise which could lead to interference in playback. This can be caused
by faulty software or hardware settings or by the CD being used. Should
such problems arise, contact the customer services of your CD burner or
software manufacturer or look for relevant information, for example on the
internet. When you are making audio CDs, observe all legal guidelines
and ensure that the copyright of third parties is not infringed.
If you need any further advice, please call our Technical Helpline on :020 8758 0338 (Mon-Fri)
32
Playing an MP3/WMA CD
1. Press the Play/Pause button to start playback. The display will show
the first track number.
1,3
2. Adjust the Volume and 3D Sound switch to the required settings.
3. To pause playback press the Play/Pause button. To resume playback
press the Play/Pause button again.
2
4. To stop play, press the Stop button. The total number of CD tracks
will be displayed.
2
2
5. To take out the CD, press and release the CD Eject button. The
display will show "OPEN".
4
5
Selecting a track
1. Whilst the CD is playing, press either the Fastforward or Rewind
buttons to change to the desired track, the track number appears in
the display.
2. You can also skip tracks when the player is in stop mode. Skip to the
desired track using the Fastforward or Rewind buttons. Press and
hold the button to make the track numbers cycle, release the button
when the desired track is displayed.
3. Press the Play/Pause button to play the selected track.
33
1,2
1,2
3
Select a desired track
1. For track numbers 1-9 simply press the corresponding digit button.
2
2. For track numbers ten and above press the direct track access button then press the required digits.
3. If the track number entered exceeds the number of tracks on the CD,
then no track will be played.
1,2
Search function
1. Whilst the MP3 CD is playing, press and hold the Fastforward or
Rewind buttons.
2. Release the button when the desired part of the track is reached.
1
1
To skip to the next folder
1. Whilst the MP3 CD is in stop or play mode, press and release the
Folder button.
1
2. The first file of the next folder will be played.
If you need any further advice, please call our Technical Helpline on :020 8758 0338 (Mon-Fri)
34
Repeat a single MP3 file
1. Whilst the MP3 CD is playing, press the Setup button until the
single track symbol appears in the display. The current track will be
repeated.
1
Repeat all MP3 tracks
1. Whilst the MP3 CD is playing, press the Setup button until the repeat all
tracks symbol appears in the display. All the tracks will be repeated.
1
Repeat all MP3 tracks in a single album
1. Whilst the MP3 CD is playing, press the Setup button until the repeat
all tracks in a single album symbol appears in the display. All the tracks
within that album will be repeated.
1
Play files in random order
1. Whilst the MP3 CD is playing, press the Info button until the random
symbol appears in the display. The tracks will be played in random
order.
1
To stop playing files in random order
1. Whilst the MP3 CD is playing, repeatedly press the Info button until
the random symbol disappears from the display. The MP3 CD will
return to normal play.
35
1
Using SD cards or USB memory devices
Secure Digital (SD) cards or USB memory devices can be used with the
MP-23 for playback of MP3 or WMA files.
Many different brands and capacities of SD card are available. Your MP23 has been tested with the most popular cards and USB device up to 1
GB. However, there are many different card variants available and not all
cards can be guaranteed to work in the MP-23.
SD card and USB slots are located behind the panel beneath the volume
control. This is opened by pushing and releasing the right hand top corner of the panel. To close the panel, press in the panel door until it clicks
into place.
Do not attempt to open or close the panel door using the left hand
edge as this may distort or damage the panel.
Inserting and removing a card
To insert an SD card into your radio push the card label side forward and
gold contacts first into the SD card slot on the front of your radio until it
clicks.
To remove the card push the card in slightly and it will pop out allowing
removal.
USB memory devices plug into the rectangular slot on the right hand side,
under the panel.
1
1. To select SD card or USB mode press the SD/USB button.
If you need any further advice, please call our Technical Helpline on :020 8758 0338 (Mon-Fri)
36
Playing MP3/WMA files - SD card/USB
1. Press the Play/Pause button to start playback. The display will show
the first track number.
1,3
2. Adjust the Volume and 3D Sound switch to the required settings.
3. To pause playback press the Play/Pause button. To resume playback
press the Play/Pause button again.
4. To stop play, press the Stop button. The total number of MP3 tracks
will be displayed.
Note: The SD card/USB memory device should only be removed when
the unit is in stop mode.
You may find that although you have added files to either an SD card
or a USB memory device, the MP-23 is unable to identify the files
and may report "No data". In this event, we recommend that the card
or memory should be reformatted in your computer. Before doing this,
you should copy all files and folders on the card to your computer for
temporary storage. After the format process is completed, then you
should copy the files back again. If the MP-23 is still unable to read
the files, then it is likely that your SD or USB memory device is not
completely compatible in some way.
37
2
2
4
2
Selecting a track
1. Whilst the MP3/WMA file is playing, press either the Fastforward or
Rewind buttons to change to the desired track, the track number
appears in the display.
1,2
1,2
3
2. You can also skip tracks when the player is in stop mode. Skip to the
desired track using the Fastforward or Rewind buttons. Press and
hold the button to make the track numbers cycle, release the button
when the desired track is displayed.
3. Press the Play/Pause button to play the selected track.
Select a desired track
1. For track numbers 1-9 simply press the corresponding digit button.
2
2. For track numbers ten and above press the direct track access button then press the required digits.
3. If the track number entered exceeds the number of tracks on the CD,
then no track will be played.
If you need any further advice, please call our Technical Helpline on :020 8758 0338 (Mon-Fri)
1,2
38
Search function
1. Whilst the MP3/WMA file is playing, press and hold the Fastforward
or Rewind buttons.
2. Release the button when the desired part of the track is reached.
1
To skip to the next folder
1. Whilst the unit is in stop mode, press and release the Folder button.
2. The first file of the next folder will be played.
39
1
1
Repeat all MP3/WMA tracks in a single album
1. Whilst the MP3/WMA file is playing, press the Setup button until the
repeat all tracks in a single album symbol appears in the display. All
the tracks within that album will be repeated.
1
Play files in random order
1. Whilst the MP3/WMA file is playing, press the Info button until the
random symbol appears in the display. The tracks will be played in
random order.
1
To stop playing files in random order
1. Whilst the MP3/WMA file is playing, repeatedly press the Info button
until the random symbol disappears from the display. The unit will
return to normal play.
1
SD card/USB memory device Intro play
1. Whilst the unit is in stop mode, press the Autotune/Intro button once
to play the first 10 seconds of all the tracks on the SD card/memory
device.
1
2
2. Press the Stop button to interrupt Intro play.
If you need any further advice, please call our Technical Helpline on :020 8758 0338 (Mon-Fri)
40
Alarm
Your sound system has an alarm which can be set to wake you to CD,
USB, SD card, FM radio, MW radio, DAB or Auxiliary in.
1. Press and release the Clock button the clock time will show on the
display. Ensure that the clock time is set see page 7.
1,2
2. Press and release the Clock button again the alarm digits will show
on the display and "On" will be displayed next to the alarm symbol.
3. Press and release the Clock/Adjust button to adjust the alarm hour
digits. The alarm hour digits will flash.
4. Press the Tuning Up or Down to select the required alarm hour.
3,5
5. Press and release the Clock/Adjust button to adjust the alarm minute
digits. The alarm minute digits will flash.
6. Press the Tuning Up or Down to select the required alarm minute.
4,6
41
4,6
7. Press and release the Clock button the alarm off time digits will
show on the display and "OFF" will be displayed next to the alarm
symbol.
7
8. Press and release the Clock/Adjust button to adjust the alarm off
hour digits. The alarm hour digits will flash.
9. Press the Tuning Up or Down buttons to select the required alarm
hour.
10. Press and release the Clock/Adjust button to adjust the alarm off
minute digits. The alarm minute digits will flash.
8,10
11. Press the Tuning Up or Down buttons to select the required alarm
minute.
12. Press and release the Clock button the previous alarm mode set
will show on the display and "SOURCE" will be displayed next to the
alarm symbol.
9,11
9,11
13. Press and release the Clock/Adjust button to adjust the alarm
mode.
14. Press the Tuning Up or Down buttons to select the required alarm
mode.
12
13
If you need any further advice, please call our Technical Helpline on :020 8758 0338 (Mon-Fri)
14
14
42
14. Your alarm can be set to the following modes:
CD - Will wake you from favourite CD
USB - Will wake you from USB memory device
SD Card - Will wake you from SD card
FM Tuner - Will wake you from FM radio station
AM Tuner - Will wake you from MW radio station
DAB
- Will wake you from DAB radio station
Aux
- Will wake you from your MP3 player
14. Press the On/Off button again and the radio will remain in standby
mode until the alarm sounds. The alarm symbol will appear in the
display. If the alarm has been enabled. To enable the alarm if needed
press and release the alarm button. (see page 44)
The alarm will sound at the selected alarm time.
The alarm volume will be the volume previously listened to when setting up the alarms.
Note: The alarm will not sound if the alarm has not been activated
and set to the "Enabled" position. See page 44.
When the alarm is set to wake by radio your sound system will
switch on to the last used station.
43
Switching alarm on or off
1. To turn the alarm On (ENABLED) or Off (CANCEL) press and release
the Alarm button.
2. The alarm symbol
will appear when the alarm has been enabled.
1
Cancelling alarms
Note: The alarm will activate for the specified alarm duration (maximum
24 hours).
1. Press the On/Off button to switch the alarm off.
2. Enter the alarm setup menu and select the alarm mode to the
"CANCEL" position.
If you need any further advice, please call our Technical Helpline on :020 8758 0338 (Mon-Fri)
1
44
System reset
If your radio fails to operate correctly, or some digits on the display are
missing or incomplete carry out the following procedure.
1. Ensure that your radio is in DAB mode.
1
2. Press and hold in the Setup button until the display shows "Press
SELECT to confirm reset...".
3. Press in and release the Ok/Select button to select System
reset.
4. If DAB was used last then a "Quick scan" of the DAB band will be
performed, otherwise a "Quick scan" will be carried out the next time
the DAB band is selected.
After a system reset, any DAB preset settings will have been
cancelled.
If a problem persists our technical staff would be pleased to help offer
any assistance on operating the radio. Our technical helpline number
is 020 8758 0338.
45
3
Clock display
1. Your radio will display clock time when it is set to Standby mode.
1
3D sound switch
Your radio speakers may be altered to give a normal or a 3D sound
effect.
1. To give 3D sound, switch your 3D sound switch to 3D position.
2. To give normal sound, switch your 3D sound switch to normal.
If you need any further advice, please call our Technical Helpline on :020 8758 0338 (Mon-Fri)
46
Aux in socket (3.5mm Jack)
1. Repeatedly press and release the Radio button until "Aux" is displayed.
2. Connect a stereo or mono audio source (ie iPod, MP3 or CD player)
to the Aux in socket.
3. Adjust the Volume control on your iPod, MP3 or CD player for comfortable listening.
Line Out socket (3.5mm Jack)
A 3.5mm Line Out socket located on the rear of your radio is provided
for connecting the audio signal to an external amplifier. Inserting an audio
cable into this socket will not mute the internal loudspeaker. Set the volume
control to minimum if desired.
47
1
Headphone and optical output sockets
1. A 3.5mm Headphone Socket located on the rear of your radio is
provided for use with headphones. Inserting a plug automatically
mutes the internal loudspeaker.
2. A digital optical output socket is provided on the rear of your radio for
connection to an amplifier, mini-disc or other equipment with a digital
optical input.
2
If you need any further advice, please call our Technical Helpline on :020 8758 0338 (Mon-Fri)
48
General
Do not allow this radio to be exposed to water, steam or sand. Do not leave
your radio where excessive heat could cause damage. It is recommended
that the DAB band be used wherever possible as better results in terms
of quality and freedom from interference will usually be obtained than on
the FM and MW band.
Specifications
Circuit features
Power Requirements
Mains
Battery (Remote control)
AC 230 volts, 50Hz
CR2025
only
Loudspeaker
2 x 75 mm
Output Power
8 Watts RMS per channel
87.5-108MHz
Headphone socket
3.5mm dia
3.5mm dia
Frequency Coverage
FM
DAB
174.928 - 239.200MHz
Auxiliary in socket
MW
522 -1620kHz
Line Out socket
3.5mm dia
Digital optical output socket
Toslink
Aerial System
FM
Telescopic aerial
DAB
Telescopic aerial
MW
Built in ferrite aerial
The Company reserves the right to amend the specification without notice.
49
Mains supply
The MP23 will operate from a supply of AC 230 volts, 50Hz
only.
DO NOT cut off the mains plug from this equipment. If the plug fitted
is not suitable for the power points in your home or the cable is too short
to reach a power point, then obtain an appropriate safety approved extension lead or adaptor. If in doubt consult your dealer.
The wire coloured BLUE must be connected to the terminal marked N or
coloured BLACK.
The wire coloured BROWN must be connected to the terminal marked L
or coloured RED.
If nonetheless the mains plug is cut off, remove the fuse and dispose of
the plug immediately to avoid a possible shock hazard by inadvertent
connection to the mains supply.
If this product is not supplied with a mains plug, or one has to be fitted,
then follow the instructions given below:
IMPORTANT. DO NOT make any connection to the larger terminal which
is marked with the letter E or by the safety earth symbol
or coloured
Green or Green-and-yellow.
The wires in the mains lead are coloured in accordance with the following
codes :BLUE - NEUTRAL
BROWN - LIVE
Fuse
When replacing the fuse only a 3A ASTA approved to BS1362 type should
be used and be sure to re-fit the fuse cover.
IF IN DOUBT - CONSULT A QUALIFIED ELECTRICIAN.
Replacement fuse holders are available from Roberts Radio Technical
Services at the address shown on the rear of this manual.
If you need any further advice, please call our Technical Helpline on :020 8758 0338 (Mon-Fri)
50
Notes
51
Notes
If you need any further advice, please call our Technical Helpline on :020 8758 0338 (Mon-Fri)
52
Notes
53
Guarantee
This instrument is guaranteed for twelve months from the date of delivery to the original owner against failure due to faulty workmanship or component
breakdown, subject to the procedure stated below. Should any component or part fail during this guarantee period it will be repaired or replaced free
of charge.
The guarantee does not cover:
1. Damage resulting from incorrect use.
2. Consequential damage.
3. Receivers with removed or defaced serial numbers.
N.B. Damaged or broken telescopic aerials will not be replaced under guarantee.
Procedure:
Any claim under this guarantee should be made through the dealer from whom the instrument was purchased. It is likely that your Roberts' dealer
will be able to attend to any defect quickly and efficiently but should it be necessary the dealer will return the instrument to the Company’s service
department for attention. In the event that it is not possible to return the instrument to the Roberts' dealer from whom it was purchased, please contact
Roberts Radio Technical Services at the address shown overleaf.
If you need any further advice, please call our Technical Helpline on :020 8758 0338 (Mon-Fri)
54
ROBERTS RADIO TECHNICAL SERVICES
97-99 Worton Road
Isleworth Middlesex
TW7 6EG
Technical Helpline :- 020 8758 0338 (Mon-Fri during office hours)
Website: http://www.robertsradio.co.uk
Issue 1