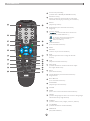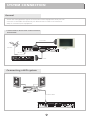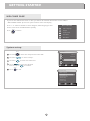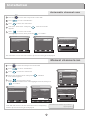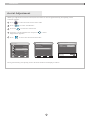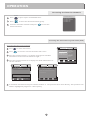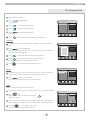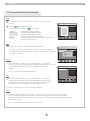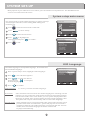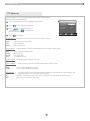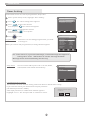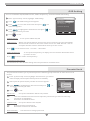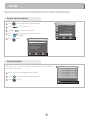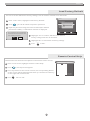
1
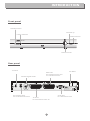
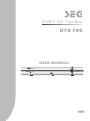
DVB-T Set-Top-Box
DTR 705
USER MANUAL
DTR 705
English
FCC and Safety Information
NOTE:
This equipment has been tested and found to comply with the limits for a Class B digital device
pursuant to part 15 of the FCC Rules. These limits are designed to provide reasonable protection
against harmful interference in a residential installation. This equipment generates, uses and can
radiate radio frequency energy and, if not installed and used in accordance with the instructions,
may cause harmful interference to radio communications. However, there is no guarantee that
interference will not occur in a particular installation. If this equipment does cause harmful interference
to radio or television reception, which can be determined by turning the equipment off and
on, the user is encouraged to try to correct the interference by one or more of the following measures:
- Reorient or relocate the receiving antenna.
- Increase the separation between the equipment and receiver.
- Connect the equipment into an outlet on a circuit different from that to which the receiver is
connected.
- Consult the dealer or an experienced radio/TV technician for help.
FCC and Safety Information
Important Safety Instructions
1. Read these instructions.
2. Keep these instructions.
3. Heed all warnings.
4. Follow all instructions.
5. Do not use this apparatus near water.
6. Clean only with a damp cloth.Please unplug power.
7. Do not block any of the ventilation openings. Install in accordance with the manufacturer’s
instructions.
8. Do not install near any heat sources such as radiators, heat registers, stoves, or other
apparatus (including amplifiers) that produce heat.
9. Do not defeat the safety purpose of the polarized-type plug. A polarized plug has two blades
with one wider than the other. The wide blade is provided for your safety. When the provided
plug does not fit into your outlet, consult an electrician for replacement of the obsolete
outlet.
10. Protect the power cord from being walked on or pinched particularly at plug, convenience
receptacles, and the point where they exit from the apparatus.
11. Only use attachments/accessories specified by the manufacturer.
12. Use only with a cart, stand, tripod, bracket, or table specified by the manufacturer or sold
with the apparatus. When a cart is used, use caution when moving the cart/apparatus
combination to avoid injury from tip-over.
13. Unplug this apparatus during lighting storms or when unused for long periods of time.
14. Refer all servicing to qualified service personnel. Servicing is required when the apparatus
has been damaged in any way; such as when the power-supply cord or plug is damaged, liquid
has been spilled or objects have fallen into the apparatus, the apparatus has been exposed to
rain or moisture, does not operate normally, or has been dropped.
A Class II APPARATUS shall be permanently marked with the words DOUBLE INSULATION or
insulated and hen servicing use only identical replacement parts.
WARNING: To reduce the risk of fire or electric shock, do not expose this apparatus to rain or
moisture. The apparatus shall not be exposed to dripping or splashing and that no objects filled
with liquids, such as vases, shall be placed on the apparatus.
Double
Precautions
Please read these precautions before operating this unit.
Power cord protection
To avoid any malfunctions of the unit, and to protect against electric shock, fire or personal injury,
please observethe following.
Hold the plug firmly when connecting or disconnecting the AC power cord.
Keep the AC power cord away from heating appliances.
Never put any heavy object on the AC power cord.
Do not attempt to repair or reconstruct the AC power cord in any way.
Never make or change connections with the power switched on.
Placement
Avoid placing the unit in areas of:
direct sunlight or heating radiators, or closed automobiles
high temperature (over 350C) or high humidity (over 90%)
much dust as the internal parts may be seriously damaged.
Non-use periods
When the unit is not being used, turn it off. When left unused for a long period of time, the unit should
be unplugged from the household AC outlet.
No fingers or other objects inside
Touching internal parts of this unit is dangerous, and may cause serious damage to the unit. Do not atte
important to disassemble the unit.
Do not put any foreign object in this unit.
Keep away from water/magnet
Keep the unit away from flower vases, tubs, sinks, etc. If liquids are spilled into the unit, serious damage
could occur.
Never bring a magnet or magnetized object near the unit.
Stacking
Place the unit in a horizontal position, and do not place anything heavy on it.
Condensation
Moisture may form on the lens in the following conditions:
immediately after a heater has been turned on
in a steamy or very humid room
when the unit is suddenly moved from a cold environment to a warm one
If moisture forms inside this unit, it may not operate properly. In this case, turn on the power and wait about
one hour for the moisture to evaporate.
If there is noise interference on the TV while a broadcast is being received
Depending on the reception condition of the TV, interference may appear on the TV monitor while you watch
a TV broadcast and the unit is left on. This is not a malfunction of the unit or the TV. To watch a TV broadcast,
turn off the unit.
English
This symbol on the product or in the instructions means that your electrical and electronic
equipment should be disposed at the end of its life separately from your household waste.
There are separate collection systems for recycling in the EU. For more information, please
contact the local authority or your retailer where you purchased the product.
CONTENTS
FCC and Safety Information
INTRODUCTION
Front panel
Rear panel
Remote control
SYSTEM CONNECTION
General about connections
Connection to the TV and video recorder with SCART
Connecting a HiFi System
1
1
2
3
3
3
GETTING STARTED
WELCOME PAGE
System setup
INSTALLATION
Automatic channel scan
Manual channel scan
Aerial Adjustment
4
4
5
5
6
OPERATION
Accessing the favorite channels
Access the Electronic Programme Guide(EPG)
7
7
CHANNEL
Channel list
Channel list menu
TV Channel list
Radio Channel list
Delete All Favorites
Delete All Channels
8
8
9-11
11
12
12
SYSTEM SET UP
System setup main menu
OSD Language
TV System
Start up Service
Region and Time
Timer Setting
OSD Setting
Parental Lock
13
13
14
15
15
16
17
17
TOOLS
Tools main menu
Information
Load Factory Default
Remote Control Help
18
18
19
19
INTRODUCTION
Front panel
Standby button
Channel up
Power indicator
Channel down
DTR 705
Remote sensor
Rear panel
TV aerial
Coaxial Digital Audio
AUX Scart
for connection to a VCR
or a satellite receiver
AC Mains
AC220-240V
~50/60Hz
RS232
DTR 705
DVB-T SET TOP BOX
POWER SUPPLY: AC 220-240V~50/60Hz
POWER CONSUMPTION: 10WATTS
Art-Nr.:_________
Veseg GmbH, Ostring 60,
D-66740 Saarlouis-Fraulautern
R F Loop through
for an external TV aerial
TV Scart
for connection to the TV
1
Serial port
for connection to PC
INTRODUCTION
1
1
Power On/Standby
(Switch the STB ON/STANDBY mode)
2
Numeric entry
(Enter numeric values and to select the
channel directly by entering it's number)
3
Menu
(Open up menu)
4
Red Button (For teletext function)
Page up
5
Cursor/ Enter
(
to select sub-menu from the
main menu and channel +/-,
11
DTV/ VCR
2
MENU
3
12
4
5
VOL
VOL
+
OK
-
14
CH MUTE
PAUSE
FAVORITE
LANG
INFO
X
8
EPG
15
16
RECA LL
TV/RADIO
6
Yellow Button
(For teletext function)
7
Mute
8
RECALL
(switch to previous channel)
9
EPG
(Open up Electronic Program Guide
menu)
10
TTX
(Open Teletext function)
11
DTV/VCR
(Switch between TV and external input
through AUX scart)
12
EXIT
(Exit from menu)
13
Green Button (For teletext function)
Page down
14
Blue Button
(For teletext function)
15
FAVORITE
(Open up Favourite list)
16
PAUSE
17
INFO
(Press for current channel information)
18
LANG
(Select language for the two or more language
simultaneous programmes)
19
AUDIO
(Select audio: Left / Right /Stereo / Mono)
20
TV/RADIO
(Switch between TV and Radio)
21
SUBTITLE
(On/Off Subtitle)
13
CH+
6
7
to select menu and sub-menu
from the menu and volume +/-,
Press to enter.)
EXIT
AUDIO
17
18
19
9
20
10
TTX
SUBTITLE
21
2
SYSTEM CONNECTION
General
There are many different types of TV/VCR and other equipment that you can
connect to the STB.In this manual you will see some of the most common
ways to connect your equipment.
Connection to the TV and video recorder
with SCART
Scart cable
Antenna
RS232
AC220-240V
~50/60Hz
DTR 705
DVB-T SET TOP BOX
POWER SUPPLY: AC 220-240V~50/60Hz
POWER CONSUMPTION: 10WATTS
Art-Nr.:_________
Veseg GmbH, Ostring 60,
D-66740 Saarlouis-Fraulautern
TV
RF cable
VCR
Video Cassette Recorder
Scart cable
Connecting a HiFi system
Hi-Fi
Coaxial cable
AC220-240V
RS232
4
3
~50/60Hz
DTR 705
DVB-T SET TOP BOX
POWER SUPPLY: AC 220-240V~50/60Hz
POWER CONSUMPTION: 10WATTS
Art-Nr.:_________
Veseg GmbH, Ostring 60,
D-66740 Saarlouis-Fraulautern
GETTING STARTED
WELCOME PAGE
If you use the STB the first time or after you delete all channel information in the STB,the
"WELCOMOE PAGE" picture for quick shortcut menu will display .
Press "1~5" numeric button to enter Region, OSD Language Tuner
Power, Auto Scan and Main Menu quickly.
WELCOME PAGE
1
OSD Language
2
Region
MENU
Press
to return.
3
Tuner Power
4
Auto Scan
5
Main Menu
System setup
Main Menu
MENU
1
Press the
to enter the setup menu of the STB.
2
Press the
to select "Setup" .
3
Press the
to enter the sub-menu.
4
Press
to select the desired
item and press
to confirm.
Channel
Installation
Setup
Tools
Select
OK Enter
MENU Exit
MENU
5
Press
to exit.
System Setup
OSD Language
TV System
Start up Service
Region and Time
Timer Setting
OSD Setting
Parental Lock
Select
4
OK Enter
MENU Exit
Installation
Automatic channel scan
MENU
1
Press the
to enter the setup menu of the STB.
2
Press
to select "Installation".
3
Press
4
Select the "Auto Scan" and press
appears
5
Press
to select Scan mode
and highlight "Search",then press the
to enter the sub-menu.
, Auto Scan menu
to confirm .
Installation
Auto Scan
Auto Scan
Channel Scan
Aerial Adjustment
Scan Mode
Search
Auto Scan
All
UHF 470.0~862.0 MHz Ch No.
Frequency 858.00 MHz FFT
Modulation
GI
40%
TV Service
Radio Service
MENU Exit
Select
OK Enter
MENU Exit
Select
Change OK Enter MENU Exit
The automatic search will start and the picture shown right is displayed.
Manual channel scan
MENU
1
Press
to enter the setup menu of the STB.
2
Press
to select "Installation".
3
Press
to enter the sub-menu.
4
Select the "Channel Scan" and press
Scan menu appears
5
Press
to select Scan mode,
Scan Band and Channel No. and highlight "Search",then press
to confirm .
Main Menu
Channel
, Channel
Installation
Setup
Installation
Channel Scan
Auto Scan
Channel Scan
Aerial Adjustment
Mode
Scan Band
Ch No.
Frequency
BandWidth
Search
Tools
Select
OK Enter
MENU Exit
Channel Scan
By Channel
UHF
21
000.000MHz
8 MHz
Signal Intensity
Signal Quality
Select
OK Enter
MENU Exit
Select
UHF 470.0~478.0 MHz
Frequency
FFT
Modulation
GI
40%
TV Service
65%
90%
Radio Service
MENU Exit
Change 0-9 Input MENU Exit
Your STB will start to scan the desired service or Frequency
and the picture shown right is displayed.
5
Channel Scan mode: By channel
By frequency
Installation
Aerial Adjustment
When you adjust the location of aerial,use this menu to check signal intensity and quality of the
selected channel.
MENU
1
Press
to enter the main menu of the STB.
2
Press
3
Press the
4
Select the "Aerial Adjustment" and press
Adjustment appears.
5
Press
to select "Installation".
to enter the sub-menu.
, Aerial
to select the desired channel No.
Main Menu
Channel
Installation
Installation
Aerial Adjustment
Auto Scan
Channel Scan
Aerial Adjustment
Ch No.
Tuner Power
21
On
Setup
Signal Intensity
Signal Quality
Tools
Select
OK Enter
MENU Exit
Select
OK Enter
MENU Exit
The signal intensity and quality for the desired channel will display as above.
6
Change MENU Exit
65%
90%
OPERATION
Accessing the favorite channels
FAVORITE
Favorite Group 1
1
Press
to open up the "FAVOURITE LIST".
2
Press
3
Select the favourite channels and press
selected channel.
0001 HN Radio2
0002 BBC NEWS 24
0003 BBC Text
Channel
0004 BBC Two
to select the desired favourite group.
Installation
to view the
System Setup
Tools
Accessing the Electronic Program Guide (EPG)
Accessing the EPG of all channels:
EPG
1
Press
EPG
to enter EPG menu .
2
Press
to view the current selected in full screen.
3
Press the numeric button"1" to display all programs schedule
information of the selected channel as right.
4
Press the numeric button"2" to display the detail informations of
current channel.
Schedule
15/02/2006
14:29
0002 BBC NEWS 24
15/02/2006
Detail
15/02/2006
0001 HN Radio2
0002 BBC NEWS 2
0003 BBC Text
0004 BBC Two
0005 BBC CHOICE
15/02/2006
Select
Page
1 Schedule 2
Detail
14:29
14:05-14:55
BBC News
Theme: News
Rate:00
15:00-16:00
BBC News
Theme: News
Rate:00
OK Enter MENU Exit
14:29
BBC NEWS 24
13:00-15:00 BBC News
Bill Turnbull and Valerie Sanderson present
the news,with live reports from around the
world. Widescreen.
Select
OK Enter
5
Page MENU Exit
Date
1
Detail
2
Timer
Page MENU Exit
1
Extend
2
Timer
In schedule and detail menu,press numeric button "2" can open the timer menu directly. This operation can
add the highlighted program to a timer quickly.
7
CHANNEL
Channel list
There are four ways of channel selection - stepping through the channel list, selection by number, from the
on-screen channel list, and using the electronic programme guide(EPG).
1
Stepping through the channel list:
To move through the channel list, press the upward arrow or downward arrow
key on the remote control.
2
Selection by number:
Enter the channel list number directly by remote control to select desired channel.
3
Selection by on-screen channels list:
You can also select the required channel directly from on-screen channel list. This is
displayed using the STB's main menu.
4
Selection by EPG:
You can also select the required channel directly from electronic program guide (EPG).
For EPG details ,see previous page.
Channel list menu
1
Press
to enter the main menu of the STB.
2
Press
to highlight channel.
3
Press
to enter the sub-menu.
4
Press
5
Press
to highlight the desired item and press
to confirm .
to exit.
Main Menu
Channel
Channel
Installation
TV Channel List
Radio Channel List
Delete All Favorites
Delete All Channels
Setup
Tools
Select
OK Enter
MENU Exit
Select
OK Enter
8
MENU Exit
CHANNEL
TV Channel list
1
Enter Channel menu.
2
Press
to highlight TV
channel list.
3
Press
,TV channel list appears.
4
Press
to select channel group.
5
Press
channel
to preview the desired
TV Channel List
All Channel
0001 BBC CHOICE
0002 BBC NEWS 2
1 Favorite 2
Select
6
Press
Move 3
Group
Preview
Find
4
Sort
5
Edit
Page OK Enter MENU Exit
to view the selected channel in full screen.
Favorite
1
In channel list menu, press numeric button "1" to setup Favorite
item.
2
Press
to move highlight
between 8 favorite groups ,you can setup the desired channel to
the selected favorite group.
3
Press
to confirm,a favorite mark will be added.
TV Channel List
All Channel
Favorite
0001 BBC CHOICE
Favorite 1
0002 BBC
NEWS
Favorite
2 2
1 Favorite 2
Select
4
Press
on the marked favorite group to cancel
favorite group,the mark will be cancel too.
5
Press
Preview
Favorite 3
Favorite 4
Favorite 5
Favorite 6
Favorite 7
Favorite 8
Move 3
Group
Find
4
Sort
5
Edit
Page OK Enter MENU Exit
EXIT
to and return to Channel list menu.
TV Channel List
Move
All Channel
1
In channel list menu, press numeric button "2" , there will show a
"moving mark" in the right side of the selected channel.
2
Press
to move the selected
channel to the position that you want to place
0001 BBC CHOICE
0002 BBC NEWS 2
1 Favorite 2
Select
Move 3
Group
Preview
Find
4
Sort
5
Edit
Page OK Enter MENU Exit
Find
Use this menu to find a desired channel.
1
In channel list menu, press numeric button "3" to open Find menu.
2
Press
to
highlight the letter or numeric and press
input one by one.
TV Channel List
All Channel
Find
0001 BBC CHOICE
0002 BBC NEWS 2
to
3
After input each character, the program list on the left will search
the channel according your input, and list the matched channel.
4
Pressing
to close "Find" and select
channel from the channels list directly.
EXIT
1 Favorite 2
Select
9
Move 3
Group
A
H
O
V
3
0
/
Find
4
BPreview
C D E F G
I J K L M N
P Q R S T U
W X Y Z 1 2
4 5 6 7 8 9
( ) @& - +
SP ? DEL OK
Sort
5
Edit
Page OK Enter MENU Exit
CHANNEL
TV Channel list (Continued)
Sort
In channel list menu, press numeric button "4" to open "Sort"
menu.
1
2
Press
to highlight sorting
way you want and Press
to confirm.
Default:
Name (A-Z):
Name (Z-A):
FTA:
Locked:
TV Channel List
All Channel
Sort
0001 BBC CHOICE
Default
0002 BBC
NEWS 2
Name(A-Z)
Sorting by scanning result.
Sorting in Alphabetical Order.
Sorting in Alphabetical Order.
Sieving out all free fare channels.
Accumulating all locked channels and list in the
last of TV Channel List.
Preview
Name(Z-A)
FTA
Lockd
1 Favorite 2
Select
Move 3
Find
Group
4
Sort
5
Edit
Page OK Enter MENU Exit
Edit
Use this menu to delete ,skip,lock and edit channel list.
TV Channel List
In channel list menu, press numeric button "5" to open channel
list edit menu.You will be asked to enter the password.The default
password is "0000".
.
Delete:
All Channel
0679 SZTV-M
Input Password
No Signal!
----
1 Favorite 2
Select
In "Edit Channel" menu, press numeric button "1" can make
a delete mark in the right side of the highlighted channel. After save
and exit "Edit Channel" menu, the marked channel will be
deleted.
Move
3 Find
Group
4
5
Edit
Edit Channel
All Channel
0001 BBC CHOICE
0002 BBC NEWS 2
Press "1" again to cancel delete channel.
Sort
Page ok Enter MENU Exit
Preview
Skip:
In "Edit Channel" menu, press numeric button "2" can make
a skip mark in the right side of the highlighted channel. After
save and exit "Edit Channel" menu, the marked channel will
be skip while you change the channel in full screen.
1 Delete
Select
2
Skip
Group
3
Lock
4
Edit
Page MENU Exit
Press "2" button again to cancel the skip channel .
Lock:
In "Edit Channel" menu, press numeric button "3" can make a lock mark in the right
side of the highlighted channel. After save and exit "Edit Channel" menu, the marked
channel will be locked.STB will request you to input the password while you want to watch
the locked channel.
Press "3" button again to cancel the lock channel .
10
5
Del All
CHANNEL
TV Channel list (Continued)
Edit:
Edit Channel
Use edit to rename a channel.
All Channel
In "Edit Channel" menu, press numeric button "4" to open
edit channel menu.Highlight name item and press
to confirm.The mock keypad will be showed.
0001 BBC CHOICE
Edit Channel
0002 BBC
NEWS 2BBC ONE
Name
Video PID
Audio PID
PCR PID
Save
Exit
Input letter and numeric one by one by pressing
and press
to confirm.
1 Delete
After complete input,highlight "OK" on mock keypad to confirm,
you change the name of channel successfully.
Select
Skip
2
3
Group
Preview
160
82
160
Lock
4
Edit
5
Del All
Page MENU Exit
NOTE:
After modification, highlight "Save" item and press
to save the modified value and exit "Edit"
mode.
Highlight "Exit" item and press
to exit
"Edit" mode and won't save any modification.
"Video PID", "Audio PID" and "PCR PID" items are
grey and can not be edited.
Del All:
In "Edit Channel" menu, press numeric button "5" can mark all the channel with delete mark.
After save and exit , all channels are deleted.
Press number "5"button again to cancel Del All function..
Radio Channel list
1
Enter Channel menu.
2
Press
to highlight Radio
channel list.
Radio Channel List
All Channel
0001 BBC PARLMNT
Preview
3
Press the
4
Press
5
Press
to preview channel
logo of the desired channel
6
Press
,Radio channel list appears.
to select channel group.
1 Favorite 2
Select
Move 3
Group
to listen the selected radio channel .
NOTE:
Basically, the operation of "Radio Channel List" is same as "TV
Channel List", but there is one point different: In "Radio Channel
List" mode, there is no video information, so it will always display
Radio's logo in the right side preview window.
11
Find
4
Sort
5
Edit
Page OK Enter MENU Exit
CHANNEL
Delete All Favorites
Use this menu to delete all favorite channels.
1
Enter Channel menu.
2
Press
to highlight Delete
All Favorites item.
3
Press the
password.
4
Input the password using the numeric buttons,a warning
window is displayed.
Channel
,you will be asked to input the
Warning! Do you really want
to delete all favorite channels?
Yes
TV Channel List
Radio Channel List
Password
Delete AllInput
Favorites
Delete All Channels
5
No
----
Select
OK Enter
MENU Exit
Highlight "Yes" to confirm,
Highlight"No" to cancel .
Delete All Channels
Use this menu to delete all channels.
1
Enter Channel menu.
2
Press
to highlight Delete
All channels item.
3
4
Press the
password.
Channel
TV Channel List
Radio Channel List
Password
Delete AllInput
Favorites
Delete All Channels
,you will be asked to input the
----
Input the password using the numeric buttons,a warning
window is displayed.
Warning! Do you really want
to delete all channels?
Yes
No
5
Highlight "Yes" to confirm,
Highlight"No" to cancel
12
Select
OK Enter
MENU Exit
SYSTEM SET-UP
Many aspects of your STB can be set to reflect your circumstances and preference. The SETTINGS menu
screen is accessed from main menu.
System setup main menu
Use system menu to setup OSD Language, TV System, Start up
Service,Region and Time, Timer Setting, OSD Setting and
Parental Lock.
Main Menu
Channel
MENU
1
Press
2
Press
3
Press
4
Press
to highlight the
desired item and press
to confirm .
Installation
to enter the main menu of the STB.
Setup
to select "Setup".
Tools
to enter the sub-menu.
Select
OK Enter
MENU Exit
System Setup
MENU
5
Press
OSD Language
TV System
Start up Service
Region and Time
Timer Setting
OSD Setting
Parental Lock
to exit.
Select
OK Enter
MENU Exit
OSD Language
Use OSD Language to setup OSD Language , First Audio and
Second Audio language.
1
Enter "System Setup" menu, highlight "OSD Language".
2
Press
3
Press
to select the desired
item and press
to setup the
desired language
4
Press
,the sub-menu appears.
Second Audio:
OSD Language
First Audio
Second Audio
Select
To select your desired OSD language.
Some channels have more than one audio language for choosing; use this
function you can set the first audio for this channel. If the playing channel
has the same audio as the "First Audio" you set, system will play this audio
language as default. If the channel hasn't the suited audio language, then
the system will compare automatically with second audio language.
If the channel has no correspond audio with "First Audio" but have corres
ponded audio with "Second Audio", system will play the second audio l
anguage as default. If no audio language corresponds with the "Second
Audio", then the default language of current channel will
be played automatically.
13
English
English
English
Change
to confirm.
OSD Language:
First Audio:
OSD Language
MENU Exit
SYSTEM SET-UP
TV System
Use this menu to setup Display Mode,Aspect Ratio.Dolby Digital,
Video Output and LCN Mode.
1
TV System
Enter "System Setup" menu, highlight "TV System".
2
Press
3
Press
to select the desired
item and press
to setup the
desired selection.
4
Press
Display Mode
Aspect Ratio
Dolby Digital
Video Output
LCN Mode
,the sub-menu appears.
Select
Auto
4:3PS
Off
CVBS
Off
Change
MENU Exit
to confirm.
Display Mode: TV System menu is to set up the broadcast system.
Auto
PAL
NTSC
Auto switch to TV System
PAL TV System
NTSC TV System
Aspect Ratio:
Auto
4:3PS
4:3LB
16:9
Aspect Mode is used for switching the screen aspect ratio mode.
Auto switch to Aspect Ratio
4:3 Pan Scan
4:3 Letter Box
16:9 Wide Screen
Dolby Digital: Dolby Digital to set AC3 on or off.
Video Output:
Video Output is use for switching the video output mode.
RGB
CVBS
Set to output RGB video signal
Set to output CVBS video signal
LCN Mode:
If LCN (Logical Channel Number)Select function is activated,You can't change the
original number of TV channels by scanning .
Activate "LCN Select" function if there is LCN for the TV station of the country.
Deactivate "LCN Select" function.
On
Off
14
SYSTEM SET-UP
Start up Service
Use this menu to setup a start up service when you power on STB.
1
Enter "System Setup" menu, highlight "Start up Service".
2
Press
3
Press
to select the desired
item and press
to setup the
desired selection.
4
Press
,the sub-menu appears.
Start up Service
Boot on Service
Mode
Start up Service
On
TV
to confirm.
Select
Boot on Service:
On
Off
Activate "Start up Service" function
Deactivate "Start up Service" function
Mode:
Set up TV or Radio as Start up Service mode .
Start up Service:
Change
MENU Exit
Set up Start up Service On/Off.
Set up a channel as Start up Service.
Region and Time
Use this menu to setup country and time.
Region and Time
1
Enter "System Setup" menu, highlight "Region and Time".
2
Press
3
Press
to select the desired
item and press
to setup the
desired selection.
,the sub-menu appears.
Region
GMT Usage
GMT Offset
Date
Time
Summer Time
Time Display
Select
Change
France
By Region
GMT+01:00
05/10/2005
11:23
Off
Off
0~9
Input
MENU Exit
4
Press
to confirm.
MENU
5
Press
to exit.
GMT Usage: This item is use for open the usage of GMT.There are three mode for using.
Off / User Define / By Region, press
to switch.
GMT Offset:
This item is valid only when the setting of "GMT Usage" is "Uesr Define".
Press
to switch "GMT Offset" value. and the range is
"-12:00 ~ +12:00", increase each half hour progressively.
Date:
Time:
"Date" and "Time" items are valid only when the setting of "GMT Usage" is "Off".
Press
to moving highlight and use number keys to
input directly.
Summer Time:
Time Display:
This item is valid only when the setting of "GMT Usage" is "By Region".
Press
to switch between "On" and "Off".
This function can control whether the time will be displayed on screen or not.
Press
to switch between "On" and "Off".
15
OK
Enter
SYSTEM SET-UP
Timer Setting
Various time can be set, such as program time, Sleep time.
1
Enter "System Setup" menu, highlight "Timer Setting".
2
Press
3
Press
to select the desired
item and press
,the sub-menu appears.
4
Press
to highlight the desired
item and press
to set up the
selection you want.
Time Setting
Program Timer
Sleep Timer
Load Default Timer Setting
,the Timer Setting menu appears.
Select
OK Enter
MENU Exit
MENU
5
Press
to exit.
Program Timer:
Timer
This item is use for setting program timer you want
to change to.
When you want to exit program timer,a saving window appears
Current Date/Time 06/10/2005 03:17
1
Timer Number
Timer Mode
Off
Timer Service
Message
Wakeup Channel
General
Wakeup Date
06/10/2005
Wakeup Time
03:10
Duration
01:00
Select
Change 0~9 Input
For "Timer Service",if you select Message,a remind message will appear at
setting timer. Press "OK" button to exit the message window.
Message mode:General/Birthday/Anniversary
Sleep Timer:
You can set the STB to power off in 10 min,30min,
60min,90min and 120min automatically.
Sleep Timer
Sleep Time
Change
Off
MENU Exit
Load Default Timer Setting:
This function can clear all timer setting and return back to default timer setting.
If you enter this menu,you will be asked to input password
(the default password is "0000").
After input password, a confirmation window appears.
Highlight "Yes" or "No" and press"OK" to confirm or cancel.
16
All Timers will be cleared,
continue?
Yes
No
MENU Exit
SYSTEM SET-UP
OSD Setting
You can set Subtitle On/Off,OSD Timeout, OSD Transparency, and load default OSD setting.
1
Enter "System Setup" menu, highlight "OSD Setting".
2
Press
3
Press
to select the desired tem and press
sub-menu appears.
OSD Setting
,the
to
Select
MENU
5
Press
On
5
Off
Load Default OSD Setting
Press
to highlight the desired item and press
set up the selection you want.
4
Subtitle Display
OSD Timeout
OSD Transparency
,the OSD Setting menu appears.
Change
MENU Exit
to exit.
Subtitle Display:
OSD Timeout:
Press
To set up the subtitle On/Off.
When you switch channels in full screen, there will show up some information
about current channel on the lower of the screen. Use "OSD Timeout " item to
set upthe duration of these information show up on the screen.
to set the time from "1 second ~ 10seconds".
To set up the transparency of display of menu and the information show
up on the screen.
OSD Transparency:
Press
to set the valule of transparency.
Load Default OSD Setting:
This function can clear all OSD setting and reset parameters as default value.
Parental Lock
The parental lock allows you to password protect channels,groups of menus or allow access to all
menus.
1
Enter "System Setup" menu, highlight "Parental Lock".you will be
asked to input password(the default password is"0000").
2
After input the password,the parental lock menu appears.
3
Press
to highlight the desired item and press
set up the selection you want.
4
Press
MENU
to exit.
Menu Lock:
Yes
No
OSD Language
Input Password
TV System
Start up Service
Region and Time
---Timer Setting
OSD Setting
Parental Lock
Select
OK Enter
MENU Exit
Set up the "Installation "Menu Lock/Unlock.
Lock the "Installation"menu.You must input the password if you want to enter any
sub-menu of "Installation".
Unlock the "Installation"menu.
Channel Lock:
Yes
No
to
System Setup
Set up the channel Lock On/Off.
Activate channel lock function
Deactivate channel lock function
New Password:
Use this item to change password.
17
Tools
In Tools menu ,you can see the software information, play game, Load factory default settings,
upgrade software, help using remote control and enter welcome page for quick shortcut menu.
Tools main menu
MENU
1
Press
2
Press
Main Menu
to enter the main menu of the STB.
Channel
to select "Tools".
Installation
3
Press the
4
Press
press
5
Press
to enter the sub-menu.
System Setup
to highlight the desired item and
to confirm .
Tools
Select
MENU
to exit.
OK Enter
MENU Exit
Tools
Information
Game
Load Factory Default
Software Upgrade
Remote Control Help
Welcome Page
Select
OK Enter
MENU Exit
Information
The "Information" menu can display some parameters of the software
information in this STB.
1
2
Enter "Tools" menu, highlight "Information".
Press
,the information window appears.
Press
bootloader
Scan
Band 0.2.0
2006-08-21
maincode
Scan
Band 0.4.0w2
2006-09-26
videoback 1.0.0
2005-12-23
radioback
Scan
Band 1.0.0
2005-12-23
default
db 0.1.0
Scan
Band
2005-12-23
user db
MENU
3
Information
to exit .
MENU Exit
18
1.0.0
2005-12-23
Tools
Load Factory Default
You can re-set the STB back to factory settings, clear all existed channels ae in this menu.
Tools
1
Enter "Tools" menu, highlight "Load Factory Default".
2
Press
3
Input the password using the numeric buttons(the default
password is "0000"),a confirmation window is displayed.
,you will be asked to input the password.
This operation will load default
and erase all the channels that
user added,continue?
Yes
Information
Input Password
Game
Load Factory Default
Software upgrade
---Remote Control Help
WELCOME PAGE
Select
OK Enter
4
Highlight "Yes" to confirm, STB will return back to
factory settings and clear all channels.
5
Highlight "No" to cancel back to factory settings.
6
Press
No
MENU Exit
MENU
to Exit .
Remote Control Help
This function can show the description of each button on the screen.
Remote Control Help
1
Enter "Tools" menu, highlight "Remote Control Help".
2
Press
3
Press any button on the remote control, the corresponding button
on the screen will be highlight and show up a statement of this key
on the right side on the screen.
Power
1
4
7
Menu
PG+
,the help menu appears.
EXIT
4
Press
twice to exit.
19
2
5
8
0
D/V
3
6
9
Exit
PG-
Ch+
VV+
OK
ChMute Pause
FAV
Recall Lang
Info
EPG
Audio
T/R
TTX
Sub
Press "Exit"
twice to exit
Veseg GmbH
Ostring 60 D-66740
Saarlouis-Fraulautern
www.SEG.tv