1
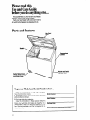
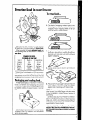
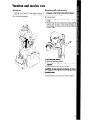
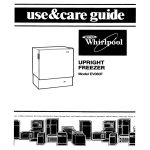
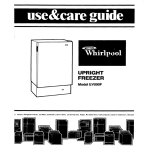
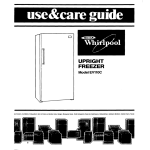
I
CHEST FREEZER
Models EH12OC
and EH15OC
ers. Freezers, Refrigerator-Freezers,
Ice Makers, Dishwashers, Built-In Ovens and Surface Units, Ranges, Microwave Ovens. Trash Compactors, Room Air Conditioners, Dehumidlf
Please read this
Use and Care Guide
before you do anything else...
This booklet tells you how to start your freezer,
defrost it, clean it and adjust controls.
Treat your new freezer with care. Use it only to
do what home freezers are designed to do.
Parts and features
Key Eject
lock
Basket
Temperature
control
Model and Serial
Number Plate
Defrost Water Dral
and Drain Cover
Copy your Model and Serial Numbers here...
When you need service, or call with a question,
have this information ready:
1. Complete Model and Serial Numbers [from the
plate located as shown).
2. Purchase date from sales slip.
Copy this information in these spaces. Keep this
book, your warranty and sales slip together
in a
handy place. There is no warranty registration to return. Proof-of-purchase
is all that is required for inwarranty service.
2
Model Number
Serial Number
Purchase Date
Service
Company
and Telephone
Number
Contents
Page
3
3
4
SAFEI’YFIRST. .....................
BEFOREYOUPLUGITIN ............
Install Properly. ..................
Level Chest Freezer ..............
Install Defrost Drain Cover. ........
Remove Sales Labels ............
Clean It ........................
Plug ltln ........................
Page
6
CLEANING YOUR FREEZER.
Cleaning
6
Chart
7
FREEZINGFOOD IN YOUR FREEZER.
7
7
8
8
Packaging and Sealing Food
To Wrap Foods
Loading
Storing Frozen Food
9
VACATION AND MOVING CARE.
USING YOUR FREEZER..............
Setting the Temperature Control ...
Adjusting the Temperature Control
Cooling Freezer First .............
The Sliding Basket ...............
The Key Eject Lock ...............
Energy Saving Tips ...............
Vacations
Shutting Off and Moving
IF YOU NEED SERVICE OR ASSISTANCE
I.
2.
3.
4.
Before Calling for Assistance
If You Need Assistance
IfYouNeedService
,,,,............
IfYouHaveaProblem
,,.,.,,,,.,...
, ,
9
9
10
10
10
41
11
01985 Whirlpool Corporation
Before you plug it in
IMPORTANT
Before using your freezer, you are personally responsible for making sure that it...
l is installed
and levelled on a floorthat will hold the
weight, and in an area suitable for its size and use.
. is connected
only to the right kind of outlet, with the
right electrical
supply and grounding.
(Refer to
your “Electrical
Requirements
and Grounding
Instructions:‘)
l is used only for jobs expected
of home freezers.
l is not near an oven,
radiator or other heat source.
l
l
l
l
l
l
is properly maintained.
is out of the weather.
is used in an area where the room temperature
will not exceed 110°F (43.3%).
is not run where there are explosive fumes.
is not used by those who may not understand
how it should be used.
is not loaded with food before it has time to get
properly cold.
Install properly..
Remove sales labels...
Remove the Consumer
DD
I
II
111
I&l
I
Buy Guide label and any
inside labels before using the freezer
To remove any remaining glue:
1. Rub briskly
remove.
with thumb
to make
a ball,
then
OR
Allow room to open lid
2. Soak area with dishwashing detergent solution (1
teaspoon detergent
in 1 quart warm water) before removing glue as described
in step 1.
/;inches
I, Check
weight
DO NOT USE rubbing alcohol or flammable or
toxic solvents, such as acetone, gasoline, carbon tetrachioride,
etc. These can damage the
material.
NOTE: DO NOT REMOVE the Care b Service label
on inslde ild or Tech Sheet on back of cabinet.
3inchesfr
the strength of the floor. It should hold the
of a fully loaded freezer.
2. Pick a safe place, indoors, away
ftammabies such as gasoline.
from in-
Clean it ...
Clean your freezer befo
using it. See cleaning
instructions on page 6.
3. Allow at least 3 inches (7.5 cm) air space on all
sides of freezer and 2 inches (5 cm] at back. Leave
roam at top for lid to open all the way.
4. It should not be necessary to remove the lid during
installation. If, for any reason, the hinges need adjustment, see your authorized WHIRLPOOL dealer.
5. Do not cover the freezer with items such as
blank&s,
sheets, tablecloths,
etc.
Plug- it in...
Level chest freezel;..
from end to end and front to back so that the lid will
seal properly
3-prong grounding
type wail receptacle
Retainipg Clip
A-7
Check with level
Install defrost drain covel;..
I. Remove cover from literature package.
2. Check drawing on front cover for placement.
3. Install cover
Freezer /
Power Plug
I
* ‘I”“’ grounding-plug
Recommended
Grounding
Method
A 115 Volt, 60 Hz.. AC only 15 or 20 ampere fused
and properly grounded electrical supply is required.
It is recommended
that a separate circuit serving only
this appliance
be provided.
Use a receptacle
which cannot be turned off wtth a swlfch or pull
chain. Do not use an exfenslon cord.
Attach retaining
literature package
4
clip over power cord plug from
inside the freezer.
Using
your
,: *.<m.
Wm..‘
*-:-.-r.r
Ii..freezer
,hes
.lLLL
Setting the temperature control...
I. Insert a coin in the slot of the Temperature Control to
turn it.
2. Turn COntrOl to Number 3. This setting is designed to
maintain the temperature at or near 0°F ( - 17.8”C)
under normal operating conditions.
Adjusting the temperature control...
1, Turn control to higher number for colder temperatures.
2, Turn to lower number for less cold temperatures.
Cooling freezer first...
I, Allow freezer to cool 6 to 8 hours before filling with
frozen food.
2. Let it cool overnight
of unfrozen food.
before adding
large amount
NOTE: When freezer is first started the compressor will
run constantly until the cabinet is cooled. It may take
up to 6 to 8 hours or longer, depending on room temperature and the number of times the freezer lid is
opened.
After the cabinet is cooled the compressor will turn
on and off as needed to keep freezer at proper
temperature.
The sliding basket...
Can be moved from side to side or removed
loading or unloading food below it.
when
To remove:
Lift basket out.
To replace:
Lower basket into place.
The key eject lock...
can
help
entrapment.
rvK7Bre-Enew
l
l
reduce
satig
the
Tips**.
hazard
of
-
To lock or unlock the freezer you must hold the
key in the lock while turning. The lock is spring
loaded so the key cannot be left in the lock.
If the key is lost, contact
your WHIRLPOOL
dealer for a replacement.
Always give the complete model and serial number of your freezer
when requesting
a replacement
key.
child
-‘rr~~-~rA~-’
Check lid gasket and level cabinet to ensure a
good lid seal. Keeping freezer locked ensures lid
closure.
Keep lid openings to a minimum. Remove several
items at one time. Keep contents organized to eliminate searching.
l
l
l
Fill to capacity
Follow recommended
procedures
for freezing foods.
Set Temperature Control to provide temperatures
around 0°F ( - 17.8”Cj. There is no need to store foods
below 0°F.
Do not let frost build up to more than Y4 inch
(6 mm) thick.
Cleaning your freezer
This freezer should be cleaned when frost has built up to about Y4 inch (6 mm] thickness.
Complete defrosting and cleaning should be done at least once a year
In high humidity areas, a freezer may need more frequent defrosting.
To defrost and clean:
1. Turn Temperature Control to OFF.
2. Unplug Freezer
3. Take out all frozen food and sliding basket.
Note: Wrap frozen foods and packages
in several
layers of newspaper and cover with a blanket. Food
will stay frozen several hours.
4. Remove drain cover by pul(ing out.
5. Insert hose adapter provided into drain
6. Remove rubber stopper from inside
freezer.
7. Place a pan under the drain, or attach a
thread&
end of the adapter and direct
a separate drain.
8. Clean
freezer
according
to the
directions.
outlet.
bottom
of
hose to the
water into
following
After defrosting:
I.
2.
3.
4.
Remove hose adapter
Replace drain cover and rubber stopper
Plug in freezer.
See directions for “Setting the Temperature
trol:’ page 5.
Con-
Cleaning chart...
Part
Removable
(basket)
Outslde
part
What to use
How to clean
Sponge, cloth or
paper towel; mild
detergent, warm water
l
Sponge, cloth or
paper towel; mild
detergent. warm water
l
l
Wash with warm water and a mild detergent,
Rinse and dry
l
Wash with warm water and a mild detergent.
Rinse and dry
l
Do not use abraslve
or harsh cleansers.
Waxlng is recommended
In hlgh humldlty areas. Use a good auto
paste wax or an appliance wax on palnted metal surfaces. Do not
use on plasflc because lt may damage these parts.
lnslde walls
Plastic scraper, pans of
hot water, electric fan.
sponge or towel, baking
soda and warm water
0 Use plastic scraper to remove frost.
l Place pans of hot water in freezer with lid open
to speed melting. Directing air from an electric
fan into freezer will also help.
l Remove
defrost water with towel or sponge.
l Wash with solution of 2 tablespoons
(26 g)
baking soda to 1 quart (.95 L) warm water
l Rinse and dry
DO NOT USEan Ice pick, knife of other sharp-pointed
tool or any
type of electric defroster to defrost freezer. They can cause damage
to the lfner and lnterlor parts.
Ud gasket
Sponge, soft cloth or
paper towel; mild detergent and warm water
l Wash with mild detergent
* Rinse and dry.
and warm water
DO NOT USEcleaning waxes, concentrated
detergents,
or cleansers contalnlng petroleum on plastic parts.
6
bleaches
Freezing food in your freezer
To wrap foods...
/
,
1. Cut sheet of wrapping
material about onethird longer than distance around food to be
wrapped. Place wrapping
sheet on flat surface with food in center of sheet.
When freezer has cooled to a safe storage
temperature, it may be loaded with frozen food.
When you plan to freeze unfrozen food, see
the following chart for the amount to freeze at
one time.
2. Bring front and back of wrapping
together
and fold in toward food, making at least two
one-inch (2.5 cm) folds until food fits tightly
POUNDS OF FOOD
TO FREEZEAT ONE TIME’
I
Size of
Freezer
Meat or
Fish
Vegetables
or Fruit
12cuft.
( 346 L)
15 cu. ft.
(433 L)
24 Ibs.
(10.8 kg.]
30 Ibs.
(13.5 kg.)
36 Ibs.
(16.2 kg.)
45 Ibs.
(20.25 kg.)
3. Crease
ends close to food to eliminate
air
‘These amounts are based on USDA recommendations If too many packages
of unfrozen food
are packed at one time Into the freezer, the rate
of freezing 1stoo slow Poor quality products result
Packaging and sealing food .. .
Airtight packaging
IS important
in freezing
foods. Containers
and wrappings
should be
moisture and vapor-proof and packages should
be sealed carefullv to keen, moisture in and air
out
Freezer burn can result If food is not properly
wrapped. When this happens, food dehydrates
and is of poor quality.
4. Press all air from package
twice
Make sure fold
against end of package
Fold each end over
is tight and fasten
with freezer tape.
NOTE: When packaglng
meats that have not
been boned, pad sharp edges with extra wrap
or use stockinette to protect against tearing or
puncturing.
Use heavy-duty aluminum freezer foil, kraft paper with cellophane
bonded to it, special freezer
bags, jars, cartons and freezer sealing tape for
packaging
your food items. You’ll find them at the
supermarket or freezer dealer.
See booklet, “How to Preserve Foods the
Modern Way with Your WHIRLPOOL Freezer,”
for complete information and tips on home
freezing.
71
Storing frozen food...
Loading...
After food
in the freezer
the cabinet
closing and
is frozen, stack packages anywhere
Packages should not extend above
edge or they may keep the lid from
sealing properly.
1. Before freezing large quantities
of food, turn Temperature Control to highest setting and let freezer
operate for several hours. After loading all food
items, return Temperature
Control to the usual
setting.
Foods to be frozen near side wall
Packages
already
frozen
2. To speed freezing, place unfrozen packages
near a side wall. Leave space between
packages.
3. Add more unfrozen food after first load is
frozen (approximately
18 to 24 hours). Stack
frozen packages
in center of freezer
8
Basket - Store small packages
losing
them
in bottom
of freezer
here to avoid
Vacation and moving care
Vacations...
Shutting off and moving...
Arrange for someone to make regular checks of
your freezer to make sure it is operating and electricity
has not been interrupted.
If freezer is shut off for more than 24 hours:
1. Remove and store all food.
2. Unplug freezer.
3. Clean thoroughly. See ‘Cleaning
your freezer,”
page 6.
4. Block lid open for air circulation. Turn lock to locked
position with lid open. Place blocks between lid
and cabinet and tape in place with self-adhesive
filament tape
If you move the freezer:
1. Remove the sliding basket.
2. Do not place objects lnrlde
cabinet.
3. Level properly
or on top of
to ensure good lid seal.
CAUTION: To help prevent accidents, do not allow children near the freezer when the Ild Is
blocked open.
To restart freezer, see “Using your freezer,” page
5.
If you need setice or assistance, we suggest
you follow these four steps:
1. Before calling for assistance...
2. lf you need assistance*...
Performance problems often result from little things
you can find and fix yourself without tools of any kind.
Call Whlrlpool COOL-LINE@service
telephone number. Dial free from:
Continental U.S. . . . . . . . . . . . (800)
Mlchlgan . . . . . . . . . . . . . . . . . . (800)
Alaska & Hawaii . . . . . . . . . . (8001
If electrlclty
goes off:
Learn how long power will be off by calling the
power company.
l If service
is to be interrupted 24 hours or less, keep
freezer closed. Most food will stav frozen.
l If service
is to be interrupted longer than 24 hours,
do this:
1. Remove all unfrozen food and store in a frozen
food locker OR...
2. Place 2 Ibs. (0.9 kg] of dry ice in freezer for every cu.
ft. of freezer space. This will keep frozen foods for 2
to 4 days. Wear gloves to protect your hands from
dry ice burns.
l
3. If neither food locker storage or dry ice is available, use or can perishable food at once.
The length of time food will stay frozen depends on
several factors. For instance: a full freezer will remain
cold longer than a freezer partially filled. And a
freezer full of meat will stay cold longer than a
freezer filled with baked goods. Also, if the food still
contains ice crystals, it may be safely refrozen, although the quality and flavor may be affected. Use
this food as soon as convenient. If the condition of
the food is poor or is in any way questionable,
it is
wise to dispose of it.
If freezer stops running:
l
l
l
l
10
Check to see if power cord is plugged
into the
outlet.
Check fuse box or circuit breaker
Check electric company for a power failure.
Be sure Temperature Control is turned ON.
assistance
253-1301
632-2243
253-1121
and talk with one of our trained Consultants. The
Consultant can instruct you in how to obtain satisfactory operation from your appliance
or, if service is
necessary, recommend a qualified service company
in your area.
If motor seems to run too long
1. If large amounts of unfrozen food have been put
into the freezer, motor will run longer:
2. On hot summer days of if raom is hot. motor will run
longer to provide correct amount of cooling.
If freezer feels warm
During normal operating
conditions the freezer
transfers heat removed from food packages and air
space to the outside room air. The freezer cabinet
may feel warm.
If ttost builds up on the trim strip around top of
cabinet
1. Check the fit of the lid to make sure it is sealing. With
the lid closed, press down firmly on the edges or at the
center of the lid. This pressure will cause the flexible lid
to fit flat against the cabinet and seal.
2. Do not open or close the lid by grasping a corner.
Use the handle.
3. If you need senic&...
4. If you have a problem*...
Whirlpool has a naCall our COOL-LINE service assistance telephone
tionwide
network
of number
[see Step 2) and talk with one of our
franchised TECH-CARE@ Consultants, or if you prefer, write to:
Mr. Stephen E. Upton, SK Vice President
Whirlpool Corporation
Administrative Center
to fulfill the product
2000 US-33 North
Benton Harbor, Ml 49022
*If you must call or write, please provide: model
number, serial number, date of purchase, and a
locate
States.
To
complete description of the problem. This informaTECH-CARE service in your area, call our COOL-LINE
tion is needed in order to better respond to your
service assistance telephone number (see Step 2) or request for assistance.
look in your telephone directory Yellow Pages under:
APPLIANCES
- HOUSEHOLD.
MAJORSERVICE 6 REPAIR
ELECTRICAL
APPLIANCESMAJOR-REPAIRING
6 PARTS
OR
WHIRLPOOL APPLIANCES
FRANCHISED TECH-CARE SERVICE
WHIRLPOOL APPLIANCES
FRANCHISED TECH-CARE SERVICE
SERVICE
COMPANIES
XYZ SERVICE CO
123 Maple
999-9999
SERVICE
COMPANIES
XYZ SERVICE CO
123 Maple
999-9999
OR
WASHING
MACHINES,
(L IRONERS-SERVICING
DRYERS
WHIRLPOOL APPLIANCES
FRANCHISED TECH-CARE SERVICE
SERVICE
XYZ SERVICE CO
123 Maele
CYIMPANIES
999-9999
0
FSP
8
FSP IS a reglstered
trademark
of WhIrlpool
Corporation
for qualtty
parts
Look for this symbol
of quality
whenever
You need a replacement
part
for your WhIrlpool
appliance
FSP replacement
parts WIII fit right and work right. because
they are
made to the same exacting
speclflcatlons
used
to build every new WhIrlpool
appliance
Making
Part No. 730049
01985 Whirlpool
your world
a little easier.
Corpomtion
=
ce Makers, Dishwashers. Built-In Ovens and Surlace Units, Ranges, Microwave Ovens, lrash Compactors. Room Air Conditioners. Oe’humidifiers. Automalic Washers. Clothes Ory