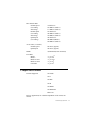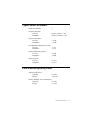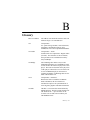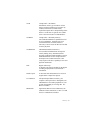
1
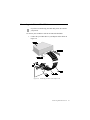
Creative CD-R Drive
User Guide
On-line Version
User’s Guide
Information in this document is subject to change without notice and does not represent a
commitment on the part of Creative Technology Ltd. The software described in this document
is furnished under a license agreement and may be used or copied only in accordance with the
terms of the license agreement. It is against the law to copy the software on any other medium
except as specifically allowed in the license agreement. The licensee may make one copy of the
software for backup purposes. No part of this manual may be reproduced or transmitted in any
form or by any means, electronic or mechanical, including photocopying and recording, for any
purpose without the written permission of Creative Technology Ltd.
Copyright 1996 by Creative Technology Ltd. All rights reserved.
Version 1.0
March 1996
Sound Blaster is a registered trademark of Creative Technology Ltd.
Sound Blaster 16 is a trademark of Creative Technology Ltd.
IBM is a registered trademark of International Business Machines Corporation.
Microsoft , MS-DOS, Windows, and the Windows Logo are registered trademarks of Microsoft
Corporation.
Adaptec and EZ-SCSI are trademarks of Adaptec, Inc.
All other products are trademarks or registered trademarks of their respective owners.
Regulatory Information
The following sections contain regulatory notices for the USA and Canada.
Notice for the USA
FCC Part 15: This equipment has been tested and found to comply with the limits for a Class B
digital device, pursuant to Part 15 of the FCC Rules. These limits are designed to provide
reasonable protection against harmful interference in a residential installation. This equipment
generates, uses, and can radiate radio frequency energy and, if not installed and used in
accordance with the instructions, may cause harmful interference to radio communications.
However, this notice is not a guarantee that interference will not occur in a particular installation.
If this equipment does cause harmful interference to radio or television reception, which can be
determined by turning the equipment off and on, the user is encouraged to try one or more of the
following measures:
❑
Reorientate or relocate the receiving antenna
❑
Increase the distance between the equipment and receiver
❑
Connect the equipment into an outlet on a circuit different from that to which the
receiver is connected
❑
Consult the dealer or an experienced radio/TV technician
Caution
To comply with the limits for the Class B digital device, pursuant to Part 15 of the FCC Rules,
this device must be installed in computer equipment certified to comply with the Class B limits.
All cables used to connect the computer and peripherals must be shielded and grounded.
Operation with non-certified computers or non-shielded cables may result in interference to radio
or television reception.
Modifications
Any changes or modifications not expressly approved by the grantee of this device could void
the user’s authority to operate the device.
Notice for Canada
This apparatus complies with the Class “B” limits for radio interference as specified in the
Canadian Department of Communications Radio Interference Regulations.
Cet appareil est conforme aux normes de CLASSE “B” d’interference radio tel que spe’cifie’ par
le Ministère Canadien des Communications dans les règlements d’interfe’rence radio.
iii
Safety Information
CAUTION: This CD-ROM is intended to be installed by the user in a CSA/TUV/UL
certified/listed IBM AT or compatible personal computers in the manufacturer’s defined operator
access area. Check the equipment operating/installation manual and/or with the equipment
manufacturer to verify/confirm if your equipment is suitable for user-installed application cards.
ATTENTION: Ce CD-ROM est destiné à être installé par l’utilisateur, dans un ordinateur
compatible certifié CSA/TUV/UL ou listé IBM AT, à l’intérieur de la zone définie par le
fabricant. Consulter le mode d’emploi ou le fabricant de l’appareil pour vérifier ou confirmer si
l’utilisateur peut y installer lui-même des cartes périphériques.
Compliance
This product conforms to the following Council Directive:
❑
Directive 89/336/EEC, 92/31/EEC (EMC)
iv
Contents
Introduction ..................................................................................................... vii
Before You Begin............................................................................................ vii
Recording Model and Serial Numbers.............................................. vii
Checking System Requirements....................................................... viii
Using this Guide............................................................................................. viii
Document Conventions....................................................................... ix
Text Conventions...................................................................... x
Key Combinations.................................................................... x
Icons......................................................................................... xi
1
Knowing Your CD-R Drive
The Drive’s Front Panel.................................................................................1-1
The Stereo Phone Jack ......................................................................1-1
Volume Control..................................................................................1-2
Busy Indicator....................................................................................1-2
Writing Indicator................................................................................1-2
Eject Hole...........................................................................................1-2
Eject Button .......................................................................................1-2
Disc Tray............................................................................................1-2
The Drive’s Rear Panel..................................................................................1-4
CD Audio Connector.........................................................................1-4
Jumpers ..............................................................................................1-5
SCSI Connector .................................................................................1-5
Power In Connector...........................................................................1-5
2
Setting Up Your CD-R Drive
Installing Your Drive .....................................................................................2-2
Inserting Your Drive into Your System ............................................2-3
Connecting Cables to Your Drive’s Rear Panel ...............................2-5
Connecting Cables to Your SCSI Adapter Card..............................2-8
v
3
Connecting With Other Devices
SCSI - An Overview......................................................................................3-2
SCSI Bus ........................................................................................................3-2
Setting Up Your Drive ...................................................................................3-4
Enabling and Disabling Jumpers ......................................................3-4
Setting an ID Number........................................................................3-5
Setting a Terminator ..........................................................................3-6
Connecting Cables to An External Device...................................................3-7
Connecting to An External Hard Disk..............................................3-8
4
Using Your CD-R Drive
Maintaining The CD-R drive ........................................................................4-1
Maintaining Your Recordable CDs...............................................................4-2
Appendices
A
Technical Specifications
Physical Dimensions.....................................................................................A-1
Performance Characteristics.........................................................................A-1
Compact Disc Formats .................................................................................A-2
Typical Audio Performance..........................................................................A-3
Environmental Operating Limits..................................................................A-3
B
Glossary
C
Technical Support
Inside U.S.A., Canada, and South America................................................. C-2
Inside Europe................................................................................................. C-3
Inside Asia..................................................................................................... C-4
Through Internet............................................................................................ C-5
Through CompuServe................................................................................... C-5
If you are already a member of CompuServe ................................. C-5
If you are not a member of CompuServe
(valid only in U.S.A.)..................................................................... C-6
vi
Introduction
This User’s Guide provides you with information on how to install and
operate your CDR4210 recordable drive.
The CDR4210 recordable drive has:
❑ Double-speed data recording and quad-speed data reading
capability.
❑ a Small Computer System Interface (SCSI) — the newest data
transfer format and standard. SCSI allows you to daisy chain
your drive to seven other SCSI devices through a single
connection.
❑ Orange Book (Part 2) format compliance. Thus, your drive
supports both track at once and multisession modes.
❑ Write, read, and play functions for various CD formats such as
CD-Audio, CD-I, CD-Plus, CD-ROM, CD-ROM/XA, and
Photo CD.
❑ The assurance of compatibility with Creative’s earlier CD-R
drive and other drives that comply and supports the same CD
formats.
Before You Begin
Before you set up your SCSI CD-R drive, please read the following
sections carefully:
❑ Recording Model and Serial Numbers
❑ Checking System Requirements
Recording Model and Serial Numbers
Your CD-R drive has been assigned a model number and a serial
number. After you have removed the drive from its packaging, write
down its model number and serial number in Table C-1 on page C-1
of this manual.
The model number and serial numbers are printed on a sticker on the
drive.
vii
Checking System Requirements
The following are the minimum system requirements for your drive:
❑ A 486DX2 66Mhz with at least 8Mb of RAM
(Pentium recommended for optimum performance)
❑ Windows 95 or Windows 3.X with Win32s version 1.30
If you are using a 16-bit operating system such as
Windows 3.x, we recommend that you install Win32s
into your system so that you can run 32-bit applications
without any problems.
❑ SCSI or Fast IDE hard disk with transfer rate better than 1 MB
per second and with a seek time of less than 14msec
(Hard disk with no thermal recalibration recommended)
❑ Adaptec SCSI host adapter card or any other ASPI-compatible
SCSI host adapter card
Using this Guide
This guide is arranged as follows:
Chapter 1, Knowing Your CD-R Drive
Before you install your drive, you should read this chapter to be more
familiar with your CD-R drive. This chapter acquaints you with the
various components and features of your drive.
Chapter 2, Setting Up Your CD-R Drive
After you have acquired a general understanding of your SCSI CD-R
drive, you will be able to set up your drive easily and quickly. This
chapter shows you how to install your SCSI drive and a SCSI adapter
card into your system.
Chapter 3, Connecting With Other Devices
This chapter shows you how you can set your drive’s ID when
connecting to another SCSI device such as an external SCSI hard disk.
If you are unfamilar with SCSI, this chapter also contains general
information regarding SCSI and how you can set up a SCSI bus in
your system.
viii
Chapter 4, Maintaining Your CD-R Drive
This chapter describes how you can maintain your CD-R drive and
discs.
Appendix A, Technical Specifications
If you want to know more about the physical dimensions, performance
characteristics, and other specifications of your CD-R drive, you can
refer to this appendix.
Appendix B, Glossary
This appendix explains the technical terms used in this guide.
Appendix C, Technical Support
You can call our Technical Support for service if you encounter
problems when installing or using your CD-R drive. This appendix
provides information on where you can get help.
Document Conventions
This guide follows certain conventions to help you locate and identify
the information that you need. These conventions are described in the
following sections:
❑ Text Conventions
❑ Key Combinations
❑ Icons
ix
Text Conventions
The following text elements are used to help you distinguish among
different types of information presented in this guide:
Table i: Text conventions used in this guide.
Text Element
Use
bold
Command names, switches, and any text that
must be entered exactly as it appears.
italics
Title of a book. Otherwise, when presented at the
DOS command line, it is a placeholder that
represents information you must provide. This
information usually appears in the parameter
listing after the command is presented.
UPPERCASE
Directory name, file name, or acronym.
<>
Symbols, letters, and key names on the keyboard.
Key Combinations
In this guide, the following conventions are used to help you identify
different key stroke combinations:
Table ii: Key conventions used in this guide.
Combination
Use
<Key1+Key2>
A plus sign (+) between key names means you
must press the keys at the same time. For
example, “Press <Ctrl+Z>” means “press the
<Ctrl> key and hold it down while you press the
<Z> key”.
<Key1,Key2>
A comma sign (,) between key names means you
must press the keys in sequence. For example,
“Press <Alt,F>” means “press the <Alt> key and
release it, and then press the <F> key and release
it”.
x
Icons
In this guide, icons are used to highlight areas of text that require your
special attention.
Table iii:Icons used in this guide.
Icon
Use
A tip or some useful information.
A warning.
xi
2
Setting Up Your CD-R Drive
This chapter provides you with instructions to set up your CD-R drive.
Please get the following items ready before setting up your drive (see
Figure 2-1):
Figure 2-1:
Items required for setting up your CD-R drive.
We recommend you to use a Philip Number One screwdriver as
it can be used in most systems. To avoid any damage to your
drive, fasten the drive to your system using the M3x5mm
screws provided.
Setting Up Your CD-R Drive 2-1
If you have purchased your CD-R drive with Small Computer System
Interface (SCSI) adapter card, get the adapter card ready
(see Figure 2-2).
Figure 2-2:
SCSI adapter card.
If you have an audio card installed in your system, get a CD Audio
cable ready (see Figure 2-3).
Figure 2-3: CD Audio cable.
Installing Your Drive
To install your CD-R drive, you need to do the following:
❑ Inserting Your Drive into Your System
❑ Connecting Cables to Your Drive’s Rear Panel
❑ Connecting Cables to Your SCSI Adapter Card
Setting Up Your CD-R Drive 2-2
Inserting Your Drive into Your System
To insert your drive into your system:
1. Switch off your system and all peripheral devices.
2. Touch a metal plate on your system to ground yourself and
discharge any static electricity.
3. Remove the cover from your system as illustrated in
Figure 2-4.
If your computer differs from the one shown below, refer to
your computer’s manual for more details.
Figure 2-4: Removing the computer cover of your system.
Setting Up Your CD-R Drive 2-3
4. Locate and vacate a 5¼" drive bay for your CD-R drive.
If a disk drive is positioned above your vacant drive bay, loosen
the screws of your disk drive and slide it out by two to three
inches. See Figure 2-5.
Figure 2-5: Vacating a drive bay.
For more information on how to vacate a drive bay, refer to
your computer system’s manual for assistance. If you
require further help, please consult a technician.
Setting Up Your CD-R Drive 2-4
5. Insert your CD-R drive into the vacant drive bay as shown in
Figure 2-6.
Do not slide the drive completely into the vacant drive
bay. Leave some space at the rear so that it is easier for
you to connect cables to your drive.
Figure 2-6:
Inserting your CD-R drive.
You may need to use some force to insert your CD-R
drive into your drive bay. However, please refrain from
excessive force as this may damage your drive or other
devices on your system.
Connecting Cables to Your Drive’s Rear Panel
To connect all the necessary cables to the rear panel of your CD-R
drive:
1. Locate an unused power cable from your system.
A power cable can be located from your system’s power supply
unit. The power supply unit is located at the right hand corner
of most systems.
Setting Up Your CD-R Drive 2-5
2. Connect the power cable to the CD-R drive as shown in
Figure 2-7.
Figure 2-7: Connecting power cable to your CD-R drive.
3. Connect the SCSI cable to the CD-R drive as shown in
Figure 2-8. Make sure you align the colored wire on the cable
to Pin 1 of the SCSI connector.
Figure 2-8: Connecting SCSI cable to your CD-R drive.
Setting Up Your CD-R Drive 2-6
4. If you have an audio card installed in your system, you can
connect the CD Audio cable to your drive as shown in
Figure 2-9. This will allow you to channel audio signals from
your CD-R drive to your audio card.
Figure 2-9:
Connecting CD Audio cable to your CD-R drive.
Setting Up Your CD-R Drive 2-7
Connecting Cables to Your SCSI Adapter Card
After connecting the cables to the CD-R drive’s rear panel, you need
to connect these cables to your SCSI adapter card.
If your drive comes with a SCSI adapter card, you need to install the
adapter card and connect it to your drive.
For more information pertaining to your adapter card, refer to
the documentation that comes with it.
To install the adapter card:
1. Locate a vacant 16-bit slot in your system (see Figure 2-10).
Figure 2-10: Locating a vacant slot.
Setting Up Your CD-R Drive 2-8
2. Remove the metal plate from the slot you have chosen and put
the screw aside (see Figure 2-11).
Figure 2-11: Removing the metal plate from the slot.
3. Align the adapter card’s gold-stripped connector with the
expansion slot and firmly lower it into the slot (see Figure
2-12).
Figure 2-12:
Inserting the SCSI adapter card.
Setting Up Your CD-R Drive 2-9
4. Secure the adapter card to the expansion slot with the screw
you removed from the metal plate (see Figure 2-13).
Figure 2-13: Fastening the SCSI adapter card to your system.
To connect the drive to the SCSI adapter card:
1. Connect the SCSI cable to your adapter card as shown in Figure
2-14. Make sure you align the colored wire on the cable to Pin
1 of the SCSI connector.
Figure 2-14: Connecting the SCSI cable to the adapter card.
Setting Up Your CD-R Drive 2-10
2. If you have an audio card installed in your system, connect the
CD Audio cable to the CD Audio connector on the audio card
as shown in Figure 2-15.
Figure 2-15: Connecting the CD Audio cable to the audio card.
3. If you do not have an audio card installed in your system,
connect a headphone or powered speakers to the Stereo Phone
jack on your drive’s front panel. Set the volume controls of
your drive and powered speakers to minimum before powering
on (or resetting) the system. This is to prevent possible damage
to the headphone or speaker.
Setting Up Your CD-R Drive 2-11
4. Slide the drives back into place and fasten them to your system
as shown in Figure 2-16.
Figure 2-16: Fastening the drives to your system.
5. Switch on your system.
6. Proceed to install EZ-SCSI 4.0, your SCSI driver software.
Refer to the documentation that comes with EZ-SCSI.
If you wish to connect your drive to other devices, refer
to the next chapter.
Setting Up Your CD-R Drive 2-12
3
Connecting With Other Devices
You can set your SCSI CD-R drive so that it can be connected to a host
of SCSI devices.
If you need more general information regarding SCSI, refer to
the section “SCSI - An Overview” on page 3-2.
If not, proceed to the section “Setting Up Your Drive” on page
3-4.
Connecting With Other Devices 3-1
SCSI - An Overview
SCSI is a standard for connecting computer systems to other
peripheral devices, such as hard disks, scanners, and CD-ROM drives
and to other computer systems.
Some of the main advantages of SCSI are as follows:
❑ SCSI supports up to seven devices per adapter card.
This translates to savings in terms of slots, Interrupt Request
(IRQ) lines, and Direct Memory Access (DMA) channels for
your computer system.
❑ SCSI devices will work in other systems and platforms such as
Macintosh and UNIX. Thus, there is the assurance of
cross-platform compatibility.
❑ SCSI device drivers are written for the adapter card not for the
specific device. Thus, you can connect any device to your
system without considering brand or software compatibility.
SCSI Bus
When connecting SCSI devices you will have to take note of the
following:
❑ SCSI devices are connected sequentially. A SCSI bus must run
continously from one device to another (see Figure 3-1).
Figure 3-1: A SCSI bus.
The maximum length of the SCSI bus is limited to 6 meters
according to the SCSI standard. When the length is over the
standard, errors may occur during operation.
Connecting With Other Devices 3-2
❑ Each device on the SCSI bus should have at least 4 to 6 inches
of cable between them (see Figure 3-1).
❑ The SCSI bus must have only two terminating devices. One at
the begining, the other at the end of the SCSI bus (see Figure
3-2).
Figure 3-2: Acceptable SCSI bus connections.
Termination must occur wthin 4 inches of the ends of
the SCSI bus.
❑ It does not make any difference where each ID is placed along
the SCSI bus — that is, the ID numbers do not have to be in a
sequential order. As long as no two devices (including the
adapter card) along the bus have the same ID.
Connecting With Other Devices 3-3
Setting Up Your Drive
To connect additional devices to your system, you will need to assign
an individual SCSI ID number to all devices and terminate the end
devices on the SCSI bus.
This section shows you how to:
❑ Enable and Disable Jumpers
❑ Set an ID
❑ Set a Terminator
Enabling and Disabling Jumpers
A jumper exists in two states: enabled or disabled. A jumper is
enabled when a plastic hood called a jumper block is placed over the
jumper’s two pins as shown in Figure 3-3.
Figure 3-3: An enabled jumper.
In contrast, a disabled jumper is one in which the jumper block is not
placed over the jumper’s two pins as shown in Figure 3-4.
Figure 3-4: Disabled jumpers.
Connecting With Other Devices 3-4
Setting an ID Number
You can set an ID number for your drive by using the jumpers at the
back of the drive. The figure below shows the default jumper setting.
Figure 3-5: Default jumper setting.
The jumpers have the following pin assignments shown in Table 3-1:
Table 3-1: Jumper Pin Assignments.
Pin
Description
1,8
ID Setting: 1
2,9
ID Setting: 2
3,10
ID Setting: 4
4,11
Parity
5,12
Not Used
6,13
Terminator
7,14
Term Ground
The first three pair of pins, pin 1,8, pin 2,9 and pin 3,10, allows you to
set your device ID. Table 3-2 shows you the possible ID numbers you
can set for your CD-R drive.
Table 3-2: Possible SCSI ID Numbers.
SCSI ID
Number
Pin
1,8
Pin
2,9
Pin
3,10
0
D
D
D
1
E
D
D
Connecting With Other Devices 3-5
Table 3-2: Possible SCSI ID Numbers.
SCSI ID
Number
Pin
1,8
Pin
2,9
Pin
3,10
2
D
E
D
3
E
E
D
4
D
D
E
5
E
D
E
6
D
E
E
7
E
E
E
D represents a disabled jumper and
E represents an enabled jumper.
For example, to set your drive’s SCSI ID number at 1, enable pin 1,8
and disable pin2,9 and pin 3,10.
Ensure that no two devices along the SCSI bus have the same
ID number. For more information regarding SCSI bus, refer to
the section “SCSI Bus” on page 3-2.
Setting a Terminator
If your drive is an end device along the SCSI bus, you will have to
terminate your drive by enabling pin 6,13 (see Figure 3-6).
Figure 3-6: Terminator jumper enabled.
Connecting With Other Devices 3-6
Connecting Cables to An External Device
If you wish to connect an external device to your SCSI drive, get ready
an external SCSI cable (see Figure 3-7).
Figure 3-7: An external SCSI cable.
Ensure that your SCSI cable has a pair of matching connectors
to fit the external SCSI connector of your adapter card and your
external device.
Connecting With Other Devices 3-7
Connecting to An External Hard Disk
If you have not backed up your hard disk, please do so before
you proceed.
To connect your CD-R drive with an external SCSI hard disk:
1. Connect the your CD-R drive to your adapter card as shown in
Figure 3-8.
Figure 3-8: Connecting your drive to the adapter card.
Connecting With Other Devices 3-8
2. Connect your external SCSI cable to your hard disk as shown
in Figure 3-9.
Make sure that you connect the SCSI cable to the hard disk and
adapter card correctly.
Figure 3-9: Connecting SCSI cable to the hard disk.
Ensure the all your SCSI devices have a different SCSI
ID. For more information pertaining to the hard disk
and adapter card, refer to their individual
documentation.
3. Slide your CD-R drive back into place and fasten it to your
system.
4. Switch on your system and your external hard disk.
5. Proceed to install EZ-SCSI 4.0, your SCSI driver software.
Refer to the documentation that comes with EZ-SCSI.
Connecting With Other Devices 3-9
4
Using Your CD-R Drive
Once you have installed your CD-R drive and the device driver, you
can proceed to use the drive.
To use the CD-R drive:
1. Switch on your computer.
2. If you wish to record a CD-R disc or playback an audio CD,
load the CD on the disc tray.
You must first install your CD recording software
before you can proceed to use your drive to record on
CD-R discs.
3. After using the disc, press the Eject button to eject the disc from
the disc tray.
Do not turn off the power while the CD-R drive is
loading or ejecting the disc or while the orange Busy
and Writing indicators are blinking.
Maintaining The CD-R drive
The following are some ways of maintaining the CD-R drive in
working condition:
❑ Remember to remove any discs from the CD-R drive if you do
not intend to use the drive.
❑ Do not spill liquids on the CD-R drive, and do not insert metal
objects inside the CD-R drive. If any foreign object or matter
should get inside of the CD-R drive, contact your dealer.
Using Your CD-R Drive 4-1
❑ Do not use benzene or thinner to clean the housing.
In addition, prevent chemicals such as insecticide from coming
into contact with the housing. Either wipe the housing with a
dry soft cloth or dampen the cloth with a mild detergent diluted
with water.
Maintaining Your Recordable CDs
Recorable CDs are good storage mediums with a possible a shelf life
of more than five years without any degradation in data. However, this
durability and longevity depends on how careful you handle your
discs.
Here are some general guidelines you should follow in handling your
recordable CDs.
❑ Do not expose your discs to direct sun or other strong light
sources for a long period.
❑ Do not store your discs in places with high humidity and
temperature. Always keep your discs in a dry and cool place.
❑ Do not use alcohol-based writing instruments to write on your
discs as the ink may eat through the disc’s laquer surface and
damage your data.
❑ Do not use sharp-tipped writing instruments to write on your
discs as they may scratch through the laquer surface and
damage your data.
❑ Do not put labels on your discs unless they are specifically
made for recordable CDs. This is because the label’s adhesives
may eat through the laquer surface. Labels may also unbalance
the disc and cause problems during reading and recording.
❑ If you have to label your discs, try not to remove them as you
might tear off some of the laquer and reflecting surface.
❑ Do not stack your discs one on top of the other as this might
cause scratchs on your disc surface. If you are not using the
discs, always remember to store them in their plastic casing.
Using Your CD-R Drive 4-2
❑ Avoid getting dust particles and fingerprint on your discs as
they will damage the discs and cause reading and writing errors
(see Figure 1-2 on page 1-3 for correct way of holding a disc).
To remove the dust particles and fingerprints, use cleaning
products that are nonflammable and nonabrasive.
Using Your CD-R Drive 4-3
A
Technical Specifications
This appendix provides you with the technical specifications of your
CD-R drive.
Physical Dimensions
Height
41.3 mm
Width
146 mm
Depth
203 mm
Color
PC white
Performance Characteristics
Power Supply
Storage Capacity
74-minute Disc
Buffer Memory
1.0 Amp (Max.) on +5 Volts
1.5 Amp (Max.) on +12 Volts
656 MB (Mode 1)
748 MB (Mode 2)
256 KB
Technical Specifications A-1
Data Transfer Rate
Normal Speed
(for reading
and wrting)
75 blocks/sec
150 KB/sec (Mode 1)
171 KB/sec (Mode 2)
Double Speed
(for reading
and wrting)
150 blocks/sec
300 KB/sec (Mode 1)
342 KB/sec (Mode 2)
Quad Speed
(for reading)
300 blocks/sec
600 KB/sec(Mode 1)
684 KB/sec (Mode 2)
Access Time (1/3 Stroke)
Normal Speed
Quad Speed
450 msec (Typical)
300 msec (Typical)
MTBF
70,000 POH (Power On Hours)
Error Rate
Mode 1
Mode 2
Mode 2 Form 1
Mode 2 Form 2
CD-Audio
< 1 per 1012
< 1 per 109
< 1 per 1012
< 1 per 109
< 1 per 109
Compact Disc Formats
Formats Supported
CD-Audio
CD-I
CD-Plus
CD-R
CD-ROM
CD-ROM/XA
Photo CD
Refer to Appendix B, for a detailed explanation of the various CD
formats.
Technical Specifications A-2
Typical Audio Performance
Number of Channels
2
Frequency Response
Line-out
Headphone
20 Hz to 20 kHz ± 3 dB
100 Hz to 20 kHz ± 3 dB
Signal to Noise Ratio
Line-out
Headphone
> 83 dB
> 80 dB
Total Harmonic Distortion (at 1 kHz)
Line-out
< 0.1%
Headphone
< 0.2 %
Channel Separation (Typical)
Line-out
Headphone
>65 dB
>50 dB
Output (Typical)
Line-out
Headphone
0.8 Vrms
0.6 Vrms
Environmental Operating Limits
Ambient Temperature
Operating
Storage
5 to 40oC
-30 to 60oC
Relative Humidity (No Condensation)
Operating
5 to 90%
Storage
5 to 95%
Technical Specifications A-3
B
Glossary
Base I/O Address
The address from which the interface card’s I/O
addresses begin. See I/O Addresses.
CD
Compact Disc.
An optical storage medium, 12cm in diameter,
which has a much higher capacity (up to
650MB) but slower access speed than hard disks.
CD-Audio
Compact Disc - Audio.
Another name for Compact Disc - Digital Audio
(CD-DA). The forerunner of all CD formats,
this specification was established in 1980 by
Sony and Philips.
CD-Bridge
The CD-Bridge disc defines a way to add
additional information in a CD-ROM/XA track
in order to allow the track to be played on a CD-I
player. The result is a disc that can be played on
a CD-I player connected to a TV set and as well
as on a CD-ROM/XA player connected to a
computer. Examples of CD-Bridge discs are the
Photo CD and Video CD.
CD-I
Compact Disc - Interactive.
Released in 1986 to extend the CD-ROM’s
Mode 2 definition, the CD-I format was
introduced to improve the synchronization of
retrieving data, graphics and audio information.
CD-Plus
CD-Plus is a 2-session disc format defined by
Philips and Sony. The first session contains your
CD-Audio tracks — up to 98 tracks can be
recorded. The second session contains your
CD-ROM data track.
Glossary B-1
CD-R
Compact Disc - Recordable.
Information on this type of media is written
using a laser-based desktop CD recorder. By
contrast, information on commercially
replicated compact discs is stamped using nickel
masters. CD-R discs are gold in color, unlike
silver-colored CD-Audio or CD-ROM discs.
CD-ROM
Compact Disc - Read Only Memory.
The CD-ROM standard was published in 1983
by Sony and Philips. It defines more error
correction than the CD-Audio format as
inaccuracy is more serious in data retrieval than
in music playback.
CD-ROM/XA
CD-ROM(Extended Architecture).
An extended CD-ROM format developed in
1988 by Philips, Sony, and Microsoft that
provides synchronized data and audio, as well as
additional hardware for the compression and
decompression of audio information. This
vastly improves the discs’ capability to store and
playback multimedia.
DAT
Digital Audio Tape.
A magnetic tape storage medium for the digital
recording and playback of encoded audio
information.
Double-speed
A drive that reads information twice as fast as
original music compact disc players.
I/O Addresses
The input/output addresses used by your
computer’s microprocessor to distinguish your
CD-ROM drive from other peripherals in your
system when sending or receiving data. See
Base I/O Address.
Multimedia
Applications that have been enhanced by the
addition of sound, animation, or video. It could
also be a combination of all these.
Glossary B-2
Multi-session
A multi-session disc has more than one set of
information recorded onto it at different times.
Space on the disc that is not used during a
recording can be used to record more
information at another time.
Photo CD
Released in 1990 by the Eastman Kodak
company to provide a standard for storing high
quality photographic images. This standard is
based on the CD-ROM/XA format.
SCSI
Small Computer System Interface.
Pronounced “Scuzzy”.
SCSI is a standard for connecting computer
systems to other peripheral devices, such as hard
disks, scanners, and CD-ROM drives and to
other computer systems. Up to seven devices,
not including your system, can be attached
through a single SCSI connection in a sequential
order known as daisy-chain.
Track
A logical region of a disc. Each track can
contain sound, animation, video or other
computer data. A compact disc may contain 1 to
99 tracks.
Video CD
Video CD is a CD-Bridge disc. That is, it can be
played on a number of devices but must always
contain a CD-I application so that it can be
played on any CD-I player. The Video CD is
multi-platform compatible due to its Bridge
format and is also independent of broadcast
standards such as NTSC and PAL.
Glossary B-3
C
Technical Support
We are committed to giving you the best product as well as the best
technical support. When you contact us, please have the following
information:
❑ The model and serial numbers of your CD-R drive and other
devices.
❑ Error message on the screen and how it came about.
❑ Information on the adapter card that conflicts with your drive.
❑ Hardware configuration information such as the base I/O
address, IRQ line, or DMA channel used.
For quick and easy reference, please write down the following
numbers related to your CD-R drive and other hardware devices, if
installed in your system in Table C-1 and Table C-2.
Table C-1:Model and Serial Numbers of your hardware.
Hardware
Model Number
Serial Number
CD-R Drive
CD-ROM Drive
SCSI Card
Audio Card
Video Card
Fax/Modem
MIDI Device
Others:
Technical Support C-1
Table C-2:Hardware Configuration Information.
Hardware
Base I/O Address
IRQ
DMA
CD-R Drive
CD-ROM Drive
SCSI Card
Audio Card
Video Card
Fax/Modem
MIDI Device
Others:
This section shows where you can contact us:
❑ Inside U.S.A., Canada, and South America
❑ Inside Europe
❑ Inside Asia
❑ Through Internet
❑ Through CompuServe
Inside U.S.A., Canada, and South America
CREATIVE LABS, INC. Technical Support
Tel
Fax
BBS
FaxBack
:
:
:
:
(405) 742 6622
(405) 742 6633
(405) 742 6660
(408) 428 2389
Operating Hours (U.S.A. Central Time)
Mon-Sun
: 8:00 am-12:00 am (16 hours)
Public Holidays : Closed
24-hour automated technical support.
Technical Support C-2
Inside Europe
CREATIVE LABS (IRELAND) LTD. Technical Support
Ballycoolin Business Park
Blanchardstown
Dublin 15
Ireland
Ireland
Tel
Fax
BBS
:
:
:
:
+353 1 820 7555
+353 1 820 5052
+353 1 820 3784 (HST)
+353 1 820 3818 (ZyXEL)
Belgium
(for Benelux)
Tel
Tel
BBS
:
:
:
:
+32 32300997 (French)
+32 32300998 (Dutch)
+32 3281 4631 (HST V.34)
+32 3281 4632 (V.34)
Denmark
Tel
BBS
: 8001 7177 (Freephone)
: +45 4824 4351 (HST V.34)
: +45 4824 4361 (ZyXEL 19,200)
Finland
Tel
BBS
: 08001 18052 (Freephone)
: +45 4824 4351 (HST V.34)
: +45 4824 4361 (ZyXEL 19,200)
France
Tel
Fax
BBS
Germany
(for Central and
Eastern Europe)
Tel
Fax
BBS
: +49 089 9579081
: +49 089 9577453
: +49 089 9577274
Holland
Tel
: +31 15578244
Italy
Tel
: +39 2 982 4 4100
:
:
:
:
Minitel :
+33 1 39 20 04 21
+33 1 39 20 90 10
+33 1 39 20 90 43 (HST)
+33 1 39 20 90 47 (V32bis)
3615 CREATIVE and
3617 CREATIVE
Technical Support C-3
Norway
Tel
BBS
: 800 11663 (Freephone)
: +45 4824 4351 (HST V.34)
: +45 4824 4361 (ZyXEL 19,200)
Scandinavia
Tel
Fax
: +45 4824 4322
: +45 4824 4323
Spain
Tel
: 900 953536 (Freephone)
Sweden
Tel
BBS
: 020 791088 (Freephone)
: +45 4824 4351 (HST V.34)
: +45 4824 4361 (ZyXEL 19,200)
UK
Tel
Fax
BBS
: +44 01734 344 744
: +44 01734 320 271
: +44 01743 360 287
Operating Hours
Mon-Fri
Sat-Sun
: Business Hours
: Closed
FaxBack is a facility that allows you to obtain product and
technical information through facsimile services. In Europe, use
the following number: +353 1 820 3667.
Where not specified differently, please use the Irish Fax
Number.
Inside Asia
CREATIVE TECHNOLOGY LTD. Technical Support
Blk 75, #01-04
Ayer Rajah Crescent
Singapore 139953
Tel
Fax
BBS
:
:
:
+65 773 4048
+65 776 5116
+65 776 2423
Technical Support C-4