1
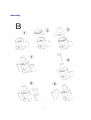
INSTRUCTIONS FOR USE
Juice Extractor
Model: XJ-8K129
Voltage: 120V~60Hz
Power: 700W
Parts
1
Assembly
2
INTRODUCTION
Your new juicer has a special, slightly tilted design that leans 5 degrees to the side of the juice
outflow opening to ensure maximum juice output.
GENERAL DESCRIPTION (See Fig. A)
1. Pusher
2. Feeding tube
3. Filter/Grating Disc
4. Juice collector
5. Juice jug lid
6. Juice jug
7. Pulp container
8. Motor unit
9. Clamp
10. Knob
11. Spout
IMPORTANT
Read this user manual carefully before you use the appliance and save it for future reference.
Danger
Do not immerse the motor unit in water or any other liquid or rinse it under the tap.
Warning
1. Check if the voltage indicated on the base of the appliance corresponds to the local voltage
before you connect the appliance.
2. Do not use the appliance if the plug, the cord or other components are damaged.
3. This appliance is not intended for use by persons (including children) with reduced physical,
sensory or mental capabilities, or lack of experience and knowledge, unless they have been
given supervision or instruction concerning use of the appliance by a person responsible for
their safety.
4. Never let children play with the appliance.
5. Never operate the appliance unattended.
6.
Never reach into the feeding tube with your fingers or other object while the appliance is
running. Only use the pusher for this purpose
7. Do not touch the small cutting blades in the base of the filter. They are very sharp.
Caution
1.
2.
3.
4.
This appliance is intended for household use only.
Make sure all parts are correctly mounted before you switch on the appliance (See Fig. B).
Only use the appliance when both sides of the clamp are locked.
Only unlock the clamp after you have switched off the appliance and the filter has stopped
3
rotating.
5. Do not operate the juicer for more than 40 seconds at a time when juicing heavy loads. Let it
cool down sufficiently between uses. None of the recipes in this user manual constitute
heavy loads.
6. Do not remove the pulp container when the appliance is operating.
7. Always unplug the appliance after use.
\
PREPARING FOR USE
1. Wash all detachable parts (see chapter on ‘Cleaning’).
2. Pull the electric cord out of the cord storage compartment at the back of the appliance. Place
the juice collector into the appliance. Place the pulp container by tilting it forwards slightly. Insert
the top end of the pulp container first and then push the bottom end.
3. Do not empty the pulp container while you are juicing. Switch off the appliance and carefully
remove the pulp container.
Note: Reassemble the empty pulp container before you continue juicing.
4. Put the filter in the juice collector. Hold the lid over the filter and lower it into position
5. Make sure the filter and juice collector are fitted securely onto the drive shaft (‘click’)
6. Snap the clamp onto both sides of the lid to lock it into place (‘clicks’). Align the groove in the
pusher with the small protrusion on the inside of the feeding tube and slide the pusher into the
feed
7. Place the lid on the juice jug to avoid splattering or if you want to store juice in the refrigerator.
8. Place the juice jug under the spout
USING THE APPLIANCE
The appliance will only function if all parts have been properly assembled and the lid has been
properly locked in place with the clamps (See Fig. B).
1. Wash the fruit and/or vegetables and cut them into pieces that fit into the feeding tube.
2. Make sure the juice jug has been placed under the spout.
3. Turn the control knob to speed setting I (high speed) or II (normal speed) to switch on the
appliance.
z Speed II is especially suitable for soft fruits and vegetables such as watermelons, grapes,
tomatoes, cucumbers and raspberries.
z Speed I is suitable for all kinds of fruits and vegetables.
4. Put the pre-cut pieces in the feeding tube and gently press them down towards the rotating
filter with the pusher.
5. Do not exert too much pressure on the pusher, as this could affect the quality of the end result
and it could even cause the filter to come to a halt.
6. Never insert your fingers or other object into the feeding tube. Only use the pusher for this
purpose.
7. After you have processed all ingredients and the juice flow has stopped, switch off the
4
appliance and wait until the filter has stopped rotating.
TIPS
Use fresh fruit and vegetables, as they contain more juice. Pineapples, beetroots, celery stalks,
apples, cucumbers, carrots, spinach, melons, tomatoes, pomegranates, oranges and grapes are
particularly suitable for processing in the juice extractor.
1. You do not have to remove thin peels or skins. Only thick peels, e.g. those of oranges,
pineapples and uncooked beetroots need to be removed. Also remove any pits/seeds of
fruits because they have a bitter taste and may damage the filter/grating disc.
2. When preparing apple juice, remember that the thickness of the apple juice depends on the
kind of apple you are using. The juicier the apple, the thinner the juice. Choose a kind of
apple that produces the type of juice you prefer. Apple juice turns brown very quickly. To
slow down this process, add a few drops of lemon juice.
3. Fruits that contain starch, such as bananas, papayas, avocados, figs and mangoes are not
suitable for processing in the juice extractor. Use a food processor, blender or bar blender to
process these fruits.
4. Leaves and leaf stalks (e.g. lettuce) can also be processed in the juice extractor.
5. Drink the juice immediately after you have extracted it. If it is exposed to air for some time,
the juice will lose its taste and nutritional value.
6. To extract the maximum amount of juice, always press the pusher down slowly.
7. The juicer is not suitable for processing very hard and/or fibrous/starchy fruits or vegetables
such as sugar cane.
CLEANING
Never use scouring pads, abrasive cleaning agents or aggressive liquids such as alcohol,
petrol or acetone to clean the appliance.
The appliance is easier to clean if you do so immediately after use.
1. Switch off the appliance. Remove the plug from the wall socket and wait until the filter has
stopped rotating.
2. Remove the dirty parts from the motor unit. Disassemble the appliance in the following
order:
a. Remove the pulp container;
b. Remove the pusher;
c. Open the clamp;
d. Remove the lid.
3. Remove the juice collector together with the filter.
4. Clean these parts with a cleaning brush in warm water with some liquid detergent and
rinse them under the tap.
5
Note: All detachable parts are dishwasher-safe. Place the detachable plastic parts on the
top tray of the dishwasher. Make sure they are placed well away from the heating element.
5. Clean the motor unit with a damp cloth.
6. Never immerse the motor unit in water or rinse it under the tap.
ENVIRONMENT
Do not throw away the appliance with normal household waste at the end of its life. Hand it in at an
official collection point for recycling. By doing this, you help to protect the environment.
TROUBLESHOOTING
This chapter summarizes the most common problems you may encounter with your juice extractor.
Please read the different sections for more details.
PROBLEM
(1) The appliance does not work.
(2) The motor unit gives off an unpleasant smell the first few times the appliance is used.
(3) The filter is blocked.
(4) The filter touches the feeding tube or vibrates strongly during processing.
SOLUTION
(1) The appliance is equipped with a safety system. It will not work if the parts have not been
assembled properly. Switch off the appliance and check whether the parts have been assembled in
the right way (See Fig. B).
(2) This is not unusual. If the appliance continues to off this smell after a few times, check the
quantities you are processing and the processing time.
(3) Switch off the appliance, clean the feeding tube and the filter and process a smaller quantity.
(4) Switch off the appliance and unplug it. Check if the filter has been properly placed in the juicer
collector. The ribs in the bottom of the filter should fit properly onto the drive shaft. Check if the filter
is damaged. Cracks or a loose grating disc or any other irregularity may cause malfunction.
6
Model
XJ-8K129
TWO YEAR LIMITED WARRANTY
U.S. PRO APPLIANCES, INC warrants this product to be free from defects in material and workmanship
for a period of two (2) year from the date of the original purchase. If your appliance fails to operate
properly while in use under normal household conditions within the warranty period, return the complete
appliance and accessories, freight prepaid to:
U.S. PRO APPLIANCES, INC
14317 E DON JULIAN RD, CITY OF INDUSRTY, CA 91746
If the appliance is found to be defective in material or workmanship, U.S. PRO APPLIANCES will repair or
replace it at free of charge to you. Should U.S. PRO APPLIANCES determine that the product is not
defective, is not covered by warranty or is outside of the warranty term, U.S. PRO APPLIANCES shall
return the product to you at your expense without being repaired or replaced. The liability of U.S. PRO
APPLIANCES is limited solely to the cost of the repair or replacement of the unit at our option. This
warranty does not cover normal wear of parts and does not apply to any unit that has been tampered with
or used for commercial purposes. This limited warranty does not cover damage caused by misuse, abuse,
negligent handling or damage due to faulty packaging or mishandling in transit. This warranty does not
cover damage or defects caused by or resulting from damages from shipping or repairs, service or
alterations to the product or any of its parts, which have been performed by a repair person not authorized
by U.S. PRO APPLIANCES.
*Important: Carefully pack item to avoid damage in shipping. Be sure to include original sales
receipt as proof of purchase with product in either original packaging or packaging affording an
equal degree of protection along with your name, complete address and phone number with a note
giving purchase information, model number and what you believe is the problem with item. We
recommend you insure the package (as damage in shipping is not covered by your warranty). Mark
the outside of your package “ATTENTION CUSTOMER SERVICE”. We are constantly striving to
improve our products, therefore the specifications contained herein are subject to change without
notice.
7