1
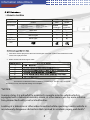
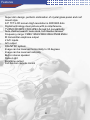
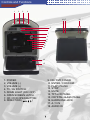
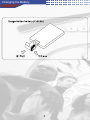
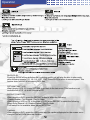
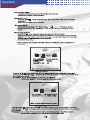
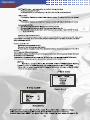
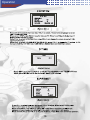
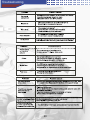
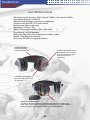
QUALITY, RLIABILITY, & PURE BLISS
ALL-IN-ONE ROOF MOUNT 8” TFT-LCD
WITH BUILT-IN DVD PLAYER
AVM380DVD
OPERATING INTSTRUCTIONS
PLEASE RETAIN MANUAL FOR FUTRE USE AND REFERENCE
Table of Contents
Table of Contents
INTRODUCTION
3
MONITOR INTRODUCTION
4
INFORMATION ABOUT DISCS
5
FEATURES
6
CONTROLS AND FUNCTIONS
7
REMOTE CONTROL
8
CHANGING THE BATTERY
9
OPERATION
10-17
WIRING
18
INSTALLATION
19
TROUBLESHOOTING
20
SPECIFICATIONS
21
HEAPHONES
22
WARNING / DISCLAIMER
23
WARRANTY
24-25
2
Monitor Introduction
Read this manual careuly bfore operatng the teleisin and follow the cautions lised below.
1. Do not try to rpair the device by yourself. Please witch off the television immediately
and then inform Audiobahn or your local Authorized Dealer if there is a problem. This
television is comprised of many precision electronic components. Disassembling or self
renovation may damage it or cause it to malfunctin.
2. Do not expose thetelevision to moisture, dust, vapor, oils mog, or direct sunlight.
3. Do not use diluent or other chemical detergents. Use a soft cloth to remove dust or dirt
on the television.
4. Keep the television display away from extremely hot or cold conditions. The television's
storage temperature range is -20 ~ 60 degrees Celsius, and itsoperation temperatur
erangeis 0 ~ 40 degrees Celsius. 5.Use only the AC adapter and automobile adapter
(12V) that comes with the television.
6. For safety purposes, whenyou do not use the television, remove the AC adapter or
automobile adapter.
7. Avoid dropping or impact to the television.
There may be a few bright or dark spots on the liquid crystal display. That is a very
common phenomenon in active matrix display technology. It does not indicate any fault or
problem has occurred.
�������
�������������������������������������������������������������������������������
���������������������������������������������������������������������������������
�������������������������������������������������
�������������������������������������������������������������������������
������������������������
�
Information About Discs
TYPE
DVD
VCD
Record Format
MPEGII
MPE
CD-DA
650MB
74 Minutes
650MB
74 Minutes
12cm / 8cm
Compatibility
One layer on one side:
4.7GB 2 hours
One Layer on Both Sides:
8.5GB 4 hours
Two layer on one side:
9.4GB 4.5 hours
Two layer on both sides:
17GB 9 hours
Size
12cm / 8cm
12cm
Horizotal Clear
450 Lines
240 Lines
Caption
Max 32 Types
Language
Musical Track
Max 8 Types
*
2
Icon
CD
*
*
*
DVD discs and this player have their own world region code. Both codes must be identical in order
for the unit to play the DVD.
Bolew are the DVD world region codes.
Attention:
This machine’s individual function is related to the DVD discs. The disc may not support
the function or may need special settings to accomplish.
�������
�������������������������������������������������������������������������������
�����������������������������������������������������������������������������������
�����������������������������������������������
������������������������������������������������������������������������������������
����������������������������������������������������������������������������������
5
Features
Super slim design, perfectc ombination of crystal glass panel and roof
mount style
8.0” TFT-LCD screen High resolution is 800X600 dots
Digital technology,clear picture with no interference
TV/DVD/CD/MP3/CD-R/JPEG format full compatibility
Auto channel search, auto store, full channel receive
Frequency range: FM88.1MHz\FM88.5MHz\FM88.9MHz
IR transmitter earphone output
2 A/V inputs
A/V output
PAL/NTSC system
Image can be reversed horizontally to 30 degrees
Image can be reversed vertically
Built-in stereo speaker
Dome Light
Earphone output
Full-function remote control
6
Controls and Functions
1
2
3
4
16 17
6
18
5
7
8
9
10
11
12
13
14
15
1. POWER
2. VOLUME (-)
3. VOLUME (+)
4. TV / AV SWITCH
5. DOME LIGHT (ON / OFF)
6. OPEN SCREEN LATCH
7. CD / DVD OPEN BUTTON
8. DIRECTION (
)
9. CD / DVD COVER
10. ENTER / CONFIRM
11. PLAY / PAUSE
12. STOP
13. MUTE
14. TFT-LCD PANEL
15. CRYSTAL GLASS PANEL
16. EARPHONE JACK
17. A / V IN
18. AUDIO IN
Remote Control
MENU
POWER
CHANNEL +/-
TV / AV SWITCH
VOLUME (-)
CHANNEL SEARCHING
VOLUME (+)
NUMBER KEYPAD
TRACK / AUDIO SWITCH
SUTITLE
RETURN / ESCAPE
SLOW
DISC INFO / SCREEN INFO
DIRECTIONAL BUTTONS
ENTER
GO TO
MUTE
PAL/NTSC
ANGLE
REPEAT
SETUP
ZOOM
TITLE MENU
STOP
PLAY / PAUSE
FAST FORWARD
REWIND
PBC
NEXT TRACK
PREVIOUS TRACK
Changing the Battery
9
Operation
INSERTING DISC
1. Press the OPEN button to open the CD cover.
2. Place the disc in the unit. ou should hear the CD snap into place.
3. Close the cover.
POWERING ON / OFF
1. Press the power button to turn the unit on. Then press enter to play disc.
2. Press the STOP button onceand the unit will go in standby mode. Press PLAY button
to play from memoy.
PLAY / PAUSE
1. After turning the unit ON, you may press play to continue where the disc left off
playing from memory.
2. If “NO DISC” s displayed, it means the disc is not properly seated in the unit, there is
no disc in the unit, or the disc is damaged or unreadable.
3. When the unit is in PLAY mode, press the PLAY button to pause, press again to
continue play.
FAST FORWARD
1. Press the Fast Forward button and the unit will fast forward the disc at the following
speeds (X2 / X4 / X8 / X16 / X32)
2. Press the Fast Rewind button and the unit will fast rewind the disc at the following
speeds (X2 / X4 / X8 / X16 / X32)
3. When playing MP3 files, this feature is not available.
LAST CHAPTER / PLAY NEXT
1. Press the
button to skip to the next chapter.
2. Press the
button to go back to the last chapter.
STOP
1. While the unit is playing, press the STOP button and the machine will go into standby
mode.
2. Press the PLAY button to resume play where the disc left off at.
MENU OPERATION
1. While the unit is playing a VCD, press the “PBC” button and the mune will change from
ON to OFF.
2. When the menu operation is set to ON, selecting chapters option is not available, only
menu operation is available:
A--Press RETURN to go back to the menu
B--Press 0~9 to choose
C--Press ENTER to play
When the menu operation is off, the RETURN button function is not available. The
selection must be ade manually.
A--Press 0~9 to choose
B--Press ENTER to play
10
Operation
TITLE MENU FUNCTION
When playing a DVD, press TITLE to enter the TITLE MENU.
Press the directional
buttons to choose your selection, then press ENTR to accpet.
MAGNIFY FUNCTION
When using the ZOOM button, you can zoom th picture to double the normal size.
ANGLE SHIFT
Some DVDs are encoded with multiple angles of the same scene. To watch available different angles
press the ANGLE button and
will be displayed in the top right corner of the screen. Press
ANGLE angain, and
will be displayed. This function is not available with all DVDs.
OSD (ON SCREEN DISPLAY)
The information displayed on the screen changes depending on what mode the unit is in.
Press the OSD button and the following screen appears:
DVD CONSOLE
Operation
VCD CONSOLE
SLOW PLAY
Press the SLOW button while the disc is playing and th unit will play the disc in slow motin
atthe following speeds (1/2, 1/4, 1/8, 1/16, 1/32). Press PLAY to return to normal speed. This
feature does not work when playing MP3 files.
RETURN FUNCTION
When playing VCD 2.0, press RETURN to go back to the last menu. This function is not
available with VCD 1.0 or MP3 files and CD.
REPEAT FUNCTION
When playing a DVD, press the REPEAT button to select the following:
Chapter Repeat / Title Repeat / Play In Order
When playing a VCD or CD, in the state of PCB, press REPEAT to select the following:
Single Song Repeat / All Chapter Repeat / Play In Order
This feature is not available when playing MP3 Files.
Captions
When playing a DVD, press the USB button and the captions displayed on the screen can e
changed. Not all DVDs have this function
Operation
Operation
14
Operation
15
Operation
16
Operation
17
Wiring
18
Installation
Mountng Instructions:
1. Loosen the four screws in the rook of the monitor as
shown in the figure #1.
2. Fasten the metal mounting plate to the roof of the
vehicle with 4 of the provided PA4.0 x 16mm screws.
3. Attach the monitor to the mounting plate using 4 of
the provided PM4.0 x 18mm screws.
19
Troubleshooting
20
Specifications
21
Headphones
AVH1 SPECIFICATIONS
FM system carrier frequency: Right channel 2.8MHz / Left channel 2.3MHz
Light weight design for comfort fit
Automatic muting design on receiving headphones
Volume control and ON / OFF power switch
Speaker size: 40mm mylar cone
Impedance: 32 Ohms 15%
Effective use range (maximum): About 10 meters
Power source: (2) AAA batteries
Battery life: About 40 hours (Depending on battery quality)
Weight: 120g (Batteries excluded)
Auto power-off (When no signal is present)
(POWER SWITCH)
Use this to turn the
headphones ON / OFF.
(POWER INDICATOR LIGHT)
This light turns off if the power
is not on or there is no signal
being received by the
headphones.
(VOLUME ADJUSTMENT)
Use this to adjust the volume
up and down.
(BATTERY COMPARTMENT)
To install or replace the batteries, remove the side panel of the headphone by
lifting under the lip located at the bottom of the earpiece. Use (2) AAA batteries
following the placement directions located inside the compartment.
22
��
24
���������������������������������������������������������
Warranty Continued
How to receive warranty service: Contact your local Authorized Audiobahn Dealer, or call Audiobahn at
(800) 488-8595 between the hours of 9:00 AM and 5:00 PM PST.
If you are having problems with your system, we recommend you check the product carefully and
thoroughly to confirm that the product truly has a manufacturer defect; as opposed to abuse, or other
components in the system causing the failure. This might include having an Authorized Audiobahn
Dealer look at the product to confirm the source of the problem. Any product found to have a
manufacturer defect will be replaced with a new piece of the same or similar model, or repaired at the
discretion of Audiobahn. Any product found to have no manufacturer defect will be returned to the sender
at their cost.
You must acquire a Return Authorization Number (RA#) prior to returning ANY product to
Audiobahn. That Return Authorization Number (RA#) must be prominently and clearly marked on the
outside of the shipping carton, or product delivery will be refused (no exceptions will be made).
Please note: All shipping and handling (to and from) charges will be the sole responsibility of the
consumer.
Please record and keep your Return Authorization Number (RA#) in the event that further communication
is required.
Return Authorization Number (RA#):
______________________________
Date product was sent:
______________________________
Contact Information
Audiobahn Headquarters
114 South Berry St.
Brea, CA 92821
Phone (800)488-8595 Fax. (714)988-0433
Pacific Coast Time : 9am-5pm Mon. - Fri.
[email protected]
25