1
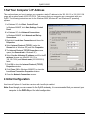
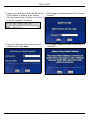
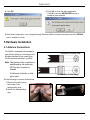
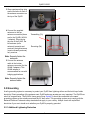
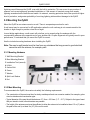
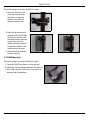
ZyAIR G-5100
Outdoor Dual-802.11g Wireless LAN Access Point & Bridge
Quick Start Guide
Version 3.50
5/2005
ZyAIR G-5100
Overview
This Quick Start Guide covers how to set up and configure the ZyAIR as an Access Point (AP) to allow
wireless clients to access your wired network. See your User’s Guide for how to configure bridge/repeater
functions and for background information on all features. This Quick Start Guide is divided into the following
sections.
1 Requirements
2 Hardware Connections
3 Set Your Computer’s IP Address
4 Initial Configuration
5 Hardware Installation
6 Troubleshooting
1 Requirements
You need the following.
1 ZyAIR
2 Ground Cable
3 Power Injector (PoE
(Power over Ethernet))
4 Cross-over RJ-45
Ethernet Cable
5 Computer
6 Outdoor Ethernet Cable
(straight through)
7 Power Cord
8 Console Cable (optional)
2 Hardware Connections
Configure the ZyAIR before mounting it. Use the following steps to connect the ZyAIR.
Note: Keep the ZyAIR’s box and packing materials.
2
ZyAIR G-5100
1 Use the installation tool to
connect the ground cable
to the ZyAIR’s frame
ground. Connect the other
end of the ground cable to
an appropriate grounding
system.
2 For initial configuration,
use a cross-over Ethernet
cable to connect the
power injector’s DATA IN
port to a computer.
3 Connect the RJ-45
Ethernet connector end of
the outdoor Ethernet cable
to the power injector’s
POWER & DATA OUT
port.
Connect the other end to
the outdoor Ethernet port
on the bottom of the ZyAIR
(align the connector’s
notch with the port’s inside
bump).
4 Use a power cord to
connect the power
injector’s power socket to
an AC power source.
5 Look at the front of the
power injector. The
POWER LED turns on
first. Then the ACTIVE
LED turns on and the
ZyAIR starts.
3
ZyAIR G-5100
3 Set Your Computer’s IP Address
This section shows you how to assign your computer a static IP address in the 192.168.1.3 to 192.168.1.254
range with a subnet mask of 255.255.255.0. This ensures that your computer can communicate with your
ZyAIR. The following instructions are for the Windows 2000, Windows NT and Windows XP operating
systems.
1 In Windows XP, click Start, Control Panel.
In Windows 2000/NT, click Start, Settings, Control
Panel.
2 In Windows XP, click Network Connections.
In Windows 2000/NT, click Network and Dial-up
Connections.
3 Right-click Local Area Connection and then click
Properties.
4 Select Internet Protocol (TCP/IP) (under the
General tab in Windows XP) and click Properties.
5 The Internet Protocol TCP/IP Properties screen
opens (the General tab in Windows XP).
6 Select Use the following IP address and fill in the IP
address (choose one from192.168.1.3 to
192.168.1.254) and Subnet mask (255.255.255.0)
fields.
7 Click OK to close the Internet Protocol (TCP/IP)
Properties window.
8 Click Close (OK in Windows 2000/NT) to close the
Local Area Connection Properties window.
9 Close the Network Connections screen.
4 Initial Configuration
Use Internet Explorer 6.0 and later versions with JavaScript enabled.
Note: Even though you can connect to the ZyAIR wirelessly, it is recommended that you connect your
computer to the DATA IN port for initial configuration.
4
ZyAIR G-5100
1 Launch your web browser. Enter 192.168.1.2 (the
ZyAIR’s default IP address) as the address.
If the login screen does not display, see Section 3
to set your computer’s IP address.
2 Click Login (the default password 1234 is already
entered).
3 Change the login password by entering a new
password and clicking Apply.
4 Click Apply to replace the ZyAIR’s default digital
certificate.
5
ZyAIR G-5100
5 Click WIZARD SETUP.
4.1 Wizard Setup
Use the setup wizard to configure your ZyAIR for wireless clients to access your wired LAN.
Note: Click Next in each screen to continue or click Back to return to the previous screen.
Your settings are not saved when you click Back.
1 This screen is optional. You can just click Next.
System Name is for identifying the ZyAIR.
You can enter your computer's "Computer
Name".
Enter a Domain Name if your ISP requires
one for authentication; otherwise you can
leave it blank or set to whatever may have
displayed automatically.
6
ZyAIR G-5100
2 Use this wizard screen to configure one of the ZyAIR’s two wireless LAN (WLAN) adapters to function as
an AP (WLAN 1 is recommended). Use the ADVANCED WIRELESS screens to configure a WLAN adapter for
bridge/repeater functions.
Note: The wireless clients and ZyAIR must use the same SSID, channel ID and WEP encryption key (if
you enable WEP) for wireless communication.
Enter a descriptive name (up to 32 printable 7bit ASCII characters) for the wireless LAN
Click Scan to have the ZyAIR automatically
select the optimum channel.
Select 64-bit or 128-bit to encrypt data frames
before transmitting them over the wireless
network. Select Disable to turn off WEP data
encryption.
Select ASCII or HEX WEP key input method
and then follow the on-screen instructions to
set up the WEP keys. You must configure all
four.
Note: Use the ADVANCED WIRELESS
screens to configure stronger types
of security (such as WPA).
.
3 If you have an IP address to use,
select Use fixed IP address and
enter it along with the subnet
mask and gateway IP address.
Click Finish.
Note: If you change the ZyAIR’s IP
address, you must use the
new IP address to access
the web configurator again.
7
ZyAIR G-5100
4 Click OK.
5 Click Yes to close the web configurator.
Click No to use the ADVANCED screens to
configure other features.
6 After initial configuration, use a straight-through Ethernet cable to connect the power injector’s DATA IN
port to a switch or router.
5 Hardware Installation
5.1 Antenna Connections
The ZyAIR is equipped with standard-N
type (female) jacks for connecting to the
included standard-N type (male) plug
2.4GHz wireless antennas (or cable).
Standard-N Female Jack
Note: The gender of the connectors is
determined by the center pin,
NOT by the connectors’s
threads.
A hollow pin is female, a solid
pin is male.
Standard-N Male Plug
Do the following to connect the antennas.
1 Remove the backing from
both sides of the
waterproofing strip.
2 Stretch the waterproofing
strip.
8
ZyAIR G-5100
3 Wrap a waterproofing strip
around the base of each of
the antenna connectors on
the top of the ZyAIR
4 Connect the supplied
antennas to the top
antenna connectors (these
are for the ZyAIR’s WLAN
1 adapter). When facing
the rear of the ZyAIR, the
left antenna (main
antenna) transmits and
receives, the right antenna
(receive diversity antenna)
only receives.
Transmitting (Tx)
Receiving (Rx)
Note: Securely fasten the
antennas.
5 Connect the antenna
cable to the bottom
antenna connector (for the
WLAN 2 adapter). This
WLAN adapter is
recommended for use with
bridging applications.
Note: Securely fasten the
antenna cable.
5.2 Grounding
A safe grounding system is necessary to protect your ZyAIR from lightning strikes and the build-up of static
electricity. Direct grounding of the antenna mast, ZyAIR and surge arrester are very important. The ZyAIR has
a built in surge arrester. The ZyAIR’s frame ground (see Section 2) should be connected to the same
grounding system as the antenna mast and the AC wall outlet. The grounding system must comply with the
National Electrical Code and safety standards that apply in your country. Always check with a qualified
electrician if you are in doubt as to whether your ZyAIR is properly grounded.
5.2.1 Additional Lightening Protection
9
ZyAIR G-5100
Lightning can still damage the ZyAIR, even with the built-in protection. This can occur for any number of
reasons, such as an improperly grounded installation or if the amount of transient energy from nearby
lightning exceeds what the devices can handle. An external, reverting protection device can provide a higher
level of protection, and greater probability of surviving lightning strikes without damage to the ZyAIR.
5.3 Mounting the ZyAIR
Mount the ZyAIR on an antenna mast or a wall. There is a separate procedure for each.
A wall mount may be convenient for AP applications when the roof overhang is not excessive and/or the
location is high enough to provide a clear line of sight.
In most bridge applications, a wall mount will not allow you to properly align the antenna with the
corresponding antenna at the opposite end of your wireless link. As poor alignment will typically result in poor
performance, it is advised that you mount the ZyAIR to a mast.
Use the included mounting hardware when installing the ZyAIR.
Note: The mast or wall-bracket must be free from any substance that may prevent a good electrical
connection with the antenna, for example, paint.
5.3.1 Mounting Hardware
1 Wall Mounting Bracket
2 Mast Mounting Bracket
3 Installation Tool (wrench)
4 U Bolt
5 Anchor Bolt
6 Screw
7 Washer
8 Split Lock Washer
9 Nut
5.3.2 Mast Mounting
To accommodate the ZyAIR, the mast must satisfy the following requirements:
• The construction of the mast must be of a sturdy, weatherproof and non-corrosive material, for example, galvanized or stainless steel construction pipe.
• Typical diameter of the mast should be between 37.5mm ~ 62.5mm (1.5” ~ 2.5”). Subject to the type of mast
that you intend to install, other diameters are possible.
• The height of the antenna mast must be sufficient to allow the antenna to be installed at least 1.5 m (5’) above
the peak of the roof (or at least 3m (10’) if the roof is metal.
10
ZyAIR G-5100
Do the following to mount the ZyAIR on a mast.
1 Insert the U-bolt into the
mast-mounting bracket
and attach it using two
washers, two split lock
washers and two nuts.
2 Align the top two holes in
the back of the ZyAIR with
the holes in the first mastmounting bracket. Use two
screws, two split lock
washers and two washers
to attach the ZyAIR to the
mast-mounting bracket.
3 Attach the other bracket in
a similar fashion.
5.3.3 Wall Mounting
Do the following to mount the ZyAIR on a wall.
1 Place the ZyAIR face down on a flat surface.
2 Attach the wall mounting brackets to the back of
the ZyAIR using the four screws, four split lock
washers and four washers.
11
ZyAIR G-5100
3 Use the included anchor bolts and washers and
nuts, to mount the ZyAIR on the wall.
Note: Be careful to avoid damaging pipes or
cables located inside the wall when drilling
holes (9 mm in diameter and 36 mm deep)
for the anchor bolts.
Make sure the anchor bolts are securely
fastened to the wall and that the wall is
strong enough to hold the weight of the
ZyAIR with the connection cables and
antennas.
5.4 Antenna Alignment
Proper antenna selection and positioning increases the range and coverage area of a wireless LAN.
Omni-directional antennas have a wide radiation pattern. For omni-directional antennas mounted on a wall or
ceiling, point the antenna down. For a single AP application, place omni-directional antennas as close to the
center of the coverage area as possible.
Point a directional antenna at the desired coverage area. With bridge applications, use binoculars and/or a
map and compass to point the antennas at one another. Use the MAINTENANCE Association List screen to
see if a peer bridge is connected.
6 Troubleshooting
Problem
Corrective Action
The power injector’s
POWER and ACTIVE
LEDs are off.
Make sure the power cord is connected to an adequate power supply and that the
power supply is turned on.
The ACTIVE LED on
the power injector is
off.
Check the cable connection to the ZyAIR’s outdoor Ethernet port. The outdoor Ethernet
cable must be straight-through and no longer than 80 m.
I cannot ping any
computer on the LAN.
If all of the power injector LEDs are off, check the cables between the ZyAIR and your
computer or hub.
I cannot ping any
computer on the
WLAN.
Make sure the wireless adapter on the wireless client is working properly.
Check that both the ZyAIR and wireless client(s) are using the same SSID, channel and
WEP keys (if WEP encryption is activated).
Disconnect and reconnect the power supply. If the error persists, you may have a
hardware problem. In this case, you should contact your vendor.
12
ZyAIR G-5100
Problem
Corrective Action
Cannot access the
ZyAIR from the LAN.
Check the cable connections between the ZyAIR, the power injector and your computer
or switch. Use a cross-over Ethernet cable to connect the power injector to a computer.
Use a straight through Ethernet cable to connect the power injector to a switch or router.
Ping the ZyAIR. Make sure your computer’s Ethernet card is installed and functioning
properly.
In the computer, click Start, (All) Programs, Accessories and then Command
Prompt. In the Command Prompt window, type "ping" followed by the ZyAIR’s IP
address (192.168.1.2 is the default) and then press [ENTER]. The ZyAIR should reply.
You must connect to the ZyAIR’s current IP address and your computer’s IP address
must be in the same subnet as the ZyAIR’s IP address.
If you don’t know the ZyAIR’s IP address, you can check the IP address in the System
Management Terminal (SMT). Use the included console cable to connect the ZyAIR’s
console port to a computer running a terminal emulation program set to VT100
terminal emulation, no parity, 8 data bits, 1 stop bit, no flow control and 9600 bps
port speed.
If the ZyAIR is set to get an IP address via DHCP, you can check the DHCP server
to see which IP address it assigned to the ZyAIR.
If you’ve forgotten the ZyAIR’s password, refer to the Resetting the ZyAIR section in the
User’s Guide.
I cannot access the
Internet.
Make sure the ZyAIR is connected to the network.
Make sure that your computer’s IP address is in the same subnet as the ZyAIR’s IP
address. If you are using a wireless client:
• Make sure the wireless adapter is working properly.
• Check that both the ZyAIR and wireless client(s) are using the same SSID, channel
and WEP keys (if WEP encryption is activated).
Procedure to View a Product’s Certification(s)
1 Go to www.zyxel.com.
2 Select your product from the drop-down list box on the ZyXEL home page to go to that product's page.
3 Select the certification you wish to view from this page.
13