1
BEFORE TO USE THIS SOUND EQUIPMENT IS
IMPORTANT TO READ THIS MANUAL
ANTES DE USAR SU EQUIPO DE SONIDO ES
IMPORTANTE LEER ESTE MANUAL
Owner's maual & installation manual
Manual de instrucciones y de instalaci6n
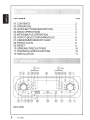
FZ.150
RADIO AM/FM/MP3/WMA PLAYER WITH USB/SD/MMC
AND FRONT AUX INPUT
RADIO AM/FM REPRODUCTOR DE MP3/WMAI
ENTRADAS USBlSD/MMC Y AUXILIAR FRONTALES
FEATURES
PAG
01.- CONTENTS ................................................................................... 2
02.- OPERATION.................................................................................... 2
03.- QUICK BUTTONS DESCRIPTION .......................................... 3
04.- BASIC OPERATIONS................................................................... 4
05.- MP3/WMAFILE OPERATION.................................................... 7
06.- HOW TO SELECT MP3/WMAFILES ....................................... 8
07.- USB/SD/MMC MEMORY CARD ............................................... 8
08.- FRONT AUXIN .............................................................................. 9
09.- RESET ................ ·.............................................................................. 9
10.- GENERAL PRECAUTIONS ........................................................ 10
11.- TECHNICAL SPECIFICATIONS ................................................ 10
12.-INSTALLATION............................................................................... 11
~)
15
23
NCD-3700
2
FZ150
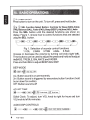
G)<!> Power on/off .
® SEL Function select button: controls for bass (BAS), treble (TRB), balance
(BAL), fader (FAD), beep (BEEP), adj time (ADJ), audio.
0
Vol up/vol down button: controls for bass (BAS), treble (TRB), balance
(BAL), fader (FAD), beep (BEEP), adj time (ADJ), audio.
01, 2, 3, 4, 5 y 6 Preset stations.
@ ST Stereo/mono button.
® EQ Equalizer control.
(j) LOC Local/distant button.
® DISP Display button.
® MODE Mode button .
@ BD/LD Band/loudness button.
@ ~ , 111+1 Automatic or manual tuning
(freq up or freq down ) track/search
button.
@AlPS Auto seek search tuning.
@SCAN Scan automatic tuning control
@ bl Mute button.
@LCD display.
@ 1 Pause button (for USB, SD/MMC at MP3/WMAfiles).
@2 Repeat button (for USB, SD/MMC at MP3/WMAfiles).
@ 31ntro button (preview all tracks) (for USB, SD/MMC at MP3/WMAfiles).
@ 4 Random button (for USB, SD/MMC at MP3/WMA files).
@ 5 Search previous folder (MP3/WMA files only).
@ 6 Search next folder (MP3/WMA files only).
@USB port.
@Multi-media card (MMC) /SD card slot.
@AUX-IN.
@ Reset button .
FZ150
3
CD C> Power on/off
Press button to turn on the unit. To turn off, press and hold button.
®
y @) SEL Function Select Button: Controls for Bass {BAS}, Treble
{TRB}, Balance {BAL}, Fader {FAD}, Beep {BEEP}, Adj time {ADJ}, Audio
Press the SEL button until the desired functions are shown on
display. Figure 1, shows how to control functions that are selected
usi~g the SEL. button.
Fig 1. Selection of sounds control functions
4.BAL S.FAD
3.TRB
1.VOL 2.BAS
Increase or decrease the volume by turning vol knob (right I left).
These buttons can be used to adjust the press and hold sel to adjust
the BASS, TREBLE, BALANCE and FADER.
Press and hold SEL to adjust BEEP/ADJ/DSP.
BEEP MODE
ALL: Button sound is on permanently
2nd: Button sound is triggered by secondary button functions (hold
button down for a while)
OFF: Button sound is off
ADJUST TIME
Digital Clock. To adjust, turn VOL knob to right for hours and turn
VOL knob to left for minutes.
AUDIO DSP CONTROLS
FLAT I POP I ROCK I CLASSICAL
4
FZ150
01, 2, 3, 4, 5 y 6
Preset stations
Six numbered preset buttons store and recall stations for each
band.
Storing a station:
1. Select a band (if needed)
2. Select a station
3. Hold a preset button longer than one second. Preset station
number appears in the display when station is saved.
Recall a station:
1. Select band (if needed)
2. Press a preset button for less than one second to select stored
station.
0
ST Stereo/mono button
Press ST button to switch between stereo and mono sound for FM
radio reception. When reception of an FM station is weak, listening
quality can be improved by switching to mono sound.
® EQ Equalizer control
Press EQ to select between Off/Flat/Pop/Rock/Classic equalizer
modes.
0
LOC Local/distant button
Press Local/Distant (LO/DX) button for listening to weak stations~
"LOCAL" indicator will appear on the display. Press this button
again (Distant mode) for normal operation.
® DISP Display button
Press DISP button to switch between display informations such as
radio frequencies, clock, track and other informations depending on
the playing MODE.
®MODE Mode button
By pressing this key, user can select. AUX/TUNERIUSB or
MMC/SD mode.
FZ150
5
@ BD/LD Band/Loudness Button
Each band is toggled cyclically by pressing this key FM1---FM2--FM3--AM 1--AM2.
LOUDNESS: Press and hold this button, you can select
LOUDNESS mode.
®
~+~~, ~ Automatic or Manual Tuning (freq up orfreq down)
Track I Search Button
(A) RADIO MODE
When pressed short, these keys are operated as SEEK tuning
mode.
When pressed longer than 1 sec., they are operated as MANUAL
tuning mode.
(B) MP3/WMA PLAYER MODE
When pressed short, they are operated as TRACK UP or TRACK
DOWN mode.
When pressed longer than 1 sec., they are operated as FAST
FORWARD or FAST REWIND mode.
@ AlPS Auto Seek Search Tuning
By pressing shortly, the radio searches for each preset station.
When field strength level is bigger than the threshold level of stop
level, the radio is holding at that preset number for 5 sec. with
releasing mute, and then searches again.
By pressing longer than 1 sec, and then 6 strongest stations are
preset to the corresponding preset number. When AS operation is
finished, the radio executes the preset scan.
@ SCAN Scan Automatic Tuning Control
1. Press the MODE button to switch to Radio mode.
2. Press SCAN button. When a station has been found, it is played
for 5 seconds and then the auto-scan is continued. Press the button
again to stop the auto-scan to listen to the currently played station.
6
FZ150
@
bl Mute Button
Press this button, audio will disappear. Press this button again in
order to hear audio newly.
@LCD Display
The Liquid Crystal Display will display the current state of the unit.
@ Track/search Button, Forward And Reverse Track Search
{or Changing Songs)
Press the SKIP button ~ (or) ~~+~ during play to go to the desired
track( song).
~ .... REVERSE ~~+~ .... FORWARD
Press and hold the SKIP button ·~ (or) ~~+~ during play to scan at
high speed. When the desired music section is found, release the
button. Normal play will resume.
@ 1 Pause Button {for USB, SD/MMC at MP3/WMA Files)
During playback, press 'PAUSE' button (16) to pause. Press it again
to resume play.
@ 2 Repeat Button {for USB, SD/MMC at MP3/WMA Files)
When this button is pressed, 'RPT' indication is displayed and play
of the selected track will be continually repeated until the Track
repeat mode is cancelled by pressing 'RPT' button again.
@ 3 lntro Button {Preview all Tracks) {for USB, SD/MMC at
MP3/WMAF iles)
When this button is pressed, 'INT' indication is displayed and the
first several seconds of each track are played. Press again to stop
intra and listen to track. All tracks will be repeat continually in INTRO
mode.
FZ150
7
05.· MP3/WMA FILE OPERATION (cont.)
@ 4 Random Button (for USB, SD/MMC at MP3/WMA Files)
When this button is pressed, 'RDM' indication is displayed and each
track are played in random instead of normal progression. To
cancel RANDOM mode, press 'RDM' button again. All tracks will be
repeat continually in RANDOM mode.
@,@ 5 & 6 Search Previous/Ne xt Folder (MP3/WMA Files Only)
Press Button 5: Previous Folder I Press Button 6: Next Folder.
Searching by Track:
• Press AlPS. D~t starts blinking.
• Rotate "VOL S I VOL ~ " knob until the desired track number
shows then press SEL button.
• Song number you selected will start to play.
Searching by Folder:
• Press AlPS twice.
• Rotate "VOL @ I VOL ~ " knob to select folder name then press
SELknob.
• Rotate "VOL @ I VOL ~ " knob to select file to play then press
SEL knob to start playback.
,
/
'O<.;;X
N
tt~~tf-t~$)ttlrc IVIEMORY :C~RD
><
®% ( t~ ~"
n;JI*:
*J:?o"' v '( ~
&*1Jf :Z~
0
h
0
~0
"-:"""
,t<
-H
0
~!; :~
~
0
-;;
~
~" ~ ~
,.:
"f'.)
H
·
'
The device is equipped with a USB interface and a memory card
reader for SDIMMC cards. MP3 or WMA files stored on these media
can be played.
1. Plug your USB storage medium into the USB port.
2. If you use a memory card, insert it into the memory card reader.
3. The player automatically switches to the input used and starts
playback.
8
FZ150
4. See the section on operations common for audio files on how to
control USB or memory card playback.
Note:
• Due to the different kind of devices USB and SD/MMC card that
sometimes have specific manufacturer functions, we can not
guarantee that all media will be recognized, and that all operational
functions will be available. (This device recognizes FAT16 and
·
FAT32 devices).
• This device can play USB and SD/MMC card up to 32G capacity
·
and will only play up to 2000 files.
• You can not operate USB hard drives on this device.
Warning:
To remove the USB/SD/MMC device, you should first select
another source with MODE button, in order to avoid damaging the
USB/SD/MMC device. Then you remove the USB/SO/MMC device.
An external audio source (e.g. portable MP3 player) can be
connected to the AUX IN socket to be played back by the vehicle
loudspeakers. Press the MODE button to selecttheAUX IN mode.
• Connect the AUX IN socket with the audio output of the external
device.
Reset button is placed on the housing.
The reset button is to be activated for the following reason:
•Initial installation of the unit when all wiring is completed.
• All the function button do not operate.
• Error symbol on the display.
FZ150
·.·.··A
·~ ,
10.- GENERAL PRECAUTIONS
1.- Do not open the covers. The device has no parts inside that
can be repaired by the user. If you drop an object inside the unit
during installation, consult your dealer or an authorized service
center.
2 .-Use a soft, dry cloth to clean the control panel. NEVER use
abrasive pads, thinner, benzine, alcohol, etc .. If the unit is very
dirty, apply a little warm water with a soft cloth and carefully
remove the dirt.
3 .- Do not insert foreign devices to the auxiliary input
(screwdrivers, knives, metal objects, etc.). As this may damage
the equipment and they would not be covered under warranty.
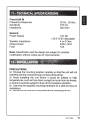
11.- TECHNICAL SPECIFICATIONS
10
MP3/WMA Player Section
Signal to Noise Ratio
Channel Separation
Frequency Response
> 60 dB
> 50 dB (1kHz)
20Hz-20kHz
Tuner (FM)
Frequency range
Sensitivity
Stereo separation
Signal to noise ratio
Channel step
87.5-107.9 MHz
2.8 ~v
30 dB
50 dB
200kHz
Tuner AM
Frequency range
Sensitivity
530-1710 KHz
32dB
Line-Out
Output
Impedance
1.5V (max.)
10k Ohm
FZ150
.
,~
·: 1~·,·~f TEPtiNICAL~,~P~Qifil~llO~$
\
..,
y
FrontAUX IN
Frequency Response
Sensitivity
Impedance
General
Power Supply
Speaker impedance
Output power
Fuse
>
«'
'
"
~
"
<
<
"
•
'
20Hz-20kHz
775mV
20k Ohm
12V DC
(10.8-15.6V allowable)
4 or 8 Ohm
40Wx4CH
10A
Note: Specification and the design are subject to possible
modification without notice due to improvements.
PRECAUTIONS
00 Choose the mounting location carefully so that the unit will not
interfere with the normal driving functions of the driver.
00 Avoid installing the unit where it would be subject to high
temperatures, such as from direct sunlight or hot air from the heater,
or where it would be subject to dust, dirt or excessive vibration.
oo Use only the supplied mounting hardware for a safe and secure
installation.
oo Be sure to remove the front panel before installing the unit.
FZ150
11
12.-INSTALLATION (cont.)
1
.
2
4
Bendthese
cli~Ws,ifnecessay
Note: Keep the release key in the safe place as you may need it in
future to remove the unit from the car.
Tosupportthe unit
1. Unit
2. Release case
3. Dash board
4.
5.
6.
7.
8.
9.
12
FZ150
Hex nut
Lock washer
Plain washer
Car body
Rear support strap
Tapping screw
Wire connection
RCA Jack Line Out:
Red (right), White (left)
ISO Connector
L (white)
Connector A
4. Memory+12v
5. Auto antenna output/
Remote control output
7. + 12v (to ignition key)
8. Ground
©
©
Antenna@
Connector
R (red)
B
Line Out
A2
•1•3•5•7
•2•4•6•8
•4
•5•7
•8
Note: (connector A no. 7) must be connected by car ignition key in
order to avoid that car battery becomes weak when the car will be
not used for long period.
ConnectorS
1. Rear right speaker (+)
2. Rearrightspeaker(-)
3. Front right speaker(+)
4. Front right speaker (-)
5. Front left speaker(+)
6. Front left speaker (-)
7. Rear left speaker (+)
8. Rear left speaker (-)
Maintenance
Fuse replacement
If the fuse blows, check the power connection and replace the fuse.
If the fuse blows again after the replacement, there may be an
internal malfunction. In this case, consult your nearest repairing
center.
Warning
Use the specified amperage fuse for each lead. Use of a higher
amperage fuse may cause serious damage.
FZ150
13
Clarion Co., Ltd.
All Rights Reserved. Copyright ©2012: Clarion Co., ltd.
Printed in China /lmpreso en China
281-0639-01 2008/9
clarion
CLARION 1 YEAR LIMITED WARRANTY
For USA and Canada only
This Clarion product purchased from an authorized Clarion dealer are warranted against all defects in materials and
workmanship for a period of one (1) year from the date of original purchase other than consumable parts, such as
the battery pack, which are covered for 6 months from the date of purchase, when purchased from AND installed
by an authorized Clarion dealer.
All Clarion cables, wires and other accessories if purchased from an authorized Clarion dealer are warranted against
all defects in materials and workmanship for ninety (90) days unless otherwise specified from the date of original
purchase.
All PURCHASES OF CLARION PRODUCTS FROM NON-AUTHORIZED CLARION DEALERS ARE SUBJECT
TO FURTHER WARRANTY RESTRICTIONS AS DESCRIBED BELOW.
The conditions of this Limited Warranty and the extent of responsibility of Clarion Corporation of America ("Clarion")
under this Limited Warranty are as follows :
1. PROOF OF DATE OF PURCHASE FROM AN AUTHORIZED CLARION DEALER WILL BE REQUIRED FOR
WARRANTY SERVICE OF THIS PRODUCT. CENTERS MAY BE OBTAINED BY CONTACTING CLARION AT
THE ADDRESS LISTED BELOW.
2. This Limited Warranty will become void if service performed by anyone other than an approved Clarion Warranty
Service Center results in damage to the product.
3. This Limited Warranty does not apply to any product which has been subject to misuse, neglect or accident,
or which has had the serial number altered, defaced or removed, or which has been connected, installed,
adjusted or repaired, other than in accordance with the instructions furnished by Clarion.
4. This Limited Warranty does not cover car static or other electrical interferences, tape head or laser pick-up
cleaning or adjustments, or labor costs for the removal or reinstallation of the unit for repair.
5. The sole responsibility of Clarion under this Limited Warranty shall be limited to the repair of the product or
replacement of the product, at the sole discretion of Clarion.
6. Product must be shipped in its original carton or equivalent carton, fully insured, with shipping charges prepaid.
Clarion will not assume any responsibility for any loss or damage incurred in shipping.
7. CLARION PRODUCTS PURCHASED FROM A SOURCE OTHER THAN AN AUTHORIZED CLARION DEALER,
INCLUDING ANY AND All PURCHASES VIA THE INTERNET FROM A NON INTERNET AUTHORIZED
CLARION DEALER, SHALL NOT BE COVERED BY ANY CLARION LIMITED WARRANTY TO THE EXTENT
ALLOWED BY APPLICABLE LAW. IN THE EVENT AND TO THE EXTENT APPLICABLE LAW PROHIBITS
ELIMINATION OF WARRANTIES UNDER THESE CIRCUMSTANCES, THE APPLICABLE LIMITED WARRANTY
PERIOD SHALL BE DEEMED TO BE FIFTEEN (15) DAYS FROM THE DATE OF ORIGINAL PURCHASE.
8. ALL IMPLIED WARRANTIES EXCEPT TO THE EXTENT PROHIBITED BY APPLICABLE LAW SHALL HAVE NO
GREATER DURATION THAN THE WARRANTY PERIOD SET FORTH ABOVE. UNDER NO CIRCUMSTANCES
SHALL CLARION BE LIABLE FOR ANY LOSS OR DAMAGE, DIRECT OR CONSEQUENTIAL, ARISING OUT OF
THE USE OR INABILITY TO USE THE PRODUCT. BECAUSE SOME STATES DO NOT ALLOW LIMITATIONS
ON HOW LONG AN IMPLIED WARRANTY LASTS OR EXCLUSIONS OR LIMITATIONS OF INCIDENTAL OR
CONSEQUENTIAL DAMAGES, THE ABOVE LIMITATIONS OR EXCLUSIONS MAY NOT APPLY TO YOU.
9. THIS LIMITED WARRANTY GIVES YOU SPECIFIC LEGAL RIGHTS, AND YOU MAY ALSO HAVE OTHER
RIGHTS WHICH VARY FROM STATE TO STATE.
1 0. The laws of the State of California shall govern and control this Limited Warranty, its interpretation and enforcement.
11. Should you have any difficulties with the performance of this product during the warranty period, please call
Clarion or visit our web site for a listing of Authorized Warranty Service Centers in your area. You may also contact
Clarion Customer Service at the address listed below for any service help you may need with Clarion products.
In USA:
Clarion Corporation of America
Attn:Customer Service Manager
6200 Gateway Drive
Cypress, CA 90630
1-800-GO-ClARION
www.clarion.com
In Canada:
Clarion Canada Inc.
Warranty Service Center
2239 Winston Park Drive
Oakville, Ontario L6H 5R1
(905) 829-4600
www.clarion.com