1
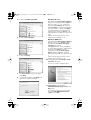
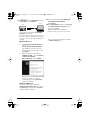
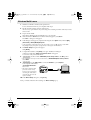
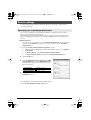
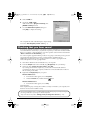
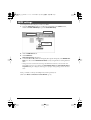
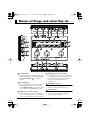
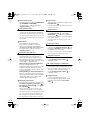
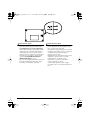
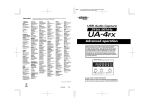
UA-4FX_s_e.book 1 ページ 2005年11月4日 金曜日 午前9時19分
Read this first!
UA-4FX Owner’s Manual
Copyright © 2005 ROLAND CORPORATION
All rights reserved. No part of this publication may be reproduced in any
form without the written permission of ROLAND CORPORATION.
Check the contents of the package
The UA-4FX comes with the following items. When you open the package, check that you have
all of these items. If any are missing, contact the dealer where you purchased the UA-4FX.
• UA-4FX
• License agreements
These license agreements grant you
permission to use certain software whose
copyrights are the property of Roland
Corporation. You must read these before
opening the CD-ROM package. The terms of
the license may also be displayed in the
course of installing the software; you must
read these as well.
• USB cable
Use this to connect the UA-4FX’s USB
connector to the USB connector of your
computer. For details on connections, refer to
“You must install the driver first” (p. 2).
You must use the included USB cable.
• UA-4FX CD-ROM
The CD-ROM contains a driver and VSC-DXi
for using the UA-4FX.
You will need to provide the following
items yourself
• SONAR LE CD-ROM
* You must read the separate license agreements
before opening the included CD-ROM.
• External amp, speakers, headphones,
mic
• MD or DAT recorder, digital input/
output cables, etc.
* Do not touch the underside (the data side) of the
disc or allow it to be scratched. Doing so may make
the data unreadable. If the disc gets dirty, use a
commercially available CD cleaner to clean it.
* You must read the various Readme files on the
CD-ROM. The most recent supplementary
information will be included in the Readme files.
* Do not play back the CD-ROM in a conventional
audio CD player. Doing so will produce a loud
noise that may damage your hearing and your
speakers.
• Read this first!
This is the manual you are reading. Be sure to
read this before you begin using the UA-4FX.
When using the UA-4FX, keep this at hand
for reference.
• Advanced operation
Read this when you want to learn how to use
the UA-4FX’s advanced capabilities.
1
04019145
1SX
UA-4FX_s_e.book 2 ページ 2005年11月4日 金曜日 午前9時19分
You must install the driver first
A “driver” is software that transfers data between the UA-4FX and application software running
on your computer, when your computer and the UA-4FX are connected by a USB cable. The driver
sends data from your application to the UA-4FX, and from the UA-4FX to your application.
The installation procedure will differ depending on your system.
Please proceed to one of the following sections, depending on the system you use.
•
•
•
•
Windows XP/2000 users ............p. 2
Windows Me/98 users................p. 5
Mac OS X users.............................p. 9
Mac OS 9 users..............................Advanced operation, p. 39
Steps in which you operate the UA-4FX itself are indicated by a
Operation of the UA-4FX
symbol.
Driver installation and settings (Windows)
Driver installation
Windows XP/2000 users
1. With the UA-4FX disconnected, start up Windows.
4. Open My Computer.
Don’t connect the UA-4FX to your computer
until step 12 (p. 4).
* Disconnect all USB cables except for a USB
keyboard and USB mouse (if used).
Windows XP users:
From the Windows Start menu, choose My
Computer.
fig.
* If you are using Windows XP Professional, you
must log on using a user name with an
administrative account type (e.g., Administrator).
For details on user accounts, please consult the
system administrator of your computer.
2. Exit all currently running software (applications).
Also close any open windows. If you are
using virus checking or similar software, be
sure to exit it as well.
3. Prepare the CD-ROM.
Insert the CD-ROM into the CD-ROM drive
of your computer.
* If the screen indicates “Windows can perform
the same action each time you insert a
disk or connect a device with this kind of
file,” click [Cancel].
Windows 2000 users:
Double-click My Computer on your desktop.
2
UA-4FX_s_e.book 3 ページ 2005年11月4日 金曜日 午前9時19分
5. Double-click AUDIO_CAPTURE.
Windows XP users:
If the setting in the Driver Signing Options
dialog box is anything other than “Ignore,” a
dialog box with a “!” or “x” symbol may
appear. If the [Continue] button appears,
click [Continue] to continue the installation.
If you are unable to continue, click [OK] to
cancel the installation, change the Driver
Signing Options setting to “Ignore”, and
then perform the procedure once again from
step 1.
(Refer to ➔ Advanced operation “Driver
Signing Options settings,” p. 46)
fig.
6. Double-click Driver(XP2k).
fig.
Windows 2000 users:
If the setting in the Driver Signing Options
dialog box is not set to “Ignore”, a dialog
box indicating “Could not find digital
signature” may appear.
If the [Yes] button is shown, click [Yes] to
proceed with the installation. If this button is
not shown, click [OK] to cancel the
installation, change the Driver Signing
Options setting to “Ignore,” and then
perform the procedure once again from step
1.
(Refer to ➔ Advanced operation “Driver
Signing Options settings,” p. 46)
7. Double-click Setup.
fig.
10. A dialog box indicating “Ready to install
the driver” will appear.
You are now ready to install the driver.
fig.driver-eps
8. The Driver Setup dialog box will appear.
Click [Next].
9. To begin the installation, click [Next] once
again. The installation will begin.
fig.
11.
Operation of the UA-4FX Set the UA-4FX’s
ADVANCED (Model select) switch to the
ON position.
* The installation will not proceed as described
below if the ADVANCED (Mode select)
switch is turned OFF.
3
UA-4FX_s_e.book 4 ページ 2005年11月4日 金曜日 午前9時19分
12.
13. The screen will indicate “Completing the
Found New Hardware Wizard”.
Operation of the UA-4FX Use the USB cable to connect
the UA-4FX to your computer.
Click [Finish].
fig.
Computer
14. In the Driver Setup dialog box, click [Close].
UA-4FX
If the System Settings Change dialog box
appears, click [Yes].
Windows will restart automatically.
* If this is not shown, you don’t need to restart.
Your computer will indicate “Found New
Hardware”. Please wait.
942
* This unit is equipped with a protection circuit. A
brief interval (a few seconds) after connecting the
USB cable is required before the unit will operate
normally.
Next, you need to make the driver settings.
(➔ Driver settings (p. 6))
Windows XP users:
1.
The Found New Hardware Wizard will
appear.
If the Found New Hardware Wizard
asks whether you want to connect to
Windows Update, choose “No, ...” and
click [Next].
2.
Make sure that the screen indicates
“EDIROL UA-4FX ”, select “Install the
software automatically
(Recommended)”, and click [Next].
fig.
* In some cases a dialog box with a “!”
symbol} may appear. Click [Continue] to
continue the installation.
Windows 2000 users:
In some cases a dialog box indicating
“Digital Signature Not Found” may appear.
If a [Yes] button is displayed, click [Yes] to
continue with the installation.
4
UA-4FX_s_e.book 5 ページ 2005年11月4日 金曜日 午前9時19分
Windows Me/98 users
1. With the UA-4FX disconnected, start up Windows.
Don’t connect the UA-4FX to your computer until step 9.
2. Exit all currently running software (applications).
Also close any open windows. If you are using virus checking or similar software, be sure to
exit it as well.
3. Prepare the CD-ROM.
Insert the CD-ROM into the CD-ROM drive of your computer.
4. Click the Windows Start button. From the menu that appears, select Run....
The “Run...” dialog box will appear.
5. In the dialog box that appears, input the following into the “Open” field, and click [OK].
(drive name) : \Driver(Me98)\Setup.exe
* In the explanatory example shown here, the drive name is given as “D:”. The drive name “D:”
may be different for your system. Specify the drive name of your CD-ROM drive.
6. The Driver Setup dialog box will appear.
Click [NEXT].
7. To begin the installation, click [Next] once again. Installation will begin.
A dialog box indicating “Ready to install the driver” will appear.
You are now ready to install the driver.
8.
Operation of the UA-4FX
Set the UA-4FX’s ADVANCE (mode select) switch to the ON position.
* The installation will not proceed as described below if ADVANCED (Mode select) switch is
turned OFF.
9.
fig.
942
Operation of the UA-4FX
Use the USB cable to connect the UA-4FX to your computer.
Your computer will indicate
“Found New Hardware”.
Please wait.
Computer
UA-4FX
* This unit is equipped with a
protection circuit. A brief
interval (a few seconds) after
connecting the USB cable is
required before the unit will
operate normally.
10. In the Driver Setup dialog box, click [Close].
Next, you need to make the driver settings. (➔ Driver settings (p. 6))
5
UA-4FX_s_e.book 6 ページ 2005年11月4日 金曜日 午前9時19分
Driver settings
In order to get the best performance from the software you are using, you must set the
correct device settings.
Specifying the input/output destination
If you want to use Media Player (included with Windows) with the UA-4FX, proceed as
follows to specify the input/output device.
The UA-4FX audio driver supports WDM/ASIO 2.0, but the procedure for making device
settings will depend on the software you’re using. For details, refer to the manual for your
software.
Windows XP users:
* Depending on how your system is set up, the Sound and Audio Devices icon may be displayed
directly in the Control Panel (the Classic view). In this case, double-click the Sound and
Audio Devices icon.
1. Open the Sounds and Audio Devices Properties dialog box.
1.
Click the Windows Start button, and from the menu that appears, select Settings |
Control Panel.
2.
In “Pick a category”, click “Sound, Speech, and Audio Devices”.
3.
In “or pick a Control Panel icon”, click the sounds and Audio Devices icon.
2. Click the Audio tab.
3. In the Sound playback, Sound recording, and MIDI
music playback areas, click the Default device field.
From the list that appears for each field, choose the
device shown below.
Sound playback
Sound recording
MIDI music playback
EDIROL UA-4FX
EDIROL UA-4FX
EDIROL UA-4FX
4. Click [OK] to close the Sounds and Audio Devices
Properties dialog box.
This completes the audio and MIDI input/output settings.
Proceed to “Checking that you hear sound” (p. 8).
6
UA-4FX_s_e.book 7 ページ 2005年11月4日 金曜日 午前9時19分
Windows 2000/Me users:
1. Open the Sounds and Multimedia Properties dialog box
1.
Click the Windows Start button and select Settings | Control Panel.
In Control Panel, double-click the Sounds and Multimedia icon to open the
“Sounds and Multimedia Properties” dialog box.
* If the Sound and Multimedia icon is not displayed, click “View all control panel options”
in the frame at the left.
2.
2. Click the Audio tab.
3. For Sound Playback, Sound Recording, and MIDI
music playback areas, click the ▼ located at the right
of [Preferred device], and select the following from
the list that appears.
Sound Playback
Sound Recording
MIDI music playback
EDIROL UA-4FX
EDIROL UA-4FX
EDIROL UA-4FX
4. Close the Sounds and Multimedia Properties dialog
box.
Click OK to complete the settings.
This completes the audio and MIDI input/output settings.
Proceed to “Checking that you hear sound” (p. 8).
Windows 98 users:
1. Open the Multimedia Properties dialog box.
1.
Click the Windows Start button and select Settings | Control Panel.
2.
In Control Panel, double-click the Multimedia icon to open the “Multimedia
Properties” dialog box.
2. Click the Audio tab.
3. Specify the “Preferred device”.
Click the Playback field and Recording field, make
the following selections from the list that appears, and
click [Apply].
Playback
Recording
EDIROL UA-4FX
EDIROL UA-4FX
7
UA-4FX_s_e.book 8 ページ 2005年11月4日 金曜日 午前9時19分
4. Click the MIDI tab.
5. Specify the “MIDI output”.
Add a check mark to [Single instrument], click
[EDIROL UA-4FX] in the list.
6. Close the Multimedia Properties dialog box.
Click [OK] to complete the settings.
This completes the audio and MIDI input/output settings.
Proceed to “Checking that you hear sound” (p. 8).
Checking that you hear sound
Now, let’s play back the sample data to verify that the connections and settings are correct. We will
use standard Windows functionality to play back the sample data provided on the included CD-ROM.
Before you continue, connect headphones or monitor speakers to the UA-4FX as described in
“Basic connections for the UA-4FX” (p. 12).
981b
Use of the song data supplied with this product for any purpose other than private, personal
enjoyment without the permission of the copyright holder is prohibited by law.
Additionally, this data must not be copied, nor used in a secondary copyrighted work
without the permission of the copyright holder.
1. Insert the CD-ROM into the CD-ROM drive of your computer.
2. From the Sample folder of the CD-ROM, drag Alright(.wav) onto your desktop.
3. Set the UA-4FX’s sample rate select switch to 44.1 kHz.
If you change the UA-4FX’s sample rate, you must disconnect the USB cable that
connects the UA-4FX to your computer, and then re-connect the USB cable in order for
the new setting to take effect.
4. Right-click the Alright(.wav) file you copied.
Windows Me/98 users:
1.
From the menu that appears, choose Properties.
2.
Click the Preview tab, and then click the
button.
Windows XP/2000 users:
1.
From the menu that appears, choose Play.
Playback begins.
If the sample data plays correctly, the UA-4FX is correctly connected to your computer, and
the driver has also been installed correctly.
* If you’re using Windows XP, we recommend that you make settings to give priority to background
processing so that driver processing is as smooth as possible.
(Refer to ➔ Advanced operation “Giving priority to background services” (p. 44))
8
UA-4FX_s_e.book 9 ページ 2005年11月4日 金曜日 午前9時19分
Driver installation and settings (Mac OS X)
* If you’re using Mac OS 9, refer to Advanced Operation (p. 39).
Installing the driver
* If an Authentication dialog box appears during installation, enter the password and click [OK].
* The contents of the display may differ depending on your system.
1. Disconnect all USB cables other than those for your keyboard and mouse, and restart
your Macintosh.
2. Close all software that is currently running.
3. Prepare the CD-ROM.
Insert the CD-ROM into the CD-ROM drive of your computer.
4. In the Driver (Mac OS X) folder of the CD-ROM, double-click UA4FXUSBDriver.pkg.
A message such as “A program that determines whether installation is possible ...” may
appear.
Click [Continue].
5. The display will indicate “Welcome to the EDIROL UA-4FX USB Driver Installer”.
Click [Continue].
6. The display will indicate “Select a Destination”.
Click the drive in which the operating system is installed to select it, and then click [Continue].
* Select your startup disk as the drive.
7. The display will indicate “Easy Install”.
Click Install or Upgrade.
8. The display will indicate “Installing this software requires you to restart your
computer when the installation is done”.
Click [Continue Installation].
9. The screen will indicate “Click ‘Restart’ and ...”.
Click [Restart] to restart your computer.
This completes installation of the UA-4FX driver.
Next, make MIDI device and audio device settings.
9
UA-4FX_s_e.book 10 ページ 2005年11月4日 金曜日 午前9時19分
Driver settings
If you want to use the UA-4FX with the iTunes software included with your Macintosh,
specify the input/output devices as follows.
The procedure for making device settings differs depending on the software you are using.
For details, refer to the owner’s manual for your software.
1.
Operation of the UA-4FX
Set the UA-4FX’s ADVANCED (Mode select) switch to the ON position.
2.
Operation of the UA-4FX
Use the USB cable to connect the UA-4FX to your computer.
Connect the UA-4FX to a USB connector on the Macintosh itself. Don’t connect it to a
USB connector on your keyboard.
942
* This unit is equipped with a protection circuit. A brief interval (a few seconds) after connecting
the USB cable is required before the unit will operate normally.
3. Open “System Preferences” and click “Sound”.
4. In the Sound Effects tab, set “Play alerts and sound effects through” to “EDIROL
UA-4FX 44.1 kHz”.
* Although “44.1 kHz” is used for the purpose of explanation within this document, this changes
depending on the actual setting of the sampling frequency select on your UA-4FX.
5. In the Output tab, set “Choose a device for sound output” to “EDIROL UA-4FX 44.1
kHz”.
* If you want alerts to be played not from the UA-4FX but from the internal speakers of your
Macintosh, choose “Internal speakers” for the “Play alerts and sound effects through”
setting.
6. In the Input tab, set “Choose a device for sound input” to “EDIROL UA-4FX 44.1 kHz”.
When you have finished making settings, close the dialog box.
* You’ll need to make MIDI device settings within the sequencer you’re using. For details, refer to
the owner’s manual for your sequencer software.
Cautions for use
Before you use your software with the UA-4FX, please note the following.
• Before you start up your software, use a USB cable to connect the UA-4FX with your
computer.
•
•
•
•
Do not disconnect the UA-4FX’s USB cable while your software is running.
Close your software before you unplug the UA-4FX’s USB cable.
Turn off the Sleep setting of your Macintosh.
The UA-4FX will not work in the Classic environment of Mac OS X. Use it when the
Classic environment is not running.
• Depending on the model of Macintosh you are using, starting up the Macintosh when
the UA-4FX is connected may cause operation to become unstable. In this case, start up
the Macintosh and then connect the UA-4FX.
For details on making device settings appropriate for the device you’re using, refer to the
owner’s manual of your software.
10
UA-4FX_s_e.book 11 ページ 2005年11月4日 金曜日 午前9時19分
MIDI settings
You must perform this setup if you want to use MIDI.
1. Open the Applications folder of your Macintosh hard disk. In the Utilities folder,
double-click Audio MIDI Setup to open the Audio MIDI Setup.
fig.audio-midi.eps
2
3
Click MIDI Devices
Click Add Device
mouse to drag
4 Use the
a connection
2. Click the MIDI Devices tab.
3. Click Add Device.
New external device will appear.
4. Connect the ▼ and ▲ symbols (which signify the outputs and inputs) of the EDIROL UA4FX icon to those of the New External Device icon by using the mouse to drag between
them.
* Change icons and set other items according to the MIDI devices that are connected to the UA4FX’s MIDI connectors. If you double-click new external device, the new external device
Properties dialog box will appear, allowing you to specify a variety of things, such as the device
name.
Next, you need to connect your headphones, monitor speakers, etc.
(Refer to ➔ “Basic connections for the UA-4FX” (p. 12))
11
UA-4FX_s_e.book 12 ページ 2005年11月4日 金曜日 午前9時19分
Basic connections for the UA-4FX
921*
* To prevent malfunction and/or damage to speakers or other devices, always turn down the
volume on all your audio equipments before making any connections.
You can connect headphones and/or monitor speakers as shown in the diagram, and
monitor the playback of your application.
fig.basic.e
Stereo set,
Computer
Monitor speakers, etc.
LINE IN, AUX IN
USB connector
Audio cable
USB cable
LINE OUT
USB connector
Headphones
Signal flow
12
UA-4FX_s_e.book 13 ページ 2005年11月4日 金曜日 午前9時19分
Names of things and what they do
fig.top
2
1
3
4
13
5
6
14
7
11
7
12
8
15
17
16
18
9
10
19
22
20
23
24
1 Line input jacks
21
25
4 Digital output connector (optical)
Connect these when you want to input audio
from an audio device or MIDI sound module.
Use the Input volume 20 to adjust the
volume.
Connect this when you want to output audio
to a digital device such as an MD or DAT, or
to a Dolby Digital or DTS format decoder
amp. Use an optical digital cable for
connection.
2 Line output jacks
5 MIDI IN/OUT connectors
Connect these jacks to your audio system,
such as amplified speakers or a stereo set.
Use the Output volume 21 control to adjust
the volume that is output from these jacks.
You can connect MIDI equipment here to
transmit and receive MIDI messages.
6 USB connector
3 Digital input connector (optical)
Connect this when you want to input digital
audio from an audio device such as a CD/MD/
DAT. Use an optical digital cable for connection.
13
Use the included USB cable to connect this to
your computer so that audio and MIDI
signals can be transferred.
UA-4FX_s_e.book 14 ページ 2005年11月4日 金曜日 午前9時19分
7 Mic input jack (XLR type)
10 ADVANCED (mode select) switch
This is an analog audio input jack with a mic
preamp. It can accept either balanced or
unbalanced connections.
Input level: -45 – -12 dBu
This jack can supply 48V phantom power,
allowing you to connect a phantom-powered
condenser mic. In this case, turn on the
phantom power switch 27 located on the
bottom panel.
This switches the driver mode.
Normally, you should leave this turned on
(Advanced mode).
(Refer to ➔ Advanced operation “Standard
driver mode (ADVANCED switch OFF)” (p.
47))
* If you change the setting of this switch, you will
need to disconnect and then reconnect the USB
cable that connects the UA-4FX to your computer.
922
* This instrument is
equipped with balanced
(XLR) type jacks. Wiring
diagrams for these jacks
are shown below. Make
connections after first checking the wiring diagrams
of other equipment you intend to connect.
11 USB indicator
This will light in blue if the UA-4FX is
connected to your computer via the USB
cable and the computer has recognized the
UA-4FX correctly.
12 Phantom power indicator
8 Recording source select switch
This will light when the bottom panel
phantom power switch 27 is on.
This selects the input signal that will be sent via
USB to your computer as the recording source.
13 Playback button (Playback effect)
The analog audio signal from the guiANALOG tar/mic input jack or line input jacks
will be sent to your computer.
The signal from the digital input connector will be sent to your computer.
DIGITAL
LOOPBACK
If you want to apply effects to the audio signal
being played back by your computer, press
the playback button to turn it on (lit red).
You will hear the effect applied to the audio
signal that was input, but the effect is not
applied to the recorded audio signal.
When the playback button is lit in red,
pressing it turns off the effect and
extinguishes the indicator. When the effect is
off, you will hear the playback “as-is”; i.e.,
unprocessed by the effect.
(Refer to ➔ Advanced operation “Applying
effects to the playback” (p. 21))
* If DIGITAL is selected, you will not hear
the sound from your computer.
* If DIGITAL is selected but no signal is
being input from the digital input
connector, the UA-4FX will operate as if
ANALOG was selected.
The audio signal output from your
computer via USB will be sent through
the UA-4FX and returned to your
computer.
9 Sampling frequency select switch
* This can be turned on only when operating at
44.1 kHz or 48 kHz.
This selects the sampling frequency for
recording/playing audio data. After you
switch the sampling frequency, you will need
to disconnect and then reconnect the USB cable
that connects the UA-4FX to your computer.
14 Capture button (Record effect)
If you want to apply effects to the audio signal
being recorded on your computer, press the
capture button to turn it on (lit red).
When the capture button is lit in red, pressing
it turns off the effect and extinguishes the
indicator. When the effect is off, the sound
unprocessed by the effect will be recorded.
(Refer to ➔ Advanced operation “Applying
effects to the recording” (p. 21))
* If you change the setting of this switch, you will
need to disconnect and then reconnect the USB
cable that connects the UA-4FX to your computer.
* This is valid only when the ADVANCED switch
is on. If the ADVANCED switch is off, the UA4FX will operate at 44.1 kHz regardless of the
setting of this switch.
* This can be turned on only when operating at
44.1 kHz or 48 kHz.
* Limitations when 96 kHz is selected.
You can’t record and play back simultaneously,
nor can you use effects.
14
UA-4FX_s_e.book 15 ページ 2005年11月4日 金曜日 午前9時19分
15 Effect variation button
20 Input volume
This selects the type of effect (1. MASTERING
/ 2. LISTENING / 3. PERFORM).
For details, refer to Advance Operation,
“Applying effects” (p. 19).
This adjusts the volume that is input from the
line input jacks 1 .
* Leave this volume knob turned all the way down if
nothing is connected.
16 Tube simulator button
21 Output volume
This turns on a COSM effect that simulates a
vacuum tube amp. It simulates the distinctively
fat and warm sound that is typical of a tube amp.
This adjusts the volume that is output from
the headphone jack 25 and the line
Output jacks 2 . Turn this toward the left
to decrease the volume, or toward the right to
increase the volume.
* Since this models the subtle response of a vacuum
tube amp, the effect may be difficult to distinguish
in some cases.
* Turn this volume down before you connect the
USB cable.
17 Effect knobs
These adjust the depth of the effects.
The parameters available for control will
depend on the effect type (MASTERING/
LISTENING/PERFORM/TUBE SIMULATOR).
For details, refer to Advance Operation,
“Applying effects” (p. 19).
22 Input select switch
Set this according to the device that you
connect to the guitar/mic input jack 23 . Set
the switch to GUITAR if you connect a guitar,
or to MIC if you connect a mic.
* Turn down the volume of your connected equipment
before changing the position of this switch.
18 Input/output level indicators
These LEDs light to indicate the level of the
signals being input at each input jack or
being sent out from the output connectors.
When the input signal has been absent for a
certain length of time, these LEDs will switch
to operating as output indicators.
When operating as input level indicators:
The LEDs will light red at the level
immediately before the sound distorts (-6 dB).
Adjust the GUITAR/MIC input volume
control or the INPUT volume control so that
no LEDs light in red.
When operating as output level indicators:
The LEDs will indicate the state of the audio
signal output. The number of LEDs that light
will depend on the volume of the output
from the digital output connector.
23 Guitar/mic input jack
You can connect a guitar or mic here.
Use the guitar/mic input volume 19 to
adjust the volume.
24 Mic input jack (plug-in powered mic)
A miniature condenser mic that requires a
power supply can be connected to this jack. You
must use a mic that supports plug-in power.
This jack provides a 3.3 V power supply.
Use the guitar/mic input volume 19 to
adjust the volume.
25 Headphone jack
You can connect headphones here.
Even if headphones are connected, sound
will still be output from the line output
jacks 2 .
19 Guitar/mic input volume
This adjusts the volume that is input from the
mic input jack (plug-in powered mic) 24 ,
Mic input jack (XLR type) 7 or the guitar/
mic input jack 23 .
* If you’re not using a guitar or mic, leave this
volume knob turned all the way toward the left.
* This knob acts as the sensitivity adjustment when
you’re using the mic input jack (XLR type). If a
mic is plugged in, its signal will still be input
even if this knob is turned all the way to the left.
15
UA-4FX_s_e.book 16 ページ 2005年11月4日 金曜日 午前9時19分
fig.bottom
26
27
26 Input monitor switch
27 Phantom power switch
This selects whether the audio signals
received from all input jacks will be sent to
the headphone jack and line output jacks.
If this switch is ON, the input signals will be
output. If you are using the ASIO driver in
Advanced mode, you can set this switch to
AUTO so that your software can switch input
monitoring on/off. (Refer to ➔ Advanced
operation “Using ASIO Direct Monitor
(Windows/Mac OS 9)” (p. 37))
If you are not using the ASIO driver, this will
be off; the input signals will not be output.
Normally, you should leave this ON.
This is an on/off switch for the phantom
power supplied to the mic input jack (XLR
type) located on the side panel.
You must leave the phantom power switch in
the OFF position unless you have connected a
condenser microphone that requires a
phantom power supply.
Malfunctions may occur if phantom power is
supplied to a dynamic mic or an audio
playback device. For details on the
specifications of your mic, refer to the
owner’s manual for your mic.
(The UA-4FX’s phantom power supply
provides DC 48 V at a maximum current of 5
mA.)
16